
ORD 651 - Oven Orima - Free user manual and instructions
Find the device manual for free ORD 651 Orima in PDF.
| Brand | Orima |
| Model | ORD 651 |
| Product type | Built-in oven |
| Dimensions (W x H x D) | 60 cm x 59.5 cm x 57.5 cm (estimated) |
| Power supply | 220-240 V, 50/60 Hz, 16 A |
| Maximum power | Approximately 3000 W (total) |
| Lower heating element | 1200 W |
| Upper heating element | 1000 W |
| Turbo heating element | 1800 W |
| Grill (small / large) | 1000 W / 2000 W |
| Interior light | 15-25 W, type G9 or E14 |
| Temperature range | 40 °C to 240 °C |
| Cooking functions | Static, fan-assisted, grill, turbo, multi-function, steam cleaning |
| Timer | Mechanical, with automatic shut-off and audible signal |
| Control type | Flush mechanical knobs |
| Door | Removable, inner glass detachable for cleaning |
| Included accessories | Deep tray, standard tray, wire rack, grill tray, rotisserie spit for roast chicken |
| Cleaning | Steam cleaning function, removable glass |
| Safety | Cooling fan, door lock (for disassembly) |
| Repairability | Replaceable bulb, removable door, professional maintenance recommended |
Frequently Asked Questions - ORD 651 Orima
User questions about ORD 651 Orima
0 question about this device. Answer the ones you know or ask your own.
Ask a new question about this device
Download the instructions for your Oven in PDF format for free! Find your manual ORD 651 - Orima and take your electronic device back in hand. On this page are published all the documents necessary for the use of your device. ORD 651 by Orima.
USER MANUAL ORD 651 Orima
facebook.com/orima.pt

MMA
FORNO ELETRICO
Built-in Oven | Horno | Four
ORD-651
SERVICO DE APOIO AO CLIENTE
Apoio ao CLIENTE:
Tel.: (-351) 231 467 436
E: apoiocliente@orima.pt
Servico Pós Venda:
Tel.: (+351) 231 467 427 E: assistenciaorima.pt
Obrigo por ter adquirido este produits ORIMA. Por favor leia atentamente estemanualantesdeveniracusraoaparelho.
UK Thank you for purchasing this ORIMA product. Please read this manual carefully before using the appliance.
FR Merci d'avoir acheté ce produit ORIMA. Veuillez dire attentivement ce manuel avant d'utiliser l'appareil.
ES Gracias por haber adquirido este produit ORIMA. Por favor lea atentamente este manual antes de empezar a usar el aparato.
BUILT-IN ELECTRIC OVEN USER MANUAL
Dear User ;
We aim to provide you with a high quality product manufactured in our modern factory with great care and in compliance with total quality control principles.
Therefore, we suggest you to read the user manual carefully before using the product and, keep it safe for future reference.
Note: This user manual covers more than one model. Some of the features specified in the Manual may not be available in your appliance.
All our appliances are only for domestic use, not for commercial use.
Pieces of packaging (plastic bags, polystyrene etc.) must not be left within reach of children, as they are potentially dangerous. Please dispose of packaging thoughtfully by the appropriate means.
THIS APPLIANCE SHALL BE INSTALLED IN ACCORDANCE WITH THE REGULATIONS IN FORCE AND ONLY USED IN A WELL VENTILATED SPACE. READ THE INSTRUCTIONS BEFORE INSTALLING OR USING THIS APPLIANCE'
CONTENTS
Installation of your oven
Technical features of your oven
Important warnings
If your oven does not operate
Description of oven & control panels
Using oven section
Using the heat shield
Maintenance and cleaning
General overview of digital timer
Electrical Connection and Security
- THIS APPLIANCE MUST BE EARTHED
- Your oven is adjusted in compliance with 230-240 Volt AC, 50Hz (for SA will be 220-240V,60 Hz), electrical supply, and requires a 16 Amp (for England 13 Amp) fuse. If the mains are different from this specified value, contact an electrician or your authorised service.
- Isolation switches for the oven must be accessible to the end user with the oven in place.
- Should you need to replace the 16 Amp plug top (for England 13 Amp), please ensure you rewire the plug as follows; Brown wire to the Live terminal
Blue wire to the Neutral terminal
Yellow & Green wire to Earth
- Electrical connection of the oven should only be made by using sockets with Earth system installed (for England B.S. Approved sockets with Earth system), and in compliance with Regulations. If there is no proper socket with Earth in place, immediately contact a qualified electrician. The Manufacturer will not be responsible for damage or injuries that can arise because of inappropriate supply outlets with no earth system.
- If you r electric supply cable becomes damaged, it should be replaced by an authorised service engineer or qualified electrician.
- The electrical supply cable should not touch the hot parts of the appliance.
- The oven should be installed into an oven housing that provides good higher ventilation.
- This oven must be correctly installed and secured in place, in accordance with manufacturer's instructions and by a qualified person.
- Never work on the oven while it is switched on. Maintenance and service must be carried out after the power supply has been disconnected.
60 cm
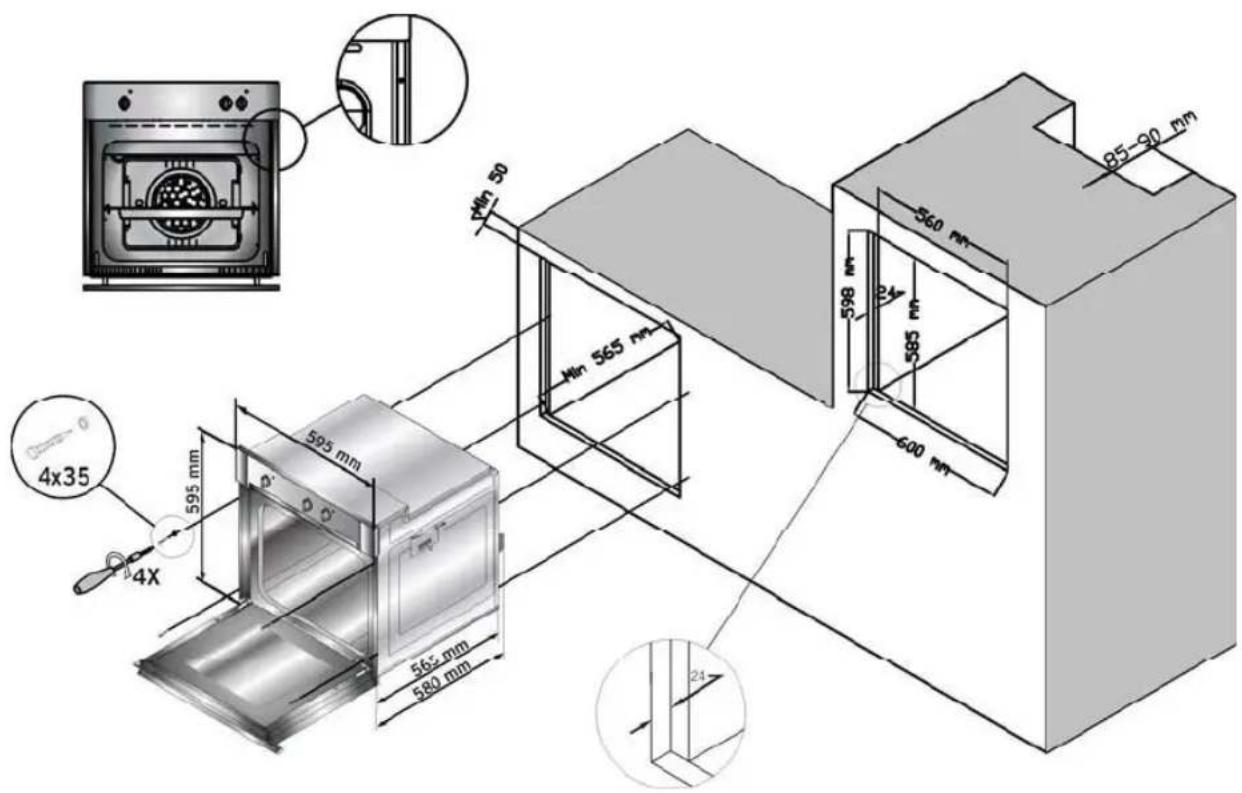
Figure-1
Important notices for the installation;
- This appliance must be installed by a competent person and with particular attention to ventilation
- The housing must be heat resistant to a temperature of 95^ as per EEC directives.
- The oven can be installed into a Standard 600 mm housing unit as shown in Figure-1, or in a tall housing unit when built-in a column.
- In bot h cases ventilation provisions must be made. Keep a gap at the back of the housing unit of 85 - 90 mm depth.
- Do not step-on, lean-on or rest heavy items on the open door, or maneuvers the oven by the door.
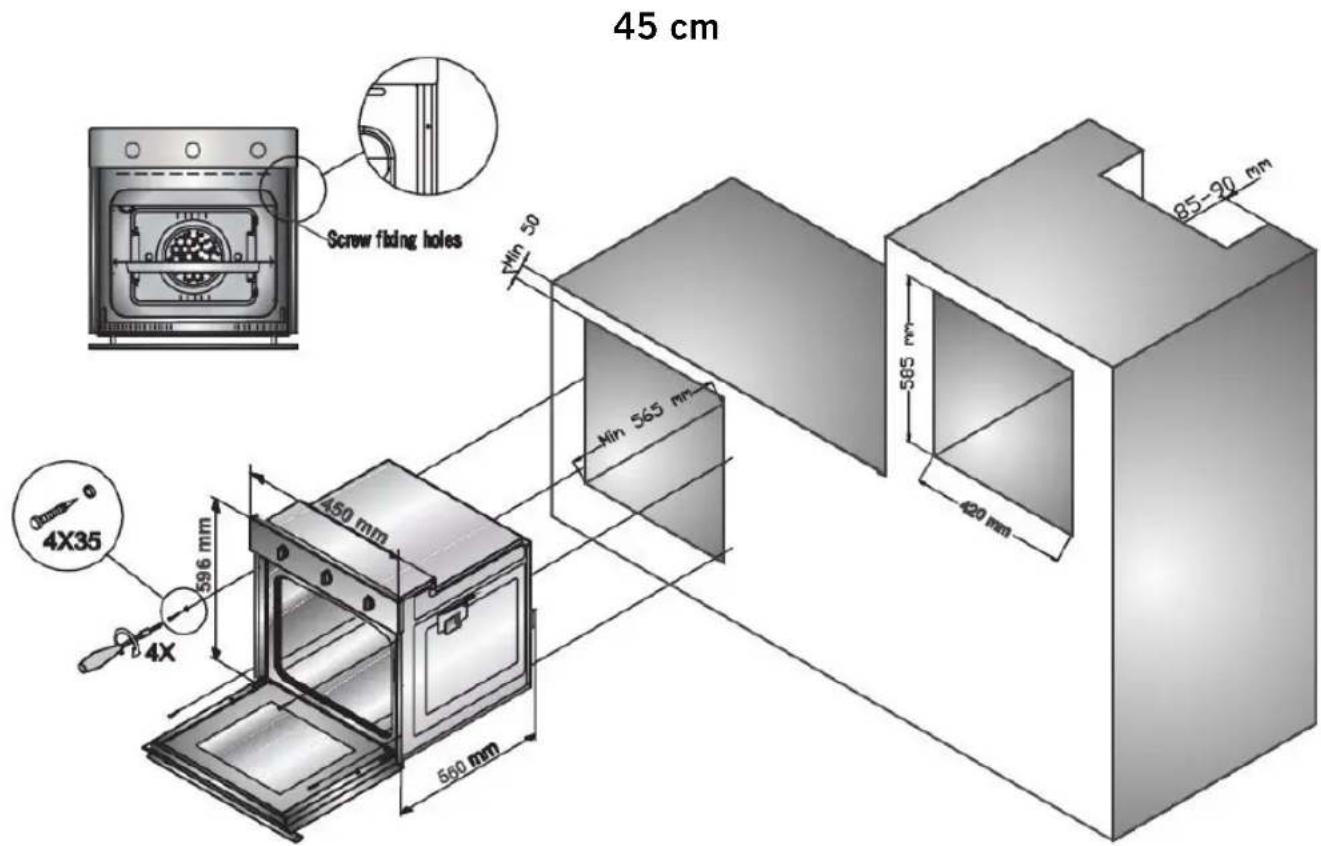
TECHNICAL FEATURES OF YOUR OVEN
| SPECIFICATIONS | 60 | cm45 cm |
| OUTER WIDTH 595 mm 450 mm | ||
| OUTER DEPTH 610 mm 610 mm | ||
| OUTER HEIGHT 595 mm 595 mm | ||
| INNER WIDTH 460 mm 365 mm | ||
| INNER DEPTH 400 mm 410 mm | ||
| INNER HEIGHT 350 mm 355 mm | ||
| LAMP POWER 15 W 15 W | ||
| THERMOSTAT 50 - 280 | °C 50 - 280 | °C |
| BOTTOM HEATING ELEMENT 1200 W | 1000 W | |
| TOP HEATING ELEMENT 1000 W 800 W | ||
| TURBO HEATING ELEMENT | 2200 W 1800 W | |
| GRILL HEATING ELEMENT | 2000 W 1500 W | |
| SUPPLY VOLTAGE | 220-240 V AC, 50-60 Hz | |
Before starting to use the appliance, read the user manual carefully. In this user Manual, there is important information regarding your safety, oven usage and maintenance.
Keep this user manual somewhere safe, and make it available to anyone who uses the oven.
IMPORTANT WARNINGS
NOTE: THIS APPLIANCE MUST BE EARTHED
- Pay attention to health and safety requirements - do not leave children un-supervised when cooking.
- Power supply voltage of your oven is 230 Volt 50Hz
- If the current rate of the fuse in your installation is less than 16 Amp, have a qualified electrician fit a16 Amp fuse. (for England 13 Amp)
- The plug on your oven must be earthed, ensure the supply socket is earthed. If the oven is used without an appropriate earth connection, the manufacturer will not accept any liability for any loss or injury, which may arise. The plug has to be located as reachable after installing
-
Keep the electrical cable of your oven away from the hot areas; do not let them touch the appliance. Keep them away from sharp sides and heated surfaces.
-
If the supply cord is damaged, it must be replaced by the manufacturer, its services agent or similar qualified persons in order to avoid hazard.
- Ensure that the appliance is switched off before replacing the lamp to avoid the possibility of electric shock.
- In case of power failure, you will need to reset the clock. Otherwise, the oven will not operate (Digital Timer).
- Usage of your appliance creates moisture and heat in the room; make sure that your kitchen is well ventilated.
- When the oven is being used, some parts may become hot; children should be kept away and supervised at all times.
- When the oven is hot never touch the oven glass by hand.
- Before starting to use your appliance, keep curtains, paper or inflammable things away from your appliance. Do not keep combustible or inflammable things in or near the appliance.
- This oven is produced for domestic cooking purposes only. Please do not use for any other purpose.
- When connecting to a cooker panel, the supply switch must have a double pole switch with contact separation of 3mm min
- Use glove when using cooker. Do not touch on hot surfaces.
- Do not splash water onto the cooker.
- Do not use cooker in potentially explosive atmospheres.
- Do not carry cooker by holding from handle
- Some models are supplied without a plug-an-lead set. In this case please use a flexible cable to suitable for connection to mono phase: H05 VV-F 3 G 4 mm2 or for 3 phase: H05 VV-F 5 G 1.5 mm2
- Please check that the electrical supply is connected and turned-on to the oven
- Please check that there is electricity supply to the property.
- Please check the fuse.
- Please check the clock / auto programmer is set to the manual mode.
- If you cannot solve the problem, contact the manufacturer-supplier, services agent or similar qualified persons.
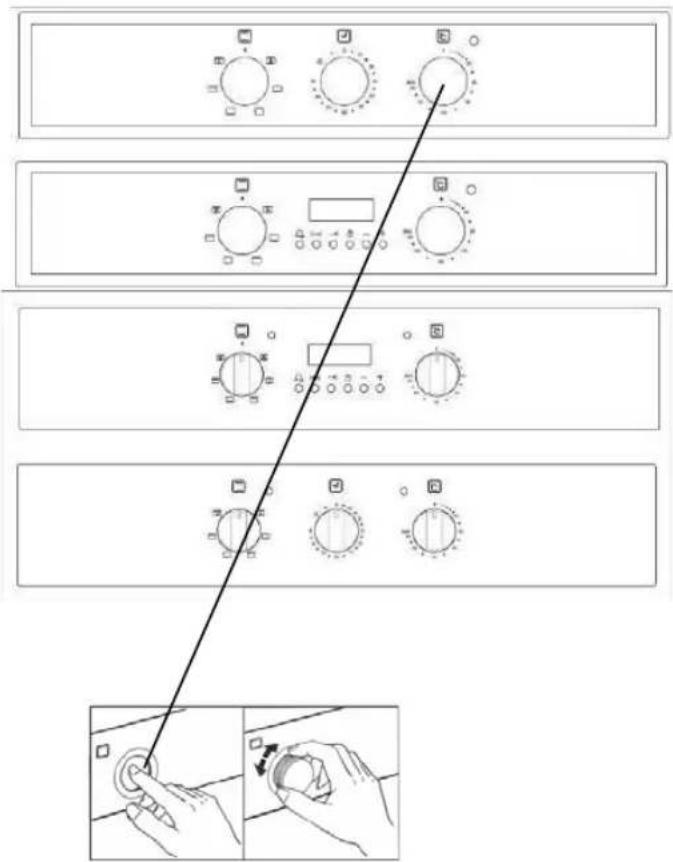
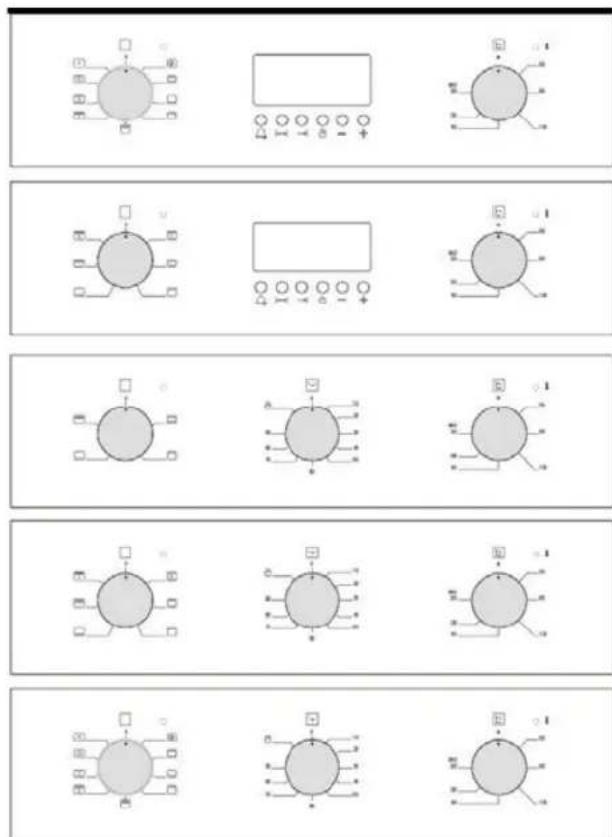
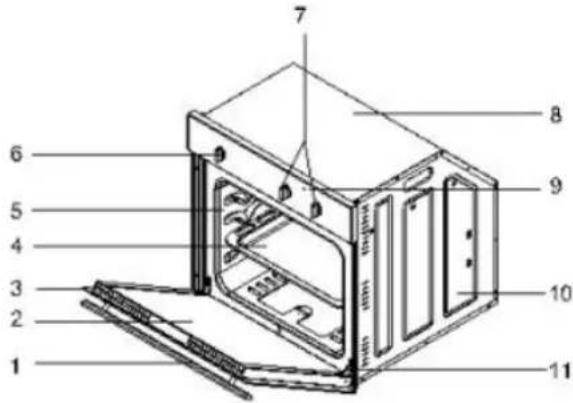
DESCRIPTION OF OVEN AND CONTROL PANELS
- Oven handle
- Oven door inner glass
- Oven glass door
- Oven tray
- Cavity
- Command panel
- Oven control knob (pop-up type)
- Mechanic timer knob (pop-up type)
- Thermostat control knob (pop-up type)
- Indicator of oven
- Back cover
- Transportation handle
-
Side panel
-
Oven handle
- Oven door inner glass
- Oven glass door
- Oven tray
- Cavity
- Command panel
- Oven control knob (pop-up type)
- Digital timer
- Thermostat control knob (pop-up type)
- Indicator of oven
- Back cover
- Transportation handle
- Side panel

MEANINGS OF THE SYMBOLS THAT MIGHT BE ON YOUR CONTROL PANEL, ARE AS FOLLOWS
| Fan | Bottom + Top heating element |
| Turbo Heating Element +Fan | Lamp |
| Bottom +Top heating Element+Fan | Bottom Heating Element+Fan |
| Grill+Fan | Grill+Turnspit |
| Grill | Grill+ Lamp |
| Top Heating Element | Timer |
| Bottom Heating Element | Grill+ Lamp+Turnspit |
| Turnspit | Lamp+Turnspit |
| Fan+Turnspitt | Fan+ Lamp |
THERMOSTAT KNOB; In order to operate the oven, the thermostat must be adjusted to desired temperature. Your thermostat can be regulated between 50^ - 280^ degrees Celsius.
MECHANIC TIMER KNOB (Optional); In order to operate the oven, the timer switch should be adjusted to the desired time.
USING THE OVEN SECTION
When your oven is operated for the first time, an odour will be given off from using the heating elements. In order to get rid of this, operate the oven at 250^ for 45 minutes while it is empty.
In order to use your oven; the switch must be rotated to the desired temperature; otherwise the oven will not operate. A suggestion of cooking times and thermostat positions are given in cooking table below - these are only a guide and will vary subject to weight and quantity of food being cooked.
You may experiment and find different flavours suitable for your taste depending on your cooking and using habits. When the oven is being used, the door of the oven should not be opened, otherwise circulation of the heat may be imbalanced and the results may change.
| Meals Temperature (℃) Rack position Cooking time (min.) | |||
| Creamed cake 150 - 170 2 | 30 - 35 | ||
| Pastry 200 - 220 2 35 - 45 | |||
| Biscuit 160 - 170 3 20 - 25 | |||
| Cookie 160 - 170 3 20 - 35 | |||
| Cake 160 - 180 2 25 - 35 | |||
| Braided cookie 200 - 220 2 | 30 - 40 | ||
| Filo pastry 180 - 200 2 35 | - 45 | ||
| Savory pastry 160 - 180 2 | 20 - 30 | ||
| Lamb meat | 210 - 230 1 | 90 - | 120 |
| Veal | 210 - 230 | 1 | 90-120 |
| Mutton | 210 - 230 | 1 | 90-120 |
| Chicken (in pieces) | 210 - 230 1 | 75 - | 100 |
| Fish | 190 - 210 3 40 | - 50 | |
Note: The values in the table are the results obtained in our laboratories. You can find different flavors and suitable to your taste by experience. 5 - 10 min. preliminary heating should be done prior to cooking.
USING THE HEAT SHIELD
- A heat shield (figure 1) is designed to protect the control panel and knobs when the oven is in Grill mode.
- Please use the heat shield in order to avoid heat damage to the control panel and the control knobs when the oven is in Grill mode.
- Place the heat shield under the control panel by opening the oven front door (Figure 2)
- Locate the two mounting tabs on the heat shield into the two slots under the control panel, then secure in place between oven and inner door by gently closing the door (figure 3).
- It is important to keep the door opened at a the specified distance when Grilling.
- The heat shield will provide an ideal cooking performance while protecting the control panel and knobs.
WARNING: THE HEAT SHIELD BECOMES HOT IN USE; NEVER ATTEMPT TO REMOVE IT WITH BARE HANDS IMMEDIATELY AFTER USE.
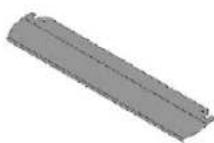

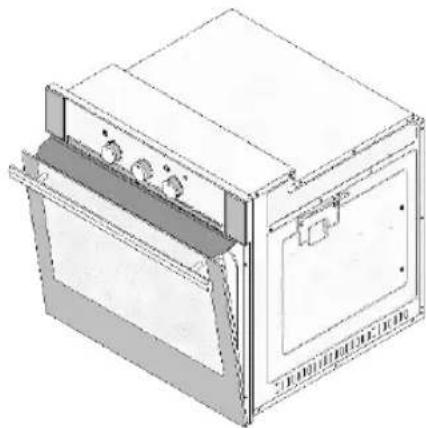
Figure-1
Figure-2
Figure-3
MAINTENANCE and CLEANING
- Disconnect the plug supplying the electricity to the oven or switch off at the supply panel.
- While the oven is operating or shortly after it starts operating, it becomes very hot. You must take care to avoid touching the heating elements.
- Never clean the interior parts, panels, trays and all other enamel parts of the oven using tools like hard wire brush, scouring mesh or knife. Do not use abrasive, scratching agents and detergents.
- Aft er cleaning the interior parts of the oven with a soapy cloth, rinse it and then dry thoroughly with a soft cloth.
- Clean the glass surfaces with special glass cleaning agents.
- Do not clean your oven with steam cleaners.
- Never use inflammable agents like thinners, petrol and acid, when cleaning your oven.
- Do not wash any part of your oven in a dishwasher.
- In order to clean the glass door of the oven; remove the inner glass cover profile (across the top and has many holes). Slide the glass out carefully, then clean and rinse glass thoroughly. After drying, re-install the glass in the door and refit top glass cover profile.
- Clean the oven regularly to prevent heavy build-up of cooking spoil that can result in burning smells.
- Baked-on cooking spoil can give an appearance of 'blisters' in the enamel on the floor of the oven, 'blistering' is not possible and baked-on grease is not a manufacturing defect.
Cher client, chere clientele,
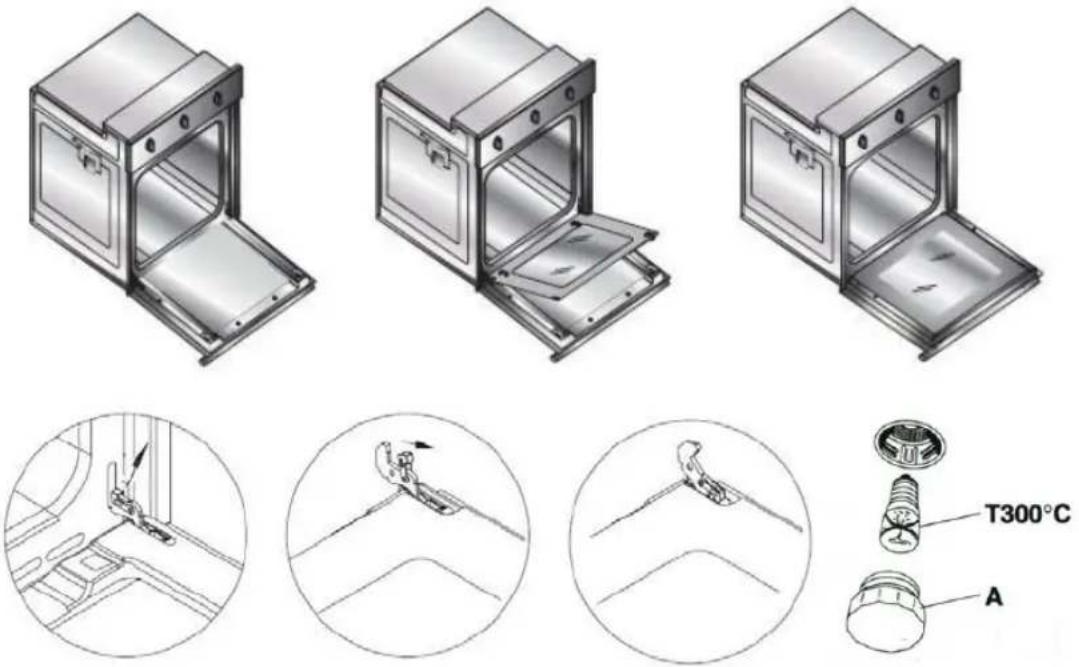
REEMPLACEMENT DE L'AMPOULE DU FOUR
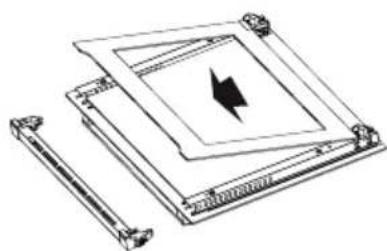
Image 13 Image 14 Image 15
NETTOYAGE ET INSTALLATION DE LA PORTE DU FOUR
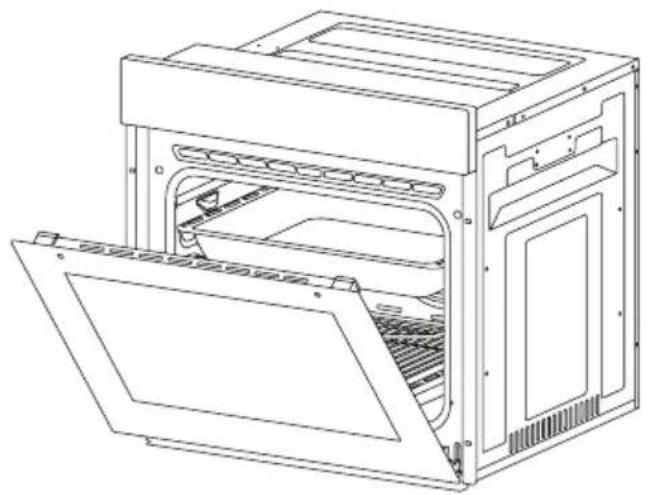
Image 16

Image 17
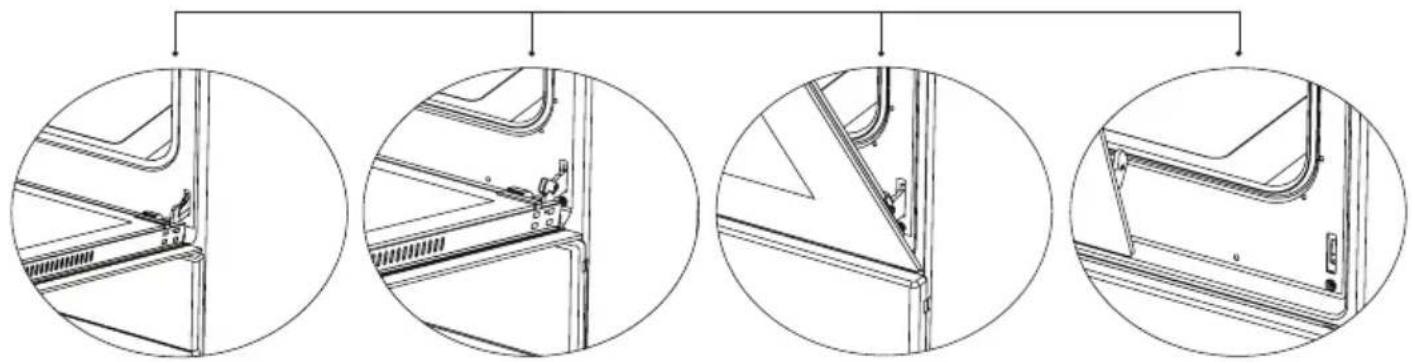
Image 16.1 Image 16.2 Image 17.1 Image 17.2


- FORNO ELETRICO
- SERVICO DE APOIO AO CLIENTE
- BUILT-IN ELECTRIC OVEN USER MANUAL
- Dear User ;
- CONTENTS
- Electrical Connection and Security
- Important notices for the installation;
- IMPORTANT WARNINGS
- NOTE: THIS APPLIANCE MUST BE EARTHED
- DESCRIPTION OF OVEN AND CONTROL PANELS
- MEANINGS OF THE SYMBOLS THAT MIGHT BE ON YOUR CONTROL PANEL, ARE AS FOLLOWS
- USING THE OVEN SECTION
- USING THE HEAT SHIELD
- MAINTENANCE and CLEANING
- Cher client, chere clientele,
- REEMPLACEMENT DE L'AMPOULE DU FOUR
- NETTOYAGE ET INSTALLATION DE LA PORTE DU FOUR
Brand : Orima
Model : ORD 651
Category : Oven