
PXY875KW1E - Cooker BOSCH - Free user manual and instructions
Find the device manual for free PXY875KW1E BOSCH in PDF.
| Product Type | Cooktop |
| Brand | BOSCH |
| Model | PXY875KW1E |
| Cooking Type | Induction |
| Number of Burners | 4 |
| Power Supply | 230 V, 50 Hz |
| Total Installed Power | 7400 W |
| Wireless Temperature Sensor | Yes, with CR2032 battery |
| Silicone Patch | Included for attachment to pan |
| Cooking Assistance Functions | PowerBoost, PerfectFry, HeatControl |
| Surface Material | Ceramic glass |
| Dimensions (W x D x H) | 90 x 52 x 5.5 cm |
| Weight | 15 kg |
| Child Safety | Yes |
| Automatic Shut-off | Yes |
| Safety Distance for Implants | 10 cm minimum |
| Sensor Cleaning | Damp cloth, not dishwasher safe |
| Ceramic Glass Surface Cleaning | Special ceramic glass cleaner |
| Sensor Battery Type | CR2032 |
| Household Use Only | Yes |
Frequently Asked Questions - PXY875KW1E BOSCH
User questions about PXY875KW1E BOSCH
0 question about this device. Answer the ones you know or ask your own.
Ask a new question about this device
Download the instructions for your Cooker in PDF format for free! Find your manual PXY875KW1E - BOSCH and take your electronic device back in hand. On this page are published all the documents necessary for the use of your device. PXY875KW1E by BOSCH.
USER MANUAL PXY875KW1E BOSCH
Register your new device on MyBosch now and get free benefits: bosch-home.com/ welcome
Wireless Temperature Sensor
HEZ39050
Important safety information. . . .9

Environmental protection . . . .10
Environmentally-friendly disposal . . . 10

Wireless temperature sensor . .10
Preparing and maintaining the wireless temperature sensor 11
Cleaning. 12
Declaration of Conformity. 13
Additional information on products, accessories, replacement parts and services can be found at www.bosch-home.com and in the online shop www.bosch-eshop.com

Intended use
Read these instructions carefully. Please keep the instruction in a safe place for later use or for subsequent owners.
Check the appliance after removing it from the packaging. If it has suffered any damage in transport, do not use the appliance, contact the Technical Assistance Service and provide written notification of the damage caused, otherwise you will lose your right to any type of compensation.
This appliance is intended for private domestic use and the household environment only. The appliance must only be used for the preparation of food and beverages. The cooking process must be supervised. A short cooking process must be supervised without interruption. Only use the appliance in enclosed spaces.
This appliance may be used by children over the age of 8 years old and by persons with reduced physical, sensory or mental capabilities or by persons with a lack of experience or knowledge if they are supervised or are instructed by a person responsible for their safety how to use the appliance safely and have understood the associated hazards.
Children must not play with, on, or around the appliance. Children must not clean the appliance or carry out general maintenance unless they are at least 8 years old and are being supervised.
When using the cooking functions, set the hotplate on which you have placed the saucepan with the temperature sensor.

Important safety information
Warning
Danger of suffocation!
Packaging material is dangerous to children. Never allow children to play with packaging material.
Warning
Hazard due to magnetism!
The wireless temperature sensor is magnetic. The magnetic elements in it may damage electronic implants, e.g. pacemakers or insulin pumps. People fitted with electronic implants should therefore not carry the temperature sensor in their pockets and always keep it at least 10 cm away from their pacemaker or similar medical device.
Warning
Risk of injury!
The wireless cooking sensor is equipped with a battery, which may become damaged if it is exposed to high temperatures. Remove the sensor from the cookware and store it away from any heat sources.
The temperature sensor may be very hot when removing it from the saucepan. Wear oven gloves or use a tea towel to remove it.

Environmental protection
Environmentally-friendly disposal
Dispose of packaging in an environmentally-friendly manner.
This appliance is labelled in accordance with European Directive 2012/19/EU concerning used electrical and electronic appliances (waste electrical and electronic equipment - WEEE). The guideline determines the framework for the return and recycling of used appliances as applicable throughout the EU.
The wireless temperature sensor is battery-powered. Dispose of used batteries in an environmentally responsible manner.

Wireless temperature sensor
Additional information can be found in the detailed instruction manual for the hob in chapter "Cooking Assist Functions". Read it through carefully.
Preparing and maintaining the wireless temperature sensor
In this section, you will find the following information:
Adhering the silicone patch
Using the wireless temperature sensor
Changing the battery
You can obtain a temperature sensor and silicone patches from specialist retailers or through our technical after-sales service. Always quote the relevant reference number.
00577921 Set of 5 silicone patches
HEZ39050 Temperature sensor and set of 5 silicone patches
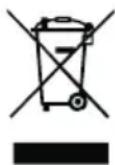
Adhering the silicone patch
The silicone patch attaches the temperature sensor to the cookware.
When a pan is used for the first time with the cooking functions, the silicone patch must be adhered directly to the pan. It is important
- that the adhesive area on the pan is free from grease. Clean the pan, dry it thoroughly and wipe the adhesive area with a spirit.
- Remove the protective film from the silicone patch. Adhere the silicone patch to the outside of the pan in the correct place using the enclosed template as a guide.
- Press down all over the surface of the silicone patch, including in the centre.
The adhesive requires one hour to fully harden. Do not use or clean the pan during this time.
Notes
- Do not leave the pan with the silicone patch to soak soapy water for long periods of time.
If the silicone patch comes off, attach a new one.
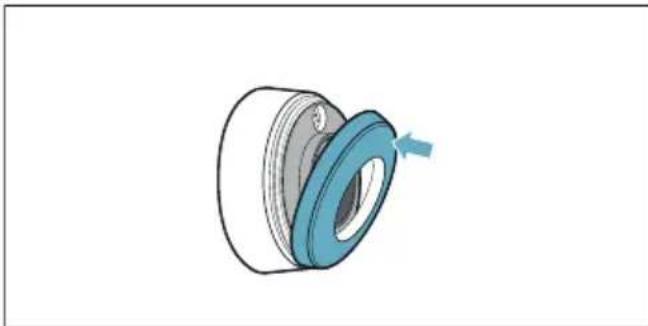
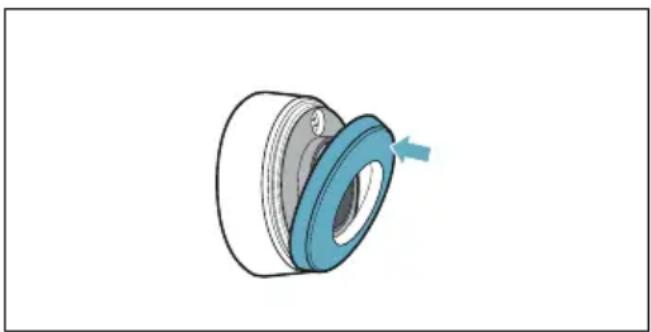
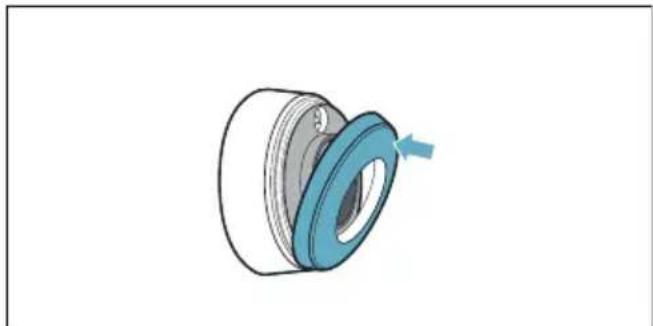
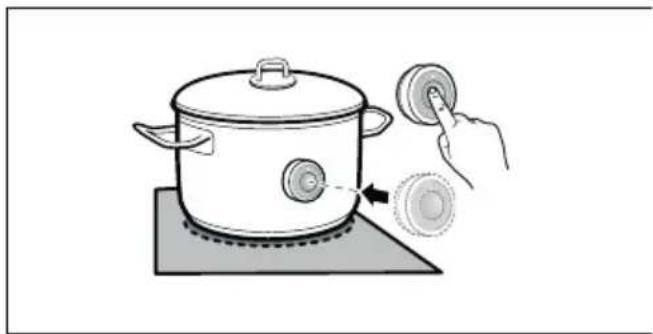
Fitting the wireless temperature sensor
Attach the temperature sensor to the silicone patch and align it correctly.
Notes
Make sure that the silicone path is completely dry before attaching the temperature sensor.
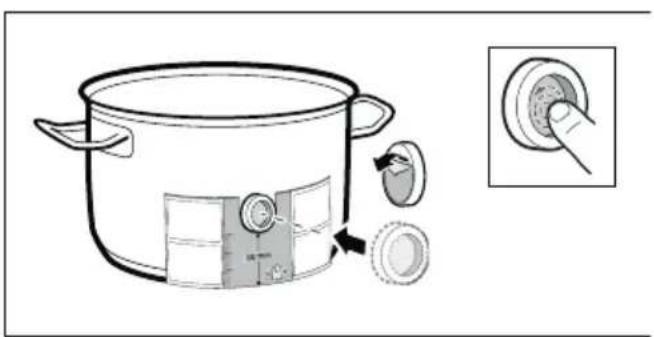
Position the cookware in such a way that the temperature sensor is pointing towards the outer side of the hob.
To prevent overheating, the temperature sensor must not be pointed towards another item of cookware that is hot.
- Remove the temperature sensor from the saucepan after cooking. Store it in a clean, safe place away from sources of heat.
Changing the battery
If the temperature sensor does not light up when the symbol is pressed, the battery is flat.
en
Changing the battery:
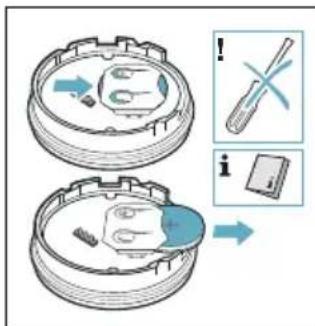
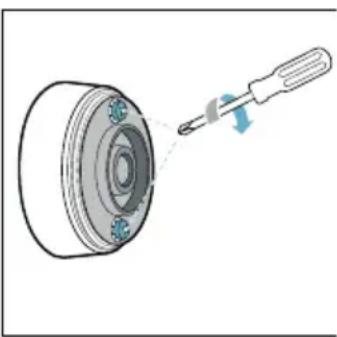
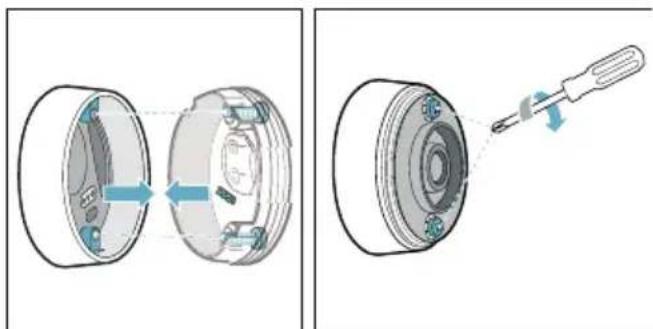
- Remove the silicone cover from the lower section of the temperature sensor housing and remove both screws using a screwdriver.

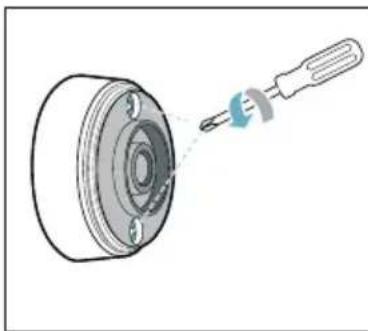
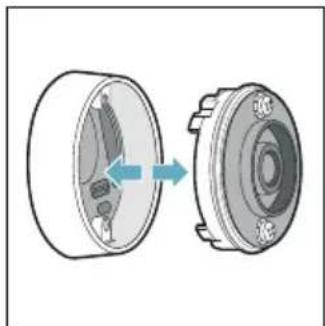
- Open the closure of the temperature sensor. Remove the battery from the lower section of the housing and insert a new battery (pay attention to the correct orientation of the battery poles).
Caution!
Do not use any metal objects to remove the battery. Do not touch the battery connection points.

- Close the closure of the temperature sensor (the notches for the screws on the closure must align with the notches on the lower section of the housing). Tighten the screws with a screwdriver.
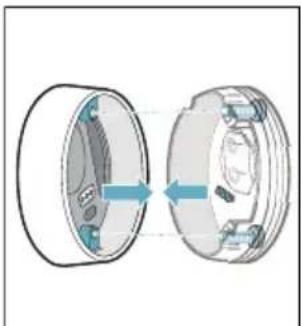
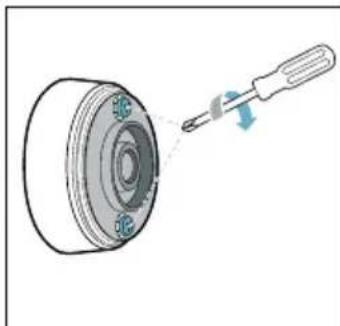
- Reattach the silicone cover to the lower section of the temperature sensor housing.
Note:
Use only high-quality batteries of the type CR2032 in order to guarantee a long service life.
Cleaning
Temperature sensor
Clean the temperature sensor with a damp cloth. Never clean it in the dishwasher. Do not immerse it in water or clean it under running water.
Remove the temperature sensor from the saucepan after cooking. Store it in a clean, safe place (such as in its packaging) away from sources of heat.
Silicone patch
Clean and dry before attaching to the temperature sensor. Dishwasher safe.
Note:
Cookware with the silicone patch must not be left to soak for long periods in soapy water.
Temperature sensor window
The sensor window must always be clean and dry. Proceed as follows:
- Remove dirt and oil splatters regularly.
Use a soft cloth or cotton buds and window cleaner for cleaning.
Notes
- Do not use abrasive cleaning agents such as scouring pads, scrubbing brushes or cream cleaners.
- Do not touch the sensor window with your fingers. This may make it dirty or scratch it.
Declaration of Conformity
Robert Bosch Hausgeräte GmbH hereby declares that the appliance with wireless temperature sensor function meets the basic requirements and other relevant provisions of the Directive 2014/53/EU.
A detailed RED Declaration of Conformity can be found online at www.bosch-home.com/de on the product page for appliance in the additional documents.
The logos and the Bluetooth® brand are registered trademarks and property of Bluetooth SIG, Inc. These trademarks are used by Robert Bosch Hausgeräte GmbH under licence. All other trademarks and brand names are owned by the respective companies.
Table des matieres

Evacuati ambalajul in mod ecologic.

IpeDynpEckJeHne OnachOCT OT HapaHЯBaHe!
Be3ka6eHnT ceH3Op 3a roTBeHe e cHa6DeH C 6aTePn, KOrTO MoKe Ja ce NOBpeN, aKO Ce n3JaRa Ha BnCOKn TempePaTyPi. B3emTe ceH3Opa OT rOTBaPCKn CbI N rO cbxpanHbAitc TaJIeU OT n3ToUHnCu Na ToPnHa.
Cen30pBT 3a Tempepatypa MoJKe Da e MHOro rOpeu npi CBAJIHe OT TeHJKePaTa. 3a CBAJIHe N3IOJ3BaIte KyXHeHcKa pBkAbuca nIi KyXHeHcKa Kbpna.

3a cBaJIHe Ha 6aTePnIa He
H3NoJI3BaIte IpeIMeTn OT MeTaN. He
DOKOCBaIte TOUkIne Ha CBbp3BaHe Ha
6aTePnIa.

- 3aTBopTe KaNaeTo Ha ceH3opa 3a TemnepaTypa (OTBepCTnra 3a BnHTOBete B Kanaueto TpObA da ce npINOKPnT C BdIbOHaTHnHte B DoIHata Yact Ha Kopnyca). 3aTeHHeTe BnHTOBete C OTBepTKa.
- Пocтавete образно силкововяkanak Вьрху Долната част Ha KoprnycaHa ceH3opa 3a Temперatype.
Yka3aHHe: N3NoJ3BaIte N3KJIIOUHTeJIHO IN CAMO BnCOKOKaueCTBeHn 6aTePnN OT MoJeI CR2032, 3a Ja rapaHTnpaTe IIO-TOJAM EKCnloaTaUHOHeH XNBOT.
Почистванe
Ceh3op 3a TemnepaTypa
NouchBaIte cen3opa 3a TemnepaTypa C BlaJHa Kbpna. Hnkora He NouchBaIte B CbDOMnHa MaunHa. He NotanrTe BB BODa I He NouchBaIte Np Teuasa BOda.
CbaIeTe ceH3opa 3a TemnepaTypa OT FOTBapckata TeHJkepa CJIed BapeHeTo. CbXpaHBAInTe rHa YnCTo, 6e3OnaCHO MACTO, HApnPmep B ONaKOBkata N He B 6IIN30CT Do n3TOUHNu Ha TOnnHa.
CnlnkoHOBa JleneHka
IpeHn noctabAHe Ha ceH3opa 3a TemnepaTpa NouchTeTe N NOcCyWeTe. IoXoJauO 3a cbDomnHa MaunHa.
Yka3aHne: CbIOBeTe CbC CNIKOHOBAJIeENKa He 6nBa Da ce OCTaBt 3aIIO-DbIro BpeMe B canyHeh pa3TBOp.
Прозорец сеньета за Temпераразу.
Ipo3opeuT Ha ceH3opa Tp86Ba Da e BInaun uNCT n cyx. IpoueinpaTe no CJIeHNHaUNH:
OTCTpaHЯBaItepeIOBHO 3aMbpcRABaHnTaI npbCKNteMa3HnHa.
3a nouchtahe n3noJ3BaIte MeK napcaJI nn BaTa n npenapat 3a nouchtahe Ha npo3Opu.
yKa3aHne
He n3noJ3BaIte dpackaio NouchTbaIo CpeIcTBo KaTo HapnIpMep Tb6n uYeTKuIN MIAKO 3a NouchTbaHe.
He doKocBaIte npO3OpueTo Ha ceH3Opa c npbCTn. To moKe da ce 3aMbpcn nII OndpacKa.
3aBHeHne 3a CbOTBeTCTBHe
C Hacoioto Robert Bosch Hausgerate
GmbH Dekapupa, ye ypeBc
Функиета be3ka6eIeH cEH3Op 3a
TempepaTpa OTRObApHa OCHOBHnTe
N3NCKBaHnHa N OCTaHaJIte peJIeBaHTHn
pa3Nope6n HaДиpeKtNbA 2014/53/EC.
N3YeepNaTeJHa DeKlapaunHa 3a
CbOTBeTCTBnE CbIaCHO RED ue
HamePte B INTEpHET Ha aIpeC
www.bosch-home.com npi
DOnbJIHnTeJIHnTe DOKyMeHTn Ha
ПpoDyKTobAta CTpaHnCa Ha BaShn YpeI.
Ilorotata n MapkaTal Bluetooth® ca peRnCTpnpaHn TbpROBcKN MapKn I co6CTBeHocT Ha Bluetooth SIG, Inc. n BCRA k yNtpe6a Ha Te3n MapKn OT Robert Bosch Hausgerate GmbH cTaba CnueH3. BcnuKn dpyr n MapKn n ImeHa Ha MapKn ca CO6CTBeHOCT Ha CbOTBEHTHnte qnPMn.
Ornablenne

Приимеенье по наразецни . .104

BaKhbIe npaBnla TexHnKn 6e3oNaChOcTn 105

OxpaHa OkpyHauoUeI cpeIbl .106
PpabnIbHa yTnIIN3auny ynaKOBKn..106

BecnpoBOHNo DaTUnK
TempepatypbI 106
Iodrotobka u yxod 3a 6ecnpoBODhBM TemnepatypbIM ceHcopOM .106 Ounchka .108 Dekapauin o COOTBETCTBUN .109
Bolee noDpo6Hyu HOpMaunO O npOkyKun, pInHaJleXHocTax, 3aNaChbIX qactx N cLyjXe cepBnca MoXHo HaHTn Ha oPhiunaBHom caTe
www.bosch-home.com Ha caiTe
HHTepHeT-MaRa3nHa
www.bosch-eshop.com

He nCnoJb3yIte MeTaJIInueCKne
npeDMetbI dJa N3BLeuEHHaBaTapeKn.
He npKacaiTeCb K TocKaM
NoDKJIIOUeHHaBaTapeKn.

- 3akpoIte 3arnyuKy daTunka Tempepatpyi (BbIeMKn DnB BnHTOB Ha 3aLyUke DoJXHbI COBnaadTb C yIyOJIeHNMa HnHXHeN qACTN Kopnyca). 3aTAHTE BuHTbIC NOMOUIO OTBepTK.
- YCTaHOBnTe CNIKKHObYIO KpbIiKy O6paTHo Ha HIXHIOU qAcTb KOpnyCa DaTuNka TempePaTypbl.
Yka3aHne: NcnoJIb3yIte TOLbKO BblcOKoKaueCTBeHHbIe 6aTapeNkTnna CR2032ДЯ o6ecneueHnДOJIrO Cpoka clyKbI DaTuNkA.
OuHCTka
TemnepaTpyhbi cehcop
IcnoJb3yIte dIa OUNCTKI TempeatypHOrO ceHCopa BlaJXHoe NOJOTeHc. HNKoRda He MoTe TEMpeatypHbI CEHCOPB NocydomoeuHoi MaunHe. HNKoRda He NORpykaTe eRo BVBOdy I He MOITE NOCTpyEIN BObl.
IIO OKOHuaHn npiroTOBHeHn He 3a6yDbTe CHrTb TempeatypHbI CeHCOP C nocdyI. XpaHnte TempeatypHbI CeHCOP B CyXOM N 6e30NaChom MeCTe, HApPIMep B ynaKOBKe, IN KaK MOxHO daJIbIe OT ICTOCHNKOB TeIIa.
CnIKHOBOHaHaKJaDka
OuNCTIte n npocuynte nepeyctaHOBkoHa DaTnke TempepaTypbI. IoXoINT dIra OunCTKn B NOCydomoeHOn MaUNHe.
Yka3aHHe: He ocTaBnIte nocyDc cnIKHOBOH HaKJaIKoB MblbHom pactBope Ha dInTeJbHOe Bpemr.
Okouko TemnepaTpyHoro ceHCopa
OKoшko TempepaTporo ceHCopa BCerda DOJXHO 6bITb YnCTbIM N CyXM. IЯ 3TOrO HeoXoImo CO6IoJaTaB CLEnyuOuNe npaBnla:
Peynepno ydaanTe 3aqr3HeHn H6pbI3n Xnpa.
IcnoJb3yInTe InA OunCTK MmRkyIO TpAnKy INN BaTHBie NaOuCK N CpeDCTBO IIN OUnCTKN CTekOJI.
Yka3aHn
He nCnoJb3yIte a6pa3nBHbIe YnCTaIue CpeIcTBA,a TaKxE JxEcTKne ry6Kn I 5ETKN.
He npikacaiTecb K OKoWky TemnepaTyphoro ceHcopa naIbcaMn. 3TO MOxET CTaTB npuHOn erO 3aRpa3HeHn IIN OucapanbBaHn.
Декларачnia O COOTBETCTBHN
Hactoim Robert Bosch Hausgerate
GmbH 3aBnE, yTo np6Op C yHKnei
6ecnpoBOHO TEmpepaTyphoro
ceHCopa COOTBeTCTByeT
OCHOBOIOnaRaIOUIM Tpe6OBaHNm I
dpyrIm DeIcTByIOUIM NIOLOXeHNm
DInpeKTHBbI 2014/53/EC.
Iopno6hna DeKlapaun O COOTBeTCTBn RED coedejntcna Hau nHTepHeT-caTe www.bosch-home.com Ha ctpaHnce C onncahneM BaJero npnbopa B pa3dJeI dOIOJIHNTeBHOJ DOKyMeHTaUn.
Ilorotnbln Mapka Bluetooth® YBIAOTc3apeHCTpnpOBaHHbIMN TOPROBIMN 3HaKaMn I CO6CTBeHHocTbIO BluetoothSIG, Inc., N03ToMy JIO6oe NCNOJb3OBaHne 3tix Mapok KOMpaHne Robert Bosch Hausgerate GmbH OcyuaceTBnAeTcB pamKax IueH3nn. Bce octaJIbHbIe Mapkn NΦIpMeHHbIe Ha3BaHnRABIAOTc CO6CTBeHHocTbIO COOTBETCTBYUUX KOMpaHn.
3mict

BnKOpNCTaHHa 3a npn3HaueHnHm.. 110

3aHTHa Ha JHBOTHa cpeHnHa
OTCTpaHyBaIbe corglaacHO npOncHTe 3a JHBOTHa cpeiHa
AmbaJaxataOTCTpaHete ja corglaCHO npoPncTe 3a XNBOTHa CpeDnHa.
Oboj anapaTe o3NaueH cnopeEd EBpONcKnOT npOnnc 2012/19/E3 3a eNeKTpo N eNeKTPOHcKn anapatn (waste electrical and electronic equipment - WEEE). Ipnncot ja daBa pamKaTa 3a BpaKaHe N NCKOpNCTyBaHe Ha cTapnte anapatn, BaKeUko Shnpym EBpona.
Be3KuHnO T cEH3Op 3a TeMnepaTpye e onpemeh co 6atepnja. EkoIoukN OTCTpaHeTe ja notpoWeHaTa 6atepnja.

БeзЖичен сEH3Op 3a TemпepаТура
3a noTeTaNn NODaTOuBnNOrIaBje "Функци 3a acnCTeHcNiJa npn rOtBeHbe BO yNaTCTBOTo 3a yNotpe6a Ha NOJeTO 3a rOtBeHbe. PpoHTajTe ro yNaTCTBOTo.
ПодгOTOBки Hera Na 6e3ЖИЧНNot ceH3Op 3a TempepaTypa
Bo Oboj n3BaJok ce coOpXaHn cIeHNTe HΦopMaUu:
JIepeHe Ha CNJIKOHCKaTa JIeNeHka
KopncTeHe Ha 6e3xuueH cEH3Op 3a TemnepaTypa
■Помера на застенияа
Ceh3op0T 3a TemnepaTypa n cnIKoHcKaTa IeIeHka MoKeTe Da rKyNITe BO CneuJaIIN3npaHaTa npOdaBnUca NII Npeky HaWata TexHnUka cepBnCHA clyX6a. HabeDyBajTe ro COODBETHNOT pepepeHTen 6poj.
| 00577921 | Cet co 5 сениконски ленинки |
| HEZ39050 | Сенисту за temпера typа и сет co 5 сениконски ленинки |
JIenneHe Ha cnHnKoHcKaTa JIeNeHka
CnIHKoHcKaTa IepeHka rO fNkCupa ceH3OpOT 3a Tempepatya Ha caTOT 3a FOrTBHe.
Ako TeHuepeTo Ce KopnCTn 3a npB nAT CO cyHKUInTe 3a rotBeHbe, CnIKoHcKaTa IepeHka Mopa Da ce 3aIePi DnpeKTHO Ha Oba TeHuepe. BaxHo 3a Toa:
- MeCTOTO 3a Лени所以他可以 Mopa нае 6e3 machotn. Исунстету садOT, доносятейу и сухиштейу MeCTOTO 3a Лени所以他可以 coшпиртус.
2.ИЗВадеTe ja 3aштHTаФолиja od cnLINOHCKaTa JIeNEHka.Co nOMOuHa NCnOPaUHnte 7a6NoHn 3aJIeNTe ja cnLIOKOHCKaTa JIeNEHka Ha COODBeTHaTa BIncHa OJ HaNBoP Ha CaIOT.

- Ппшете ja цела Товшина на си联社нската Леника, Истота К вhaltpeшноctа.
Ha IeIaKOT My e Iotpe6eH 1 yac 3a COoDBeTHO cyWeHe. TeHuepeTo 3a Toa BpeMe Da He Ce KOpNCTn nn YnCTn.
HanomeHn
TeHcpeTo CO cnIKoHcKa IeHcKa Da He Ce OCTaBn DOJI BpeMeHcKn IepNoD BO paCTBOPOT 3a PnaKHeIbe.
mk
Iokolky cnlnkohcka Ta JeeneHa ce Onden, Mopa da ce KopnCTn HOBa.
CTaBaHbe Ha 6e3HHueH ceH3Op 3a TemnepaTypa
IocTaBete ro ceH3OpOT 3a TemnepaTypa do CNIKOHCKata JelenkA, 3a nepKTHo da Ce BKnOnn.
HanomeHH
BnTe CnpyHn, DeKa CNIKKcKaTa IeNeHka e cEIoCHO cyBa, Ppe Da ce yNoTpe6n CeH3OpOT 3a TempepaTypa.
I OCTaBeTe rO caIOT 3a rOTBeHbe Ha Toj NaunH, ITO CEH3OpOT 3a TEMnepaTpa NOKaKyBa Ha CTpaHnUHaTa HAnBOpESha NOBpShHa Ha IIIOuata 3a rOTBeHbe.
Cen30pOT 3a Tempepatya He cMee da 6nnde Hacoueh KOH npyr Jxekok caI, 3a rotBeHe 3a Da Ce n3oerHe nperepeBaHe.
I IIO rOtBeHbETo OTCTpaHete Ro ceH3OpOT 3a TemnepaTpya Od caIoT. UyBaJTe Ro Ha YnCTo, 6e36eHNO MeCTO n He BO 6In3Ha Ha N3BOpn Ha TOpInHa.
H3jaba 3a coo6pa3HOCT
Co oBa Robert Bosch Hausgeräte GmbH
ce n3jacHyBa, DeKa ypeIoT co 6e3KnueH
ceH3Op 3a TempepaTypa COOdBETCTByBa
Ha OCHOBHInTe 6apaHa i npyI
peIeBaHTHi OndpeIbOn OD dIpuEKTtBaTa
2014/53/EY.
IeTaHa RED n3jaba 3a COO6pa3HocT Ke HajTe Ha nHTepHeT Ha www.bosch-home.com Ha cTpaHncaTa Ha npOn3BODn Ha BaunOT ypeJ kaj DOnOpHnTEHNHTe DOKymeHTn.
Iorata n Mapka Ta Bluetooth® ce BheceHn 3Haun 3a Do6pa n CoNCTBeHNuTBO Ha Bluetooth SIG, Inc. n cekoe KopncTeHne Ha OBHe MapKn Ce BpUn npeky IInueHua oD Robert Bosch Hausgerate GmbH. Cnte Dpyr n MapKn n mInBa Ha MapKn Ce COnCTBeHNuTBO Ha COOdBETHnTE KOMNaHn.
et
Sisukord

Thank you for buying a Bosch Home Appliance!
Register your new device on MyBosch now and profit directly from:
- Expert tips & tricks for your appliance
- Warranty extension options
- Discounts for accessories & spare-parts
- Digital manual and all appliance data at hand
- Easy access to Bosch Home Appliances Service
Free and easy registration - also on mobile phones:
www.bosch-home.com/welcome

Looking for help? You'll find it here.
Expert advice for your Bosch home appliances, need help with problems or a repair from Bosch experts.
Find out everything about the many ways Bosch can support you:
www.bosch-home.com/service
Contact data of all countries are listed in the attached service directory.
- Wireless Temperature Sensor
- Intended use
- Important safety information
- Warning
- Danger of suffocation!
- Hazard due to magnetism!
- Risk of injury!
- Environmental protection
- Environmentally-friendly disposal
- Preparing and maintaining the wireless temperature sensor
- Adhering the silicone patch
- Notes
- Fitting the wireless temperature sensor
- Changing the battery
- en
- Caution!
- Note:
- Cleaning
- Temperature sensor
- Silicone patch
- Temperature sensor window
- Declaration of Conformity
- Table des matieres
- IpeDynpEckJeHne OnachOCT OT HapaHЯBaHe!
- Почистванe
- Ceh3op 3a TemnepaTypa
- CnlnkoHOBa JleneHka
- Прозорец сеньета за Temпераразу.
- yKa3aHne
- 3aBHeHne 3a CbOTBeTCTBHe
- Ornablenne
- OuHCTka
- TemnepaTpyhbi cehcop
- CnIKHOBOHaHaKJaDka
- Okouko TemnepaTpyHoro ceHCopa
- Yka3aHn
- Декларачnia O COOTBETCTBHN
- 3mict
- 3aHTHa Ha JHBOTHa cpeHnHa
- OTCTpaHyBaIbe corglaacHO npOncHTe 3a JHBOTHa cpeiHa
- БeзЖичен сEH3Op 3a TemпepаТура
- ПодгOTOBки Hera Na 6e3ЖИЧНNot ceH3Op 3a TempepaTypa
- JIenneHe Ha cnHnKoHcKaTa JIeNeHka
- HanomeHn
- mk
- CTaBaHbe Ha 6e3HHueH ceH3Op 3a TemnepaTypa
- HanomeHH
- H3jaba 3a coo6pa3HOCT
- Sisukord
- Thank you for buying a Bosch Home Appliance!
- Looking for help? You'll find it here.
Brand : BOSCH
Model : PXY875KW1E
Category : Cooker