
16inch - TV Alden - Free user manual and instructions
Find the device manual for free 16inch Alden in PDF.
| Product type | 16-inch LED TV |
| Brand | Alden |
| Model | 16inch |
| Screen size | 16 inches (16:9 widescreen) |
| Resolution | 1366 x 768 pixels |
| Display technology | LED backlight |
| Contrast ratio | 500:1 |
| Brightness | 200 cd/m² |
| Response time | 8 ms |
| Number of colors | 262,144 |
| Weight | 1.6 kg |
| Power supply | AC 100-240 V, 50/60 Hz or DC 12 V |
| Power consumption (operating) | ≤ 15 W |
| Standby power consumption | < 1 W |
| TV systems | Analog PAL/SECAM, Digital DVB-T |
| Audio output | 2 x 3 W |
| Connections | HDMI, VGA, PC audio, CVBS, S-Video, YPbPr, SCART, USB, 3.5 mm audio output jack, CI slot |
| Included accessories | Remote control, batteries, power adapter, 12 V power cord, AV cable |
| Dimensions (active area) | 344.2 x 193.5 mm (H x V) |
| Care and cleaning | Unplug the device, clean with a soft damp cloth (soapy water). Do not use alcohol or ammonia-based detergent. |
| Safety | Do not open the casing (electric shock). Maintain a 20 cm clearance around for ventilation. Avoid exposure to water, heat, and shocks. |
| Spare parts and repairability | Use only original parts. Any intervention must be carried out by a qualified technician. Opening voids the warranty. |
Frequently Asked Questions - 16inch Alden
User questions about 16inch Alden
0 question about this device. Answer the ones you know or ask your own.
Ask a new question about this device
Download the instructions for your TV in PDF format for free! Find your manual 16inch - Alden and take your electronic device back in hand. On this page are published all the documents necessary for the use of your device. 16inch by Alden.
USER MANUAL 16inch Alden
TV 16:9 · TV 16:9 combo DVD
23Warnings
25 How to install the TV foot
26 Description of the main unit
27 How to install and use the remote control
28 Description and functions of the remote control
28 in TV mode
29 in Text mode
29 in DVD mode
30 How to use
30
First
use
31 How to use the MEDIA source
32 How to use the PVR function
33 Advanced functions to the TV
33
Picture
menu
34
Sound
menu
35
Functions
menu
36
TV
menu
37
DTV
menu
38
Computer menu
39 HDMI / YPbPr menu
39 What to do in case of breakdown
40 Technical specifications
41 Alden warranty
42 Warranty form
Deutsch
Listedesupports(devicelist)
Classification (Rating)
The reproduction of whole or part of this guide is strictly forbidden without Alden's agreement.
Alden draws your attention to the risks that may occur if the mounting is not correct. Alden declines all responsibility if the product is not mounted in the correct way and especially if it is installed by a non professional person.
The retailer is meant to know installation rules and to apply them. He will especially respect the installation location, the cable connection, the gluing and screwing. By selling and installing an Alden product, the retailer is obliged to inform his customer on how the product works and perhaps how to install the product in some cases. He will also give the customer all relevant documents. The retailer will inform the customer about security matters. The retailer must inform the end user on how to use an Alden product and safety measures. The product is to be used only for the intended matter. The retailer must also inform the end user about the current laws applicable in the country where the product is going to be used.
Each product with electronic components has to be protected from undervoltage (under 10,5 volts) and overvoltage (over 15 volts).
It is strictly forbidden to open, interfere, repair and/or modify the product without Alden's agreement. The warranty will no longer be applicable if you undertake such an action.
ALDEN declines all responsibility in the event of incidents or accidents if they are due to a non observation of the installation instructions or the way the product is used.
Remove the fuse from the electric circuit board of the satellite system and receiver before interfering on the general circuit board, or changing or connecting the battery. If the vehicle is equipped with a solar panel, also remove the fuse.
Keep away from children.
You must install separate cables, with a 5 Amp. fuse on the plus line, directly from the battery cell to the television.
Before interfering on the electric circuits, make sure the specifications of the device and the electric circuit are compatible.
Do not drop or push objects into the television, the slots or the openings. Do not spill liquid on the television. Do not open or touch the inner circuit. Do not remove the back cover: only qualified professional is allowed to do so. Do not use the television if the power supply, cables or connections are damaged. Never lay anything on the cables. Make sure that the cables cannot be pulled off and that no one will stumble over them. To unplug a cable, hold the plug and not the cable.
The openings are to ventilate the television. They have to stay free. Never lay the television on a bed, a sofa or any other soft surface. This can block the openings and stop the television from being ventilated. If you install the television in a closed area, make sure the ventilation is sufficient: there must remain a 20cm space round the television to assure a sufficient ventilation.
Do not expose the television to rain or water (kitchen, bathroom...). If this ever does happen, disconnect immediately the power supply from the television and contact your retailer.
Install the television in a place where it will not be affected by humidity, dust, and on a flat and stable surface. Use the device carefully. The screen is made of a thin layer of glass, it is therefore sensitive to shocks, scratches... Do not clean with corrosive products. Simply use a slightly damp soft cloth.
Do not place magnetic products (like loudspeakers...) near the television.
In case of dysfunction (unusual sound or smoke...), unplug immediately the power supply from the television and contact your retailer.
A high ambient temperature may cause the television to dysfunction. Do not use nor stock the television in direct sunlight or near a source of heat. If the ambient temperature is too low, the quality of the picture may be affected. If this is the case, switch the television off and wait for a few minutes. If the problem remains when you switch the television on again, change the ambient temperature.
Unplug the television from the power supply before interfering with the television.
Only use the foot sold with the device. The television must be mooved carefully. It may fall in case of brutal stop, in case of acceleration or when driving on damaged roads. Never install the television in a place where it will be in direct contact with sunlight, high temperatures, high humidity or a lot of dust: this could damage the internal parts of the television. Place the television on a stable surface and handle with care. The screen is made of glass and can be damaged if dropped, in case of collision or scraped.
When the television is not used during a long period, disconnect the power supply.
In case of dysfunction (unusual sound or smoke...), unplug immediately the power supply from the television and contact your retailer. Unplug the television from the power supply before attempting to repair it. Make sure the technician uses authorized spare parts. If these parts are not conform they may cause fire, electric shock or other dangers. Follow all the maintenance and reparation procedures, make sure the technician controls all security devices to ensure that the television can be used without danger.
-
By installing the product, you agree to the rules above
-
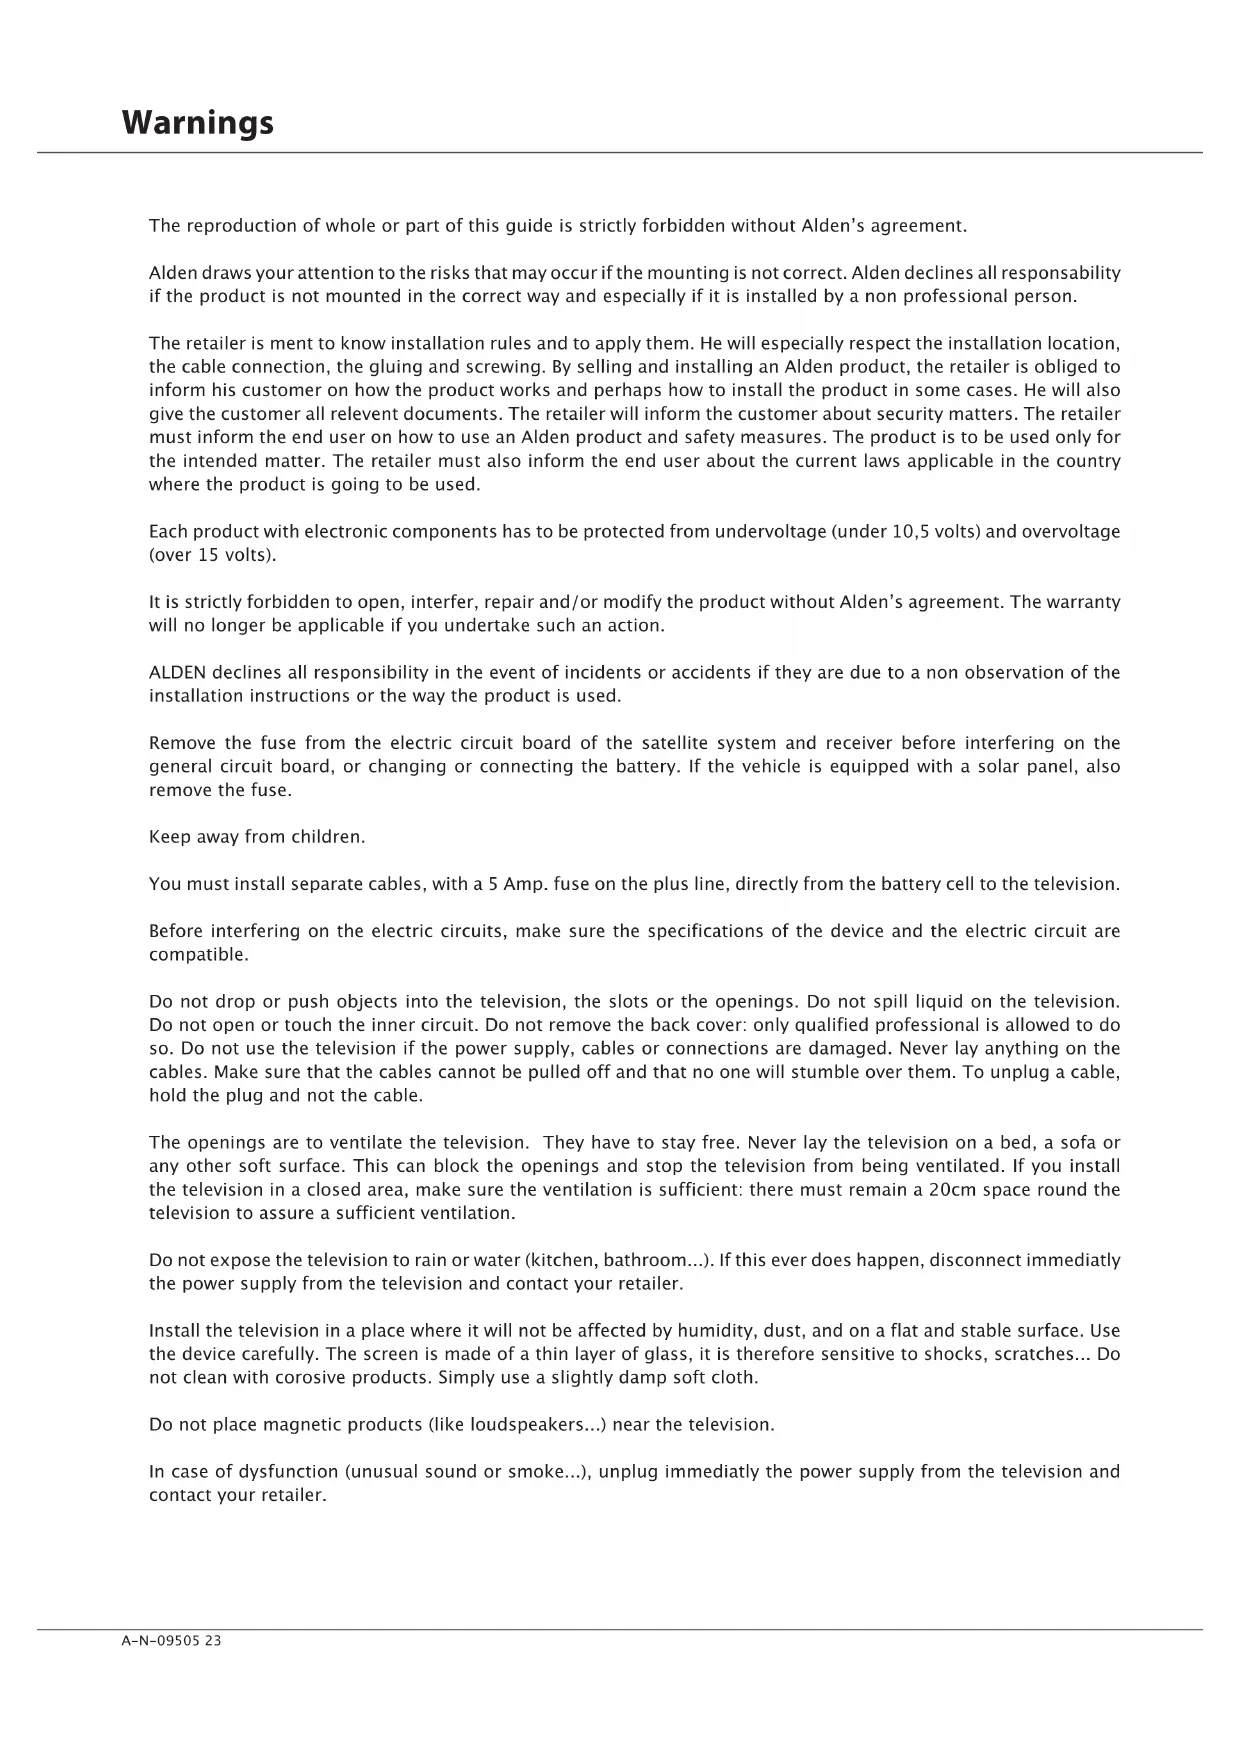
Lay the TV upside down on a clean and flat surface
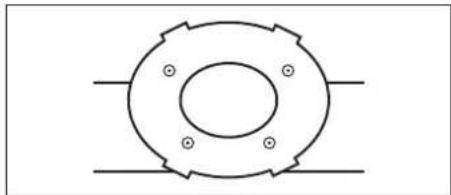
- Clip the foot on the support and make sure the position of the screws is correct.

- Fix the foot on its support by using the 4 provided screws.
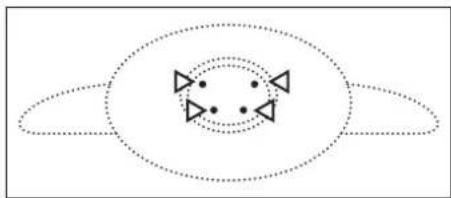
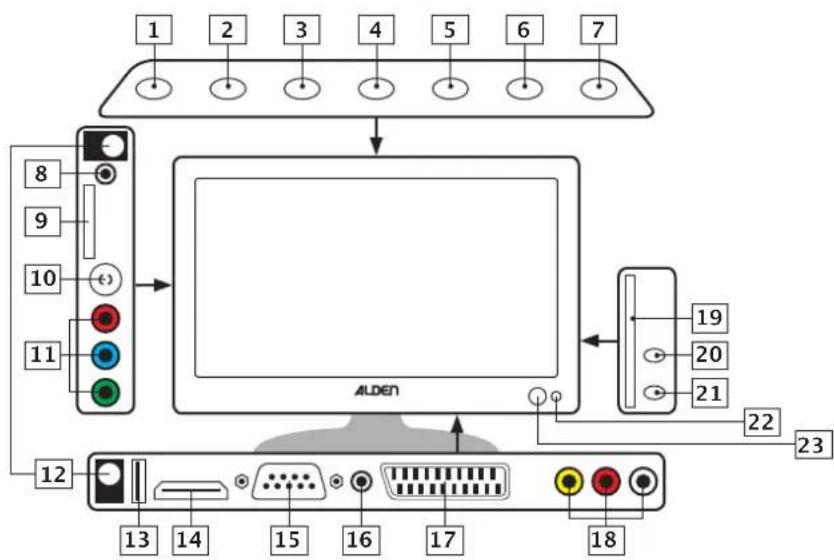
| 1 SOURCE | Press this button to select the video source. In the setting menus, it allows you to confirm your selection and enter in a sub-menue. | |
| 2 MENU | Press this button to display the main menu on the screen. In a sub-menue, it allows you to go back to the previous menu. | |
| 3 CH + | Press this button to go to the next channel. In menu, it allows you to move your selection up. | |
| 4 CH - | Press this button to go to the previous channel. In menu, it allows you to move your selection down. | |
| 5 VOL + | Press this button to increase the sound. In menu, it allows you to move your selection to the right. | |
| 6 VOL - | Press this button to decrease the sound. In menu, it allows you to move your selection to the left. | |
| 7 POWER Press this button once to switch the TV on. Press it again to switch it off. | ||
| 8 AUDIO OUT Audio stereo output (only for earphones). | ||
| 9 CI CARD Unavailable. | ||
| 10 TV | Digital RF 75 Ω connector. | |
| 11 Pr Pb Y Audio/Video input for external devices. | ||
| 12 12VDC | Power supply connector. (The position of the DC IN plug can vary depending on the model.) | |
| 13* USB USB input. | ||
| 14 | HDMI | High Definition audio / video input for external devices. |
| 15 VGA IN Computer video input. | ||
| 16 | AUDIO IN | Computer audio input. |
| 17 | SCART | Scart connector. |
| 19 | L R CVBS | Standard Definition audio / video input for external devices. |
| 20** | DVD slot. Insert the disc with the printed side facing you. | |
| 21** | ▲ | Eject the disc. |
| 22** | ■■ | Start / Pause the reading of the disc. |
| 23 | Red: TV in standby; Green: TV in function. | |
| 24 | Inbuilt infra-red sensor. | |
: USB support not supplied.
*: DVD combo version only.
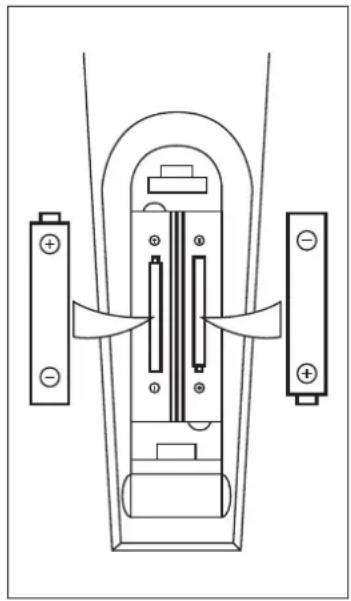
- Remove the battery cover placed on the back of the remote control.
- Put two new 1.5V AAA batteries in place: make sure the polarity is correct.
Put the cover back in place.
Warnings :
- A non conform use of the batteries can cause leaking and corrosion.
- Do not install the batteries in the wrong way.
- Do not charge, open, overheat nor short-circuit the batteries.
- Do not throw the batteries in the fire.
- Do not leave old batteries in the remote control.
- Do not use different kinds of batteries, for example an old battery with a new one.
- If the remote control is not used during a long period, remove the batteries.
- If the remote control does not function or if you have to be near the TV to use it: change the batteries.
- If the batteries have leaked, clean the compartment and the connectors and put new batteries in place.
How to use the remote control
- Orientate the remote control towards the television when you use it.
- Avoid any shocks.
- Do not leave the remote control near a source of heat or humidity.
- Do not spill water on the remote control, nor lay anything humide on it.
- Do not open the remote control.

| POWER | Press this button once to switch the TV on. Press it again to switch to stand-by mode. |
| × | Press this button once to switch the sound off. Press it again to switch it on. |
| P.MODE | Press this button several times to select a pre-programmed picture mode. |
| S.MODE | Press this button several times to select a pre-programmed sound mode. |
| NICAM | Depending on the programme, press this button to switch between the different sound modes and languages from the currently watched programme. |
| ASPECT | Press this button several times to select the picture ratio : Auto, 16:9 or 4:3. |
| 0...9 | Use these buttons to dial the number of the programme you want to watch. |
| --/-- Use this button to select any channel number above 9. | |
| ○ | Press this button to return to the previous watched channel. |
| PR+/− Use these buttons to go to the previous / next channel. | |
| OK | Use the arrows to move in the menu. Press OK to confirm your choice. In Text mode, use the arrows to change page number. |
| Source Press this button to select the video source. | |
| Sleep | Press this button several times to programme the television to be automatically switched off. |
| Info | Press this button to display information about the actual programme. |
| Menu | Press this button to display main menu. In a sub-menu, press this button to go back to the previous menu. |
| EPG | Press this button to display the Electronic Programme Guide (only in digital mode). |
| LIST Press this button to display the channel list. | |
| DTV/RADIO | Press this button to switch from TV mode to Radio mode (only in digital mode). |
| FAV. Press this button to display the favourite channel list. | |
| EXIT Press this button to exit a menu. | |
| VOL+/- Use these buttons to increase / decrease the sound. | |
| ● | Press this button to record a digital programme on a USB device. |
| MEDIA Press this button to select USB input source*. | |
| STILL | Press this button to stop the live programme (only in digital TV mode and USB mode). |
*: USB support not supplied.
These functions are used in Text mode, when the programmes you watch offer Text mode.
| TXT | Press this button once to enter Text mode. Press it again to exit. |
| MIX | Press this button once to remove the colored screen: the text will be displayed on the TV picture. Press it again to display the coloured screen. |
| SIZE | Use this button to change the size of the page (Normal - Upper half page - Lower half page). |
| INDEX Press | this button to display the Index page. |
| HOLD | Press this button once to stop the automatic refreshing of the page. Press it again to enable automatic refreshing. |
| REVEAL Press | this button to display the hidden information on the current page. |
| SUBPAGE Use | this button to display / hide the subpage. |
| CANCEL | When you have started to search for one or several pages, press this button once to go back to TV mode. The results will be displayed on the top of the picture. Press this button again to go back to Text mode. |
| Page down Page up | Use these buttons to change the displayed page. |
| Red Green Yellow Blue | Use the coloured buttons to display the corresponding page. |
Description and functions of the remote control in DVD mode
The following features are only available in DVD mode for the DVD Combo Version.
| GOTO Press to display the list of chapters. |
| ANGLE Press to select the angle of viewing. |
| D.DIS Press to display the information screen while reading. |
| REPEAT By pressing this button, you can select one of the pre-programmed repeat modes. |
| SETUP By pressing this button, you enter the main menu and access the DVD-player settings. |
| SUBTITLE By pressing this button, you display one of the available subtitles whilst watching a DVD. |
| LANGUAGE By pressing this button, you change the audio language of the DVD that is being watched. |
| TITLE By pressing this button, you display the title of the DVD you are watching. |
| II By pressing this button, you start or pause the DVD. |
| ■ By pressing this button, you stop the DVD. |
| ▲ By pressing this button, you eject the DVD from the DVD-player. |
| « By pressing this button, you go back to the beginning of the current chapter. |
| « By pressing this button, you start fast rewinding. Press several times to return to standard play. |
| » By pressing this button, you start fast forwarding. Press several times to return to standard play. |
| » By pressing this button, you go to the next chapter. |
| A-B By pressing this button, you will activate the A-B reading mode. |
| DVD MENU By pressing this button, you enter the main DVD menu that is being watched. |
| ZOOM By pressing this button, you select one of the pre-programmed picture display modes. |
| VOL+ / VOL- Use these buttons to increase / decrease the sound of the DVD. |
Basic functions.
Press Source to display the video source list.
Use and to select the source you wish to watch.
Press Ok to confirm your choice.
Basic functions in the menus.
Press Menu to display the main menu / go back to the previous menu when you are in a sub-menu.
Press and to navigate in the menus.
Use and to make alterations.
When you use the system for the first time, a configuration assistant will be displayed automatically on the screen.
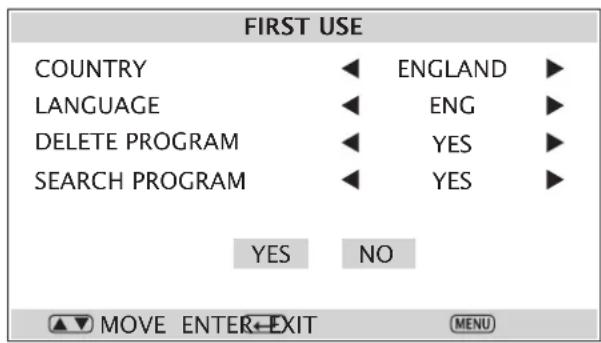
Country: choose the country in which you are.
Language: choose your language.
Delete program: will delete all the channels.
Search program: enables you to search for channels. The search settings can be found in the automatic search sub-menu.
Once the settings made, select Yes then Ok to launch the search for the channels. During the search, press Ok to cancel.
If you do not wish to search, select No then press Ok to confirm.
A confirmation screen will come up asking you if you want to exit the help guide:
- select Yes to exit
- select Do it next time to display the help guide when using the TV next time,
- select No to return to the previous screen.
Information
The help guide for the first installation can also be accessed in Function menu, submenu Installation.
Press Source to display the list of video sources.
Press and to select the Media source.
Press Ok to confirm your choice.
Use and to select the type of media you wish to watch.
Video
This function will enable you to watch films that are available on the digital device connected to the television. Press and to select the chosen file and confirm by pressing Ok.
Music
This function will enable you to listen to audio files that are available on the digital device connected to the television. Press and to select the chosen file and confirm by pressing Ok.
Picture
This function will enable you to watch files that are available on the digital device connected to the television. Press and to select the chosen file and confirm by pressing Ok.
When a digital device is plugged into the television (external hard disk, USB key...) it is possible to record and control live programmes.
Press (bottom left hand corner of the remote control) to display the menu.
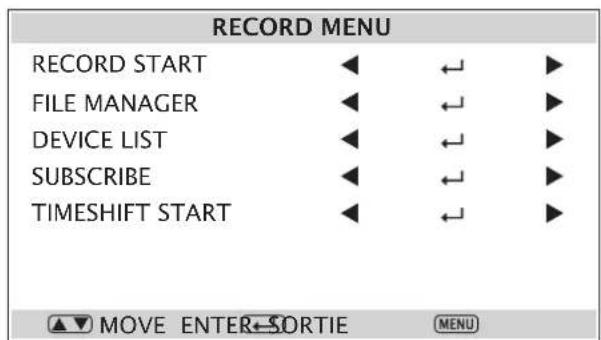
Record start
Press Ok to start recording a programme. A saving logo will appear on the screen.
To stop recording, press on the remote control: a confirmation window will appear. Confirm or not the saving of the recording.
File manager
Use and to select the chosen file and press:
- Red to read the file,
- Green to delete the file,
- Yellow to delete all the files,
- Blue to zoom on the picture.
Device list
This function will enable you to display the list of the digital devices connected to the television.
Subscribe
This function will enable you to programme a recording in the future (video tape recorder function).
Timer nr : Select the number of the chosen programme.
Mode: Select the programme mode (none, once, daily, weekly).
Source: Select the source you wish to save.
Date: Enter the date foreseen for the recording.
Start: Enter the hour foreseen for the beginning of the recording.
Duration: Enter the duration of the recording.
Timeshift start
Press OK to stop the live programme, press to start again.
Picture menu
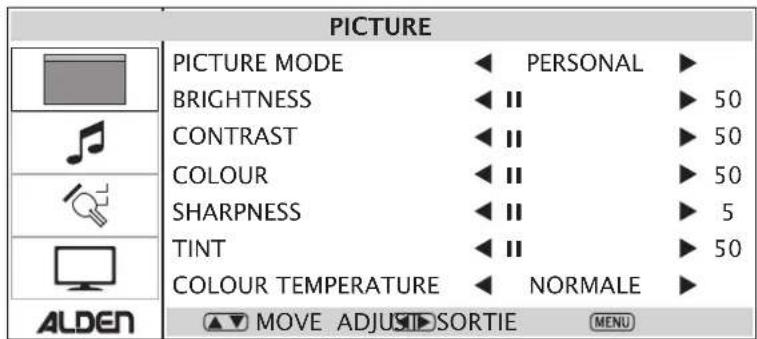
Picture mode
Select one of the following pre-programmed settings:
- Personal : when selected, enables you to enter your own value of brightness, contrast, colour and sharpness.
- Standard: standard mode.
- Movie : recommended in dark light ambient situations.
- Mild : recommended in bright light ambient situations.
- Game : recommended when you play videogames.
Brightness
Use and to set the level of brightness of the picture. This setting is only possible when the Personal picture mode is selected.
Contrast
Use and to set the level of contrast of the picture. This setting is only possible when the Personal picture mode is selected.
Colour
Use and to set the level of colour of the picture. This setting is not possible when the video source is a computer.
Sharpness
Use and to set the level of sharpness of the picture. This setting is only possible when the Personal picture mode is selected.
Tint
Use and to set the level of tint of the picture. This setting is only possible when the Personal picture mode and the NTSC mode are selected.
Colour temperature
Use and to select one of the pre-programmed colour temperatures. This setting is only possible when the Personal picture mode is selected.
Sound menu
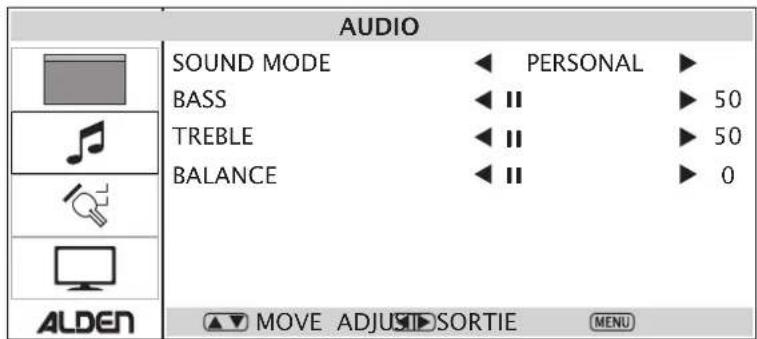
Sound mode
Select one of the following pre-programmed sound settings:
- Personal: when selected, enables you to enter your own level of bass, treble and balance.
- Voice : recommended mode for programmes such as news programmes.
- Music: recommended mode for musical programmes.
- Standard: standard mode.
- Theatre : recommended mode for films.
Bass
Use and set the bass level. This setting is only possible when the Personal sound mode is selected.
Treble
Use and to set the treble level. This setting is only possible when the Personal sound mode is selected.
Balance
Use and to set the sound balance level between the left and right loudspeaker. This setting is only possible when the Personal sound mode is selected.
Function menu
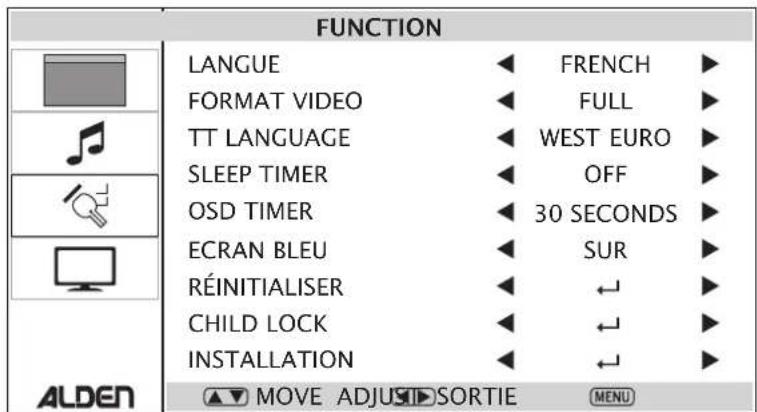
Language
Use and to select the display language (English, Italian, Spanish, Portuguese, French, German).
Video format
Use and to select the display ratio.
Text language
Use and no select the display language in Text mode.
Sleep timer
Use and set the duration before the automatic stand-by of the television.
OSD timer
Use and set the duration before the screen menus are automatically hidden.
Blue screen
Use and no activate or not the blue screen behind the displayed menu.
Reset
Select the sub-menu and press Ok to delete all personal settings and activate the factory settings.
Child lock
Select the sub-menu and press Ok to access the parentel locking settings menu. To enter, you will have to dial a 4 number code (default: 0000).
Installation
Select the sub-menu and press Ok to display the configuration assistant. This sub-menu is not available when the parental locking is activated.
TV MENU (TV source)
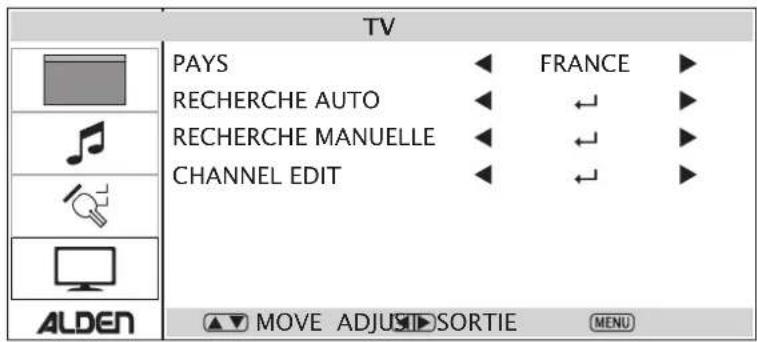
WARNING: In many regions analog TV is no longer broadcasted.
Country
Use and to select the country where you are.
Auto search
This function will enable you to search all the available channels in the country that you previously selected. Press Ok to start the search. If the parental locking is activated, the code will be requested (default: 0000).
Manual search
This function will enable you to set the research to enable you to find one or several precise channels. To access the sub-menu, enter 0000.
Channel: press and to choose the channel number.
Sound system: use and to choose the corresponding sound system (example: DK, I, L, BG...).
Colour system: use and to choose the corresponding colour system (example : Auto, Pal...).
Fine tuning: adjust the reception frequency of the channel in case of bad reception.
Channel edit
This sub-menu will enable you to organize your channel list depending on your preferences. This sub-menu will give you access to 4 functions per coloured button:
- Green : add / remove a channel from your favourite channel list.
- Blue: lock / unlock a channel.
- Yellow: ignore a channel.
By using and you can select a channel in the list. Use and move a channel in the list. It is also possible to rename a channel.
Once all the settings have been made, press Ok to confirm the modifications.
DTV menu (Digital TV, DTV source)
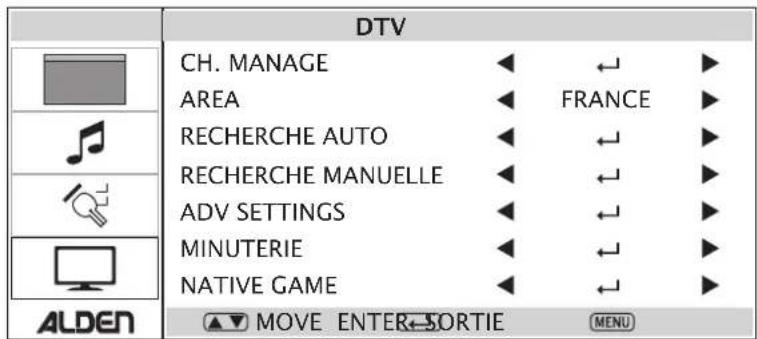
Channel manager
This function will enable you to manage the digital channels and the radios.
Organize
This sub-menu will enable you to organize the channel list depending on your preferences. This submenu will give you access to 5 functions per coloured button:
- Red : add / remove a channel from the channel list.
- Green: delete a channel.
- Yellow: exchange the position of two channels in the list.
- Blue: lock / unlock a channel.
By using and you can rename a channel.
Sort
The first option enables you to select the programme language.
The second option enables you to choose Free-to-Air channels, scrambled channels or all channels.
The third option enables you to sort the list in the alphabetical order or reverse order.
Once the settings have been made, press Ok to confirm.
Use the Red and Green buttons to switch between the top or bottom part of the screen.
Press Exit to return to the previous menu.
Group
It is possible to classify the channel in 8 groups: None, News, Science, Sports, Movies, Kids, Music, Fashion. To do so, use and select a channel in the list and press the digital button corresponding to the number of the chosen group. Once the settings have been made, press Exit to return to the previous menu.
Delete channels
Use this sub-menu to delete all TV channels. Once this sub-menu selected, a confirmation window will appear on the screen.
Delete radios
Use this sub-menu to delete all Radio channels. Once this sub-menu selected, a confirmation window will appear on the screen.
Area
Use and to define your geographical location (UK, Spain, France, Italy, Germany, Others).
Auto search
Once selected, press OK to start the automatic search for the channels.
Manual search
Once selected, this sub-menu will give you access to different parameters to enable you to search manually for the channels.
Advanced settings
Audio: Enables you to select the wished audio language when several are broadcasted.
Subtitles: Enables you to select the wished subtitle language when several are broadcasted.
Age range: Enables you to control the parental locking per age.
Timer
Mode: enables you to set the time automatically or manually.
Date: enables you to set the current date (when Mode is in Automatic).
Time: enables you to set the actual time (when Mode is in Automatic).
GMT: enables you to select your time zone.
Summer time : enables you to activate / desactivate the automatic time change in winter / summer.
Native game
Givestyouaccessto thepre-installedgamesonthe television.
Computer menu (PC source)
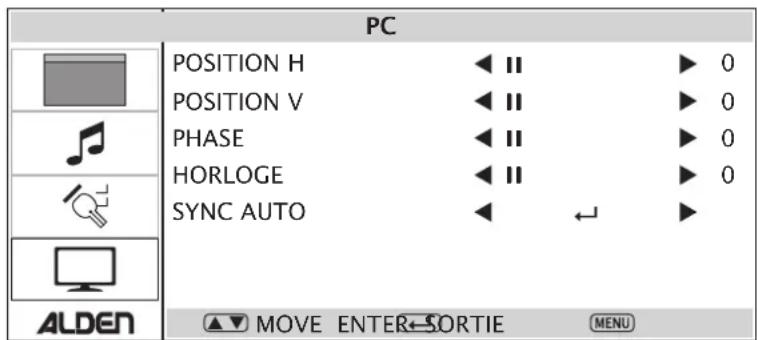
H Position
This function enables you to adjust the horizontal position of the picture on the screen.
V Position
This function enables you to adjust the vertical position of the picture on the screen.
Phase
This function enables you to set the picture frequency (the picture will be altered if the selected frequency is not adapted).
Clock
This function enables you to set the display timing.
Auto sync
This function enables you to set automatically all parameters.
HDMI / YPbPr menu (HDMI / YPBPR source)
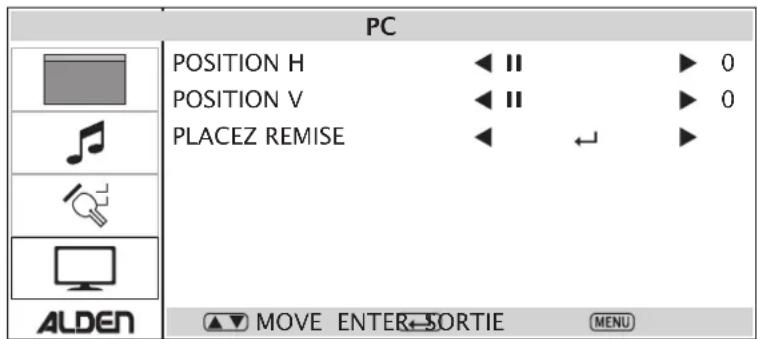
H and V Position
This function enables you to adjust the horizontal / vertical position of the picture on the screen.
Reset
This function will set the H and V position values corresponding to the manufacturer's settings.
What to do in case of breakdown
| Trouble | Solution |
| No picture and / or no sound. | Make sure the television is properly connected to power supply. Make sure the main switch is in On position. |
| A picture appears but no sound. | Make sure the sound is not set at the minimum level (0) or in Mute mode. |
| The remote control does not work | Make sure the television is properly connected to power supply. Check the remote control and make sure the batteries are in order. Make sure that the television is not in direct sunlight. Make sure there are no obstacles between the remote control and the television. |
| No TV signal | Make sure the video source is correct. Make sure the coax cable is properly plugged in. Make sure the television is properly connected. |
| No external video signal | Make sure the television is properly connected. Make sure the satellite system is properly connected and oriented. |
| The picture lacks colour or is too dark | Check the picture settings in the main menu. |
| The picture looses colour per intermittance. | Make sure your satellite system is not damaged nor disconnected. |
| The reception is not enough, the picture looses colours. | Make sure the channel settings are correct. |
| Diagonal lines appear on the picture. | The system can be affected by external magnetic devices. |
| White flakes on the picture. | Make sure your satellite system is not damaged nor disconnected. |
| A faint identical picture appears. | Check the orientation of your satellite system. |
| Model | 16" | 18,5" | |
| General specifications | Technology | Backlight LED | |
| Screen size | 16" wide screen 18,5" wide screen | ||
| Screen format | 16:9 | ||
| Resolution | 1366 x 768 pix | ||
| Contrast | 500:1 1000:1 | ||
| Active surface | 344.232 (H) x 193.536 (V) 409 | 8 (H) x 230.4 (V) | |
| Brightness | 200 cd/m2 250 cd/m2 | ||
| Responding delay | 8 ms 5 ms | ||
| Colour | 262 144 16,7M | ||
| Weight | 1,6 kg 3,3 kg | ||
| Power supply | AC 100-240 V, 50/60 Hz | ||
| DC 12 V | |||
| Consumption in function | ≤ 15 W ≤ 25 W | ||
| Stand-by consumption | < 1 W < 1 W | ||
| TV mode specifications | Analog TV system | PAL, SECAM | |
| Digital TV system | DVB-T | ||
| Audio output | 2 x 3 W | ||
| OSD languages | English, French, German, Italian, Spanish, Portuguese | ||
| Functional buttons | Input, Menu, Ch+, Ch-, Vol+, Vol-, Power | ||
| Connections | HDMI, VGA input & computer audio, CVBS and S-Video input, YPbPr, Scart, USB, audio output, CI-Slot. | ||
| Accessories | Remote control, batteries, AC/DC adapter with cable, 12V power supply cable AV cable | ||
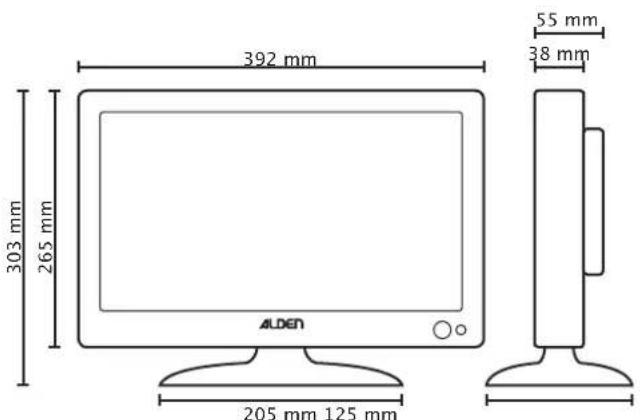
Dimensions model 18,5"Dimensions model 16"
The ALDEN warranty covers the following:
Alden Loisirs et Techniques warrants to the initial Buyer the products for a standard period of two years from the original date of purchase of the product by the end user. The end user must return the warranty form that is enclosed in the user's guide with a copy of the invoice to Alden. If this document is not returned, the warranty will begin at the date of purchase by the initial Buyer.
Warning: If the Buyer decides to undergo reparation without Alden Loisirs et Techniques's agreement, he will have to support all the consequences and the warranty will become void. Nor the buyern nor the end user can demand compensation for privation of the product for less than 30 days. Alden Loisirs et Techniques can under no circumstance be held responsible for accidents or damage due to non observation of the installation instructions. We remind you that any electric installation must be protected with an adapted fuse.
In any case, general installation rules must be followed. The installer and the end user are supposed to know rules and laws (such as the driving rules) and legal rules about heavy loads. The installer and the end user must inform themselves about installation rules. The installer and the end user can not demand compensation or further guarantee if these rules are not followed.
Nevertheless you will benefit from the general legal warranty especially concerning hidden manufacturing faults.
Warning: The application of the warranty and any aftersales return must be authorized by Alden Loisirst Techniques before. The buyer shall bear all shipping, packing and insurance costs and all other costs excluding labour and parts necessary to carry out repairs under this warranty (Alden will cover transport coasts back to the customer). If you demand express delivery, the costs will remain yours.
This warranty does not cover:
wearing parts;
- damage caused by accidents;
misuse;
- negligence;
- incorrect wiring, or improper installation;
- if the Goods are used in an installation other than that recommended in the product installation and operation instructions.
- faults and consequences due to the intervention of a non approved reparation.
Alden recommends that the installation be done by a professional.
If you choose to install the product yourself, you will be responsible for security.
In this case, you are ment to have the necessary competence. You will have to respect rules that are applied to professional installers. Respect the law. The product will only be used for the intended matter.
Warranty:
The buyer will contact his retailer if problems occur with the product.
WARNING:
The warranty will be cancelled if you interfere on the product without Alden's agreement.
Complete the following form and send it back to the following address with a copy of the invoice and the product:
ALDEN - Z.A. du Hairy - F-67230 HUTTENHEIM - FRANCE
Warranty form
NAME,First name:
Full address:
Post code:
Town - COUNTRY:
Retailer:
Date of purchase:
Product:
Serial number:

- TV 16:9 · TV 16:9 combo DVD
- Deutsch
- Listedesupports(devicelist)
- Classification (Rating)
- Warnings :
- How to use the remote control
- Description and functions of the remote control in DVD mode
- Basic functions.
- Basic functions in the menus.
- Information
- Video
- Music
- Picture
- Record start
- File manager
- Device list
- Subscribe
- Timeshift start
- Picture menu
- Picture mode
- Brightness
- Contrast
- Colour
- Sharpness
- Tint
- Colour temperature
- Sound menu
- Sound mode
- Bass
- Treble
- Balance
- Function menu
- Language
- Video format
- Text language
- Sleep timer
- OSD timer
- Blue screen
- Reset
- Child lock
- Installation
- TV MENU (TV source)
- Country
- Auto search
- Manual search
- Channel edit
- DTV menu (Digital TV, DTV source)
- Channel manager
- Organize
- Sort
- Group
- Delete channels
- Delete radios
- Area
- Advanced settings
- Timer
- Native game
- Computer menu (PC source)
- H Position
- V Position
- Phase
- Clock
- Auto sync
- HDMI / YPbPr menu (HDMI / YPBPR source)
- H and V Position
- What to do in case of breakdown
- The ALDEN warranty covers the following:
- This warranty does not cover:
- Warranty:
- WARNING:
- Warranty form
Brand : Alden
Model : 16inch
Category : TV