
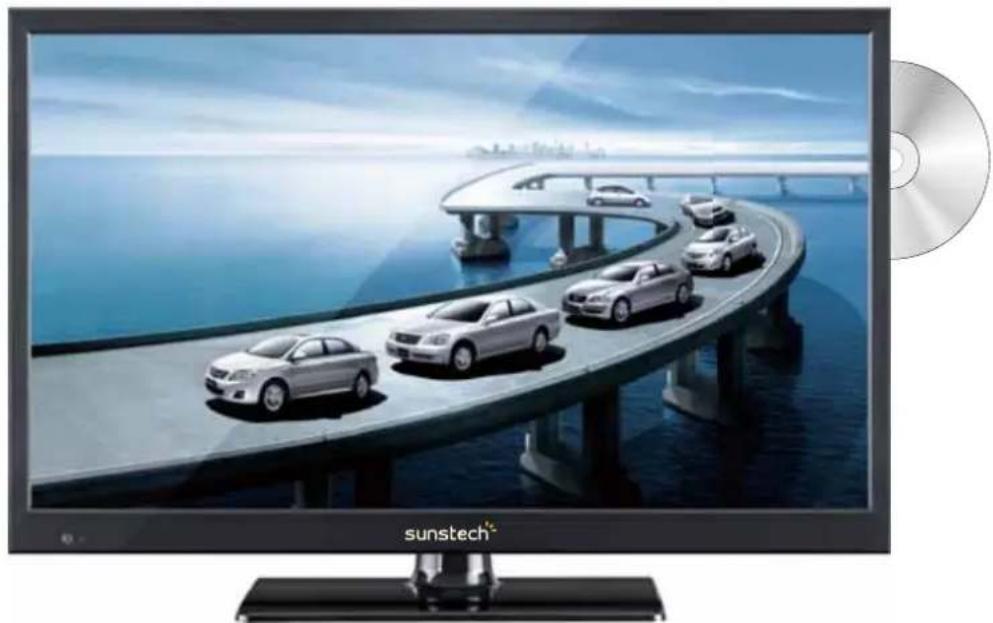
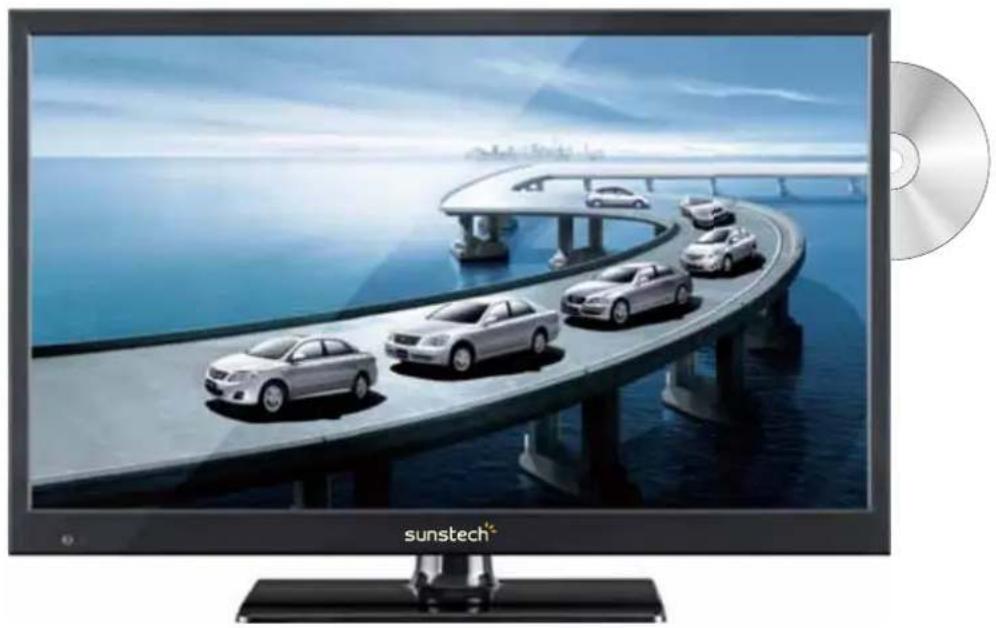
TLEXI1663HD - Television Sunstech - Free user manual and instructions
Find the device manual for free TLEXI1663HD Sunstech in PDF.

| Product type | LED TV with DVD player |
| Brand | Sunstech |
| Model | TLEXI1663HD |
| Screen size | 15.6 inches |
| Resolution | 1366 x 768 pixels |
| Aspect ratio | 16:9 |
| TV system | PAL |
| Power supply | DC 12V |
| Power consumption | < 20 W |
| Audio power | 2 x 3 W |
| Video inputs | HDMI, VGA, SCART, AV, YPbPr |
| USB input | Yes (for multimedia playback and PVR recording) |
| Common Interface (CI) | Yes |
| Audio outputs | Headphone, SCART |
| DVD player | CD/CD±R/RW, DVD±R/RW |
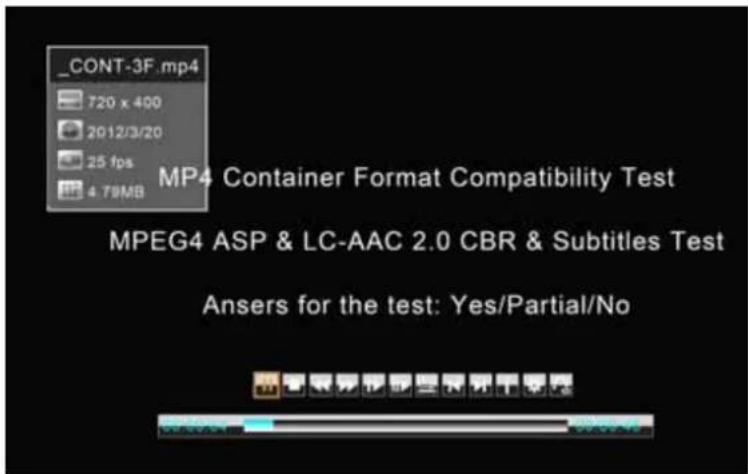
| Supported USB formats | Image: JPEG/GIF/BMP/TIF/PNG; Audio: MP3/WMA; Video: MPEG-1/2/4, H.264-HD |
| Dimensions with stand | 398 x 130 x 310 mm |
| Dimensions without stand | 395 x 60 x 300 mm |
| Weight | Not specified |
| Warranty | 2 years |
| Special features | PVR recording, time-shift, teletext, parental control |
| Maintenance | Unplug before cleaning; use a soft dry cloth |
| Safety | Do not expose to water; ensure adequate ventilation |
Frequently Asked Questions - TLEXI1663HD Sunstech
User questions about TLEXI1663HD Sunstech
0 question about this device. Answer the ones you know or ask your own.
Ask a new question about this device
Download the instructions for your Television in PDF format for free! Find your manual TLEXI1663HD - Sunstech and take your electronic device back in hand. On this page are published all the documents necessary for the use of your device. TLEXI1663HD by Sunstech.
USER MANUAL TLEXI1663HD Sunstech
16" LED Television TLEXI1663HD
Read this manual carefully and retain for future reference
- PREFACE 2
2.SAFETY PRECAUTIONS 2 - IN THE CARTON 6
4.FRONT BACK CONNECTIONS OF LED 7
5. TV INSTALLATION DRAWINGS
Power Cord Connection 8
Antennas Connection 8
HDMI Connection 9
VGA Connection 9
USB Connection 10
SCART Connection 10
1. Earphone Connection 10
AV Connection 11
YPbPr Connection 11
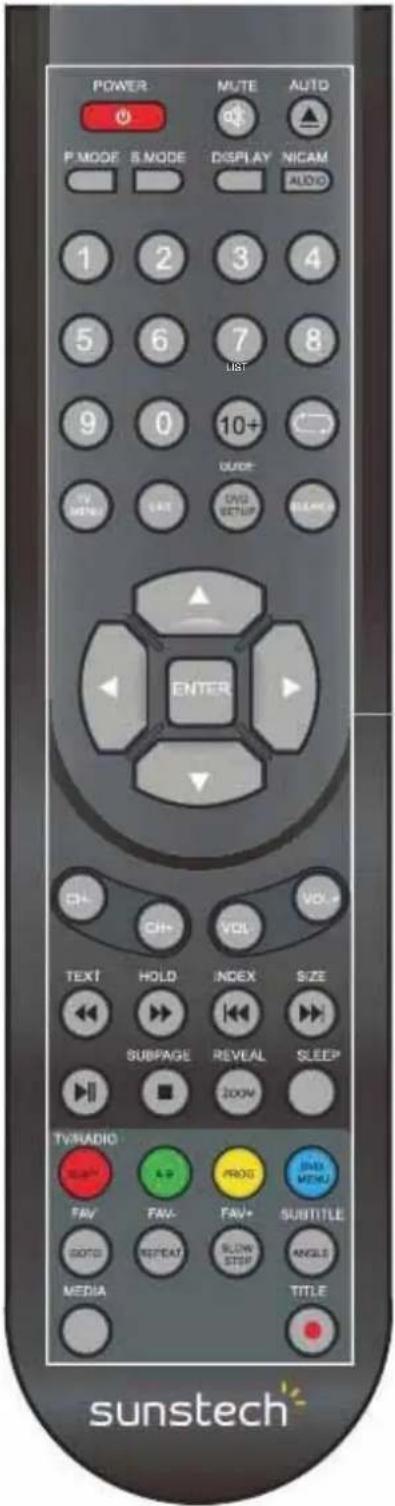
6. REMOTE CONTROL
Remote Control Instructions in DTV mode 12
Remote Control Instructions in Teletext/Media mode 14
Remote Control Instructions in DVD mode 15
Remote Control Setup 16
7. Menu Operation
Select Input Source 17
Picture Menu 17
Sound Menu 18
Channel Menu 19
Feature Menu 23
How to user Record 26
How to user Timeshift 28
Setup Menu 29
Media Menu 30
8.DVDOperation 34
9.TROUBLESHOOTING AND ADVICE 37
10. SPECIFICATIONS 38
Warranty Conditions 39
PREFACE
Thank you for buying this TV! Please read this manual thoroughly before operating the TV Makesure the TV was not damaged in transit. Should the TV is damaged, do no install it and contact your dealer Check that you have all the accessories according to the model.
Safety Precautions
Read the following recommended safety precautions carefully.
Power Source
Before plugging in for the first time, read the following section carefully.
This device should be operated only from a 220-240V AC, 50Hz outlet.
If your model include car adaptor, 12V DC supply when using the device with car charger.
Be sure that the power supply voltage of the area be used meets the required voltage and you select the correct voltage setting for your device.
Power Cord
Do not place the set, a piece of furniture, etc on the power cord or pinch the cord.
Handle the power cord by the plug. Do not unplug the appliance by pulling from the power cord and never touch the power cord with wet hands as this could cause a short circuit or electric shock.
Never make a knot in the cord or tie it with other cords. The power cord should be placed in such a way that they are not likely to be stepped on. A damaged power cord can cause fire or give you an electric shock. When it is damaged and needs to be replaced, it should be done by qualified personnel.
Moisture and Water

Do not use this device in a humid and damp place (avoid the bathroom, the sink in the kitchen, etc). Do not expose this device to rain or water, as this may be dangerous and do not place objects filled with liquids, such as flower vases, on top.
If any solid object or liquid falls into the cabinet, unplug
the connected device(s) immediately and have it checked by qualified personnel before operating it any further.
Cleaning

Before cleaning, unplug this device from the wall outlet. Do not use an aggressive liquid or aerosol cleaners. Use a soft and dry cloth.
Ventilation
The slots and openings on the device are intended for ventilation and to ensure
Ventilation
The slots and openings on the device are intended for ventilation and to ensure reliable operation. To prevent overheating, these opening must not be blocked or covered in anyway. When installing this unit make sure to leave space sufficient around the unit to ensure the ventilation to improve heat radiation.
Do not expose the unit to extreme conditions of heat, cold or moisture
Heat and Flames

The device should not be placed near to open flames or sources of intense heat such as an electric heater. Ensure that no open flame sources, such as candles, are placed on top of the device. Batteries should not be exposed to excessive heat such as sunshine, fire or the like.
Lightning


In case of storm and lightning or when going on holiday, disconnect the power cord from the wall outlet.
Replacement Parts
When replacement parts are required, make sure that the service technician has used replacement parts, which are specified by the manufacturer or have the same specifications as the original one. Unauthorized substitutions may result in fire, electrical shock or other hazards. Please contact the brand or manufacturer that will redirect you to the nearest technical service which will supply or change the replacement parts
Servicing
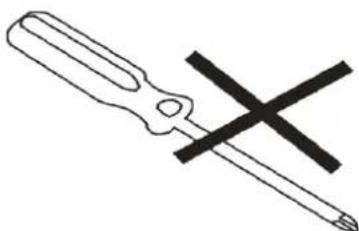
Please refer all servicing to qualified personnel of the brand. Do not remove the cover yourself as this may result in an electric shock.
Risk of electricshock
The lightning flash with arrowhead symbol, within an equilateral triangle, is intended to alert the user to the presence of not insulate, "dangerous voltage" within the product's enclosure that may be of sufficient magnitude to constitute a risk of electric shock of persons.
The exclamation point within an equilateral triangle is intended to alert the user to the presence of important operating and maintenance (servicing) instructions in the literature accompanying the appliance.


Waste Disposal
Instructions for waste disposal:
- Packaging and packaging aids are recyclable and should principally be recycled.
Packaging materials, such as a plastic bag, must be kept away from children.
- Batteries, including those which are heavy metal-free, should not be disposed of with household waste. Please dispose of used batteries in an environmentally
friendly manner. Find out about the legal regulations which apply in your area- Do not try to recharge batteries, can have a danger of explosion. Replace batteries only with the same or equivalent type.
This symbol on the product or on its packaging means that your electrical device should be disposed at the end of its service life, separately from your household wastes. There are separate collection systems for recycling in the EU. For more information, please contact the local authority or the dealer where you purchased the product.

Symbol for equipment

Symbol for batteries
Disconnecting the Device
The mains plug is used to disconnect the device from the mains and therefore it must remain readily operable.
Headphone Volume
In your device has headphones jack, please note that excessive sound pressure from earphones and headphones can cause hearing loss.
Installation
To prevent injury, this device must be securely attached to the wall in accordance with the installation instructions when mounted to the wall (if the option is available).
Warning:
Do not leave your device in standby or operating mode when you leave your house.

The Standby / On button does not fully switch off this product. Moreover the device continues to consume power in standby mode. In order to separate the device completely from mains, the mains plug has to be pulled from the mains socket. Because of that the device should be set up in a way, that an unobstructed access to
the mains socket is guaranteed, so that in case of emergency the mains plug can be pulled immediately. During periods of prolonged non-use, the device should be disconnected from the mains power supply.
Electrical device not in the hands of children
Never let children use electrical devices unsupervised. Children cannot always recognize any possible dangers. Batteries / accumulators can be life threatening when swallowed. Store batteries out of the reach of children. In case of swallowing a battery, medical aid has to be sought immediately. Also keep the packaging away from children as there is danger of suffocation.
3. IN THE CARTON
TV SET

Remote Control
USER'S MANUAL
User's Manual
1.5V
1.5V
AAA Batteries
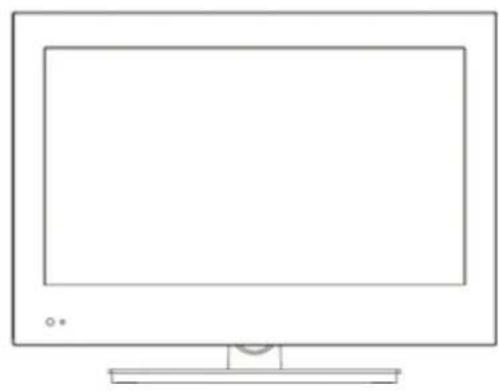
4. FRONT & BACK CONNECTIONS OF LED
Front View
(Pictures are for reference only.)
(The sample is subject to the real product.)
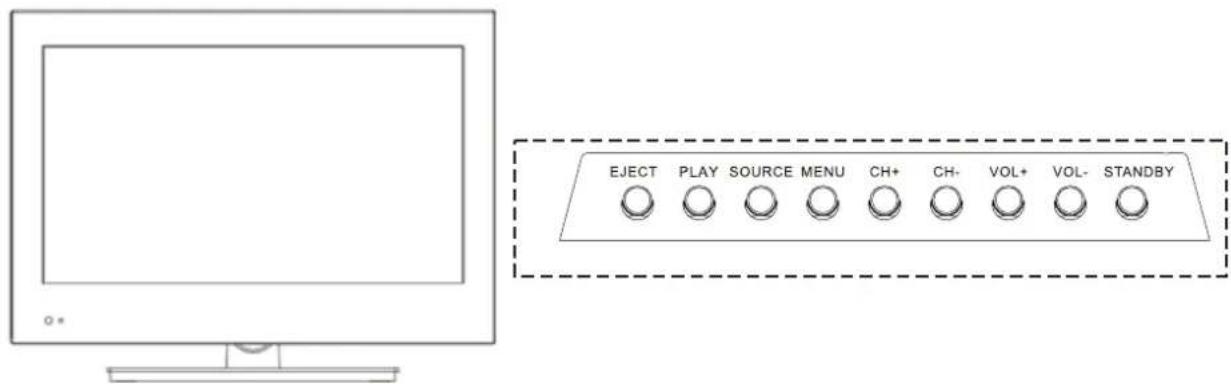
- Press"EJECT" to eject DVD disc.
- Press"PLAY" to play DVD disc.
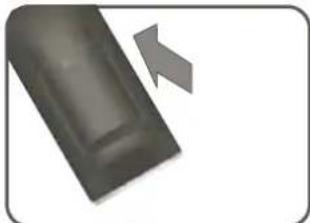
- Press"SOURCE"to select the input source.
- Press "MENU" to bring up the main menu on the screen.
- Press "CH+" or "CH-" to change channels.
- Press "VOL+" or "VOL-" to increase or decrease the sound level.
- Press "POWER" button to turn standby mode on or off.
- ON/OFF LED Indicator: Shows red in standby mode and green while your TV is turned on.
- IR Sensor: Infrared sensor for the remote control.
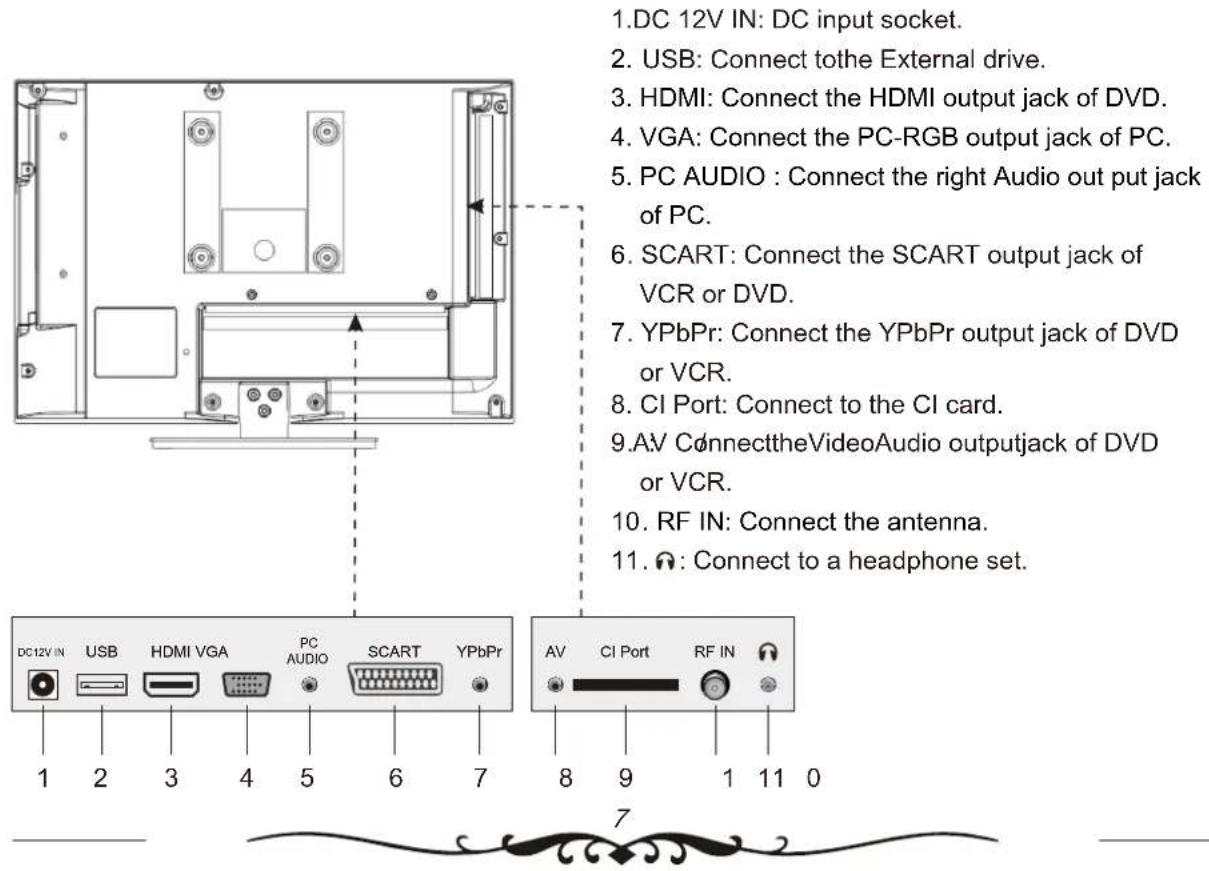
Back View and Control Connections
5. TV INSTALLATION DRAWINGS
Power Cord Connection
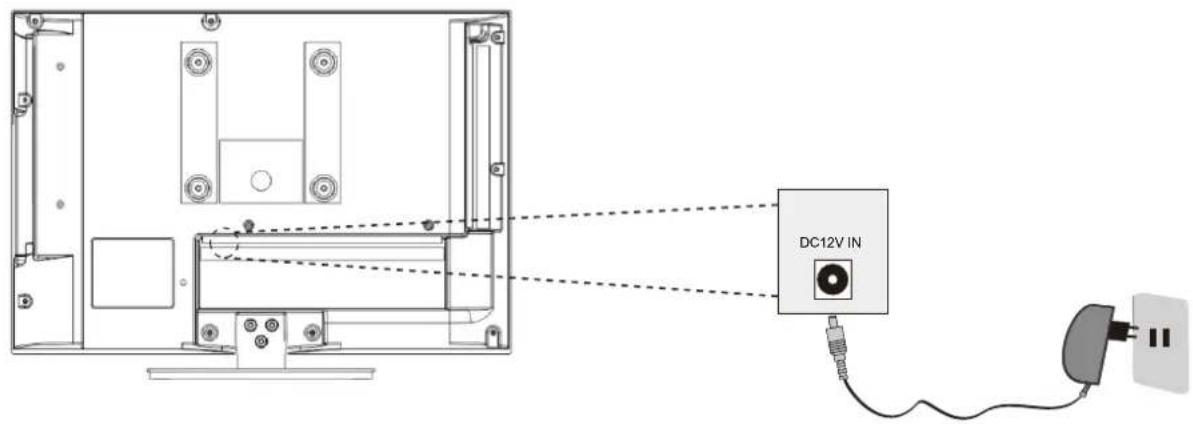
- Connect the power cord correctly as shown.
- Press the POWER switch of your LED TV to switch on the LED TV.
The power indicator on the front panel lights up in Green or Blue.
Antennas Connection
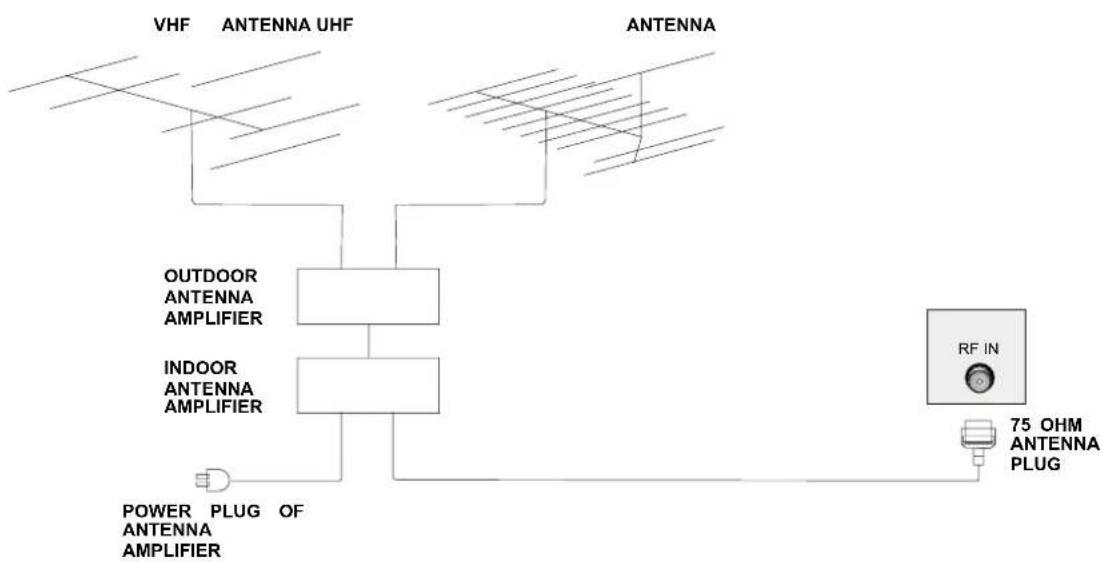
To ensure good picture and sound, TV antenna system needs to be installed. The antenna system as Shown can be soured from TV equipment shops, which will provide service for correct installation and connection. After installation, insert the 75-ohm antenna plug into the antenna jack as shown.
HDMI Connection
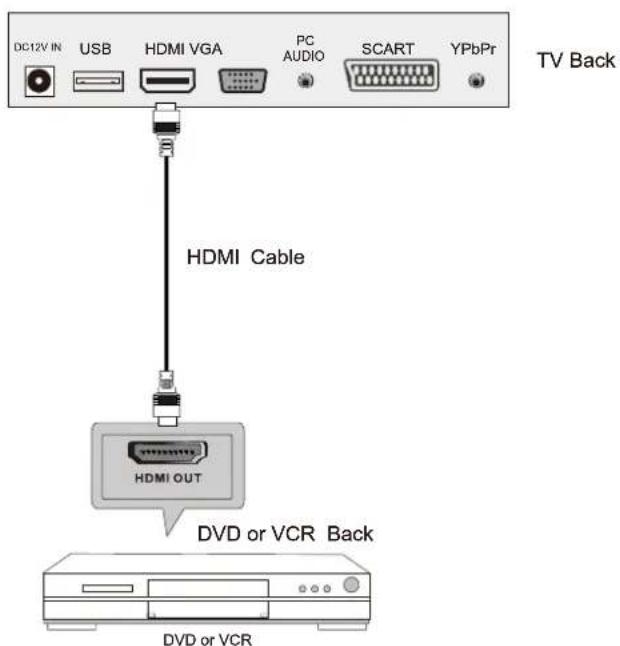
The HDMI input connection enables the digital transfer of audio/video/control signals through one cable only.
VGA Connection
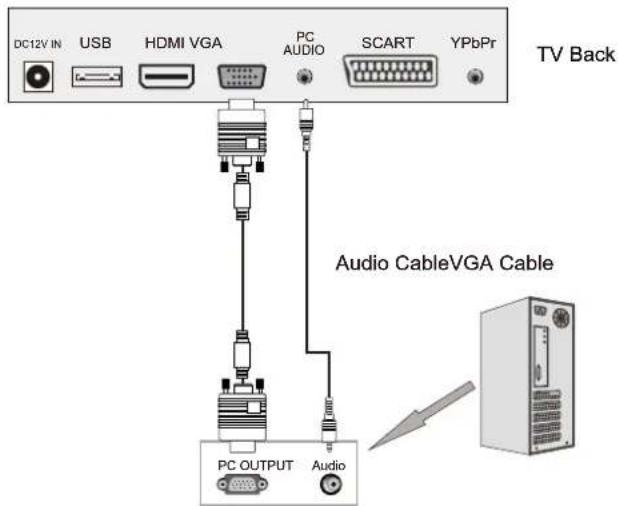
Connect the RGB output of the PC to the VGA jack on the set. Connect the AUDIO output of the PC to the PC AUDIO jack on the set. Select the VGA input source with using INPUT button on the remote control.
USB Connection
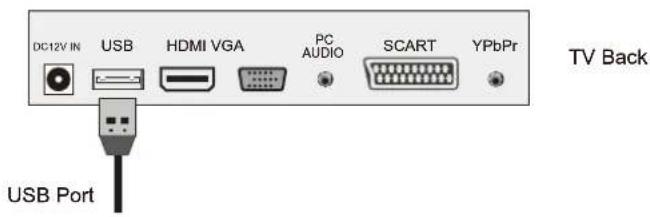
Insert the USB flash drive to the USB port. Select USB channel source via the SOURCE button on the remote control.
SCART Connection
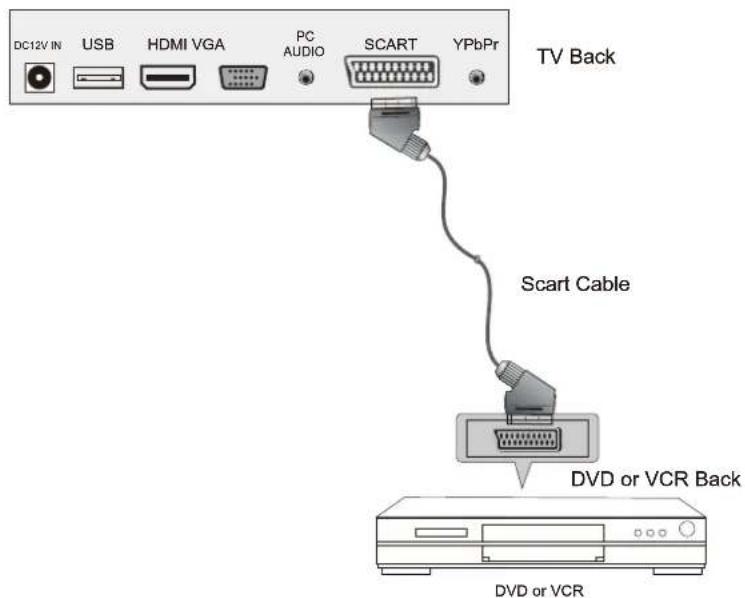
Connect the SCART connector to the external video item and the SCART connector on the tv. The SCART lead operates as an Input/Output connection. If the tv does not select the SCART input automatically, select SCART using the INPUT button on the remote control or tv.
Earphone Connection
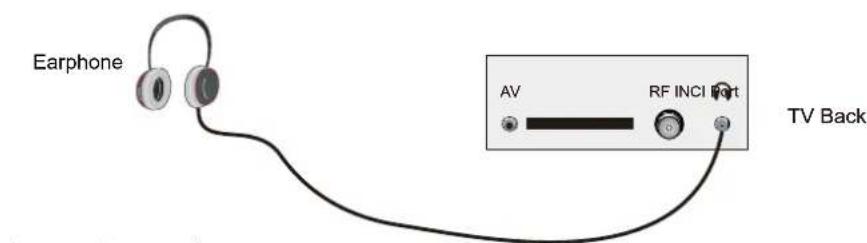
Connect to earphone.
AV Connection
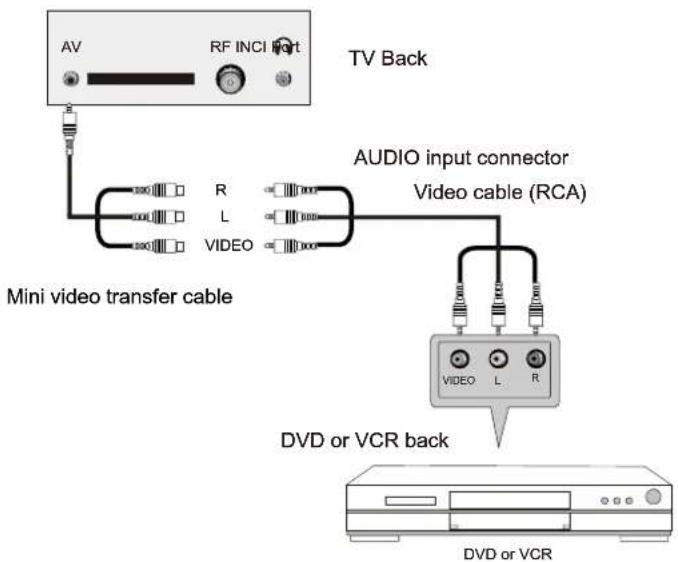
Connect the VIDEO and AUDIO output jack of the DVD or VCR to the VIDEO jacks on the TV set using the RCA cable. Match the jack colors: Video is yellow, Audio left is white, and Audio right is red. Select the AV input source via the SOURCE button on the remote control.
YPbPr Connection
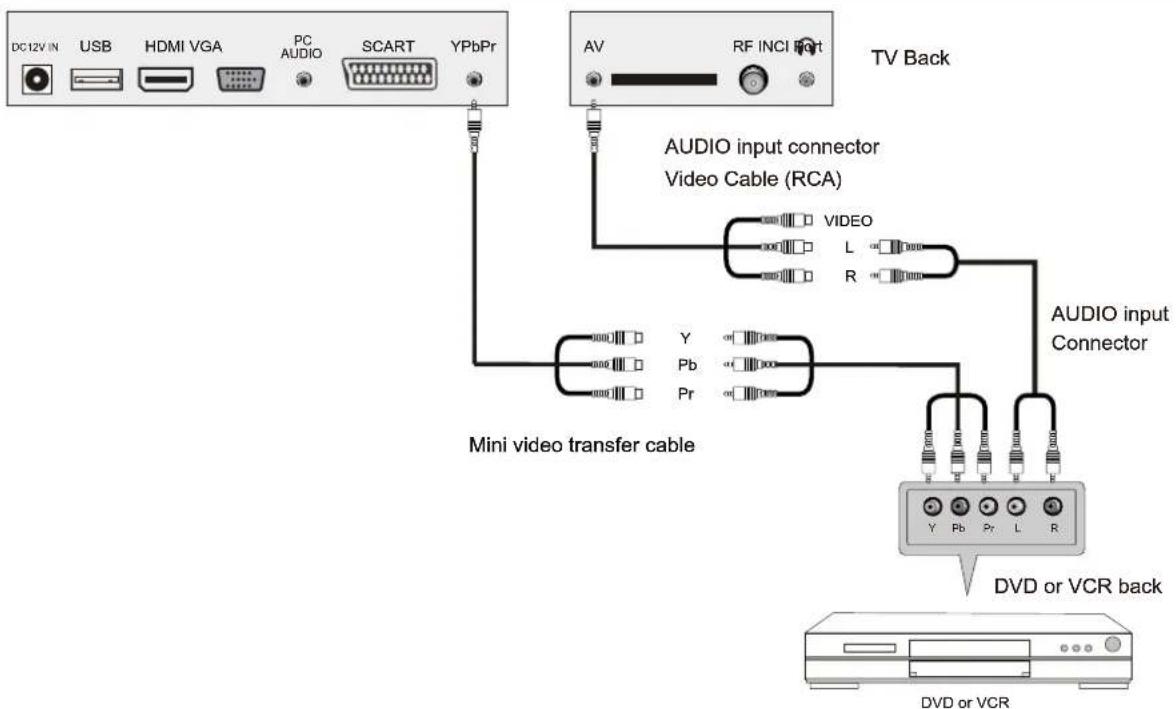
Connect the YPbPr output of the DVD or VCR to the YPbPr input on the TV set. Connect the Audio output of the DVD or VCR to the Audio input jacks on the TV set using the RCA cable. Match the jacks colors : Y is green, Pb is blue, Pr is red, Audio left is white and Audio right is red. Select Component input source via the SOURCE button on the remote control.
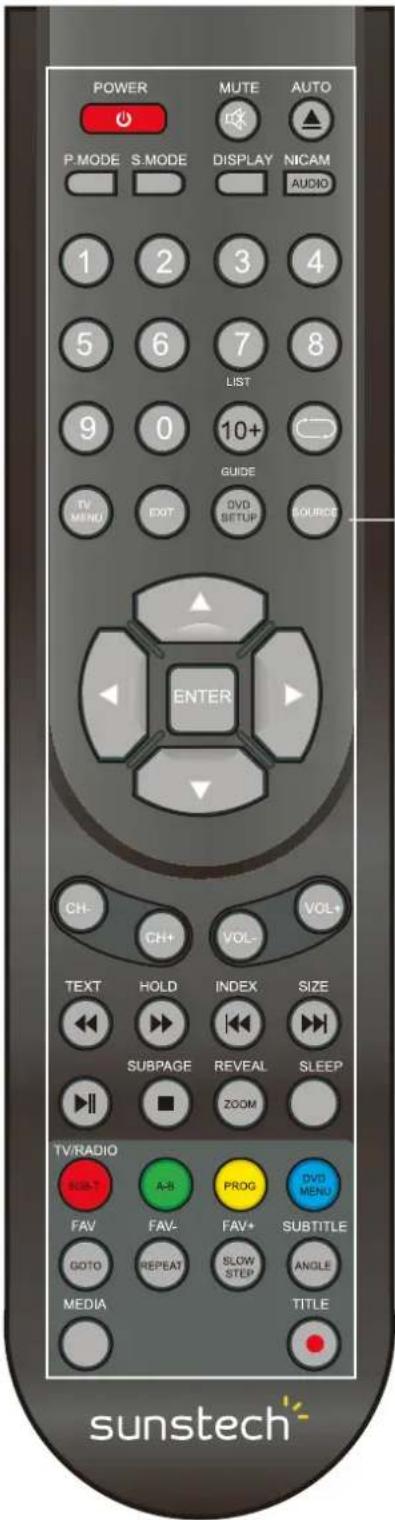
6. REMOTE CONTROL
Remote Control Instructions in DTV mode

POWER
Turn the LED TV ON or OFF.
MUTE
Press to mute the sound. Press again or press VOL+ to un-mute the TV.
AUTO
Press to do auto configuration directly(In VGA mode).
P.MODE
Press to select the picture modes.
S.MODE
Press this button to change the audio mode.
DISPLAY
Press to display the source and channel's information. NICAM
Press to select the NICAM modes.
AUDIO
Audio select button.
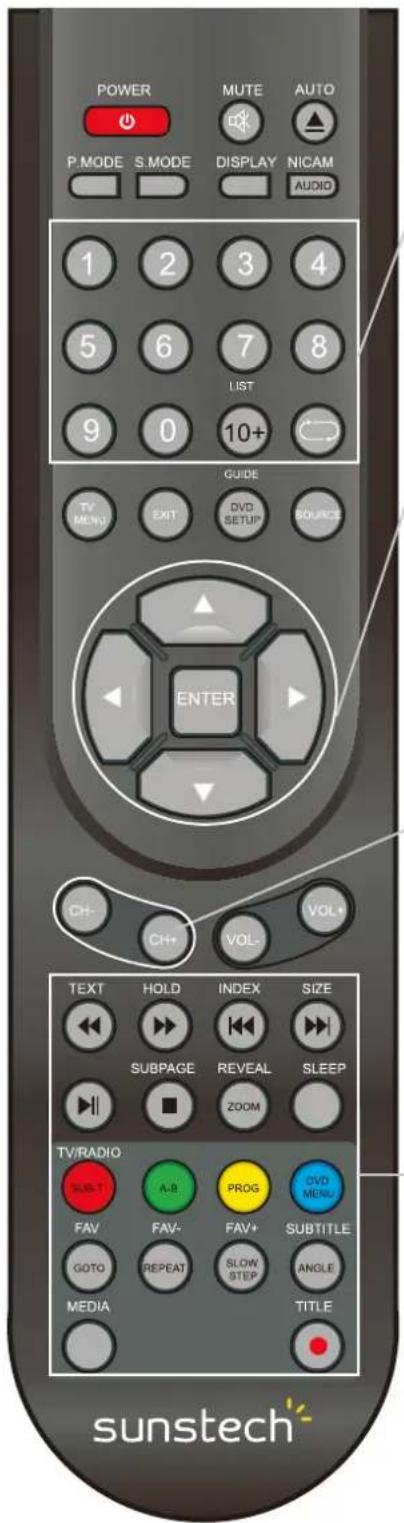
NUMBER BUTTONS
The numerical keys are used for editing the name of the channel.
Return to the previous channel viewed.
--
Press this button to enter Channel List.
TV MENU
Press to enter or exit the setup menu.
EXIT
Press to exit all the OSD on the screen.
GUIDE
Press to display the channel guide menu.
SOURCE
Press SOURCE to display the OSD input source, Press
to select an input source, and then press ENTER to confirm.
THUMBSTICK(▲/▼//Enter)
Allows you to navigate the on-screen menus and adjust the system settings to your preference.
CH+/CH-
Press to scan through channels.
VOL+VOL-
Press to increase/decrease the sound level.
Remote Control Instructions in DTV mode
Playing backward fast in timeshift mode.
Playing forward fast in timeshift mode.
(Timeshift)
Press to perform the Timeshift function.
NOTE:Select Time Shifting Mode "off" in the menu, then the "teletext" can be available.

Press to stop recording.
ZOOM
Zoom can change display size.
SLEEP
Lets you select amount of time before your TV turn itself off automatically.
Color button
Color buttons (respectively red, green, yellow and blue) used in a few sub-menus.
TV/RADIO
When watching a channel, allows you switch between TV and Radio modes.
FAV
Displays the selected favorite programmers.
FAV-
Displays the selected favorite down programmers.
FAV+
Displays the selected favorite up programmers.
SUBTITLE
In DTV mode, Press to select alternate subtitle languages during view/playback of a DTV program.

Record button.
Remote Control Instructions in Teletext/Media mode
NUMBER BUTTONS
Press 0-9 to select a teletext page.

Page up and page down.
CH+/CH-
Page up and page down.
SUBTITLE
In Teletext mode, press to display P.100.
TEXT
Switch on or off the teletext mode.
Select Time Shifting Mode "off" in the menu, then the
"teletext" can be available.
HOLD
Hold on or off for current page display.
SUBPAGE
Sub coded page access.
REVEAL
Reveal or hidden the hidden words.
Playing backward fast.
Playing forward fast.
INDEX
Request the index page.
SIZE
Change display size in teletext mode.
Skip backward button.
Skip forward button.
Press to pause the playback.
Press to stop playing.
ZOOM
Zoom can change display size.
SLOW
Slow in USB and DVD mode.
MEDIA
Press to display the MEDIA menu.
Color button
Color buttons (respectively red, green, yellow and blue)
used in a few sub-menus.
REPEAT
Repeatedly play the title or chapter continuous.
GOTO
It is possible to get access to any point on the directly
using the "GOTO" menu.
A-B
This button enables you to repeat a selected section.
Remote Control Instructions in DVD mode

To eject the disc.
DISPLAY
Press to display information about the current mode on the screen.
AUDIO
Audio select button.
DVD SETUP
Press to display the DVD setup menu.
Playing backward fast.
Playing forward fast.

Skip backward button.

Skip forward button.

Press to pause the playback.

Press to stop playing.
Number Buttons
Numerical buttons for various data.
ZOOM
Zoom can change display size.
SUB-T
To display subtitle in DVD mode.

This button enables you to repeat a selected section form the disc.
PROG
Program a disc playing in a desired sequence.
DVD MENU
DVD disc menu access to menu.
GOTO
Press GOTO to access the "GOTO" menu.
STEP
Step in DVD mode.
REPEAT
Press REPEAT to cycle through the repeat play options.
ANGLE
Angle test.
Remote Control Setup
- Open the cover.
- Use sthA size batteries.When inserting the batteries, make sure correct polarities + and - marks on the batteries line up correctly with compartment markings.
- Replace the battery cover
Place the remote control on a even surface and insert the supplied batteries into the remote control as follows.
- Softly push the back cover to open the battery compartment.
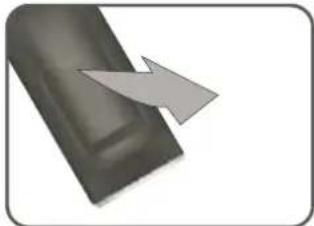
- Insert two batteries(1.5V size AA),pBatteriesake sure the polarity matches the marks inside the compartment.
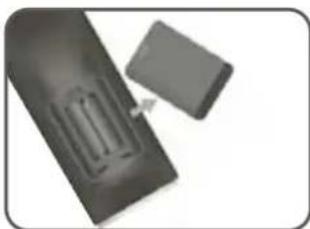
- Softly press the back cover to close it.
7. Menu Operation
Select Input Source
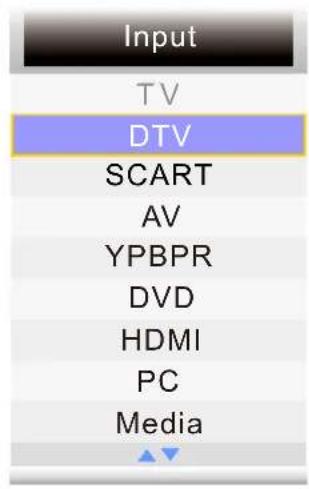
Press INPUT button to display the input source list;
Press / button to select the input source you want to watch;
Press OK button or button to enter the input source;
Picture Menu
Press MENU button to display the main menu.
Press / a button to select Picture in the main menu, then press OK button or button to enter.
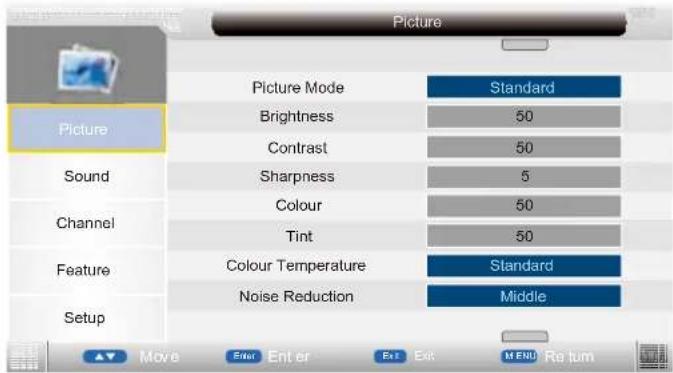
- Press / button to select the option that you want to adjust in the Picture menu, then press OK button or b button to enter.
- Press / button to adjust or press / button to select.
- After finishing your adjustment, Press MENU button to save and return back to the previous menu, and press EXIT button to exit the entire menu.
Picture Mode
Press / button to select Picture Mode, then press OK button or button to enter and press / button to select. Picture mode: Standard, Vivid, Soft, Optimal, User).
You can change the value of brightness, contrast, sharpness, colour, when the picture is inStandard mode.(You can press PICTURE button on the remote control to change the Picture Mode directly.) Brightness
Press / button to select Brightness, then press OK button or button to enter and press / button to adjust.
Contrast
Press / button to select Contrast, then press OK button or button to enter and press / button to adjust.

Sharpness
Press / button to select Sharpness, then press OK button or button to enter and press / button to adjust.
Colour
Press / button to select Colour, then press OK button or button to enter and press button to adjust.
Tint(Not available in DTV)
Press / button to select Tint, then press OK button to enter and press button to adjust. Colour Temperature
Press / button to select Colour Temperature, then press / button to select standard, warm, cool.
Noise Reduction
Press / button to select Noise Reduction, then press / button to select Off, Low, Middle, High.
Reset
Press / button to select Reset, then press OK button or button to enter to reset sub-menu.
Sound Menu
Press MENU button to display the main menu.
Press / a button to select Sound in the main menu, then press OK button or button to enter.
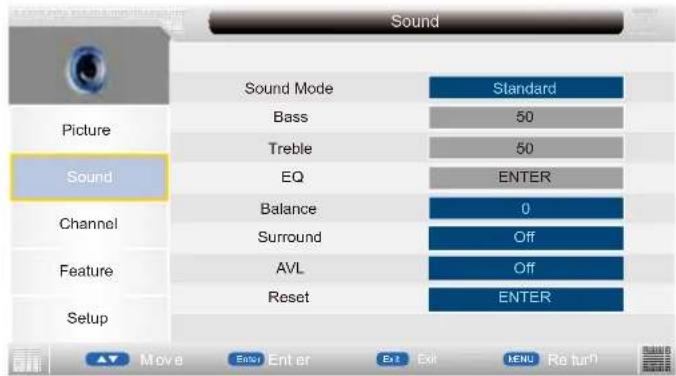
- Press / b utton to select the option that you want to adjust in the Sound menu, then press OK button or b utton to enter.
- Press / button to adjust or press / button to select.
- After finishing your adjustment, Press MENU button to save and return back to the previous menu, and press EXIT button to exit the entire menu.
Sound Mode
Press / button to select Sound Mode, then press / button to select. (Available Sound mode: User, Speech, Music, Movie, Standard).
You can change the value of bass and treble, Balance, when the sound is in Standard mode.
TIPS: You can press SOUND button on the remote control to change the Sound Mode directly.
Bass(Available just in USER Mode)
Press / button to select Bass, then press OK button or button to enter and press / button to adjust.
Treble(Available just in USER Mode)
Press / button to select Treble, then press OK button or button to enter and press / button to adjust.
EQ/Balance/Surround
Press / button to select EQ/Balance/Surro und, then press OK button or button to enter and press button to adjust.
AVL
Press / button to select Auto Volume Level, then press / button to select On or Off.
Reset
Press / button to select Reset, then press OK button or button to enter to reset sub-menu.
Channel Menu
Press MENU button to display the main menu.
Press / button to select Channel in the main menu, then press OK button or button to enter
- Press / b utton to select the option that you want to adjust in the Channel menu, then press OK button or b utton to enter.
- Press / button to adjust or press / button to select.
- After finishing your adjustment, press MENU button to save and return back to the previous menu, and press EXIT button to exit the entire menu.
Channel Management
Press / button to select Channel Management, then press OK button or button to enter.
Favorite Manager
Press / button to select Favorite Manager, then press OK button or button to enter.
Press red button to set the current channel to lock. If the current channel already lock, press red button again will unlock.
Press green button to set the current channel to delete. if the current channel already delete, press green button again will delete cancel.
Press yellow button to skip the current channel.
Use the cursor buttons to select the channel you wish to skip. Press yellow button and will be shown at the channel selected. To remove the skip function, press the yellow button again.
If one of the stations has been incorrectly placed in the station listing, you may move it to the correct position. Using the cursor select the channel to be moved, press blue button, move the station to the new location and press OK button, this will move the station to the new location.
If there is delete channel logo, press EXIT button or OKbutton, the menu will appear as follows:
Pass by defect "0000"
Delete the selected items if select "Yes" and press OK button. Otherwise cancel to delete the selected items. After a few second, the menu will appear as follows:
Press Ok button to turn to the previous page, press button to turn to the next page.
Press / button to select channel, then press OK button to enter the rename channel menu.

Note: Channel name is 8 characters.
Press green button to switch the size of the letters.
Press / or / button to select the character, then press OK button to confirm selection.
Press EXIT button, the menu will appear as follows:
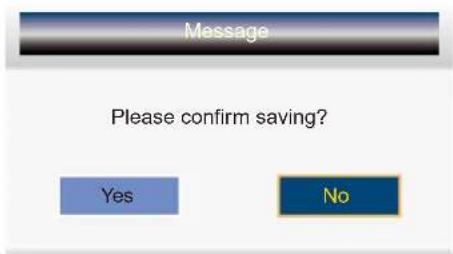

Exit the entire menu if select "No" and press OK button.
Save successful if select "Yes" and press OK button.
Favorite Manager
Press / a button to select Favorite Manager, then press OK button or button to enter.
Press / button to select Channel, press red button to set to Fav1.
Press / button to select Channel, press green button to set to Fav2.
Press / button to select Channel, press yellow button to set to Fav3.
Press / button to select Channel, press blue button to set Fav4.
If the current channel already be one of your favorite channel, press red / green / yellow / blue button again will set it to a normal channel.
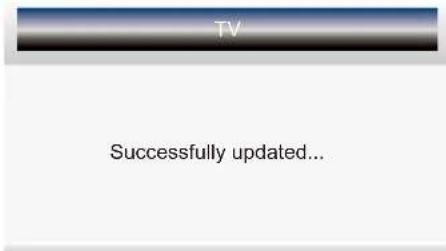
Press MENU button or EXIT button, the successfully updated menu will appear.
Country
Press / button to select Country, then press OK button or button to enter and press / button to adjust.
Auto Search
Press / button to select Auto Search, then press OK button or button to enter
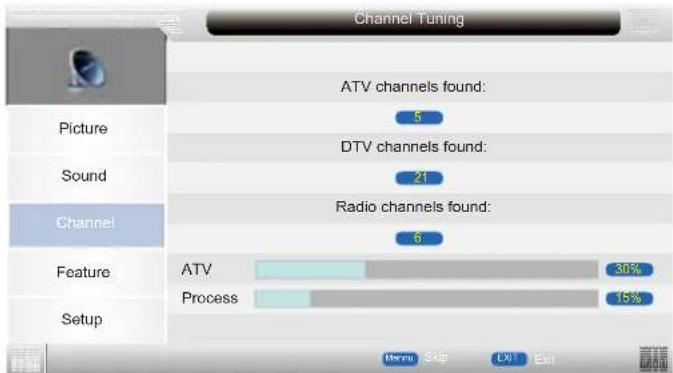
When auto search finish, the save successful menu will appear a few second.
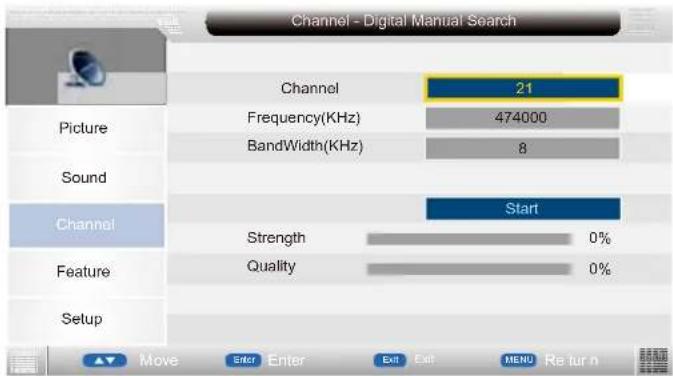
Digital Manual Search
Press / button to select Digital Manual Search, then press OK button or button to enter.
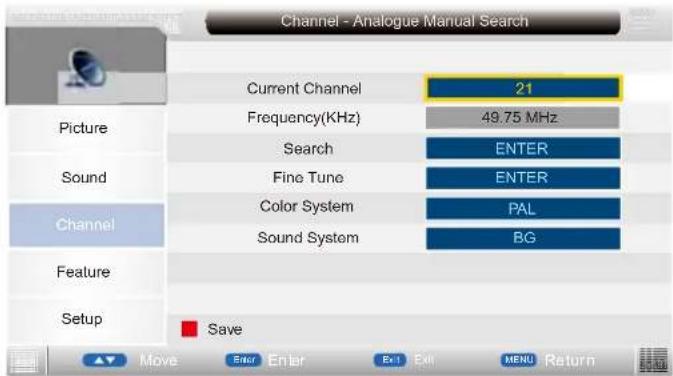
Analogue Manual Search
Press / button to select Analogue Manual Search, then press OK button or button to enter
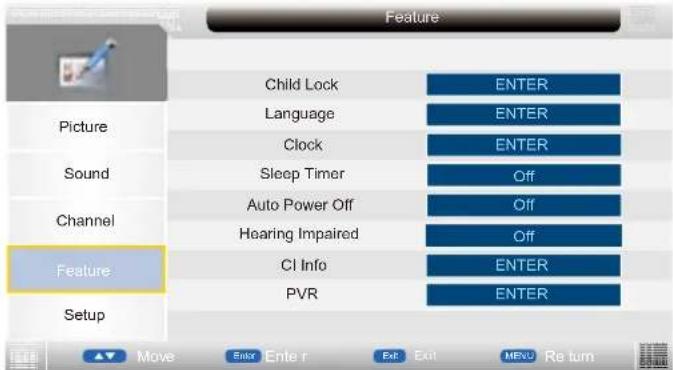
Feature Menu
Press MENU button to display the main menu.
Press / button to select Feature in the main menu, then press OK button or button to enter.
-
Press / button to select the option that you want to adjust in the Feature menu, then press OK button or b button to enter.
-
Press / button to adjust or press / button to select.
- After finishing your adjustment, Press MENU button to save and return back to the previous menu, and press EXIT button to exit the entire menu.
Child Lock
Press / button to select Lock, then press button to select On or Off(when the default lock is on, please input the default password"0000").
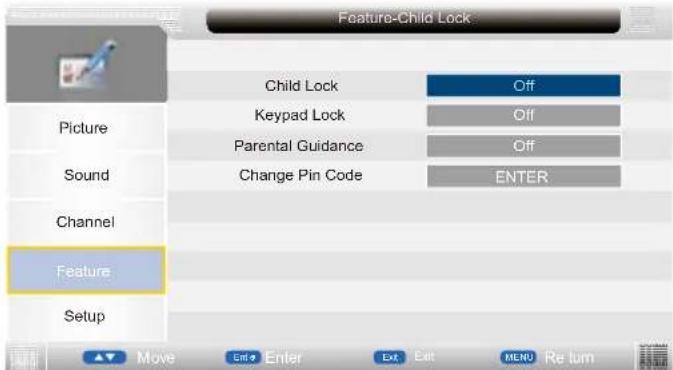
Keypad Lock: Press / button to select Keypad Lock, then press OK or enter and press / button to select.
Parental Guidance : Press / button to select Parental Guidance, then press OK or enter and press / button to select.
Change Pin Code : Press / button to select Change Pin Code, then press OK button or button, change pin code menu will appear as follows:
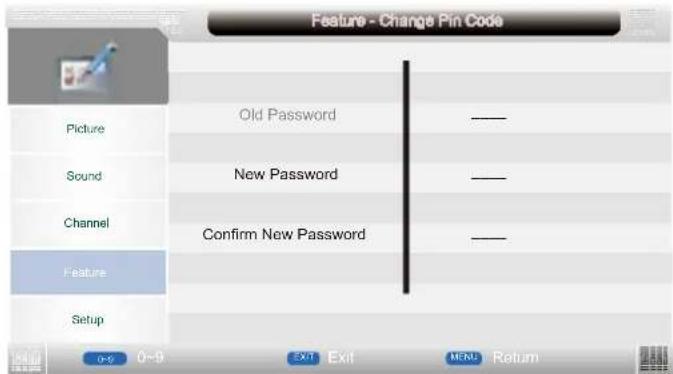
Input old password at "Old Password", if the old password is incorrect, the password will not be allowed to modify.
Input new password at "New Password".
Input new password again at "Confirm New Password". if new password and confirm new password consistent, the successfully updated menu will appear a few seconds. otherwise, the menu will display the password mismatch.
If the original password is changed, the user most have special attention in kept the new passwords save in case of lost this issue wont be admitted as a defect or failure.
Language
Press / button to select Language, then press OK button or button to enter submenu.
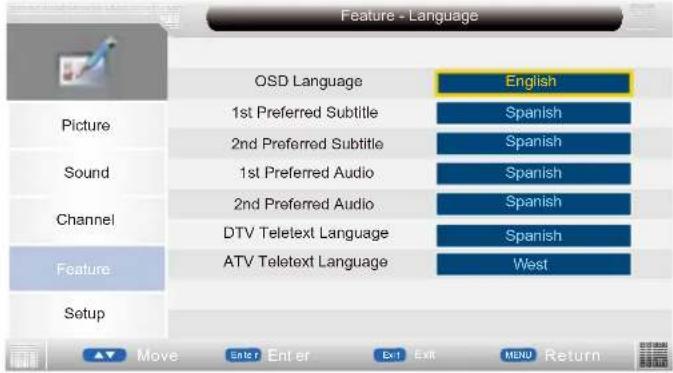
OSD Language :Press / button to select OSD Language, then press OK or enter and press / button to adjust.
1st/2nd Preferred Subtitle: Press / button to select 1st/2nd Preferred Subtitle, then press OK or Enter and press / button to adjust.
1st/2nd Preferred Audio: Press / button to select 1st/2nd Preferred Audio, then press OK or enter and press / button to adjust.
DTV Teletext Language: Press / button to select DTV Teletext Language, then press OK or enter and press / button to adjust.
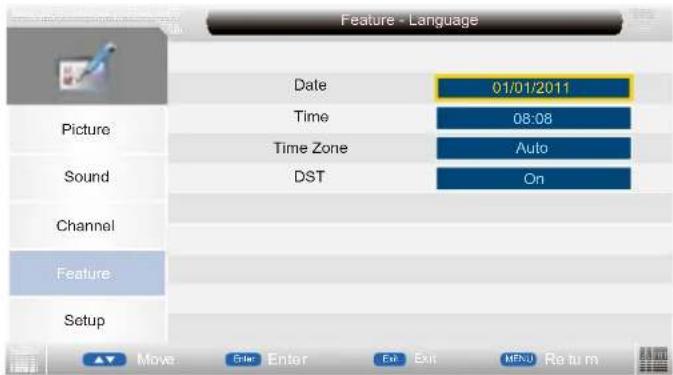
ATV Teletext Language: Press / button to select ATV Teletext Language, then press OK or Enter and press / button to adjust. Clock
Press / button to select Clock, then press OK button or button to enter submenu.
Sleep Timer
Press / button to select Sleep Timer, then press OKor enter and press / button to select the 15Mins, 30Mins, 45Mins, Off ...etc..
Auto Power Off
Press / button to select Auto Power Off, then press OK or enter and press / button to select the 1Hour, 2Hours, 3Hours 4Hours and Off.
Hearing Impaired
Select the On/Off.
CI Info
Display the Common Interface card information.
PVR/Timeshift
This function is only available under DTV mode and includes Record, Timeshift and playback functions.
ADD NOTE: If the external recorder fed via USB is an HDD, we recommend that connexion cable don't be longer than 60cms and the max capacity of the HDD should be 1TB
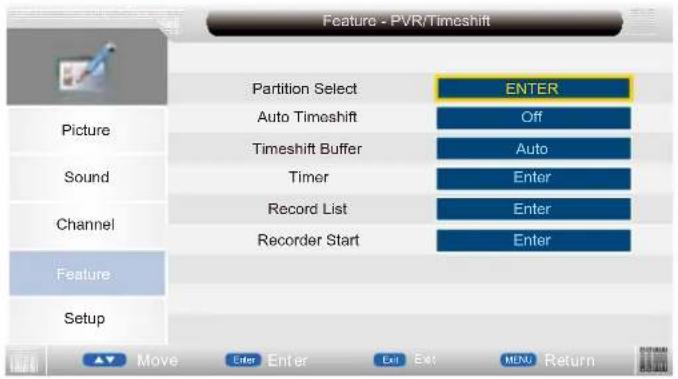
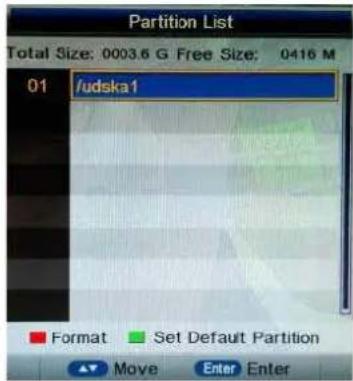
Partition Select: Press OK button enter the submenu, then press / button to select partition.
Auto Timeshift: Select the Auto/Off (Stop auto Timeshift).(Start auto Timeshift)
Timeshift Buffer: Select the Auto, 30Mins, 1hr or 2hr.
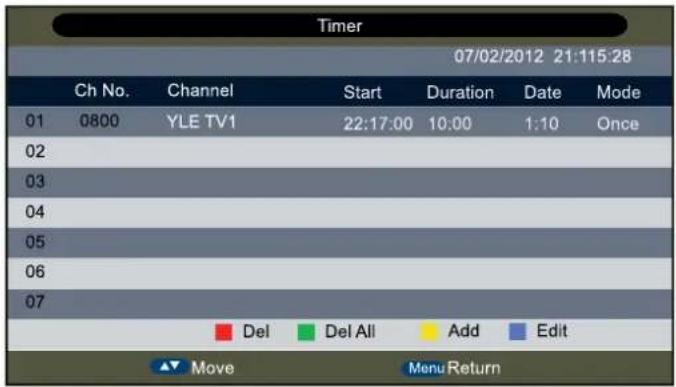
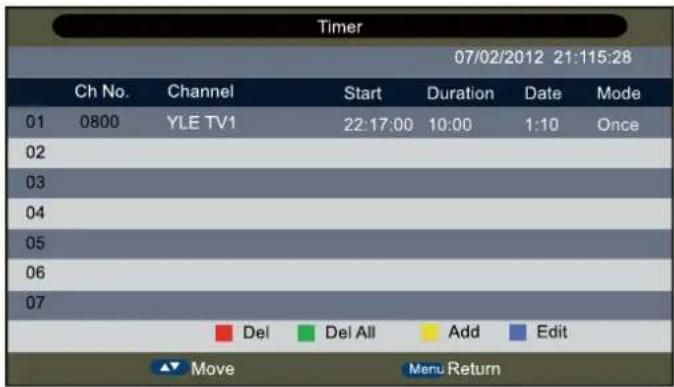
Timer
Information: Timer menu manages the preengaged programs, user can add delete preengaged programs in this menu.
Record List
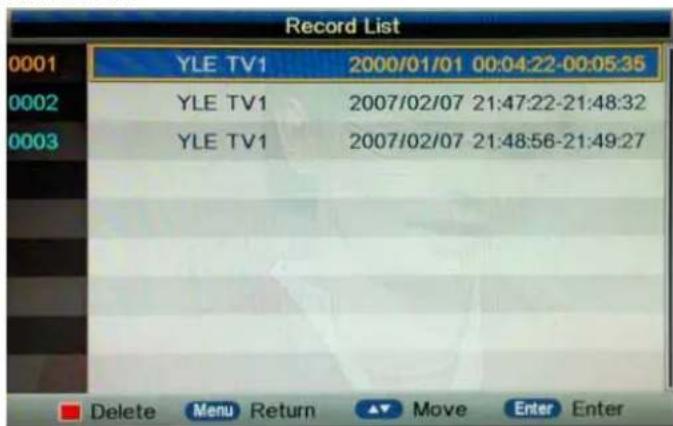
Press OK button to enter the record list menu.
Press red button to delete any program.
Press Info button to display program information.
How to user Record
A. Direct Record
B. Subscribe Record
Direct Record
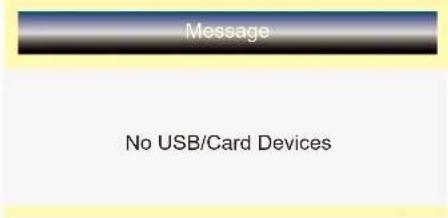
- In the DTV source, you can start record function by press the "REC" key while program playing. Before that, you have to make sure the USB storage device is inserted and the device checking and Initialization is done.
If you press "REC" key when there's no USB storage device inserted, the prompt window will appear as follow.
Message
No USB/Card Devices
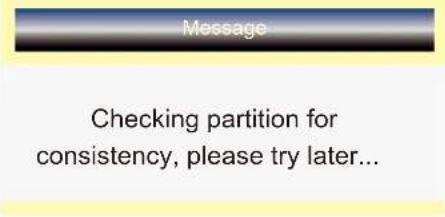
If you press "REC" key during the device checking and Initialization, the prompt window will appear as follow.
Message
Checking partition for consistency, please try later...
- After record started, you can press "REC" key to set duration time, when the duration time is over, the record will auto stop.
REC
Rec Duration Time

- You can also press "DISPLAY" key to open the detail status prompt window to see how many space left on the USB storage device.
REC

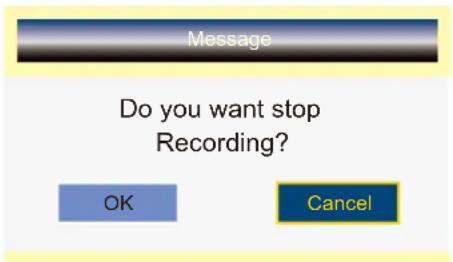
- You can press "STOP" key to stop record function after confirm.
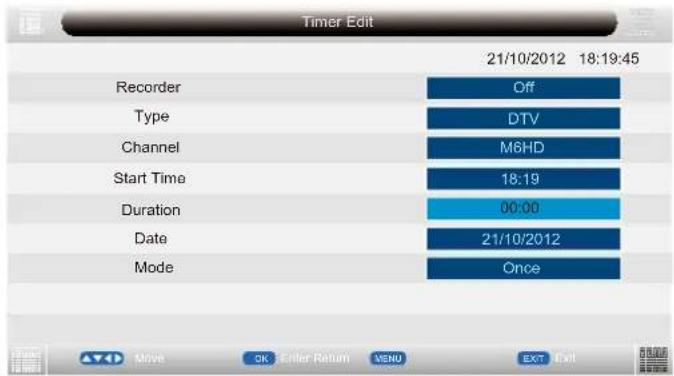
Subscribe Record
- In the DTV source, you can enter the Timer menu set the Subscribe Record.
Press the "YELLOW"key to add the record task.
The Way: Main menu---->Feature---->PVR---->Timer
- If you enter the Timer Edit menu, you can set the record task that you want to record.
-
When you success to set the record task, if the TV is standby mode, it will auto power on when three minutes before the start of the task.
-
When the record task time is start, It will auto record, but you must check you USB storage device inserted and it is enough speed to record. Otherwise the task will failure.
-
The TV enter false standby mode when the task is start, you can press the "POWER" key to watch the TV program. You can do same operation as Direct Record. When you press "POWER" again, if the task is not over, the TV will power off the panel and continue to record. The TV will real power off until the record task is over.
-
When you open the EPG menu, select the different times of the TV programs, and press the GREEN button, the subscribe record will be auto setting.
Note: Record function will stop when there's no space left on the USB storage device.
How to user Timeshift
- In the DTV source, you can start timeshift function by press the "PLAY/PAUSE" key while program playing. Before that, you have to make sure the USB storage device is inserted and the device checking and Initialization is done.
If you press "PLAY/PAUSE" key when there's no USB storage device inserted, the prompt window will appear as follow.
If you press "PLAY/PAUSE" key during the device checking and Initialization, the prompt window will appear as follow.
- After timeshift started, you can press "PLAY/PAUSE" key to pause or play the program, you can press "FAST BACKWORD/ FAST FORWORD" key to achieve the functions, the timeshift status prompt window will appear on the upper left corner of the screen. The display time means how long the current picture delays. You can also press "DISPLAY" key to open the detail status prompt window to see how many space left on the USB storage device.

- you can press "STOP" key to jump to the realtime broadcast of the program, and another press of "STOP" key, you can stop timeshift function after confirm.

Note: Timeshift function will stop when there's no space left on the USB storage device.
Setup Menu
Press MENU button to display the main menu.
Press / button to select Setup in the main menu, then press OK button or button to enter
- Press / button to select the option that you want to adjust in the Setup menu, then press OK button or button to enter.
- Press / button to adjust or press / button to adjust.
- After finishing your adjustment, Press MENU button to save and return back to the previous menu, and press EXIT button to exit the entire menu.
OSD Timer
Press / button to select OSD Timer, then press OK or enter and press / button to adjust. Auto SCART
Select the On/Off.
PC Setup(Select the source in PC)
Auto Adjust: Press / button to select Auto Adjust, then press button, the menu will appear a few second.
H Position: Press / button to select H Position, then press button to enter and press button to adjust. Adjusts the picture horizontally.
V Position: Press / button to select V Position, then press button to enter and press button to adjust. Adjusts the picture vertically.
HDMI Mode
Press / button to select HDMI Mode, then press OK or enter and press / button to adjust. Blue Screen
Press / button to select Blue Screen, then press OK or enter and press / button to select On/Off.
Aspect Ratio
Press / ▲ button to select Aspect Ratio, then press OK or enter and press / ▲ button to adjust. Reset TV Setting
Press / button to select Reset TV Setting, then press OK or button enter the password menu will appear(when the child lock is on).
Auto Installation
Press / button to select Auto Installation, then press OK button or button to enter the auto installation menu.
Software Upgrade
Press / button to select Software Upgrade, then press OK button or button to enter the software upgrade menu.
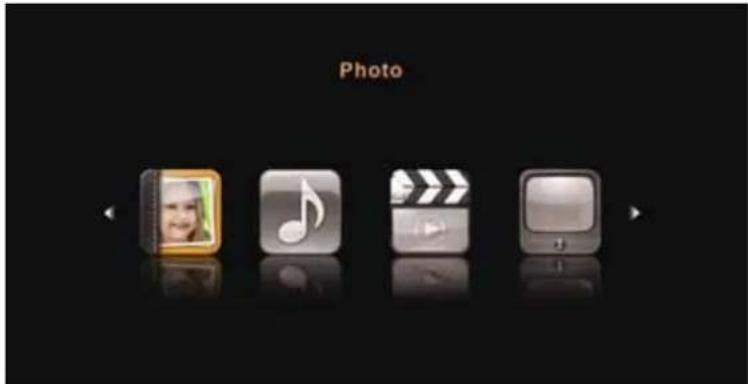
Media Menu
Note: Before operation MEDIA menu, Plug in USB device or memory card, then press SOURCE button to set the Source to Media.
Press / button to select MEDIA in the Source Menu, and then press ENTER or to enter. You can also enter the Media by pressing MEDIA button on the remote control.
Photo Menu
Press button to select Photo in the main menu, then press ENTER button to enter. Press EXIT button to return back to the previous menu.
- Press button to select the option that you want to adjust in the Media menu, then press ENTER or button to enter.
- Press / button to adjust or press / button to select.
- After finishing your adjustment, press MENU button to save and return back to the previous menu and press EXIT button to exit the entire menu.
Press / to select the photos, press ENTER or button or button to view.

Exit
Exit playing,enter previous menu.
Full screen playing of photos.
Stop playing, enter list menu.
Play previous file.
▶
Play next file.
You can see the information of the current playing photo after press INFO button, then press button to play or pause, you can see the playing state in the right.
Then press / or / button to ratite the picture.
Notes: Other menu and description are the same as that for Movie menu.
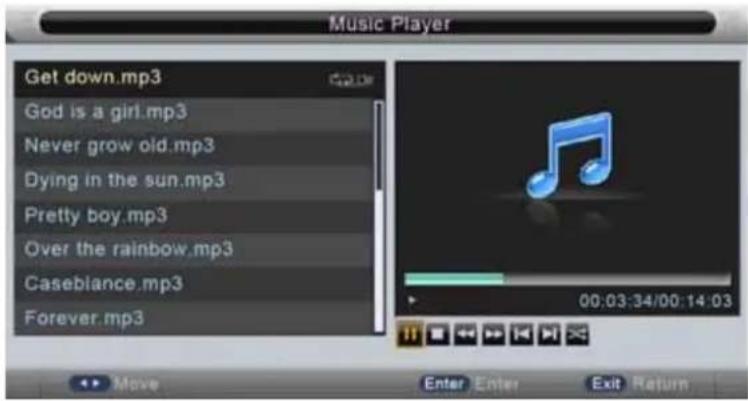
Music Menu
Press to select Music in the main menu, then press ENTER button to enter.
Press EXIT button to return back to the previous menu.
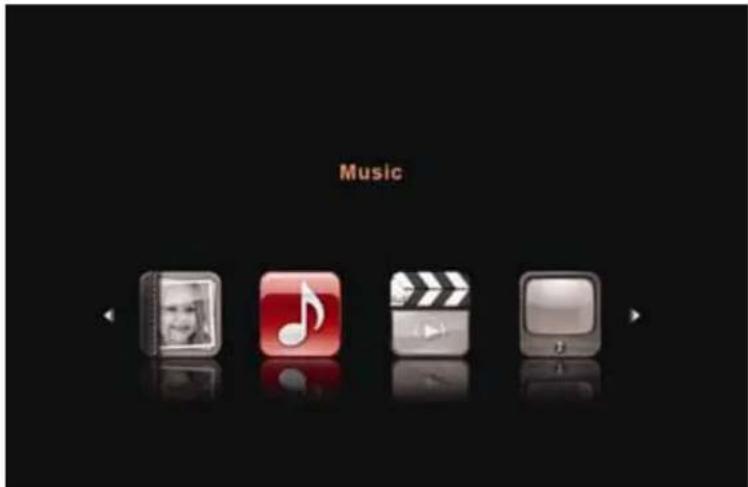
Press button to select the sonny you want to listen, and then press ENTER or button to play.
Press Bxton to return back to the previous menu.

You can see the information of the current playing sonny at the left of the menu.
Move Menu
Press button to select Movie in the main menu, then press ENTER button to enter. Press EXIT button to return back to the previous menu.
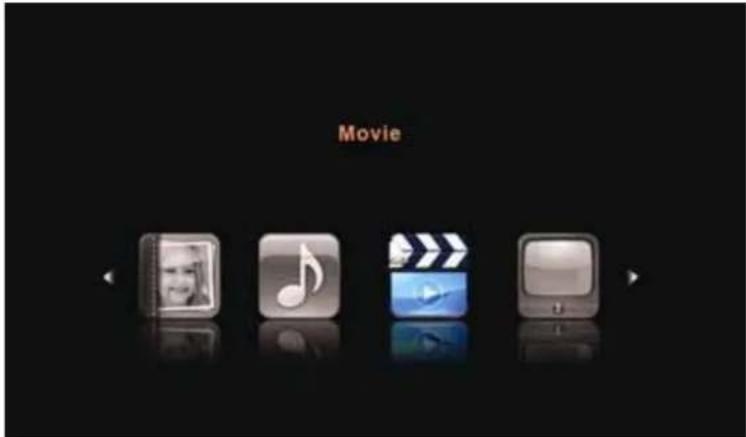
Press button to select the folder that you want to view. Press ENTER button to select the sub folder.
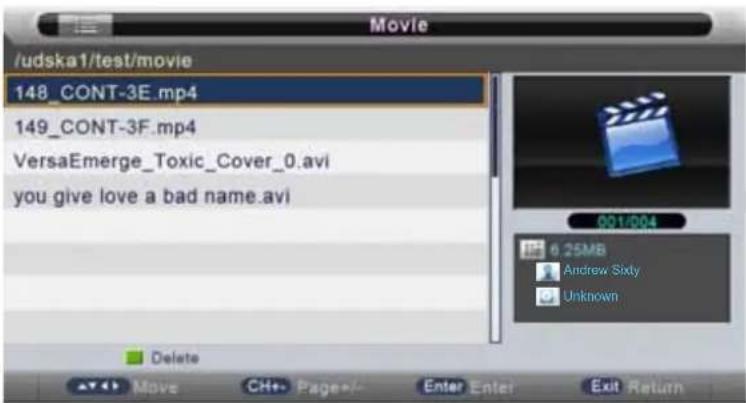
Press ENTER button or button to play.
Press button or EXIT button to stop playing.
Press the button to return back to previous page.
You can see the information of the current playing media at the first flew second or after press
INFO button.
PVR Menu
Press button to select PVR in the main menu, then press ENTER button to enter.
Press EXIT button to return back to the previous menu.
Press / to select the Video, press ENTER or button or button to play.
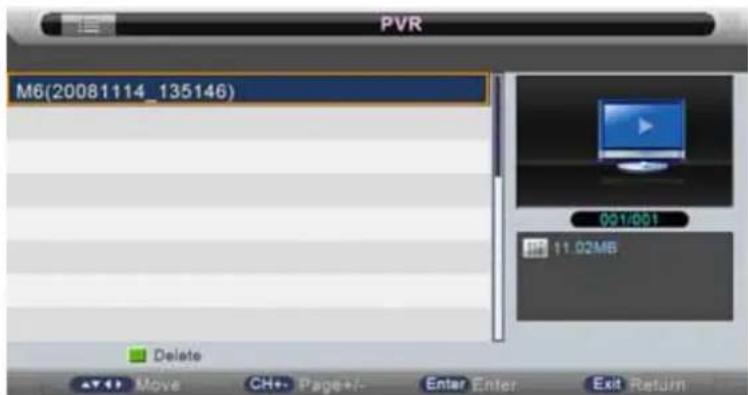
You can see the information of the current video playing at the first few seconds or after press INFO button.
Then press button to play, you can see the playing state in the right.
Notes: Other menu and description are the same as that for Movie menu.
8.DVD Operation
Press SETUP button on the remote the display the setup menu.
Press Abuton to select General Setup Page.
Press I button to select the desired item.
Press button to enter sub menu.
Press / button enter upper menu.
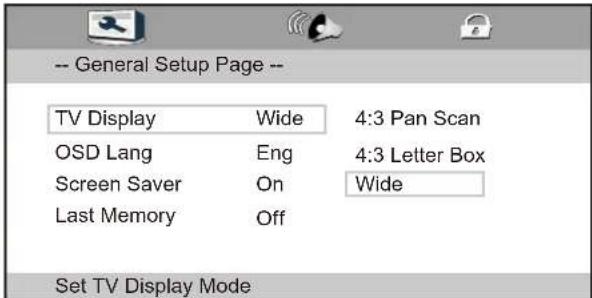
General Setup
TV Display
Press / button to enter sub menu, the press
/ select 4:3 Pan Scan/4:3 Letter Box and Wide.
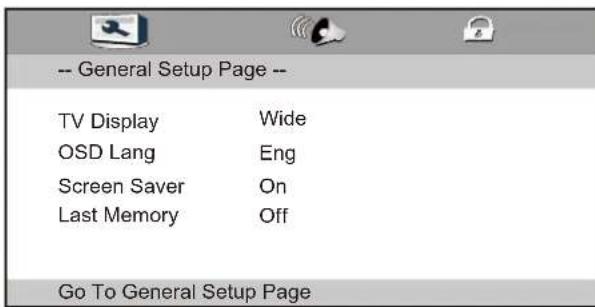
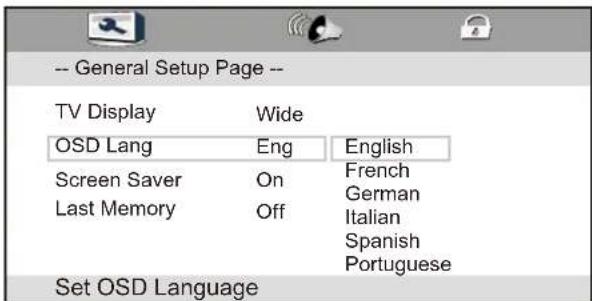
OSD Lang
Press select the language, Press ENTER button to save operation.
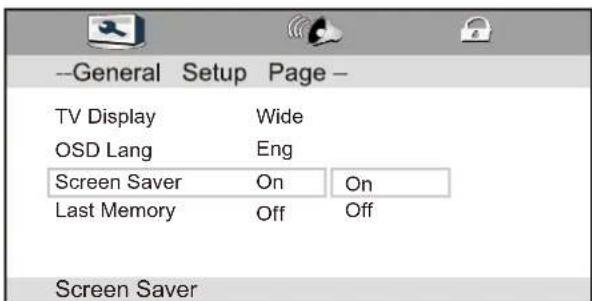
Screen Saver
Press select screen saver mode.
Select "ON" to start the screen saver.
Select "Off" to remove the screen saver.
When choosing "ON" the screen saver image will appear on the screen when the player stops or a picture is frozen without any operation after few minutes. The screen saver can keep the screen from being damaged.
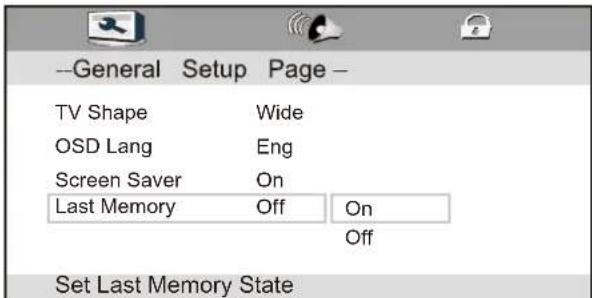
Last Memory
Please select your desired mode.
On: Press open button when you watch a DVD, it can play go on to the brENTERen segment if you close the player.
Off: No memory function.
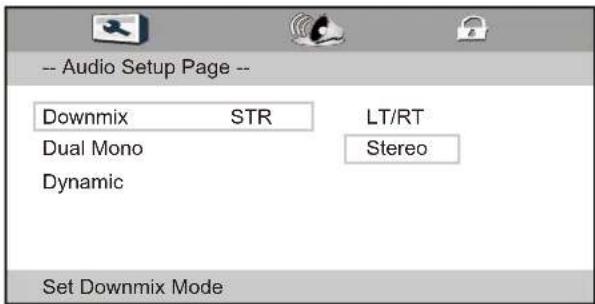
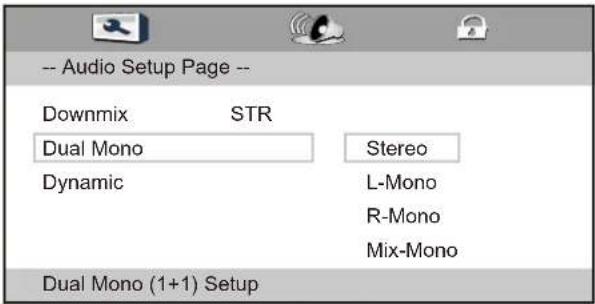
Audio Setup
Downmix
Press Abton to select the downmix.
You can select: LT/RT
Stereo
Dual Mono
You can select: Stereo
L-Mono
R-Mono
Mix-Mono
Dynamic
You can adjustment.

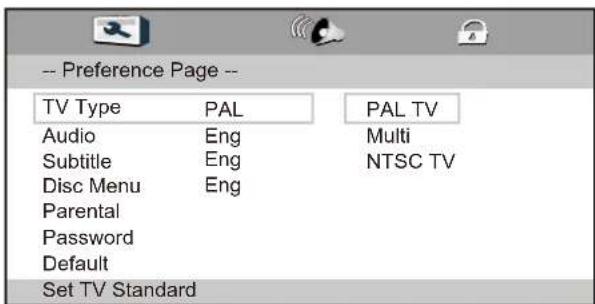
Preference Set
TV Type
Press select the TV Type, Press ENTER button to save operation.
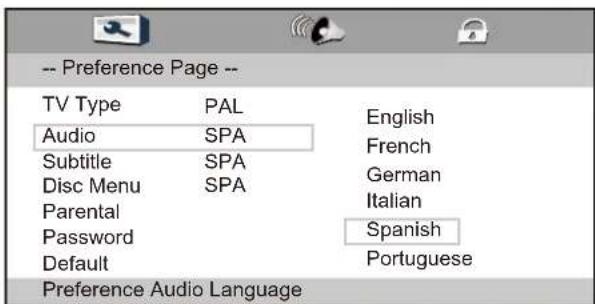
Audio
Press select the preferred language for DVD audio.
1) The selected language is assigned high priority and can therefore be adopted automatically when the player begins playing a disc.
2) Languages vary between discs, depending on the DVD. You can also select alternative languages by pressing the Audio button on the remoter.
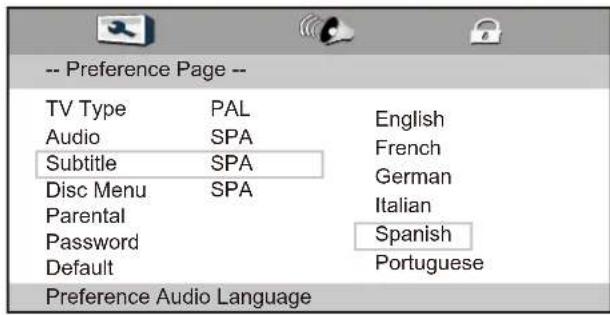
Subtitle
Select the preferred language for subtitles recorded on discs.
1) The selected subtitle language is assigned high priority and can therefore be adopted automatically when the player begins playing a discs.
2) Subtitles vary between discs, depending on the discs. You can also select alternative subtitle language by pressing the Subtitle button on the remoter.
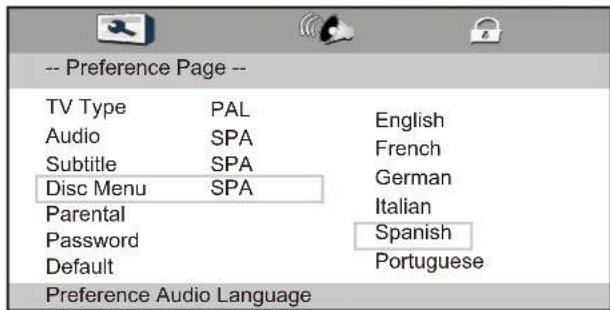
Disc Menu
Select the preferred language for the disc menu recorded on the discs.
The choice varies between discs.
Parental
It is possible to restrict playback of certain discs to a certain level of user, based on their age, for example. Certain scenes can be blocked or replaced with different scenes. The Parental function lets you set the access control level. This function is password-protected.
Note: If you play discs that do not support the parental function, the DVD player cannot restrict access to the disc.
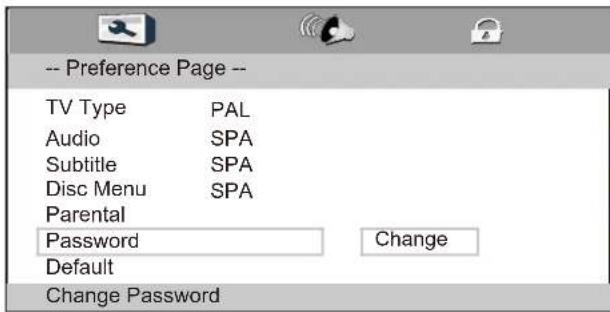
Password
Change the password to your desired. The default password is "0000".
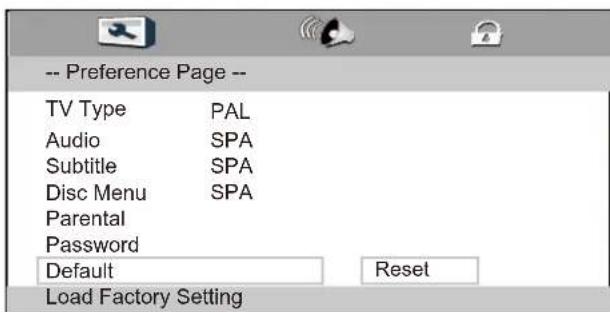
Default
Restore the DVD player's system to factory default settings.

9. TROUBLESHOOTING AND ADVICE
Please check if you can solve the troubleshooting by yourself.
| Troubleshooting | Control |
| No signal | Please check that all cables are correctly plugged in. |
| No color shades | Adjust the contrast, the color and the brightness. |
| Stain show on the screen | Maybe result from a lighting signal from car, motor, neon light and other electrical devices or appliances. |
| Double or multiple display image | Maybe the result of an electrical wave disturb from other TV, Computer and Game machine or Radio |
| Snow on the screen | The cables of the antenna are not correctly plugged in. |
| The remote control does not work | Please check the batteries order and alignment. Check that the IR of the remote control is not hidden by something. |
| "Zip" made noise on TV cover | Even if the display image is correct, the noise may come from an unsteady fixation of the panel. |
| No sound | Make sure that you have not press the MUTE button of the panel or of the remote control. |
| No DVD | Make sure if the TV Set have been switched to DVD mode. |
| DVD player not working properly | Ensure disc is correctly inserted into the player. Ensure the disc does not damaged and with correct format. Please wait patiently as some discs need longer time to play. |
10. SPECIFICATIONS
This manual is only for your reference, any change to the design and specification will not be advised.
| Screen Size | 15.6 Inch | |
| Display Type | TFT LED | |
| Resolution(Pixel) | 1366 X 768 | |
| Aspect Ratio | 16:9 | |
| Power Supply | DC12V IN | |
| Power Consumption | <20W | |
| TV System | PAL | |
| Video Input Format | PAL/NTSC | |
| Audio Output Power | L / R W2X3 | |
| SUPPORT | ANTENNA | YES |
| AV-IN | YES | |
| YPbPr - IN | YES | |
| HDMI - IN | YES | |
| VGA(PC) - IN | YES | |
| VGA(PC) AUDIO IN - | YES | |
| SCART IN - | YES | |
| SCART OUT - | YES | |
| EARPHONE - OUT | YES | |
| COAXIAL - OUT | NO | |
| COMMON INTERFACE | YES | |
| USB | YES | |
| DVD | Disc Physical Format | CD/CD±R/RW DVD/DVD±R/RW |
| DVDVideoOutputFormat | PAL/NTSC | |
| Dimensions | Inc Stand (LxWxH) | 398x130x310mm |
| Exc Stand (LxWxH) | 395x60x300mm | |
| FORMATS | USB | IMAGE: JPEG / GIF / BMP / TIF / PNG AUDIO: MP3 / WMA VIDEO: MPEG-1, MPEG-2, MPEG-4, H.264-HD |
| DVD | IMAGE: JPEG AUDIO: MP3 / WMA VIDEO: MPEG-1, MPEG-2 | |
Warranty Conditions
(Spanish)
The warranty of this product is for 2 years since the purchase date.
The warranty will exclude breakdowns caused by bad use of the product, wrong installation or installation in not desirable places for a proper maintenance of the product, rips, updates of the products that are not the supplied by the brand, pieces wore away for its use or for not domestic or inappropriate use. Also are excluded breakdowns caused for manipulations of the products by people or companies alien to our company.
For any request regarding the warranty terms, the purchase receipt must be attached.
(Nederlands)
Garantievoorwaarden
DECLARATION OF CONFORMITY
Council Directive(s) to which conformity is declared:
Erp Directive (2009/125/EC) Directive (2004/108/EC) - EMC Directive (2006/95/EC)-LVD Directive (2011/65/EU) - RoHS
Application of the Standards:
EN 55013:2003 + A1:2003 + A2:2006
EN 55020:2007+A11:2011
EN 60065:2002+A1:2006+A11:2008+A2:2010+A12:2011
EN 61000-3-2:2006+A1:2009+A2:2009
EN 61000-3-3:2008
IEC 62321-2009
Manufacturer's name: AFEX SUNS, S.A.
Manufacturer's address: C/Pallars 189, 08005 Barcelona
Type of equipment: LED TV
Trade: SUNSTECH
Model no.: TLEX11663HD
We, the undersigned, hereby declare under our sole responsibility that the specified equipment is in conformity with the above Directive(s) and Standard(s)
Place: Barcelona
(Signature)
VICTOR Planas Bas
(Full name)
Date: 1/11/2012
General Manager
(Position)
Television LED 16"
TLEX1663HD
Checking partition for consistency, please try later...
This manual is only for your reference, any change to the design and specification will not be advised.
| Tamaño de pantalla | 15.6 Inch | |
| Tipo de display | TFT LED | |
| Resolución (Pixel) | 1366 X 768 | |
| Ratio de aspecto | 16:9 | |
| Conexión de corriente | DC12V IN | |
| Consumo | <20W | |
| Sistema de TV | PAL | |
| Formato de entrada de video | PAL/NTSC | |
| Potencia de salida de audio | L/R W2X3 | |
| SOPORTA | Antena | SI |
| AV-IN | SI | |
| YPbPr-IN | SI | |
| HDMI-IN | SI | |
| VGA (PC)-IN | SI | |
| VGA (AUDIO)-IN | SI | |
| EUROCONECTOR-IN | SI | |
| EUROCONNECTOR-SALIDA | SI | |
| AURICULARES-SALIDA | SI | |
| S-VIDEO IN | NO | |
| COAXIAL-SALIDA | SI | |
| INTERFAZ COMún | SI | |
| USB | CD/CD±R/RWDVD/DVD±R/RW | |
| IPOD | PAL/NTSC | |
| DVD | Fürmato fisico del disco | 398x130x310mm |
| Fürmato deRIAde video del DVD | 395x60x300mm | |
| FORMATS | USB | IMAGE: JPEG / GIF / BMP / TIF / PNGAUDIO: MP3 / WMAVIDEO: MPEG-1, MPEG-2, MPEG-4, H.264-HD |
| DVD | IMAGE: JPEGAUDIO: MP3 / WMAVIDEO: MPEG-1, MPEG-2 | |
Warranty Conditions
(Spanish)
The warranty of this product is for 2 years since the purchase date.
The warranty will exclude breakdowns caused by bad use of the product, wrong installation or installation in not desirable places for a proper maintenance of the product, rips, updates of the products that are not the supplied by the brand, pieces wore away for its use or for not domestic or inappropriate use. Also are excluded breakdowns caused for manipulations of the products by people or companies alien to our company.
For any request regarding the warranty terms, the purchase receipt must be attached.
(Nederlands)
Garantievoorwaarden
Directiva (2006/95/EC)-LVD
Directiva (2011/65/EU)-RoHS
Simbolo do equipments

simpolo para
Desllgaroddlpqshtyto
Remoto Controlo Instructions in DVD mode
Para ejectar o disco.
DISPLAY
EQ/Balance/ Surround
Pressione / para selecionar EQ/Balanco/Surround, pressione o botao OK ou para entrada e pressione para ajustar.
AVL
Pressione / para selectionar Nivel de Volume Automático, pressione / para selectionar Ligar ou Desligar. Restabelecer
The warranty of this product is for 2 years since the purchase date.
The warranty will exclude breakdowns caused by bad use of the product, wrong installation or installation in not desirable places for a proper maintenance of the product, rips, updates of the products that are not the supplied by the brand, pieces wore away for its use or for not domestic or inappropriate use. Also are excluded breakdowns caused for manipulations of the products by people or companies alien to our company.
For any request regarding the warranty terms, the purchase receipt must be attached.
(Nederlands)
Garantievoorwaarden
Erp Directive (2009/125/EC)
Directive (2004/108/EC) - EMC
Directive (2006/95/EC)-LVD
Directive (2011/65/EU) - RoHS
Aplicacao das Normas:
EN 55013:2003 + A1:2003 + A2:2006
EN 55020:2007+A11:2011
EN 60065:2002+A1:2006+A11:2008+A2:2010+A12:2011
EN 61000-3-2:2006+A1:2009+A2:2009
EN 61000-3-3:2008
IEC 62321-2009
Nome do fabricante: AFEX SUNS, S.A.
Image Mode Image Standard
Son Luminosite 50
Chaine Contraste 50
\section*{Caracteristiques Nettete 5}
Réglages Couleur 50
Nuance 50
Température Couleur
Réduction Bruit
Standard
Moyen

Déplacer

Entrer
Quitter
Retour
The warranty of this product is for 2 years since the purchase date.
The warranty will exclude breakdowns caused by bad use of the product, wrong installation or installation in not desirable places for a proper maintenance of the product, rips, updates of the products that are not the supplied by the brand, pieces wore away for its use or for not domestic or inappropriate use. Also are excluded breakdowns caused for manipulations of the products by people or companies alien to our company.
For any request regarding the warranty terms, the purchase receipt must be attached.
(Nederlands)
Garantievoorwaarden
Erp Directive (2009/125/EC)
Directive (2004/108/EC) - EMC
Directive (2006/95/EC)-LVD
Directive (2011/65/EU) - RoHS


- TV INSTALLATION DRAWINGS
- REMOTE CONTROL
- Menu Operation
- PREFACE
- Safety Precautions
- Power Source
- Power Cord
- Moisture and Water
- Cleaning
- Ventilation
- Heat and Flames
- Lightning
- Replacement Parts
- Servicing
- Risk of electricshock
- Waste Disposal
- Disconnecting the Device
- Headphone Volume
- Installation
- Warning:
- Electrical device not in the hands of children
- IN THE CARTON
- FRONT & BACK CONNECTIONS OF LED
- Front View
- Power Cord Connection
- Antennas Connection
- HDMI Connection
- VGA Connection
- USB Connection
- SCART Connection
- Earphone Connection
- AV Connection
- YPbPr Connection
- Remote Control Instructions in DTV mode
- POWER
- Remote Control Instructions in Teletext/Media mode
- Remote Control Instructions in DVD mode
- Remote Control Setup
- Select Input Source
- Picture Menu
- Picture Mode
- Contrast
- Sharpness
- Colour
- Reset
- Sound Menu
- Sound Mode
- Channel Menu
- Digital Manual Search
- Analogue Manual Search
- Feature Menu
- Child Lock
- Language
- Sleep Timer
- Auto Power Off
- CI Info
- PVR/Timeshift
- Timer
- Record List
- How to user Record
- Direct Record
- Subscribe Record
- How to user Timeshift
- Setup Menu
- Media Menu
- Photo Menu
- Exit
- Music Menu
- Move Menu
- PVR Menu
- 8.DVD Operation
- General Setup
- Audio Setup
- Preference Set
- Subtitle
- Disc Menu
- Parental
- Password
- Default
- TROUBLESHOOTING AND ADVICE
- SPECIFICATIONS
- Warranty Conditions
- (Spanish)
- (Nederlands)
- Garantievoorwaarden
- DECLARATION OF CONFORMITY
- Erp Directive (2009/125/EC) Directive (2004/108/EC) - EMC Directive (2006/95/EC)-LVD Directive (2011/65/EU) - RoHS
- Remoto Controlo Instructions in DVD mode
Brand : Sunstech
Model : TLEXI1663HD
Category : Television