HTC 1525D - Television XORO - Free user manual and instructions
Find the device manual for free HTC 1525D XORO in PDF.

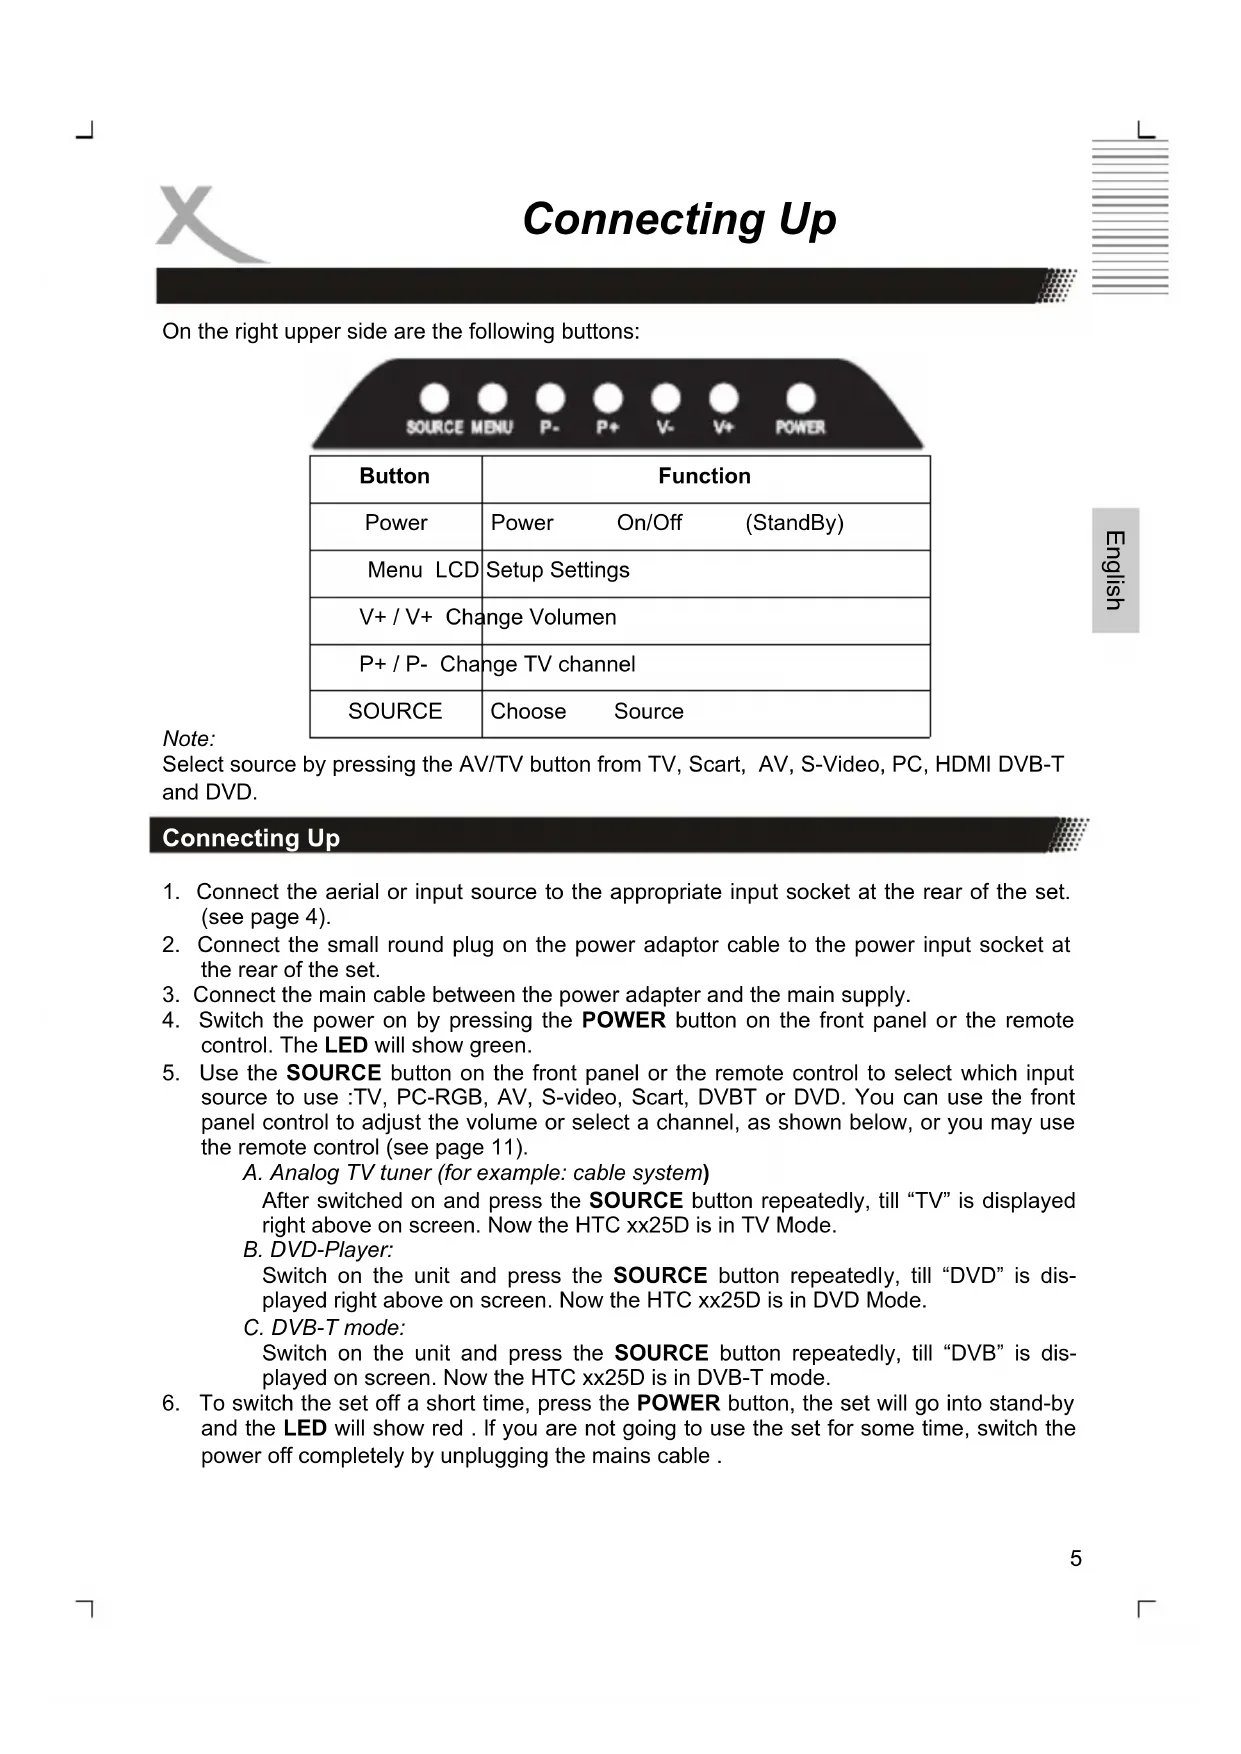


| Product type | LCD TV with built-in DVD player |
| Brand | Xoro |
| Model | HTC 1525D |
| Screen diagonal | 15 inches (38 cm) |
| Native resolution | 1280 x 800 pixels |
| Power supply | 200-240 V AC, 50/60 Hz |
| Connectivity | SCART, S-Video, CVBS, VGA, stereo audio input (RCA), headphone, RF antenna |
| Tuner | DTT (DVB-T) and analog |
| Disc player | DVD slot-in, MPEG-4 compatible |
| Main functions | Automatic channel search, teletext, EPG, parental control, auto-off |
| Maintenance and cleaning | Soft, clean, dry cloth; no solvents |
| Electrical safety | Do not expose to water, unplug if unused for several days, repairs by qualified personnel |
| Physical safety | Ventilation: at least 5 cm from a wall; do not hit the screen |
| Package contents | TV, remote control, batteries, user manual, warranty card |
Frequently Asked Questions - HTC 1525D XORO
User questions about HTC 1525D XORO
0 question about this device. Answer the ones you know or ask your own.
Ask a new question about this device
Download the instructions for your Television in PDF format for free! Find your manual HTC 1525D - XORO and take your electronic device back in hand. On this page are published all the documents necessary for the use of your device. HTC 1525D by XORO.
USER MANUAL HTC 1525D XORO
FREE TO CHOOSE INNOVATIONS

LCD TV with DVD + DVB + HDMI
HTC 1525D (without HDMI)
HTC 1925D
HTC 2225D
OPERATION MANUAL
BEDIENUNGSANLEITUNG
MODE D'EMPLOI
MANUAL DE OPERACION
L
F
Sicherheitshinweise
TV—SCART—AV—S-Video—PC—HDMI—DVB-T—DVD
Inbetriebnahme
Farbeinstellung (Colour Setting)
Farbeinstellung (Color Setting)
Programmsuche (Channel Search)
Programm (Channel No.)
Zeitzone (Time Zone)
TV Format (TV Shape)
Timer Liste (Booking List)
VSS (Virtual Surround Sound)
U.S. Patens Nos. 4,631,603; 4,577,216; 4,819,098; 4,907,093; 5,315,448 and 6,516,132
"This product incorporates copyright protection technology that is protected by U.S. patents and other intellectual property rights. Use of this copyright protection technology must be authorized by Macrovision, and is intended for home and other limited viewing uses only unless otherwise authorized by Macrovision. Reverse engineering or disassembly is prohibited."
Spezifikationen
To ensure reliable and safe operation of this equipment, please read carefully all the Instructions in this user guide, especially the safety information below.
Electrical safety
- The TV set should only be connected to a mains supply which matches that stated on the label on the mains adapter.
To prevent overload, don't share the same mains supply socket with too many other items of equipment. - Be careful to route the mains power cable away from areas where people can trip over it.
- Be sure to hold the plug-not the set is not to be used for a long time, Disconnect both the aerial and the mains power cable.
- Take care not to expose the set or the remote control to water or moisture.
-
Pull the plug out immediately, and seek professional help if:
-
the mains plug or cable is damaged
- liquid is spilt onto the set, or if it is accidentally exposed to water or moisture
- anything accidentally penetrates the ventilation slots
-
the set doesn't work normally.
-
Never remove the cover, there are No user-serviceable parts inside.
Allow only qualified service personnel to repair this equipment.
-
To avoid leakage, take out the remote control batteries when:
-
the batteries are exhausted
-
you are not going to use the remote control for a long time.
-
Dispose of the batteries properly-do not put them into a fire.
Physical safety
- Make sure the set is positioned at 5cm (2 inch) from the wall or furniture.
- Never tap or shake the screen for any reason.
Take care not to drop or sit on the remote control.
Clean the set using only a soft, clean, dry cloth. Do not use any solvents.
Contents
Safety information
Electrical safety. 1
Physical safety. 1
In the box 3
Features 3
English
Connection
Rear connection panel. 4
Right Side 4
Connecting up. 5
The Remote Control
Insert Battery 8
Operation range. 8
9
LCD Menu
Using the menus. 11
The Video menu 11
The PC menu 12
The HDMI menu 13
The Audio menu 14
The TV menu. 14
The General menu. 15
Troubleshooting for LCD 16
DVB-T Mode
Getting into DVB-T mode 17
First time installation (Channel Setting) 17
Channel List. 18
Favorite List 20
System Settings. 20
EPG 23
Teletext 24
Troubleshooting for DVB-T. 25
DVD Player
Getting into DVD mode. 27
Insert a Disc. 27
Functions 27
MPEG-1, MPEG-2 and MPEG-4 videos 31
System Setup 33
Troubleshooting 38
Specifications 40
In the Box
Following accessories should be in the box:
- HTC 1525D/HTC1925D/HTC 2225D LCD-TV
Remote Control with Battery - Manual
- Main adapter
- Wire for the main adapter
Warranty card
If any of the accessories are missing, then contact your dealer as soon as possible. Keep all the original packaging in case you need to return the set to the dealer.
Features
High quality display
- Many Connections: VGA, RF, Video, S-VIDEO, SCART and HDMI
HDMI Supports up to 1080i input resolutions (only HTC 1925D and HTC 2225D)
- Stereo audio inputs
- Integrated analog TV Tuner
- Integrated digital terrestrial TV Tuner (DVB-T)
Automatic or manual channel search
- Auto-shutdown to save power when no signal input
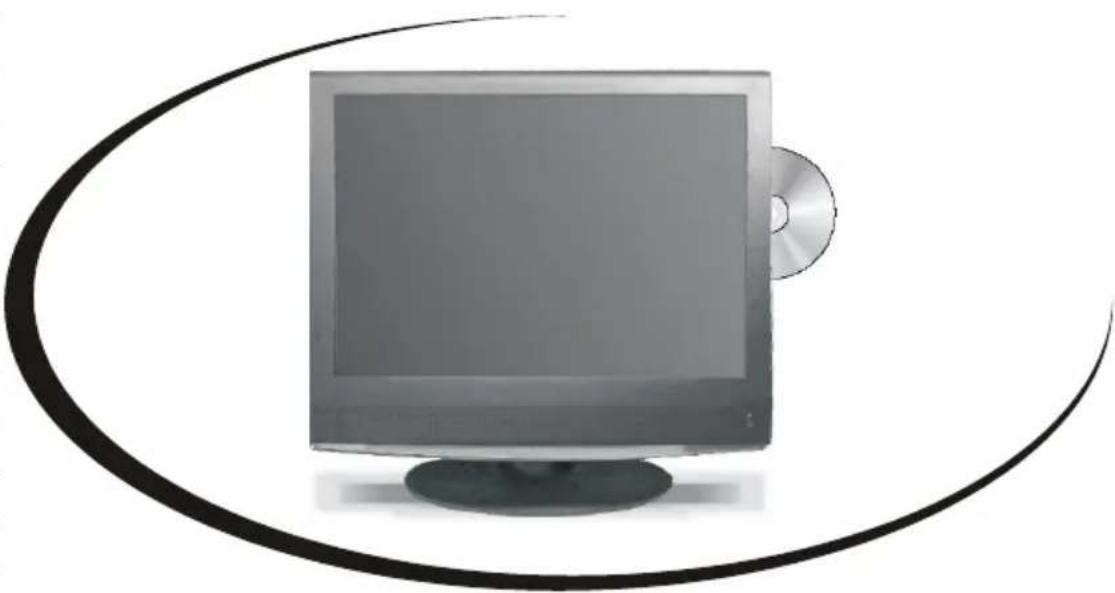
DVD-Player inside with Slot-in technology
Note:
The HTC 1525D has no HDMI interface.
Connection
Rear Connection Panel

English
| Name | Function |
| DC In | Connect to Power Adapter |
| HDMI | HDMI input (only for HTC 1925D and HTC 2225D) |
| VGA | VGA signal of computer input |
| SCART | Euro AV (Audio/Video) input |
| S-video | S-video input |
| Video | Video signal input |
| AUDIO IN L / R | Audio signal input for Video and S-Video |
| PC Audio | Audio signal of computer input |
| PHONE | Headphone |
| RF | Connect to cable or air |
Note:
The HTC 1525D has no HDMI interface.
Buttons on the right side
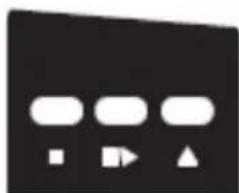
On the right bottom side are the following buttons:
| Button | Function |
| Open / | Close the loader |
| Stop | |
| >Play / | Pause |
| DVD DVD | Slot-in loader |
Connecting Up
On the right upper side are the following buttons:
| Button | Function |
| Power | Power On/Off (StandBy) |
| Menu LCD | Setup Settings |
| V+ / V+ Change Volumen | |
| P+ / P- Change TV channel | |
| SOURCE | Choose Source |
Note:
Select source by pressing the AV/TV button from TV, Scart, AV, S-Video, PC, HDMI DVB-T and DVD.
Connecting Up
-
Connect the aerial or input source to the appropriate input socket at the rear of the set. (see page 4).
-
Connect the small round plug on the power adaptor cable to the power input socket at the rear of the set.
-
Connect the main cable between the power adapter and the main supply.
-
Switch the power on by pressing the POWER button on the front panel or the remote control. The LED will show green.
-
Use the SOURCE button on the front panel or the remote control to select which input source to use :TV, PC-RGB, AV, S-video, Scart, DVBT or DVD. You can use the front panel control to adjust the volume or select a channel, as shown below, or you may use the remote control (see page 11).
A. Analog TV tuner (for example: cable system)
After switched on and press the SOURCE button repeatedly, till "TV" is displayed right above on screen. Now the HTC xx25D is in TV Mode.
B. DVD-Player:
Switch on the unit and press the SOURCE button repeatedly, till "DVD" is displayed right above on screen. Now the HTC xx25D is in DVD Mode.
C. DVB-T mode:
Switch on the unit and press the SOURCE button repeatedly, till "DVB" is displayed on screen. Now the HTC xx25D is in DVB-T mode.
- To switch the set off a short time, press the POWER button, the set will go into stand-by and the LED will show red. If you are not going to use the set for some time, switch the power off completely by unplugging the mains cable.
Connection
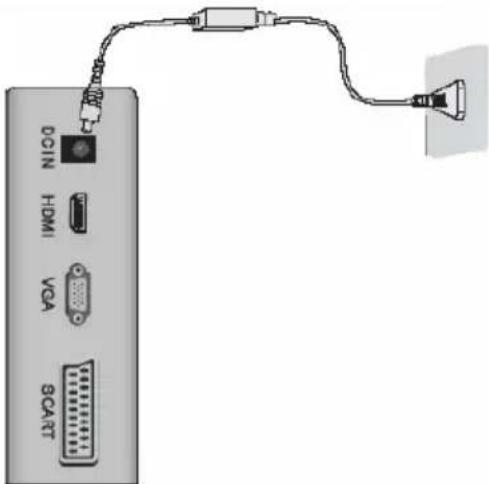
Power connection
Connect the AC/DC power adapter with the DC IN input of the HTC TV set. After than, please connect the power cable with the wall mounted power outlet.
On the front side you can see a red LED light. The HTC TV set is now in Stand-By mode. By pressing the POWER button on the remote control or on the top side of the device the red LED changes to a green light.
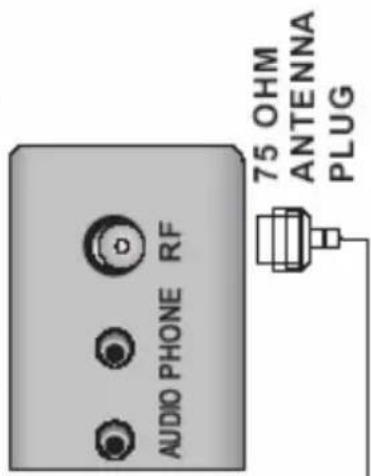
Antenna
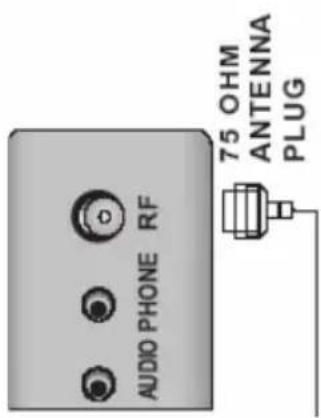
The HTC TV set has an analogue and a digital TV Tuner inside. For receiving analogue TV signals please connect the antenna cable with the RF connector on the HTC TV set and with the VHF/UHF roof antenna or with a CATV antenna plug.
For receiving digital terrestrial TV signals please connect the HTC TV set with the RF plug and also with the roof antenna. If no roof antenna is available, please use indoor aerial.
For activating the analogue TV Tuner, please switch with the Source button to "TV". For viewing DVB-T, please change with the SOURCE button to "DVB".
Note:
For getting the best DVB-T reception please uses the roof antenna. If not possible, than you can connect the HTC TV set with an active indoor aerial.
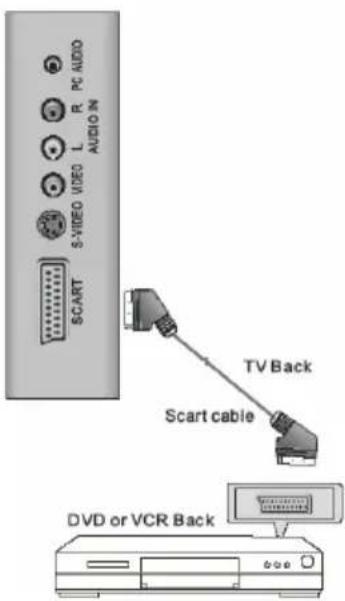
SCART Input
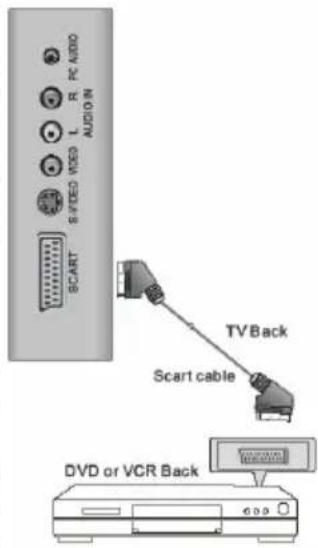
Audio- and Video signals from a VCR or a setup box can be transmitted by SCART. Please connect a SCART cable with the SCART input on the HTC TV set and with the SCART output on the VCR or setup box.
Press the SOURCE button again until "SCART" appears on the screen and the SCART interface is activated.
CVBS Video- and Stereo Audio input
If you uses more than one multimedia terminals and the SCART, HDMI and S-Video connection are used, than you connect the next device by the audio/video component input. Please connect the yellow wire of an 3-pin component cable with the VIDEO input of the HTC TV set and the multimedia device. With this kind of connection only video signals are transmitted. For listening sound on the TV you should establish also a sound connection.
Please connect the white and red wire of the 3-pin component cable with the AUDIO IN L / R and the correspondent audio out on the multimedia device.
Connection
Please press the SOURCE button until "AV" appears on the screen and the AV input is active.
If you uses more than one multimedia terminals and the SCART, HDMI and AV connection are used, than you connect the next device by the S-Video. Please connect the S-Video cable with the S-VIDEO input of the HTC TV set and with the S-Video output of the multimedia device. With this kind of connection only video signals are transmitted. For listening sound on the TV you should establish also a sound connection.
Please connect the white and red wire of the 2-pin cable with the AUDIO IN L / R and the correspondent audio out on the multimedia device.
Please press the SOURCE button until "S-Video" appears on the screen and the S-Video input is active.
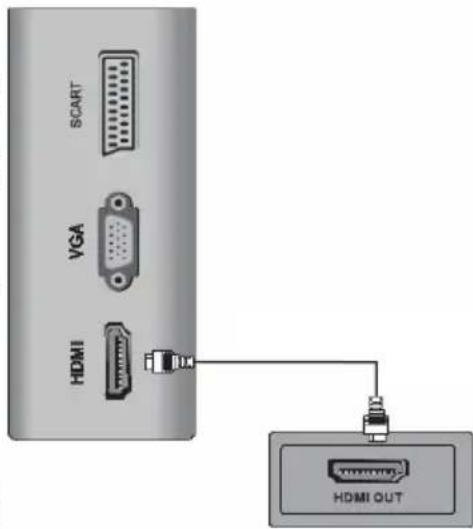
HDMI
If you want connect a multimedia device with HDMI like a game console "PS3" or a setup box with the HTC TV set, you can establish a HDMI connection. Please connect the HDMI cable on the HDMI interface on the HTC TV set and the HDMI output of the multimedia device.
Please press the SOURCE button until "HDMI" appears on the screen and the HDMI input is active.
VGA
You can use the HTC TV set as a PC monitor by using the VGA interface. Please connect a VGA cable with the VGA input of the HTC TV set and with the PC.
Please press the SOURCE button until "PC-VGA" appears on the screen and the PC-VGA input is active.
Notes:
-
Before you connect the HTC TV set with the PC, please change the graphic resolution of the PC to: 640 × 480 , 800 × 600 or 1024 × 768 .
-
Please establish the connection and switch to "PC-VGA" input.
-
For displaying the best results, please uses the native resolution of the TV LCD panel:
-
HTC 1525d 1280 x 800 Pixel
- HTC 1925d 1440 x 900 Pixel
- HTC 2225d 1680 x 1050 Pixel
Remote Control
Insert battery into the remote control
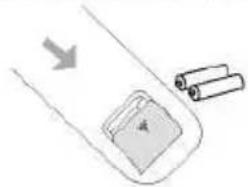
Insert the batteries in the remote control:
- Open the cover.
- Insert the batteries. Make sure to match - and +.
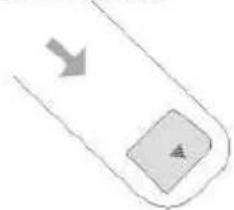
- Close the cover
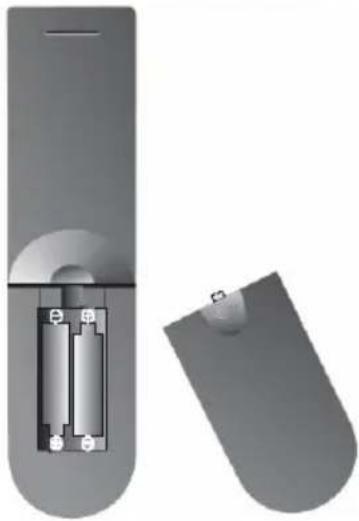
Notes on batteries:
Improper use may cause battery leakage and corrosion.
Please follow the instructions below:
- Do not insert the batteries in the wrong direction
- Do not use different types of batteries together
- If you do not use the remote control for a long time, remove the batteries
- If the remote control operates not correctly, replace the batteries
If battery leakage occurs, wipe the battery liquid from the battery compartment, then insert new batteries
Make sure that the used batteries are disposed properly according to you local regulations.
Operation range
Point the remote control at the IR:
- Within about 5m with angle about 30 grade in both direction.
Notes:
- Do not expose the IR of the device to a strong light source or direct sunlight.
- Direct the remote control at the infrared receiver (IR) of the player
- Do not drop the remote control.
- Do not spill water or put anything wet on it.
- Do not disassemble the remote control.
Remote Control
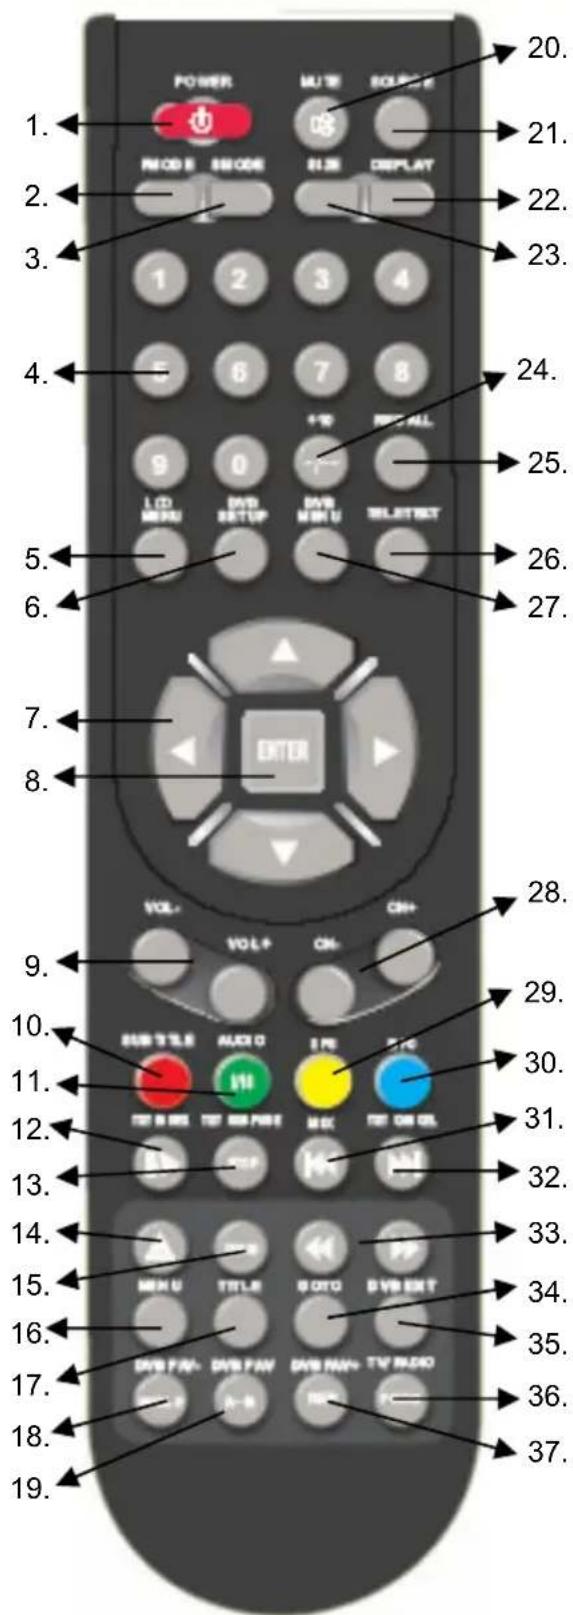
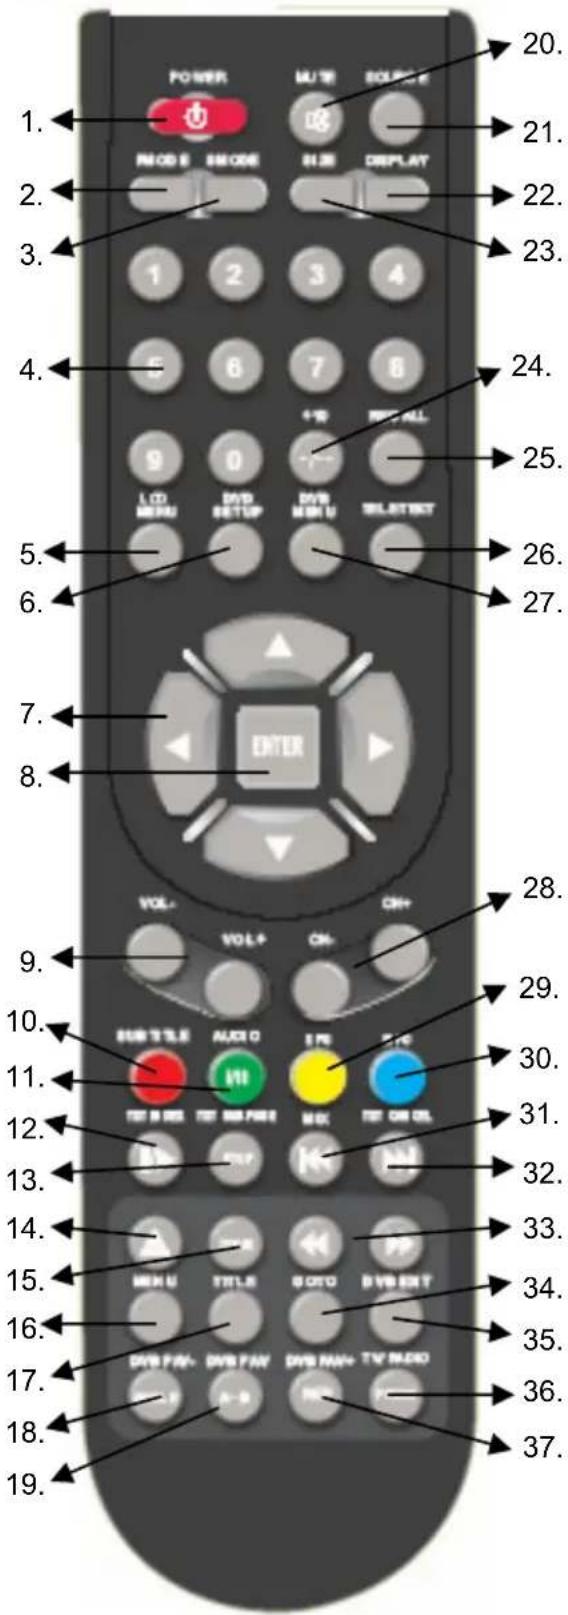
Buttons of the remote control:
ATV: Analogue TV Tuner
DVB-T: Digital TV Tuner
DVD: DVD Player
- POWER button
- Picture mode (PMODE)
- Sound mode (SMODE)
- Numeric buttons (0-9)
- LCD settings (LCD MENU)
- DVD settings (DVD SETUP)
- Navigation cross
- ENTER button
- Volume (Vol-/ Vol+)
- ATV: Red Teletext button; DVB-T: Red Teletext button and subtitle; DVD: subtitle button
- ATV: Green Teletext button and NICAM; DVB-T: Green Teletext and Audio button; DVD: Audio button
- ATV: Teletext Index button; DVD: Play / Pause
- ATV: Teletext sub page button; DVD: Stop
- DVD: Open / Close
- DVD: Zoom
16.DVD:VideoDVDMenu - DVD: Video DVD Title menu
- DVB-T: Favorite -; DVD: Angle
- DVB-T: Favorites; DVD: A-B Segment Playback
- MUTE button
- SOURCE button
- Aspect Ratio LCD 4:3 / 16:9 (SIZE)
- Source information (Display)
- One or two digits of channel numbers (- / - )
- Last TV channel (RECALL)
- Teletext in ATV and DVB-T
- DVB-T settings (DVB MENU)
More button description on the next page.
Remote Control
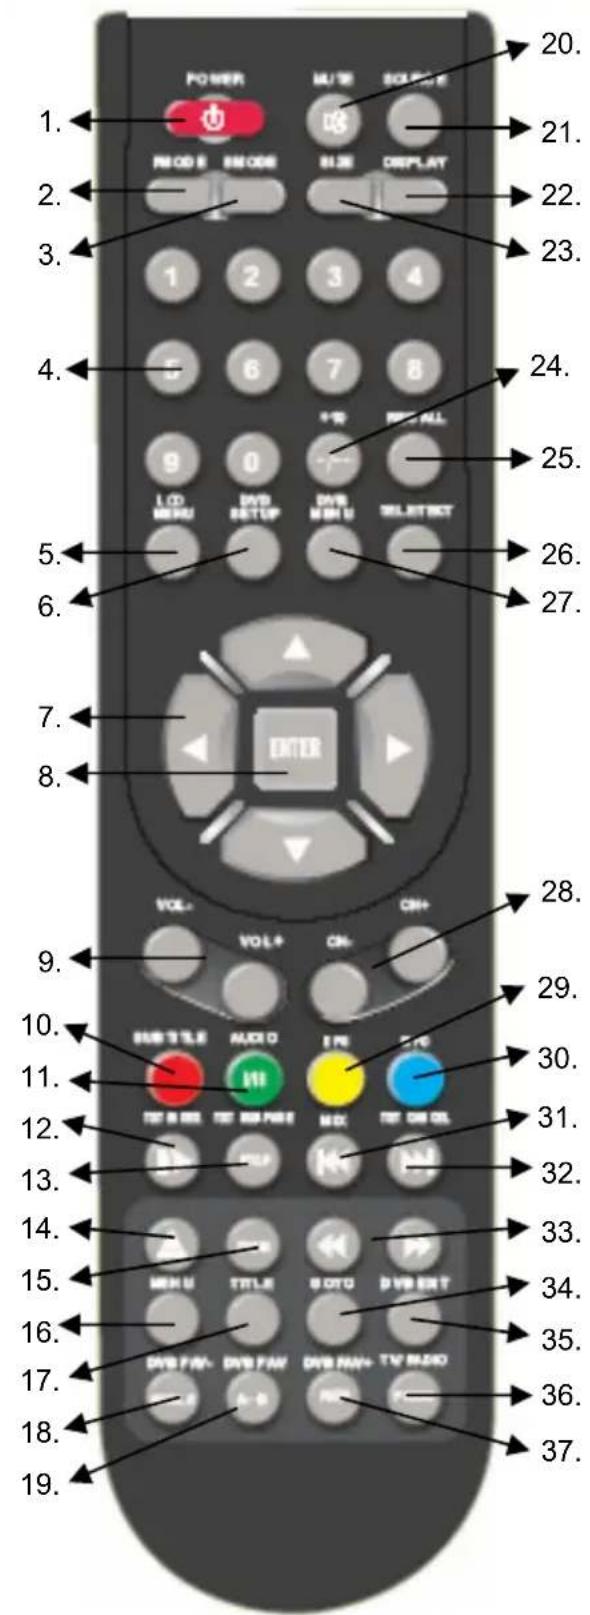
English
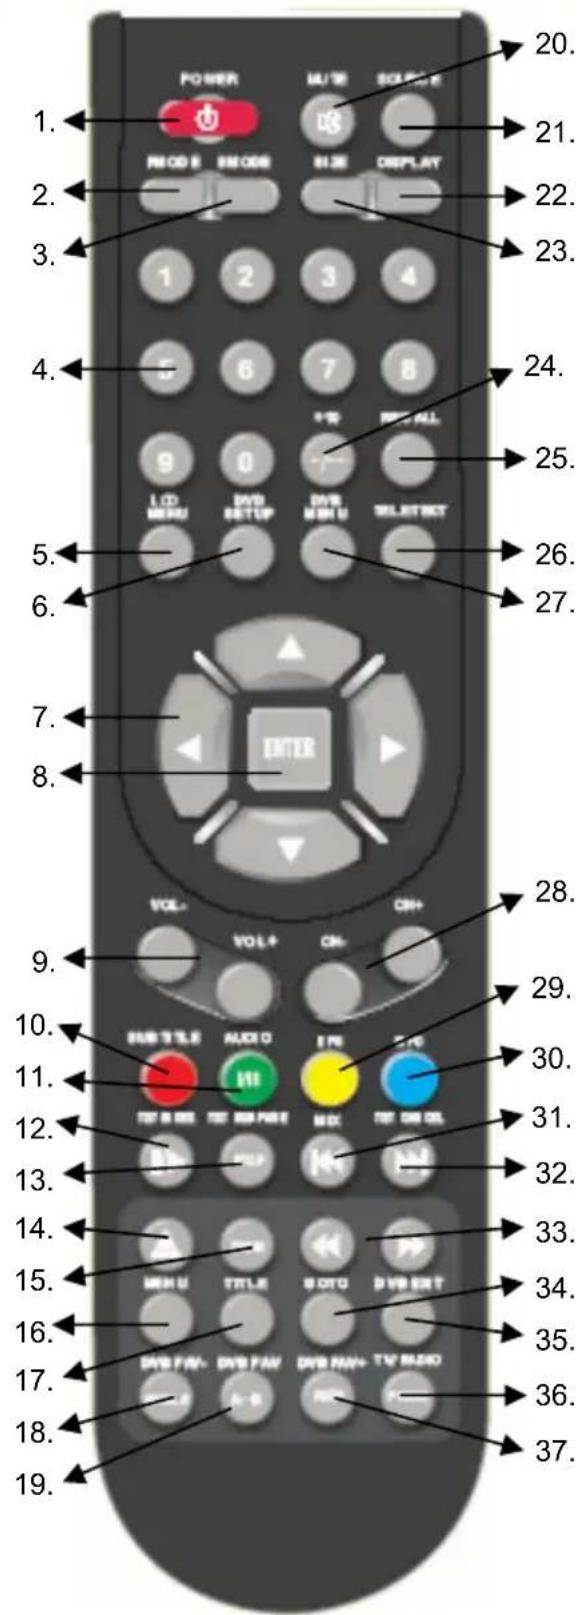
Buttons of the remote control:
ATV: Analogue TV Tuner
DVB-T: Digital TV Tuner
DVD: DVD Player
28. Channel ATV und DVB-T (CH-/ CH+)
29. ATV: Yellow Teletext button; DVB-T: EPG and yellow Teletext button
30. ATV: Blue Teletext button; DVB-T: Information and blue Teletext button; DVD: Information
31. ATV: Teletext Mix displaying; DVD: Previous chapter / track
32. ATV: Teletext exit; DVD: Next chapter / Track
33. DVD: Fast back- or Forward (<< / >>)
34.DVD:GOTO button
35. DVB-T: Exit of DVB-T settings
36. DVB-T: Switch to TV and Radio channels
37. DVB-T: Favorites +; DVD: Program
LCD Menu
For all the buttons mentioned below, you can use those on the front panel, or you can use those on the remote control. To see the menus, press the LCD MENU button. The first will show either:
theVIDEO menu, if the set is switched to TV, AV, S-video, SCART, DVB-T, DVD
the PC menu, if the set is switched to PC
The HDMI menu, if the set is switched to HDMI
Press the MENU button again, to see the other menus:
another press to see the AUDIO menu
another press to see the TV menu (only when switched to TV)
another press to see the GENERAL menu
another press to see the menus off.
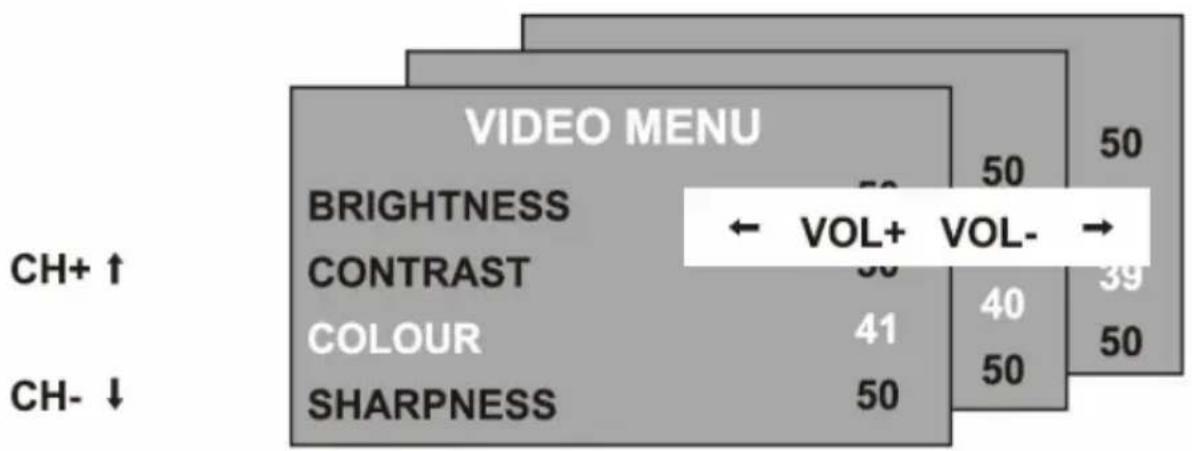
To select a menu item, for example COLOUR, press the CH^+ and CH- buttons to
- scroll up and down the list.
- When a menu item is highlighted, use the VOL+ or VOL Buttons to change the setting.
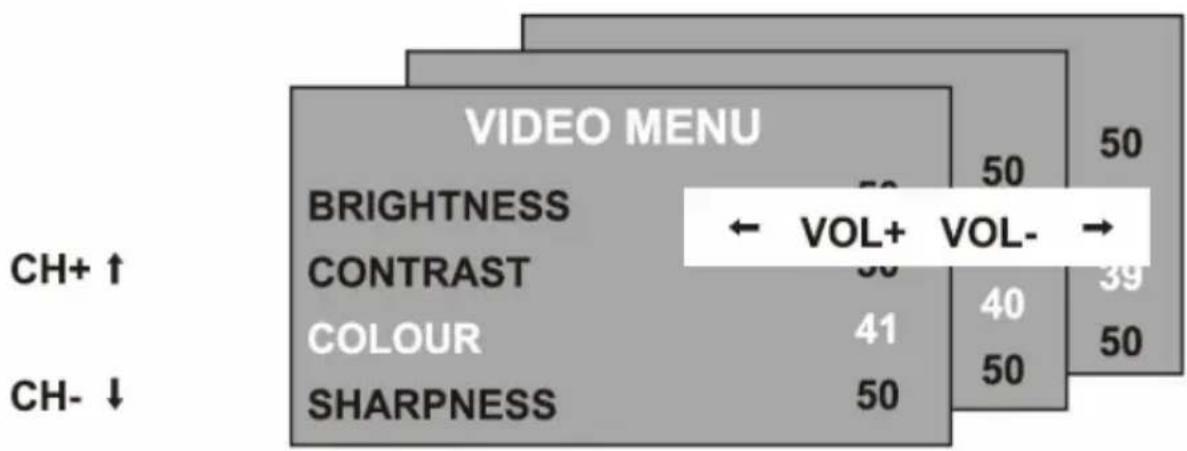
When you have changed the settings, you can exit from the menu:
by waiting fifteen seconds without pressing any buttons,
- by pressing the LCD MENU button few times until the menus turn off.
LCD Menu
Video Menu
The first press of the LCD MENU button will show the VIDEO menu, if the set is switched to TV, AV, S-Video, SCART, DVB-T, DVD. In this menu it is possible to change brightness, contrast, colour and the sharpness.
Brightness
Use the VOL+ or VOL- buttons to adjust the brightness of the picture.
Contrast
Use the VOL+ or VOL- buttons to adjust the contrast of the picture.
Colour
Use the VOL+ or VOL- buttons to adjust the colour of the picture.
Sharpness
Use the VOL+ or VOL- buttons to adjust the sharpness of the picture.
| VIDEO MENU | |
| BRIGHTNESS | 50 |
| CONTRAST | 50 |
| COLOUR | 40 |
| SHARPNESS | 50 |
PC Menu
If the LCD is connected by VGA to a personal computer (PC) or to a device with VGA output, so by pressing the LCD MENU button the PC-Menu starts up.
Brightness
Use the VOL+ or VOL- buttons to adjust the brightness of the picture.
Contrast
Use the VOL+ or VOL- buttons to adjust the contrast of the picture.
Color setting
Use the VOL+ or VOL- buttons to select from 6500k, 9300k or USER.
If you select USER, you can use the VOL+ or VOL- buttons to adjust the RED.
Green and blue values individually. Press
MENUButtonwhenyouhave finishedadjusting.
Auto configure
Press the VOL+ button to have the following settings configured automatically.
| PC MENU | |
| BRIGHTNESS | 50 |
| CONTRAST | 50 |
| COLOUR SETTING | USER |
| AUTO CONFIG | → |
| H POSITION | 0 |
| V POSITION | 0 |
| PHASE | 0 |
| CLOCK | 0 |
PC Menu
Horizontal and vertical position
Use the VOL+ or VOL- buttons to adjust the position of the picture on the screen.
Phase
Use VOL+ or VOL- buttons to adjust the phase of the ADC sampling clock relative to the Hsync signal, until a stable image is obtained.
Clock
Use the VOL+ or VOL- buttons to adjust the pixel clock frequency, until the image size is maximized for the screen.
HDMI Menu
If the LCD is connected by HDMI to a personal computer (PC) or to a device with HDMI output, so by pressing the LCD MENU button the PC-Menu starts up.
Brightness
Use the VOL+ or VOL- buttons to adjust the brightness of the picture.
Contrast
Use the VOL+ or VOL- buttons to adjust the contrast of the picture.
Color setting
Use the VOL+ or VOL- buttons to select from 6500k, 9300k or USER.
If you select USER, you can use the VOL+ or VOL- buttons to adjust the RED.
Green and blue values individually. Press MENU button when you have finished adjusting.
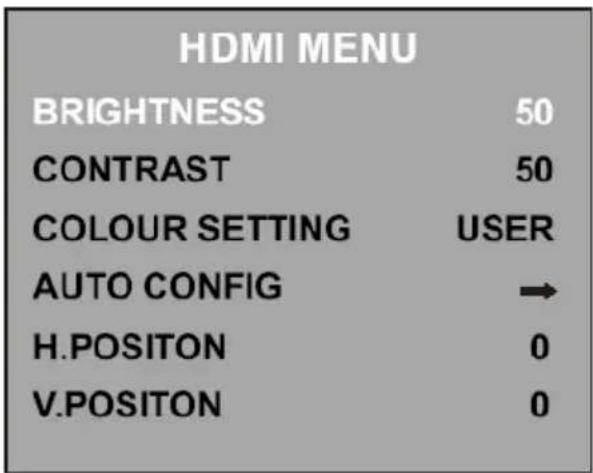
Auto configure
Press the VOL+ button to have the following settings configured automatically
Horizontal and vertical position
Use the VOL+ or VOL- buttons to adjust the position of the picture on the screen.
Audio Menu
Press the LCD MENU button again to see the AUDIO menu.
Volume
Use the VOL+ or VOL- buttons to adjust the volume of the sound.
Balance
Use the VOL+ or VOL- buttons to adjust the left/right balance of the sound.
Audio preset
Use the VOL+ or VOL- buttons to select from PERSONAL, VOICE, MUSIC or THEATRE.
If you select personal, you can adjust the following settings.
| AUDIO MENU | |
| VOLUME | 20 |
| BALANCE | 50 |
| AUDIO PRESET | PERSONAL |
| TREBLE | 50 |
| BASS | 50 |
Treble and bass
Use the VOL+ or VOL- buttons to adjust the tone of the sound.
TV Menu
Press the LD MENU button again, to see the TV menu (only if switched to TV).
Channel
Use the VOL+ or VOL- buttons to select a channel.
System
Use the VOL+ or VOL- buttons to select from DK, BG I or L TV display systems.
Skip
Use the VOL+ or VOL- buttons to turn the channel ship:
- ON - this channel will be shipped when changing channel using the CH buttons.
- OFF - this channel will be included when changing channel using the CH buttons.
AFC
Automatic frequency control. Use the VOL+ or VOL- buttons to turn AFC On or OFF.
| TV MENU | |
| CHANNEL | 0 |
| SYSTEM | DK |
| SKIP | OFF |
| AFC | ON |
| FINE TUNE | 487.25MHz |
| SWAP | → |
| MANUAL SEARCH | → |
| AUTO SEARCH | → |
Fine Tune
Use the VOL+ or VOL- buttons to fine tune the frequency if you are having Press with a week signal on the current channel. The AFC will turn off if you use the fine Tune controls.
LCD Menu
TV Menu
SWAP
Press the VOL+ buttons to enter the SWAP menu, press the VOL+/- button to select the channel that you want the program to be put in "FROM" menu, then press the CH- button to go to the "TO" menu, press the VOL+/-button to select the channel Whose program you want, press the VOL+/-button to confirm if "SWAP" menu.
Manual search
Press the VOL+ button once, then again to select from down or up
Press the MENU button to start the manual station search. When the search is finished, the first station found will be allocated to the current channel.
Auto Search
Press the VOL+ button once. Use the VOL+ or VOL- buttons to select the DK/BG/I or SE-CAM L mode then press CH+ and CH- to select yes or no, press MENU button to confirm, The automatic Station Search will start. When the searching is finished, then for example, if 12 station have been found, they will be allocated to the first 12 channel.
General Menu
Press the MENU button again to see the GENERAL menu.
Language
Use the VOL+ or VOL- buttons to select from a number of European languages.
Blue Screen
Use the VOL+ or VOL- buttons to turn the blue screen:
- ON - The screen will turn blue when the signal strength is very poor.
- OFF - The picture and sound will be noisy when the signal is very poor. (Use this function if reception cannot be improved, to stop the screen from turning blue screen)
Noise Reduce
Use the VOL+ or VOL- buttons to turn the noise reduction system:
ON: to reduce noise when reception is poor
- OFF: improve picture and sound quality when reception is good.
Input Source
Use the VOL+ or VOL Buttons to select which input source to use:
Press the VOL+ button to return the set to the factory default setting.
All the setting in the VIDEO, PC and AUDIO menus, and blue screen in the GENERAL menu will be returned to be the settings shown in this user guide.
Troubleshooting
Check the following guide for the possible cause of a problem before contacting service. Technical Support of Xoro/MAS:
| Problem Solution | |
| TV won't switch on | ·Check the mains cable is connected properly to both the mains supply and the mains adapter ·Check the cable from the mains adapter is connected properly to the set. ·The electronic circuit may have reset. Pull the plug out, wait for 60 seconds, then plug back again. |
| No picture | ·Check the aerial or other input is connected properly. ·Check that the correct input is selected, using the SOURCE button or the GENERAL menu. ·Check the brightness and contrast settings in the VIDEO or PC menu. |
| No sound | ·Check that the VOLUME isn't turned down, or the MUTE button pressed. ·Check that the audio cables are connected to the correct inputs. |
| Picture is wrong colour | ·Check that the correct input is selected, using the TV/AV button or the GENERAL menu. |
| The picture is unstable when used with a PC | ·Check that the settings in the PC menu match the video output settings of the PC. |
| There are a few coloured spots on the screen | ·High resolution LCD screens often have a small number of faulty pixels. ·This is normal and within the bounds of our quality control checks. |
| Picture with wrong scaling | ·The LCD has the wrong aspect ratio. Please press the Size button to switch the aspect ratio from 16:9 to 4:3. |
DVB-T Mode
Be sure to select the DVB source before operation. Please follow the way to switch into the DVB-T mode:
- Power on the device
- Press the AVTV button often until a "DVB" comes on the right top side.
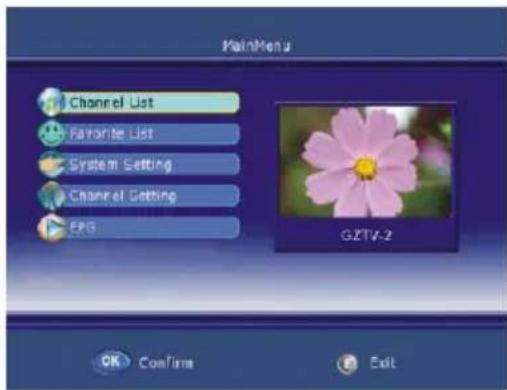
Enter Main Menu
Press the DVB MENU on the remote control to bring up the main menu on the screen and press it again to return to the previous menu or return to TV viewing.
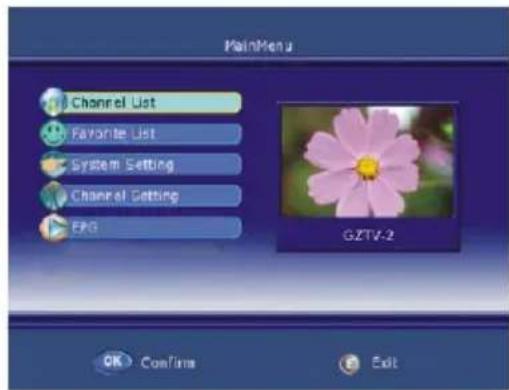
Adjust the OSD on screen
- Press / button select each menu.
- Press button and then use / / / button to select and adjust the available menus.
- Press DVB MENU or button to return to previous menu and press EXIT to return to TV viewing.
- Press Enter to confirm your settings

Waiting SIGNAL or NO SERVICE
Here is no signal or no service prompt.
Channel Setting
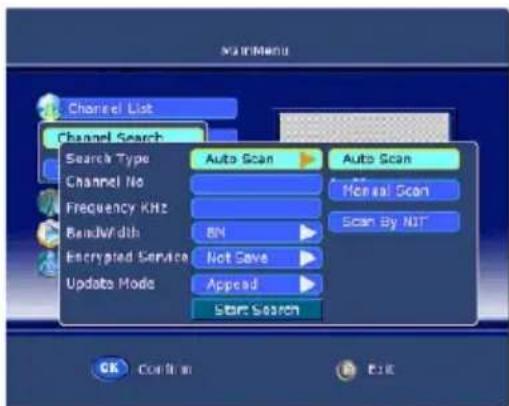
For the first time installation you should start the searching to the TV Programs. Please navi
gates to Channel Setting and activate the Menu by pressing Enter button. Choose there the option "Channel Scan" and confirm by pressing the Enter button.
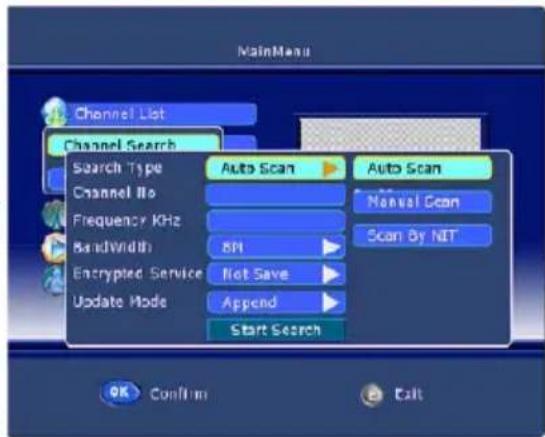
Search Type
Press and then use / to select one of the search type options: Auto Scan/ Manual Scan/ Scan By NIT. Standard setting is "AUTO Scan".
Channel No
Input the number directly to select the channel number, but the range of channel is 0---69. This option is by "Auto Scan" not active.
Frequency
This function let you know the frequency accordance the channel.
DVB-T Mode
Channel Setting
Band Width
Press and then use I to select one of the band width options: 6M/ 7M/ 8M.
Encrypted Service
Press and then use / to select one of the encrypted service options: Save/ Not Save.
Update Mode
Press and then use / to select one of the update mode options: Append/Replace.
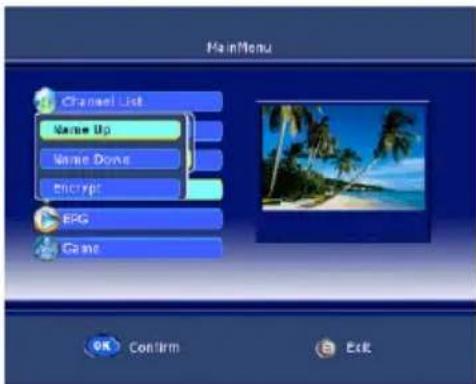
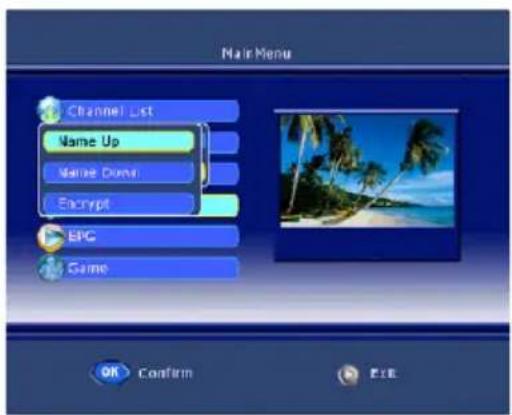
Sort Channel
Use the / to select Sort Channel item and then press Enter to confirm it
Name UP Press Enter to rise to the channel list by name.
Name Down Press Enter to drop the channel list by name.
- Encrypt Press Enter to sort the channel list by encrypting.
Channel List
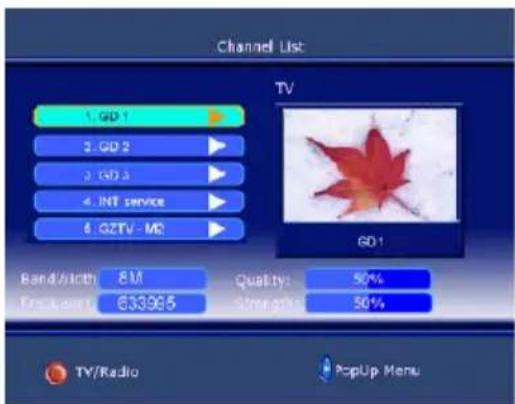
- Press the DVB MENU on the rem to bring up the main menu on the screen and use / to select the Channel List menu.
- Press the Enter to confirm your and there will be a Channel List menu on the screen
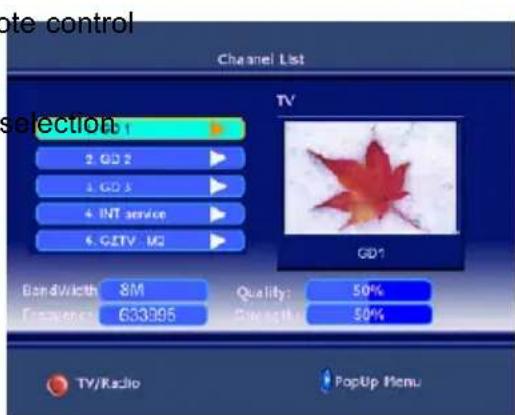
- There is a channel list of DVB-T services in this menu, also you can see the Band Width/ Quality/ Frequency and Strength of the current service.
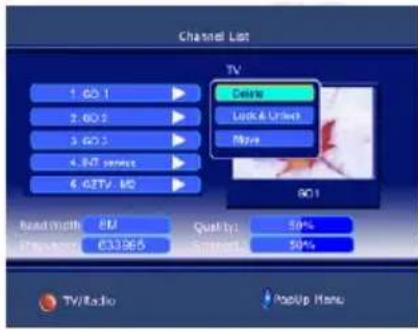
- Using the / to select channel which you like, and press that allow you to delete/ move/ Lock & Unlock it.
DVB-T Mode
Channel List
Delete
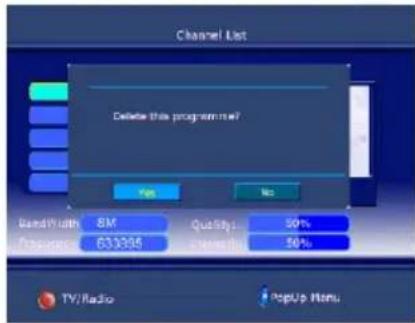
- Press I to select the delete item and press OK to confirm it. There is a delete menu on screen as below:
- Press ENTER to delete the channel and press DTV MENU to return to previous menu.
- If you want to restore the channel that have been deleted, you should search again.
Lock & Unlock
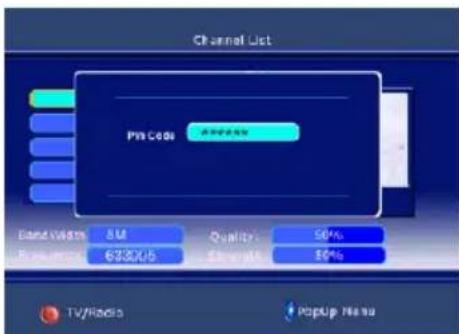
- Press I to select Lock & Unlock item and press OK to confirm it. There is a pin code menu on screen.
- Press the number buttons directly to input the pin code that is made up of six numbers and the initial is: 888888. You can change it in System Setting.
- If Lock is already set, enter the pin code as requested.
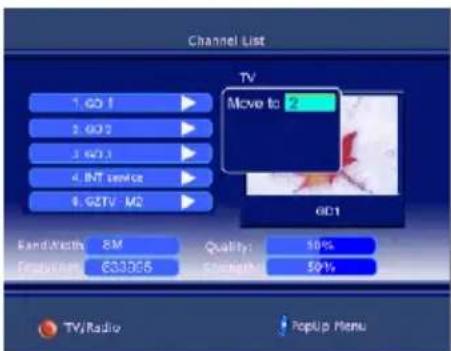
Move
- This function allows you to change the order of channel in the list.
DVB-T Mode
Favorite List
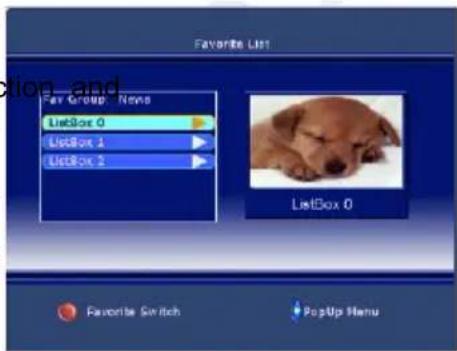
- Press the DVB MENU on the remote control to bring up the main menu on the screen and use / to select the Favorite List menu.
- Press the Enter to confirm your selected there have a Favorite List menu on screen as below:
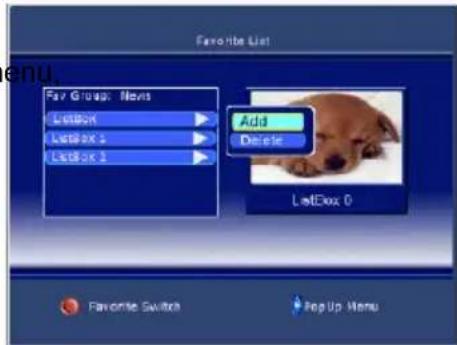
- Press that you can continue add or delete the favorite channel.
- Use the / to select add item and then press Enter to confirm it, there have a Channel list menu display on the right, you can use / and Enter to select one of them to your favorite list.
- Press DVB MENU to return to previous m then press Enter to TV viewing.
System Settings
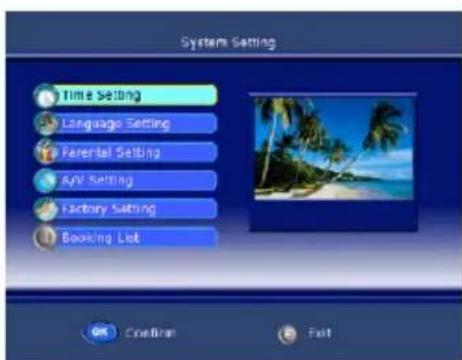
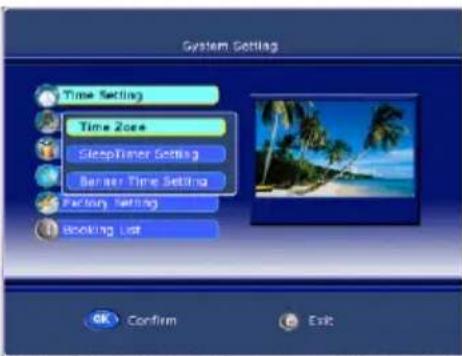
Press the DVB MENU on the remote control or on the front panel to bring up the main menu on the screen and use / to select the System Setting menu. Press the Enter to confirm your selection and there have a System Setting menu on screen as below:
Time Setting
Use the / to select Time Setting item and then press Enter to confirm it
Time zone
Press / to select Time Zone, then press OK to confirm it, you can select the option of GMT+0 --- 8.
Banner Time Setting
This function allows you to set the time of banner display, you can Press / to select banner time options: 1secs/3secs/5secs/7secs/9secs.
DVB-T Mode
System Settings
Language Setting
Use the / to select Language Setting item and then press Enter to confirm it.
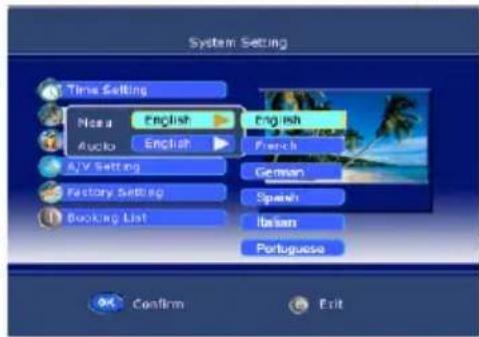
Menu language
This function allows you to set the language of OSD display, you can Press / to select the options: English / French / German / Spanish / Italian / Portuguese.
Audio language
This function allows you to set the language of audio, you can Press / to select the options: English / French / German / Spanish / Italian / Portuguese.
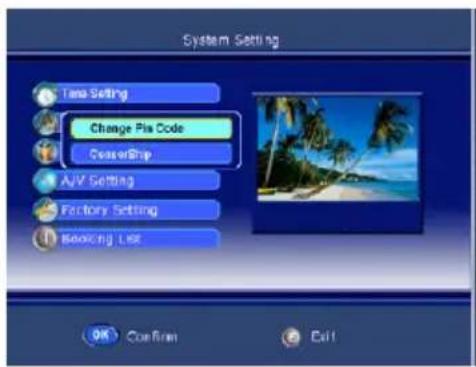
Parental Setting
Use the / to select Parental Setting item and then press Enter to confirm it If the lock is already set, enter the pin code as requested.
Chang Pin Code
This function allows you to change the pin code, you should to input a new pin code twice and press OK to confirm it.
Censorship
You can Press / to select an age bracket options: None Block/ 6/ 10/ 14/ 18.
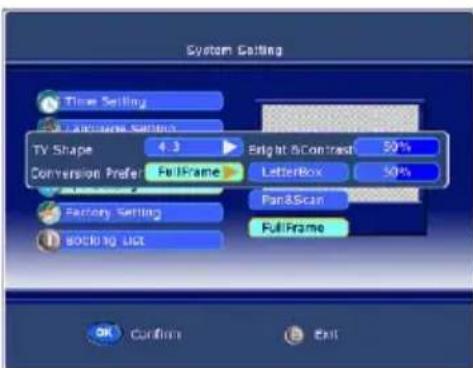
A/V Setting
Use the / to select A/V Setting item and then press Enter to confirm it.
TV Shape
This function allows you to select the proper picture proportion to match the source's image, you can select one of 4:3 and 16:9.
Conversion Prefer
This function allows you to select the screen conversion mode options: Full Frame/ Vertical cut/ Pillar Box or Full Frame/ Pan & Scan/ Letterbox.
Bright & Contrast
Press the / to adjust the value of bright and contrast.
DVB-T Mode
System Settings
Saturation
Press the / to adjust the value of saturation.
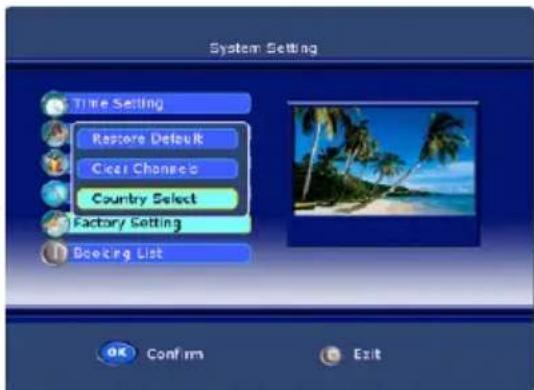
Factory Setting
Use the / to select Factory Setting item and then press Enter to confirm it
Restore Default
Press Enter to enter the restore default menu and use Enter to do it else use Menu to return to previous menu.
Clear Channels
Press Enter to enter the clear menu and use Enter to do it else use Menu to return to previous menu.
Country Select
Press Enter to enter the country select menu and use / to select country that one of Default.
Timer List
Use the / to select Booking List item and then press Enter to confirm it. This function allows you booking the TV program, press Enter to enter the setting menu
Event ID
Press and then use I to select event id options: 1 / 2 / 3 / 4 / 5
Service
Press Enter and then use / to select channel which you want to book from channel list.
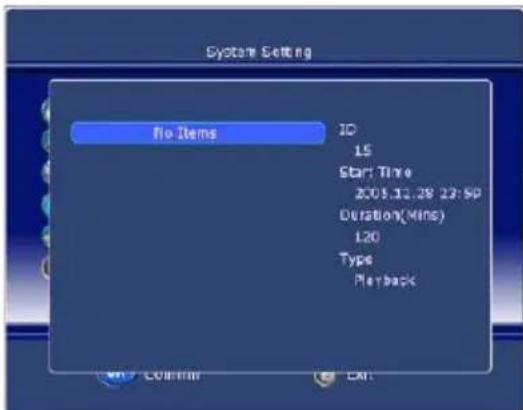
Event type
Press and then use I to select event type options: ONCE/ DAILY/ WEEKLY.
Start Time
Press the / to select the move cursor and input the number directly to set the begin time of channel which you have booked.
Start date
Press the / to select the move cursor and input the number directly to set the begin date of channel which you have booked.
DVB-T Mode
System Settings
Duration
Input the number directly to set the last time of the channel which you have booked.
Status
Press and then use I to select options: ON/ OFF.
System Info
Use the / to select System Info item and then press Enter to confirm it.
Software Version
Use the / to select Software Version item and then press Enter to refer to the version of software.
Hardware Version
Use the / to select Hardware Version item and then press Enter to refer to the version of hardware.
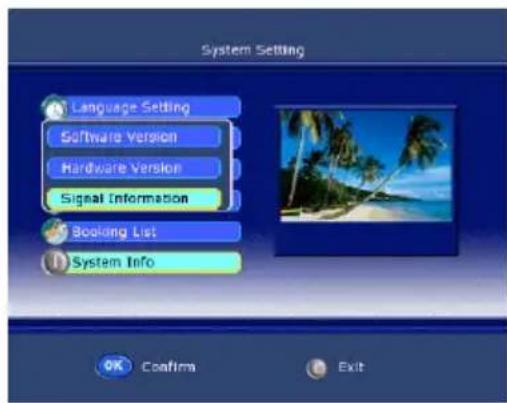
Signal Information
Use the / to select Signal Information item and then press Enter to refer to the signal quality and strength of signal.
EPG
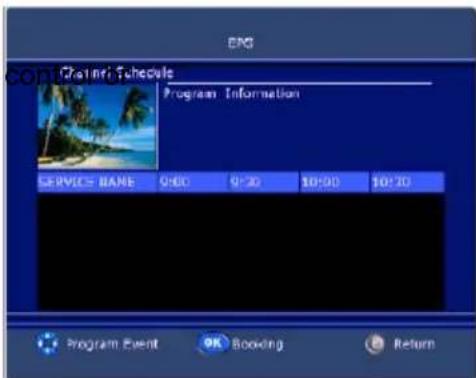
The last submenu in the main menu is EPG.
-
Press the DVB MENU on the remote on the front panel to bring up the main menu on the screen and use I to select the EPG menu.
-
Press the Enter to confirm your selection and there have a EPG menu on screen as below.
-
This function let you know the detailed information of the channel, that can predict the time of the program playing.
-
You can book channel by pressing Enter, and the operation of it is the same as Book setting.
DVB-T Others
Teletext
Press this button to enter Teletext interface. Press it again the background of teletext will become transparent and press it once more to exit teletext mode and return to normal TV viewing.
Press these buttons to access directly to the corresponding color pages displayed at the lower parts of the teletext screen.
PAGE SELECTION
- Press UP and Down buttons to select the preceding or following page.
- You also can enter page number (three digital) directly using the number buttons to select the page, and if you press a wrong number during input, you must complete the three digital number and re-enter the correct page number.
- Press Right and Left buttons to select the sub page of one page.
Other Operations
TV/RADIO
Press TV/Radio to select TV or Radio mode in sequence.
AUDIO
Press audio to select one of audio type as following: Stereo/ Left/ Right/ Mono.
SUBTITLE
Press this button to display the current sub-title, and press it again to hide it.
AUDIO
Press this button to select the Language of the current program.
EPG
Press this button to enter the EPG menu directly.
FAV
Press this button to enter the FAV menu directly.
INFO
Press this button to display some information about current program.
Troubleshooting DVB-T
Our custom service will help you. Did you already read the notes for Troubleshooting? Technical custom service of Xoro/MAS :
Phone: +49 40 77 11 09 17
Internet: www.xoro.de/support.htm
No DVB-T Signals?
Please check if the HTC xx25D is in DVB-T mode? If not please switch to this mode.
Bad reception quality?
Please, align your antenna optimally in direction of the mast. Use a antenna with active amplifier or a house antenna and roof antenna. If you have changed the HTC xx25D area, adjust the antenna new or connect an active antenna
No TV programs?
If there are no more programs shown in the Channel list. Please start automatic searching again.
Remote control works not ?
Please, direct the remote control upon the device. If the problem is not repaired yet, then change the batteries.
NOTE:
In areas with less DVB-T signals the application of amplifier aerials is recommended to the reception of all available TV channels.
DVD-Player
The DVD Player is activated by repeated printings of the AV/TV key.
The DVD Slot-In loader opens and produces now some noise. The Slot-In loader is on the left side of the HTC xx25D. Place the disc with the printed side to the rear into the loader and push very slightly to the right side. You can see the silver side. The loader moves in the disc automatically and reads the disc information.
English
Note:
If the disc is inserts with the wrong side, than the loader tries to read the disc. This procedure needs more time than in a normal way. The loader can not read the disc content and displays the message "No disc" and moves out the disc.
NOTE:
To be able to eject a CD or DVD it is necessary to enable the DVD mode. Otherwise the pressing of the OPEN/CLOSE button () will be without function.
Switch on the unit and press the SOURCE button repeatedly, until "DVD" is displayed right above on the screen. Now the HTC xx25d is in DVD mode.
Function
An On Screen Display (OSD) indicator will be displayed at the upper part TV screen when certain functions are executed, or when pressing the OSD button on the remote control.
The OSD indicator is a user friendly interface designed to display the status of playback type. When a different disc is loaded (DVD, CD, Music ready); the OSD indicator bar will be different
The OSD bar will appear automatically if it is activated by pressing the OSD button, Press the OSD button again and a new status bar will appear. Press OSD button a third time and the OSD bar will disappear. When OSD indicator bar appears, press other button, the OSD indicator bar will disappear automatically.

DVD-Player
Function
By pressing the OSD button again the following picture is shown by Video -DVD:

- Active sound track
- Format of sound track DD 5.1 CH (channel)
- Subtitle (not included in this example) (OFF)
- More aspects (in this example there are no aspects activate at moment)
By MPEG-4 video files the information is a bit different than with a video DVD. Important information for a ISO Data disk with MPEG-4 files are:

- Disc Format (here CDROM)
- Number of tracks and which one is just played
- With or without sound
- Running time
Open/Close

To open and close the disc tray. Press OPEN button on the front panel or the remote.
Notes:
Player will not skip forward or backward during "WARNING" section of a DVD disc.
- Single chapter DVD or single track CD cannot skip
Play/Pause

Press PLAY button to play the disc. Press PLAY/ause button again to pause (still picture). Press PLAY/PAUSE button to playback the content.
Stop

Press STOP button to stop in two modes:
- Press STOP button once. Stop memorizes the interrupt position and the OSD shows PRESTOP. Resume play by pressing PLAY button.
- Press STOP button twice completely stop disc. The OSD shows "STOP" and the PLAY button will resume disc.
DVD-Player
Function

Press this button skip advance DVD chapter or CD track.

Press this button skip backward DVD chapter or CD track.
Fast Backward/Fast Forward

Press this button to fast backward through the disc. Repeatedly press the button.

Press this button to fast forward through the disc. Repeatedly press the button will increase the search speed.
Notes:
The changes in speed by fast backward or fast forward are from Normal x2 x4 x8 20 Normal
- The player is muted in fast forward or fast backward this mode.
- Player will not fast forward or fast backward during WARNING section of a DVD disc
DVD Menu
While playing a DVD, press the MENU button return to the DVD disc menu.

Numeric Buttons


Numerical key pad (Random Program access)


- To direct access a DVD chapter or a CD track, input the desired
DVD chapter or CD track number using the numerical key pad.


- Input data for the DVD disc start menu or the player's setup menu.
Title
While playing a DVD, press the TITLE button return to the DVD disc title menu.

Audio Track
While playback a DVD disc, press LANG button repeatedly to select the desired audio sound track. A DVD disc may contain up to 8 selectable audio sound tracks.

DVD-Player
Function
Repeat section A-B
To repeat playback a specific section of a disc.
- Press the A-B button at the starting point of the desired section, "REPEAT A-" display on screen.
- Press the A-B button again, at the end of the desired section, "REPEAT A-B" display on screen. The desired section A to B until the function is cancelled.
- To cancel the function, Press the A-B button again return to normal play.
Note:
Some DVD discs do not allow A-B function
Repeat Mode
Press PEPEAT button repeatedly to select the repeat mode. In DVD mode In CD mode
REP.CHAPTER Repeat chapter REP.1 Repeat track
REP.TITLE Repeat title REP.ALL Repeat disc
REP.OFF Repeat off REP.OFF Repeat off

Note:
Some DVD discs do not allow repeat function.
Angle
While playback a DVD disc, press ANGLE button repeatedly to select the desired camera angle. A DVD disc may contain up to 9 selectable camera angles.

Subtitle
While play a DVD disc, press SUB-T button repeatedly to select the desired subtitle, A DVD disc may contains up to 32 selectable subtitles.

Note:
DVD disc start menu may contains set up of angle, Subtitle and Audio soundtrack selection. You may do the selection in the disc start menu.
Zoom
Press the ZOOM button repeatedly TV Screen display:
ZOOM x2 -> ZOOM x3 -> ZOOM x4 -> ZOOM x1/2 -> ZOOM x1/3 -> ZOOM x1/4 -> ZOOM OFF
When playback the JPEG. Press the ZOOM button display the zoom x1/2, x1/3, x1/4, press direction button to rotate picture. While display the zoom x2, x3, x4, press direction button to move picture position.
Function
Program
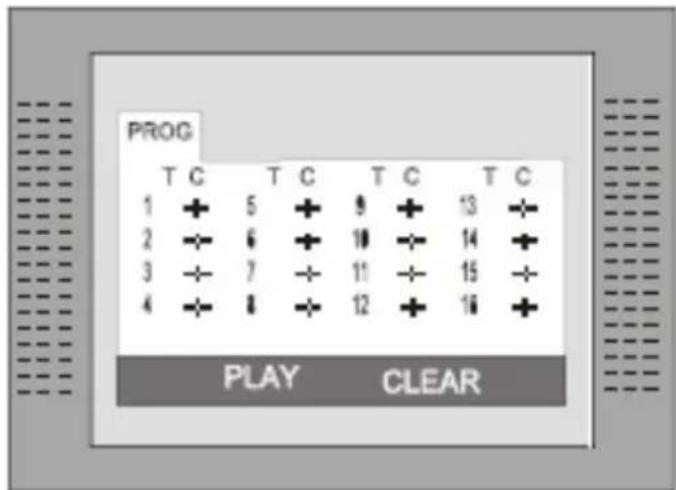
Press PROG button to quit the program menu.

In DVD mode
When the program menu appears input the Title and Chapter Number
PLAY: Press PLAY button to start program play.
CLEAR: Press CLEAR button if you want to cancel the wrong information you input. Press CLEAR again to cancel all the tracks.
In CD mode
When the program menu appears, input the Track number, press ENTER, when the programming is completed.
Data disc with Music, JPEG or Video files
- Switch on the unit
- Pressing SOURCE button repeatedly till "DVD" is displayed above left on screen.
- Insert a disc with Music, JPEG or MPEG-1, MPEG-2 or MPEG-4 video files
Insert the a disc and the player will auto search the directories saved Music/JPEG files. After searching, it will auto go to the first directory saved Music files (to the disc containing both Music and JPEG files. To the disc containing single type of files, it will go to the first directory) and play the first song in the directory (File name is highlighted). The screen displays as the picture below:
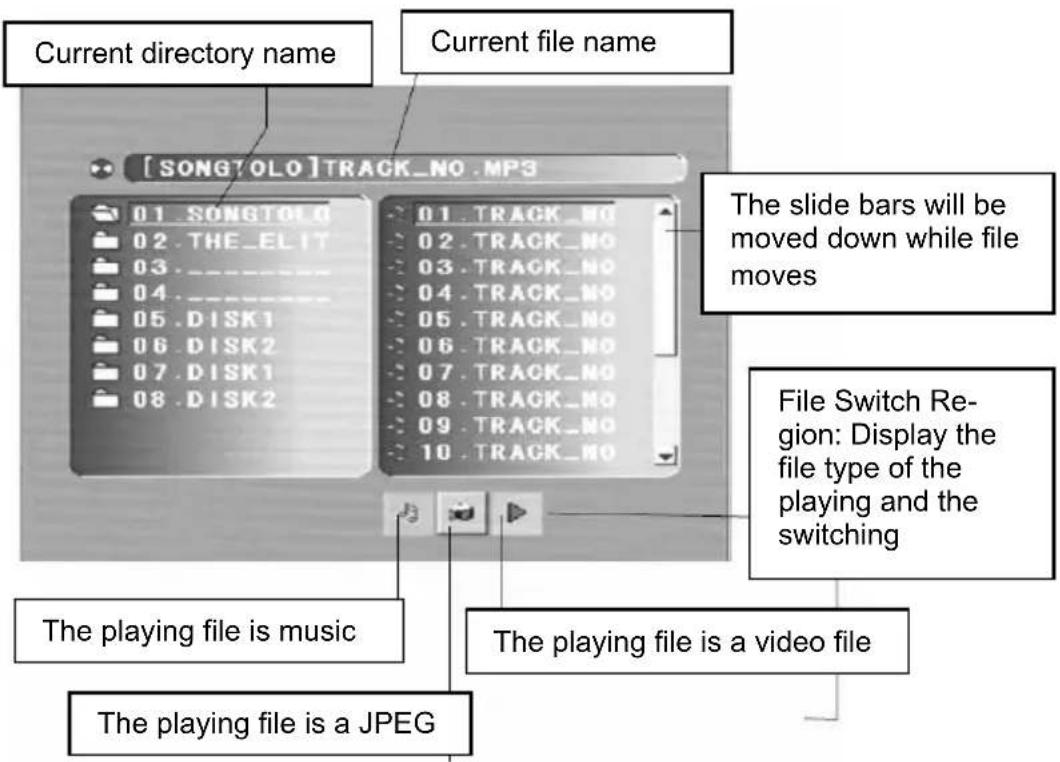
Note:
- With the arrow key to the right you can change between the catalogue window, the Chops and Track window and to the file format. File formats are of the order: music (mark (note)), pictures (camera) and video (arrow).
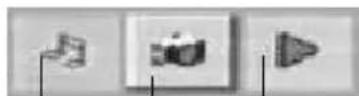
- The DVD player starts with the playback of Music files.
DVD-Player
Data disc with Music, JPEG or Video files
- Use the Arrow buttons to enter the Directory Region and highlight the desired directory, then the first track under it starts playback. You also can use the arrow buttons to enter the File Region and select the file you want to play.
Notes:
- With pressing the Left and Right arrow buttons, you can activate Directory Region, File Region and File Switch Region separately.
The highlight in Directory Region and File Region is shown as the picture on left page; While highlighted, a transparent rectangle appears - In File Switch Region, you can press the Left and Right arrow buttons to switch the highlight, then press Enter; the " " " and " "Button is illustrated in the left side picture. For example, if a disc with Music and JPEG files but without any Video files is loaded, the color of the letter " " and " " will be white and " " black. If a Music file playing, " " turns red.
- When playing a JPEG picture on discs containing WMA, MP3 and JPEG files, press the Return button to return to JPEG list.
- You can press the Numeric buttons to select the file you want to play. For example, if you desire the 15^th track in current list, press the "10+" Button once, then press "5", the 15^th starts playback.
Notes:
- When playing a disc with MP3files, no video can be displayed at the same time.
- You can press the "PREVIEW" buttons to get helpful message.
- When playing JPEG picture, press the Program button to choose the picture transition mode. There are 17 transition modes available. Press Program repeatedly to activate the function and choose the desired switch mode. Following transition modes are available :Spread from Left Up to Down, Spread from Down to Left, spread from Left to Right, Spread from Right to Left, Spread from Left Up to Right Down, spread from Right UP to Left Down, Spread Left Down to Right Up, Spread From Right Down to Left Up, Spread from Center to Up /Down, Fold from Up /Down to Center, old from Left/Right to Center, Horizontal Shutter, Vertical Shutter, Fold from the Corners to the Center, and Play, Off.
DVD Player Setup
Press the DVD SETUP button to enter the player's setup menu. Setup menu is a facility for the owner to adjust the detail setting of the player. For the detail of Setup menu see "SET UP MENU" of this instruction manual. Various features of the player can be adjusted in the SETUP menu.
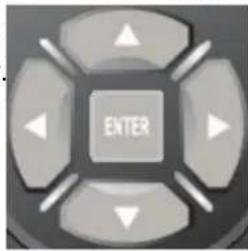
- Press DVD SETUP button SETUP menu appears.
- Press the UP/DOWN button to highlight the desired menu.
In STOP mode, press DVD SETUP button Highlight SYSTEM SETUP. Press UP/DOWN button to select the subtitle. Press ENTER button, the screen displays submenu.
- Press UP/DOWN button to highlight the desired time
Press ENTER confirm your selected item.
Three different global settings are in the Setup available:
- System Setup for TV systems, TV Type, Password, Rating and Default settings.
- Language Setup for OSD, Audio, Subtitle, Menu and MPEG-4 Subtitle settings.
- Audio Setup for Down mix, Audio Out and Dual Mono settings.
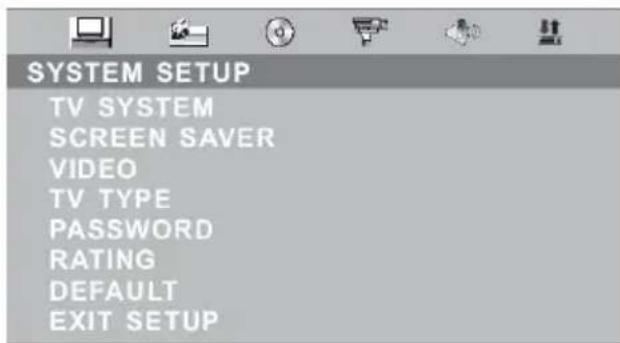
System Setup:
TV System
There are NTSC/PAL/ PAL 60 / AUTO three modes, and choose one mode according your TV mode.
If the TV mode is not suitable as the DVD player screen will blink and become colourless.
The default setting: PAL
SCREENSAVER
This setting activates or deactivates the screen saver. If the screen saver is ON, than appears the screen saver automatically when the playback stops for a longer time or when no disc is inside.
VIDEO
The setting defines the kind of video output. This setting can not changed, because the video output is fixed.
DVD Player Setup
System setup
TV Type
- 4:3 Pan Scan: It is suit to the common size TV. When playing, the picture will be cut . so that the TV screen is filled with the picture.
- 4:3 Letter box: when the player connect to the commonly size TV, please select the type. The top and bottom of TV screen will display black frame.
- 16:9 Wide Screen: When the player connects to the wide screen TV.
16:9
Wide
4:3
LetterBox
4:3
Pan Scan
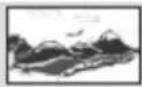
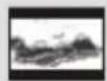
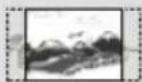
The default setting: 4 : 3 Pan Scan.
Password
Move the cursor the PASSWORD item and press ENTER button to confirm and then input the secret code "0000" (if it is the first use). After confirmation, you are required to input new secret code and then press ENTER "button" to confirm.
Warning:
Please remember the new secret code, otherwise you will not be able to change the parental control. Please contact the agent or our company if you forget the secret code.
RATING
There are total eight levels of this control. Eight levels as follow:
- KID-SAFE
- G
- PG
- PG13
- PG-R
- R
- NC-17
- ADULT
The first level discs are open to people of average and eight level only suitable for the adult. If you want to change the Parental control setting, enter the user's age control item and then enter four digital secret code. The default secret code is 8357(if you are using this player for the first time, just input this code). If the input code has been confirmed, the level setting up menu will appear. Move the cursor to choose the expected level and press ENTER button to confirm and store it.
Default
This is the factory default setting up. When choose "RESTORE", the previous setting up, by the user will be cancelled and the player will come to the factory setting up state.
DVD Player Setup
Language Setup
In STOP mode, press DVD SETUP button and Highlight LANGUAGE.
- Press UP/DOWN button
- Press ENTER button, the screen displays submenu.
- Press UP/DOWN button to highlight the desired item in the LANGUAGE menu.
- Press ENTER to confirm your selected item.
- Press SETUP button SETUP to quit.


LANGUAGE SETUP
OSD LANGUAGE
AUDIOLANG
SUBTITLE LANG
MENULANG
ENGLISH
GERMAN
SPANISH
FRENCH
PORTUGUESE
ITALIAN
EXIT SETUP
MPEG4-Lang
Select the a codepage for the MPEG-4 Subtitle:
Central EU: Swedish etc.
Cyrillic: Russian, Serbian etc.
Western EU: German, French etc...
East EU: Polish., Slovene etc.
Video setup
In STOP mode, press DVD SETUP button, highlight VIDEO SETUP. Press ENTER to enter next sub-menu.
The sub menu are "Brightness", "Contrast", "Hue", "Saturation" and "Sharpness".
Enter into one of the sub menu and change the settings by using the navigation buttons UP or DOWN. To save the new setting, please press the ENTER button.


VIDEO SETUP
BRIGHTNESS
CONTRAST
HUE
SATURATION
SHARPNESS
EXIT SETUP
DVD Player Setup
SPEAKER SETUP
In STOP mode, press DVD SETUP button and Highlight SPEAKER SETUP.
- Press UP/DOWN button
- Press ENTER button, the screen displays submenu.
- Press UP/DOWN button to highlight the desired item in the LANGUAGE menu.
- Press ENTER to confirm your selected item.
- Press SETUP button SETUP to quit.
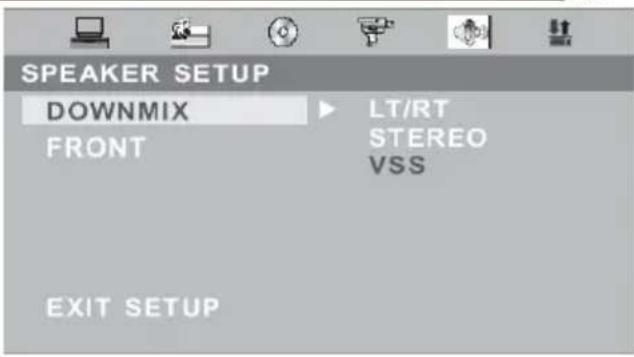
Downmix
This setting is suitable for films. If you only need two channels to enjoy music, it's recommended to select the second option, Stereo.
The option VSS produces a "virtual surround sound".
- LT/RT divided the channels.
FRONT
Adjust the size of the front speaker.
AUDIO setup
The setting "KEY" adjust the bass audio output.
Positive values for decreasing the bass. Negative values for increasing the bass.
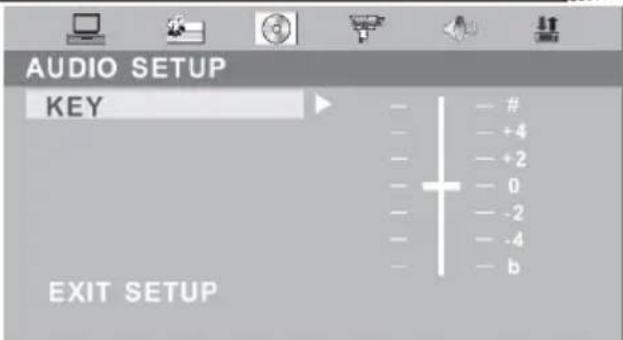
DVD Player Setup
Digital setup
In STOP mode, press DVD SETUP button and Highlight DIGITAL SETUP.
- Press UP/DOWN button
- Press ENTER button, the screen displays submenu.
- Press UP/DOWN button to highlight the desired item in the LANGUAGE menu.
- Press ENTER to confirm your selected item.
- Press SETUP button SETUP to quit.
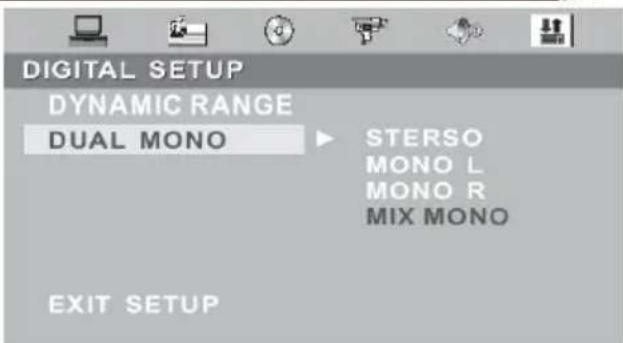
Dynamic Range
Here you can change the audio compression. If you choose the setting "FULL" than the audio gets the biggest limitation. A kind of "NIGHT MODE". By using the setting "OFF", the audio gets no compression.
Dual Mono
The options here are Stereo, Mono L, Mono R and Miy Mono.
If you have Dolby digital output your amplifier/decoder, you may select stereo, left, right and mixed sound accordingly.
Troubleshooting
Our custom service will help you. Did you already read the Troubleshooting pages?
Technical custom service of Xoro/MAS:
Phone: +49 40 77 11 09 17
Internet: www.xoro.de/support.htm
English
| Symptom Check and Action | |
| Does not play | No disc, load a disc.Disc has been loaded upside down. Place the disc with the label side up.Disc's region code does not match to the player.Disc's rating level is higher than the player's rating level setting.Disc is not correct type for the player.Disc is damaged or power on for one or two hours.Moisture may be condensed inside the player. Remove the disc and leave the unit power on for one or two hours. |
| No Picture | Check the system connection is proper and secure.Check if the connection cables are damagedCLEAN the disc. |
| Picture noise/distorted | The disc is dirty or damaged. Clean the disc or try another disc. |
| Picture not full screen | Select the screen format from the player's SETUP MENU.See “SETUP MENU” of this manual.Select the screen format from DVD disc menu. |
| Problem message display on screen | Following message will display when there is a problem with the loaded disc" 1. "WRONG REGIONAL DISC": Disc's region code is not match to the player. 2. "WRONG PASSWORD": The player refuse to play a disc with rating level higher than the player's rating level setting. 3. "WRONG DISC": The player is equipped with automatic disc quality detection software. When the player detects a problem disc or a damaged disc, the player may keep playing the disc at lower quality or stop playing, depending on the damage level of the disc. |
Troubleshooting
| Symptom Check and Action | |
| Cannot SKIP or SEARCH | Some discs are programmed that do not allow users to SKIP or SEARCH a some sections, especially at the beginning WARNING section Single Chapter disc cannot apply SKIP function. |
| Remote control des not function | Remove the obstacles between the remote control and the player. Point the remote control towards the remote sensor on the player. Check if the batteries of the remote control have been loaded with correct polarities. Replace the batteries of the remote control. |
Macrovision
U.S. Patens Nos. 4,631,603; 4,577,216; 4,819,098; 4,907,093; 5,315,448 and 6,516,132
"This product incorporates copyright protection technology that is protected by U.S. patents and other intellectual property rights. Use of this copyright protection technology must be authorized by Macrovision, and is intended for home and other limited viewing uses only unless otherwise authorized by Macrovision. Reverse engineering or disassembly is prohibited."
Specification
English
| HTC 1525D HTC | 1925 HTC 2225D | ||
| Screen Size 39 cm | (15,4 inch) 48 cm (19 inch) 56 cm (22 inch) | ||
| Display Type TFT LCD | |||
| Resolution 1280 x | 800 1440 x 900 1680 x | 1050 | |
| Aspect Ratio 16:10 | |||
| Brightness 200 cd/m | 2 | 300 | 2 cd/m 400 |
| Contrast 300:1 | 1000:1 | 1000:1 | |
| Response Time 25 ms 6,5 ms 5 ms | |||
| Viewing Angle | 90° | 160° | 160° |
| TV System | PAL BG / DK / I SECAM BG / DK / L / L' | ||
| Stereo | NICAM / A2 | ||
| Interface | |||
| CVBS Video | 1,0 V p-p 75 Ohm unausgeglichen | ||
| S-Video | Y: 1,0 V p-p +/- 3 dB C: 0,3 V p-p +/- 3 dB | ||
| Scart | CVBS: 1,0 V p-p 75 Ohm RGB: 1,0 V p-p 75 Ohm | ||
| PC VGA | 640 x 480 bei 60 Hz / 800 x 600 bei 60 Hz / 1024 x 768 bei 60 Hz Empfohlen wird immer die native Auflösung. | ||
| Antenna | RF Antennenanschluss, 75 Ohm | ||
| Speaker | 2 x 3 Watt | 2 x 3 Watt | 2 x 5 Watt |
| Video System | PAL / NTSC | ||
| AC / DC Adapter | AC: 110-260 V 50 / 60 Hz DC: 12 V bei max. 5 A | ||
| Consumption | 60 W / Standby 3 W | ||
| Dimension (LxTxD) | 385 x 175 x 336 mm | 465 x 210 x 410 mm | 540 x 210 x 460 mm |
| Weight | 5,5 kg | 6,5 kg | 7,0 kg |
cd/m


4s116u3
Ipeed hauanom 3Kcnpnyataunn KK TeJeBn3opa co BCTpoEHbIM DVD npOnrpbIBaTeJem (MOHO6Joka), NOXaJyNcTa, BHIMaTeJbH0 npOHTe pyKOBOCTBO nOlb3OBaTeJIa!
3neKtpnuecka 6e3oNaChocTb
- MoHobnok cneDyET noDKIIOuATb K cETn 3NeKtpOniTahnra TOnbKO C TeM HAnpJxHeHem, KOToPoE yKa3aHO Ha aAdanTepe.
- Дя педотьразецни порузк He ИспобуITE odHy I Ty Ze po3eTKy эл ekтponntаня дя Heckолькx npi6opOB.
- BydTe octopoxHbI, He pacnoJaarTe uHyp 3JekTpOnnTaHnB MecTax, rHe Ha Hero MoXHO HAcTyNtB.
-
O63aTeNbHO BbIKIIOuaIte MOHO6NOK, KOrda OH He IcNoJIb3yETc. EcNI Bbl He IIaHpyeTe NcNOB3OBaTb MOHO6NOK dInTeJIbHOe BpeM, OTKIIIOHTe erO OT aJIeKTPOCETn.
He donyckaite nonadHn Jnkoctn nBn BnHa MOHOk nn Ha Iy (nybT dntaHOnHoro ynpabNeHna).
B cnlyae BO3HNKHOBEHnIIO6oN3 nepeuNCJIeHHbIX HHXe cHTyaCNI, Heo6xOJMo OTKnIOHTb TeJeBN3Op OT 3JIeKTpocETn N o6paTntbcra B cepBnCHbI nCeHTp: -
NOBpeKdHa BnJIka CeTeBOrO shHypa nn cam shHyp;
BHyTpB KOpnyca nonana XnDkoCTb nnn npnbop noDBeprc B03deIcTBIO Bna; - NOCTOPOHHn IpeMTe NOnaB BeHTINJrLIOHHOe OTBepCTne;
MOHO6JOKΦyHKUOHNpyeTHeCTaBnIbHO.
He otKpbBaIe Kopnyc yctpoiCTBa. BHytpn ycTPOiCTBa HET y3IOB, Tpe6yUoXn 06cnyxNBaHn IOnb3OBaTeIeM. Ppi Heo6xoJIMocTN o6paauTEcb ToIbKO K KBaIIΦNUPOBaHHbIM CneuaJIncTaM.
Bo n36ekahne npoTeukydaJaiTe 3JeMeHTbI NITaHnN 13 IY, KOrda:
cpoK cIyX6bl 6aTapeeK nCTeK;
- HHe nCnoNb3yETcB TeueHne JInTeJbHoro BpeMeHN.
He 6pocaiTe 6aTapeiKn B oroHb.
Φn3nuecka 6e30naCHOCTb
- Y6eIntecb, yTO MOHOblok paCNOLOXKeH Ha pacCTOJHn He MeHee 5cm ot CTehb nn Me6eN.
- HnkOrda He cTyuHTe no 3KpaHy n He paCsaTbBaIte erO.
He donyckaite nonadaHna KndKocTn Ha Ndy n HnkOrda He pa3bpaate Ndy. - Chnte MOHOBOK, INcNoIb3yra TOnbKO MrgKyIO, NcCTyIO, cyxyIO TkaHB. He donyckaTcra cnoJIb3OBAHne pactBopnteJe.
Pycckn
Tpe6obAHn 6e3oNaChOn 3KcIpyatau
3KneKTnuecka 6e3oNaChocTb 1
Φn3nuecka 6e3oNaCHocTb 1
KoMnneKtaun 3
OchOBhIe Oco6eHHoCTn 3
KhoNk ynpaBneHn npa3bEmbl Ha Kopnyce ycTpoiCTBa
TbInobar naHelb 4
Ppabaa 6okobaa naheb. 4
BepxHra naneb. 5
BkHoueHHe/BbIKHoueHHe MoHO6Joka N BbI6Op nCTOuHnKa cnHaJa 5
Nyt dntaHnOHoro ynpaBneHn
Iodrotobka Iy K pa6ote 8
Ppabnla nCnoB3OBaHna Pny 8
PacnoJIOxHeNKe KHOJOK Ha Ndy. 9
OchOBhble onepaun pexnMa TB
PpHcHbI pa6ObI MeHIO HAcTpoEK 11
Hacrpoika n3o6paKeHnra 12
Hactpoika pexima kombtoephoro moHTopa 12
Hacrpoika pexima HDMI 13
HacrpoKa 3Byka. 14
Hacrpoika TeleBeuanchia 14
Obuhe HacrpoKu 16
HeincnpaBHOCTn TeIeBUN3opa n cnocobix yctpaHnna 17
OchOBhble onepaun pexmam DVB-T
PpHcunbI pa6Otb MeHIO HacTpoek 18
Hacrpoika kaHaIOB 18
Onepaunco cncKom KaHaoB 19
Cnncok IIO6mbix KaHaoB 21
CnCTeMHbIe HacTpoIKN 21
3neKtpoHna nporpaMa nepea.. 25
TeTeKCT 26
DonoHnTeIbHbIe onepaun 26
HeicnpaBHOCTn npHmHa DVB-T n cnocobIx ycTaPaeHHN 27
OchOBHbIe onepaunn pexmAd DVD
3arpy3ka/n3BneueHne DVD ncka 28
HOpMaOnOHnA cTpKa peXmAm DVD 28
OchOBhIe npaBnla ynpaBHeHnB BocpOn3BeDeHnEM DnCKOB 29
Bocnpoun3BeHeHne faJIOB MP3, MPEG-4 n JPEG 33
Hactpoika DVD nponrpbBaTeJia
CnCTeMHbIe HacTpoiKn 35
HactpoKa Ra3bIKOBbIX npaMeTpOB 37
Hacrpoika n3o6paKeHnra 38
HactpoKa 3Byka 38
Hacrpoika uippoBoro ayDIOBbIXoDa 39
HactpoKa rpoMkoROBOpTeJe 39
HeicnpabHocn DVD npounpblabeTn n cnocobI nx ycTpa Henn 40
TexHHueckne xapaKTepeNCTnKn 42
Pn pacnaKOBKe ycTpoiCtBa, noXaIyIcTa, y6eIITecb, YTO npncytCTByOT cneDyUoune akceccyapbl:
- JKK TeJIeBn3Op co BCTpOeHHbIM DVD npoIrpBaTeJIeM HTC 1525D/HTC1925D/HTC 2225D
- IyIbT dNCTaHcNoHHoro ynpaBneHnra (PdY) c6aTapeKamn
PykoBoIDCTBO nonb3OBaTeJIa
AaTep 3JekTpOnnTaHn
Ka6eB 3neKtpoNTaHnA - rapaHTnHbTaNOH
PpumeyaHue:
- Ecnu kaque-mo u3 akceccyapoe omcymcmeiom, noxanyucma, cpa3y xe obpamumecb K dunepy.
Coxpanhme ynapokky, oHa moXem Bam noHadoombc e 6yduem npu mpaHcnopmupoe neepa.
Bce2da mpaHcnpmupyme unu xpaHume npouapbIaMeNB e 20 opuaunbHOynaKoeke.
He mehme u He moduphiupyume demanu npouapbiamen uu eao akceccyapbl
OCHOBHbIEOCo6eHHoCTN
BbICOKOKaueCTBeHHbI DnCnJIeI
BolbOe KOJIueCTBO INHTeppeincoB: VGA, RF, Video, S-VIDEO, SCART n HDMI
- Iopdepka pa3peheny do 1080 ctpok npn noKnHueHn K nCTOHNK cooTBeTcByuOe rHana no nHTepceIcy HDMI . (OTHCITcra TOnbko K moJeM HTC 1925D u HTC 2225D.)
- CTepeOBxoI
BcTpoeHHbI TIOHeP aHaIorOBoro TeNeBeUaHnA
BcTpoHHbI TIOHep cHPOBOrHa3eMHOro TeHeBeaHnra (DVB-T)
- ABTomatnueckn n pyuHoi nonck n COxpaHeHne TeJIeBn3NOHHbIX KaHaJIOB
ABTOMaTHueckoe OTKIOUeHne npn OTCyTCTBn BXoHOrO CnHaJa
BcTpoeHHbI DVD npoirpbBaTeIb co igeNoB 3arpy3Ko IuCKOB
PpumeyaHue:
Bmodenu HTC 1525D uHmepfeuc HDMI omcymcmeyem.
TbINOba naHeB

Pycckn
Nodknoyehue aHmeHHbI
MOHO6JOK IMeET BCtpoEHbIe aHaIIOROBbI n cHpOBoT THePbI. IOnCOeINHInTe aHTeHHbI Ka6eJIb K aHTeHHOMy RF pa3bemy Ha TBIOBOI NaHeJI MHO6JIOKA.
Длг пиема aHaIorOBoro TeNeCnHana Bbl moKTe NcNoJIb3OBAtB BHeUHIO aHTeHHy 3ФnPHOro BeaHnry nII KOMHaTHyIO aHTeHHY nIaTHORo BeaHnry.Длг пиема LcΦpOBoro TeLeecnHana Ha3emHO RO BeaHnry Bbl moKTe NcNoJIb3OBAtB CneuaJIbHyIO BHeUHIO IIN KOMHaTHyIO aHTeHHy.Длг aKTbN3aUNa aHaIorOBoro TIOhepa BbIbepNTe npN NOMOuN KHOJKN SOURCE B KaueCTBe NcToCHNa cNHaJa TV, aДлг aKTNbauN cNΦpOBoro TIOhepa BblepNTe B KaueCTBe NcToCHNa cNHaJa DVB.
PpumeyaHue:
Для поуеня Мксumsьнога Качсma zuфpo8o ьшuaн ucnno3yime cneuaunuzupoeahny oheuHIO anmeHHy. Ecnu smo He603moXHo, mo ucnno3yume KOMHamHyO aHmeHHy.
Iodknioyehue npu nomouka6nra SCART
IHTeppeNC SCART no3B0JAE npedeBaTb BCE ayDIO-BnDEOCHaJIb IIO ODHOMy Ka6eIo. CoedHInTe pa3bEmbI SCART Ha TBIOBOI NaHeN MOHO6LOKA N TBIOBOI PaHEIN DVD INN BnDEOMarHnTOfoHa npn nomoOn Ka6eY SCART. Pp nnomoU KhoNkN SOURCE BBi6epnte SCART B KaueCTBe NCTOChNka BnDEOCnHaJa. Nocne 3tOrO MoHO6Lok 6yDet rOTOB pPnHmAtb ayINO-BnDEOCnHaJIb IIO Ka6eIo SCART.
IodknoueHue npu nomouc CVBS (AV) ka6eJra
EcnBbnoKlnOyaeTe KMOHO6NKe OJHOro BHeHrero nCTOuHnKa CnHaJa, a pa3bEmbl SCART, HDMI n S-Video yke 3aDeiCTBOBaHbI, To nIe NpOKNoUcHnO oUpeDHorO yCtpoiCTBa Bbl MoXeTe NcNoB3OBaTb CTAHdApTHbI AV Ka6enb. PnPi NmOOna ayINO-BnDeoKabEnra RCA coeHNHTe 6bIy n KpaCHbI pa3bEmbl AU-DIO IN L/R n JeNTbI pa3bEM VIDEO, paCNOLOxHhIbe Ha TblNOBoI naHeII MOHO6Noka, TblNOBn NaHEII DVD IIN BnDEOMarHnTofoHa
Pn NOMOUI KHOIIKIN SOURCE BbIepeITe AV B KaueCTBe NCTOUYHka BInDeOCnHaJa.
Pocne 3Toro MOHO6nok 6ydt roTOB npHmTa b ayDIO-BuDeoCINhaIb no AV ka6enio.
Iodknouhe npu nomouka6e S-VIDEO
EcnBbI NOdkIIOUaTe K MOHO6NOKy 6OJIe OJHORO BHeWHeRIO NCTOCHNA CnHnA, a pa3bEmbl SCART, HDMI n AV yXe 3aJeINCTBOBaHbI, TO dIra NoDKKIOUeHnRA OpePeHOrO yCTPOINCTBa Bbl MoKeTe INcNOJB3OBaTb pa3bEm S-VIDEO.
CoedHnTe pa3bembl S-VIDEO Ha TbIOBOI nAHeIN MOHOLOKa n TbIOBOI nAHeIN DVD nn BnDeomarHnTofoHa npn nOoN KabeN S-VIDEO, a pa3bembl AUDIO IN R/L npn nOoN RCA aynokabena. Pnpn nOoN KONIKI SOURCE Bb6epnte S-VIDEO B KaueCTBe NCTOHNka BnDeocnHaHa.
Iocne 3toro MOHO6k 6ydt roTOB npHIMaTb BnDEOCnHaJ no Ka6eJIO S-VIDEO, ayDnOcHnblno RCA cTepeoayDnok6eJIO.
Iodknoyehue npu nomouka6eHDMI
HHTepceHDCMI, noD6no HHTepceIcy SCART, no3BOJAE TpeJaBt Bce ayDIO-BnDEOCINHaJIbI NO ODNOMy HDMI Ka6eIHO, HO BVnΦpOBom φopMaTe C 6OJee BbICOKIM KauCTBOM. O6bIHO 3TOT HHTepceIc NcOJIb3yOt DnI NOkIIOUeHnIgPOBbIX KOHCOnEi PS3 IIN CNyTHNKOBbIX npneMHKOB. CoeINHITe pa3bEmbl HDMI Ha TBJIOBoi NaHei MoHO6JIOKa n TBIOBOI NaHei DVD, BVIDEOMaHNTofoHa, INPOBOI KOHCONI IIN CNyTHNKOBORO npneMHNka npn NOMOuK Ka6eRy HDMI. Pn NOMOuK KNOpKn SOURCE Bbl6epnte HDMI B KauCTBe NcTOUYHKa BVnDEOCINHaJa. IocNe 3TOrO MOHO6Jok 6yDet RotOB npHHMaTb aydNOBnDEOCINHaJIbI NO Ka6eIHO HDMI.
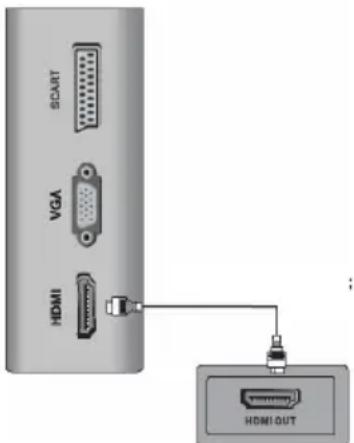
IodknioyuHue npu nomouu VGA ka6eJra
2 YCTAHOBNTE 3JIEMENTbI NITAHN,co6JIOdaa nonapHOCTb.
3 3akpoTe KpbuKy OTeKa 3IeMeHToB NHTAHN.
Ha npabte NaY Ha NK-cehcop MoHO6noka (pacnoJoxeH Ha 0HTaBHOI naHeJI) HAXMITE KhoNky, COOTBeTCTByOuH Heo6xOIMoKOMaHNe.
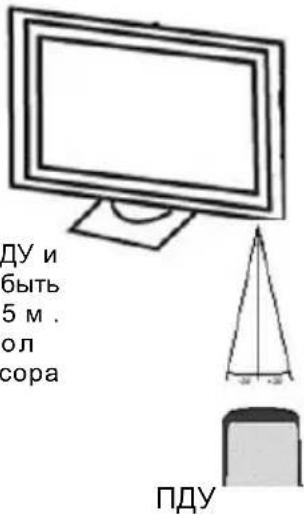
PacctoHne MeKdy NMy mOHO6nOKOM DOJXHO 6bItb He 60nee 5M. 3ΦΦeKTHBHy yrOJ «O63opa» NK-cehcopa npepa ±30°.
PpumeyaHua no uCnoJb3o8aHuO 6amapeek:
HecobnOeHne nepeuNCHeHHbIX HnKe yka3aHm MoKet npNBecTN K yTeUKe 3NeKtpoNtA n KoppO3nn 6aTapeek:
- Pn yctaHOBKe 6ataeek co6JIOdaIte nonpHocTb.
- YcTaHaBnBaembIe 6aTapeKn DoJXHbI 6bITb ODHoro N TORO Xe TIna.
Bo Bpemr dIHTeBbIX nepepbIBOB B nCNoJIb3OBAHn Iy BbIHMaTe N3 Hero 6aTapeKn. - Pn HnpaBnIbHoi pa6ote Ndy 3aMeHnte 6aTapeKn.
B cnyuae yTeuKN 3JeKtpoNt a npotpnte 6aTapeHbI OTcEK u yCTaHOBnTE HOBblE 6aTapeKn. - Pnp ytnn3aunbatapeek co6nodaTe yctahOBenHbIe npabuna.
PpumeyaHua:
- HanpaBnaume Iny Ha UK-ceHcop, pacnoJoxeHHbI Ha 0 poHmabHOu naHeNu MOHbNoka.
HeponymeIy. - Obepeaume Pny om nonadanua kudokocmu.
He pa36upaume Iy.
PacnoJoxHeue KHOJOK Ha Iy
ATV: Ahaorobb IB TB TIOHEP
DVB-T: LufpoBoB TB TIOHeP
DVD: DVD nponrpblBaTeIb
- POWER: BKJIQUHHe NITaHnI INI INepeXoD B peKIM 3HEproc6epExeHnI Standby.
- PMODE: BBbOp peXnMa oTo6paXeHnA.
- SMODE: BB60p peKIma 3ByaHnA.
- 0-9: BB6op KaHana BeuHaHnO 0-9
- LCD MENU: HactpoKa TeJeBu3opa.
- DVD SETUP: hactpoika DVD npounpmbaTeJia.
7.ДхоиCTнржmaTV(/V/OK):KHOKNynpaBHeHnKypCopom. - ENTER: NOI TBePKeHHe BbIbpaHHbIX 3HaueHnB 3KpaHHbIX MEHIO HAcTpoEk.
- VOL-/VOL+: yBéniueHne/yMeHbIeHne o6Ie IROMKoCTN.
- ATV: Kpacna KHonka pexnma TeJeTeKCT;
DVB-T: SUBTITLE: Bb6op r3bika cy6TnTPOB n
Kpacna KHonka pexnma TeJeTeKCT;
DVD: SUBTITLE: Bb6op r3bika cy6TnTPOB. - ATV: NICAM: BKNIOHHepe pexkma NICAM 3eNEHAR KONKa peKMa TeTeKCT; DVB-T: AUDIO: Bb6op RaBka 3ByKOBOrO COpOBXKeHnI N 3eNEHAR KONKa peKMa TeTeKCT;
DVD: AUDIO: BbI6op 3bIka 3ByKOBOrO CONPOBQKeHnR. - ATV: INDEKCHa KHONKa pexkMa TeTeKeCT DVD: PLAY/PAUSE: Bocnpoun3BeDeHne/nay
- ATV: nepexoK K noCDpaHnce peXkMa TeTeKCT;DVD: STOP: OCTaHOBka BOCPON3BeEHnY.
14.DVD:OPEN/CLOSE:N3BJIeYbDnCK. - DVD: ZOOM: macuTa6npoBaHne n3o6paKeHHa.
16.DVD: MENU: 3KpaHHoe MeHIO nCKa. - DVD: TITLE: ornaBneHne φnIbMa (MeHO pa3deNoB).
18.DVB-T:DVB FAV: npedbyuyn JIO6Mbki KaHAn; DVD: ANGLE: BB6op paKypca npocMOTp
19.DVB-T:DVB FAV:BKIIIOUeHHepeXIMa IPOCMOTpaJIIO6MlbIXKaHaJIOB;DVD:A-B:BBIbOp IN NOBTOpHOE BOCnPOn3BeJeHneΦparMeHTa 3aIINCn OTouKn Ado TOOKN B. - MUTE: OTKJIIOHcHHe 3Byka.
- SOURCE: BBi6op nctouHnka cunHana: TV SCART AV S -VIDEO PC-RGB DVD HDMI TV.
- DISPLAY: BBIOH Ha 3KpaH INHOpMaUN O BOCIPON3BeDEHN.
- SIZE: yctahOBka φopMaTa ᵇκρaHa 4:3 / 16:9.
24.-:pepeKIOUeHne pexIMOB BBOda OHO3HaHOrO/DByX3HaUHOrO HOMepa KaHana. - RECALL: 6bICTPoe IpeekJIIOueHHe MeXJy NocJeHNMn DByM TaKaHaJaMaN.
- TELETEXT: Bкнюсип ржима TeileTeKCT dЯ ananoroboro nцфpoBoro BeuaHn.
PacnoonKeHue KhoNOK Ha N
Pycckn
ATV:AHaIorOBbI TB TIOHeP DVB-T:UΦpOBoI TB TIOHeP DVD:DVD npOnrpBbTaTeIb
- DVB-T: DVB MENU: HactpoNka npneMHnKa DVB-T.
28.ATV: CH-/CH+: cneyuouu/npebdyu nn KaHaJ. DVB-T: CH-/CH+: cneyuouu/npebdyu nn KaHaJ. - ATV: XeJIaT KhONka peKIma TeJeTeKCT; DVB-T: EPG: 3neKTpoHHa nporpaMMA nepe- daH XeJIaT KhONka peKIma Tene- TEKCT.
30.ATV: CnHЯ KHOJapeXmMaTeTeKCT; DVB-T: INFO: HΦOpMaunO BOCpON3BOUNMOM KaHaJIe N CnHЯ KHOJapeXmMaTeTeKCT;
DVD: INFO: INHOpMaun O Bocnpoun3BedeHHN.
- ATV: BKNHoueHne pexmna npo3paHoro TeTeKCTa;DVD: nepexoN K npedyueI rnaBe/Tpeky.
- ATV: BbIXoI n3 peXmMa TeTeKeCT;
DVD: nepexoK cneyuoue rnaBe/Tpeky.
33.DVD:<</>>:yckopeHHoe BOCPON3BedeHne B npMOM/ObpaTHOM HappaBHeHN.
34.DVD: GOTO: nepexoK npyromy pa3demy - DVB-T: EXIT: BbIXoN ɪn ɪnctpoeK uɪΦpOBOrTOHepa.
- DVB-T: TV/RADIO: nepeKIOUeHne MeJy TeJIeBn3IOHHbIMN paIIOKAHaJaAMN.
- DVB-T: DVB FAV+: cIeNyHouu nnIObMbI KaHaI.
DVD: PROGRAM: nporpaMMnpoBaHne nocne- DOBaTeJIbHOCTN BOCpON3BeDEHn.
PpHcunbI pa6oTbIB MeHIO HAcTpOeK
BolbshnHCTBO KHOJOK, KOtOpbIe yNOMHaOTcR HNKe, Bbl MoKeTe HaHTn Ha BepxHei n npaBoi 6okOBoi NaHEnIax MOH6JIoka IIN6o Ha Ndy. IInr HAcTpoKn TeJeBu3Opa HaxMnte KhoNky LCD MENU. B 3aBncmocTo n OT Bbl6paHHoro nCTouHnka CnHaja Ha 3kpaHe IOBNTcra OndHO n3 CneDyUOuNX MeHIO:
VIDEO MENU (MeHIO HAcTPOkN n3o6paXeHnA), ecIn BBi6paH OOnH n3 cIeDVUOxN XcTouHKnOB CunHaJa: TV, AV, S-VIDEO, SCART, DVB-T, DVD.
PC MENU (MeHIO HacTpoiK KOMNbIOTePHoro MOHTopa), ECJIIN ICTOCHIKOM CnHana BbIOpAH KOMNbIOTeP(PC).
HDMI MENU (MeHIO hAcTpoiKpexmHa HDMI),ecnN nCTOuHkOM cnHaIa Bbipah pa3bem HDMI.
Pn KaKdOM cJeDyUoIeM HaKaTIN KHOKN LCD MENU Ha 3KpaHe 6ydyT NOBJIaTBcA CJeDyUOJIe MeHIO HAcTpoEK:
AUDIO MENU (MeHIO HacTpoNk 3Byka)
TV MENU (MeHIO HacrpoKn TeJeBeaHna) (TOJIbKO ecNI nCTOCHNKOM CnHana ABNReTcra TV).
GENERAL MENU (MeHIO hAcTpoiKn o6xN hAcTpoek)
CneIyUoIee HaxaTne KHOJKN LCD MENU npINBeTeK BbIXOy N3 MeHIO HaCTpoEK TeJIeBn3Opa.
BbXoN 3 MeHIO HAcTpoE KeTeJIeBn3Opa OcyIeCTBJIeTcR ODNHM I3 CJeDyUOnx Cnocob:
He HaxmMaTe HN OndHy N3 KHOJOK B TeueHne PAnTaTn CeKyHd,
Haxmte KhoKy LCD MENU HeckoBko pa3, noka MeHIO He nCye3HeT cKpaHa.
HactpoJa n3o6paXeHnA
EcnBb6paH OINH N3 CNeDyUOxN HCTOuHKnOB CnHaTa TV, AV, S-VIDEO, SCART, DVB-T, DVD, To npn HaxKATNI KONKl LCD MEnu Bbl nonaTe B 3KpaHHe MeHIO HaCTpoiKN n3o6paXeHn. B 3TOM MeHIO Bbl cMOXeTe OTpeRyJInpOBaTb rpkocTB, KOHTpactHOCTb, HacbIeHHOCtB n pe3KOcTB n3o6paXeHn Ha 3KpaHe TeJIeBn30pa.
BRIGHTNESS - RaKocTb
IcnoJb3yIe KhoNkVOL+ nIIN VOL- dIpeRyIInpOBKn IrpKoCTn.
CONTRAST - KOHTpactHOCTb
IcnoJb3yTe KHONK NOL+ nIN VOL- perynnpOBKn KOHTpactHOCTN.
COLOUR - HacbIeHHoCTb
IcnoJb3yTe KhoNkVOL+ nIIN VOL- dIpeRyIInpOBKn HacbIeHHOCTn.
SHARPNESS—Pe3KocTb
IcnoJb3yIe KhoNkVOL+nnn VOL-mppeyInpOBKn pe3KocTn n3o6paKeHna.
| VIDEO MENU | |
| BRIGHTNESS | 50 |
| CONTRAST | 50 |
| COLOUR | 40 |
| SHARPNESS | 50 |
Hactpoika pexima kOMnbIOTepHO MOHTOPa
EcnBaw MoHOBnok NOdKJIIOueH K KombIOTepy Hnn dpyromy yCTpOcTBy npn nOMoUk Ka6eJY VGA, To npn Haxatm KHOKN LCD MENU Bbl nonaTe B 3KpaHHe MeHIO HAcTpoiKn peXIMa KOMbIOTepHOrO MOHITopa.
BRIGHTNESS - RaPkocTb
IcnoB3yTe KHOKNVOL+nnnVOL- npeynpOBKn npKoCTn.
CONTRAST - KohtpactHOctb
IcnoB3yTe KHOKNVOL+ INN VOL- perynpoBKN KOHTpactTHOCTN.
COLOR SETTING - Pexmbi CBeTHOCTN
IcnoJb3yIe KHONKIN VOL+ nIIN VOL-ДЯ Bbl6opa OndHoro n3 Tpex npeducTaHOBneHHbIX peXIMOB UBeTHOCTN: 6500k,9300k nIIN USER.
COLOR SETTING - PeXMMbl CBeTHOCTN
NcnoIb3yIte KhoIKNVOL+nnn VOL-ДЯ BBIOpa OndHO r3 TpeX ppeDyCTaHOBJIeHHbIX peKIMOB LBEtHOCTn:6500k,9300k nIN USER.
Пи Вьборе 3начени USER Ha экран NOВТСЯ NOДмЕНО,В KOTOPOM npи NOMOИN KHONOK VOL+ Ил VOL- Bbl cmoхete yctahOBNTb Tpebyemoe 3начени Дпя кадloroцБета.Дпя подевждени ВьбранHorO 3начени НжмITE KHONKY MENU .
AUTO CONFIG - ABTOHaCtpoKa
IVcnoJIb3yIe KhoNky VOL+ДЯ BbI6opa peKIma aBToHAcTpOriK TeJIeBn3opa.
H.POsiTION -IoNcTpoiKa no ropn3oHTaJIu
IcnoIb3yIe KHONKIN VOL+ nnn VOL- dIpeRynipOBKn n3o6paXeHn no ropn3OHTaII.
V.POsiTION - PoiDcTpoiKa nO BepTnKaJIu
IcnoJIb3yIe KHOKNVOL+ nIIN VOL- dIpyIINPOBKn I3O6paXeHn no BepTnKaII.
HactpoKa 3Byka
Для Вхда B зкранhoe MeHIO HAcTpOи 3Byka HaxMnTe KhONky LCD MENU eue pa3.
VOLUME -FpomKoctb
IcnoB3yTe KHOKN VOL+nnVOL- perynpoBKn rPOMKoCTn 3Byka.
BALANCE - Baanac
IcnoJb3yIe KhoNKn VOL+nnn VOL- dnypeRyInpOBKn ayDnO6aIaNca MeKdy npabIM n JeBbIM DnHaMnKaMn TeJIeBn3opa.
AUDIO PRESET -Ппсдустановки 3Byka
NcnoB3yTe KhoNKn VOL+ nnn VOL-
IIN BbIbopa Ondoro n3 npedyctaHOBneHHbIX
peXIMOB 3Byka . DoCTynHbI cNe dyUOuMe
3HaueHnA 3TOro napametpa: PERSONAL/
AUDIO MENU
VOLUME 20
BALANCE 50
AUDIO PRESET PERSONAL
TREBLE 50
BASS 50
VOICE/MUSIC/THEATRE -Повьетьckи/Голoc/Музka/TeaTp.
Pn BbI6ope 3NaueHnA PERSONAL, Bbl cMOKeTe yCTaHOBnTb Tpe6yEmoe 3NaueHne CJeDyUoXn NapaMeTpOB.
TREBLE - BbICOKne yactoTbi
IcnoJb3yTe KHOKN VOL+ nnn VOL- dnypeRyHnPOBKn ypoBHr BbICOKnx ChaTOT.
BASS-Hn3Kne YacToTbI
IcnoNb3yTe KhoNKn VOL+ nVOL- npepynnpOBKn ypoBn Hn3Knx qactOT.
HactpoJaTeJeBeUaHnIa
Дя BXOda B 3KpaHHOe MeHIO HAcTPOHKn TeNeBeUaHnHaXMMTe KHOJky LD MENU eue pa3 (ToIbKO ecN NCTOCHNKOM CnHaJaЯBnaTeTV).
CHANNEL - Kahan
NcnoIb3yIe KHONKIN VOL+ nnn VOL- dnyBVeJIInueHn nn yMeHbSeHn Homepa TpaHCnpyEmoro KaHa.
SYSTEM - 3BykoBaa cnCTema
NcnoJb3yIe KHOJKN VOL+nnn VOL- nBbIbopa 3ByKOBOI CNCTembl. Bo3MOXHbIE 3NaueHnA 3TOI npaMetpa: BG/DK/I/L.
| TV MENU | |
| CHANNEL | 0 |
| SYSTEM | DK |
| SKIP | OFF |
| AFC | ON |
| FINE TUNE | 487.25MHz |
| SWAP | → |
| MANUAL SEARCH | → |
| AUTO SEARCH | → |
HactpoJa TeJeBeUaHnA
SKIP -Пponуck kaHaJa
IcnoJIb3yIte KHOIIK NOL+ IIN VOL- IJRA BbIbopa peKIMa npOnycka KaHaJa:
Pn BbIbope 3NaueHn ON (BkIoueHo) 3TOro napaMeTp a Tekyu n KaHaJI 6ydet NCKIIOUeH n3 CnNcKa KaHApOB. OH 6yDet npOnyckatbcra Pn IocJeIOBaTeNbHom nepe6ope KaHApOB c NOMOsbKHOOK CH+/CH-. Dnla BOCCTaHOBJeHn KaHApA B CnNcKe KaHApOB Bbl6epHTe erO, H6paB Homep Pn NOMOu nCΦpoBbIX KHOJOK, U yCTaHOBtE 3NaueHne 3TOrO napaMeTp dJa KaHAp aPaHBm OFF (BbIKIOyeHo).
AFC - ABTomatnuecka NOdctpOJa YaCTOTbI
Пи Вьборе 3начени ON (Вклюсно) 3ТО Р.apaMeТра у actOTа Tekyцero KaHаla 6удET NOДСТРаNBATbCS aBTOMaTnuecKN I He MожeT 6blT b N3MeHeHa C nOMOцьIO Φункци рун HoToHOn HAcTpOиЧaTOTbl. ДЯ прIMeHENЯ Функци рун HoToHOn HAcTpOиYCTaHOBInTe 3начEHne 3ТО Р.apaMeТра дя KaHаla paBhbIM OFF (Вьклюсно).
FINE TUNE - Tohna Hactpoika
Ecnn n3o6paXeHne nn 3BykoBoe cOnpoBxJdeHne Ha TpaHcNpyemom KaHaJIe BOCpON3BOJrTcC nOMexAmn, NcNoJIb3yIte KHOKN VOL+ nn VOL- dIra ToUHOI NOCTPOKn YactOTbI TpaHCnIPyeMoro KaHana, oBeceNeuBaIOSei MaKcImaJIbHOe KaueCTBO n3o6paXeHnN 3BykoBOcOnpoBxJdeHn. Ppr BblOpe ToHOrn HacToPOnKn napameTpPy AFC aBTOMaTHueckn 6byet npncBOeHO 3NaueHne OFF (BbIKIOUeHo).
HaxMnte KONky VOL+ДЯ BOCCTaHOBNeHn 3HaueHn npaMeTpOB, yCTaHOBneHHbIX Ha φa6pnike.
3TO OTHOCNTcK 3HaueHnM npaMeTPOB, yCTaHOBneHHbIM B MeHIO HAcTPOIKuN3o6paXeHn, 3Byka, peKIma KOMnbIOTepHoro MOHTopa N npaMeTp a BLUE SCREEN B MeHIO O6xix HacTpoEk.
Ecni y Bac Bo3nKnn npo6Iembl c cyHKcnoHnpoBaHne TeJeBn3opa, To neped o6paueHnEM B cepBnuchnyo cnjx6y n3yUHTe CneDyOuTu Tabn.
PpHnCnIbI pa6oTbIB MeHIO HAcTpoEK
Y6eHNTecb, yTO nCTOCHNKOM CnHaIa BbIbpaH cNΦpOBo TIOHeP DVB. IyBaBbopa 3TOrO nCTOCHKA CNHaJa CdelaIte CJeDyUoee:
- BkIIOUHTe 3JIeKTPoNTaHne MOHO6noka.
- Haxmnte HeckoJIbKO pa3 KhoNky SOURCE, noka B BepxHem npaBOM yrny 3KpaHa He NOBNTcHADnncb "DVB".
- DЯ BXOda B MeHIO HAcTpoeK HaxMITE KHOKNy DVB MENU Ha Iy. HaxMITE KHOKNy DVB MENU eue pa3 dIra BO3Bpata B npdeIbIyUee MeHIO INI dIra BbIXOda I3 MeHIO HAcTpoeK.
- NcnoJb3yIe KHOJIKN ▲/▼ДЯ Bbl6opa OdHOn n3 CTpaHnC MeHIO HAcTpoEK.
- HaxmTe KHONky ДлЯ aKTnBaCnBBbIbpaHHoCTpaHnCbl MeHOr NaCTpoE, a3aTeM NcnoJIb3yIe KHOKN △/▼/△/ ▲ДЛЯ BbIbopa HyxHoro npaMeTpa IN3MeHeHra erO 3HaueHnR.
- Haxmte KhoNky DVB MENU nIe B03BpaTa B npdeIyuee MeHIO nIe Haxmte KhoNky EXIT nIe BbIXOda n3 MeHIO H
- Haxmte KhoNky ENTER nIe noTBepeHnHOBOrO 3HaueHn npaMeTp a. Waiting SIGNAL or NO SERVICE
3TN COO6ueHn INΦopMnpyIOT 06 OTCyTCTBm BXoHOrO CNrHaNa nn 0 3aunΦpOBaHHOM nlaTHOM CNrHaJIe.
Hactpoika KaHaJIOB
При посвом Вкючени моноблка Bam Heo6хODIMO aKTHBnPoBaTb Функцю abTomatнueckoro NOUCKa I COxpaHEnR B nAmrTN TeJIeBN3Opa BCEx DoCTyINhIx KaHaJIOB.
- ⅡIЯ BXOIDA B MeHIO HAcTpoE KAnMITE KHOKNy DVB MENU Ha IINY.
- Пиnomоин KHONOK / V BbI6epnte ctpaHcy Channel Setting (HactpoKa KaHaNoB) n HaxMnte KHONky ENTERДЯ NOITBePckDeHn BaWero BbI6opa.
- Ha əkpaHe oTo6pa3ntcMeHIO HacTpoKn KaHaNoB.
Search Type - Tyn noncka
HaXMMTe KHONKy ▶, a 3aTeM nCNoJb3yIe KHONK I /▼ДЯ BbIbopa TUNa NONKa KaHaIOB: Auto Scan/ Manual Scan/ Scan By NIT (ABTomatNueckn nonck/PyHoi nonck/Nonck no YacToTe BeaTeTn). 3NaYeHNem napaMeTpA, yCTaHOBJIeHHbIM NO yMOJIuHaHIO RaJIaETcR Auto Scan.
Channel No - Homep kaHaJa
BbO Homepa nna haHdEHHoro kaHaana. DOnyuctmbi
Homep KaHana: 0 -- 69. 3Ta onu HnOCTynHa npn ATOMaTneckom NOnCKe KaHaoB,
Hactpoika KaHaJIOB
KOrdaHOMepaIMPnCBAuBaHOToaABTomatUeCKN.
Frequency - Yactota
Bb6op kaHajn npn nomoun npmaoro BBOda COOTBeTCTByUoJe EMy yactotbl.
Band Width - Полosa nponyckaань
HaxMTe KHOKy ▶, a 3aTe M nCNoB3yTe KHOKN ▲ /▼ ДЯ BbI6pa OДHOrO n3 npedyCTaHOBJIeHHbIX 3HaueHn NapaMeTpα: 6M/7M/8M.
Encrypted Service -ШифpoВане даньх
Haxmte KONky , a 3aTeM nCnOJb3yIte KONK /▼ДЯ BbIbopa OdHoro N3 npedyCTaHOBJIeHHbIX 3HaueHn napaMeTpA: Save/ Not Save (CoXpaHrB/He coXpaHrTb).
Update Mode - Pexim o6HOBnEHHa
HaxmTe KhoKy , a 3aTeM nCNoJb3yIte KhoKn ▲/▼ДЯ BbIbopa Ondoro n3 npedycTaHOBneHHbIX 3HaueHn napametpa: : Append/ Replace (DOnonHraTb/3ameuatb).
Sort Channel - CoptnpoBka KaHaJIOB
IcnoJb3yIte KHONK I /▼ДЯ Bbl6opa napametpa Sort Channel (CopTnpOBKa KaHAnOB) n HaxMnTe KHOKNY ENTER IJI NaTBePKeHnI.
BbIepeNte Name UP n HaxMnTe KhoNky ENTER dna nepemueHnaHaJa BBePx no cnCKy KaHaNoB.
BbI6epnte Name Down n HaxMnTe KHOkY
Onepaunco cncKom KaHaNoB
ENTER nIepeMeueHn KaHaNa Bn3 no cnNcKy KaHaNoB.
BbI6epnte Encrypt n HaxMMte KhoNky EN-TER dIa copTnpOBKn CnNcKa KaHaIOB no aIpaBNTy.
1. ネ淋巴白 BxOda B MeHIO HAcTpoE KHaXMITE KHONKY DVB MENU HaПДУ.
2. Пиnomоин KHONOK / V BbI6epnte cTpaHnUy Channel List (CncocK kaHAnOB) n HaxMITE KhONky ENTER ДЯ NOДТВержденя Baшero Bbl6opa.
3. Ha ekpahe oTo6pa3ntcra cnncok KaHaJIOB, a TaKke Band Width/Quality/Frequency/
Strength (NoIoca nponyckaHnKaueCTBO/YacToTa/MoUHocTb cnHaJa), COOTBeTCTByUOUIe BbIbpaHHOMy KaHaJy.
Cnncok JIO6MbIX KaHaJIOB
KAHaJIOB.
1.ДЯ BXOJa B MeHIO HAcTpoE KHaXMITE KHOKNY DVB MENU Ha Iy.
2. Пи пOMOUI KHOJOK /▼ ВьбepNTe CTpaHnUy Favorite List (Cncoc JIO6mblx KaHAnOB) И НжмITE KhoNkY ENTER Дпя NOДТВержденЯ Baшero Вьбopa. Ha экране OTO6pa3ntcЯсncok KaHAnOB.
3. Ecnn Bby XOTnTe Do6aBnTB HObI KaHaJI B CnncOK IIO6mMbIX KAHaIOB Nn ydaNtB KaHaJI n3 3TOrO CnNcKa, To npn NOMoU KHOJOK A /▼ BBi6epnte HxKbI Bam KaHaJI n HaXMMTE KHOKNy ▶, n Ha 3KpaHe NOBNTcR MeHIO BBi6opa CneDyHOUero DeINCTBnI.
4. Пиnomоин KHONOK /▼ Вьбepnte HxKHyIO onuIO n HaxMITE KHONky ENTER Дя поТВержденя Baшero Вьбopa.
5. Ecnn Bbl Bblbpann onuH No Delete (ydaNTb), TO BblpaHHbI KaHaJ ydaHTcN3 cnpCKa IIO6MbIX KaHaNoB.
6. Ecnn Bbl Bbipaln onuio Add (Oobntb), To cnpaba Ha 3kpahe noBNTc cnncok docty
7. Пиnomоши КнОнOK /▼ Вьберпгу hyхньи KaHаи НжмITE KhoNky ENTER ДЯ поТВерждени Baшero Вьбopa. ВьбpaHHь KaHалdo6aBNTcR B cIncoK IIO6mblx kaHaNoB.
CnCTeMHbIe HacTpoiKn
- HaxmTe KhoNky DVB MENU JnB Bo3Bpata B npEbyUyue MeHIO Nn HaxmTe KhoNky EXIT nBbIXOda n3 MeHIO HaCTpoEK.
- ⅡЯ BXOda B MeHIO HAcTpoE KHaXMITE KHOIky DVB MENU Ha Iy.
- Пиnomоин KHONOK / BBb6epnte ctpaHcy System Setting (CnCTemMbie HacTpoKn) n HaxMITE KHONky ENTER nI npdTBepxdHnBaWero Bb6opa.
- Ha 3kpaHe OTo6pa3ntcMeHcNCTeMHbIX HAcTpoek.
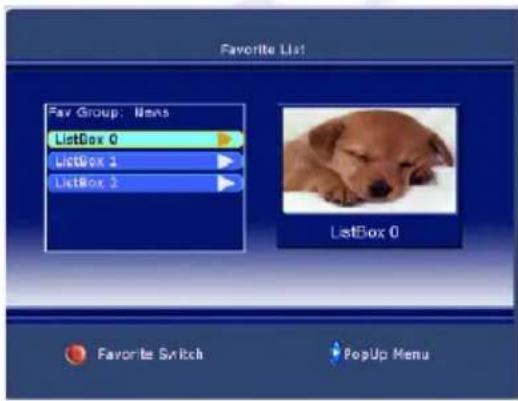
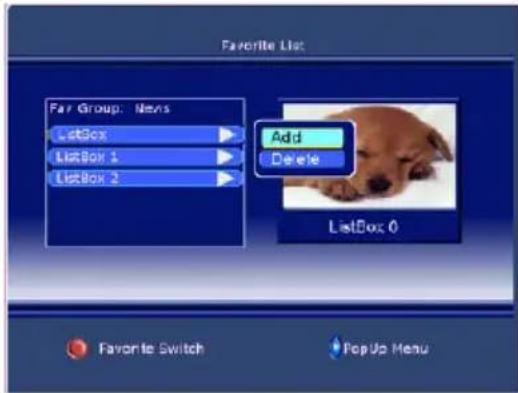
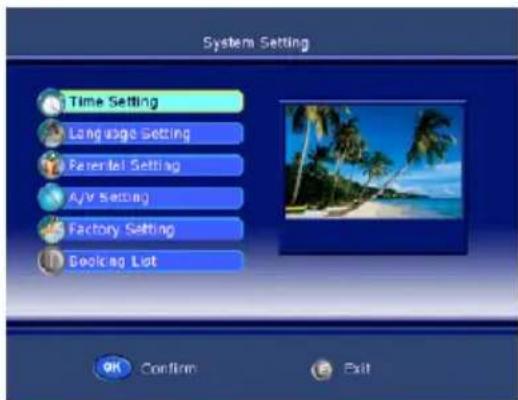
Time Setting - YcTaHOBka BpeMeHn
- Пиnomоин KHONOK /▼ Вьберпге onциHo Time Setting (YctaHOBka BpeMeH) n HaxmTe KhoNky ENTER Дя поТВержденя Baшero Bb6opa.
- Ha 3kpae OTo6pa3ntc MeHIO yCTaHOBKn BpeMeHN.
OCHOBHbIE ONEPAUIN PEXKIMADVB-T
CnCTeMHbI He HAcTpoiKn
Time zone - BpemeHHa 3oHa
3TOT napametp no3BOJnEe Bac yctaHOBtB BpeMeHHyU 3OHy, COOTBETCTByUoIyU BaSei MeCTHOCTN. IcNoJIb3yIe KhoNkI ▲/▼ДЯ Bbl6opa OHOH N3 BpeMeHHbIX 3OH: GMT+0---8.HaxMITE KhoNky ENTER nIra NOdTBePckJeHna BaWero Bbl6opa.
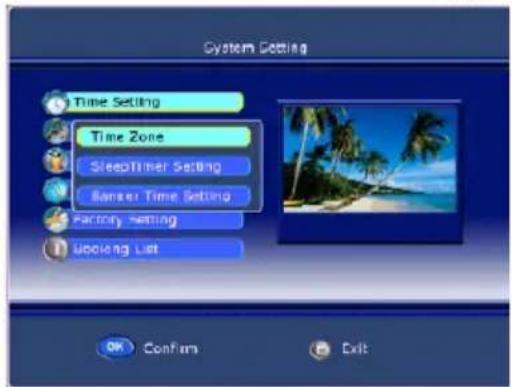
Factory Setting - 3aBODCKne ycTaHOBKn
- Пи поюн Кногok /▼ Вьберпс оцию Factory Setting (3aBoDcKne yctahOBKN) и НжмITE Kногу ENTER严禁 noTBePckdHnBaWero Bvibopa.
OCHOBHbIE ONEPAUIN PEXKMA DVB-T
CnCTeMHbIe HacTpoiKn
- Ha 3kpaHe oTo6pa3ntcMeHIO 3aBOdcknx yCTaHOBOK.
Restore Default - NapaMeTpbl no yMonuHnIO
Haxmte KhONky ENTER nBxOda B MeHIO BOCCTaHOBJIeHn 3HaueHn npaMeTpOB, yCTaHOBJIeHHbIX NO yMOJUahHIO.
HaxMnte KONky ENTER nIy NOITBepKdEHHBOcctaHOBHeHn 3NaueHn npametpoB,ycTaHOBHeHHbIX NO yMOJUaHHo, INI HaxMnte KONKY MENU nIy OTKa3a OT BbINOnHeHHaTOrO DeiCTBn.
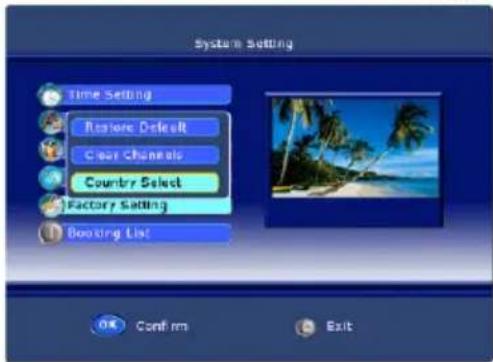
Clear Channels - 06HyJeHne cNcKa KaHaJIOB
Haxmte KhONky ENTER IINBxOda B MeHIO OShyIeHn CnNcKaHaNoB.
HaKMITE KHonky ENTER nIy o6HyneHn cncka KaHaoB nn HaKMITE KHonky MENU dIy OTKa3a OT BbINOnHeHn 3TOrO DeiCTBn.
Country Select - BbI6Op cTpaHbI
HaKmTe KhONky ENTER IJBA BXOa B MeHIO BbIbopa CTpaHbl. Pn nOMoUng KHONoK A / V Bbl6epnte CTPaHy, RaBk KOtOpO 6ydt NcNoB3OBaTbcra B KaueCTBe 3HaueHnry, yCTaHOBNeHHoro NO yMOJIuaHIO B Ra3bIKOBbIX HAcTpoNkax.
Booking List - YcTaHOBka TaIMepoB
-
ПиnomоинКHONOK /▼ ВьбepиTe onuH Booking List (YcTaHOBka TaMepoB) И НжмITE KHONky ENTER ДЯ NOДТВержденя Baшero Вьбopa.
-
Ha əkpaHe OTo6pa3ntcMaHIO HAcTpoKn TaMepOB.
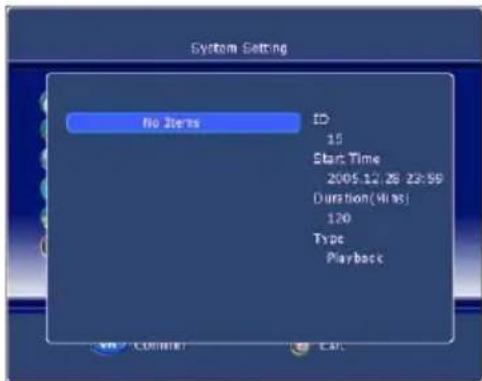
Event ID - Homeport Taïmepa
Haxmte KhONky , a 3aTeM nCNoB3yIe KhONKn ▲ /▼ Дя BblOpa Homepa yCTaHaBnBaemoro TaMepa: 1/2/3/4/5.
Service-Homep kaHaJa
Haxmte KhONky , a 3aTe mncnoj3yTe KhONKn ▲ /▼ Дя BbI6opa KaHaJa, KoTOpBb Bbi Jenaete BkJIIOuATb no BbI6paHHOMy TaImepy.
Event type - Tn TaMepa
HaxMnte KhONky ▶, a 3aTeM nCNoJb3yIte KhONKn ▲ / √ДЯ Bb6opa Tnna TaIMepa: ONCE/ DAILY/ WEEKLY (OdHokpato/HExeDHeBHO/ExeHeJeNbHO).
Start Time - BpemBkIouHne KaHaJa
IcnoJb3yTe KHONKn / DnIe npemeueHm MExdy NOnpOBoBie KHOKN DBA BBOda BpeMeHN BKIOUeHn KaHaJa.
CnCTeMHbIe HacTpoiKn
Start Date - BpemBbIKIOueHnKaHaJa
IcnoJb3yIe KHOJIKn / DJIpeMeUeHm MExDy NIOJAMN UINpOBoBle KHOJIKN DJI BBOJa BPeMeHn OTKJIOnyeHn KaHaJa.
Duration - PpOdoJnxTeJbHocTb
IcnoJb3ynte cnpobBie KHONKn dny HENOCpeCTBeHHoro BBOda npoOJIxNTbHOCTN BeuaHnry Bb6paHHoro KaHana.
Status - AktnBaçın Taimepa
Haxmte KhONky ▲, a 3aTeM nCNoJb3yIte KhONKn ▲/ ▼ДЯ BblOpa OndHO r 3HaueHn : ON/ OFF (BknOHTb/BbIKNIOHTb).
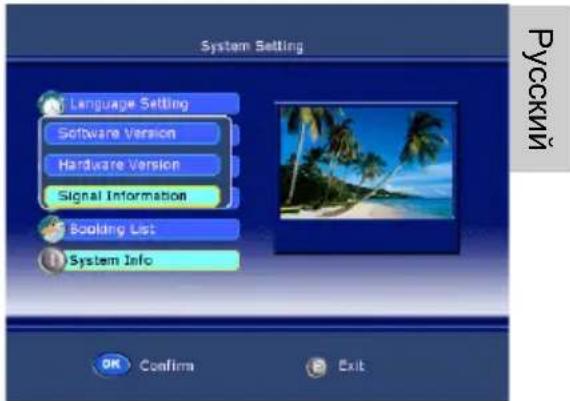
HENCINPABHOCTN INPNEMHnKA DVB-T IN CNOOCbIXX UCTPAHEHnA

Ecn y Bac Bo3nKn npo6nembl c yHKuHnpOBaHne npnemnka DVB-T, to nepeD o6paueHnEM B cepBnCHyO cnjx6y n3yUHTe CNeDuOn pa3dI.
Omcymcmyem cuhaJ DVB-T
IpoBepbTe nepeKnHueH Jn MoHO6Jok HTC xx25D B peXIM DVB-T. Ecnn HeT, To nepeKJIouHTe MOHO6Jok B 3TO T peXIM.
IIloxoe kaueembo npuema.
Ioxayncta, otperynpyte Bauy aHTeHny. Icnoj3yTe aHTeHHy c aKTHBbIM ycInTeJem (KOMHaTHyo aHTeHHy nIN BHeuHIO aHTeHHy). EcIn Bbl nepemeCTnIn HTC xx25D, to Hactpoite aHTeHHy eue pa3 nIN NOkNouHTe aKTNBHyO aHTeHHy.
NymcnucokKaHaNoe.
3anyctnte npoceDpyaBtOMaTnueckoro noncka KaHaJIOB epe pa3.
He pa6omaem Ndy.
HanpaBnIe Ndy HEnocpeDCTBeHHo Ha MOHOJok. Ecn npO6Jema He peuHnacb, To 3aMeHnte 6aTapeKu B Ndy.
PpumueaHue:
B paohax co cna6bIM DVB-T cuhaHOM dnn npuema ecex docmynHbix meeneu3uoHHbIX KaHIOB hacmormenbHO pekomehoyemc npumehue akmuho2o ycunumei.
Kauecmgo u3o6paXeHua
KaueCTBO n3o6paXeHnra, noIyuaemoro ot DVB-T npneMHnka cyuaceTBeHHO 3aBnCIT OT MeCTHOCTN pa3nUHbIX ycNOBni npneMa. Han6oJee BaxHbIe dIpa KaueCTBa n3o6paXeHn npametpbI - 3TO CKOpocTb nepeDaun nHΦopMaun (bit rate) n pa3peSeHne, oBeCneuHaembIe nepeDaBaEMbIM DVB-T cnHaIOM.
CkopocTb nepaun HnΦopmaun (Bit rate)
Ckopoctb nepedaun HnΦopMaun OnpeJeTcB WeaTeJem N MoKet 6bItb pa3nHoh Ira KaKdoI KAHaJa. Pa3hIMN BeaTeJAMN NOdEprXnBaIOTCR pa3hIe cKOpOCTN nepedaun CnHaJa. Ecnn npn npneMe DVB-T CnHaJa Bb Ha6nOaTe Ha ekpaHe Mo3Anky, apTePakTb nn pacnblBvatoe n3o6paxKeHne, To noctapaiTecb yBeiNuHTb yPoBeHb CnHaJa nn erO kaueCTBO, OTperynipOBaB NoJoxKeHne BaWei KomHaTHoAHTHe Bn. Pnpobyte 3ameHtB KOMHaTHHy o aHTeHHy Ha BHeuHIO. Ecn Bb DoCTnIgOnTMaJIbHO KaucctBa CnHaJa, Ho n3o6paxKeHne He uLyUHNIOcb, TO npINHMaEMbI DVB-T CnHaI NMeet HeNoCTaTOUHyO Ckopoctb nepedaun HnΦopMaun.
Yem Bblie CKOpocTb Npepaun HOpmaun, Tem 60Je KaueCTBeHHbIM 6ydet n3o6paKeHne, C MehBWM KOJIueCTBOM apTeqakTOB mO3aUNHbIX BKpapanHeHn.
Pazpeшени
CneyuouumnapaemtpoBnnaHkaueCTBO n3o6paXeHnraBnreTcpa3peuHne. Yem BbIe pa3peuHne,TeMaKaeCTBeHHee uYteUe 6yudT n3o6paXeHne.
OCHOBHbIE ONEPAUIN PEXNMA DVD
3aarpy3ka/ɪn3BνeueHne DVD dɪncka
- BKJIOHTe 3JIeKTPoNTaHHe MOHO6Ioka.
- Haxmnte HeckoIbko pa3 KhoNky SOURCE, noka B BepxHem npabom yrny ekpaHa He NOBNTc HADNNCb "DVD".
- Tenepb MoHO6IOK HTC xx25d roTOB K BOCPON3BeHeHNO DVD DnCKOB.
3arpy3uK dncOB paCNOJoxeH Ha JEBoB 6OKOBn naHeN MoHO6Joka HTC xx25D. Ppn OTKpbITIN 3arpy3uKa CJIbIweH HeKOtOpBn IyM.
BCTaBbTe DnCK B 3arpy3uK MapKnpoBaHNO ot Ce6r CTopoHOI n aKKypaTHo HaxMNTe Ha DnCK B npaByIO CTOpOHy. B 3TO Bpem Bbl DoJXhbl BNDeTb CEpe6pncTyIO CTOpOHy DnCKA. 3arpy3uK BTaHET DnCK BHyTp b ABTomAtuYeCK N pOnIrpbIbATEJIb HauHET qHTaTB NHOpMaunC DnCKa.
PpumueaHue:
Ecnu duck bcmae HenpabunbHou cmopohou 8eepx, mo 3a2py3uk nonbimaemc npoumamb duck. 3mo 3aumem 2opa3do 6oIbwe 6peMeHu, yem o6bIuHo. Ho uHcpMaucu c ducka 6ocnpunHa He 6ydem u Ha ducnnee noBumc coo6ueHue No disc (Hem ducka), nocne yezo duck 6ydem abmamuuecku bbiobunym u3 3a2py3uka.
PpumeyaHue:
Ira u3neueHua CD unu DVD ducka u3 3a2py3uKa Heo6xodumo nepeknioumb MOHOk 8 peKUM DVD. B npomueHom cnyuae, Haxamue KhoIKNU OPEN/ CLOSE (A) He npueedem K doJXHOMy 0fpekmy.
HΦopMaζnoHHa CTpoka pexmá DVD
Pn BbINOHeHn HeKoTOpBix Oepaun DVD npOnrpbIbATEJem nIn npn HaxaTN KHOKN DISPLAY Ha PdY B BepxHeu acTn 3kpaHa NoRbIeTcN HΦopMaunOHHa CTpoka.
HnΦopMaunOHna Ctpoka npedctabnaret co6o npyxeCTBHeHHbI NOJIb3OBaTeJIIO nHTeppeic, oTo6paxaUoJe Ha 3KpaHe pa3nHyO HnΦopMaunO BocnpOn3BeDeHHN . B 3aBncmocTn OT 3arpyxeHHoro DnCKa (DVD, CD, Music CD) coedePKaHne HnΦopMaunOHNo CtpOKn 6ydt pa3HbIM.
HΦopMaζnoHHa CTpoka NOBJIeTcA BtOMaTnueckn, ecn 6ydet HaxaTa KhoNka DISPLAY Ha Πy. NobTOphoe HaxaTne KHOKN DISPLAY npuBeTeK OTo6paXeHIOB V HΦopMaζnoHHo CTpoke DOnONHHTeNbHO HΦopMaζnn. A npn TpeTbeM HaxaTm N KHOKN DISPLAY HΦopMaζnoHHa CTpoka NOnHOCTbO NcYe3HeT C eKpaHa. HΦopMaζnoHHa CTpoka Ncye3Het C 3KpaHa ABtOMaTnueckn I npn HaxaTm IIO6bIX dpyrnx KHOKN Ha Πy.
HΦopMaζnoHHa CTpoka pexima DVD
CoepekHne HOpmaOnHHoCTpOKn npBocnpOn3BeJeHNn DVD nscKa:

- FopMaT nUcKa: DVD
HΦopMaunO pa3delaX: Bocnpn3BOUntc1-bi pa3den 2.
HΦopMaunO rnaBax: Bocnpn3BoDntc 3-ay rnaBa n3 33.
Bpem Bocnpon3BeDHeN: 2 ckyHdbI.
CoepkaHne INHOpMaUHOHHo CTPOKn nocJe noBTOpHOro HaxaTna KhoNkn DISPLAY npn Bocnpou3BeDeHN DVD dncKa:

- AKTNBHyI 3ByKOBoI TpeK: BOCnpon3BOOnTCs1 TpeK n3 1.
- ΦopMaT 3ByKObO r TpeKa: DD 5.1 CH.
Cy6Tntpbl: OFF ( OTKJIIOUeHbI). - Yron o63opa: OFF (oTcyTCTByeT).
CoepeKaeHne HOpMaunOHn CToKn npn Bocnpn3BeHeu ncka MPEG-4:

- Opmat ducka: CDROM.
HOpmaun O Tpekax: BOCnpon3BOOnTcra 1-bi TpeK n3 12.
HaHnue/OTcyTCTBne 3ByKOBOrO cnpoBoXKeHnA: 3ByK eCTb.
BpeMa BocnpOn3BeDeHnA: 41 cekyHda.
OchOBhIe npaBnla ynpaBHeHna BocnpOn3BeDeHneM dNcKOB

Omkpbimb u 3akpbimb noddoh 3aepy3uka ducko
Haxmte KhoNky OPEN Ha npaBoi 6okOBoi nane MoHO6noka nnHa Pny.
PpumueaHua:
- Пουарьевамь He можем осуесменияпегхod велер ул назад по pa3denam DVD ducka EO epemЯEOcnpou3eedeHua pa3deHa WARNING (ПЕДУПЕЖDEHNE).
He8o3MOxHO uCnOJIb306aMb kOMaHdy SKIP, eCnu ducK coCmoum u3 oDhoU 2naebi (DVD) unu odHozo mpeka (CD).

Hauano oocnpou3eedeHu u nay3a.
HaxmTe KhONky PLAY/PAUSE nHaayana BocnpOn3BeDeHnry Dncka. IpyBpeMeHHo npnoCTaHObKn BOCpOn3BeDeHnry HaxmTe KhONky PLAY/PAUSE eue pa3. HaxmTe KhONky PLAY/PAUSE eue pa3, n BocnpOn3BeDeHne npoDOnKHTcra.
OchOBhIe npaBnla ynpaBneHna BocnpOn3BeDeHneM dNcKOB

OcmaHoBa eocnpou3eedeHua
HaxaTneM KhoNk STOP MOXHO BBeCTn Dba peKIma:
- HaxMMTE KHONKY STOP ODNH pa3. Пи сTOI octaHOBKe B nAMrTb 6yTe coXpaHeHa TOnKa OCTaHOBa, a Ha INΦopMaunOHNoCtPOKe NOrBtCra COO6UeHne PRESTOP (IPNOCTAHOBKA).ДЯ BO3o6HOBJIeHnRA BOCpON3BeDEHnC TOUYK NOCTaHOBa HaxMMTE KHONKY PLAY/PAUSE .
Haxmte KhoKy STOP DbaKdbI, YTO6bI NOHOCbIO OCTaHOBTb Bocnpo3BeDeHne. Ha HΦopMaunHOHcTPOKe NOBTCa COO6eHne STOP (OCTAHOBKA).ДЯ BO306HOBJIeHnB BOCpOu3BeDeHnC HauJaA DaNcKa Haxmte KhoKy PLAY/PAUSE.

IepexoK cneyoue Iaee/Tpeky
Haxmte 3Ty KhoNky, YTo6bl IpeeTn K Bocnpo3BeDeHNo CneDyUoSei rnaBbI DVD nscKa nn Tpeka CD nscKa.

NepexoK npedbIdyuuei Tnae/Tpeky
Haxmte 3Ty KhoNky, YTo6bI nepeTn K BocnpOn3BeDeHIO npeDbIyuei rnaBbl DVD nicka nn Tpeka CD nicka.

YckopeHHoe 8ocnpou3eedeHue 8 o6pamHom HanpaenHuU
Haxmte 3Ty KONky dny yckopeHHoro Bocnpon3BeDeHnB o6paTHOM HnpaBneHn. Heckonbko pa3 HaxmTe KONky dny yBeNueHnCKOpOCTN BOCpOn3BeDeHn.

YckopeHHoe 8ocnpou3eedeHue e npMOM HanpaenHeuu
Haxmte 3ty KhoNky dIy yckopeHHoro Bocnpo3BeDeHnB npMOM HappaBHeHn. Heckobko pa3 haxmte KhoNky dIy yBeJIuHcHn CkOPOCTn BOCpO3BeDeHn.
PpumeyaHua:
- Изменные скорсу ускоренью вocп pouь dedеня в пямом ул у obразим Наразим eu npoucxodum в сдедуюшем подке: Hopmaльна --x2 --x4 --x8 --20 --Hopmaльна.
- Pn yckopeHHOM Bocnpon3BeHn e npMOM uu obpamHom HapaeHeHu 36ykooe conpoeOxdeHue omKnIouaemc aBomammuyecku.
- Пουзбамь He можем осушесмь уckорнoe Bocpon3beHne 6 npromm unu obpamHom HanpaBHeHu npu bocnpou3eDeHu ceMeHma WArnING (PPEyPExKDEHNE) DVD ducka.
MENU

3KpaHHoe MeHIO DVD ducka
MeHIO pa3deNoe DVD ducka
При Воспpon3бдени DVD ДИСКа НжмITE КнОКУ TITLE ДЯ перexODA B MeHIO pa3delenOB DVD ДИСКА.

BbI6Op np3bika 38yko02o conpooxdeHua
При Воспpon3ВeDEнн DVD ДUCKa HAXMITE KHONKY AUDIO HeCKOЛько pa3 ДЯ Выбopa ЛаEMOROЯ3bika 3ByKOBOrO copoBoXdeHnry.DVDДИСК мОжТ coDEрЖаТ bdo8 3ByKOBbIX TpeKOB (Я3bIKOB 3ByKOBOrO copoBOxdeHnry).

Ioeopnoe 6ocnpou3eedeheue paemma ducka
YTO6bI NOBTopntb BOCPON3BeDHeNc OO6bIX ppaMentOB DnCKa:
HaXMMTe KHOIky A-B Ha HauaJIbHoi TOUKe XeJaEMOro fpaarmEHTa. Ha 3KpaHe NOBNTc COO6UeHne REPEAT A-.
Haxmnte KhONky A-B eue pa3 Ha KOHeuHOJ TOUKe Jeaemoro fpparmenta. Ha 3kpahe nOBnTcra coo6uene REPEAT A-B. BbIbpaHHb I parmeHT OT A do B 6yDet BOCpOn3BODITbcr, Noka peKIM He 6yDet OTMeHeH.
- Yo6bI OTMeHnTB peKIM NOBTOpHOrO BOCnpOn3BeDeHnR n BepHyTbCRA K HOpMaNbHOMy BOCnpOn3BeDeHnIO, HaxMITE KHONKY A-B eue pa3.
PpumueaHue:
HekomopbE DVD duCKu He nooepxuaom pexum A-B.

Ioeopnoe 6ocnpou3eedeue
Haxmte KhoKy PEPEAT HeckoIbko pa3 dIy Bbl6opa OndHO r 3 DoctynbIX peKIMOB NOBTOpHOrO BOCnpon3BeDeHn.
PnBocnpon3BeDenHm DVD ncka
REP.CHAPTER NOBTop rnaBbl
REP. TITLE NobTop pa3dena
REP. OFF NobTop OTKnIOueH
PnBocnpo3BeHEni CD ncka
REP.1 NOBTOP Tpeka
REP. ALL Повтор диска
REP. OFF NOBTOP OTKNIHOUEN
PpumueaHue:
HekomopbE DVD ducku He nooepkuaa om pekum noemopno 8ocnpou3eehnra.

Pn Bocnpon3BedeHn DVD ncka
B KaKdyu no3nuiu Tabnuii Bam npn nmooun cnppoBbIX KHOJOK Heo6xOIMO BBeCTH Homep Pa3dena (T) u Homep TlaBbl (C).ДЯ nepemeuenno Ta6nue nCnoJIb3yIte KhoNk ynpablenenyn Kypcopom.
PLAY: Haxmte 3kpaHHy KhoNky PLAY nna hauana nporpammbi Bocnpo3BeDeHnra.
CLEAR: Haxmnte 3kpaHHy0 KhONky CLEAR, ecn Bbl XOTnTe OTMeHnTB HeBepHy0 INΦopMaunio, KOtopy0 Bbl BBen. Haxmnte 3kpaHHy0 KhONky CLEAR eue pa3 dIpy OTMeHb BCEx TpeKOB.
Pn BocnpOn3BeDeHn CD dNcKa
B KaKnyu No3nHTo Ta6nUb Bam npn NOMOu nCpOBbIX KHOOK Heo6xOIMO BBecTu HOpE TpeKa B HyKHO Bam nocneObaTeNbHOCTN.
Для завершениnporpaMMIOBaHЯнжмTe KhoNky ENTER.
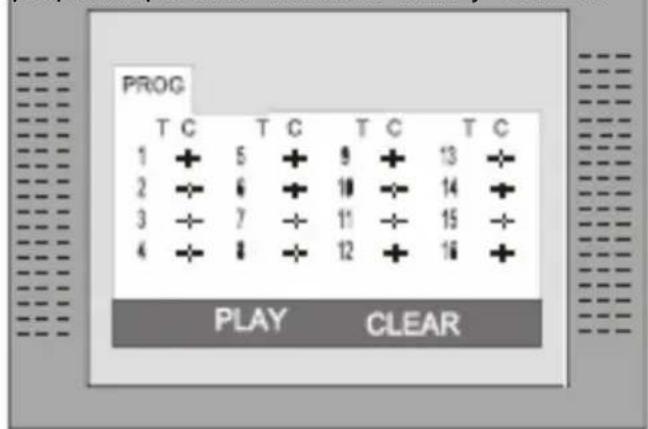
Bocnpo3BeDeHne paHOB MP3, MPEG-4 n JPEG
- BkHouHTe 3JKeKTPoNTaHHe MOHO6JOKa.
- Haxmnte HeckoIbko pa3 KhoNky SOURCE, noka B BepxHem npabom yIy 3kpaHa He NOBUTc HADnncb "DVD".
- BCTaBbTe dNcK c faaiamn B opMaTe MP3, JPEG nnMPEG-4.
BCTaBbTe DnCK n npOnrpblBaTeJIb aBTOMaTnueckn HaChET nonck faiNoB MP3 / JPEG. Nocne 3aBepSeHnna ONsKa DVD npOnrpblBaTeJIb nepeIeT K nepBoi panKe c faiJaMn MP3 (dny DnCK, coOpjkaUero oba Tnna faiNoB MP3 u JPEG; ecInn DnCK coOpjKHT faiNbI TOJbKO Ondoro Tnna, To DVD npOnrpblBaTeJIb nepeIeT K nepBoi panKe, coOpjkaUeF faiNbI eTORo Tnna) n HaChET BOCnpOIN3BeDeHne nepBOr oaiNa B 3ToI panKe (pni 3tOM Homep faiJa "01:" 6yDet noCDBeUeH). Ha ekpaHe NOBITcA CleDyUoJe
n3o6paqkenie:
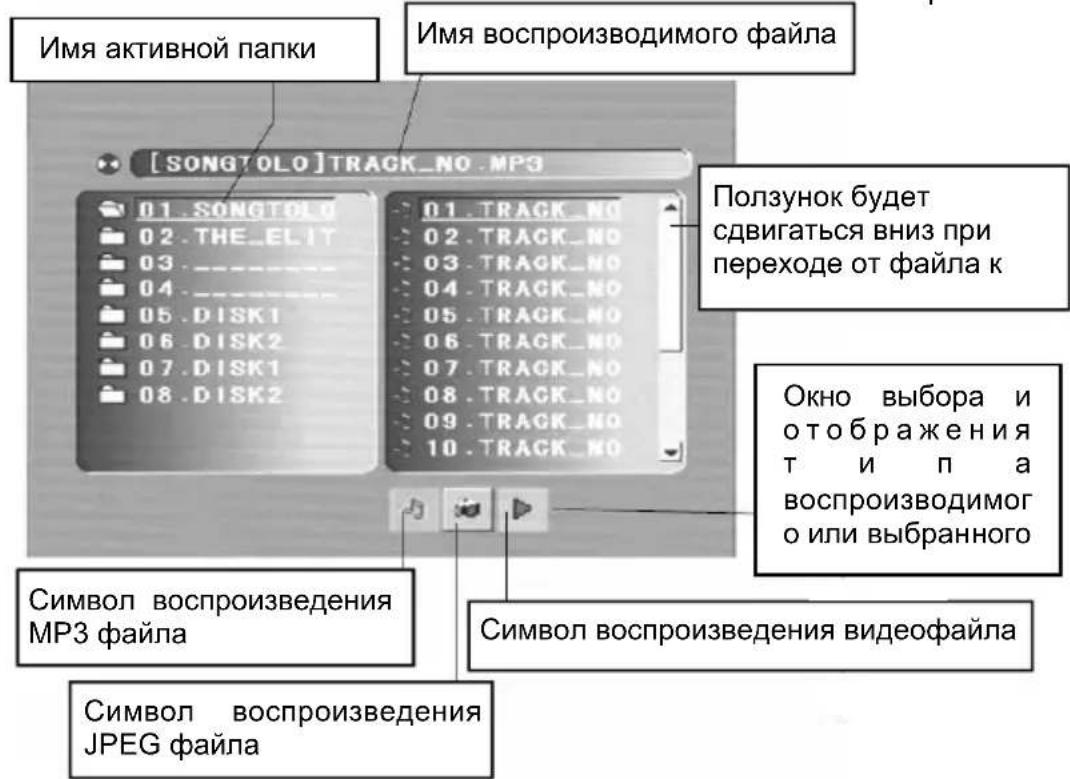
PpumeyaHue:
HcnoIb3yK HONku ynpaeneHu Kypcopom enpaeo, Bbl moxeme nepemuaibc Mekoy Okhamu nanok, faJIOB u OKHom bIbopa muna oocnpou3eodumbx faunoe. Fopmam fauna moxem 6bIMb cneDyUoUM: My3bikalnbHbI faun MP3 (063naeh
H o m a M u), K a M e p o u
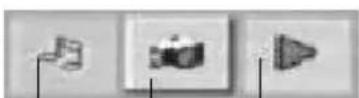
u3o6paXeHue (o6o3HaueH eudeoopaun (mpeyaonbHK).
Bocnpo3BeDeHne paJnoB MP3, MPEG-4 n JPEG
IcnoIb3yIte KhoNn HABnrauIN DnI nepeXoDa B OKHO nanOK n BbIbopa HyxHoi Bam IaIK. NepBbI TpeK n3 Bbl6paHHo nnPKn NaKNn HauHET BOCpON3BOIDtbcr. Ppi nOmoi KNOPK HABnrauIN Bbl MoXe Te nepeHTB OKHO paJIOB IN Bbl6paTb paJl, KOToPbI JKeJaTe BOCpON3BeCTn.
PpumeyaHua:
- IcnoIb3yUme KhoNku u ▷dnernepeKIOueHua MeXdy OKHaMu nApOK, faunoe u ebopa muna fauna.
Iodcbemka akmuehbx nanku u fauna npoullnocmpupoeha bliwe Ha pucyHke, ecnu cumboJ muna fauna bydem bidehen e okhe ebiopa 6ecubemhbim npraMOy20nbHKOM.
B Okhe ebibopa muna qauna dna nepeknouehn mejdy nukmoaspammu muna qaunoe Bbl moke me ucnolb3oambk HONku u ▲, a 3ameM haxamb KNONKY ENTER; Ecnu 3aepyken duck c qauanmu MP3 u JPEG, Ho 6e3 Kaux 6bl mo Hu 6blno eudeoqaunoe, mo nukmoaspmmbl u 6ydym
6eIbIMU, a nuKmoapamMa cepou, m.e. HedocmyHou
ucnoIb3oBaHua. Ipu eoCnpou3eedeHuu faaHa MP3 nuKmoapMa cmaHem KpaHoU.
- Ipu 0ocnpou3beDeHuJPEG u3o6paXeHua c ducka, codepkaueo fauIbI fopmamoe WMA, MP3 u JPEG, haxMume KhoNky RETURN dner 8o3epama K cnucky bcex JPEG faunoe.
- Дя ebьбopa Фаuna, komopьи Bы xomume bocnpou3becmu, можно успобзoeamb u zuфpoьie kHonku. Hanpumep, dЯ bocnpou3eDEHua 1520 mpeka u3 akmuehoi panku haxmume chayana kHONky 10+, a 3aem KhONky 5, u DVD npouapbivamel naHem bocnpou3eDEHue 1520 mpeka.
PpumeyaHua:
Ppu 8ocnpou3eedeHuMP3 qauNo8 He8o3MOKeH OHO6peMeHHbI npocMomp buoeou3o6paxeHu.
- Ipu bocnpou3ebeHuu u3o6paxeHua JPEG haxmume KhoNky Program dny ebibopa pexuma 3ameuHua u3o6paxeHu. Docmynbl 17 pexumoe nepexoda. Haxmume khoNky Program Heckolbko pa3 dny akmuBu3aauu fynkuuu u ebibopa Jenaemozo pexuma nepeknoyehura. Docmynblcneyuue pexumbl nepexoda: Spread from Left Up to Down (cneeaa ceepy hanaepo ehu3), Spread from Down to Left (cneeaa eepx), Spread from Left to Right (cneeaa hanaepo), Spread from Right to Left (cnpaea haneo), Spread from Left Up to Right Down (cneeaa ceepy hanaepo ehu3), spread from Right UP to Left Down (cnpaea ceepy haneo ehu3), Spread Left Down to Right Up (cneeaa chu3y hanaepo eepx), Spread From Right Down to Left Up (cnpaea chu3y haneo eepx), Spread from Center to Up /Down (u3 uehmpa eepx/ ehu3), Fold from Up /Down to Center (ceepxy/chu3y e eemp), old from Left/Right to Center (cneeaa/cnpaa e eemp), Horizontal Shutter, Vertical Shutter, Fold from the Comers to the Center (om yanoe K eHmpy), Play (bocnpou3ebeHue), Off (Bbiknoyeho).
MeHko HaCtpoek
MeHIO HacTpoEK DVD npOnrpbIbATEnJaet BO3MOxHOCTb NOlb3OBATeIIO peryInpoBaTb OTdIbHbIe HAcTPOkN npOnrpbIbATEnJ.
ДяdoctуаКустановампponгьвateльВржимe STOP(octahobka Bocnpoan3BedeHn)нжмte KHonkyDVDSETUPHaПУ.Nocne nepBOrOнхатЯKHonkVDSETPUBbI nonaDATeHaCTpaHnCy SYS-TEM SETUP(CNUCTEMHbie HACTPOJKN).Дяпор exodaКдру�о
CTpaHnue nCnoJIb3yIe KHOKn ynpaBHeHna KypcOpom A. Ecn Bbl Bb6paHn HuxHyIO CTpaHnU, haxMnte KhoNky ENTER dJra ee aKTNaun.
PpumeyaHue:
Ecnu Bbl haxaun KhoNky DVD SETUP 60 epemBocnpou3beDeHua ducka, mo Hekomopbie onuu byyum heoocmynbl.
MeHn HactpoeK DVD nponpblbATEJIA COCTOIT n3 8eCTN OCHOBhIX CTpaHNU:
- SYSTEM SETUP (CNCTEMHbIE HACTPOKNI). 3TO MEHIO HAcTPOKNI FOpMaTa 3KpaHa, ypoBn I npOJIa DoCTyNa K npocMOTpy FInMbMOB, 3KpaHHoN 3aCTaBKn, BblOpa AKTNBHOrO BVideOBbIXOda N BOCCTaHOBJIeHnI 3aBOcCKNX HAcTPOEK.
- LANGUAGE SETUP (HACTPOIKA 3bIKOB). 3TO MeHIO BbI6opa 3bIKOB DnaydnocponpoBxdeHn, cy6TnTPOB, MeHIO ncka n cy6TnTPOB nCKa MPEG-4.
- AUDIO SETUP (HACTPOIKA 3BYKA). ΘTO MEHIO HAcTpoIKN 6acOB CnCTeMbl.
4.VIDEO SETUP (HACTPOINKA N3OBPAKENNA). - SPEAKER SETUP (HACTPOIKA IPOPKOROBOPTEJEI). 3TO MEHIO HAcTPOIKI peKIMUKNIPOBAHN N MOUHOCTNU CEHTpAJIbHORO KaHaJa.
- DIGITAL SETUP (HACTPOIKA LINΦPOBOTO AYDNOBbIXODA). 3TO MeHIO HacTpoI KI DNHaMnueckoro Dnana30Ha N peKIma BbIBOda MOHOoHnueckoro ayDnOcNHaJa.
CnCTeMHbIe HacTpoiKN
Bpekme STOP haxmte KhoNky DVD SETUP.
- Bы пonaдае на страниу SYSTEM SETUP (СИСТЕМьIE HACTPOДКИ).
- IcnoIb3yIte KhoIKN ▲/▼ ДЯ Bbl6opa OndHOrO nI napametpoB n HaxMITE KhoNky ENTERДЯ BXOda B NOdMeHIO Bbl6opa Ra3bIka.
- История Кнокки /Дя Вьбoga язILA И НжмITE Kноку ENTER Дя подеверкденя.
- Haxmnte KhoIky DVD SETUP IJIa BbIXOJa n3 MeHIO HaCTpoeK.
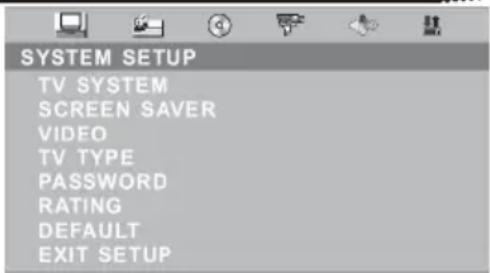
TV SYSTEM - Cnctema LbETHOCTN
PonpmbaTeNb NOpDcepKnBaet CneDyUoune CnCTeMbI UBeTHOCTN: NTSC/PAL/PAL60/ AUTO. BbIbepnte Ty cnCTeMy, KOTopra nCnoJb3yeTcB BaWem TeJeBn3ope.
Ecnn CnCTema 乙BETHOCTN BbIbpaHa HeBepHo, TO 3TO MOxEt Bbl3BaTb dpoXaHne n3o6paKenne Hn HeBepHyu 乙BETonepeDaUy. YcTaHOBka no yMOJuaHIO: PAL.
CnCTeMHbIe HAcTpoiKn
SCREENSAVER-3KpaHHa3acTabka
3KpaHHa 3acTabKa aKTHBnpyeTc, KOrda BaW DVD npOnrpbIbATEIb HaxOHTcB ODHOM n3 coCToHn STOP (ocTaHOBa BocPon3BeDeHnA), OPEN (OTkpbl TIOtOK 3arpy3uKa DnCKOB) nNo Disc (HeT dNcKa B 3arpy3uKe), a TaKke ecnn BocPon3BeDeHne 6blIO BpeMeHHo npnoCTaHObeHo HaxaTneM KHONK PAUSE (nay3a) Ha cPok 60nee, Yem 180 cekynd.
VIDEO - BbI6op BnDeOBoXoJa
yctaHObKa onpeDeJnT nAknBHoro BnDeOBbIXOJa. 3Ta yCTaHOBka He MoKet 6bITb N3MeHeHa, TaK KaK BnDeOBbIXOd CnKcnpOBaH dIra MOHO6Noka.
YcTaHOBkaNo yMOJIuaHnIO:4:3Pan Scan.
PASSWORD - Napoь Дд ДocTyna K HacTpOyKaM
Дя установки уровая достура К порсмOTу phиь mobв ВБдNTe napOl, 3аданьи по умочанio, -«0000» И нажмITE кноку ENTER ДЯ поТВержdeHЯ. Дя сmeны napОЯ сntema nonpocit Bac chayaja BBeCTn DeiCTByUOu n napOl, a NOTOM HOын napОь. ВБдNTe cheTbIpex3Hauchoe YHCNo. OHO 6ydet BaшIM HOblm napOjem.
IpeynpeKdeHue:
Ioxanyucma, 3anomhme ho8bui npoib, uhae Bbl He e cocmohuu 6yde me ycmahoeumbu uU u3MeHmb ypoeehb docmya K npocmomy Ecnu Bbl 3abiu
CnCTeMHbIe HAcTpOuKN
napoi, obpamumecb K Bauemy npodabuy uu e cepuchbi uehmp.
RATING - YpOBeHb Doctyna K npocMoTppy fNJIbMOB
CyueCTByeT 8 ypoBHei Doctyna K npocMoTppy fHJIbMOB:
1-ΦnIbMbI DnIeTei. PekomeHDoBaHbI DnIeTei n IInC BCEx BO3paCTOB.
2:G-OchOBHOJ 3pntJIb.PekOMeHIOBaHbI KaK DOnyCTNMBie JINB BCEX BO3paTOb.
3:PG - Iocobety poDnteJIeN.
4:PG13-ΦnIbMbI,3aIpeHHeIeIaTeMnaJe 13 neT.
5:PG n 6:R - C orpaHnueHnmaM npnteNe. 3anpeueneI nI npocmoTpa deTm MnaIwe 17 let nI npa3peuehbK npocmoTpy TOnbKO B npncytCTBnB3pocloro.
7:NC17-He mnaIe 17.3anpeueHbI nra npocMoTa pTeBm MnaIe 17 neT.
8-TolbkoДЯВЗрсьIX.Harлбньс ecKиJижecTOKOCTb.
ДиСКИ CпЕРБИМ урOBHEMdoCTуа OTKpbITbl ДЯ ЛЮдЕВCEX BO3pactOB,aДИСКИ C BOCMbIM ypoBHeM NOxOJaT TOnbKO B3PocNbIM.EcIn Bby XOTte N3MeHnTB 3HaueHne DAHHORo napametpa,Bam ChaHana npednoKAT BBecTN UΦpOBoN napoJIb.PapONy, YCTAHOBHeHbI no yMOJUanHIO:6666(EcIn Bby NcNoIb3yTe 3TOT npOnrPbIBaTeJIb BпeRbI pa3,BBeIte 3TOT KOD).EcIn BBeDeHbI KOJ NOdTBePjKeH, NOBHTCm MeHIO N3MeHEnHry upoBHeNdoCTuNA.ПОВБeIte KypCop K JekaEMOMy ypoBnIO n HaxMITE KHOJky ENTER IЯ erO NOtBepKdEHN I 3aONMHAnHЯ erO. ПОВБeIte KypCop K 3KpaHNoI KhoNke "ENTER"и NaXMMTE KhONky ENTER IЯ NOtBepKdEHN CdeHaHNoI yCTaHOBKn IIN HaXMMTE KhONky ENTER Ha COOTBeTCTByUoUeM 3NaUke NOtBepKdEHN OpeaunN.
DEFAULT-BocctaHOBJIeHne3aObcknxycTaHOBOK
3Ta onu BOCCTaHaBnBaet 3NaueHn Bcex npaMeTpOB, yctaHOBJeHHbIe Ha 3aBOJe. Pocne toro, kak Bbl BbIbepete onuio RESTORE (BOCCTAHOBNTb) BCE cdeJaaHHbIe
HactpoJa3bIKOBbIX npaMeTpOB
Bampahee yctaHOBKn 6ydyT aHHyInpoBaHbI n npOnrpbIbaTeJIb BepHeTcK nepBOHaJbHOMy COCTOHNIO C 3aBOIDCKMm yCTaHOBKaMn.
Bpekme STOP haxmte KhoNky DVD SETUP.
- Пи помоши Кнонok / > ВьберпесТраниу LANGUAGE SETUP (HACTPOИKAЯЗIKOB) И НжмITE Kнонк enter?
- 对
- 对
- IcnoIb3yIte KHONKn / IJRA BbIbOpa OJHOrO I3 napametpoB n HaxMITE KHONKy ENTER IJRA BXoJa B NOdMeHIO BbIbOpa Ra3bika.
- IcnoIb3ayIte KhoNkI △/V DnI Bbl6opa Ra3bika N HaxMnte KhoNky ENTER nI NOITBepKdEHHa.
HaKMTe KHOIIky DVD SETUP IJIy BbIXOJa n3 MeHIO HAcTpoE.K.
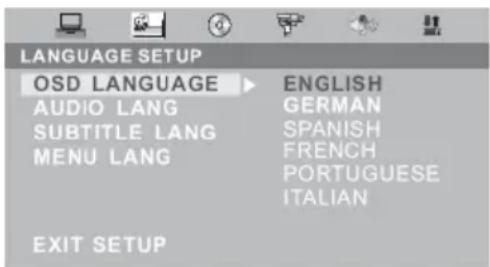
MPEG4-Lang - Kodobary cTpaHnca dIy cy6tntpoB MPEG-4
Central EU: Swedish etc.
Cyrillic: Russian, Serbian etc.
Western EU: German, French etc...
LcHTpaIbHaE BpONa: (UBeunr n T.D.)
Pycckn: (Poocna, Cep6na n T.d.)
3anaHna Ebpona: (FepMaHn, FpaHnI nT.d.)
HactpoJa n3o6paXeHnA
East EU:Polish.,Slovene etc. Boctohna Ebpona:(Ponbha,CnoBehnruT.D.)
BpeKIme STOP haxMnTe KhoNky DVD SETUP.
- Пи помоши Кнонок / > Вьберпге страниуVIDEO SETUP (HACTPOИKA N3OBPAЖЕня)и НжмITE KНОКУ ENTER ДЯ ee akТВаци.
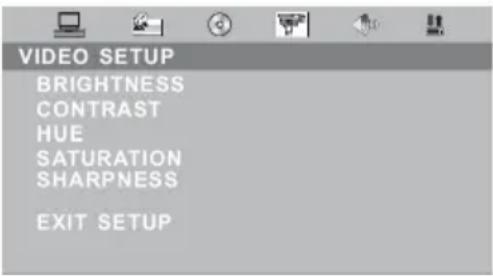
CTpaHnua coedepxnt cJeDyUoune npaMeTpbl: BRIGHTNESS, CONTRAST, HUE, SATURATION n SHARPNESS (RPKOCTb, KOHTPACTHOCTb, UBET PE3KOCTb).
TV—Peritel—AV—S-Video—PC—HDMI—TNT—DVD
Mise en marche
Support technique Xoro/MAS:
Tel.: 0825 889441
- Internet: www.xoro.fr/Service.aspx
- Email: supportfrance@mas.de
Support technique Xoro/MAS:
Tel.: 0825 889441
- Internet: www.xoro.fr/Service.aspx
- Email: supportfrance@mas.de
Pas de signal TNT?
If you press the title button during playback, the video DVD goes back to the title menu.
Menu DVD

m = 311
- Enfants
- G
- PG
- PG13
- PG-R
- R
- NC-17
- Adultes
Support technique Xoro/MAS:
Tel.: 0825 889441
- Internet: www.xoro.fr/Service.aspx
- Email: supportfrance@mas.de
U.S. Patens Nos. 4,631,603; 4,577,216; 4,819,098; 4,907,093; 5,315,448 and 6,516,132
"This product incorporates copyright protection technology that is protected by U.S. patents and other intellectual property rights. Use of this copyright protection technology must be authorized by Macrovision, and is intended for home and other limited viewing uses only unless otherwise authorized by Macrovision. Reverse engineering or disassembly is prohibited."
SPECIFICATIONS
François
| HTC 1525D HTC | 1925 HTC 2225D | ||
| Screen Size 39 cm | (15,4 pouses) 48 cm (19 pouses) 56 cm (22 pouses) | ||
| Display Type TFT LCD | |||
| Resolution 1280 x 800 1440 x 900 1680 x | 1050 | ||
| Aspect Ratio 16:10 | |||
| Brightness 200 cd/m | 2 | 300 | 2 cd/m 400 |
| Contrast 300:1 | 1000:1 | 1000:1 | |
| Response Time 25 ms 6,5 ms | 5 ms | ||
| Viewing Angle | 90° | 160° | 160° |
| TV System | PAL BG / DK / I SECAM BG / DK / L / L' | ||
| Stereo | NICAM / A2 | ||
| Interface | |||
| CVBS Video | 1,0 V p-p 75 Ohm | ||
| S-Video | Y: 1,0 V p-p +/- 3 dB C: 0,3 V p-p +/- 3 dB | ||
| Scart | CVBS: 1,0 V p-p 75 Ohm RGB: 1,0 V p-p 75 Ohm | ||
| PC VGA | 640 x 480 bei 60 Hz / 800 x 600 bei 60 Hz / 1024 x 768 bei 60 Hz | ||
| Antenna | RF Antennenanschluss, 75 Ohm | ||
| Speaker | 2 x 3 Watt | 2 x 3 Watt | 2 x 5 Watt |
| Video System | PAL / NTSC | ||
| AC / DC Adapter | AC: 110—260 V 50 / 60 Hz DC: 12 V bei max. 5 A | ||
| Consumption | 60 W / Standby 3 W | ||
| Dimension (LxTxH) | 385 x 175 x 336 mm | 465 x 210 x 410 mm | 540 x 210 x 460 mm |
| Weight | 5,5 kg | 6,5 kg | 7,0 kg |


François
Treble and bass (agudos y bajos)
Estamericano.
Lareshortening of the code is a good way to improve the performance of your program.
Censorship
- G; 3.
- PG
- PG13
- PG-R
- R
- NC-17
- ADULT
U.S. Patens Nos. 4,631,603; 4,577,216; 4,819,098; 4,907,093; 5,315,448 and 6,516,132
"This product incorporates copyright protection technology that is protected by U.S. patents and other intellectual property rights. Use of this copyright protection technology must be authorized by Macrovision, and is intended for home and other limited viewing uses only unless otherwise authorized by Macrovision. Reverse engineering or disassembly is prohibited."
Specifications
| HTC 1525D HTC 1925 HTC 2225D | |||
| Tamaño de monitor | 39 cm (15,4ulgadas) | 48 cm (19ulgadas) | 56 cm (22ulgadas) |
| Tipo de pantalla TFTLCD | |||
| Resolution en Pixel | 1280 x 800 1440 x 900 | 1680 x 1050 | |
| Relacion de lados | 16:10 | ||
| Brillo 200 cd/m | 2 | 300 2 | cd/m 400 2 |
| Contraste 300:1 | 1000:1 | 1000:1 | |
| Tiempo de reccion | 25 ms 6,5 ms | 5 ms | |
| Angulo de vista | 90° | 160° | 160° |
| Sistema de TV | PAL BG / DK / I SECAM BG / DK / L / L' | ||
| Estereo | NICAM / A2 | ||
| Conexiones | |||
| Video CVBS | 1,0 V p-p 75 Ohm desiguales | ||
| S-Video | Y: 1,0 V p-p +/- 3 dB C: 0,3 V p-p +/- 3 dB | ||
| Euroconector | CVBS: 1,0 V p-p 75 Ohm RGB: 1,0 V p-p 75 Ohm | ||
| PC VGA | 640 x 480 bei 60 Hz / 800 x 600 para 60 Hz / 1024 x 768 para 60 Hz Siempre se recomienda la resolution negativa | ||
| Antena | Conexion de antenna RF, 75 Ohm | ||
| Parlantes | 2 x 3 Watt | 2 x 3 Watt | 2 x 5 Watt |
| Sistema de Video | PAL / NTSC | ||
| Adaptador AC / DC | AC: 110—260 V 50 / 60 Hz DC: 12 V max. 5 A | ||
| Consumo | 60 W / Standby 3 W | ||
| Medidas (LxAxA) | 385 x 175 x 336 mm | 465 x 210 x 410 mm | 540 x 210 x 460 mm |
| Peso | 5,5 kg | 6,5 kg | 7,0 kg |
cd/m
louedes
FREE TO CHOOSE INNOVATIONS

XORO by MAS Elektronic AG
Blohmstrasse 16/20
21079 Hamburg
Germany
Tel: +49(040) 77 11 09 17
Fax: +49(040) 77 11 09 33
xoro@mas.de
www.xoro.de



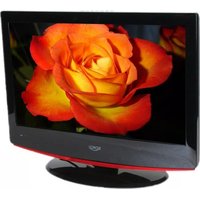
- Sicherheitshinweise
- Inbetriebnahme
- Farbeinstellung (Colour Setting)
- Farbeinstellung (Color Setting)
- Programmsuche (Channel Search)
- Programm (Channel No.)
- Zeitzone (Time Zone)
- TV Format (TV Shape)
- Timer Liste (Booking List)
- VSS (Virtual Surround Sound)
- Spezifikationen
- Electrical safety
- Physical safety
- Contents
- Safety information
- In the box 3
- Features 3
- English
- Connection
- The Remote Control
- LCD Menu
- DVB-T Mode
- DVD Player
- Specifications 40
- In the Box
- Features
- Note:
- Rear Connection Panel
- Buttons on the right side
- Connecting Up
- Power connection
- Antenna
- SCART Input
- CVBS Video- and Stereo Audio input
- HDMI
- VGA
- Notes:
- Remote Control
- Insert battery into the remote control
- Operation range
- Buttons of the remote control:
- Video Menu
- Brightness
- Contrast
- Colour
- Sharpness
- PC Menu
- Color setting
- Auto configure
- Horizontal and vertical position
- Phase
- Clock
- HDMI Menu
- Audio Menu
- Volume
- Balance
- Audio preset
- Treble and bass
- TV Menu
- Channel
- System
- Skip
- AFC
- Fine Tune
- SWAP
- Manual search
- Auto Search
- General Menu
- Language
- Blue Screen
- Noise Reduce
- Input Source
- Troubleshooting
- Enter Main Menu
- Adjust the OSD on screen
- Waiting SIGNAL or NO SERVICE
- Channel Setting
- Search Type
- Channel No
- Frequency
- Band Width
- Encrypted Service
- Update Mode
- Sort Channel
- Channel List
- Delete
- Lock & Unlock
- Move
- Favorite List
- System Settings
- Time Setting
- Time zone
- Banner Time Setting
- Language Setting
- Menu language
- Audio language
- Parental Setting
- Chang Pin Code
- Censorship
- A/V Setting
- TV Shape
- Conversion Prefer
- Bright & Contrast
- Saturation
- Factory Setting
- Restore Default
- Clear Channels
- Country Select
- Timer List
- Event ID
- Service
- Event type
- Start Time
- Start date
- Duration
- Status
- System Info
- Software Version
- Hardware Version
- Signal Information
- EPG
- DVB-T Others
- Teletext
- PAGE SELECTION
- Other Operations
- TV/RADIO
- AUDIO
- SUBTITLE
- FAV
- INFO
- Troubleshooting DVB-T
- No DVB-T Signals?
- Bad reception quality?
- No TV programs?
- Remote control works not ?
- DVD-Player
- The DVD Player is activated by repeated printings of the AV/TV key.
- Function
- Open/Close
- Play/Pause
- Stop
- Fast Backward/Fast Forward
- DVD Menu
- Numeric Buttons
- Title
- Audio Track
- Repeat section A-B
- Repeat Mode
- Angle
- Zoom
- In DVD mode
- In CD mode
- Data disc with Music, JPEG or Video files
- DVD Player Setup
- System Setup:
- TV System
- SCREENSAVER
- VIDEO
- System setup
- TV Type
- Password
- Warning:
- RATING
- Default
- Language Setup
- MPEG4-Lang
- Video setup
- SPEAKER SETUP
- Downmix
- FRONT
- AUDIO setup
- Digital setup
- Dynamic Range
- Dual Mono
- Macrovision
- Specification
- 3neKtpnuecka 6e3oNaChocTb
- Φn3nuecka 6e30naCHOCTb
- Pycckn
- Tpe6obAHn 6e3oNaChOn 3KcIpyatau
- KoMnneKtaun 3
- OchOBhIe Oco6eHHoCTn 3
- KhoNk ynpaBneHn npa3bEmbl Ha Kopnyce ycTpoiCTBa
- Nyt dntaHnOHoro ynpaBneHn
- OchOBhble onepaun pexnMa TB
- OchOBhble onepaun pexmam DVB-T
- OchOBHbIe onepaunn pexmAd DVD
- Hactpoika DVD nponrpbBaTeJia
- TexHHueckne xapaKTepeNCTnKn 42
- PpumeyaHue:
- OCHOBHbIEOCo6eHHoCTN
- Nodknoyehue aHmeHHbI
- Iodknioyehue npu nomouka6nra SCART
- IodknoueHue npu nomouc CVBS (AV) ka6eJra
- Iodknouhe npu nomouka6e S-VIDEO
- Iodknoyehue npu nomouka6eHDMI
- IodknioyuHue npu nomouu VGA ka6eJra
- PpumeyaHua no uCnoJb3o8aHuO 6amapeek:
- PpumeyaHua:
- PacnoJoxHeue KHOJOK Ha Iy
- PacnoonKeHue KhoNOK Ha N
- PpHcunbI pa6oTbIB MeHIO HAcTpOeK
- HactpoJa n3o6paXeHnA
- BRIGHTNESS - RaKocTb
- CONTRAST - KOHTpactHOCTb
- COLOUR - HacbIeHHoCTb
- SHARPNESS—Pe3KocTb
- Hactpoika pexima kOMnbIOTepHO MOHTOPa
- BRIGHTNESS - RaPkocTb
- COLOR SETTING - Pexmbi CBeTHOCTN
- COLOR SETTING - PeXMMbl CBeTHOCTN
- AUTO CONFIG - ABTOHaCtpoKa
- H.POsiTION -IoNcTpoiKa no ropn3oHTaJIu
- V.POsiTION - PoiDcTpoiKa nO BepTnKaJIu
- HactpoKa 3Byka
- VOLUME -FpomKoctb
- BALANCE - Baanac
- AUDIO PRESET -Ппсдустановки 3Byka
- TREBLE - BbICOKne yactoTbi
- BASS-Hn3Kne YacToTbI
- HactpoJaTeJeBeUaHnIa
- CHANNEL - Kahan
- SYSTEM - 3BykoBaa cnCTema
- HactpoJa TeJeBeUaHnA
- SKIP -Пponуck kaHaJa
- AFC - ABTomatnuecka NOdctpOJa YaCTOTbI
- FINE TUNE - Tohna Hactpoika
- PpHnCnIbI pa6oTbIB MeHIO HAcTpoEK
- Hactpoika KaHaJIOB
- Search Type - Tyn noncka
- Channel No - Homep kaHaJa
- Frequency - Yactota
- Band Width - Полosa nponyckaань
- Encrypted Service -ШифpoВане даньх
- Update Mode - Pexim o6HOBnEHHa
- Sort Channel - CoptnpoBka KaHaJIOB
- Onepaunco cncKom KaHaNoB
- Cnncok JIO6MbIX KaHaJIOB
- CnCTeMHbIe HacTpoiKn
- Time Setting - YcTaHOBka BpeMeHn
- OCHOBHbIE ONEPAUIN PEXKIMADVB-T
- CnCTeMHbI He HAcTpoiKn
- Time zone - BpemeHHa 3oHa
- Factory Setting - 3aBODCKne ycTaHOBKn
- OCHOBHbIE ONEPAUIN PEXKMA DVB-T
- Restore Default - NapaMeTpbl no yMonuHnIO
- Clear Channels - 06HyJeHne cNcKa KaHaJIOB
- Country Select - BbI6Op cTpaHbI
- Booking List - YcTaHOBka TaIMepoB
- Event ID - Homeport Taïmepa
- Service-Homep kaHaJa
- Event type - Tn TaMepa
- Start Time - BpemBkIouHne KaHaJa
- Start Date - BpemBbIKIOueHnKaHaJa
- Duration - PpOdoJnxTeJbHocTb
- Status - AktnBaçın Taimepa
- HENCINPABHOCTN INPNEMHnKA DVB-T IN CNOOCbIXX UCTPAHEHnA
- Omcymcmyem cuhaJ DVB-T
- IIloxoe kaueembo npuema.
- NymcnucokKaHaNoe.
- He pa6omaem Ndy.
- PpumueaHue:
- Kauecmgo u3o6paXeHua
- CkopocTb nepaun HnΦopmaun (Bit rate)
- Pazpeшени
- OCHOBHbIE ONEPAUIN PEXNMA DVD
- 3aarpy3ka/ɪn3BνeueHne DVD dɪncka
- HΦopMaζnoHHa CTpoka pexmá DVD
- HΦopMaζnoHHa CTpoka pexima DVD
- OchOBhIe npaBnla ynpaBHeHna BocnpOn3BeDeHneM dNcKOB
- Omkpbimb u 3akpbimb noddoh 3aepy3uka ducko
- PpumueaHua:
- Hauano oocnpou3eedeHu u nay3a.
- OchOBhIe npaBnla ynpaBneHna BocnpOn3BeDeHneM dNcKOB
- OcmaHoBa eocnpou3eedeHua
- IepexoK cneyoue Iaee/Tpeky
- NepexoK npedbIdyuuei Tnae/Tpeky
- YckopeHHoe 8ocnpou3eedeHue 8 o6pamHom HanpaenHuU
- YckopeHHoe 8ocnpou3eedeHue e npMOM HanpaenHeuu
- MENU
- 3KpaHHoe MeHIO DVD ducka
- MeHIO pa3deNoe DVD ducka
- BbI6Op np3bika 38yko02o conpooxdeHua
- Ioeopnoe 6ocnpou3eedeheue paemma ducka
- Ioeopnoe 6ocnpou3eedeue
- Pn Bocnpon3BedeHn DVD ncka
- Pn BocnpOn3BeDeHn CD dNcKa
- Bocnpo3BeDeHne paHOB MP3, MPEG-4 n JPEG
- Bocnpo3BeDeHne paJnoB MP3, MPEG-4 n JPEG
- MeHko HaCtpoek
- TV SYSTEM - Cnctema LbETHOCTN
- SCREENSAVER-3KpaHHa3acTabka
- VIDEO - BbI6op BnDeOBoXoJa
- PASSWORD - Napoь Дд ДocTyna K HacTpOyKaM
- IpeynpeKdeHue:
- CnCTeMHbIe HAcTpOuKN
- RATING - YpOBeHb Doctyna K npocMoTppy fNJIbMOB
- DEFAULT-BocctaHOBJIeHne3aObcknxycTaHOBOK
- HactpoJa3bIKOBbIX npaMeTpOB
- MPEG4-Lang - Kodobary cTpaHnca dIy cy6tntpoB MPEG-4
- Mise en marche
- Pas de signal TNT?
- Menu DVD
- SPECIFICATIONS
- Treble and bass (agudos y bajos)
- XORO by MAS Elektronic AG
Brand : XORO
Model : HTC 1525D
Category : Television