LFA45X - Dishwasher FAGOR - Free user manual and instructions
Find the device manual for free LFA45X FAGOR in PDF.

User questions about LFA45X FAGOR
0 question about this device. Answer the ones you know or ask your own.
Ask a new question about this device
Download the instructions for your Dishwasher in PDF format for free! Find your manual LFA45X - FAGOR and take your electronic device back in hand. On this page are published all the documents necessary for the use of your device. LFA45X by FAGOR.
USER MANUAL LFA45X FAGOR
Operating Instructions
Control Panel. 3
Dishwasher Features 3
Wash Cycle Table 4
Detergent 5
Rinse Aid 5
Using an all in one pod 6
Loading the DishwasherRacks. 7
Cutlery Basket 8
Filtering System 9
Caring for the Dishwasher 9
Troubleshooting Tips
Before you call for service 11,12
Write the model and serial numbers here:
Model: LFA-45X
Serial#
For technical support or repairs call: 1.877.743.2467
For general information or inquiries call: 1.800.207.0806
The Fagor Model LFA-45X has several characteristics which separate it from the competition. These Are:

TimeDelayfeature
This allows the start of the program delayed between 3/6/9/12 hours, The Time Delay feature allows you to program the dish washer your convenience, saving you time and money.

ErrorAlarm
Error codes on the display will inform you of problems with the dishwasher.

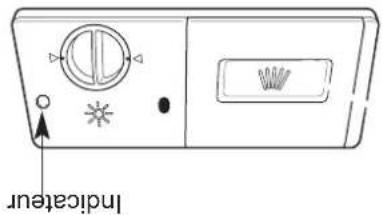
RinseAid Warning Indicator
When the rinse aids in the machine begin to run low, an alert on the panel will be clearly displayed informing you to refill them. This will ensure the unit will operate at optimum performance.

Stainless Steel Tub
The Stainless Steel tub of the dishwasher is made of tough and durable steel that is resistant to staining.

6 Dishwashing Programs
Depending on your cleaning needs, you can choose any of the 6 pre-programmed cycles to better clean your dishes. Choose from Allin 1, Heavy, Normal, Light, Rinse and Speed.

NOTE:
Themanufacturermaymakemodificationswithout givingpriornotice.
IMPORTANT SAFETY INFORMATION READ ALL INSTRUCTIONS BEFORE USING
WARNING!
When using your dishwasher, follow the below basic precautions including the following:

GROUNDING INSTRUCTIONS
Thisappliancemustbegrounded.Intheevent ofamalfunctionorbreakdown,groundingwill reducetheriskoflectricshockbyprovidinga pathoflessresistance totheelectricalcurrents. Thisapplianceisequippedwithan equipment-groundingconductorandagrounding plug.Theplugmustbepluggedintoanappropriate outletthatisinstalledandgroundedinaccordance withallocalcodesandordininances.
WARNING!
- Improperconnectionofthequipment-groundingconductorcanresultinarisk ofelectricshock. Checkwithaqualified electricianorservicerepresentative toensure that theapplianceisproperlygrounded. Donotmodifytheplugprovidedwiththe appliance. Iftheplugdoesnotfittheoutlet, contactaqualifiedelectriciantoinstallaproper outlet.

WARNING! PROPER USE
■ Donotabuse,siton,orstandondhedoorordish rackofthedishwasher.
- Donottouchtheheatingelementduringor immediatelyafteruse.
- Donotwashplasticitemsunlessstheyaremarked dishwashersafe. Forplastic itemsnotmarked, checkthemanufacturerommendations.
Use only detergent and rinse additives designed for an automatic dishwasher. Never uses soap, laundry detergent or handwashing detergent in your dishwasher. Keep these products out of reach of children.
- Keepchildawayfrom detergentsandrinseaits.Keep childawayfromtheopendoorthedishwasher, therecouldstillbesomedetergentleftinside.
The door should not be left in the open position since this could present atrippinghazard.
During installation, the powersupply must not be excessively or dangerously bent or flattened.
■ Donottamperwithinternalcontrols.
The appliance is not intended for use by young children or infirm persons without supervision.
- Dishwasher detergents are strongly alkaline, they can be extremely dangerous if swallowed. Avoid contact with skin and eyes and keep children away from the dishwasher when the door is open.
Donotoperateyourdishwasherunlessall enclosurepanelsareproperlyinplace.Openthedoorverycarefullyiftthedishwasherisoperating, thereisariskofwatersquirtingout.
- Donotplaceanyheavyobjectstorstandondhedoor whenitisopenasthiscoulddamagethedoorandcausetheapplianctotipforward.
- When loading items to be washed: 1) Locate sharp items so that they are not likely to damage the doorseal. 2) Load sharp knives with the handles up to reduce the risk of injuries.
When using your dishwasher, make sure no plastic items come in contact with the heating element.
If the powersupply cord is damaged, it must be replaced by a qualified service agent or a similarly qualified person.
Please dispose of packing materials properly.
■ Usethedishwasheronlyforitsintendedfunction.
- Whendisposingofanolddishwasher,besuretoremovethedoorbeforediscarding.
Besuretookeepchildrenawayfromthedishwasher.
Checkthatthedetergentreceptableisemptyafter completionofthewashcycle.
READ AND FOLLOW THIS SAFETY INFORMATION CAREFULLY
SAVE THESE INSTRUCTIONS
IMPORTANT!
To get the best performance from your dishwasher, read all operating instructions before using it forthefirsttime.
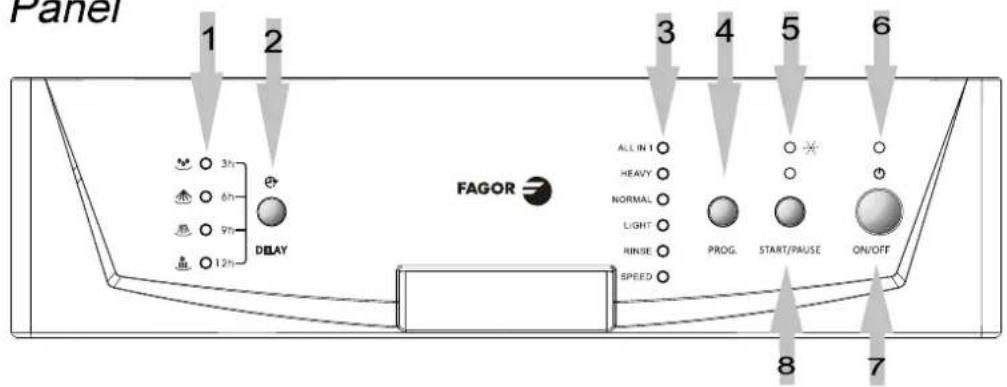
Control Panel
Time Delay/Washing Phase Status: When using the time delay function, the indicator light will show the amount of time selected. Similarly when the system is in use this will show which portion of the cycle is in operation.
2 Delay: Use this button to set your time delay.
3 ProgramIndicators: These lights show which washing program is use.
4 Program Selector: Use this button to select which washing program you want to use.
5 Warning Light: This indicator will signal when the rinse aid needs to be filled.
6 On/Off Indicator: Lets you know when the dishwasher is on or off.
7 On/OffButton:Turnstthesystemandoff.
8 START/PAUSEButtonThisbuttonstartsthe selected cycle. It can also be used to pause a cycleinprocess.
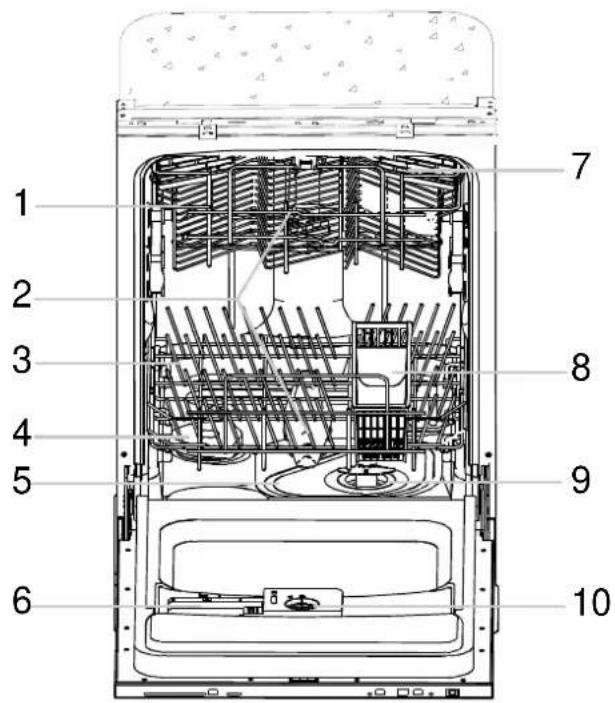
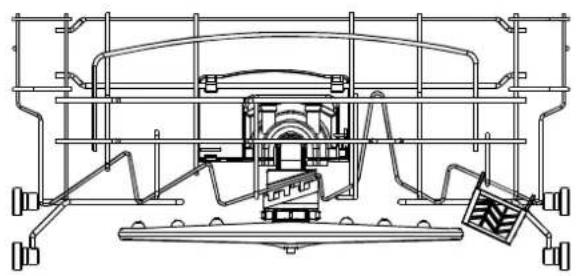
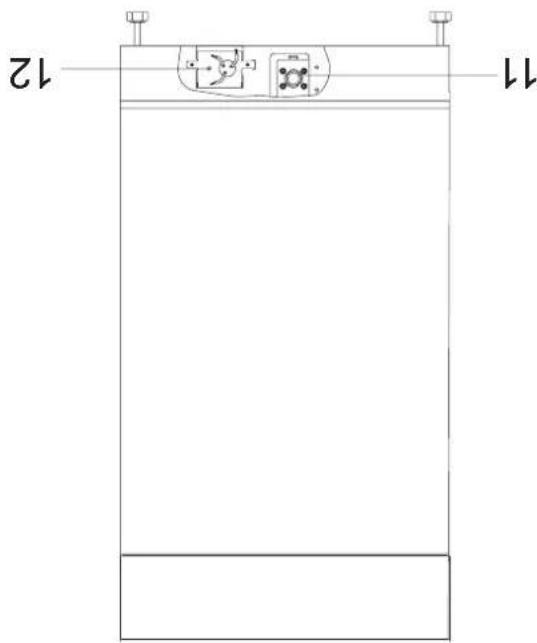
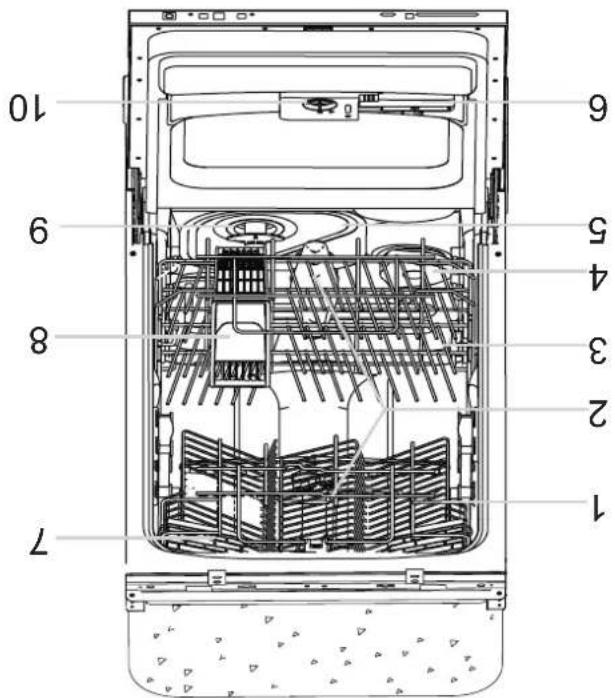
Dishwasher Features
1 UpperRack
2 SprayArms
3 LowerRack
4 WaterSoftener
5 MainFilter
6 DetergentDispenser

7 CupShelf
8 CutleryBasket
9 CoarseFilter
10 RinseAidDispenser
11 InletValve
12 JunctionBox
WASH CYCLE TABLE
| Program | Cycle Information | Description of Cycle | Cycle Time | Water (gal) | Rinse Aid |
| All-in-1 | For all soiled loads such as pots, pans, casserole dishes and dishes that have been sitting with dried food on them for awhile. | Pre-wash Pre-wash wash 127°F (53°C) Rinse 154°F (67°C) Drying. | 2:00 | 3.7 | Yes |
| Heavy | Fortheheaviest ormostsoiled loadssuchas,pans, casserole dishes and plates that have been sitting with driedfood onthemforawhile. | Pre-wash Pre-wash 122°F (50°C) Wash 127°F (53°C) Rinse Rinse 149°F (65°C) Drying | 2:10 | 4.6 | Yes |
| Normal (AHAM) | Forloadmal household such as,pots, plates, glasses and lightly soiled pans. Standard dailycycle. | Pre-wash Wash 127°F (53°C) Rinse Rinse 154°F (67°C) Drying | 1:45 | 3.65 | Yes |
| Light | For lightly soiled loads such as, glasses, bowls lightly soiled pans. | Pre-wash Wash 122°F (50°C) Rinse Rinse 140°F (60°C) Drying | 1:30 | 3.67 | Yes |
| Rinse | Forrinsing partialloadsthat will be washed later. Do not usedetergentwiththiscycle. Thiscycledoesnotinclud heatedry. | Pre-Wash Pre-Wash | 0:25 | 1.9 | |
| Speed | Ashorterwashforlightly soiled loads that do not needdrying. | Pre-Wash Wash 122°F (50°C) Rinse 131°F (55°C) Drying | 0:55 | 2.75 |
| Cycle | Wash | Rinse | Dry | |||
| Pre Wash 1 | Pre Wash 2 | Main Wash | Rinse 1 | Rinse 2 | ||
| All-in-1 | ■ | ■ | 127°F(53°C) | 154°F(67°C) | - | ■ |
| Heavy | ■ | 122°F(50°C) | 127°F(53°C) | ■ | 149°F(65°C) | ■ |
| Normal | ■ | - | 127°F(53°C) | ■ | 154°F(67°C) | ■ |
| Light | ■ | - | 122°F(50°C) | ■ | 140°F(60°C) | ■ |
| Rinse | ■ | ■ | - | - | - | - |
| Speed | ■ | - | 122°F(50°C) | 131°F(55°C) | - | ■ |
ERROR CODES
When malfunction occur, the dishwasher will display error codes to warn you:
| Codes | Meanings | Possible Causes |
| TheSpeedlight flickers | Waterisnotflowingfastenough | Valves are closed, inletpipe may be blocked or not connected, home water pressure is too low. |
| The Rinselight and Speed light flicker | Heatingistaking too long/not reaching necessary temperature | Error in the temperature sensor or malfunction of the heating element itself. |
| The Lightlight and Rinselight flicker | Temperaturesensomotworking | Incomplete electrical circuit temperature sensor is inoperative. |
| The Lightlight, Rinselight and Speedlight flicker | Temperaturesensomotworking | Possible wiring error/shortcircuit temperature sensor is inoperative. |
Note: Please use only the recommended amount of dishwashing liquid when washing your dishes.
The detergent dispenser must be refilled before the start of each wash cycle. Please follow the manual instructions provided in the" Wash Cycle Table" on page 4.
As a rule of thumb, you generally only need one tablespoon of dishwashing detergent for a normal household wash load. For more heavily soiled items please refer to the instructions on your detergent packaging. Please make sure to add the detergent just before starting the dishwasher.
Detergent Usage
Please follow the instructions on the back of the detergent packaging for the proper amount of detergent to use for the type of load you have. The amount of detergent can vary depending on the hardness of your water. To determine your water consistency, please contact your local water company. Generally, the harderthewater, the more detergent you will need to use.
WARNING!
Please keep dishwashing liquid out of the reach of children as it is very dangerous for them to consume.
Removing Hard Water Stains
Toremovehardwater, staintrythefollowingsstepsinthisorder:
Run dishes through a normal wash program.
Remove all metal dishware, such as cutlery, pans, etc., from the dishwasher.
Donotadddetergent.
Pour two cups of whitevinegar into a bowl and set the bowl face up on the lower rack of the dishwasher.
Proper Use of Detergent
Use only detergent specifically made for use in dishwashers. Keepyourdetergentfreshanddry. Pleasedonotstore detergent in dispenser until ready to use.
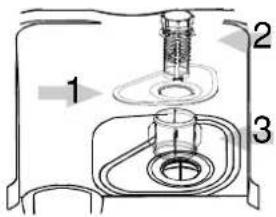
RINSEAID DISPENSER
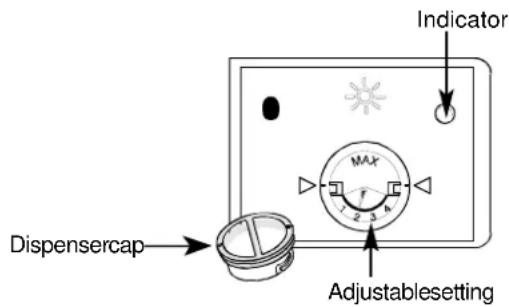
To open the dispenser, turn the cap to the "open" (left) arrowandlift capupuntilopen.
Pour the rinse aid into the dispenser, being careful not too overfill.
Return the cap by inserting it aligned with "open" arrow and turning it to the closed (right) arrowposition.
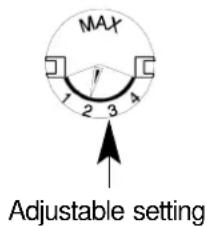
Adjusting Rinse Aid Dispenser
The rinse aid is released during the final rinse to prevent water from forming droplets on your dishes that can leave spots and streaks. It also improves drying by allowing waterto "sheet" off the dishes.
- Your dishwashers are designed to use liquid rinse aids. The rinse aid dispenser is located inside the door next to the detergent dispenser. To fill the dispenser, open the cap and pour the rinse said into the dispenser until the indicator turns completely black. The dispenser holds about 8f. 4quid(10s) and.
■ Be careful not to overfill the dispenser, asthiscan cause over sudsing ofthe detergentintheunit. Wipeawayany spills with adampcloth. Don'tforgettoreplacement the dispenserscap beforeyouclosethedishwasherdoor.
If your household water is soft, you may not need additional rinse agents in your water as it may cause a white film around your dishes.
A measured amount of rinse aid is released during the final rinse to assist in rinsing dishes properly, keeping them residue and streak free. As with detergent, the amount of rinse aid needed for your dishes depends on the hardness of the water in your area. If you have very soft household water, you may need to dilute or omit the rinse aid.
The rinse aid dispenser is designed with four settings. Please begin your wash cycles with the dispenser set on setting 2. If spots and streaks are evident, increase the amount of rinse aid dispensed in the machine by removing the dispenser lid and rotating the dial to setting 3. If the dishes still are not drying properly or are spotted, increase the dial to setting 4.
When to Refill the Rinse Aid Dispenser
When the dishwasher begins to run out of rinse aid, the rinse aid dispenser indicator will show a decrease in the size of the black dot. As the rinse aid in the dispenser diminishes the size of the black dot diminishes. You should never let the rinseaid get below 1/4 full.
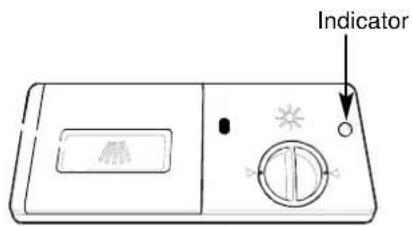
As the rinse aid diminishes, the size of the black dot on the rinse aid level indicator changes, as illustrated below.
Full
3/4full
1/2full
1/4 full-Shouldrefilltoeliminatespotting
Empty
Using anAll-in-One detergentpod
The All-in-One wash program can be used when using an all-in-one detergent pod instead of separate detergents.

NOTE: This program should be used only when using an all-in-one detergent pod. Using all-in-one detergent podsonother programs may causeinconsistentresults.
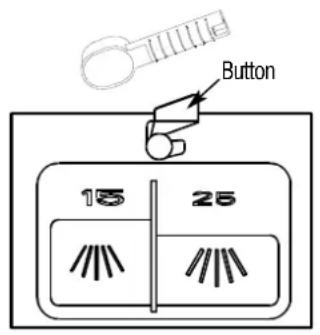
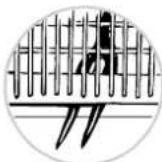
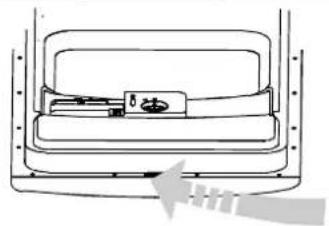
- Place the all in one tablet container in the upper basket as shown below.
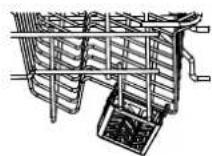
- Rotate the upper spray arm and change the location of the container to ensure flow of water from the upper arm isnotblocked.
- Insert the tablet into the container, then initiate the program.
Loading the Dishwasher Racks.
For best performance of the dishwasher, follow these loading guidelines. Features and appearance of racks and cutlery baskets may vary from your model.
Use of the Upper Rack
The upper rack is designed to hold more delicate and lighter dishware such as glasses, small plates, small bowls and shallow pans (as long as they are not too dirty).
Position the dishes and cookware so that they do not get moved by the spray of water.
The height of the upper rack can be changed by placing different sized wheels on the rails.
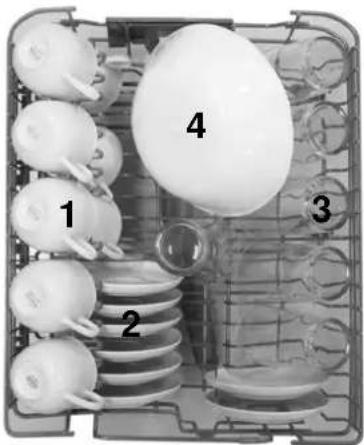
1 CUPS
2 Saucers
3 Glasses
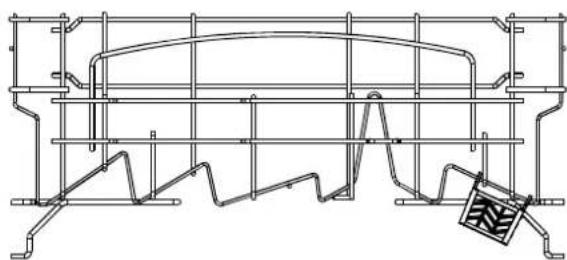
Use of the Lower Rack
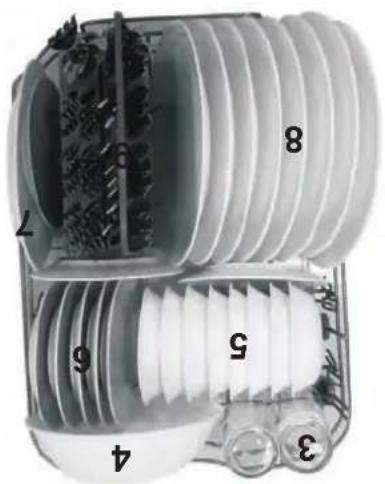
We recommend that you place large items which are most difficult to clean on the lower rack: pots, pans, lids, serving dishes and bowls; as shown in the figure to the right.
We recommend placing serving dishes and lids on the side of the racks in order to avoid blocking the rotation of the hottopsprayarm.
Pots, serving bowls, etc., must always be placed facing down.
Deep pots should be slanted to allow water to flow out.
Thebottomrack features fold over tine rows that can be used on larger pots and pans.

4 Servingbowl
5 Fruitbowl
6 Breadandbutterplates
7 Servingplate
8 Dinnerplates
9 Cutlerybasket
CUTLERY BASKET
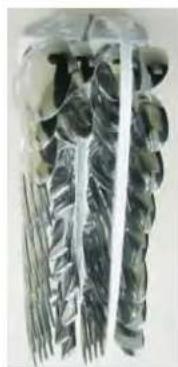
Cutlerycathuld be placed in the basket with handles at the bottom. Especially long utensils should be placed horizontally atthefrontoftheupperrack.Allknivesandsharputensilsshouldbeplacedintothecutlerybasketwith bladesfacingdownsoastoavoidinjury.

| 2 | 4 | 5 | 1 |
| 4 | 5 | 1 | |
| 2 | 4 | 5 | 1 |
| 2 | 4 | 5 | 1 |
| 4 | 5 | 1 | |
| 2 | 4 | 5 | 4 |
| 2 | 4 | 5 | 7 |
| 3 | 5 | ||
| 2 | 3 | 3 | 1 |
| 2 | 3 | 3 | 1 |
| 2 | 3 | 6 | 6 |
1 SaladForks
5 Knives
2 Teaspoons
6 Servingspoon
3 Soupspoons
7 Servingfork
4 Dinnerforks
WARNING!
Please make sure silverware does not stick out of the basket as it can cause harm when unloading.
Operating the Dishwasher
Starting a Wash Cycle
1 Make sure the plug of the dishwasher is inserted into the proper wall outlet.
2 Make sure that the water supply is turned on to full pressure.
3 Load dishes, bowls, glasses and/or pots into the dishwasher. Please see the "Loading Dishwasher" section in the manual for loading and arrangement details.
4 Pour in suggested amount of detergent (see Detergent and Rinse Aid sections for suggestions).
5 Closethedoor,presstheON/OFFbutton,theON/OFFlightwillturnon.
6 Press the"Prog button"toselectthe "Wash Cycle"(See the section entitled "Wash Cycle Table").
7 Press the START/PAUSE button, the washing will start after ten seconds.
Changing a Washing Program
Once the dishwasher has begun its cycle, it can only be changed if the dishwashing detergent has not yet been released. If it has been released, follow the below instructions.
Open the door, press and hold the "Prog" button for 3 seconds to cancel the running cycle. Once the current wash cycle has been fully deprogrammed, refill your detergent dispenser, close the door and select your new wash cycle (See the section entitled "Starting a Wash Cycle").
At the End of the Wash Cycle
Once the washing cycle is complete and the dishwasher has stopped, an alarm will go off for about 8 seconds informing you of cycle completion. At that moment, the dishwasher will go into stand-by mode, in which the unit is still on with no program running. We recommend that you manually shut the unit off and wait about 15 minutes before unloading your dishes, giving time for the dishes to cool off and fully dry.
Forgot to Add a Dish?
You can easily add a dish to the washing cycle anytime before the detergent cup opens to release the detergent. Please follow the directions below:
1 Slightly open the dishwasher door to stop the washing cycle.
3 Add additional dishes, glasses or cookware onto the dishwashing rack.
2 Once the washing spray arms stop moving, you can open the dishwasher door completely.
4 Close the dishwasher door, the washer will continue itscycleafter10seconds.
WARNING!
Please take caution when opening the dishwasher while in washing mode, the water is extremely hot and may burn you. Please keep kids away from the dishwasher while in washing mode.
Filtering System
For your convenience, we have placed the drain pump and filtering system within easy reach inside the tub. There are three components of the filtering system: the main filter, the coarse filter, and the fine filter.
1 Mainfilter Food particles trapped by this filter are brokendown by a special jet on the lower spray arm and washed down the drain.
2 Coarsefilter Larger items, such as pieces of bone or glass, that could clog the drain are trapped in the coarse filter. To remove an item caught in this filter, gently squeeze the tabs ontopofthisfilterandliftitout.
3 Finefilter This filter holds soil residue in the sump areapreventing it from being redeposited onto the dishes during a cycle.
Caring for the Dishwasher
To clean the control of the dishwasher, use a lightly dampened cloth then dry thoroughly. To clean the exterior of the unit, use a good appliance polish wax. Never use sharp objects, scouring pads or harsh cleaners on any part of the dishwasher.
Protecting Against Frozen Pump Damage
It is important to protect your pumps from frozen water damage caused by the drop of internal home temperature. If your home temperature goes below 34^ for a long period of time, you can have ice build in the lines and around the motors. Have your plumber follow the below steps if you water pipes freeze.
- Cut off the electrical power to the dishwasher.
- Turn off the watersupply and disconnect the water inlet pipe from the watervalve.
- Drain the water from the inlet pipe and water valve. (Use a pan to catch the water)
- Reconnect the water inlet pipe to the water valve.
- Remove the filter at the bottom of the tubanduse a sponge to soak up water in the sump.

NOTE: If your dishwasher does not work because of ice, please contact professional service persons.
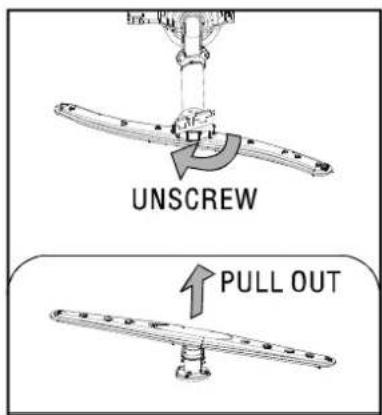
Cleaning the Spray Arms
It is necessary to clean the spray arms regularly inordertopreventthe clogging of the jets and bearings from hard water chemicals.
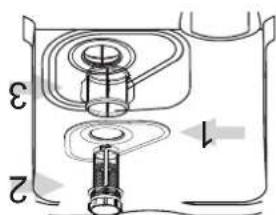
To remove the upper spray arm, turn the nut clockwise and remove the arm.
To remove the lower spray arm, pull it upward.
Wash the armsin soapy warm water and use asoftbrusht to clean the jets. Replace them after rinsing them thoroughly.
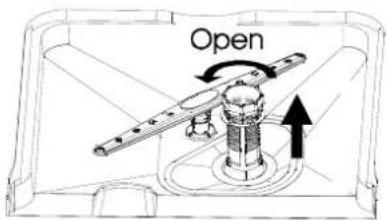
Cleaning the Filters
1
2
3
Step 1: Turn the filter in counterclockwise and lift it up.
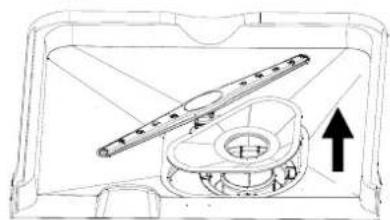
Step 2: Lift the Main filter up
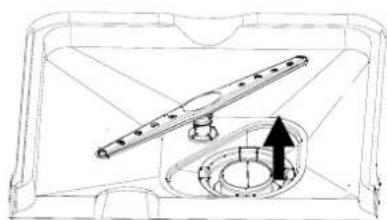
Step 3: Lift the Fine filter up

NOTE: Please follow steps 1 through 3 in order to remove the filter system.
In order to reinstall, please perform the steps in reverse order.
User-Maintenance Instructions Cleaning the Door
To clean the edges of the dishwasher door, a soft, damp rag to wipe around the unit.
Besure toipheandthowadenttoanyeephegelectrical components.Itisbestnottousespraycleanersonthedishwasher.Itisalsobest nottouseabrasivecleanersorscouringpadsontheoutersurfaceofthedishwash erastheytendtoscratchhandleavemarks.
WARNING!
Never use a spray cleaner to clean the door panel as it could damage the door lock and electrical components.
Keeping your dishwasher in prime condition
After Every Wash
After every wash, leave the door slightly ajar so moisture and odors are not trapped inside the washer.
Remove the Plug
Prior to any cleaning or maintenance to the dishwasher, it is recommended that you disconnect the unit from the electrical socket for safety.
Do not use abrasive cleaning products
Whencleaning the exterior and rubber parts of the dishwasher, were recommend that youdonotuse use solvents or abrasive cleaning products. Rather, use only acloth andwarm soapy water.
Toremovespotsorstainsfromthesurfaceofthe interior, use a cloth dampened with water and a little white vinegar, or a cleaning product made specifically fordishwashers.
Caring for your dishwasher while on vacation
If you should go on vacation, we recommend the following the below procedure to keep the unit in its best shape. Run awashcycle with the dishwasher empty and then remove the plug from the outlet. Turn off the water supply and leave the door of the appliance slightly ajar. This will help the seals last longer and prevent odors from forming within the appliance.
■ Moving the Appliance
If the dishwasher needs to remove, try to keep it in the vertical position. If absolutely necessary, it can be positioned on its back.
Seal maintenance
One of the many factors which can cause odorstoform in the dishwasher is food trapped in the seals of the dishwasher. Periodic cleaning with a damp sponge will prevent this from occurring.
About Electricity Connecting
CAUTION, for personal safety:
DO NOT USE AN EXTERNAL CORD OR AN ADAPTER PLUG TO OPERATE THIS DISHWASHER. DO NOT, FOR ANY REASON, CUT OR REMOVE THE THIRD GROUNDING PRONG FROM THE POWER CORD.
Electrical Requirements
This dishwasher is designed for operation on an adequately wired individual 120VAC,60Hz. Use recommended 15 amp fuses and copper wire only. Time delay fuses or circuit breakers are recommended as they provide a separate circuit serving only this appliance. When installing the dishwasher, be sure not to install it directly in front of the outlet it will be plugged into as this will block access to it. Please refer to the installation manual.
Electrical Connection
WARNING!
Insure proper ground exists before use
After making sure the voltage and the frequency values for the current in the home correspond to those on the rating plate and that the electrical system is sized for the maximum voltage on the rating plate, insert the plug into a properly grounded electrical outlet. If the electrical outlet is not suited for the plug, replace the outlet instead of using a adaptors as they could cause overheating and burns.
Below are some troubleshooting tips which can save you time and money. Please review the charts on the following pages.
You may not need to call for service.

| Problem | Possible Causes | What To Do |
| Dishwasher doesn't run | Blownfuseor circuit breakercutoff | Replacefuseorresetcircuitbreaker.anyointconnect appliancesharingthesamecircuitwiththedishwasher |
| Powersupplyisnot turnedon | Makesurethedishwasheristurnedonandthedooris closedsecurely. Makesurethepowercordproperlypluggedintothe wallsocket. | |
| Waterpressureislow | Checkthatthewatersupplyisconnectedproperlyand thewateristurnedon. | |
| Noise | Somesoundsarenormal | Noise can be created by the spray arms spraying water, dishes movingorthedetergentcupopening. |
| Utensilsarenotsecure inthebasketorsometimesmallhas droppedintothebasket | Make sure everything is secured in the dishwasher. | |
| Motorhum | Dishwasherhasnotbeenusedregularly.Ifyoudonotuse yourdishwasheroften,werecommend thatyourunthe shortestwashprogramonceeveryweek.Thiswillkeepthe sealmoistavoidthemotorfrommakingnoises. | |
| Suds in the tub | Improperdetergent | Onlyuse dishwasherdetergentto avoid an overaccumulation andoverflowing of soap suds.lfthis occurs, open the dishwasher and let suds evaporate. Add 1 gallon of cold water to the tub. Close the dishwasher andstartthewash cycle to drain out the water.Repeatifnecessary. |
| SpilledrinseagentAlwayswipeuprinseagentspillsimmediately. | ||
| Stained tub interior | Detergentwith colorantwasused | Makesurethedeterragercolorant. |
| Dishes are not dried | Rinseagentdispenser isempty | Make sure that the rinse agent dispenser is filled. |
| Dishes and flatware not clean | Improperprogram | Selectstrongerprogram. |
| Impropperrackloading | Makesurethatthedetergentdispenserandsprayarms arenotblockedbylargeddishware. | |
| Spots and filming on glasses and flatware | 1 Extremely hard water2 Low inlet temperature3Overloadingthe dishwasher4Improperloading5Olddamppowder detergent6Emptyinseagent dispenser7Toolittle detergent | Toremovespotsfromglassware:1Takeallmetalutensilsoutofthedishwasher.2Donotadddetergent.3Choosethelongestcycle.4Turnyourdishwasheronabeginyourwashingcycle. Ittkesabout18to22minutesforthecycletoenterinto itsheaviestwash(thermainwash).Thissthebesttime toaddthedetergent.5Openthetopistwahsphobitevinegar intothebottomofthedishwasher.6Closetheartidethetodshewashercomplete thecycle.lfthevinegar doesnotwork,repeat thesteps above,using 1/4cup(60ml)ofcitricacid crystalsinsteadofvinegar. |
Before you call for service
Problem Possible Causes What To Do
| Cloudiness on glassware | Combination of soft water and too much detergent | This cloudiness is known as etching and can become permanent on your glassware. To prevent this from happening, use less detergent if you have soft water and select the shortest cycle to washyglassware. |
| Yellow or brown f thair or coffee stains on inside surfaces of your cups. | Remove the stains by hand, using a solution of 1/2 cup of bleach and 3 cups warm water | |
| Iron deposits in water can cause film | A water softening filter should be installed. These can be purchased at most hardware stores and installed by a qualified plumber. | |
| White film on inside surfaces of dishwasher | Hard water minerals To clean the , use a disinfense with dishwasher detergent and wear rubber gloves. Do not use any type of cleanser other than dishwasher detergent as it may cause foaming or sudsing. ▲WARNING Before cleaning the interior wait at least 20 minutes after a cycle for the temperature to cool down. Failure to do may result in burns or injury. | |
| Detergent cap won't latch | Dial is not in the OFF position | Turn the Dial to OFF position and slide the door latch to the left. |
| Detergent left in dispenser | Dishes block detergent dispenser | Re-load the dishes properly. |
| Steam | Normal result of drying process | There is some steam coming through the vent by the door latch during drying and water draining. |
| Black or gray marks on dishes | Aluminum utensils have rubbed against dishes | Use a mild abrasive cleaner to those marks. erase |
| Water standing in the bottom of the tub | This is normal | A small amount of clean water at the back of the tub keeps the water seal lubricated. |
| Dishwasher leaks | Rinse aid dispenser or detergent dispenser are overfilled | Be careful not to overfill the rinse aid dispenser. Spilled rinse aid could cause overaccumulation and overflowing of soap suds. Wipe away any spills with a damp cloth. |
| Dishwasher isn't leveled | Make sure the dishwasher is leveled. | |
| nene nee nee nee nee nee nee nee nee nee nee nee nee nee nee nee nee nee nee nee nee nee nee nee nee nee nee nee nee nee nee nee nee nee nee nee nee nee nee nee nee nee nee nee nee nee nee nee nee nee nee nea nee nee nee nee nee nee nee nee nee nee nee nee nee nee nee nee nee nee nee nee nee nee nee nee nee nee nee nee nee nee nee nee nee nee nee nee nee nee nee nee nee nee nee nee nee nee nee nee nee neee nee nee nee nee nee nee nee nee nee nee nee nee nee nee nee nee nee nee nee nee nee nee nee nee nee nee nee nee nee nee nee nee nee nee nee nee nee nee nee nee nee nee nee nee nee nee nee nee nee neo nee nee nee nee nee nee nee nee nee nee nee nee nee nee nee nee nee nee nee nee nee nee nee nee nee nee nee nee nee nee nee nee nee nee nee nee nee nee nee nee nee nee nee nee nee nee nee nee nee ne e nee nee nee nee nee nee nee nee nee nee nee nee nee nee nee nee nee nee nee nee nee nee nee nee nee nee nee nee nee nee nee nee nee nee nee nee nee nee nee nee nee nee nee nee nee nee nee nee nee nec nee nee nee nee nee nee nee nee nee nee nee nee nee nee nee nee nee nee nee nee nee nee nee nee nee nee nee nee nee nee nee nee nee nee nee nee nee nee nee nee nee nee nee nee nee nee nee nee nee neesne nne nne nne nne nne nne nne nne nne nne nne nne nne nne nne nne nne nne nne nne nne nne nne nne nne nne nne nne nne nne nne nne nne nne nne nne nne nne nne nne nne nne nne nne nne nne nne nne nne nne nee nee nee nee nee nee nee nee nee nee nee nee nee nee nee nee nee nee nee nee nee nee nee nee nee nee nee nee nee nee nee nee nee nee nee nee nee nee nee nee nee nee nee nee nee nee nee nee nee neae nee nee nee nee nee nee nee nee nee nee nee nee nee nee nee nee nee nee nee nee nee nee nee nee nee nee nee nee nee nee nee nee nee nee nee nee nee nee nee nee nee nee nee nee nee nee nee nee nee ne. |
saeepxneqqesruewexe zllineA nbnabeuedepapssessosanbienb o
sresnns nnnnne nnnnne nnnnne nnnnne nnnnne nnnnne nnnnne nnnnne nnnnne nnnnne nnnnne nnnnne nnnnne nnnnne nnnnne nnnnne nnnnne nnnnne nnnnne nnnnne nnnnne nnnnne nnnnne nnnnne nnnnne nnnnnee nnnnne nnnnne nnnnne nnnnne nnnnne nnnnne nnnnne nnnnne nnnnne nnnnne nnnnne nnnnne nnnnne nnnnne nnnnne nnnnne nnnnne nennnne nannnee nannnee nannnee nannnee nannnee nannnee nannnee nannnee nannnee nannnee nannnee nannnee
nne nne nee nee nee nee nee nee nee nee nee nee nee nee nee nee nee nee nee nee nee nee nee nee nee nee nee nee nee nee nee nee nee nee nee nee nee nee nee nee nee nee nee nee nee nee nee nee nee nee nee nee neee

enbnne ennnnne
eep
NOI⊥NNEWNI,NO NOONCOOHNREERN NIN

eep sodr
esinpod es eoe
nepnpnepeepnepeepneppeeppeeppeeppeeppeeppeeppeeppeeppeeppeeppeeppeeppeeppeeppeeppeeppeeppe
eessnne ne nne ennnne eenee
eeppepepepepepepepepepepepepepepepepepepepepepepepepepepepepepepepepepepepepepepepepepepepepepepepepepepepepepepepepepepepepepepepepepepepepepepepepepepepepepepepepepepepepepepepepepepepepepe pe
y
(3655nnepepepepepepepepepepepepepepepepepepepepepepepepepepepepepepepepepepepepepepepepepepepepepepepepepepepepepepepepepepepepepepepepepepepepepepepepepepepepepepepepepepepepepepepepepepepepepepepepepepe pe
Jes
epnne nnnnne ene nne ne nne nne nne nne nne nne nne nne nne nne nne nne nne nne nne nne nne nne nne nne nne nne nne nne nne nne nne nne nne nne nne nne nne nne nne nne nne nne nne nne nne nne nne nne nne nne nne nne nne nne nnee
10000000000000000000000000000000000000000000000
| 9 | 9 | ε | 乙 |
| I | ε | ε | |
| I | ε | ε | 乙 |
| I | ε | ε | 乙 |
| ε | ε | ||
| L | ε | a | 乙 |
| b | S | b | 乙 |
| I | S | b | |
| I | S | b | 乙 |
| I | S | b | |
| I | S | b | 乙 |
xneane noe eJeueed 6
eessss
JNNEeEid
e e e e eee
Iny e log g
Nes
səpuε6
seepn eepnnepepepepepepepepepepepepepepepepepepepepepepepepepepepepepepepepepepepepepepepepepepepepepepepepepepepepepepepepepepepepepepepepepepepepepepepepepepepepepepepepepepepepepepepepepe pe
uIeI d /I
u|d t/ε
uield
'snossap-o
nne nnnnne nee e nne enne
UeD%eP
snossopnneeppepepepepepepepepepepepepepepepepepepepepepepepepepepepepepepepepepepepepepepepepepepepepepepepepepepepepepepepepepepepepepepepepepepepepepepepepepepepepepepepepepepepepepepepepe pe
EONINN NNNNNNNNNNNNNNN
e e ennnnne nnnnne nnnnne nnnnne nnnnne nnnnne nnnnne nnnnne nnnnne nnnnne nnnnne nnnnne nnnnne nnnnne nnnnne nnnnne nnnnne nnnnne nnnnne nnnnne nnnnne nnnnne nnnnne nnnnne nnnnne nnnnne
eep 2
uousswpe,p eAeA. L
aee
e 6
Jnne nnnnne nnnnne nnnnne nnnnne nnnnne nnnnne nnnnne nnnnne nnnnne nnnnne nnnnne nnnnne nnnnne nnnnne nnnnne nnnnne nnnnne nnnnne nnnnne nnnnne nnnnne nnnnne nnnnne nnnnne nnnnne nannnee
eess-ae np saeouoe
ENNEENNNNNSOSONNO:DESENNNSINNSOSS
eepn np en epeaeeep enb zye
suees suoeoosseeppepepepepepepepepepepepepepepepepepepepepepepepepepepepepepepepepepepepepepepepepepepepepepepepepepepepepepepepepepepepepepepepepepepepepepepepepepepepepepepepepepepepepepepepepepepepepepepepepepe
:ENRR

P (p) 111111111111111111111111111111111111111

esnnnns xne nne nne nee nee nee nee nee nee nee nee nee nee nee nee nee nee nee nee nee nee nee nee nee nee nee nee nee nee nee nee nee nee nee nee nee nee nee nee nee nee nee nee nee nee nee nee nee nee nee nee nee nee neee