HDBL655AFS - Dishwasher HAIER - Free user manual and instructions
Find the device manual for free HDBL655AFS HAIER in PDF.
User questions about HDBL655AFS HAIER
0 question about this device. Answer the ones you know or ask your own.
Ask a new question about this device
Download the instructions for your Dishwasher in PDF format for free! Find your manual HDBL655AFS - HAIER and take your electronic device back in hand. On this page are published all the documents necessary for the use of your device. HDBL655AFS by HAIER.
USER MANUAL HDBL655AFS HAIER
24" Built-In Dishwasher
Lave-Vaiselle Incorpere 24"
Lavavajillas Empotrado 24"
natural_image
Illustration of a white rectangular kitchen appliance with a handle and lid (no text or symbols)TABLE OF CONTENTS
DISHWASHER SAFETY 2
LOCATION REQUIREMENTS....5
ELECTRICAL REQUIREMENTS......6
WATER SUPPLY REQUIREMENTS......6
PARTS AND FEATURES ....7
Filter System 8
Sensor Wash System....8
START UP GUIDE......8
How Your Dishwasher Cleans 8
Using Your New Dishwasher....9
CONTROLS 9
Cycle Charts....12
DISHWASHER LOADING ....14
Loading Upper Rack....16
Loading Lower Rack....17
DISHWASHER USE 20
Proper Use of Detergent....20
Proper use of Rinse Aid....22
Washing Special Items....23
DISHWASHER CARE....24
Cleaning 24
Storing....25
TROUBLESHOOTING....26
Error Codes....31
LIMITED WARRANTY 32
RECORD KEEPING
Thank you for purchasing this Haier product. This user manual will help you get the best performance from your new dishwasher.
For future reference, record the model and serial number located on the inside frame of the dishwasher, and the date of purchase.
Staple your proof of purchase to this manual to aid in obtaining warranty service if needed.
Model number
Serial number
Date of purchase
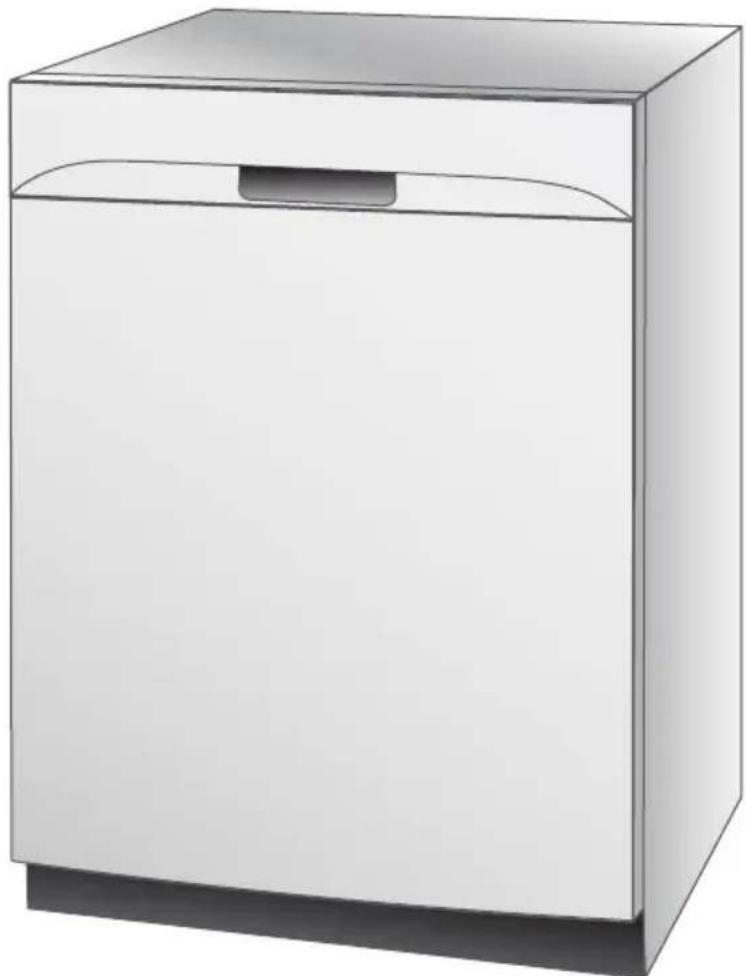
Your safety and the safety of others are very important.
We have provided many important safety messages in this manual and on your appliance. Always read and obey all safety messages.

text_image
Warning sign with exclamation mark inside a triangle, commonly used to indicate caution or hazard.This is the safety alert symbol.
This symbol alerts you to potential hazards that can kill or hurt you and others. All safety messages will follow the safety alert symbol and either the word "DANGER," "WARNING" or "CAUTION."
These words mean:
! DANGER
An imminently hazardous situation. You could be killed or seriously injured if you don't immediately follow instructions.
WARNING
A potentially hazardous situation which, if not avoided, could result in death or serious bodily injury.
CAUTION
A potentially hazardous situation which, if not avoided, may result in moderate or minor injury.
All safety messages will tell you what the potential hazard is, tell you how to reduce the chance of injury, and tell you what can happen if the instructions are not followed.
IMPORTANT SAFETY INSTRUCTIONS
WARNING: To reduce the risk of fire, electrical shock, injury to persons, or damage when using the dishwasher, follow basic precautions, including the following:
• Certified residential dishwashers are not intended for licensed food establishments.
- Use the dishwasher only for its intended function.
- Use only detergents or rinse agents recommended for use in a dishwasher, and keep them out of the reach of children.
- When loading items to be washed:
1) Locate sharp items so that they are not likely to damage the door seal;
2) Load sharp knives with the handles up to reduce the risk of cut-type injuries.
- Do not wash plastic items unless they are marked "dishwasher safe" or the equivalent. For plastic items not so marked, check the manufacturer's recommendations.
- If the dishwasher drains into a food disposer, ensure disposer is completely empty before running the dishwasher.
- Do not tamper with or override controls and interlocks.
- Do not touch the heating element during or immediately after use.
- Do not operate the dishwasher unless all enclosure panels are properly in place.
- Do not tamper with controls.
- Do not abuse, sit on, or stand on the door, lid, or dish racks of the dishwasher.
- To reduce the risk of injury, do not allow children to play in or on the dishwasher.
- Under certain conditions, hydrogen gas may be produced in a hot water system that has not been used for two weeks or more. HYDROGEN GAS IS EXPLOSIVE. If the hot water system has not been used for such a period, before using the dishwasher turn on all hot water faucets and let the water flow from each for several minutes, This will release any accumulated hydrogen gas. As the gas is flammable, do not smoke or use an open flame during this time.
- Do not store or use combustible materials, gasoline or other flammable vapors and liquids in the vicinity of this or any other appliance.
IMPORTANT SAFETY INSTRUCTIONS
- Do not use the dishwasher if it has a damaged power line, or plug. Do not plug the dishwasher into a damaged outlet.
- Do not use an extension cord.
- When disposing an old dishwasher, remove the door from the washing compartment. This will reduce the possibility of danger to children.
READ AND SAVE THESE INSTRUCTIONS
GROUNDING INSTRUCTIONS
For a grounded, cord-connected dishwasher:
The dishwasher must be grounded. In the event of a malfunction or breakdown, grounding will reduce the risk of electric shock by providing a path of least resistance for electric current. If the dishwasher is to be connected with a power cord the cord must have an equipment grounding conductor and a grounding plug. The plug must be plugged into an appropriate outlet that is installed and grounded in accordance with all local codes and ordinances.
WARNING: Improper connection of the equipment-grounding conductor can result in a risk of electric shock.
Check with a qualified electrician or service representative if you are in doubt whether the dishwasher is properly grounded.
Do not modify the plug provided with the dishwasher; if it will not fit the outlet, have a proper outlet installed by a qualified electrician.
For a permanently connected dishwasher:
The dishwasher must be connected to a grounded metal, permanent wiring system, or an equipment- grounding conductor must be run with the circuit conductors and connected to the equipment- grounding terminal or lead on the dishwasher.
SAVE THESE INSTRUCTIONS
WARNING

natural_image
Simple black-and-white illustration of a tilted book with a bookmark, resting on a flat line (no text or symbols)Tip Over Hazard
Do not use dishwasher until completely installed.
Do not push down on open door.
Failure to follow these instructions can result in serious injury or cuts.
State of California Proposition 65 Warnings:
WARNING: This product contains one or more chemicals known to the State of California to cause cancer.
WARNING: This product contains one or more chemicals known to the State of California to cause birth defects or other reproductive harm.
WARNING
Suffocation Hazard
Before you throw away your old appliance, remove the door or lid so that children cannot hide or get trapped inside your old appliance.
Failure to follow these instructions can result in death or brain damage.
LOCATION REQUIREMENTS
- Install where dishwasher is protected from the elements. Protect against freezing to avoid possible rupture of fill valve. Such ruptures are not covered by the warranty. See "Storing" in the "Dishwasher Care" section for winter storage information.
- Install and level dishwasher on a floor that will hold the weight and in an area suitable for its size and use.
WARNING

Electrical Shock Hazard
Electrically ground dishwasher.
Connect ground wire to green ground connector in terminal box.
Do not use an extension cord.
Failure to follow these instructions can result in death, fire, or electrical shock.
This dishwasher is designed for operation on an adequately wired individual 120 V, 60 Hz, 15- or 20-amp fused electrical supply with copper wire only. Time-delay fuse or circuit breaker recommended, and provide a separate circuit serving only this appliance. Outlet should be placed in adjacent cabinet.
WATER SUPPLY REQUIREMENTS
The water supply temperature should be 120^ F to 150^ F ( 49^ C to 66^ C).
text_image
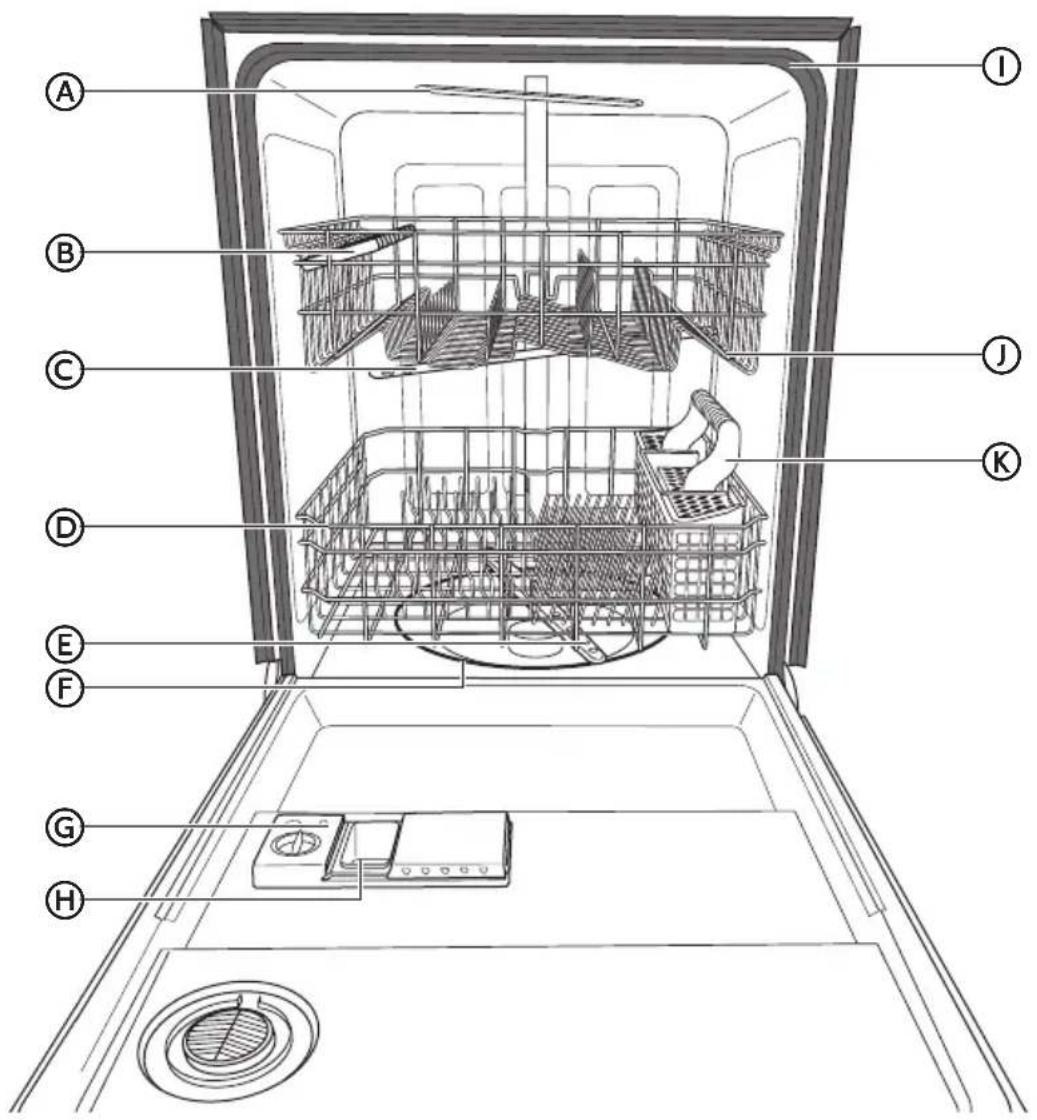
Technical diagram of a kitchen appliance with labeled parts from inner to outer casing(A) Upper Spray Arm
(B) Cup Shelf
© Middle Spray Arm
(D) Bottom Spray Arm
E Bottom Rack
(F) Heating Element
G Rinse Aid Dispenser
H Detergent Dispenser
① Tub Gasket
① Adjustable Upper Rack
Three Piece Silverware Basket
| SPECIFICATIONS | |
| Capacity: 14 Place Settings | |
| Dimensions (WxDxH): 2378 " x 25916 " x 3334 " (606 x 650 x 857 mm) | |
| Weight Unpacked: 94 lb (42 kg) | |
| Power Supply: 120 volts, 60 Hz | |
| Rated Power Usage: Wash motor 50 W Heater 840 W | |
| Water Feed Pressure: 20 ~ 120 psi (138 ~ 828 kPa) | |
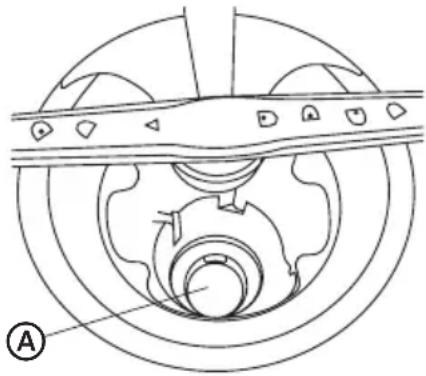
FILTER SYSTEM
Your dishwasher has a multiple filter system. In the system there are three filters, a Coarse filter designed to collect large items such as toothpicks, a Fine filter designed to collect corn, beans etc. and a Micro filter designed to collect very small particles. It then separates soiled water from clean water in different chambers allowing your dishwasher to perform better while using less water and energy.
natural_image
Technical line drawing of a mechanical component with concentric rings and a central shaft (no text or symbols)
Filter Location
SENSOR WASH SYSTEM
Your dishwasher has a food soil sensing system. When a partial load of lightly soiled dishes is placed in the dishwasher, a wash cycle similar to a short wash will automatically be activated. When a full load of heavily soiled dishes is placed in the unit, a heavy wash cycle will automatically be activated. Your dishwasher can determine the type of cycle required to clean the dishes and will clean more efficiently every time.
START UP GUIDE
Before using your dishwasher, remove all packaging materials. Read this entire Use and Care Guide. You will find important safety information and useful operating tips.
HOW YOUR DISHWASHER CLEANS
Your dishwasher cleans by spraying a mixture of hot water and detergent through the spray arms against soiled surfaces.
The dishwasher fills with water covering the filter area. Water is then pumped through the multiple filter and spray arms. Separated soil particles go down the drain as the water is pumped out and replaced with clean water.
If the Sensor Wash system is activated, the number of water fills may vary with the cycle being used.
USING YOUR NEW DISHWASHER
- Load dishwasher. See "Dishwasher Loading."
- Add detergent. See "Proper Use of Detergent."
- Add rinse aid. See "Proper Use of Rinse Aid."
- Close door firmly to latch.
- Select desired CYCLE. See "Cycle Charts." The indicator light next to the Cycle will blink when selected.
- Select desired OPTIONS. See "Controls." The indicator light next to the Option will illuminate when selected.
- Turn on the hot water faucet nearest the dishwasher until water is hot. Turn water off.
- To start, press the Start / Cancel button.
NOTE: The dishwasher is programmed to remember the last cycle so you do not have to reset each time. To start the dishwasher using the same cycle and options selected on the previous wash, just press the Start/Cancel button.
CONTROLS
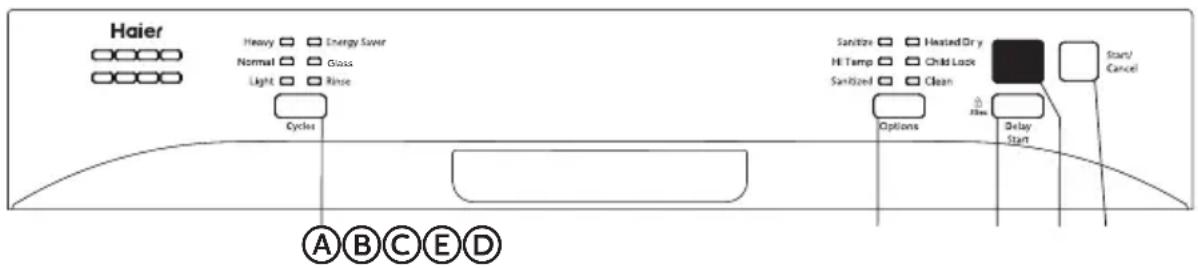
text_image
Haier Heavy Energy Saver Normal Glass Light Rose Cycles Sanitex Heated Dry Hi Temp Child Lock Sanitized Clean Options Delay Start/Cancel A B C E DⒶ CYCLES
Press the Cycles button to toggle among the wash cycles. The light next to the cycle illuminates to indicate the selected cycle.
HEAVY
This cycle is for hard to clean, heavily soiled dishes, pots and pans.
NORMAL
This cycle is for moderately soiled dinner dishes and silverware.
LIGHT
This cycle is for lightly soiled or rinsed dishes and silverware.
ENERGY SAVER
This cycle is for lightly soiled or rinsed dishes and silverware.
GLASS
This cycle is for lightly soiled glassware.
RINSE
This cycle is for rinsing dishes or glasses. This cycle is only a rinse that keeps food from drying on your dishes and reduces odor buildup in your dishwasher until you are ready to wash a full load. Do not use detergent.
® OPTIONS
Press the Options button to toggle among the options. The light next to the option illuminates to indicate the selected cycle.
NOTE: The Clean indicator light illuminates to indicate the end of the wash cycle. The light will turn off after the door has been unlocked for 30 seconds.
SANITIZE
WARNING: Only sanitizing cycles have been designed to meet the requirements of 6 for soil removal and sanitization efficacy. There is no intention, either directly or indirectly, that all cycles on a certified machine have passed the sanitization performance test.
The sanitize option sanitizes dishes and glassware in accordance with NSF International NSF/ANSI Standard 184 for Residential Dishwashers. Certified residential dishwashers are not intended for use in licensed food establishments.
This option is available for all cycles except except Glass and Rinse.
When the Sanitize option is selected, the water temperature will reach 158^ F ( 70^ C) maximum.
The Sanitized indicator light illuminates to indicate when the Wash cycle with the Sanitize option is completed. The light will turn off after the door has been unlocked for 30 seconds.
NOTE: It is possible that the water will not reach 158^ F ( 70^ C) in the Sanitize mode, if the temperature of the incoming hot water is not the minimum requirement of 120^ F ( 49^ C).
HI TEMP
This option is available for all cycles except except Glass and Rinse.
When the Hi Temp option is selected, the water temperature will be maintained at 140^ F ( 60^ C) maximum.
HEATED DRY
This option is available for all cycles except Rinse.
When the Heated Dry option is selected, the heater will work during the drying process.
CHILD LOCK
You can lock all controls to avoid unintentionally changing the dishwasher cycle or starting the dishwasher. The light next to Child Lock will illuminate to indicate that Child Lock is activated and the Control panel is locked.
- Press and hold the Delay Start button for 3 seconds to Lock/Unlock the control panel.
© DELAY START
To delay the start of a selected cycle, press the Delay Start button until the desired delay time shows in the LED display window. You can delay the start of your dishwasher from 1 to 24 hours. To cancel the Delay Start option, and start the wash cycle during the delay period, press the Start/Cancel button. The selected cycle will begin immediately.
© LED DISPLAY WINDOW
Displays the Time Remaining in the wash cycle, Delay Hours, and Error Codes.
Time Remaining
Time remaining in a cycle will show hours and minutes alternately (1H-2H or 0-59).
NOTE: The time remaining could increase or decrease by several minutes. This means the Smart Sensor has checked the soil level and determined whether additional water fills are needed or if the programmed number of water fills can be reduced.
Delay Hours (1 to 24)
If the Delay Start option is selected, the selected time shows in the display window. If the cycle is running, the time remaining shows in the display.
CL
"CL" will appear when the Start/Cancel button is pressed. "CL" Flashes if the door is opened during a wash cycle. Close the dishwasher door to begin or continue a wash cycle.
Error Indicator
In situations, which are critical to dishwasher function and safe operation, the control will shut down and indicate an Error code (Er) in the LED display window. See "Error Codes" in the Troubleshooting section. If an Er code is displayed, contact Service for assistance with troubleshooting the problem, or for help locating an authorized service technician.
E START/CANCEL
Start - Firmly close the door. Select the desired wash cycle and options. The indicator light next to the cycle and options selected will be lit when activated. Press the Start/Cancel button once.
Pause - To pause or stop the dishwasher during a cycle, open the door slowly allowing the hot steam to escape. The dishwasher will stop. Check the detergent dispenser. If the main wash section of the detergent dispenser is still closed, you can add items.
Cancel - To cancel a cycle when the dishwasher is running, press the Start/ Cancel button once. The dishwasher will start a 60 second drain, and then shut off. At the end of the drain, you can select the desired wash cycle and restart.
CYCLE CHARTS
Select the wash cycle and options desired. Unless you select a delay wash, the dishwasher starts filling once the door is closed and you press the Start/Cancel button. After filling, and a brief wash period, the machine will pause for a 5 minute energy saving soak interval. During this time, dried and baked on soil is softened for easier removal later in the cycle. You can select options as the machine is filling.
Cycle times are approximate and will vary with options selected. Hot water is necessary to activate dishwasher detergent and melt fatty food soils.
An automatic sensor will check the incoming water temperature and if it is not hot enough, the cycle may be delayed to heat the water during the main wash. This also happens when HI-TEMP WASH is selected and a hotter temperature is required to wash heavier soil loads.
A “•” shows what steps are in each cycle. Temperatures indicate where extra heat is added. Water usage is shown in U.S. gallons/liters.
HEAVY
| Use this cycle for hard to clean, baked on, cookware and harder than normal water conditions. | ||||||||
| Pre-Wash | Second Pre-Wash | Main Wash | Rinse | Rinse Final | Heated Rinse | Dry Running Time (min) | Water Usage (gal/L) | |
| ●●● | 118°F (48°C) | ●●● | 136°F (58°C) | ● | 140 6 gal. (22.8 L) | |||
| AVAILABLE OPTIONS | ||
| Sanitize Hi Temp Heated Dry | ||
| X | X | X |
NORMAL
| Use this cycle for loads with normal amounts of food soil. | ||||||||
| Pre-Wash | Second Pre-Wash | Main Wash | Rinse | Rinse Final | Heated Rinse | Dry Running Time (min) | Water Usage (gal/L) | |
| • | •107° - 118°F(42° - 48°C) | •122° - 136°F(50° - 58°C) | • | 100-130 | 3 to 6 gal. / (10.8 - 23 L) | |||
| AVAILABLE OPTIONS | ||
| Sanitize Hi Temp Heated Dry | ||
| X | X | X |
LIGHT
| Use this cycle for lightly soiled or rinsed dishes and silverware. | ||||||||
| Pre-Wash | Second Pre-Wash | Main Wash | Rinse R | Rinse Final | Heated Rinse | Dry Running Time (min) | Water Usage (gal/L) | |
| • | •108°F(42°C) | •136°F(58°C) | • | 100-120 3 | to 5 gal. / (11.4-18.9 L) | |||
| AVAILABLE OPTIONS | ||
| Sanitize Hi Temp Heated Dry | ||
| X | X | X |
ENERGY SAVER
| Use this cycle for lightly soiled or rinsed dishes and silverware. | ||||||||
| Pre-Wash | Second Pre-Wash | Main Wash | Rinse R | Rinse Final | Heated Rinse | Dry Running Time (min) | Water Usage (gal/L) | |
| ●●● | 104°F (40°C) | ● | 122°F (50°C) | ● | 105 5 gal. / 19.3 L | |||
| AVAILABLE OPTIONS | ||
| Sanitize Hi Temp Heated Dry | ||
| X | X | X |
GLASS
| This cycle is for lightly soiled glassware. | ||||||||
| Pre-Wash | Second Pre-Wash | Main Wash | Rinse R | Rinse Final | Heated Rinse | Dry Running Time (min) | Water Usage (gal/L) | |
| ●●● | 118°F (48°C) | ● | 136°F (58°C) | ● | 120 5 gal./19.3 L | |||
| AVAILABLE OPTIONS | ||
| Sanitize Hi Temp Heated Dry | ||
| N/A N/A | X | |
RINSE
| Use this rinse cycle for rinsing dishes, glasses and silverware that will not be washed right away. | ||||||||
| Pre-Wash | Second Pre-Wash | Main Wash | Rinse R | Rinse Final | Heated Rinse | Dry Running Time (min) | Water Usage (gal/L) | |
| • | 20 2 gal./8 L | |||||||
| AVAILABLE OPTIONS | ||
| Sanitize Hi Temp Heated Dry | ||
| N/A N/A N/A | ||
DISHWASHER LOADING
LOADING SUGGESTIONS
- Remove leftover food, bones, toothpicks and other hard items from the dishes. To conserve water and energy, and save time, it is not necessary to rinse dishes before putting them into the dishwasher. The wash system is designed to remove food particles from the water.
- It is important for the water spray to reach all soiled surfaces.
- Load dishes so they are not stacked or overlapping if possible. For best drying results, water must be able to drain from all surfaces.
- Load heavy pots and pans carefully. Heavy items can dent the stainless steel interior of the door if they are dropped or bumped.
- Make sure pot lids and handles, pizza pans, cookie sheets, etc., do not interfere with the spray arm rotation.
- Conserve water and energy, and save the time you would spend hand-rinsing by running a rinse cycle to keep dishes moist, if you do not plan to wash them soon. Foods such as eggs, rice, pasta, spinach and cooked cereals may be hard to remove if they are left to dry over a period of time.
To avoid thumping/clattering noises during operation:
• Make sure lightweight items are secured in the racks.
- Make sure pot lids and handles, pizza pans, cookie sheets, etc., do not touch interior walls or interfere with the rotation of the spray arm.
- Load dishes so they do not touch one another.
NOTE: For built-in models, keep sink drain plugs closed during dishwasher operation to prevent noise transfer through drains.
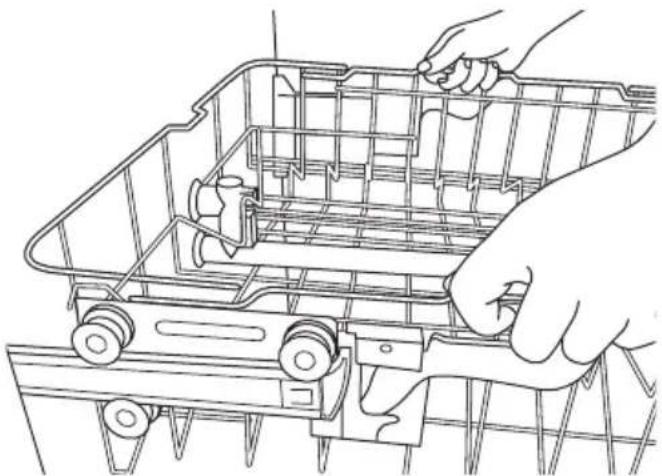
ADJUST UPPER RACK
The Upper Rack height can be easily adjusted to accommodate loading taller dishes in either rack.
IMPORTANT: Remove any dishes before adjusting the rack.
To accommodate taller dishes in the bottom rack:
- Grasp each side and lift up to raise the upper rack.
natural_image
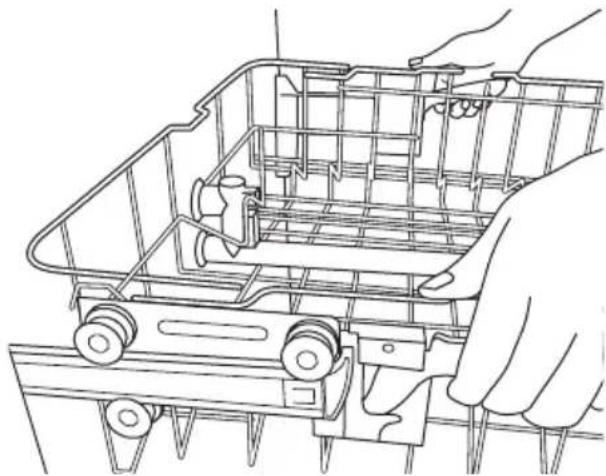
Line drawing of a hand holding a shopping cart filled with items, no text or symbols presentTo accommodate taller dishes in the upper rack:
- Pull up on the adjusting arm on each side to lower the upper rack.
natural_image
Line drawing of a hand holding a shopping cart with wheels (no text or symbols)LOADING UPPER RACK
The upper rack is designed for cups, glasses, small plates, bowls and plastic items marked dishwasher safe.
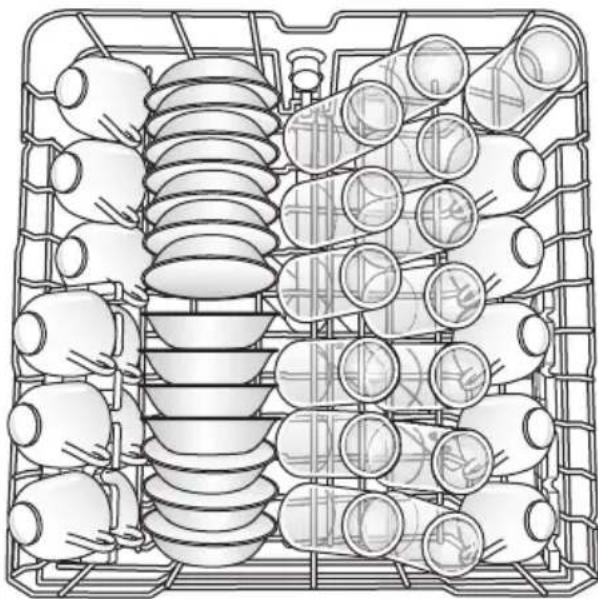
natural_image
Technical line drawing of a mechanical assembly with insulators and housing (no text or symbols)14 Place Setting
IMPORTANT: Make sure the dishes loaded in the upper rack do not interfere with the rotation of the middle spray arm located beneath the upper rack. Check by turning spray arm by hand.
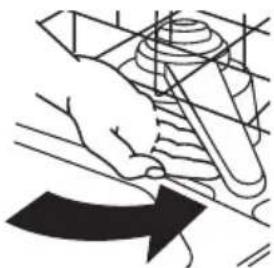
natural_image
Diagram of a hand holding a tool with a curved arrow indicating direction (no text or symbols)NOTE: The features on your dishwasher rack may vary from the drawings shown.
- Place items so open ends face downward for cleaning and draining.
- Load glasses and cups in upper rack only. The lower rack is not designed for glasses and cups. Damage can occur.
- Place cups and glasses in the rows between tines. Placing them over the tines can lead to breakage and water spots.
- To avoid chipping, do not let stemware touch other items. Small bowls, pans and other utensils can be placed in the top rack. Load bowls in the center section for best stability.
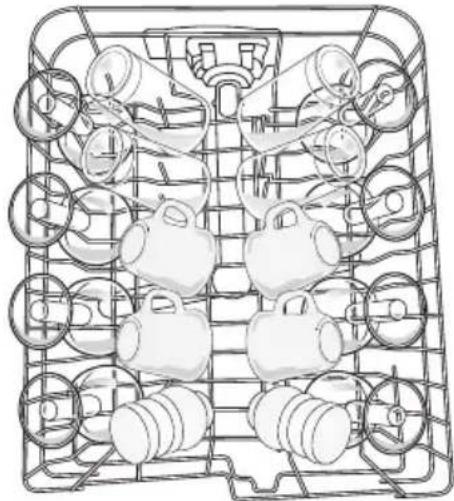
natural_image
Line drawing of a grid with circular objects and mechanical parts (no text or symbols)- China, crystal and other delicate items must not touch each other during dishwasher operation. Damage may occur.
- Load plastic items so the force of the spray does not move them during the cycle.
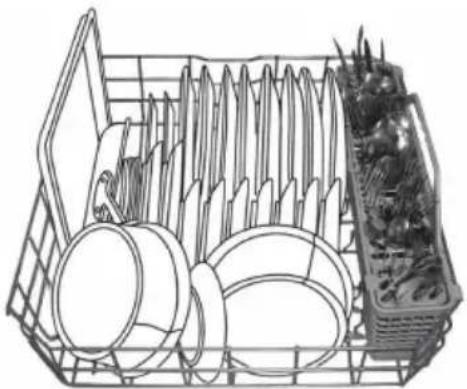
LOADING LOWER RACK
IMPORTANT: Large items should be placed along the edge so they do not interfere with the middle or lower spray arm turning freely, or block the detergent dispenser from opening.
The lower rack is designed for plates, soup bowls, cookware and bakeware.
The adjustable upper rack allows you to load items up to 13" in height.
The fold-down tines in the bottom rack make it easier to load large items. The tines may be left in the up position for normal use, or folded down for more flexible loading.
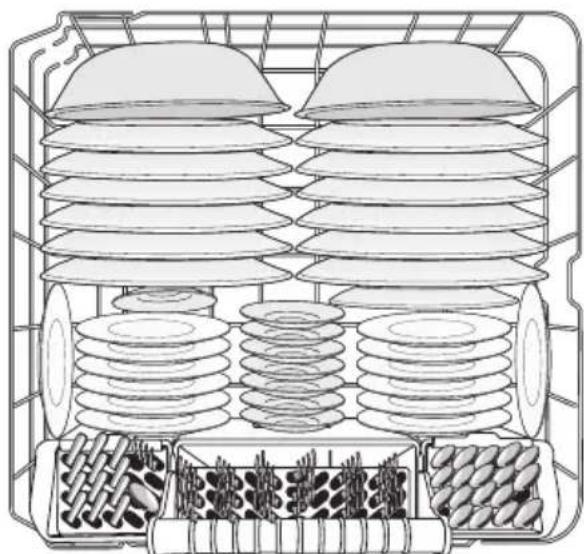
natural_image
Diagram of a multi-tiered storage unit with circular and rectangular components, no text or symbols presentNOTE: The features on your dishwasher rack may vary from the drawings shown.
- Do not load glasses, cups, or plastic items in the lower rack. Load small items in the lower rack only if they are secured in place.
- Load plates, soup bowls, etc. between tines.
- Load soup, cereal, and serving bowls in the rack in a variety of ways depending upon their size and shape. Load bowls securely between the rows of tines. Do not nest bowls because the spray will not reach all surfaces.
natural_image
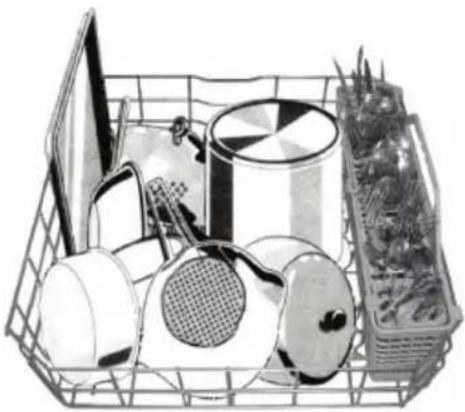
Illustration of a shopping basket containing various household items including a plate, lamp, and drawer (no text or symbols)- Load cookie sheets, cake pans, and other large items at the sides and back. Loading such items in front can keep the water spray from reaching the detergent dispenser.
natural_image
Line drawing of a basket filled with various kitchen utensils and a plastic container (no text or symbols)- Place heavily soiled cookware face down in the rack.
- Make sure pot handles and other items do not stop rotation of the spray arm(s). The spray arm(s) must move freely.
- Do not load items between the bottom rack and the side of the dishwasher tub because they might block the water inlet opening.
NOTE: Spin the spray arms. Be sure items in the basket do not stop the rotation of the spray arms.
FOLD-DOWN AND/OR ADJUSTABLE TINES (ON SOME MODELS)
- Grasp the tip of the tine that is in the tine holder.
- Gently pull the tine out of the tine holder.
- Lay the row of tines down or adjust as needed in the rack to make room for larger dishes, bowls, pots, pans or roasters.

natural_image
Line drawing of a multi-tiered plastic container with internal structure (no text or symbols)THREE-PIECE SILVERWARE BASKET
The silverware basket consists of three separate sections. For optimum loading flexibility, the center section of the basket can be used either individually or joined with one or both side sections as desired.
- Lift handle to remove the silverware basket and set the basket on a counter or table top.
- Lift up on each side section to disengage the center section from the keyhole slots in the side sections.
- Either replace the section(s) in the bottom rack and load the silverware, OR load the silverware while the section(s) are on the countertop and then replace the basket in the bottom rack.
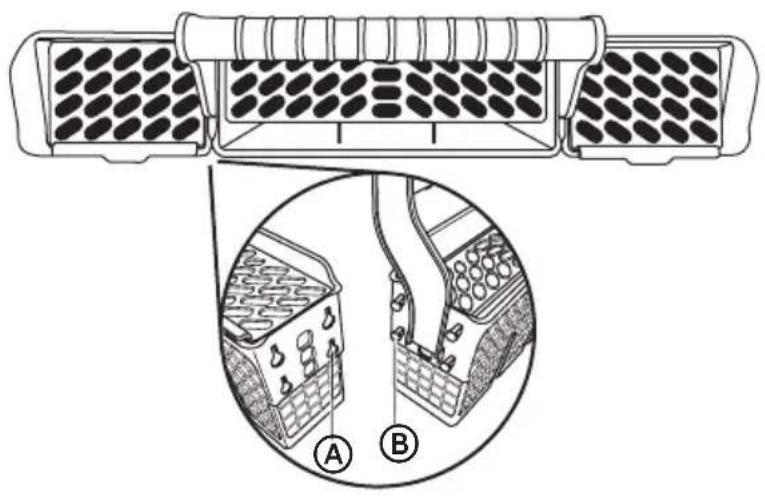
text_image
Diagram showing a device with labeled components A and B, including a magnified inset of internal structures.
Keyhole Slots

Prongs
NOTES:
- Load items with handles down, using the separators to prevent silverware from nesting.
- Place small items such as baby bottle caps, jar lids, corncob holders, etc. in the section(s) with hinged cover(s). Close the cover to hold small items in place.
- Unload or remove the basket before unloading the racks to avoid water drops from falling on the silverware.
- When handles are up, mix items in each section of the basket with some pointing up and some down to avoid nesting. Spray cannot reach nested items.
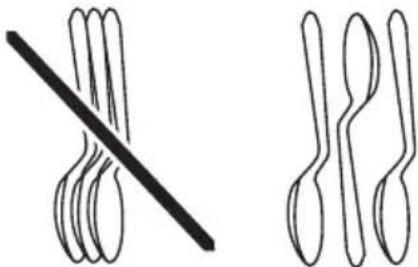
natural_image
Two simple line drawings of abstract shapes: a diagonal line and a wavy line with rounded ends, both without any text or symbols.IMPORTANT: Always load sharp items (knives, skewers, etc.) pointing down. Be sure that nothing protrudes through bottom of the basket or rack that may block the wash arm.
DISHWASHER USE
PROPER USE OF DETERGENT
IMPORTANT:
- Use automatic dishwashing detergent only. Other detergents can produce excessive suds that can overflow out of the dishwasher and reduce washing performance.
- Add detergent just before starting a cycle.
- Store detergent tightly closed in a cool, dry place. Fresh automatic dishwasher detergent results in better cleaning.
- All wash cycles except RINSE require detergent in the detergent dispenser.
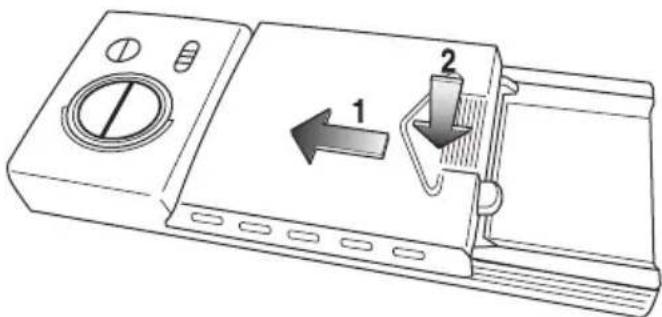
DETERGENT DISPENSER
- If the dispenser cover is closed, open the cover by pressing down on the cover latch. The cover will slide to the right.
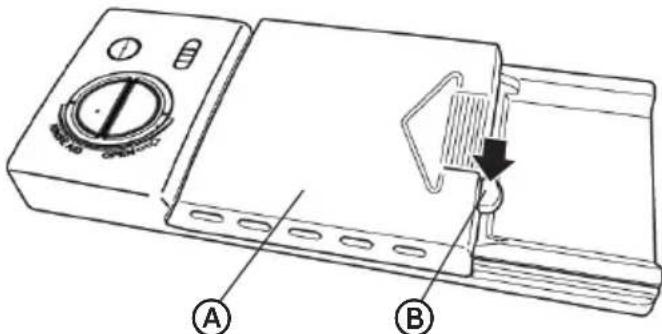
text_image
Technical diagram of a device with labeled parts A and B, showing a dial indicator and mechanical component.A
Cover
B
Cover Latch
- Add the recommended amount of detergent to the detergent cup.
NOTE: If using dishwasher detergent in the tablet or pac form, place the detergent in the detergent cup, NOT in the tub to avoid premature breakdown of the detergent.

natural_image
Line drawing of a microwave oven with a lid and side panel, showing liquid dispersion from the top outlet (no text or symbols)
Detergent Cup
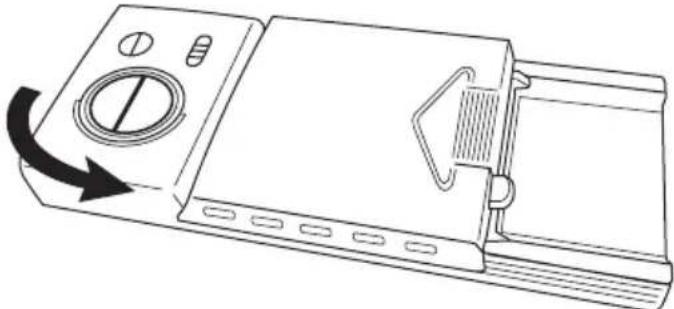
- Slide the dispenser cover to the left, and then press down on the ridged arrow to close.
text_image
Diagram of a device with labeled components and directional arrows indicating movement or flowHOW MUCH DETERGENT TO USE
The amount of detergent to use depends on the hardness of your water and the type of detergent. If you use too little, dishes won't be clean. If you use too much detergent in soft water, glassware will etch.
Water Hardness
Water hardness varies depending on your source. For the best results, your dishwasher is designed to operate with water that has a hardness of no more than 7 grains per gallon. Test kits are available from all major appliance parts retail outlets. If your water has a hardness over 8 grains per gallon, you may consider installing a water softener or regularly use an additive to enhance the performance of your detergent.
Soil Level of Load
Depending on how much soil is on your dish load, you may need to adjust the amount of detergent.
PROPER USE OF RINSE AID
Your dishwasher is designed to use a LIQUID rinse aid. Using a rinse aid greatly improves drying performance after the final rinse.
Rinse aids prevent water from forming droplets that can dry as spots or streaks. They also improve drying by allowing water to drain off of the dishes during the final rinse by releasing a small amount of the rinse aid into the rinse water. Your Rinse Aid dispenser is designed to use a liquid rinse aid. Do not use a solid or bar-type.
RINSE AID DISPENSER
Under normal conditions, you will need to fill the rinse aid dispenser approximately once a month. Rinse aid is released through an opening in the dispenser. You do not need to wait until the dispenser is empty to refill it. Try to keep it full, but be careful not to overfill it.
- Open the dishwasher door.
- Turn the rinse aid dispenser cap counterclockwise and pull up to remove.
natural_image
Line drawing of a device with a circular dial and handle, showing a curved arrow indicating rotation (no text or symbols)- Pour rinse aid into the dispenser until the indicator points to MAX.
- You can adjust the amount of the rinse aid released during the rinse. The greater the number indicates a greater amount of rinse aid released.
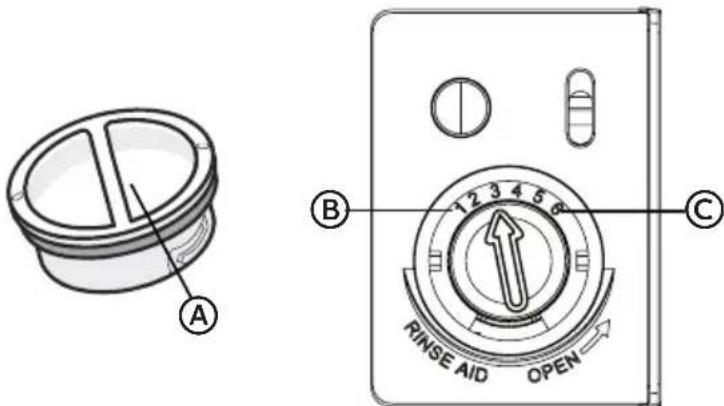
text_image
A B C RINSE AID OPEN
Dispenser Cap

Less

More
- Clean up any spilled rinse aid with a damp cloth.
- Replace the rinse aid cap, and then turn the cap clockwise to close.
If you have doubts about washing a particular item, check with the manufacturer to see if it is dishwasher safe.
| Material | Dishwasher Safe | Comments |
| Aluminum Possible High water | temperature and detergents can affect finish of anodized aluminum. Unfinished aluminum will be discolored. | |
| Disposable Aluminum | No Do not wash | sh disposable aluminum pans in the dishwasher These might shift during washing and transfer black marks to dishes and other items. |
| Bottles and cans | No Wash bottles | les and cans by hand. Labels attached with glue can loosen and clog the spray arms or pump and reduce washing performance. |
| Cast Iron No Seasoning will be removed and iron will rust. | ||
| China / Stoneware | Yes Always check manufacturer's recommendations before washing. Antique, hand-painted, or over-the-glaze patterns may fade, gold leaf can discolor or fade. | |
| Crystal Yes Check manufacturer's recommendations before washing. Some types of leaded crystal can etch with repeated washing. | ||
| Gold No Gold-colored flatware will discolor. | ||
| Glass Yes Milk glass yellows with repeated dishwasher washing. | ||
| Hollow-Handle Knives | No Handles of some knives are attached to the blade with adhesive that can loosen if washed in the dishwasher. | |
| Pewter Brass, Bronze | No High water temperatures and detergent can discolor or pit the finish. | |
| Disposable Plastics | No Cannot withstand high water temperatures and detergents. | |
| Plastics Yes Always check manufacturer's recommendations before washing. Plastics vary in their capacity to withstand high temperatures and detergents. Load plastics in top rack only. | ||
| Stainless Steel | Yes Run a rinse cycle if not washing immediately. Prolonged contact with food containing salt, vinegar, milk products, or fruit juice can damage finish. | |
| Sterling Silver or Silver Plate | Yes Run a rinse cycle if not washing immediately. Prolonged contact with food containing salt, acid, or sulfide (eggs, mayonnaise, and seafood) can damage finish. | |
| Tin No Can rust. | ||
| Wooden Ware No Wash by hand. Always check manufacturer's instructions before washing. Untreated wood can warp, crack, or lose its finish. | ||
DISHWASHER CARE
CLEANING
CLEANING THE EXTERIOR
In most cases, regular use of a soft, damp cloth or sponge and a mild detergent is all that is necessary to clean outside of your dishwasher.
Clean the stainless steel door and handle regularly with a clean, soft cloth to remove debris.
IMPORTANT: Do not use appliance wax, polish, bleach, or products containing chlorine to clean the stainless steel door.
Control Panel
Gently clean the control panel with a clean, soft cloth.
CLEANING THE INTERIOR
The tub is made of stainless steel designed to resist rust and corrosion if the dishwasher should be scratched or dented.
Hard water minerals can cause a white film to build up on the inside surfaces, especially just beneath the door area.
Do not clean the dishwasher interior until it has cooled. Wear rubber gloves. Do not use any type of cleanser other than dishwasher detergent because it may cause foaming or create suds.
Clean the spots on the steel inner door and tub with a clean, soft damp cloth.
Using a damp cloth, clean around the door gasket regularly to remove food particles.
CLEANING THE FILTERS
The coarse filter needs to be cleaned regularly to maximize wash performance.
- Remove the bottom rack.
- Rotate the coarse filter counterclockwise a quarter turn and lift up to remove.
- Empty filter and rinse it under running water.
- Remove the Fine filter and Micro filter and clean by holding under slow running water.
- Replace filters by reversing the process.
DRAIN AIR GAP
Check the drain air gap anytime your dishwasher isn't draining well. Some state or local plumbing codes require the addition of a drain air gap between a built-in dishwasher and the home drain system. If a drain is clogged, the drain air gap protects your dishwasher from water backing up into it.
The drain air gap is usually located on top of the sink or countertop near the dishwasher.
NOTE: The drain air gap is an external plumbing device that is not part of your dishwasher. The warranty provided with your dishwasher does not cover service costs directly associated with the cleaning or repair of the external drain air gap.
To Clean the Drain Air Gap:
Clean the drain air gap periodically to ensure proper drainage of your dishwasher. Follow the cleaning instructions provided by the manufacturer.
With most types:
- Turn off the dishwasher.
- Lift off the metal cover, and then unscrew the plastic cap.
- Clean plastic cap with a toothpick.
STORING
STORING FOR THE SUMMER
Protect your dishwasher during the summer months by turning off the water supply and power supply to the dishwasher.
WINTERIZING YOUR DISHWASHER
Protect your dishwasher and home against water damage caused by freezing water lines. If your dishwasher is left in a seasonal dwelling or could be exposed to near freezing temperatures, have your dishwasher winterized by authorized service personnel.
TROUBLESHOOTING
First try the solutions suggested here to possibly avoid the cost of a service call.
DISHWASHER NOT OPERATING PROPERLY
| PROBLEM POSSIBLE CAUSE SOLUTION | ||
| Dishwasher does not run or stops during a cycle | Most cycles pause for 5 minutes near the start of a cycle to let the dishes soak. | This is normal, and reduces the energy required to clean the dishes. |
| The door is not closed tightly and latched. | Close and latch the door. | |
| There is no power to the dishwasher. | Replace fuse or reset circuit breaker. | |
| The motor has stopped due to an overload. | The motor will automatically reset itself within a few minutes. | |
| The water shutoff valve is not turned on. | Turn the water shutoff valve to its fully on position. | |
| Certain cycles repeatedly pause for 15 to 65 seconds during the main wash. | This is normal. | |
| The Delay option was selected. | See “Options” to reset. | |
| Child Lock is activated. | Deactivate Child Lock. See “Options.” | |
| Dishwasher will not fill | The overfill protection float is not able to move up and down freely. | Press down on the float to release. |
| The water valve is turned off. Turn on the water valve. | ||
| Door latch is not properly seated. | Close and latch the door. | |
| Dishwasher seems to run too long | The water supplied to the dishwasher is not hot enough. The dishwasher runs longer while heating water, and a delay automatically occurs in some wash and rinse cycles until the water reaches the proper temperature. | Run the water in the adjacent sink until it gets hot before turning on the dishwasher. |
| The Sanitize option is selected. | The cycle time will increase to meet the sanitized temperature. | |
| The cycle time will vary depending on soil level. | When heavy soil is detected, the Normal cycle will automatically increase the cycle time. | |
| Water remains in the dishwasherNOTE: A small amount of clean water around the outlet in the bottom of the tub is normal. It keeps the seal lubricated. | The cycle is not complete or it is in a pause. | The water will drain when the cycle is completed. |
| The drain hose is kinked. Straighten the drain hose. | ||
| The knockout plug is still in the garbage disposal. | Remove the knockout plug. | |
| Drain hose is connected to the garbage disposal, and the garbage disposal is not empty. | Run the garbage disposal until it is empty. | |
| Drain is clogged. Check the air gap. | ||
| Detergent remains in the covered section of the dispenser | The cycle has not completed. Close the door and press START/CANCEL to complete cycle. | |
| The detergent is damp or has clumped. | Remove detergent and replace with fresh dry dishwasher detergent. | |
| An item was blocking the dispenser. | Remove item. Remove detergent and replace with fresh dry dishwasher detergent. | |
| The spray arm is blocked. Load the dishes in a manner that does not block the spray arm from rotating freely. | ||
| Water residue on front panel | Too much detergent was used or detergent is making too much foam. | Reduce amount of detergent or replace with a different brand to reduce foaming and eliminate buildup. |
| Odor in dishwasher | Dishes washed infrequently. Run a Rinse Only cycle once or twice a day until you have a full load. | |
| Dishwasher needs to be cleaned. | Run a vinegar rinse. | |
| Moisture on the kitchen counter | The dishwasher is not aligned with the countertop. Steam coming from the vent can condense on the countertop. | Level and Align dishwasher. |
| NoisesGrinding, grating, crunching or buzzing soundsBeeps | A hard object or powder detergent granules have entered the wash module.Indicates the wash cycle is completed. | Remove the object. The sound should stop once the detergent is ground up. |
| Suds in the Tub | Used improper detergent. Use only detergent approved for automatic dishwashers. | |
| Dishwasher Leaks | Excessive suds caused by using improper detergent. | Use only detergent approved for automatic dishwashers. |
| Dishwasher is not level. | Level the Dishwasher. See Installation Instructions. | |
DISHES ARE NOT COMPLETELY CLEAN
| Food soil left on the dishes | Dishwasher is not loaded correctly. | See “Dishwasher Loading.” |
| Selected the wrong wash cycle for the dish load. | Select the cycle for the most difficult soil in the dishwasher load. If you have some items with heavier soils, use a heavier washing cycle. | |
| Water temperature is too low. | For best results, the incoming water temperature should be a minimum of 120°F (49°C) as it enters the dishwasher. | |
| Used incorrect amount of detergent. | Use a minimum of 1Tbsp. (15 g) detergent. (15 g) per load. Heavy soil and/or hard water generally require extra detergent. | |
| Detergent is too old. Detergent must be fresh to be effective. Store detergent in a cool, dry area. | ||
| Detergent is caked in the dispenser. | Do not allow detergent to sit for several hours in a wet dispenser. Clean dispenser and refill with fresh, dry detergent. | |
| The pump or spray arm is clogged with labels from bottles and cans. | Check pump and spray arm for labels and remove the labels. | |
| The pressure of the water coming into the home is too low. | Water pressure should be 20 to 120 psi (138 to 828 kPa) for proper dishwasher fill. A booster pump on the water supply can be added if pressure is too low. | |
| High suds are slowing the wash arm. | Use detergent recommended for the dishwasher only. Do not use soap or laundry detergents. | |
| PROBLEM POSSIBLE CAUSE SOLUTION | ||
| Spotting and filming on dishesNOTE: To remove spots and film from dishes. Try a white vinegar rinse. This procedure is intended for occasional use only. Vinegar is an acid and using it too often could damage your dishwasher. See "Cleaning." | Hard water. High mineral content in your water | Use a rinse aid and keep the dispenser filled to help eliminate spotting and filming. If your water hardness is 13 grains or above, it is strongly recommended that you install a home water softener. |
| Water temperature is too low. | For best results, water should be a minimum 120°F (49°C) as it enters the dishwasher. | |
| Did not use enough detergent. | Use a minimum of 1 Tbsp. (15 g) of detergent per load. Heavy soil and/or hard water generally require extra detergent. | |
| Detergent is too old. Detergent must be fresh and dry to be effective. Store detergent in a cool, dry area. | ||
| Home water pressure is too low to fill dishwasher properly. | Water pressure to the home should be 20 to 120 psi (138 to 828 kPa) for proper dishwasher fill. A booster pump on the water supply can be added if pressure is too low. | |
| Rinse aid dispenser is empty. | Add rinse aid to the dispenser. | |
| Silica film or etching | Sometimes there is a water/chemical reaction with certain types of glassware. This is usually caused by some combination of softened water, alkaline washing solutions, insufficient rinsing, overloading the dishwasher, and the heat of drying. | Silica film and etching are permanent and cannot be removed. To slow this process, use a minimum amount of detergent but not less than 1 tbsp. (15 g) per load. Use a liquid rinse aid and under load the dishwasher to allow thorough rinsing. Do not use heated drying. |
| The inlet water temperature exceeds 150°F (65°C). | Lower the incoming water temperature. | |
| White spots on cookware with non-stick finish | The dishwasher detergent removed cookware seasoning. | After washing in the dishwasher, season cookware again. |
| Brown stains on dishes and dishwasher interior | Water has a high iron content. | Rewash dishes using 1 - 3 tsp (5-15 ml) of citric acid crystals added to the detergent dispenser. Do not use detergent. Follow with a Normal wash cycle using detergent. |
| Black or gray marks on dishes | Aluminum items rubbing dishes during washing. Disposable aluminum items can break down in the dishwasher and cause marking. | Hand wash aluminum items. Remove aluminum markings by using a mild abrasive cleaner. |
| Orange stains on plastic dishes or dishwasher interior | Large amounts of tomato-based foods on dishes placed in the dishwasher. | Use a stain removal product to remove stains from your dishwasher. Stains will not affect dishwasher performance. |
DISHES DO NOT DRY COMPLETELY
| PROBLEM POSSIBLE CAUSE SOLUTION | ||
| Dishes are not completely dryNOTE: Plastics often need towel drying. | Dishes are not loaded properly to allow water drainage. | Do not overload dishwasher. Place glasses and cups in the rack so that the bottom surface is slanted to allow water to run off. |
| Rinse Aid not used or dispenser is empty. | Use a liquid rinse aid to speed drying and keep the dispenser full. | |
| Used an air dry or energy-saving option. | Use a heated drying option for dryer dishes. | |
DISHES ARE DAMAGED DURING A CYCLE
| PROBLEM POSSIBLE CAUSE SOLUTION | ||
| Dishes are chippedNOTE: Antiques, feather-edged crystal, and similar types of china and glassware might be too delicate for automatic dishwashing. Wash by hand. | Dishes not loaded properly. | Load the dishes and glasses so they are stable and do not strike together from washing action. |
| You moved the rack in or out of the dishwasher too quickly. | Minimize chipping by moving the rack in and out slowly. | |
ERROR CODES
| Code | Meanings Possible Causes | |
| E1 | Longer inlet time Faucets not opened, or water intake is restricted, or water pressure is too low. | |
| E4 | Overflow Some element of the dishwasher is leaking. | |
| E8 | Failure of the orientation of the distributary valve. | Open circuit or break of distributary valve. |
| E9 | Need to touch a button for longer than 30 seconds. | Water or substance on the button. |
FOR MORE HELP, VISIT HAIER.COM OR CALL THE CONSUMER HELP LINE AT 1-877-377-3639.
LIMITED WARRANTY
IN-HOME SERVICE
FULL TWO YEAR WARRANTY
For 24 months from the date of original retail purchase, Haier will repair or replace any part free of charge including labor that fails due to a defect in materials or workmanship.
Haier may replace or repair at their sole discretion any part, sub system including the entire product.
Product must be accessible, without encumbrance and installed properly to receive warranty repair service.
LIMITED WARRANTY
NOTE: This warranty commences on the date the item was purchased, and the original purchase receipt must be presented to the authorized service representative before warranty repairs are rendered.
Exceptions: Commercial Use Warranty
90 days labor from date of original purchase 90 days parts from date of original purchase
No other warranty applies.
FOR WARRANTY SERVICE
All service must be performed by a Haier authorized service center. For the name and telephone number of the nearest authorized service center, please call 1-877-337-3639.
Before calling please have available the following information:
Model number and serial number of your appliance. The name and address of the dealer you purchased the unit from and the date of purchase.
A clear description of the problem.
A proof of purchase (sales receipt).
This warranty covers home appliance services within the contiguous United States and Canada and where available in Alaska, Hawaii and Puerto Rico.
What is not covered by this warranty:
Replacement or repair of household fuses, circuit breakers, wiring or plumbing.
A product whose original serial number has been removed or altered.
Any service charges not specifically identified as normal such as normal service area or hours.
Damage incurred in shipping.
Damage caused by improper installation or maintenance.
Damage from misuse, abuse accident, fire, flood, or acts of nature.
Damage from service other than an authorized Haier dealer or service center.
Damage from incorrect electrical current, voltage or supply.
Damage resulting from any product modification, alteration or adjustment not authorized by Haier.
Adjustment of consumer operated controls as identified in the owner's manual.
Hoses, knobs, plumbing parts and all attachments, accessories and disposable parts.
Labor, service transportation, and shipping charges for the removal and replacement of defective parts beyond the initial 24-month period.
Damage from other than normal household use.
Any transportation and shipping charges.
THIS LIMITED WARRANTY IS GIVEN IN LIEU OF ALL OTHER WARRANTIES, EXPRESS ED OR IMPLIED, INCLUDING BUT NOT LIMITED TO, THE WARRANTIES OF MERCHANTABILITY AND FITNESS FOR A PARTICULAR PURPOSE
The remedy provided in this warranty is exclusive and is granted in lieu of all other remedies.
This warranty does not cover incidental or consequential damages, so the above limitations may not apply to you. Some states do not allow limitations on how long an implied warranty lasts, so the above limitations may not apply to you.
This warranty gives you specific legal rights, and you may have other rights, which vary from state to state.
Haier America
Wayne, NJ 07470
TABLE DES MATIÈRES
SÉCURITÉ DU LAVE-VAISSELLE ....34
EXIGENCES D'EMPLACEMENT ....37
CONFIGURATION REQUISE POUR L'ÉLECTRICITÉ....38
SPÉCIFICATIONS DE L'ALIMENTATION EN EAU....38
PIECES ET CARACTERISTIQUES .... 39
text_image
Warning sign with exclamation mark inside a triangle, commonly used to indicate caution or hazard.natural_image
Simple black-and-white illustration of a tilted book with a bookmark, resting on a flat line (no text or symbols)text_image
Labeled diagram of a kitchen appliance showing internal components like seats, fans, and a washing machine.natural_image
Technical line drawing of a mechanical assembly with concentric circles and a central shaft (no text or symbols)
GUIDE POUR METTERE EN MARCHE
text_image
Haier Heavy Energy Saver Normal Glass Light Rose Cycles Seritex Heated Dry Hi Temp Child Lock Sanitized Clean Options Delay Start/Cancel A B C E DⒶ PROGRAMMES
E START /CANCEL (MISE EN MARCHE/ANNULATION)
natural_image
Line drawing of a hand holding a shopping cart filled with items, no text or symbols presentnatural_image
Line drawing of a hand holding a shopping cart with wheels, no text or symbols presentCHARGEMENT DU SUPPORT SUPERIEUR
natural_image
Technical line drawing of a mechanical assembly with insulators and housing (no text or symbols)natural_image
Illustration of a hand holding a tool with a curved arrow indicating direction (no text or symbols)natural_image
Technical line drawing of a grid-based mechanical component with multiple cylindrical components (no text or symbols)natural_image
Technical diagram of a mechanical assembly with layered components and internal parts (no text or labels)natural_image
Illustration of a shopping basket containing various household items including tennis, hats, and snacks (no text or symbols visible)natural_image
Line drawing of a basket filled with various kitchen utensils and a small container (no text or symbols)natural_image
Line drawing of a multi-tiered rectangular container with internal grid lines and no text or symbolsPANIER À COUVERTS EN TROIS PARTIES
text_image
Diagram of a battery pack structure with labeled components A and B, showing internal components and wiring connections.(A) Orifices en trou de serrure
B Tiges
REMARQUES :
natural_image
Two simple line drawings of kitchen utensils, one with a diagonal line crossing the other (no text or symbols)text_image
Technical diagram of a device with labeled parts A and B, showing a dial indicator and mechanical component.Ⓐ Couvercle
natural_image
Line drawing of a microwave oven with a drain and lid, showing liquid flow from a fan to a tray (no text or symbols)
text_image
Diagram of a device with labeled parts and directional arrows indicating movement or changeQUANTITEE DE DETERGENT A UTILISER
natural_image
Line drawing of a mechanical device with a circular dial and handle, showing a rotational arrow (no text or symbols)text_image
A B C RINSE AID OPENtext_image
Warning symbol with exclamation mark inside a triangle, commonly used to indicate caution or hazard.natural_image
Simple black-and-white illustration of a tilted book with a bookmark, resting on a flat line (no text or symbols)Peligro de Vuelco
No use la lavavajillas antes de estar completamente instalada.
text_image
Labeled diagram of a kitchen appliance showing internal components like seats, fans, and dish traynatural_image
Technical line drawing of a mechanical assembly with concentric rings and a central shaft (no text or symbols)
text_image
Haier Heavy Energy Saver Normal Glass Light Noise Cycles Sanitex Heated Dry Hi Temp Child Lock Sanitized Clean Options Delay Start Cancel A B C E DⒶ CYCLES (CICLOS)
© DELAY START (INICIO DIFERIDO)
natural_image
Line drawing of a hand holding a shopping cart filled with items, no text or symbols presentnatural_image
Line drawing of a hand holding a shopping cart with wheels, no text or symbols presentCARGA DE LA REJILLA SUPERIOR
natural_image
Technical line drawing of a mechanical assembly with insulators and housing (no text or symbols)14 puestos
natural_image
Illustration of a hand holding a tool with a curved arrow indicating direction (no text or symbols)natural_image
Line drawing of a grid-like object with circular elements, no text or symbols presentnatural_image
Diagram of a multi-tiered storage unit with insulators and trays, no text or symbols presentnatural_image
Illustration of a shopping basket containing various household items including tennis, hats, and snacks (no text or symbols visible)natural_image
Line drawing of a basket filled with various kitchen utensils and a small container holding a plant (no text or symbols)natural_image
Line drawing of a multi-tiered rectangular container with internal grid lines and no text or symbolstext_image
Diagram of a battery pack structure with labeled components A and B, showing internal components and wiring connections.natural_image
Two simple line drawings of abstract shapes: a diagonal line and two symmetrical oval shapes (no text or symbols)text_image
Technical diagram of a device with labeled parts A and B, showing a dial indicator and mechanical component.Ⓐ Tapa
B Seguro de la tapa
natural_image
Line drawing of a microwave oven with a drain and lid, showing liquid dispersion from the top outlet (no text or symbols)text_image
Diagram of a device with labeled parts and directional arrows indicating movement or changeCUÁNTO DETERGENTE USAR
natural_image
Line drawing of a device with a scroll wheel and handle, showing a curved arrow indicating rotation (no text or symbols)text_image
A B C RINSE AID OPENⒶ Ajuste regulable
B Menos
© Más
Protect your dishwasher during the summer months by turning off the water supply and power supply to the dishwasher.
CÓMO ACONDICIONAR SU LAVAVAJILLAS PARA EL INVIERNO
Haier may replace or repair at their sole discretion any part, sub system including the entire product.
Product must be accessible, without encumbrance and installed properly to receive for warranty repair service.
GARANTÍA LIMITADA
If you have a problem with this product, please contact the
"Haier Customer Satisfaction Center" at
1-877-337-3639.
DATED PROOF OF PURCHASE, MODEL #, AND SERIAL #
REQUIRED FOR WARRANTY SERVICE
IMPORTANT
HDBL655AFS, HDBL655AFW,
HDBL655AFB
Issued: July 2015 Printed in China Part # 00XXXXXXXXXX