
WA 6012 A+ - Washing machine Exquisit - Free user manual and instructions
Find the device manual for free WA 6012 A+ Exquisit in PDF.
| Product type | Automatic washing machine |
| Brand | Exquisit |
| Model | WA 6012 A+ |
| Maximum load capacity | 6 kg |
| Maximum spin speed | 1200 rpm |
| Energy class | A+ |
| Washing efficiency class | A |
| Spin efficiency class | B |
| Annual energy consumption | 190 kWh |
| Annual water consumption | 9900 L |
| Noise level (wash / spin) | 59 dBA / 75 dBA |
| Dimensions (H x W x D) | 846 x 596 x 558 mm |
| Net weight | 64 kg |
| Voltage / Frequency | 230 V / 50 Hz |
| Power consumption | 2100 W |
| Required water pressure | 0.05 – 1.0 MPa |
| Wash programs | 14 programs: Cotton, Synthetic, Delicates, Wool, Hand wash, Quick, Mixed, Intensive, Bleach, Sportswear, Sports shoes, Rinse, Drain, Spin |
| Additional functions | Soak, prewash, drum stop, easy iron, extra rinse, child lock, delayed start |
| Display type | Digital with time, temperature, speed and options display |
| Anti-leak system | Filling hose with protection |
| Safety | Door lock, grounding, child lock |
| Number of detergent compartments | 3 (prewash, main wash, additives) |
Frequently Asked Questions - WA 6012 A+ Exquisit
User questions about WA 6012 A+ Exquisit
0 question about this device. Answer the ones you know or ask your own.
Ask a new question about this device
Download the instructions for your Washing machine in PDF format for free! Find your manual WA 6012 A+ - Exquisit and take your electronic device back in hand. On this page are published all the documents necessary for the use of your device. WA 6012 A+ by Exquisit.
USER MANUAL WA 6012 A+ Exquisit
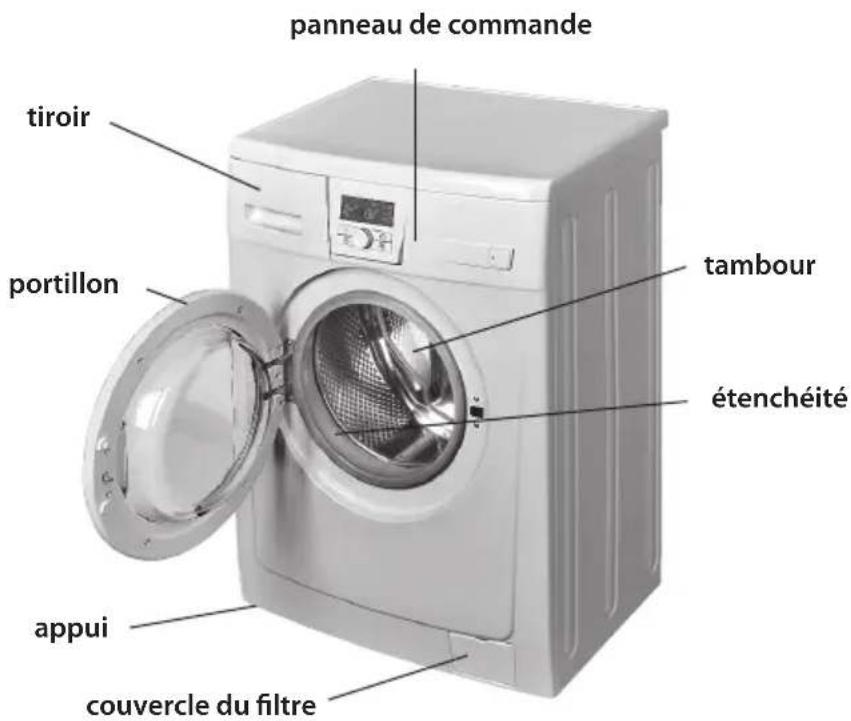
Figure 1-Overall view
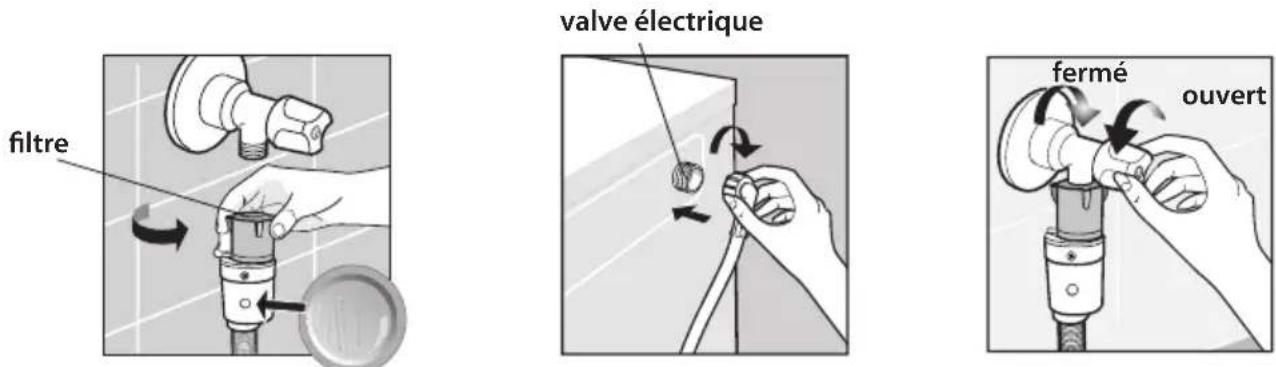
Figure 8 Figure 9 Figure 10
ENLEVEMENT CERTAINTS TYPES DETACHES

Figure 17 Figure 18 Figure 19
FR
The present Operation Manual describes technical features of the household automatic washing machine (hereinafter referred to as "the Machine") and gives necessary information on its operation and helpful tips on how to make your laundry. Having carefully read the Operation Manual before switching on and using the Machine, you will be able to operate it properly.
Be sure to keep the Operation Manual throughout the whole service life of your Machine.
1 GENERAL INFORMATION
Automatic Washing Machine (hereafter, the Machine) is designed for textile and sports shoes washing with the use of synthetic detergent of low foam formation, and for rinsing and spinning at home conditions. All items processing operations are automatically performed in accordance with preset program.
Machine is designed for operation in household conditions (at home) only. Operating it for industrial purposes (in restaurants, cafes, offices, kindergartens, hospitals, etc.) is forbidden.
Major Machine components and its overall dimensions are illustrated in the Figures 1.
The Machine should be operated at:
ambient temperature (25± 10)^ and maximum relative humidity up to 75%
pressure in water-supply line from 0, 05 to 1 MPa;
power source is single-phase electric main of alternating currant at a frequency of 50± 1 Hz;
- at a rated electric main voltage of 230V
ATTENTION! Temperature drop in the room below 0^ may result in freezing of the water inside the Machine and its failure.
Main specification Machine's data are specified in Table 1.
The Manufacturer works for further Machine's design development and improvement in its quality for all the time. Thus, the Manufacturer reserves the right to change the design, machine kitting-up, keeping its main specification data unchanged.
After transportation at ambient temperatures below 0^ , take a time of 24 h at a room indoor temperature before plug the Machine in electric main.
ATTENTION! The manufacturer (seller) should not be made liable (including during the warranty period) for any defects or damage arising due to violation of operation or storage conditions, or resulting from force majeure circumstances (fire, natural calamity, etc.).
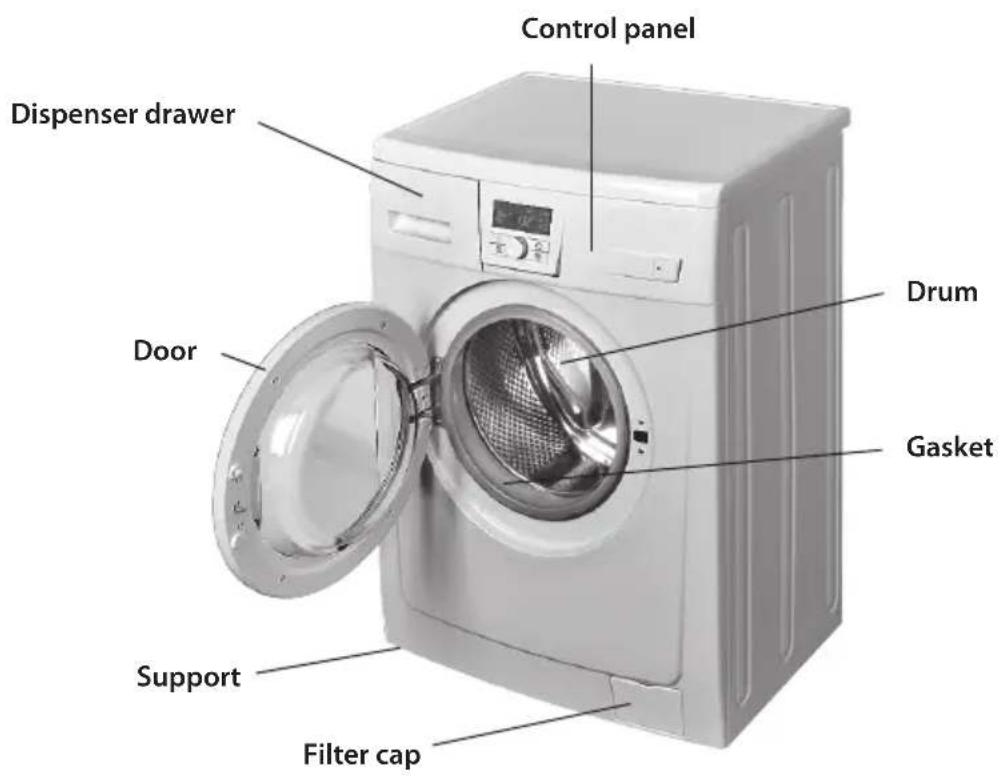
Figure 1 – Overall view
Table 1 Product fiche for household washing machines according to Delegated Regulation (EU) 1061/2010.
| Brand name Exquisit | ||
| Model WA 6012 A+ WA 6014 A+ | ||
| Energy consumption class1 | A+ A+ | |
| Washing efficiency class A A | ||
| Wringing efficiency class2 | B | A |
| Annual energy consumption [kWh/year]3 | 190 | 190 |
| Annual water consumption [l/annum]3 | 9900 | 9900 |
| Consumption per cycle 6 kg Cotton 60°C [kW·h/l], Programme time [min.] | 1,05 kw·h/l / 50 l, 147 min. | |
| Consumption per cycle 3 kg Cotton 60°C [kW·h/l], Programme time [min.] | 0,80 kw·h/l / 40 l, 140 min. | |
| Consumption per cycle 3 kg Cotton 40°C [kW·h/l], Programme time [min.] | 0,65 kW·h/l / 40 l, 87 min. | |
| Remaining moisture [%] | <54 | <45 |
| Power Left on/Power off [W] | 2,0/1,0 | 2,0/1,0 |
| Maximum rotational speed during the wringing [rpm] | 1200 | 1400 |
| Maximum loading in the cotton washing mode [kg] | 6,0 6,0 | |
| Water supply system pressure [MPa] | 0,05 - 1,0 | 0,05 - 1,0 |
| Voltage/Frequency [V/Hz] | 230/50 | 230/50 |
| Nominal power consumed [W] | 2100 | 2100 |
| Overall dimensions [H/W/D mm] | 846x596x558 | 846x596x558 |
| Net weight [kg] | 64 | 65 |
| Noise level: Washing / Wringing [dB(A)] | 59/75 | 59/78 |
A+++ (highest efficiency) to D (least effective).
2 A (highest efficiency) to D (least effective).
3 On the basis of 220 standard washing cycles within a year when washing cotton at 60^ and 40^ at full or partial loading
2 DESCRIPTION OF THE MACHINE
Machine's control panel with controls' coding is depicted in Figure 2.
Switch on the Machine by the push button to select the washing program by turning and pressing the washing program selector knob (hereafter, Knob) in accordance with Figures 2 and 3.
ATTENTION! In the case when all controls are blocked (on screen you can see please turn off "Protection against kids" option
Washing parameters selected by the Knob in accordance with Figures 2 and 3 are highlighted on the control panel display.
Time assignment of the delayed washing start is provided. It is highlighted on the display in accordance with Figure 3.
Selection of the auxiliary operations, if needed, can be performed by the Knob in accordance with Figure 3.
When the button nearest to the superscription START/PAUSE (hereafter, "START/PAUSE" button) is pressed, LED on the button is lit in accordance with Figure 2, and the blocking device designed for prevention of the door's opening is actuated. So, the Machine starts to run according to selected program.
Acoustic alarm is provided in the Machine. Sound signal accompanies the Machine's work start up and its work completion, it sounds when incompatible operations being assigned, and accidental buttons pushed during Machine's running according to selected program.
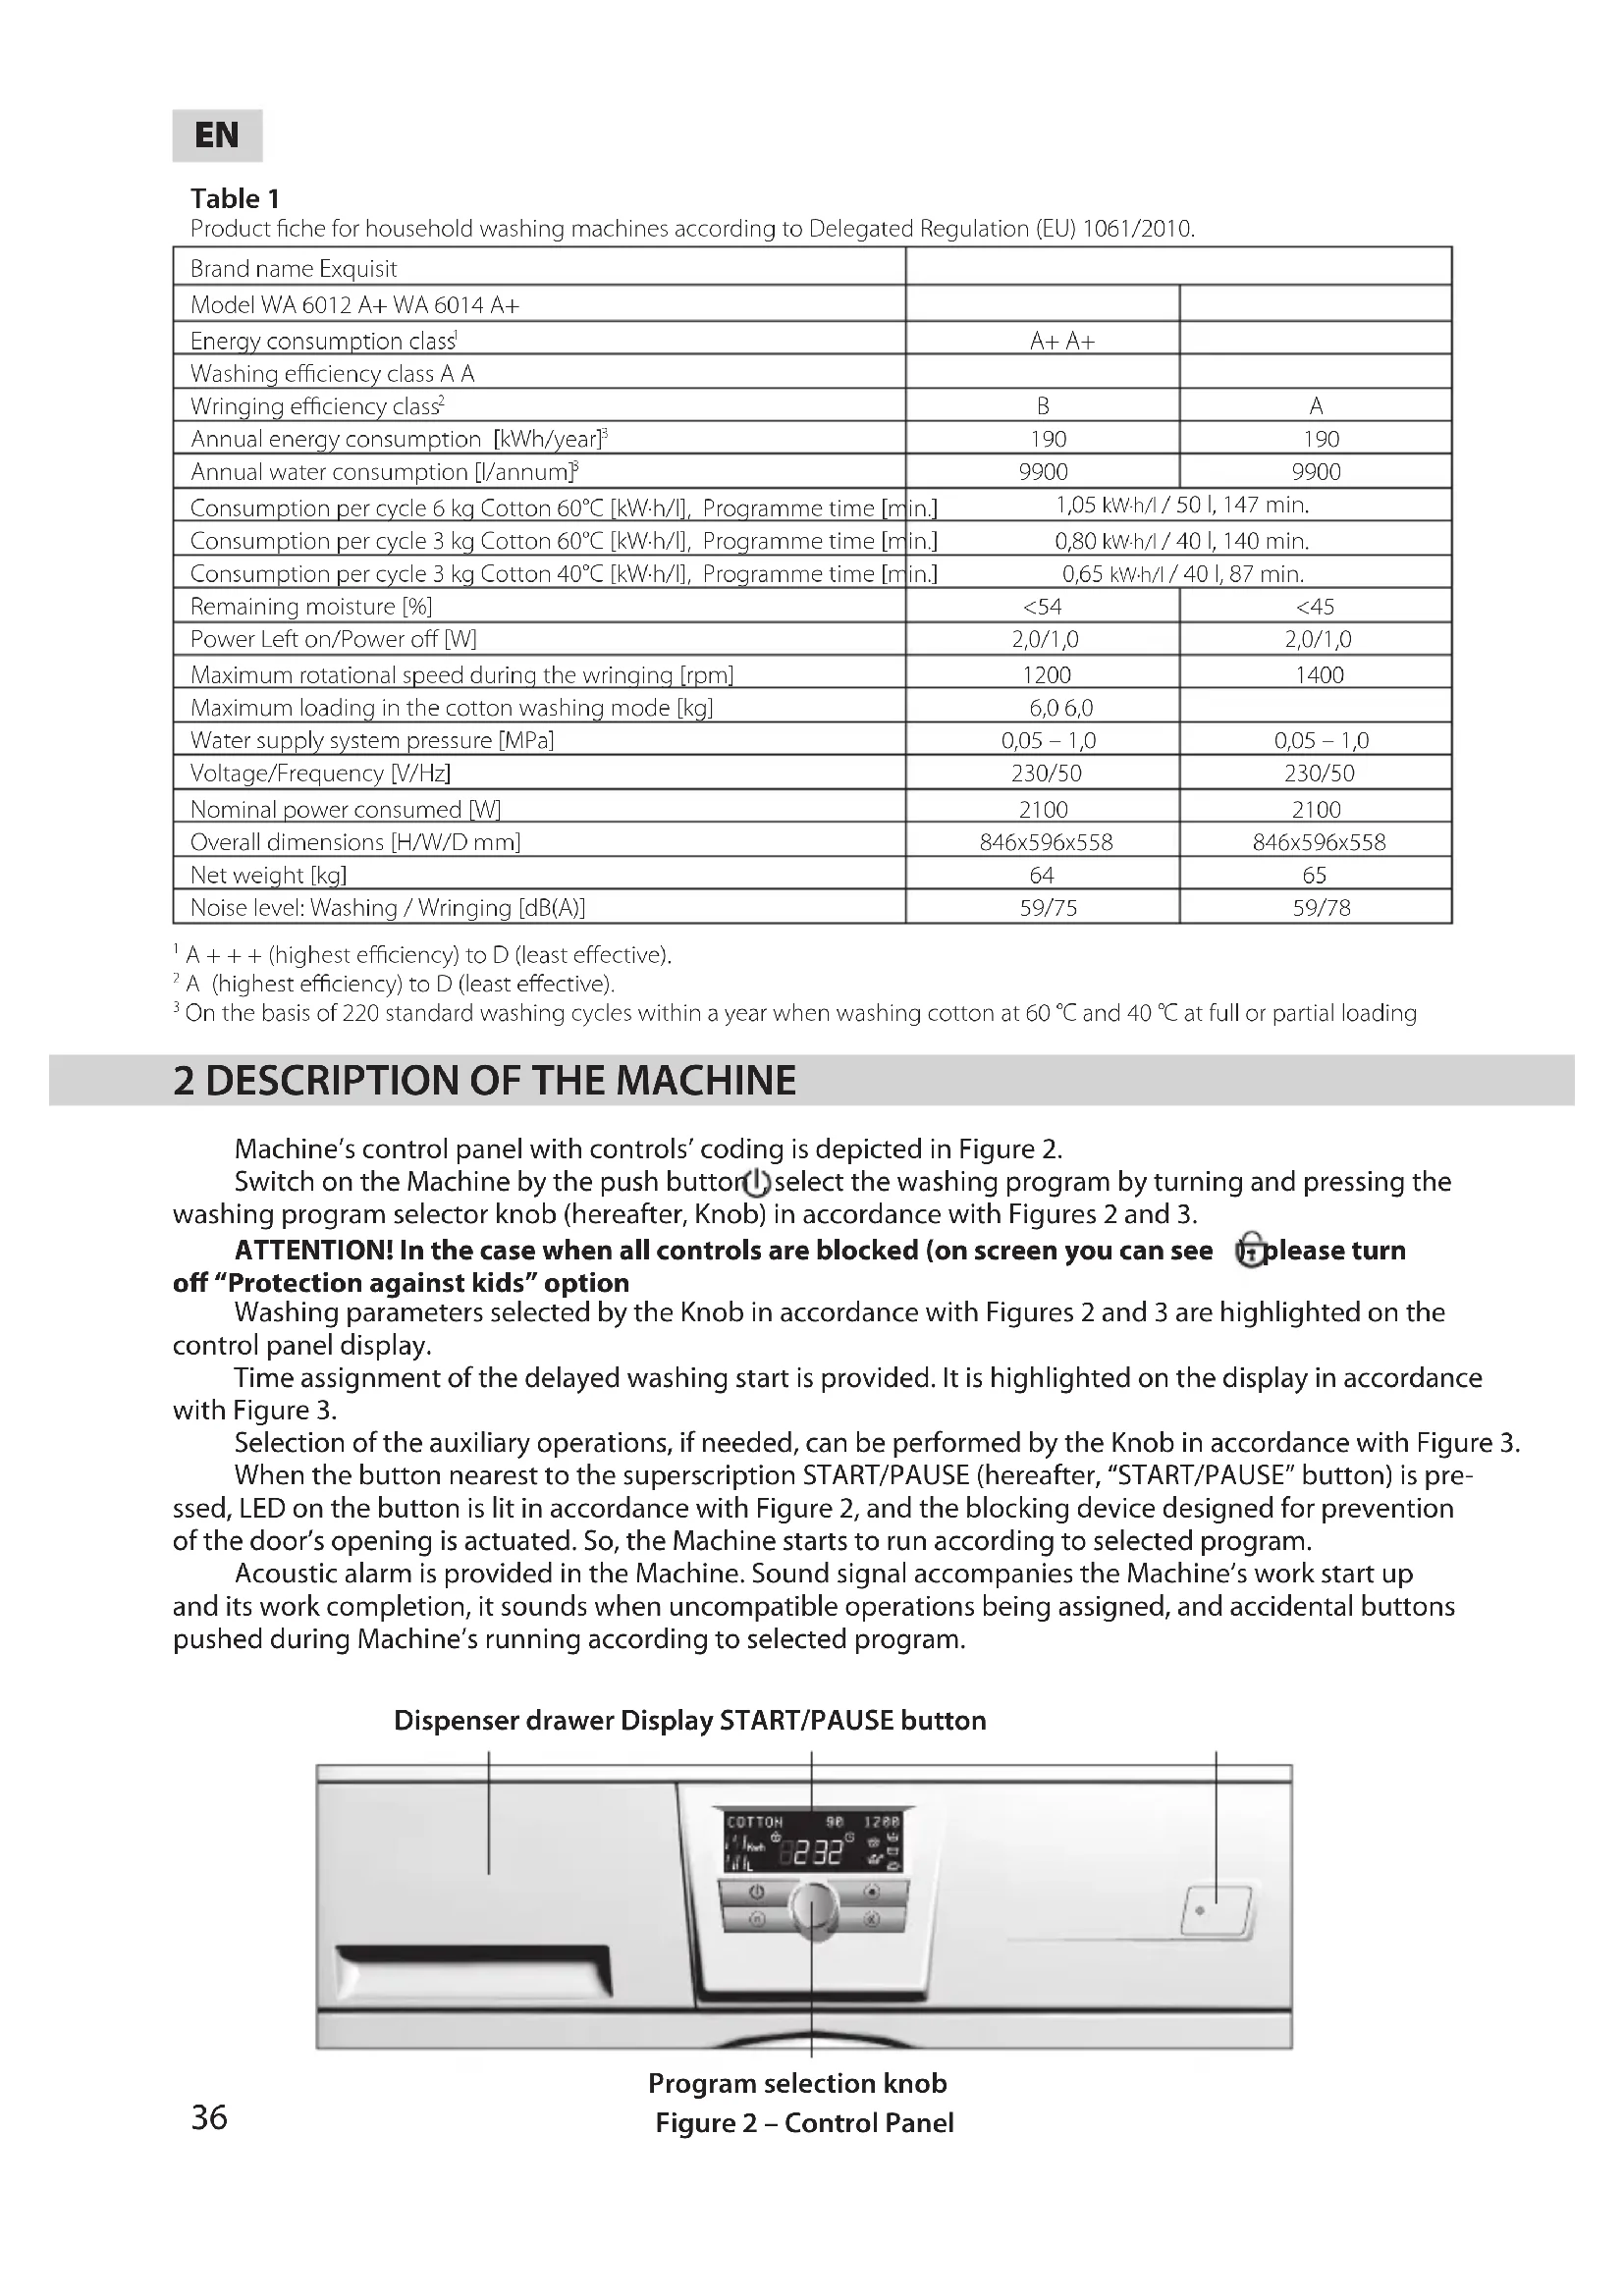
Dispenser drawer Display START/PAUSE button
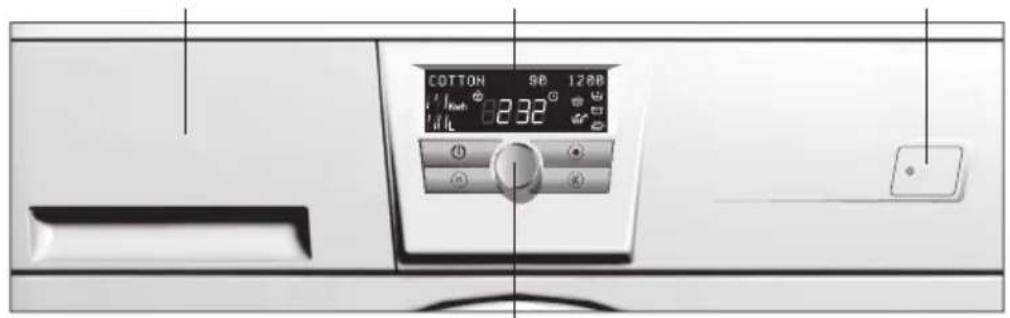
Figure 2 - Control Panel
Program selection knob
To prevent high vibrations and noise, electronic control system is provided in the Machine, before every spinning it uniformity arrange the laundry' in the drum.
The door is provided with block system designed for pretension from shutting. This system prevents authorized Machine's using, for instance, by kids.
Protective system in the Machine detects the presence of probable water leakage in the filling hose.
DISPLAY
Following zones are situated on the display in accordance with Fig. 3:
A - water consumption indication zone;
B - electrical power consumption indication zone;
C - washing program and temperature indication zone;
D spin RPM indication zone;
I auxiliary operations indication zone;
F - time indication zone.
Washing program and its basic parameters highlighted in the display are listed in Table 4.
Flashing of the washing parameters on display accompanies their selection. Flashing stops when selected parameters are confirmed by Knob axial pushing or button pressing.
SELECTION OF DISPLAY LANGUAGE
Select language of text information on display after first activation of your Machine. To select the language push button and hold it for 2 seconds - current language name highlighting is doing on. Select desired language name (FRANCAIS, ENGLISH, DEUTSCH, NETHERLANDS) by Knob turning and confirm your choice by its axial pushing. The selected language of text information is saved for subsequent activations.
PROGRAM SELECTION
Washing program selection is performed by the Knob in accordance with Figures 2 and 3. The Knob turns in both sides: clockwise and contraclockwise.
"COTTON 60 °C 1200 rpm" program to be highlighted when Machine is being switched on. When the Knob turns clockwise, washing program names are highlighted in series in zone C. To confirm the program selection, push the Knob axially. By this, the selection goes to the new parameter.
TEMPERATURE SELECTION
Assignment of the washing temperature value below the maximal level stipulated by the washing program in accordance with detergent producer's recommendations is provided in the Machine.
On confirmation of the washing program selection, the temperature value in Celsius degrees begins to blink in zone C. When the Knob turns, temperature value is changed from maximal to minimal gradually: "CLD" at interval of 10^ . On selection of desired temperature of washing, push the Knob: sound signal
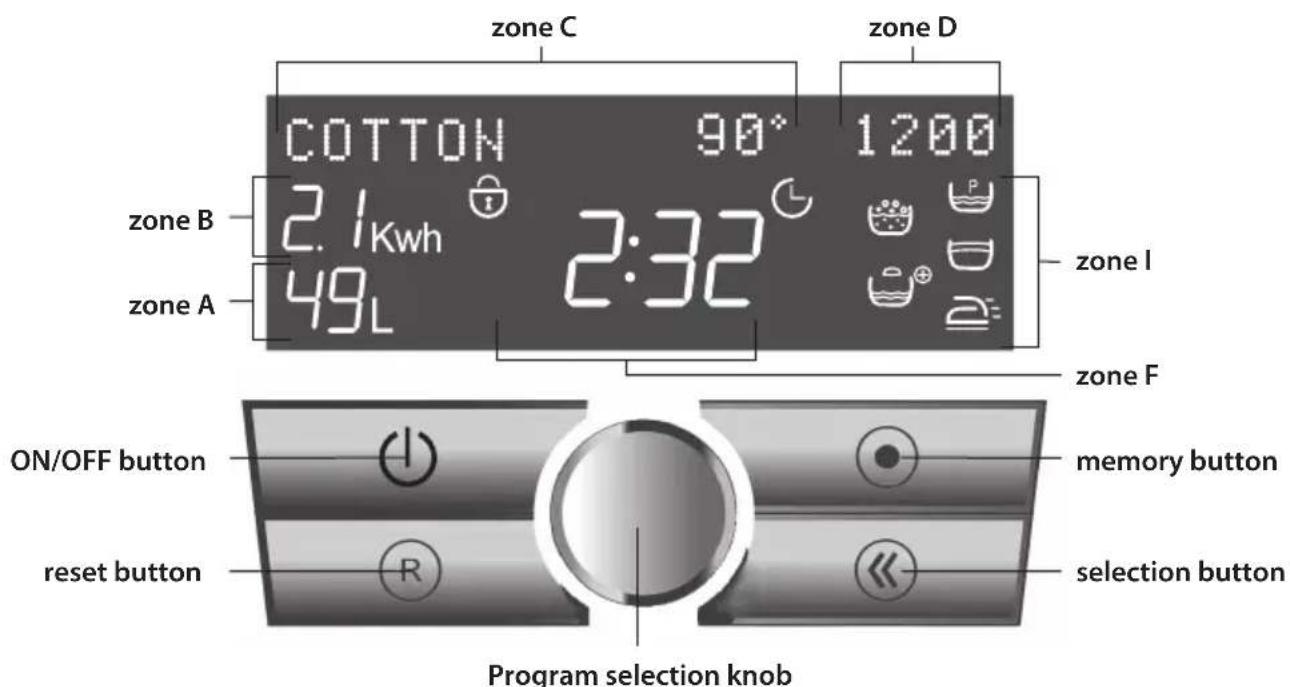
Figure 3 - Display
EN
sounds and "temperature value" stops to blink. Simultaneously, as the temperature is selected, electrical power, water consumption, and washing duration accordantly are changed.
SELECTION OF THE DRUM SPEED DURING SPIN
After temperature selection, selection of the drum speed during spin (hereafter, "spinning speed") of the value below the stipulated speed by washing program is available. After the temperature selection in zone D (in accordance with Fig. 3) has been confirmed, maximal value of RPM spin for the selected washing program begins to blink. When RPM spin needs to be changed, turn the Knob. Digital values of RPM spin changes gradually from maximal (depending on model and used program in accordance with Tables 1 and 4) to minimal: "0" (spin is switched off) at interval of 200rpm . On selection of desired number of RPM spin, push the Knob: sound signal sounds and "RPM spin value" stops to blink. Simultaneously, as the RMP spin is selected, electrical power, water consumption, and washing duration are changed accordantly.
CAUTION! Drum RPM during interim spins, between main washing operations, is non-adjustable and depends upon the selected program.
AUXILIARY MACHINE'S OPERATIONS
Possibility of auxiliary operation actuating depends upon washing program in accordance with Table 4 (operations incompatible with the program are not highlighted). Next auxiliary operation indicators are highlighted in zone I:
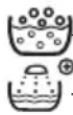
-soaking, -preliminary washing, -stop with water in the tank, -light press.
additional rinse, protection against kids, delayed washing start time.
After RPM spin has been selected, selection of the auxiliary operations can be performed by pushing the Knob. One of the auxiliary operation symbols starts to blink in zone I in accordance with Fig. 3. Switching from one auxiliary operation to another starting to blink is performed by turning the Knob. On selection of desired auxiliary operation, push the Knob. Symbol blinking stops. Every Knob pushing is accompanied by sound signal. Simultaneously, as the auxiliary operation is selected, electrical power, water consumption, and washing duration are changed accordantly.
Soaking is provided for the cotton items with high degree of soiling. The items are exposure in water with detergent for a time up to 2 h (with periodical tumbling) and then wash in accordance with selected program. Simultaneously, on selection of this operation, preliminary washing is switched on. Two relevant indicators go on. Soaking activates after the pre washing has been completed, indicator of watering starts to blink.
This operation can be switched off by canceling, or cut in time. Thus, the Machine will start to run in accordance with selected program.
Preliminary washing is provided for the cotton items with high degree of soiling. If this operation is selected, the items are washed additionally in the water with detergent at the temperature of 30^ , thus qualitative soiling removal during main washing is assured.
Stop with water in the tank is used during washing of the items made of gossamers to protect them against crumpling.
When this operation is selected, final spin cycle is excluded.
Light press is provided to reduce textile crumpling during washing and spin. Thus, subsequent ironing is facilitated. Using this operation assures favorable washing mode and cautious spin with a minimal number of wrinkles remaining after washing.
Additional rinse is provided for infants' garments and garments of the persons allergic to detergents, or for washing in extremely soft water where the detergent is swelled out insufficiently.
When this operation is selected, one more rinsing is added in the program.
PROTECTION AGAINST KIDS is provided against accidental changes of the selected program made by kids. When this operation is selected, all control buttons except the button become blocked. Selection of this operation can be performed before washing start or within the process of washing. Switch on the operation by turn and press the Knob or by simultaneous pressing the Knob and button for 3 s till the signal sounds. Indicator on display will light up. On completion of the operation, indicator blinks, thus, showing that the Machine couldn't be shut down. To switch off the auxiliary operation, press simultaneously the Knob and button and hold for 3 s. Indicator on display will fade.
Time assignment of the delayed washing start is performed after the symbol a has been selected on the display. Maximal period of washing start delay of 24 hours ("24:H") appears in zone F in accordance with Fig. 3. The time is changed gradually at interval of 1 hour ("1:H") by turning the Knob clockwise or contraclockwise.
If the time of washing start delay is not assigned, washing will start after button (START/PAUSE) pushing.
CHANGING SELECTED PARAMETERS
To change previously selected parameters, proceed, if needed, as follows:
push button R and hold it for a 3 s;
- while pressing the Knob, select the parameter, and then assign desired value by Knob's;
- press the Knob to latchup the selected parameter.
RETAINING PARAMETERS IN MACHINE'S MEMORY
Selected parameters can be retained in machine's memory prior to CTAPT/PIAY3A (START/PAUSE) button pushing.
Four memory sections are provided in the Machine: one for every fabric type (cotton, synthetics, sensitive fabrics, and wool).
To retain parameters of washing proceed as follows:
-
select the program and all the desired parameters of washing;
-
push button and exit from selection mode; push button
Previously retained parameters will be highlighted when next program is selected. These parameters can be changed.
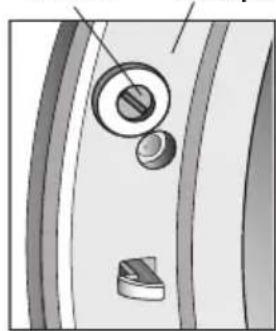
It is provided to prevent accidental powering on the Machine by kids. To block the door against closing, turn the sleeve in accordance with Fig. 4 with screwdriver clockwise up to the stop. The sleeve will come forward not allowing the door to be closed. To remove the blocking, prior washing start, perform the acts in reverse sequence.
3 PRELIMINARY STARTING PROCEDURE
PREPARING TO INSTALLATION
CAUTION! To prevent the Machine from being damaged not, move it by grasping at the dispenser drawer, door, or gasket in accordance with Fig. 1
For transportation purposes, the drum of the Machine is fixed by locking bolts and spacer bars.
Unscrew the four bolts with a spanner and take out the spacer bars (Fig. 5). If the spacer bars remain inside the Machine and would not get out, remove the back panel (Fig. 6) with a cross-blade screwdriver and take the bars out. Reinstall the panel. Close the holes with plastic plugs, if they are supplied. Keep the bolts and spacer bars for future transportation.
NEVER operate the Machine with open spacer bar holes in the rear wall of the body.
CAUTION! To avoid potential body damage, don't switch on the Machine not removing locking bolts and spacer bars previously.
INSTALLING THE MACHINE
The Machine should be installed on a solid, even and dry surface. Soft flooring (carpets, polyurethane-based coatings etc.) is not recommended as it promotes vibration and degrades ventilation of the Machine.
When installed on a wooded floor, the Machine should be first placed onto a wooden slab at least 15 mm thick that is reliably bolted to the floor. To increase the stability of the Machine during its operation on
sleeve door panel
Figure 4 Figure 7
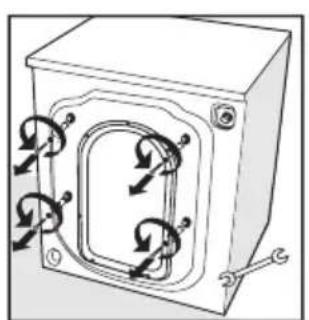
Figure 5
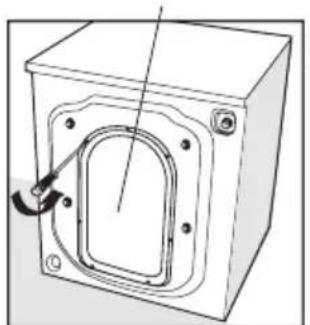
Figure 6
EN
a wooden floor, it is recommended to install the Machine in the corner of the room.
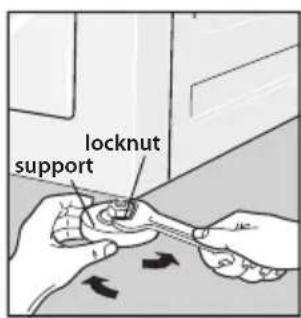
The Machine should be levelled precisely horizontally by screwing its adjustable supports in or out (Fig. 7): loosen lock nuts 2 of the supports with a spanner, adjust the height of the supports, and tighten the lock nuts. A wrong installation of the Machine by its horizontal level and low tightening of the lock nuts may be in the future a source of vibration and excessive noise during its operation.
CONNECTING TO ELECTRIC MAIN
CAUTION! The Machine must be grounded.
The Machine should be connected to the electric main through the bipolar receptacle with a grounding terminal. The current capacity of the receptacle should be not less than 16 A. Three-wire cable with a copper wire strands having a cross-section at least 1,5mm^2 (or with an aluminum strands having a cross-section at least 2,5mm^2 ) should be connected to the receptacle.
Phase conductor must be hooked up through an automatic safety device of electric main power protection which is rated for maximal current (operating current) of 16 A. The device must have an actuation time up to 0,1 s.
If receptacle has no terminated mentioned above cable or have a location remote from the Machine, it is necessary to upgrade the electric main and install a new receptacle. Works on electric main upgrading and receptacle installation must be carried out by skilled personnel.
IT IS FORBIDDEN to wire the connection to ground by a single wire, through the heating, water supply, or sewerage facilities.
CAUTION! Manufacturer (or Seller) is not responsible for any damages of ownership and to health arising from violation of above requirements to the hooking up procedure.
CONNECTING TO WATER CONDUIT AND SEWERAGE
The Machine should be connected to the cold water conduit only through the water delivery cock with the help of rubber bench pipe of 3/4 inch.
Prior to connect the Machine to the water conduit, open the cock and let the water flow down thus making washing down the contaminations of sand and rust out off the pipes.
The filling hose of Machine is equipped with "AQUASTOP" protective system. Check up the filling hose prior to connect the Machine. Keep an eye on following circumstances: In accordance with Fig. 8, a yellow-orange color should be seen through the special window; if the color is red, than the hose is out of service. Connect the filling hose to the threaded branch pipe of the water delivery cock in accordance with Fig. 8 and to the solenoid-operated value in accordance with Fig. 9 having tightened the nuts by hand.
CAUTION! Do not sink the hose with a system "AQUASTOP" in water.
Water delivery cock should be fully opened during washing in accordance with Fig. 10.
The drain hose should be laid on the height of not less than 60 and not more than 90~cm against the ground level in accordance with Fig. 11.
Violation of these requirements may cause Machine's failure.
To drain water directly in sewerage, mount the Machine's drain hose above the drain elbow pipe (siphon drain) in the sewerage pipe having an inner diameter not less than 40mm .
This prevents back siphonage of drainage water in the Machine.
If the siphon drain equipped with a branch pipe to connect the drain hose, it can be connected directly to siphon drain in accordance with Fig. 12.
When the water drained in the kitchen sink or bath, the hose should be secured, in accordance with Fig. 13, in the bend point by a special bracket included in delivery set.
Do not sink the hose in water.
CAUTION! Filling and drain hoses, after they have been connected to the water conduit and
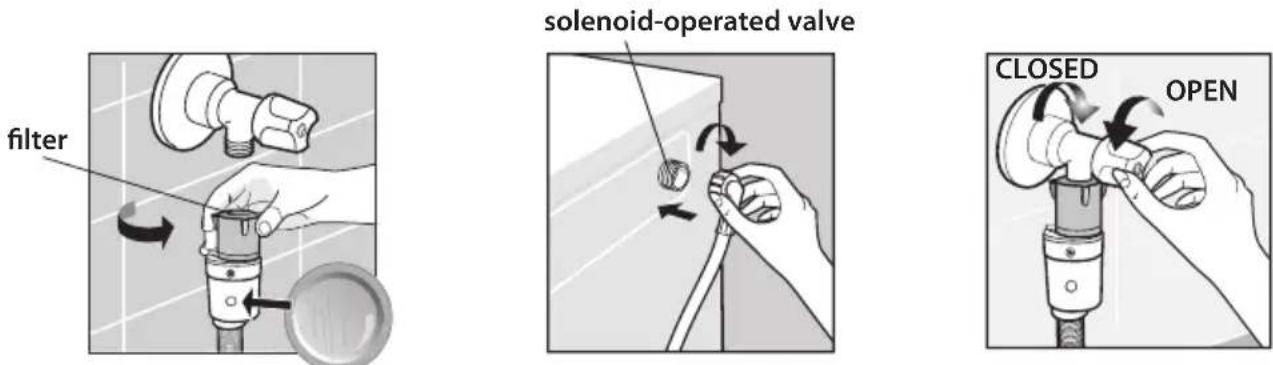
Figure 8 Figure 9 Figure 10
sewerage, should not be over bended and squeezed.
On connection the Machine to the water conduit and sewerage, check the leakproofness of hose connections. Junctions should be dry.
4 MACHINE OPERATION
FIRST WASH
Each Machine is tested by the Manufacturer; therefore, some water may remain inside it. To clean the Machine inside and remove water, remaining after testing, perform a first washing without a laundry load.
First washing should be performed by selection program "COTTON" with a temperature of 90^
CAUTION! Charge a half of a rated volume of detergent taking into account its Manufacturer's requirements for a maximal laundry loading into section 2 of dispenser drawer in accordance with Figure 14.
PREPARATION AND LOADING OF A LAUNDRY
Prior to washing proceed as follows:
sort out the laundry and garments making separation of color items from white ones;
-
dispart the goods by a type of cloth checking the symbols on the labels;
-
check up, that pockets of garments were empty, tore out parts sewed up, zippers, sashes, buckles, and hooks fastened, hard-to-remove stains taken out in advance;
-
shake the sand out of garments (pockets, flaps);
-
turn outside in the goods with overlays.
CAUTION! Ingress in the Machine of metal subjects (coins, a paper clips, etc.) together with a laundry can become the reason of damage of a rubber gasket and a machine's plastic tank.
Minute objects (socks, pocket-handkerchiefs, etc.) and delicate goods (thin leotards, stockings, etc.) should be packed in special net or pillowcase prior to washing.
It is recommended to wash in a special net or pillowcase the bras with kernels liable to machine washing whereas the kernels may ingress inside the Machine through the drum holes as this may lead to Machine's fault.
Prior to start washing of sports shoes proceed as follows:
- get a shoestrings out of shoes;
- shake the sand out and clean shoes outside.
CAUTION! It is not recommended to wash sports shoes of natural leather, sueded leather and nobook.
Check the drum for presence of foreign objects and pets.
Load the laundry inside the drum. To obtain better results of a washing and spinning, it is recommended to wash a big and small goods together.
CAUTION! Spinning speed is declined automatically or spinning did not starts (is refused to switch on).
IT IS FORBIDDEN to load the Machine with the goods of clothes soacking a lot of water (terry towels, bathrobes, rugs, etc.).
CAUTION! Close the machine's door up to the feelable click of the locking device (release a door blocking against closing). The laundry should not be squeezed between the door and gasket.
OPERATION PROCEDURE
Check the correctness of filling and draining hoses mounting.
If the Machine is not in service for a long time, drain stale water from the filling hose by unscrewing the
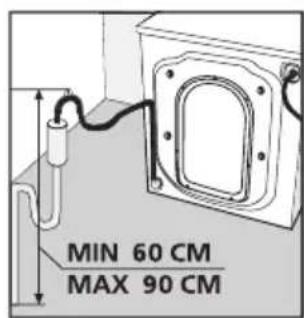
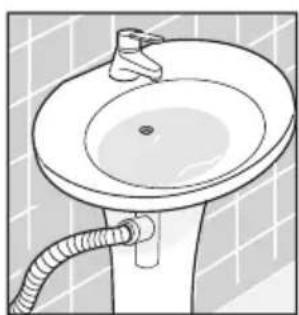
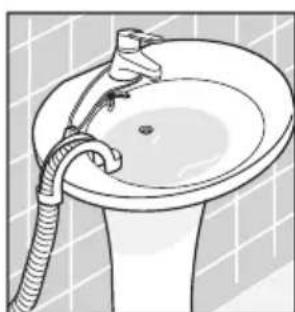
Figure 13Figure 12Figure 11
EN
nut and disconnecting the hose from water delivery cock. Connect the filling hose to the water conduit.
Open the water delivery cock.
Charge the respective dispenser drawer section with a detergent designed for automatic washing machines and a special treatment. Close the drawer carefully.
Insert the plug in receptacle.
Switch on the Machine by pushing the button (the drum's booster light goes on. Make a washing program selection. Program name and its basic parameters (maximal temperature of washing, number of revolutions per minute during spin, electrical power, water consumption, and washing duration readings) are highlighted in display indication zones.
Perform temperature, spin RMP selection and assign auxiliary operations. Thus, indicators of assigned program parameters will be highlighted on the display.
Averaged time of selected washing program duration is displayed.
The real time of a washing may differ from the displayed one as it depends on water temperature and pressure in water-supply line, weight of laundry, type of good's cloths, voltage magnitude in electric main, etc.
CAUTION! Nonconcurrence in displayed reading of time up to the end of washing with its real termination time is admitted.
Prior to start the Machine's operation under the selected program, push button (START/PAUSE). The indicator on button goes on and the sound signal sounds. Blocking device to prevent the door opening is actuated. If the door has a poor closing, the washing will not start and there will be a message "DOOR OPEN".
If the time of the delayed washing start has been assigned, time reading begins to blink slowly in E zone of the display. This time reading declines with the interval in one hour and the indicator in zone D of the display is on. Upon expiration of the set time, the indicator fades and the Machine starts to run upon selected program. Time remaining up to washing program counts down in zone F.
During Machine's running, selected program name and a name of a main operations carried out in present time (PREWASH, SOAKING, WASHING, RINSING, RINSE HOLD, FINAL SPIN, PROGRAM END) highlights one at a time on the display with an interval of 5 s.
CAUTION! It is not recommended to use the water conduit when the water is filled in the Machine during washing program execution. Quantity of filling water may be excessive or poor because of pressure disturbance in the water conduit.
On completion of the last washing operation, after expiry of aprox. 2 min, blocking device of the door is released. Triple sound signal sounds by a five times (with an interval of 1 min). Message "PROGRAM END" appears on display and indicator on the button START/PAUSE fades.
On completion of the washing, switch off the Machine by pushing the button. Draw the plug connector of the power cord out of the receptacle and close the water delivery cock.
Open the door and extract the laundry.
Pull out the drawer slightly and remain the door ajar till the inners Machine's parts became dry. To prevent an odor in the Machine, the door should be remained ajar up to the next washing. It is recommended to fix up blocking of the door against closing.
CAUTION! Ceasing of energizing in electric main during washing has no affects on following operation of the Machine. On renewal of energizing in electric main, the Machine proceeds program execution from the stop time.
ALTERNATION OF PROGRAM
To alternate the previously selected program, hold the button pressed for 3 s up to triple sound signal sounding. The Machine shuts down and the program is cancelled. Proceed the new Machine's powering.
Check the detergent for presence in the dispenser drawer designed for detergents and recharge if needed. If it is necessary to open the door, drain the water by pushing button and than, select program "Drainage".
If it is necessary to stop Machine's running without alteration of program (for instance, to add some laundry in the drum), hold the button START/PAUSE for 2 s up to indicator's on the button START/PAUSE blinking appearance and sound signal sounds. Countdown on the display will stop and on expiry of aprox. 2 min the door's blocking device will be released.
It is impossible to stop the Machine running under the programs "DELICATES, "WOOL", "HAND WASH", "MIXED" as the washing with great quantity of water is provided. The indicator does not blink and blocking device will not be released.
If it is necessary to open the door at that program execution, perform the water drainage. Push the knob and then select "Drain" program.
CAUTION! Do not open the Machine's door if the water level in the drum detects visually through the door's glass.
5 RECOMMENDATIONS AND TIPS
USE OF SYNTHETIC DETERGENTS (SDs)
The machine has a drawer for loading washing powders or deter-gents (Fig. 14). The drawer has three compartment marked with fig-ures and a symbol as follows:
1 - for pre-washing and bleaching agents;
2- for the basic washing;
- for special treatment substances (conditioners, softeners, starchers, aromatizers, etc.).
Take for your washing the SDs, bleachers and conditioners in-tended for automatic washers, and take into account the manufac-turer's guidelines.
ATTENTION! In is not recommended to use gel-bleachers for your washing.
Select the dosage of SDs with account of the weight of the items, their dirtiness and water hardness.
ATTENTION! SD overdosage, and use of the SDs intended for manual washing may result in excessive foam-formation, which degrades the washing quality and may cause the Machine failure.
Shutter, in section 2 in accordance with Figs. 15 and 16, is provided for liquid detergent using. Numeral levels of dosing in ml are applied on the both sides of the shutter.
Shutter with numerals on the face should be installed in WA 6012 A+, WA 6014 A+ Machine, but with numerals 200, 150, 100, 50.
When installing in pan section 2, the shutter must moved on the guides in lower position freely.
When you are using SDs as powder, take the shutter out of the main wash compartment 2 (Fig. 14). Be careful not to put any powder into the compartment for special treatment substances (Fig. 15), otherwise foam may form during rinsing and white spots may appear on the items.
In case of a liquid SD, set the shutter into compartment 2 (Fig. 16) and pour the SD with the account of the level marks on the shutter.
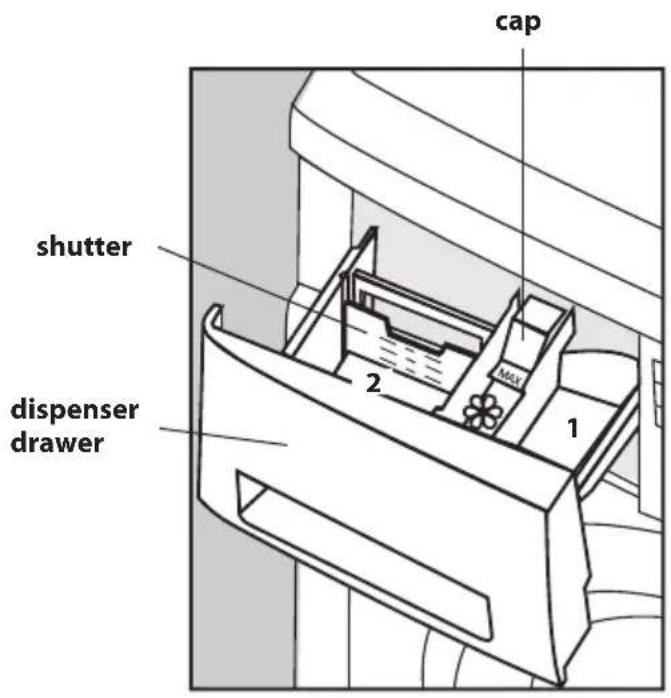
Figure 14
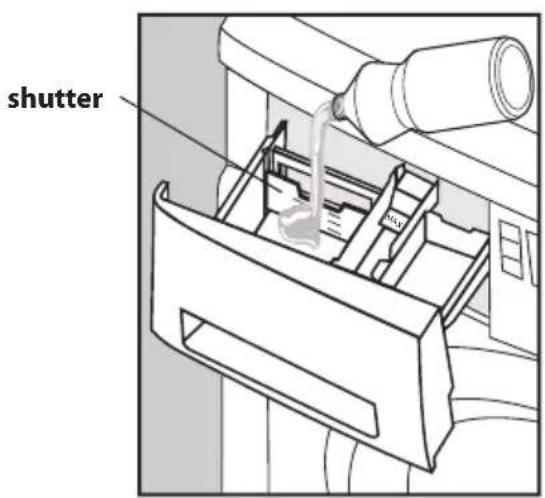
Figure 16
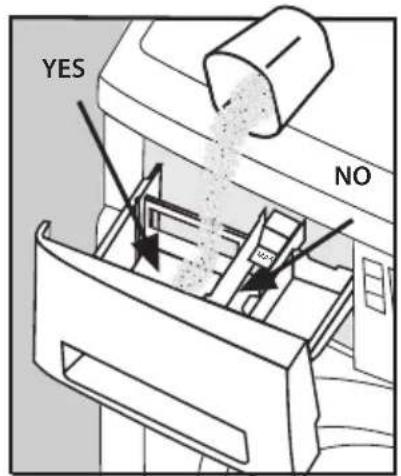
Figure 15
Table 2
| Hardness Degree | Water Characterization Water Hardness in \( {}^{0}\mathrm{{dH}} \) Water Hardness in Milli-Mol per Litre |
| I Soft 0 - 7 Up to 1,3 | |
| II Medium hard 7 - 14 1,3 - 2,5 | |
| III Hard 14 - 21 | \( 2,5 - 3,8 \) |
When choosing optional functions place the SD into compartment 1. When using a liquid SD, put it in right before washing.
Any overdosage of special treatment agents in the compartment (above the level MAX on the cap), and their getting into the neighbouring compartments will degrade the washing quality.
When choosing the program spot Removal), put the bleachers into compartment 1 (Fig. 14), and the bleaching will take place immediately after the main washing.
ATTENTION! When using a bleacher, never set the optional function of pre-washing.
To improve the washing quality and protect the Machine from lime sediments, when washing in water having hardness II or III, it is recommended to use, alongside with SDs, a water softener. It should be added to the SD into compartment 2 (Fig. 14) according to manufacturer's guidelines.
The water hardness is defined according to Table 2. You may obtain data on your water hardness from the local water supply entity.
Prior to start washing, close the drawer filled with the SD.
NEVER move out the detergent drawer, when the Machine is working, otherwise water may leak and spray out of the Machine.
REMOVAL OF CERTAIN SPOT TYPES
Certain spots cannot be removed from items at usual machine washing. Therefore, they must be removed manually before washing in the Machine. First try the process in an unseen place of the item, then start from the edge of the spot and proceed towards its centre to avoid formation of blotchiness. See below the removal methods of various spots.
Wax should be scraped off with a rounded object in order not to damage the cloth, then the item is placed between two sheets of blot-ting paper and hot-ironed.
Spots from ball pens and felt pens are cleaned by means of soft cloth moistened in ethyl alcohol. Watch for the spot not to bleed.
Spots of mould are removed at washing with adding of a bleacher into the bleacher tray (Fig. 14), if the cloth withstands the effect of the bleacher. Otherwise, the dirty spot is moistened with 10-percent solution of hydrogen peroxide and left for 15 minutes.
Light fabric burns left by an iron are removed in the same way as the mould spots.
Rust is removed by special rustremoving agents. Follow the manufacturer's guidelines.
To remove the chewing gum, rub the cloth with ice, then rub with a force and treat with a piece of cotton cloth moistened in acetone.
Paint is removed after complete drying. A contaminated spot is wiped with a solvent as indicated in the paint packing (for example, water, turpentine, trichloroethylene), soaped and washed.
Lipstick spots on cotton and wool are wiped with a cloth moistened in ether, and on silk – in trichloroethylene.
To remove nail varnish (polish), put some blotting paper over the dirty cloth and moisten the spot with acetone from the backside. By frequently changing the paper, moisten the cloth with acetone, until the spot disappears.
Spots of vegetable oil or tar (resin) are coated with butter for some time, and then washed off with turpentine.
Grass spots should be soaped by using diluted bleacher. They are easily removed from wool fabrics by 90 percent alcohol solution.
Table 3
| Washing | Wash at max. temperature of 40 °C | ||
| Delicate washing | Wash at max. temperature of 30 °C | ||
| Wash at max. temperature of 95 °C | Hand washing | ||
| Wash at max. temperature of 60 °C | Washing is forbidden |
A cloth with spots of blood should be soaked in cold water with adding salt, and then washed with household soap.
INTERNATIONAL SYMBOLS FOR TAKING CARE OF TEXTILE ITEMS
The labels attached to the items contain marks to indicate the permitted care. Symbol meanings are summarized in Table 3.
When choosing the washing program and temperature, we recommend to get acquainted with the care symbols to avoid shrinkage and fading of your items.
6 WASH PROGRAMS
CAUTION! On behalf of economy of detergent, electric power, and reduction of pollution of environment, when selecting washing program, take into account the type of cloth and degree of good's soiling in accordance with Table 4.
Table 4 - Washing Programs
| Program name | Wash temperature | Rotational speed in the wringing mode, (rpm) | Power consumption, kW-h | Water consumption, I | Weight of clothes to be washed, kg | Program duration, min.* | Detergent compartment | ||||||
| max m | min stand | dart max | min stand | III | * | ||||||||
| COTTONS | 90°C | CLD | 60°C | 1200114002 | 0 | 1200114002 | 40°C: 0,8560°C: 1,2590°C: 2,30 | 50 6,0 | 143 | ○ | ● | ○ | |
| SYNTHETICS | 60°C | CLD | 40°C | 1000112002 | 0 | 1200114002 | 0,4 40 3,0 | 82 X | ● | ○ | |||
| DELICATES | 40°C | CLD | 30°C | 400 0 | 400 0 | 3 60 3,0 | 52 X | ● | ○ | ||||
| WOOL | 40°C | CLD | 30°C | 400 0 | 400 0 | 3 85 1,5 | 48 X | ● | ○ | ||||
| HAND WASH | 30°C | CLD | 30°C | 80014002 | 0 | 80014002 | 0,3 60 1,5 | 62 X | ● | ○ | |||
| QUICK CYCLE | 30°C | CLD | 30°C | 0 | 0,2 30 3,0 | 43 X X | ● | ||||||
| MIXED | 40°C | CLD | 40°C | 400 | 0 400 0,3 60 | 6,0 57 X | ● | ○ | |||||
| INTENSIVE | 60°C | CLD | 60°C | 1200114002 | 0 | 1200114002 | 0,9 70 6,0 | 164 X | ● | ○ | |||
| DRY CLEAN. | 40°C | CLD | 30°C | 1200114002 | 0 | 1200114002 | 0,4 60 6,0 | 92 | ○ | ● | ○ | ||
| SPORTSWEAR | 30°C | CLD | 30°C | 1200114002 | 0 | 1200114002 | 0,2 30 3,0 | 78 X | ● | ○ | |||
| SPORT SHOES | 30°C | CLD | 30°C | 1000 | 0 | 1000 | 0,06 | 25 | 2 pairs | 59 | X | ● | ○ |
| RINSE | - | - | - | 1200114002 | 0 | 1200114002 | 0,06 40 6,0 | 43 X | ● | ○ | |||
| DRAIN | - | - | - | - | - | - | 6,05 | 3 | X | XX | |||
| SPINNING | - | - | - | 1200114002 | - | 1200114002 | 0,1 | 0 | 11 X | XX | |||
| DELIC_SPIN | - | - | - | 800110002 | - | 800110002 | 0,1 | - | XX | ||||
| For WA 6012 A+ model; ● - fill the detergent compartment;2 For WA 6014 A+ model; ● - fill the detergent compartment according to the function and your wish;X - do not fill the detergent compartment. | |||||||||||||
| * The real time of a washing may differ from the displayed one as it depends on water temperature and pressure in water-supply line, weight of laundry, type of good's cloths, voltage magnitude in electric main, etc. | |||||||||||||
CAUTION! Disconnect the Machine from the electric main and close water delivery cock before cleanup.
Clean the machine regularly. Outer Machine's surfaces, parts of plastic and rubber materials should be wiped with soft wet cloth only.
Wipe the gasket along its contour, in accordance with Fig. 1, by a soft dry cloth after every washing.
CAUTION! Take out the accumulations of foreign particles on the gasket of the door.
IT IS FORBIDDEN to use the chemical agents, abrasive compositions, alcohol, gasoline, and other solvents to clean the Machine as they may damage it.
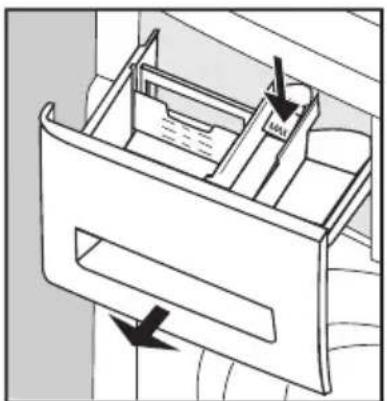
The detergents dispenser drawer needs periodic washing. For this purpose, pull the drawer out, and pressing down a little to the snug of the lid, following the indicator, and take it out of the Machine (Fig. 17).
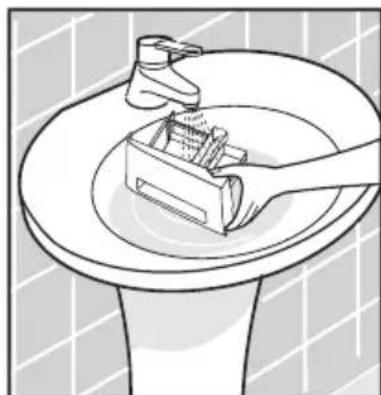
Take the shutter and caps out of the pan in accordance with Fig. 14 and flush carefully its outer and inner surfaces under a jet of warm water. Flush the pan for detergents in accordance with Fig. 18. Insert the detachable parts into the drawer's section and install the drawer into the Machine with no squeezing of lateral surfaces of the section close the drawer gently.
If rusty objects have been trapped in the Machine together with laundry, stains of rust may appear that needs to be taken out by the means of stainless steel objects' cleanup.
CLEANING THE WATER DELIVERY FILTERS
To clean the filters, proceed as follows:
- disconnect the filling hose out of the water delivery cock by turning the nut counterclockwise in accordance with Figs 8;
- disconnect the filling hose from the solenoid-operated valve's threaded branch pipe in accordance with Fig. 19;
- extract the filter out of solenoid-operated valve's branch pipe with flat pliers or a forceps in accordance with Fig. 19;
- remove a trash from the filter, sweep by the brush and flush filters under the water jet.
Install in the filling hose and the solenoid-operated valve's threaded branch pipe in reverse sequence. Connect the filling hose and check up the leakproofness of hose connections. Junctions should be dry during Machine's running.
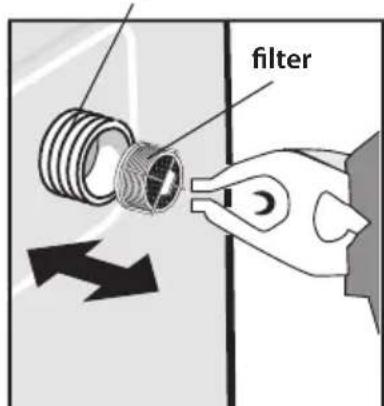
CLEANING THE PUMP FILTER
Check the drum for the presence of water prior to cleaning the pump filter. If the Machine does not drain the water.
Clean the filter monthly and after the every washing of the goods with a long hair.
Drain the water remaining in the filter prior to cleaning. To do this, open the filter cover in accordance with Fig. 20 with a screwdriver or some other taping object. Draw the hose up to the stop out from the Machine and place any container for collection of water in accordance with Fig. 21. Remove the plug from the hose and drain the water in the container. Turn the filter knob counterclockwise in accordance with Fig. 21 and remove the filter.
CAUTION! Water residues' bleeding is possible when turning the filter's knob.
solenoid-operated valve
Figure 18Figure 17 Figure 19
Remove a trash from the filter, and flush the filter under the water jet.
Insert the plug in the hose and the filter itself in the Machine in reverse sequence. Check the correctness of filter's installation and its hold lock. Close the filter's cover.
8 SAFETY REQUIREMENTS
The Machine is household electric appliance. Therefore, general rules of electrical safety should be observed when Machine being in service.
Machine's degree of protection against electric shock is I.
Before plug in, check visually for absence of Machine's power cord damages. The power cord should not be over-bended and over-squeezed.
The Machine is not designed for use by handicapped persons (including children), people having degraded sensorial and mental abilities, and with insufficient experience and incomplete knowledge also, in case if above persons are not under supervision, or do not receive instructions from persons responsible for their safety.
Keep your Machine away from use in children games.
If the supply cord is damaged, it must be replaced by a special cord or assembly available from the manufacturer or its service agent.
Safety precautions should be taken when moving and transporting the Machine as it has a great weight.
CAUTION! Do not use Machine as a trestle, pedestal, etc.
IT IS FORBIDDEN to place the Machine outdoor in order not to expose it to weather.
IT IS FORBIDDEN to operate Machine without installing the plastic plugs.
When Machine's connecting to the system of cold-water supply, use new filling hose only.
IT IS FORBIDDEN to operate Machine by kids.
IT IS FORBIDDEN to use solvent-containing washing agents inside the Machine as they can cause explosion.
Avoid to touch the Machine's door glass as it can be hot, thus causing burn.
Upon completion washing, press the button in accordance with Figure 3, cut out the Machine from electric main, remove the electrical plug from the receptacle, and water delivery cock.
To assure electrical safety and fire prevention regulations to:
- plug in the Machine when electrical overload protection of the electric main is faulty;
- use the receptacle, for Machine plug in, without ground contact;
- use adapter connectors, multiplug-type (having two or more sockets) receptacles, and extension cords;
- plug in and take off the electrical plug from the receptacle by wet hands;
- touch the running Machine by wet hands;
- wash out the Machine by the water jet;
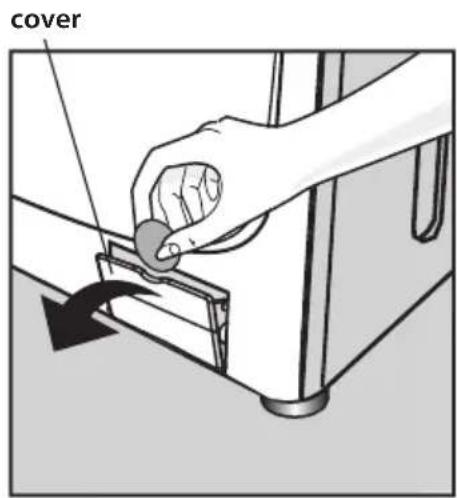
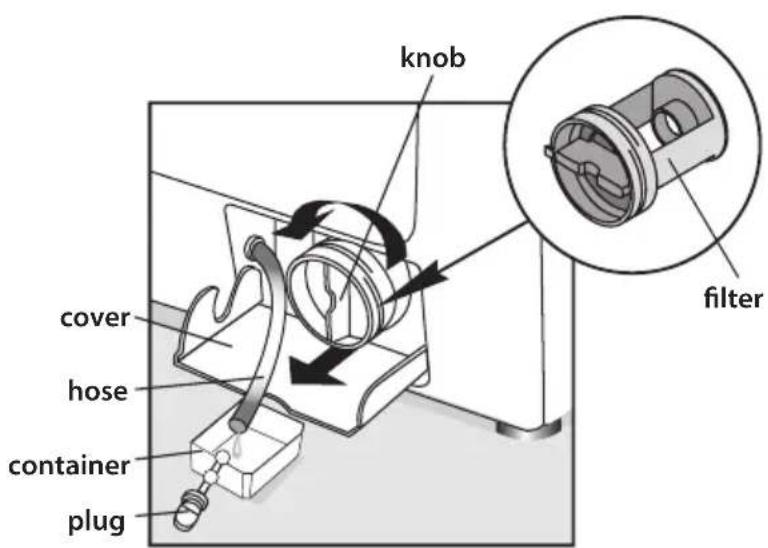
Figure 20 Figure 21
EN
-
cut the Machine off the electric main pulling out by the power cord;
-
repair the Machine and make alterations in its design, water and power supply characteristics as this activities may lead to serious damages and make void any warranty repairs. Have the Machine repaired by a duly qualified maintenance department machinist; as the Product may became the source of danger after unskilled repair works. In occurrence of failures in Machine's operation that associated with electrical clicks, smoke formation, etc., switch off the Machine immediately by removing the electrical plug from the receptacle, close water delivery cock and call a maintenance department machinist.
In occurrence of fire, disconnect the Machine from the electric main, close water delivery cock, take action to fire extinguishing and call fire fighting service.
CAUTION! The Manufacturer doesn't bear any responsibility for safe operation at the end of Machine's service life. Further operation may be unsafe as the possibility of electro- and inflammable situations rises because of natural ageing of materials and wearing of Machine's components.
Bipolar grounding receptacle for power supply of machine should be installed in place which is accessible for immediate shutting down the machine from electrical network.
9 DISPOSAL
The materials used for packing the Machine may be processed and reused, if delivered to the second-hand materials collection points.
ATTENTION! Never let children play with the packing materials, since there is a danger to suffocate by getting entrapped in the film.
The Machine, which is subject to disposal, should be brought to the condition of unfitness by cutting away the power cord to exclude any possibility to connect the Machine to the electric mains, and by breaking the door lock. Then, dispose the Machine according to the current legislation of your country.