2.37 E - Lawn mower Wolf Garten - Free user manual and instructions
Find the device manual for free 2.37 E Wolf Garten in PDF.


User questions about 2.37 E Wolf Garten
0 question about this device. Answer the ones you know or ask your own.
Ask a new question about this device
Download the instructions for your Lawn mower in PDF format for free! Find your manual 2.37 E - Wolf Garten and take your electronic device back in hand. On this page are published all the documents necessary for the use of your device. 2.37 E by Wolf Garten.
USER MANUAL 2.37 E Wolf Garten
Original operating instructions 10
natural_image
Illustration showing two steps of fabric cutting: one with a bandage and the other with a bag (no text or symbols)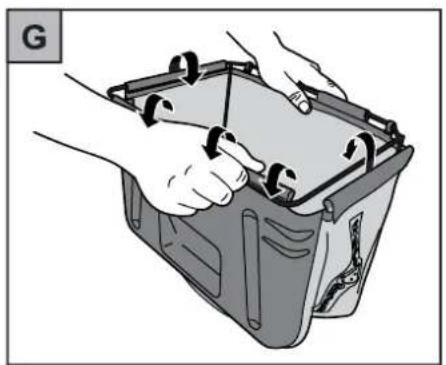
natural_image
Illustration of hands installing or adjusting a mechanical component with a tool (no text or symbols visible)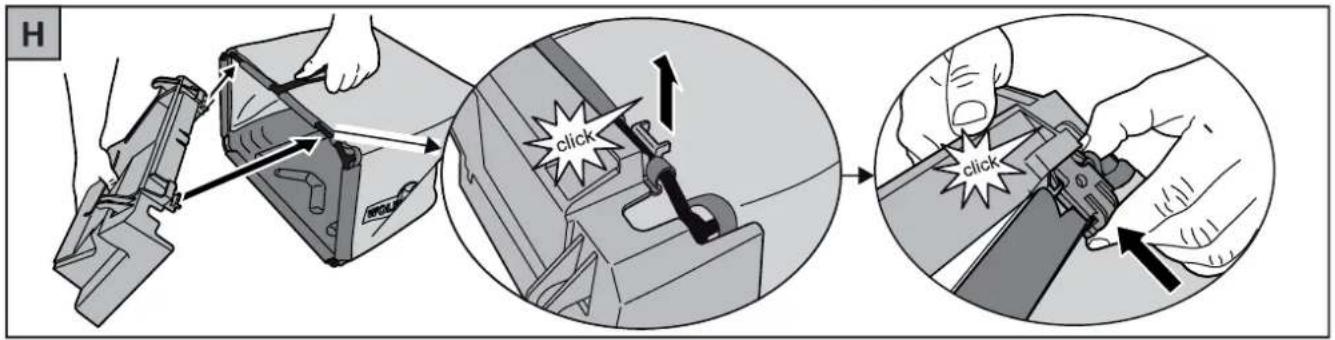
text_image
H click click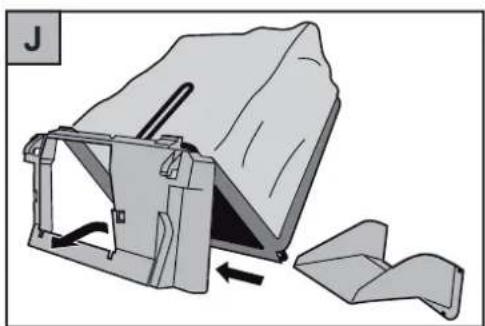
natural_image
Diagram of a mechanical device with a folded paper or sheet, showing a folding and disassembly process (no text or symbols present)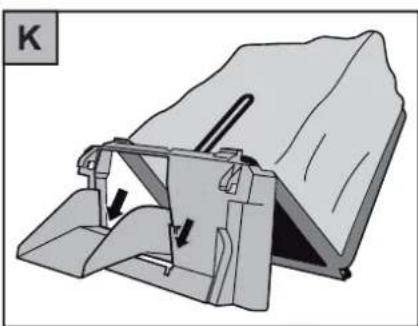
natural_image
Mechanical assembly diagram showing a folded paper or plastic component with internal structure and directional arrows (no text or symbols)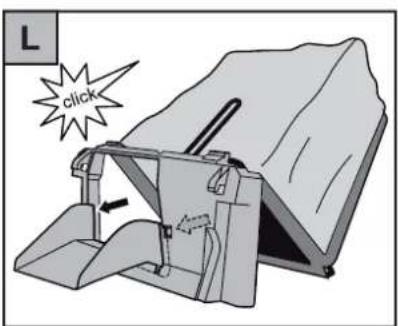
text_image
L click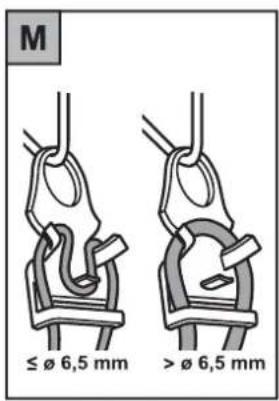
text_image
M ≤ Ø 6,5 mm > Ø 6,5 mm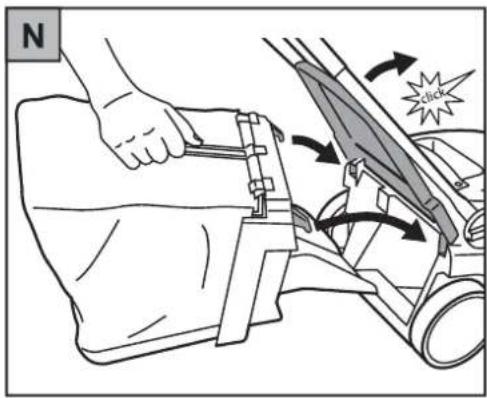
text_image
N click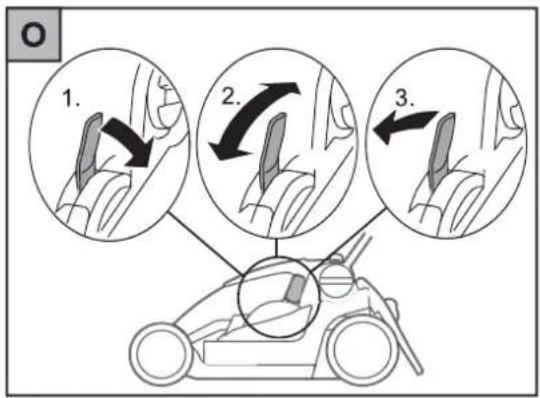
text_image
1. 2. 3.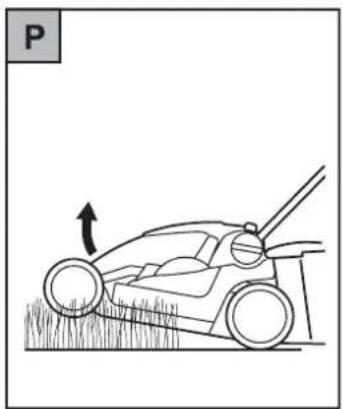
natural_image
Line drawing of a lawn mower with grass blades and a hand operating the wheel (no text or symbols)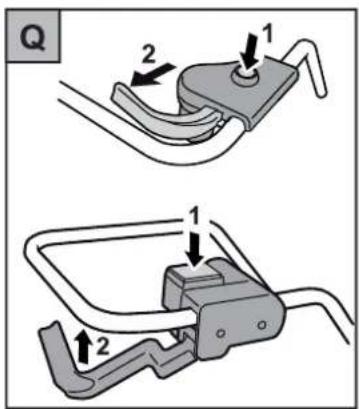
text_image
Q 1 2 1 2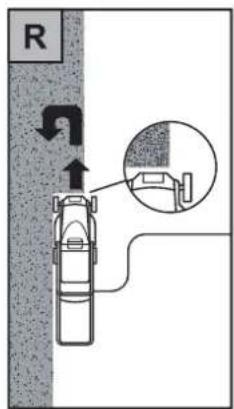
text_image
R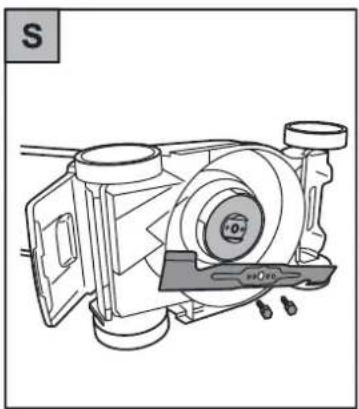
natural_image
Technical line drawing of a mechanical pump assembly (no text or symbols)2.34 E - 2.37 E
text_image
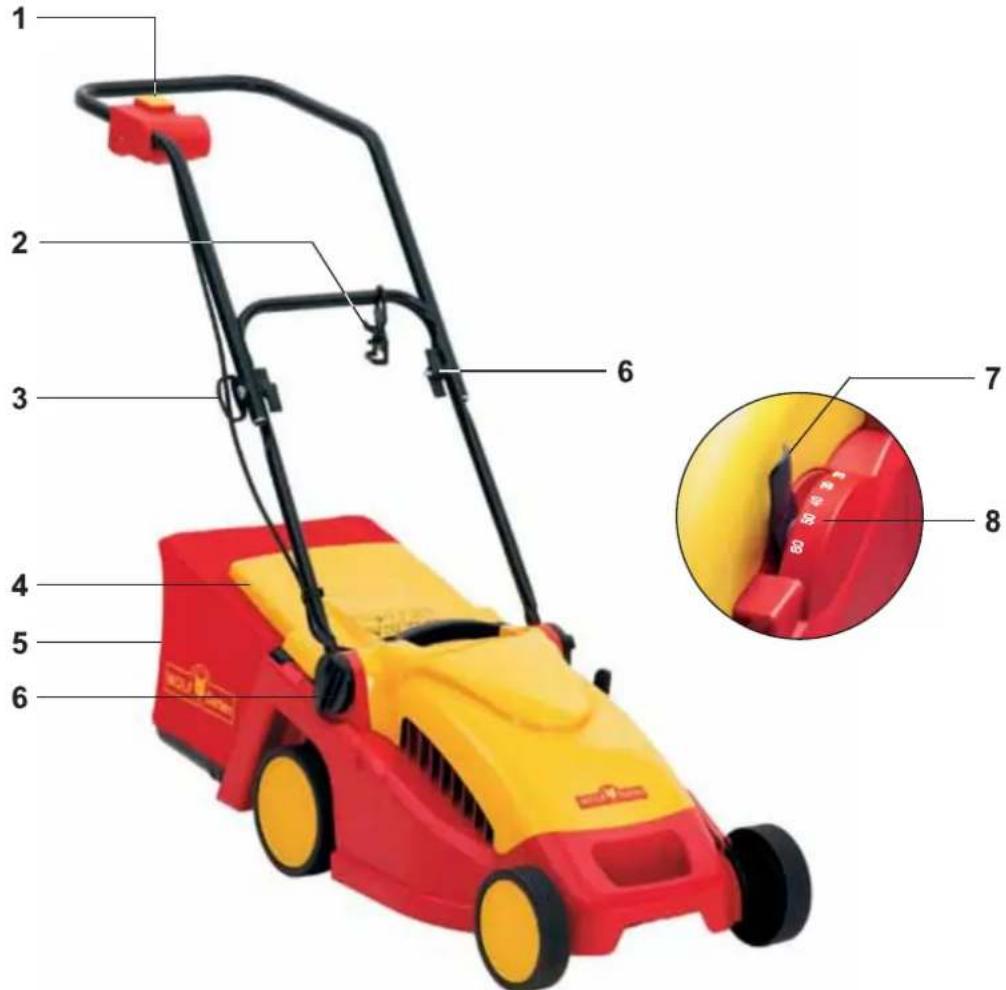
1 2 3 4 5 6 6 7 8D
1 On-/Off-switch
2 Cable-kink protection
3 Cable anti-king protection
4 Deflector plate
5 Collector
6 Fitting of handle
7 Height adjustment
8 Indicator to cutting
F
natural_image
Red and yellow toy car with black wheels (no text or symbols visible)Congratulations on your purchase of a WOLF-Garten lawn mower

It is important that you read, fully understand and observe the following safety precautions and warnings. Careless or improper use of the machine may cause serious or fatal injury. The user is responsible for any accidents involving other people or other people's property.

Never let children or other persons who are not familiar with the operating instructions use the lawnmower. Juveniles under 16 years may not use the equipment. Local regulations may specify the minimum age of the operator.
Contents
Safety instructions .....10
Assembly....11
Operation....12
Maintenance .....12
Spare parts....13
Faults and how to remedy .....13
Warranty . . . . . . . . . . . . . . . . . . . . . . . . . . . . . . . . . . . . . . . . . . . . . . . . . 13
EC Conformity declaration .....92
A quick guide to features
natural_image
Red and yellow toy car with black wheels and a red body (no text or symbols visible)— Central cutting height setting
- Fold-down handle for space-saving storage and easy transport
— dual-position height-adjustable handle
— Easily emptied, capacious catchment bag
– High-quality materials, excellent workmanship and attractive design
- Ready-to-use: From 0 to mowing mode in 30 seconds
Safety instructions
Meaning of the symbols

Attention!
Read instruction manual before use!
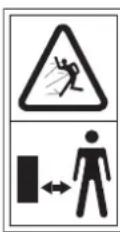
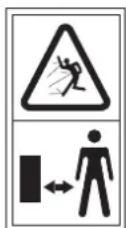
Keep bystanders away!
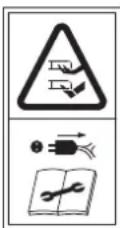
Attention!
- Sharp knives - before performing a maintenance work or if the cable is damaged pull out the plug!
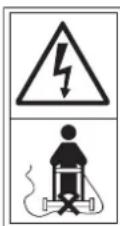
Keep the sup- ply flexible cord away from the cutting blade!
General information
●This lawnmower is designed for domestic grass and lawn surfaces. Because of the physical risk to the user or to others, the lawnmower must not be used for other purposes.
- Never mow the lawn if others – in particular children and animals – are in the vicinity.
- Only mow the lawn during daylight or with the aid of appropriate artificial light.
Before mowing
●Always wear sturdy shoes and long trousers when mowing. Never mow while barefoot or wearing flimsy sandals.
●Always wear sturdy shoes and long trousers when mowing. Never mow while barefoot or wearing flimsy sandals.
- Check the site on which the machine is to be used, and remove all items which could be caught and ejected
- Check the line and connection cable fitted to the outside of the lawnmower for damage and ageing (brittleness). Only use if in perfect condition.
●Only have the cable repaired by a qualified person.
- Check the grass catchment device regularly for wear-and-tear and deformation.
- Check the protective flap frequently for brittleness and to ensure that it is attached firmly.
●Before use, carry out a visual inspection to check whether the cutting gear and its mounts are blunt or damaged. In order to avoid generating an imbalance, replace blunt or damaged cutting gear as an entire set.
Cable

Caution! Risk of electrocution from damaged cables
The fuse does not always respond if the cable is cut or damaged.
- Do not touch the cable before the plug has been removed from the plug socket.
- Damaged cables should be replaced completely. It is prohibited to mend the cable using insulating tape.
●Repairs to the cable should only be undertaken by an expert.
- Attach the cable to the tension relief unit. Do not let it rub up against edges, points or sharp items.
- Do not squash the cable by putting it through door gaps or gaps in windows.
●Switching devices must not be removed or bridged out (e.g.strapping the switching lever to the guide bar). - Use only extension cables with a minimum cross-section of 3 × 1.5 ~m^2 and a length of max. 25 ~m :
- When using rubber-sheathed cables, they must be of type HO 7 RN-F or heavier.
- When using PVC-sheathed cables, they must be of type HO5 VV-F or heavier (cables of this type are not suitable for continuous outdoor use - e.g. underground installation for the connection of an outdoor socket or pond pump, or outdoor storage).
●The cables must be water spray protected.
When mowing
- Do not tilt the lawnmower when switching on the motor, unless the lawnmower has to be tilted when starting. If that is the case, do not tip the lawnmower more than absolutely necessary, and only lift the part furthest removed from the user. Always ensure that both hands are in the operating position before replacing the lawnmower on the ground.
●Caution, danger! Cutting gear will continue running!
●Maintain the safety distance prescribed by the handle bars.
- Only switch on the motor if your feet are at a safe distance from the cutting gear.
●Take care to ensure a safe and stable position, especially on slopes. Never run; always walk calmly forward.
●Always mow slopes at right angles to the incline; never mow up and down.
- When mowing slopes, be especially careful when changing direction.
●Never mow steep slopes.
- Be especially careful when mowing backwards and pulling the lawnmower towards you.
- Switch the mower off when tilting it, running on empty or transporting the lawnmower, e.g. to/from a lawn or along paths.
●Never use the lawnmower if safety devices are faulty or missing, such as deflector and/or grass catchment devices.
●Caution: do not touch running cutters.
●Always keep hands and feet away from rotating parts. Do not stand in front of the grass ejector opening.
●Never lift or carry a lawnmower while the motor is running.
●Never open the guard flap while the motor is still running.
●Before removing the grass catchment device, turn off the motor and wait until the cutting gear has stopped running. After emptying the grass catchment device, reattach carefully.
- Never drive across gravel while the motor is running – impacting stones!
●Avoid mowing wet grass where possible. - Switch off the lawnmower, pull the mains plug and wait for the lawnmower to stop running if, for example:
– leaving the lawnmower - unblocking a blade
- intending to check, clean or work on the lawnmower
- you have encountered a foreign object, in which case you should check the lawnmower for damage and carry out any necessary repairs.
- the lawnmower is vibrating heavily (switch off immediately and ascertain the cause).
- you wish to change the settings or carry out cleaning work.
- you wish to check whether the connection cables have become tangled or damaged.
- If the connection cable is damaged during use, it must be immediately disconnected from the mains power supply. Do not touch the cable before it has been disconnected from the mains power supply.
Maintenance
Attention! Rotary cutter blade
Before all maintenance and cleaning work:
●Pull out the power plug.
●Do not touch running blades.
●Never spray down the lawnmower using water, especially not at high pressure.
● Regularly check and tighten all visible screws and nuts, especially those relating to the cutting bar, to ensure a firm fit.
●Always have blades changed or re-sharpened by a specialist workshop, since a balance test must be carried out as specified in the safety regulations following any removal of parts.
- Only use original WOLF-Garten spare parts. Otherwise we can't guarantee that your mower conforms to the safety regulations.
●Never park your lawnmower in damp rooms.
- For safety reasons, replace worn or damaged parts.
Disposal
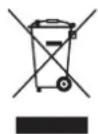
Do not dispose of electrical equipment in domestic waste. Recycle equipment, accessories and packaging in an environment-friendly manner.
Assembly
Fixing the grab handle A B C D E

Caution!
When collapsing and unfolding the grab handle, the cable could be damaged.
●Take care that you do not kink the cable.
●See illustrations for assembly.
Mount the collecting bag F G H J K L
●See illustrations for assembly.
Operation
Operating times
- Please check noise abatement regulations prevailing in your country.
Feed cable through the strain relief M
- Please feed cable through the strain relief. M
Hang up collection bag N

Attention! Rotary cutter blade
Undertake adjustments on the equipment only after the motor is switched off and the cutting tool has come to a standstill.
- Lift the protective flap.
- Hang the grass bag in the chassis with the hooks in the recesses (see arrow).
- Replace the protective flap.
Set cut height 0

Attention! Rotary cutter blade
Undertake work/adjustments on the equipment only after the motor is switched off and the cutting tool has come to a standstill.
- Pull the lever out.
- Set the desired cutting height.
- Press the lever back in.
Selection of Cutting height
- If possible, mow when grass is dry in order to protect turf. Do not se cutting position too low when mowing very hight or wet grass.
●We recommend an average cutting height of 40 mm.
Connecting to the mains (230 Volts, A.C., 50 Hz)
●The mower operates from any normal household mains supply, provided with a 16 Amps. fuse.

Note: Residual current protection device
These protection devices safeguard while touching damaged wires, from insulation flaws and in certain cases, also while damaging live wires.
- We recommend that the equipment only be plugged into a power socket, which is protected by a residual current protection device (RCD) with a residual current of not more than 30 mA.
●Retrofit kits are available for old installations. Consult an electrician.
Starting and Stoping
- Switch on motor with mowerplaced on level and firm ground.
●not in high grass - alternatively tilt slightly . P
Switch-on motor Q
- Depress button and hold (1).
- Lift up bar (2).
- Release bar (1).
Switch-off motor Q
- Release bar (2).
Emptying of Grassbox
The grassbox is full and should be emptied as soon as grass clippings remain uncollected on the ground behind your mower.

Attention! Rotary cutter blade
Undertake adjustments on the equipment only after the motor is switched off and the cutting tool has come to a standstill.
●Empty collection bag.
- Remove potential blockages in the cutting space before starting.
Tips for mowing
● To prevent strips of grass from being left unmowed, the cutting paths must always overlap a few centimeters R
Maintenance
General

Attention! Rotary cutter blade
Before all maintenance and cleaning work:
- pull out the power plug.
- Do not touch running blades.
Cleaning
●Clean mower thoroughly after each mowing with cloth or brush.
- Do not spray with water.
Winter Storage
●Clean mower thoroughly before storing away.
●Have your mower thoroughly checked once a year by an approved Service Centre.
- Do not store it in a wet or humid place.
Changing blades S
- For all works on blades, coupling and cutter bars, first of all, pull out the power plug and wear protective gloves.

Attention!
An unbalance can develop after regrinding of the blade.
●Always regrind the blades in a specialist workshop, because an unbalance check should be undertaken according to the safety regulations.
●Always change blades in a specialist workshop. A torque spanner of 10 mm is mandatorily required.
Fastening torque of the screws: 6-7 N-m . S
Spare parts
| Item number Order description Product information | |
| 4909 031 Grass catcher (34) | |
| 4917 031 Grass catcher (37) | |
| 4904 096 Vi 34 FM Replacement blade 34 cm | |
| 4907 096 Vi 37 FM Replacement blade 37 cm |
Faults and how to remedy
| Remedy (X) by: | |||
| Problem Possible cause | WOLF-Garten service-workshop | Yourself | |
| Uneven running, heavy vibrations in the mower | Blades damaged | X --- | |
| Blades loose in the fastening parts | --- X | ||
| Motor will not run | Fuse blown | --- X | |
| Cable damaged:Attention! Electric shock through cable damageWhen the cable is cut through or damaged, the safety fuse doesn't always trip.Do not touch cable, before pulling out the power plug from the socket.Damaged cable has to be completely replaced.Patching cable with insulating tape is forbidden. | X | --- | |
| Poor mowing-/ catching | Blunt blades | X --- | |
| Catcher bag blocked | --- X | ||
| Incorrect cutting height | --- X | ||
When in doubt, always consult a WOLF-Garten service workshop.
Important: switch off the mower and disconnect the mains plug before inspecting, cleaning or working on the blades.
Warranty
The warranty rules issued by our company or the importer apply to every country. As part of the warranty, we remedy malfunctions on your appliance free of charge provided that this malfunction is caused by a material or manufacturing defect. In the event of a warranty claim, please turn to your dealer or the nearest branch office.
natural_image
Red and yellow toy car with black wheels and a white top (no text or symbols visible)natural_image
Red and yellow toy car with wheels and a black handle (no text or symbols visible)natural_image
Red and yellow toy car with black wheels and front suspension (no text or symbols)natural_image
Red and yellow toy car with black wheels (no text or symbols visible)natural_image
Red and yellow toy car with black wheels and front suspension (no text or symbols)natural_image
Red and yellow toy car with black wheels and a yellow body (no text or symbols visible)natural_image
Red and yellow toy car with black wheels and a white top (no text or symbols visible)natural_image
Red and yellow toy car with black wheels and front wheel (no text or symbols visible)natural_image
Red and yellow toy car with black wheels and front wheel (no text or symbols visible)natural_image
Red and yellow toy car with wheels and front blades (no text or symbols visible)natural_image
Red and yellow toy car with black wheels and front wheel (no text or symbols)- centralno podešavanje visine košnje
— preklapajuća ručka za čuvanje na malom prostoru i jednostavan transport
— Namještanje visine ručke 2-struko
– Košara za prihvat trave
— visoko kvalitetni materijali, izvanredna obrada i atraktivan dizajn - Ready-to-use: od nule do košnje za 30 sekundi
Sigurnosne upute
Značenje simbola

Upozorenje!
Prije puštanja u pogon pročitati upute za upotrebu!
natural_image
Red and yellow toy car with black wheels (no text or symbols visible)natural_image
Red and yellow toy car with black wheels and front wheel (no text or symbols)natural_image
Red and yellow toy car with black wheels (no text or symbols visible)natural_image
Colorful toy car with red and yellow body, no visible text or symbolsnatural_image
Red and yellow toy car with black wheels and a yellow body (no text or symbols visible)natural_image
Red and yellow toy car with black wheels and a yellow body (no text or symbols visible)natural_image
Red and yellow toy car with wheels and a black handle (no text or symbols visible)natural_image
Red lawn mower on grass, no visible text or symbols
natural_image
Worker using a red-handled manual tree to lift a tree branch, no visible text or symbols
natural_image
A leafy green lettuce growing in soil with a red-handled tool nearby (no text or symbols visible)
text_image
4. 009269.000000 R 00000000000 Type: MUSTER
natural_image
Illustration of a red spray gun attached to a green hedgehog, no text or symbols present
natural_image
Red and black lawn shaver in a grassy field with green foliage (no text or symbols visible)
natural_image
Person using a red pushrower in a garden setting (no visible text or symbols)
natural_image
Hand watering a red and yellow lawn tool in a grassy garden with colorful flowers (no text visible)
natural_image
Red and white lawn mower in a grassy field with trees in the background (no visible text or symbols)