
WM600 Wafelijzer - Waffle Maker INVENTUM - Free user manual and instructions
Find the device manual for free WM600 Wafelijzer INVENTUM in PDF.

| Product Type | Waffle Maker |
| Brand | Inventum |
| Model | WM600 Wafelijzer |
| Number of waffles | 4 Belgian waffles |
| Plate coating | Non-stick |
| Heating system | Opti-Heat System (central heating, aluminum plates) |
| Cooking indicator | Progressive LED (Light, Medium, Dark) |
| Automatic shut-off | Yes, after 60 minutes |
| Lid closure | Locking lever |
| Handle | Oven mitt recommended |
| Cord storage | Under the appliance |
| Power | 800 W (estimated) |
| Dimensions (L x W x H) | 25 x 25 x 10 cm (approx) |
| Weight | 2 kg (approx) |
| Voltage | 220-240 V ~ 50 Hz |
| Exterior material | Heat-resistant plastic |
| Cleaning | Damp cloth, do not immerse |
| Maintenance | Non-metallic utensils recommended |
| Safety | Automatic shut-off, do not touch hot metal parts |
| Warranty | 24 months |
Frequently Asked Questions - WM600 Wafelijzer INVENTUM
User questions about WM600 Wafelijzer INVENTUM
0 question about this device. Answer the ones you know or ask your own.
Ask a new question about this device
Download the instructions for your Waffle Maker in PDF format for free! Find your manual WM600 Wafelijzer - INVENTUM and take your electronic device back in hand. On this page are published all the documents necessary for the use of your device. WM600 Wafelijzer by INVENTUM.
USER MANUAL WM600 Wafelijzer INVENTUM
Legislation requires that all electrical and electronic equipment must be collected for reuse and recycling. Electrical and electronic equipment marked with the symbol indicating separate collection of such equipment must be returned to a municipal waste collection point.
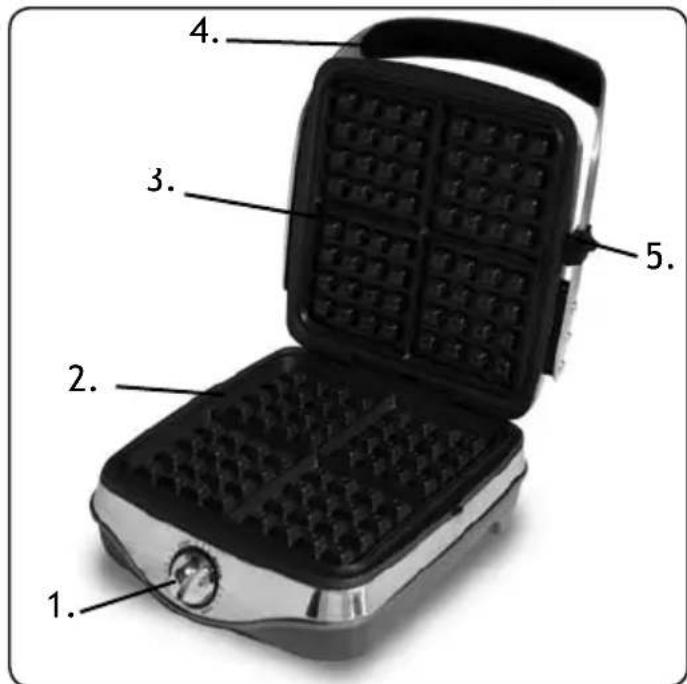
DESCRIPTION OF THE APPLIANCE PAGE 15
- SAFETY INSTRUCTIONS PAGE 15
- INTRODUCTION PAGE 16
- BEFORE FIRST USE PAGE 16
- MAKING WAFFLES PAGE 16
- CLEANING & MAINTENANCE PAGE 16
- FREQUENTLY ASKED QUESTIONS PAGE 17
- RECIPIES PAGE 17
GUARANTEE & AFTER SALES SERVICE PAGE 19
NEDERLANDS

1 | SAFETY INSTRUCTIONS
- Please read these instructions before operating the appliance and retain for future use.
- The appliance is intended solely for domestic use within the home.
- Attention! Avoid touching the metal parts. They become hot during use.
- Before plugging into a socket, check that the voltage in your home corresponds with the voltage printed on the bottom of the appliance.
- Never let the power cord of the appliance hang over the edge of a table or counter, touch hot surfaces or become knotted.
- Never place this appliance on or near a hot gas or electric burner or where it could touch a heated oven or microwave oven. Do not allow this appliance to touch curtains, wall coverings, clothing, dishtowels or other flammable materials during use.
- Always use the appliance on a secure, heat resistant, level surface.
- Never leave the appliance unattended when in use.
- Do not place anything on top of or underneath this appliance while it is operating.
- If the supply cord is damaged, it must be replaced by the manufacturer, its service agent or similarly qualified persons in order to avoid a hazard.
- The appliances are not intended to be operated by means of an external timer or separate remote-control system.
- For your own safety, only use the accessories and spare parts from the manufacturer which are suitable for the appliance.
- Always return the appliance after a malfunction, or if it has been damaged in any manner to the Customer Service Department for examination, repair or adjustment as special purpose tools are required.
- Never unplug it from the socket by pulling on the cable.
- Always ensure that your hands are dry before handling
the plug, switch or power cord.
- An electrical appliance is not a toy, and should therefore always be placed outside the reach of children. Children are not always able to understand potential risks. Teach children a responsible handling of electrical appliances.
Children should be supervised to ensure that they do not play with the appliance.
- This appliance is not intended for use by persons (including children) with reduced physical, sensory or mental capabilities, or lack of experience and knowledge, unless they have been given supervision or instruction concerning use of the appliance by a person responsible for their safety.
- Be sure to turn the appliance 'OFF' and unplugging it as soon as you have finished using it and when you are cleaning it.
- If an extension cord is used, check the marked electrical rating of the extension cord to the electrical rating on the appliance. Make sure that it can not be pulled on by children or tripped over unintentionally.
- Should you decide not to use the appliance anymore, make it inoperative by cutting the power cord after removing the plug from the socket. We also recommend making all potentially dangerous parts of the appliance harmless, particularly for children who might be tempted to play with it.
- Never use the appliance if it is not working properly, or if it has been damaged. Any intervention other than cleaning and normal maintenance by the customer must be carried out by an approved service centre.
- Never immerse the appliance, power cord or plug in water or any other liquid to protect against electrical hazards.
- If the appliance is used for other purposes than intended, or is it not handled in accordance with the instruction manual, the full responsibility for any consequences will rest with the user. Any damages to the product or other things are not covered by the warranty.

With this wafflemaker you can make four square Belgian waffles.
Opti-heat system:
the precision placement of the heating elements, along with the internal temperature sensor, helps maintain even heat across the waffle plates. This means you will enjoy evenly browned waffles, with a slight crust on the outside and a tender texture on the inside.
Exclusive LED system:
Our exclusive control lights gradually illuminate as your waffles cook to the selected level of browning - from light, to medium, to dark. So, as the lights appear, you will see the progress and know when your waffles are done without needing to take a peek inside.
Non-stick coating:
the premium non-stick coated waffle plates eliminate the annoyance of waffle batter that sticks. That means you won't waste time scraping bits of the waffle from the plates.
Auto-off timer:
for your safety, your waffle maker will automatically shut off if it is left on continuously for 60 minutes. If you're cooking a lot of waffles and need it to operate longer, simply turn the control 'OFF' and then turn it right back on.
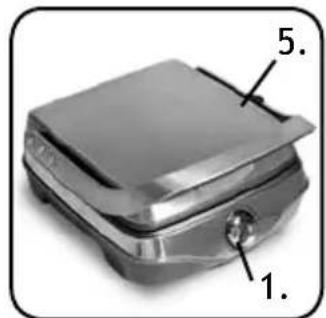
Upright storage:
save space in the kitchen with the convenient upright storage of the waffle maker. Just close the waffle maker, slide the locking lever into the locked position, and tuck the waffle maker away standing upright for space saving convenience.
3 BEFORE FIRST USE
Before you use the appliance for the first time, please do as follows: Carefully unpack the appliance and remove all the packaging material. Keep the material (plastic bags and cardboard) out of reach of children. Check the appliance after unpacking for any damage, possible from transportation. Place the appliance on a heat resistant flat and stable surface.
Clean the outside of the appliance and the waffle plates with only a damp cloth and dry it with a dry cloth.
Before plugging into a socket, check that the voltage in your home corresponds with voltage printed on the appliance.
4 | MAKING WAFFLES2 | INTRODUCTION
Prepare a waffle batter. You can use your own recipe or a recipe you will find in this instruction manual.
-
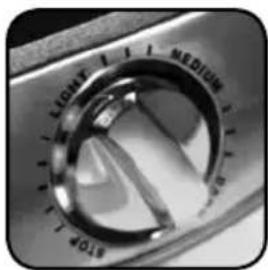
Choose the desired shade setting. Turn the control knob clockwise to the desired level of browning - light, medium or dark.
-
Allow the waffle maker to preheat. As the waffle maker preheats, the lights between 'OFF' and your chosen setting will gradually illuminate. Once the light next to your chosen setting illuminates, the waffle maker chime will sound, indicating that it is ready to cook waffles.
-
Add batter to the waffle maker. Open the waffle maker, using an oven mitt, and pour approximately two ladles of waffle batter evenly over the bottom plate. Use a temperature resistant nylon or wood utensil to spread the batter evenly over the bottom plate. Close the waffle maker.
Note: the premium non-stick finish of the waffle plates means that you do not need to grease the waffle plates - not even the first time you use it.
Attention: when pouring batter or removing waffles from the waffle maker, prevent the waffle maker from accidentally closing by holding the handle for the upper waffle plate with an oven mitt.
As the waffles cook, the LED lights gradually illuminate to your selected level of browning - from light to medium to dark. As the lights appear, you will track the progress of your waffles cooking, and know when they are done - without peeking inside.
- Remove the waffles. When the waffles are done, a chime will sound. Open the waffle maker and remove the waffles carefully with a heat resistant nylon or wood utensil.
When you are done baking, turn the control knob back to 'OFF' and unplug the appliance.
5 | CLEANING & MAINTENANCE
Make sure that before cleaning or storage the control knob is turned to 'OFF' and the appliance is unplugged. After use, allow the waffle maker to completely cool before cleaning or storing.
Clean the housing and the waffle plates with a clean, damp cloth.
Metal utensils will damage the non-stick coating. Use only non-metal, temperature resistant utensils, such as wood or nylon.
Never use any abrasives for cleaning the appliance. Never immerse the appliance, power cord or plug in water or any other liquid to protect against electrical hazards.
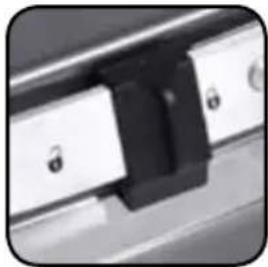
Your waffle maker includes a locking feature that holds the waffle maker together so you can conveniently store it upright. Allow the waffle maker to cool completely. Clean the waffle plates and housing as need. Close the waffle maker. Slide the storage lock lever to the locked position.

6 | FREQUENTLY ASKED QUESTIONS
The waffles I made were rounded on the edges instead of square. What happened?
You probably didn't use enough waffle batter. The waffle maker takes about two ladles of batter per batch, though you may need to experiment to determine the right amount for the way you like to make waffles. Be sure to use a heat resistant nylon or wood utensil to spread the batter evenly over the bottom plate so that all of the corners are filled. This will ensure that every waffle is beautifully shaped.
My waffles stuck to the grates. What did I do wrong? Be sure you preheat the waffle maker before adding the batter. Turn the knob to the desired level of browning and then wait until all of the lights between 'OFF' and that setting are illuminated and the chime sounds.
If I want to make two waffles instead of four, can I fill half of the waffle maker at a time?
Yes, simply use half the amount of batter and pour it over half of the waffle plates.
Is it important to follow the waffle recipes in this guide, or can I use my own waffle recipe? Use any of your favorite waffle recipes, and then try some of ours. We have creative ideas we're sure you will love. Waffles are great for breakfast, lunch and even dessert.
7 | RECIPIES
Basic-recipe for Belgian waffles
100 gram butter
½ litre milk
10 gram baking powder
75 gram brown sugar
300 gram flour
2 eggs a pinch of salt icing sugar
Make sure that all the ingredients are at room temperature. Mix the butter in a large bowl with the brown suger and the salt. Add the eggs one by one through the mixture. Stir in carefully half of the milk. Mix the baking powder with the flour and sift it over the egg mixture and stir the flour through. Add the rest of the milk.
Preheat the waffle maker and follow the instructions in chapter 4 'MAKING WAFFLES'. Take the waffles out of the waffle maker when they are ready and sprinkle them generously with the icing sugar.
Whole wheat waffles
125 gram plain flour
250 gram whole wheat flour
50 gram quick cooking oats
1 tablespoon corn flower
2 tablespoons brown sugar
112 teaspoon baking powder
12 teaspoon salt
250 ml low fat milk
50 ml low fat yogurt
1 tablespoon vegetable oil
1 large egg, beaten
Make sure that all the ingredients are at room temperature. In a large mixing bowl combine the flours, oats, corn flour, brown sugar, baking powder and salt. Mix well.
In a separate bowl combine the milk, yogurt, oil and egg together. Mix well. Add the liquid mixture to the flour mixture. Stir until thick and smooth.
Preheat the waffle maker and follow the instructions in chapter 4 'MAKING WAFFLES'. Take the waffles out of the waffle maker when they are ready. Try one of the following delicious toppings too.
Fruity nut topping (2 pers.)
1 cup strawberries, chopped
1 cup blue berries
1 / 4 cup roasted pecan nuts
112 cup honey
Place all the ingredients in a medium sauce pan and warm on medium heat. Pour the warm topping over the waffles and serve.
Orange Maple Syrup (for 6 to 8 waffles)
1 cup real maple syrup (not maple-flavored)
3 tablespoons butter
Zest of 1 large navel orange
Juice of 12 of large navel or
Place all the ingredients in a medium sauce pan and warm on medium heat. Pour the warm topping over the waffles and serve.
Chunky Apple topping (for 4 waffles)
2 cups apples, peeled, coarsely chopped
2 teaspoons lemon juice
4 tablespoons butter
125 ml water add sugar and cinnamon to your own taste
Combine lemon juice and apples. Preheat an omelette pan over medium heat. Add butter and heat. When butter is bubbling briskly, add apples. Cook for 3 to 4 minutes, stirring occasionally.
Dissolve sugar in water and add to the apple mixture. Cook and stir an additional 3 to 4 minutes or until apples are tender and the liquid is thick and syrupy. Pour over waffles and serve.
Whipped cream, a mixture of fresh fruit, chocolat or a combination can also be used for a topping.
Enjoy!
GARANTIE & SERVICE
- This product is guaranteed for a period of 2 years from the date of purchase against mechanical and electrical defect.
- Guarantee can only be given if proof of purchase (e.g. till receipt) can be shown. Therefore keep it in a safe place. The guarantee period starts at date of purchase.
-
Guarantee is not valid in case of:
-
normal wear;
- damage through misuse use or when the instructions were not followed correctly;
- lack of maintenance;
- not following the operation- and safety instructions;
- incompetent montage or repairs made by yourself or others;
-
using accessories and spare parts which are not suitable for the appliance; for assessment by our technical department.
-
The guarantee is not valid for:
-
normal wear;
external cables; - (interchangeable) signal- and controllamps for assessment by our technical department.
Return to your supplier of send the appliance, including a copy proof of purchase and description of the complaint, stamped to:
Inventum Holland BV
new E.T.P. bvba
Generatorstraat 17
Passstraat 121
3903 LH VEENENDAAL
9100 Sint Niklaas
THE NETHERLANDS
BELGIUM
AVC Service GmbH
Hohenstrasse 24
70736 Fellbach
GERMANY
- Pack it carefully (preferably in the original carton).
Ensure unit is clean. - Enclose your name and address and quote model number on all correspondence.
When the guarantee is no longer valid or when the period of guarantee has passed, we will charge any costs that flow out of an assessment and/or repairing.
On request we will supply a statement before repairing. Without requesting a statement, we assume that you, by sending the appliance, automatically order to repair the appliance.
A guarantee period of two months is valid for repairs done by our technical department and the used spare parts, counting from the repairdate. When a malfunction occurs within this period which directly flows out of the repairs and the used spare parts, the consumer has the right of repairs without any costs.
Inventum Holland BV