
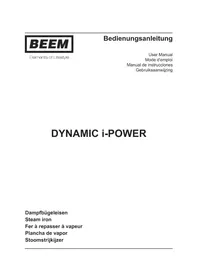
Power Generator EVO3 ProC - Iron BEEM - Free user manual and instructions
Find the device manual for free Power Generator EVO3 ProC BEEM in PDF.

| Product type | Steam station iron |
| Brand | BEEM |
| Model | Power Generator EVO3 ProC |
| Power supply | 220-240 V ~ 50/60 Hz |
| Power | 2000-2400 W |
| Water tank capacity | 1.0 liter |
| Soleplate | Ceramic coating |
| Temperature setting | Electronic with LED display (5 levels) |
| Steam flow | 3 levels: Low, Middle, High |
| Functions | Steam ironing, dry ironing, vertical steaming |
| Safety | Automatic shut-off (20 min), safety valve, anti-drip system |
| Filter | Replaceable anti-scale cartridge (replacement indicator light) |
| Cleaning | Descaling recommended with demineralized water |
| Included accessories | Removable water tank, anti-scale cartridge, iron rest |
| Spare parts available | Water tank (orange/gray), anti-scale cartridge, rubber foot |
| Warranty | 24 months (domestic use) |
| Certifications | TÜV Süd, CE (EMC, low voltage, RoHS, WEEE) |
| Weight | Approximately 4.5 kg (estimate) |
| Dimensions (L x W x H) | Approximately 35 x 25 x 30 cm (estimate) |
Frequently Asked Questions - Power Generator EVO3 ProC BEEM
User questions about Power Generator EVO3 ProC BEEM
0 question about this device. Answer the ones you know or ask your own.
Ask a new question about this device
Download the instructions for your Iron in PDF format for free! Find your manual Power Generator EVO3 ProC - BEEM and take your electronic device back in hand. On this page are published all the documents necessary for the use of your device. Power Generator EVO3 ProC by BEEM.
USER MANUAL Power Generator EVO3 ProC BEEM
natural_image
Exterior view of two power generators (EVO® PRO-C) ironing machines, no visible text or symbols on the devices themselves.- Introduction.... 16
- About these instructions....16
- Description of utensil, components, illustrations.... 17
- Important safety instructions.... 18
- Prior to initial use 19
- Use.... 19
6.1 Preparation....20
6.2 Steam ironing 21
6.3 Vertical steam ironing 21
6.4 Dry ironing 22 - Faults and troubleshooting 22
- Cleaning 23
8.1. Cleaning after use....23
8.2. Descaling 24
8.3.Filter system 24 - Disposal 24
- Technical data....25
- Certifications.... 25
- Guarantee, service, repairs 25
- Replacement parts and accessories 27
- Wiring diagram....52
- European Conformity Declaration 53

Sommaire
Zahlenschlüssel
The Steam Generator EVO ^3 comes with a number of innovative features to make your ironing much easier:
- iron sole with ceramic coating,
• electronic temperature setting with LED display,
• 3 different steam pressure levels,
• transparent, removable water tank with a capacity of 1,000 ml,
• automatic switch-off function,
• electronic filter change indicator, - heat-resistant iron stand on the station,
- safety pressure release valve.
We wish you every success with it.
2. About these instructions
The utensil is equipped with safety devices. Nevertheless, please carefully read the safety instructions and only use the appliance as described in these instructions so as to avoid inadvertent injuries or damage.
Keep these instructions safe for later reference. If the appliance is given to another person, these instructions must also be included with it.
Safety terms in these instructions:
The signal word DANGER warns of potentially serious injuries and a risk to life.
The signal word WARNING warns of injuries and serious material damage.
The signal word CAUTION warns of minor injuries or damage.
3. Description of utensil, components, illustrations
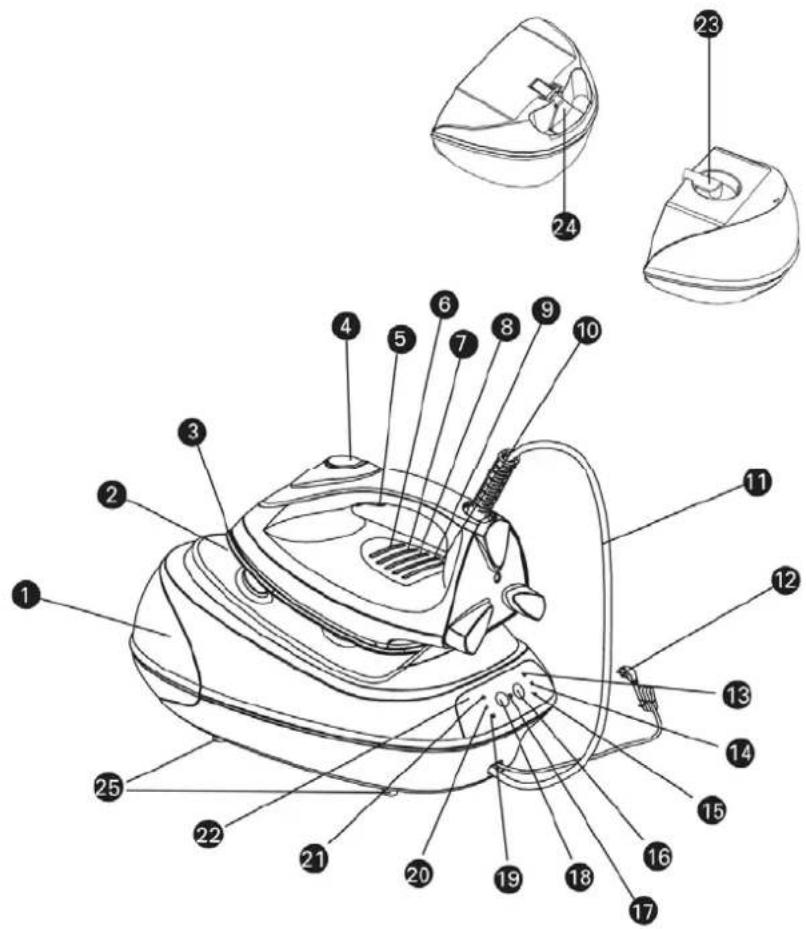
Key to numbers
- removable water tank
- iron sole
- steam pressure button
- temperature control lamp 2
- temperature control lamp 4
- steam pipe
- indicator for maximum steam
- indicator for low steam
- pilot lamp
- filter change indicator
- indicator for temperature/heating
-
filter cartridge
-
rest for iron
- temperature regulator
- temperature control lamp 1
- temperature control lamp 3
10.temperature control lamp 5 - mains lead
- indicator for medium steam
16.steam volume regulator - on/off switch
- indicator for pump function
- control panel
- release knob for water tank
- rubber feet
4. Important safety instructions
Intended use
- This utensil is only intended for domestic use. Commercial use prohibited.
- This utensil is intended exclusively for ironing clothing and textiles.
DANGER FOR CHILDREN
- Particular care should be taken if the utensil is used near children.
- The utensil should be placed beyond the reach of children.
- Keep children away from the packaging. Dangers can include suffocation!
HAZARD FROM ELECTRICITY
- To avoid the risk of fire, electric shock and personal injury, do not use the utensil in the open air, and do not immerse it in water or other liquids.
- Before connecting the utensil to your power supply, you should ensure that the voltage indicated on the rating plate matches that of your power supply.
- If an extension cable is required, use an extension cable with a 15 amp fuse to avoid overheating of the cable and subsequent damage.
- The utensil should only be connected to a properly earthed mains power supply.
- We recommend that the utensil be connected to a separate electrical circuit.
- Never pull on the cable to disconnect the utensil from the power socket. Always pull the plug.
- Do not allow the mains lead to hang over sharp edges or hot surfaces.
- For safe operation of the steam generator, the power cable and the steam pipe must always be wound off without twisting and kinking.
- Never attempt to repair the unit yourself, and never use it if the plug or cable is damaged, if it is not working properly, or if there is another type of damage. Send or take the utensil to an authorised dealer. Attempts at repair by unauthorised persons will lead to invalidation of the guarantee entitlement.
- Switch the utensil to the standby mode before pulling out the mains plug.
-
Pull the mains plug out of the socket,
-
if you are not using the utensil
- when you leave the room,
- if a fault occurs during use,
• before filling the utensil with water or emptying the water tank,
• before cleaning the utensil.
WARNING of burns/ fire
- Never operate the utensil unattended.
- Never use the utensil near to a source of heat or steam, or close to flammable materials.
- Coming into contact with hot metal parts, hot water or steam can cause burns.
- Never fold and wind the steam pipe and please bear in mind that it can get very hot.
- Never point the iron at persons when you are using the iron's steam functions.
- Never iron clothes on the body.
- Pull the plug out and allow the utensil to cool before putting it away.
- If the iron is placed on the steam generator during use, the rest surface of the steam generator will get hot. Never touch the rest or the sole of the iron with your hands before they have cooled down completely.
WARNING of injuries from other causes
- Do not allow the mains lead to hang over projections (trip-wire effect).
CAUTION - Material damage
- Place the steam generator on a heat-resistant, sturdy, level, water-proof surface.
- Always place the steam iron horizontally on the steam generator. The hot iron may not come into contact with the power cable, the steam pipe or the plastic parts of the steam generator.
- The water tank may only be filled with water. Never fill with other liquids.
- Never place the utensil near a gas flame, electric hotplate or other source of heat. External heat can damage the utensil.
ATTENTION: No liability can be accepted for any damage caused by misuse.
5. Prior to initial use
- Ensure that all the packaging has been removed from the utensil (protective foil, etc.).
- Do not remove the rating plate or any warnings.
CAUTION: Check that the utensil is undamaged and that no parts are missing. If any components are damaged, the utensil should not be used. Contact qualified service personnel.
- Some parts of the utensil carry residue of assembly grease. Therefore there may be some smell and smoke the first time the utensil is used.
A new iron may splash or spit when using tap water. This stops after using a few times.
6. Use
- The automatic switch-off function switches the utensil off after about 20 minutes if you do not press the steam pressure button. The utensil beeps twice and all the indicators go out. Press the ⏻ button to switch the utensil back on.
- The anti-drip system prevents water from dripping from the sole of the iron when the temperature is too low. However, water still drips if:
o the temperature is on the lowest temperature setting and the steam is on.
- The ceramic coated iron sole glides smoothly over the fabric when ironing. Please bear the following in mind:
o Never iron over zip fasteners, rivets or buckles, these can scratch the sole.
- Wipe off the sole occasionally with a damp cloth. Do not use abrasive cleaning agents.
- Always stand the iron on the steam generator for storing.
- The electronic temperature setting ensures an accurate temperature control. The display flashes whilst the iron is heating up. On reaching the temperature, the selected temperature level lights continuously. Clicking noises whilst ironing are normal. Use the table below for setting the temperature and observe the ironing instructions on the clothing labels.
| Steam quantity adjustment (on the iron station) | Temperature adjustment (on the iron) | Textile / Fabric | Recommendations |
| • | Iron off | ||
| Iron dry (steam ironing not possible) | Synthetic | • Synthetic fibre• Acetate• Nylon (polyamide)• Acrylic• Acetate (artificial silk)• Viscose• Silk• Rayon (polyester) | Iron dry and preferably inside out. |
 | Wool/ Silk | • Wool• Silk | Place a cloth over the material when ironing and preferably iron inside out. |
 | Cotton/Linen | • Cotton• Linen• Ramie | Iron whilst still slightly damp. |
  [CSKY] [CSKY] | MAX | • Cotton• Linen• Ramie | Generally insensitive and ideally suited to steam ironing. |
NOTE: Please bear in mind that the utensil needs some time to cool down when you reduce the temperature setting.
- First check whether the item of clothing has a label with ironing instructions. (The ironing instructions are on a label with an iron symbol. The number of dots indicates the correct temperature.) Always observe the instructions on the label and in the settings table.
- If the item of clothing has no label but you are familiar with the material, observe the table above. The table refers to the basic material and not to any coatings or gloss applications.
- Textiles with special surfaces (smooth, creased, etc.) should be ironed at low temperatures.
- If an item of clothing is made from different materials, always choose the lowest specified ironing temperature. An item of clothing with 60% polyester and 40% linen should be ironed at the temperature for polyester and without steam.
- Sort the materials according to the ironing temperatures. Wool to wool, cotton to cotton, etc. The iron heats up quicker than it cools down. Therefore you should iron materials with lower ironing temperatures first. Then iron the materials with higher ironing temperatures.
6.1 Preparation
- Make sure the mains plug is removed.
- Place the steam generator where you want to use it.
- Press up the release knob in the recessed handle of the water tank and pull the water tank out of its rest.
-
Take the filter cartridge out of the tank opening.
-
Fill the water tank with approx. 1 l of water, up to the MAX mark at the most. The water tank may only be filled with water. Never fill with other liquids. For extremely hard water, we recommend a mixture of 50% tap water and 50% distilled water. Do not add vinegar, additives or descaling agents or other chemicals.
- Reinsert the filter cartridge in the water tank.
- Push the water tank into the rest until you feel it snap in (click).
- Place the iron on the rest of the steam generator.
- Switch the steam generator on by pressing the ⏻ button. The red indicator on the steam generator lights up and indicates that the utensil is switched on. It goes out again when the utensil is switched off. At the same time the Heat indicator lights up, indicating that the utensil is heating up.
- Set the temperature of the iron to at least wool/silk. The temperature control lamp of the selected level flashes. As soon as the set temperature is reached, the display lights continuously.
- When switching on, the steam volume regulator is automatically in the ☑Low position. Do not set a higher level yet.
- Wait until the Heat indicator on the steam generator goes out.
NOTE: The indicators switch on and off frequently during ironing when the utensil reheats.
- Switch the steam volume regulator to 🔒High and wait again until the Heat indicator goes out.
- Press the steam pressure button for about 20 seconds. Wait 30 seconds and press the steam pressure button again for 20 seconds. The steam generator system is cleaned, air pumped out and water pumped into the system. You will hear a loud vibration and pumping noise which quickly disappears as soon as the air has been evacuated from the pipes. This may take 1 or 2 minutes. The pumping noise during operation is normal.
- Always operate the utensil with the low steam volume of level ◆Low for about 2 minutes at the start before setting to the higher ◆Middle or ◆High levels.
6.2 Steam ironing
- Prepare the utensil as described in 6.1.
- After preparation, leave the steam volume on Low or select the desired steam volume Middle or High.
- Set the desired temperature on the iron. You can start ironing when the temperature control lamp on the iron lights continuously.
- Set the iron to level • to switch off and replace it on the steam generator.
- Press the ⏻ button on the steam generator and then pull out the mains plug.
- Empty the water tank as described in chapter 8.
6.3 Vertical steam ironing
Vertical steam ironing is particularly suitable for hanging items of clothing (coats, jackets, suits), curtains and for removing creases.
- Prepare the utensil as described in 6.1.
- After preparation, leave the steam volume on Low or select the desired steam volume Middle or High.
- You obtain the maximum steam emission when you set the steam volume regulator on the steam generator to High and the temperature of the iron to the MAX position.
- Hold the iron vertically 5 cm to 15 cm away from the item to be ironed and press the steam pressure button. Move the sole of the iron continuously up and down over the material.
- Keep the steam pressure button pressed for 1 minute at the most. See the instructions for the steam iron.
- If no more steam emerges, wait until the heating indicator on the steam generator goes out.
NOTE: Hang the washing to be ironed where heat and moisture cannot cause any damage. Never hang the washing in front of wallpaper, windows or mirrors.
ATTENTION: The steam pipe gets hot after long steam operation.
- Use the same procedure as for normal steam ironing to switch off.
6.4 Dry ironing
- Put the plug into the socket.
- Switch on the steam generator. The indicator light comes on and a beep tone is sounded.
- Press the steam volume button until all the steam indicator lights are off.
- Select the desired ironing temperature with the temperature selector switch. The selected setting flashes whilst the iron is heating up. The ironing temperature is reached when it stops flashing.
NOTE: Press the steam button about every 15 minutes, otherwise the automatic switch-off function will become active and the utensil switch off.
- Set the iron to level • to switch off and replace it on the steam generator.
- Press the ⏻ button on the steam generator and then pull out the mains plug.
7. Faults and troubleshooting
The utensil is equipped with a safety valve. If the steam pipe is blocked, the safety valve opens and the steam escapes under the utensil. This produces a high whistle. If this is the case, switch off the utensil immediately, pull out the plug and check the steam pipe for possible damage or kinks. If you cannot find anything wrong, clean the utensil as described in section 8 and change the filter cartridge (section 8.3).
| Faulty function | Possible reason Remedy | |
| The steam iron stays cold. | The utensil is not switched on. Switch | the utensil on with the on/off switch on the steam generator. |
| The temperature is on •. Set the necessary temperature. | ||
| The utensil does not produce steam. | The steam generator is not switched on. | Switch on the steam generator. |
| The filter is not inserted in the water tank. | Insert the filter in the water tank. | |
| The water tank has hardly any water in it or is empty. | Fill with water. | |
| The water tank is not inserted in the steam generator correctly. | Insert the water tank so that it clicks in audibly. | |
| Water drips from the sole of the iron. This is normal when starting ironing or after short breaks (cold hose and the steam condenses). | The steam pressure button has been kept pressed for too long and the Heat indicator on the steam generator lights up. | Wait until the iron has reheated. The Heat indicator on the steam generator goes out. If this does not help, select a lower steam volume briefly. |
| The temperature of the iron is off (position •) or too low (position Synthetic). | At least level Wool/Silk must be selected for steam ironing. Select a higher temperature on the iron. | |
| The iron has not yet reached the temperature necessary for ironing. | Wait until the temperature control lamp on the iron no longer flashes. | |
| The steam volume is higher than necessary. | Set the steam volume as specified in the table. | |
| Limescale emerges from the steam nozzles. | The water is too hard or the utensil has been in use too long without descaling. | Descale the iron as described in section 8.2. |
| The anti-limescale cartridge is used up. | Change the anti-limescale cartridge. | |
| All lamps on the utensil go out. | The utensil has switched off automatically. | Press the on/off button to switch the utensil back on. |
| There is not steam, the pump indicator light goes off when you press the steam button. | The steam chamber has not yet heated up. | Wait until the Heat indicator goes out. |
| The steam volume regulator is at off. | Press the button of the steam volume regulator until one of the three steam symbols lights up. | |
| The utensil cannot be switched on. | Mains plug not plugged in or no power. | Plug in the mains plug or check the socket/house fuse. |
| Fuse blows | Utensil defective or too many devices connected. | Contact after-sales service or reduce number of appliances using the circuit |
8. Cleaning

WARNING
Risk of burns
Before cleaning, always remove the plug and allow the utensil to cool down. Only clean it when it has cooled down fully.
DANGER
Danger of death from electric shock
Never immerse the steam generator in water or other fluids.
CAUTION
Material damage
Never use aggressive or abrasive cleaning agents.
8.1. Cleaning after use
- Place the iron on the rest of the steam generator.
- Remove water reservoir (1) from the steam station and press steam pressure button (5) until no more steam comes out. Replace the water reservoir.
- Switch the iron and the steam generator off and pull out the plug.
- Rinse out the water tank with clean water.
- Let the utensil cool down (for about 30 minutes).
- Wipe off with a damp, soft cloth.
- Clean all the operating elements and other components also with a soft cloth.
- The sole can be cleaned with a damp cloth. It is best to use a cloth dipped in distilled water. Then wipe off the sole clean with a dry cloth. Never use scrubbing pads, vinegar or chemicals.
- Protect the sole of the iron against scratching. Do not iron over metal objects such as buttons or zip fasteners.
- We recommend you to always use distilled water or 50% tap water and 50% distilled water. All steam generators work more efficiently when distilled water is added.
NOTE: if the iron station is unused for a longer period, ensure that the filter cartridge (see chapter: Filter System) is removed and allowed to dry outside of the appliance.
8.2. Descaling
To rinse any limescale deposits from inside the utensil, operate the utensil with the water tank filled up to maximum about every 4 weeks with distilled water or with at least 50% distilled water. Hold the steam iron over a sink or a vessel which you can easily clean afterwards. Do not iron during cleaning. Proceed as follows:
- Set the temperature regulator of the iron to position •
- Set the steam volume regulator to the 🔒Low position first and press the steam pressure button until steam emerges. Then set the steam volume regulator to the 🔒High position and keep the steam pressure button pressed until as much water as possible drips from the sole of the iron.
- Repeat the process but then set the temperature of the iron to the MAX position and wait until the set temperature is reached (the temperature control lamp of the iron stops flashing). The rest of the limescale particles are flushed out with the emerging steam.
- If limescale should still emerge during ironing, the filter cartridge must be changed urgently.
8.3. Filter system
The filter cartridge reduces the formation of residue caused by ironing with water. This prolongs the life of the utensil. However, please bear in mind that regularly cleaning of the utensil is important.
The filter cartridge should be changed when the filter indicator flashes. Proceed as follows to change the filter cartridge:
- Remove the water tank and the cartridge.
- Insert a new cartridge and fill the water tank up to the MAX mark.
- Push the water tank back into its rest.
- Plug the mains lead back in and press the ⏻ button and the steam selector button at the same time. The filter indicator stops flashing.
9. Disposal
The following regulations may only apply for countries of the European Community.
Dispose of the packaging according to type. If you do not wish to keep the unit, dispose of it in accordance with the environmental regulations and current provisions.
The following standard provision applies for Germany and several EC countries:
This product is not to be treated as normal domestic refuse, but instead handed over to a collecting point for recycling electrical and electronic appliances corresponding to the provisions applicable in your country. Your municipal authority will provide you with information.
Several EC and non-EC countries have country-specific regulations for the disposal of old appliances. The authority responsible for this can provide you with information.
10. Technical data
Model: POWER GENERATOR EVO
^3 Pro-C
Model number: G-1030ST-E-CERAMIC
Power supply: 220-240 V \~ 50/60Hz
Power consumption: 2000-2400 W
Protection class: I
Protection type: IPX0
Capacity: 1.0 litres
We reserve the right to change the design and technology at any time. Misprints excepted.
11. Certifications

This utensil has been tested and certified by TÜV Süd.

This utensil complies with the EC Directive on Electromagnetic Compatibility (EMC) 2004/108/EC and the Low-Voltage Directive 2006/95/EC.

This device complies with the European Directive 2002/95/EC on the restriction and use of certain hazardous substances in electrical and electronic appliances (RoHS).

This device complies with the European Directive 2002/96/EC on the disposal of waste electrical and electronic appliances (WEEE).
12. Guarantee, service, repairs
This high quality product from BEEM has been made in accordance with the latest manufacturing methods.
We guarantee that this high-quality product is in perfect condition. We will remedy all material or manufacturing defects free of charge within the warranty period.
The warranty period for this product is 24 months.
With industrial or similar use e.g. in hotels, guesthouses or communal facilities, or when the customer is not a consumer in terms of the German Civil Code, the manufacturer provides a warranty of 6 months. This does not affect the warranty exclusion.
Warranty exclusion: the warranty specifically excludes defects that have been caused by incorrect manipulation, disregard of the operating instructions and safety notes, use of force, alterations, attempts at self-repair or repair attempts undertaken by unqualified third parties. Also excluded are defects caused by normal wear & tear.
Insofar as we are legally obliged to provide a warranty, we will either repair or replace the defective item free of charge – with rights of replacement or reduction in price being excluded. If it is not possible to repair the product after a number of attempts have been made, or if the replacement is also defective for reasons which are our responsibility,
then the customer is entitled to a reduction in price or, at his discretion, to withdraw from the contract. The warranty is not extended by availment thereof.
The dealer from whom you purchased the product is responsible in the first instance for swapping (exchange or replacement), return of the product (withdrawal from the sales contract) or reduction in the sale price. This is especially the case in the event of return or claims for reduction in price, since these must be settled with consideration for the sale price. Refund of the sale price in the event of return of goods, or issue of a credit note in the case of price reduction, can only be effected by the dealer from whom you bought the product.
If defects should transpire, contrary to expectations, please try first by telephone to clear up the problem. If the problem still remains please send the carefully-packed article to your dealer or to the customer service address given below. Include your full address, the product's type and model number and the serial number; these are to be found on the rating label. Describe as detailed as possible the defects or deficiencies. A machine-generated and dated sales receipt or invoice is to be enclosed with the product or spare parts order. Warranty services cannot be rendered without a machine-generated and dated sales receipt or invoice, either for repairs, spare parts or other claims.
Outside of Germany and especially in non-EC countries, send the article to your dealer or to your local distributor. You can obtain information from the customer service address below, preferably via email.
You can also arrange for repairs that are not covered by the warranty to be carried out by customer service - outside of Germany, via your dealer or distributor. These will be invoiced on their individual merits.
Consumable parts & materials can be ordered from your dealer or from the stated customer service address. Outside of Germany, please contact your dealer or distributor in the first instance.
Contact your dealer or the stated customer service department if you want product information or wish to order accessories or ask questions relating to service matters.
Outside of Germany and especially in non-EC countries, please contact your dealer or distributor in the first instance.
Please also use the internet. On our website www.beem.de can be found accessories, replacement parts and instruction manuals in various languages. Also further product information.
Customer service address, Germany:
BEEM GmbH, Customer Service Department, Dieselstrasse 19 – 21, D-61191 Rosbach Service telephone number: +49 1805-233600 | Service fax number: +49 1805-233699 (Service number subject to a charge, may vary according to the country) | Service email address: kundenservice@beem.de | Internet: www.beem.de
13. Replacement parts and accessories
| Number* | Article number Name of part | |||
| 1 900 | 286 001 | Water tank | including release knob; orange | |
| 1 900 | 286 004 | Water tank | including release knob; grey | |
| 23 | 900 | 286 | 006 Anti-limescale cartridge | |
| 25 | 900 | 286 | 036 Rubber foot | |
* as per the diagram in the utensil description (see above; Chapter 3)
Waiver: Translation of the binding original version of the Instructions in German language into English language for information purposes only.
1. Introduction
Chère cliente, cher client!
Descriptif
Cijfersleutel
We herewith confirm that this appliance complies with the standards of the European Electromagnetic Compatibility Directive (EMC) 2004/108/EG (EN55014-1/A2:2002, EN55014-2/A1:2001, EN61000-3-2/A2:2005, EN61000-3-3/A1:2001), and with the European safety regulations according to the European Low Voltage Directive (LVD) 2006/95/EG (EN60335-1/A13:2008, EN60335-2-3/A2:2008, EN62233:2008).


- Sommaire
- Zahlenschlüssel
- About these instructions
- Description of utensil, components, illustrations
- Key to numbers
- Important safety instructions
- Intended use
- DANGER FOR CHILDREN
- HAZARD FROM ELECTRICITY
- WARNING of burns/ fire
- WARNING of injuries from other causes
- CAUTION - Material damage
- Prior to initial use
- CAUTION: Check that the utensil is undamaged and that no parts are missing. If any components are damaged, the utensil should not be used. Contact qualified service personnel.
- Use
- Preparation
- NOTE: The indicators switch on and off frequently during ironing when the utensil reheats.
- Steam ironing
- Vertical steam ironing
- ATTENTION: The steam pipe gets hot after long steam operation.
- Dry ironing
- NOTE: Press the steam button about every 15 minutes, otherwise the automatic switch-off function will become active and the utensil switch off.
- Faults and troubleshooting
- Cleaning
- WARNING
- Risk of burns
- DANGER
- Danger of death from electric shock
- CAUTION
- Material damage
- Cleaning after use
- Descaling
- Filter system
- Disposal
- The following standard provision applies for Germany and several EC countries:
- Technical data
- Certifications
- Guarantee, service, repairs
- The warranty period for this product is 24 months.
- Customer service address, Germany:
- Replacement parts and accessories
- Introduction
- Descriptif
- Cijfersleutel
Brand : BEEM
Model : Power Generator EVO3 ProC
Category : Iron