
861354 - Oven Westfalia - Free user manual and instructions
Find the device manual for free 861354 Westfalia in PDF.
| Product Type | Oven |
| Brand | Westfalia |
| Model | 861354 |
| Power Supply | 230 V ~ 50 Hz, with grounding |
| Rated Power | 1500 W (estimated) |
| External Dimensions (approx.) | 45 x 35 x 30 cm (W x D x H) |
| Net Weight | 8 kg (estimated) |
| Oven Capacity | 25 liters (estimated) |
| Exterior Material | Stainless steel |
| Control Type | Rotary knobs |
| Cooking Functions | Conventional cooking, grill, convection (assumed) |
| Maximum Temperature | 250 °C (estimated) |
| Safety | Hot surface, mandatory grounding, do not immerse, supervision required for children |
| Care and Cleaning | Clean with a damp cloth, do not use excess water, unplug before cleaning |
| Supplied Accessories | Grid, drip tray (assumed) |
| Repairability | Have repaired by a qualified technician or customer service |
Frequently Asked Questions - 861354 Westfalia
User questions about 861354 Westfalia
0 question about this device. Answer the ones you know or ask your own.
Ask a new question about this device
Download the instructions for your Oven in PDF format for free! Find your manual 861354 - Westfalia and take your electronic device back in hand. On this page are published all the documents necessary for the use of your device. 861354 by Westfalia.
USER MANUAL 861354 Westfalia
natural_image
White microwave oven with open oven showing meat inside, placed on a reflective surface with fresh vegetables nearby (no visible text or symbols)
Instruction Manual
Stainless Steel Oven
Article No. 86 13 54


natural_image
Illustration of a person in a yellow patterned suit standing on water with a pipe, holding a tool, and another figure partially visible (no text or symbols)
Dear Customers
Instruction manuals provide valuable hints for using your new device. They enable you to use all functions, and they help you avoid misunderstandings and prevent damage.
Please take the time to read this manual carefully and keep it for future reference.
text_image
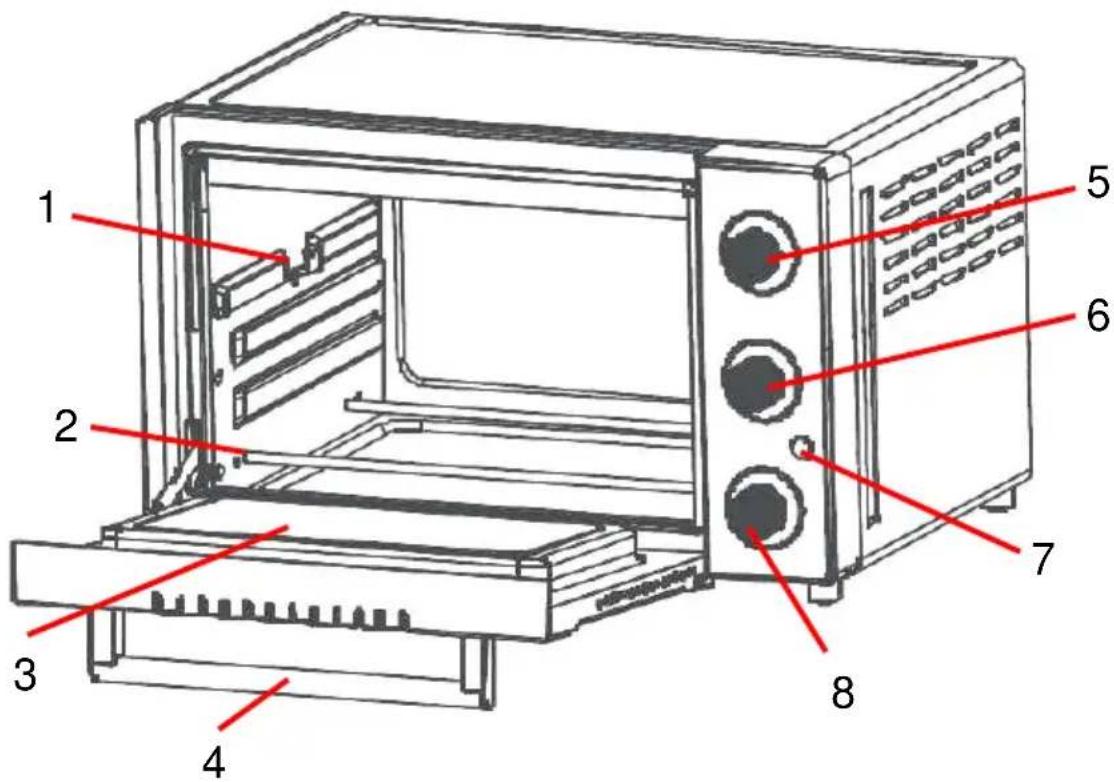
Technical diagram of a microwave oven with numbered parts labeled 1 through 8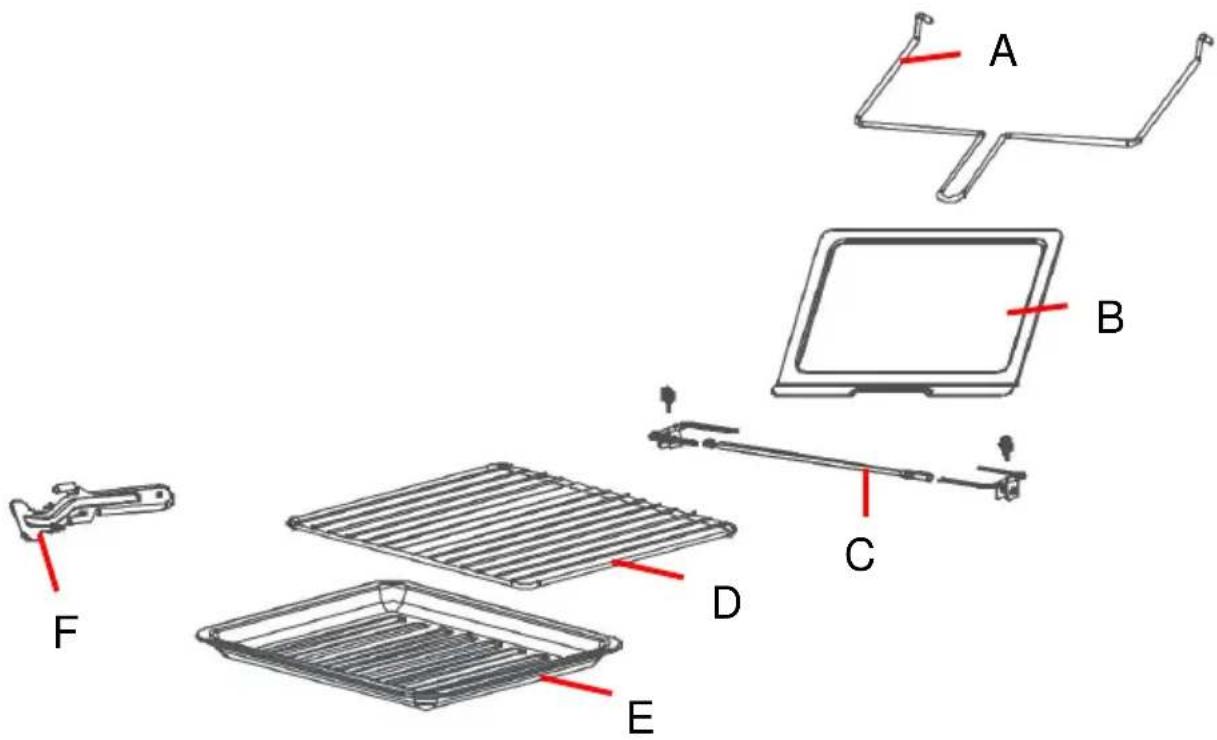
text_image
Exploded view diagram of a device with labeled parts A through F, including a tray and internal compartments.Assembling the Appliance and Heating up......Page 19
Operation......Page 20
Using the Rotisserie Spit......Page 20
Using the Pizza Stone......Page 21
Using the Crumb Tray....Page 21
Cleaning......Page 22
Technical Data......Page 23

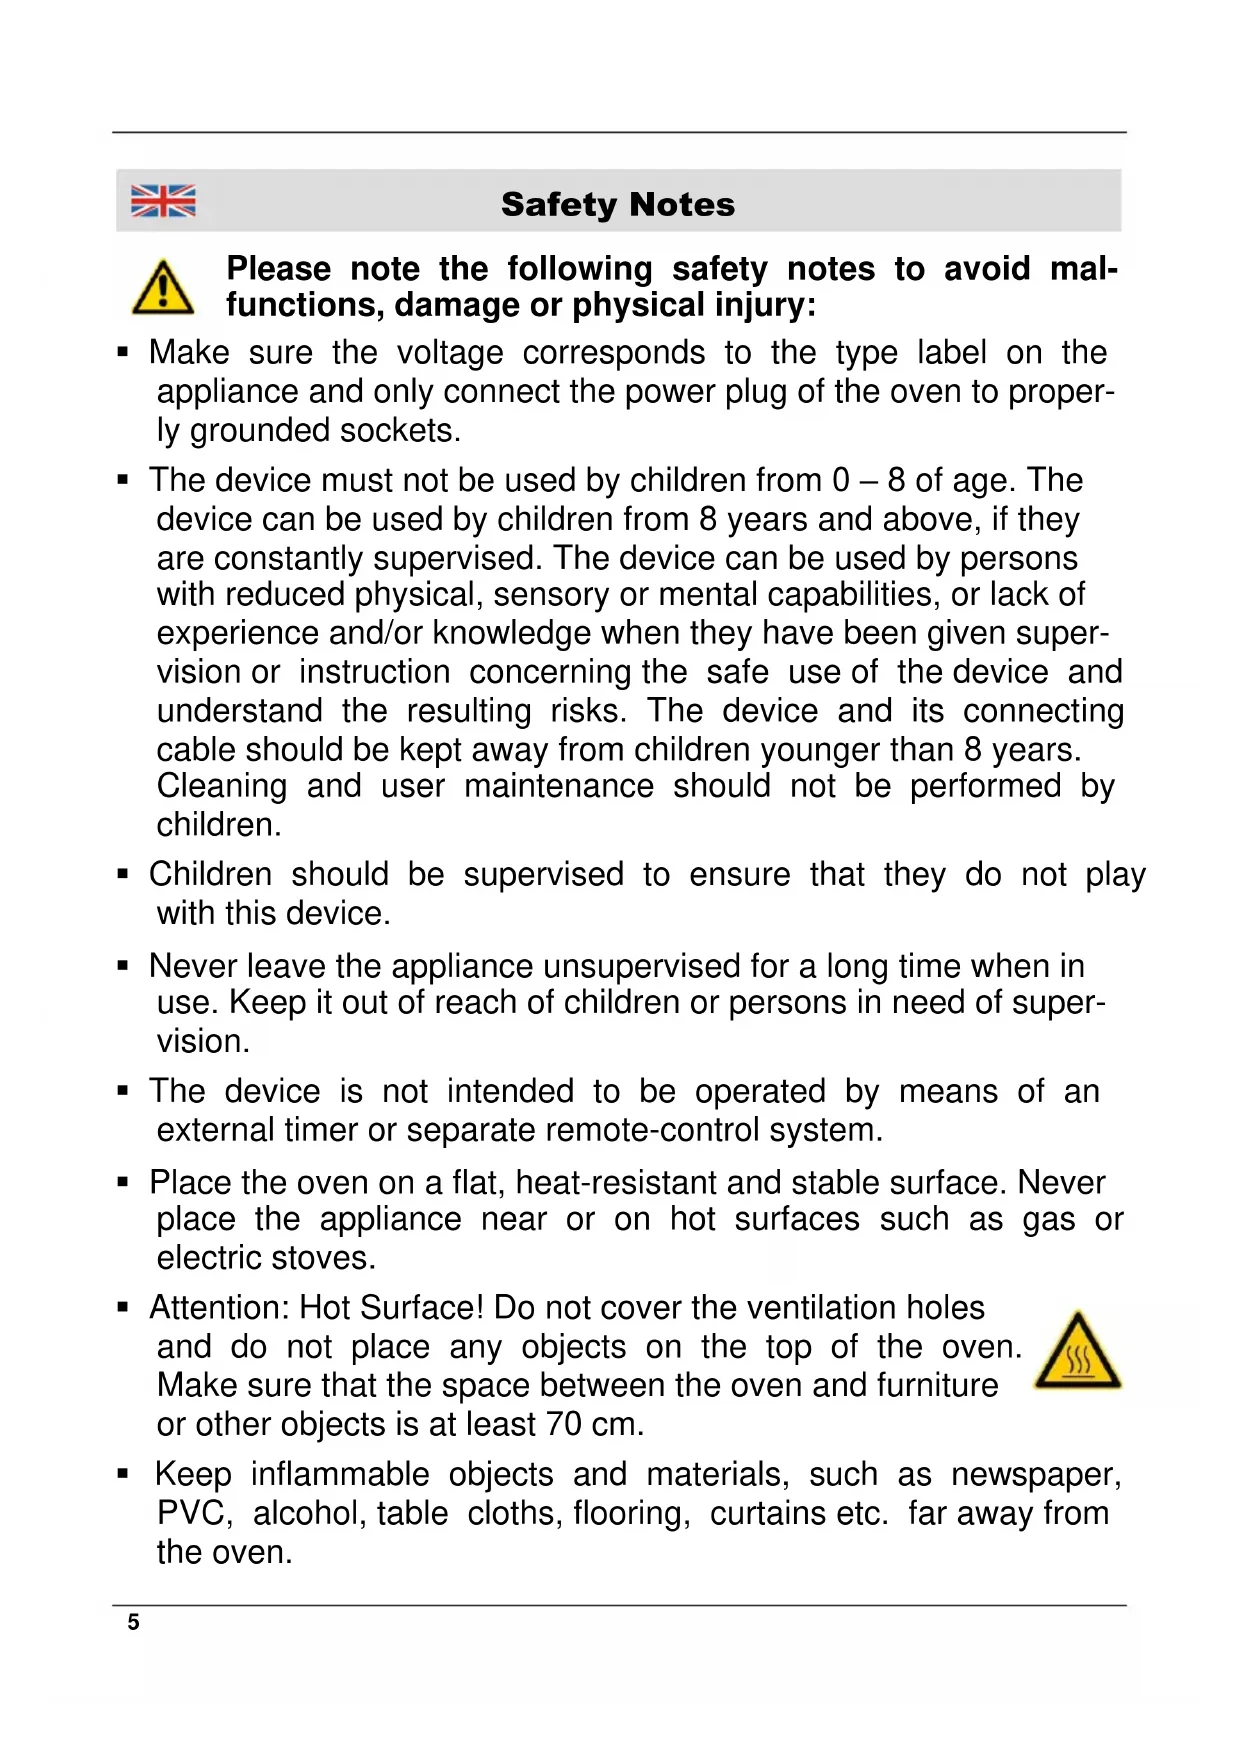
Please note the following safety notes to avoid malfunctions, damage or physical injury:
■ Make sure the voltage corresponds to the type label on the appliance and only connect the power plug of the oven to properly grounded sockets.
- The device must not be used by children from 0 – 8 of age. The device can be used by children from 8 years and above, if they are constantly supervised. The device can be used by persons with reduced physical, sensory or mental capabilities, or lack of experience and/or knowledge when they have been given supervision or instruction concerning the safe use of the device and understand the resulting risks. The device and its connecting cable should be kept away from children younger than 8 years. Cleaning and user maintenance should not be performed by children.
- Children should be supervised to ensure that they do not play with this device.
- Never leave the appliance unsupervised for a long time when in use. Keep it out of reach of children or persons in need of supervision.
- The device is not intended to be operated by means of an external timer or separate remote-control system.
- Place the oven on a flat, heat-resistant and stable surface. Never place the appliance near or on hot surfaces such as gas or electric stoves.
- Attention: Hot Surface! Do not cover the ventilation holes and do not place any objects on the top of the oven. Make sure that the space between the oven and furniture or other objects is at least 70 cm.
- Keep inflammable objects and materials, such as newspaper, PVC, alcohol, table cloths, flooring, curtains etc. far away from the oven.
[Non-Text]
Safety Notes
- Please switch OFF the appliance and unplug from the power supply before cleaning or when not in use.
- Protect yourself against electric shock. Never immerse the whole appliance, the plug, the power cord or the heating element into water or let them have contact with water or any other liquid.
- Do not splash water on the body or door when the oven is in operation.
- Please keep this appliance and his accessories clean at all times as they come into direct contact with food.
- Only use the included accessory. Do not store the accessory in the hot oven. Remove the accessory only with oven gloves from the hot oven.
■ Never move the appliance by pulling the cord.
■ Make sure the cord cannot get caught in any way. Do not wind the cord around the appliance and do not bend it. - Do not allow the cord to hang over the edge of a table or countertop, or to touch hot surfaces.
- Do not touch hot surfaces, risk of burn! Only open the glass door by grasping the door handle.
- Only use the control switches to operate/control the oven. Wait until the oven has completely cooled down before carrying or cleaning it.
- Do not operate the oven with a damaged cord or plug or when the oven malfunctions or has been dropped or damaged in any other manner.
- When cleaning the oven, only use a moistened cloth and do not splash too much water on the body or inside the oven. Make sure that the oven is completely dry before connecting it to the mains again.
- The device is not intended for continuous professional operation. The device is intended to be used in closed rooms only and in
Safety Notes
similar applications such as: staff kitchen areas in shops, offices and other working environments; farm houses; by clients in hotels, motels and other residential type environments; bed and breakfast type environments. The use in any other way is not considered as intended use.
- Should the appliance become damaged do not use it and have it repaired by a professional or contact our customer support department. Do not disassemble the appliance or try repairing it yourself.
- The unit is intended for use up to 2000 m above sea level.

natural_image
Close-up of a metallic tool interacting with a U-shaped metal bracket (no visible text or symbols)Remove the oven and all accessories from the packaging. Please check the cooking chamber, too. Please keep packing materials away from infants. There is danger of suffocation! Clean all parts of the appliance before using the first time as described below in the chapter "Cleaning".
Assembling the Appliance and Heating up
- Make sure the oven sits steadily on a solid, level surface. Make sure that there is enough space around the oven and that the ventilation holes are uncovered.
- Plug the appliance into a wall socket. The oven is now ready for use.
- Turn the TEMP switch (5) to of 230^ C. Turn the TIME switch (8) up to the end (up to 90 min.) clockwise and then turn back the switch to the setting 15 minutes. Let the oven to heat up for 15 minutes.
- Turn the FUNCTION switch (6) to the setting Upper Heat + Lower Heat + Convection.
The smell is harmless and disappears in a while. Make sure, there is sufficient ventilation in the room.
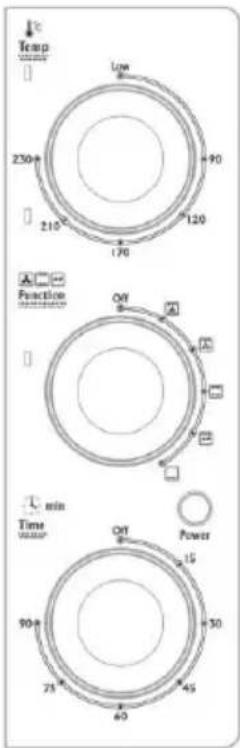
text_image
Temp 230+ 210- 170 Low 90 120 OFF A C D Power 90+ 75- 60 Time min TIME W/WRP + 15 + 30 + 45
flowchart
graph TD
    A["Start"] --> B["Step 1"]
    B --> C["Step 2"]
    C --> D["Step 3"]
    D --> E["Step 4"]
    E --> F["End"]
Upper Heat + Lower Heat + Convection
Upper Heat + Convection + Rotisserie Spit
Upper Heat + Lower Heat
Upper Heat + Rotisserie Spit
Lower Heat
Using
Operation
- Place the oven grid into the desired shelves/level and insert the ovenware on the grid. When using ovenware, make sure that the material is heat-proof and fits in the oven. The ovenware must not touch the glass door.
- Close the oven door. Select the desired temperature and turn the TIME switch (8) clockwise up to the end (up to 90 min.) in order to set the time. Now turn back the switch to the desired time.
- Turn the FUNCTION switch (6) to the desired position for Upper Heat + Lower Heat + Convection.
- Now, select the desired temperature using the TEMP switch (5).
You can check the cooking process through the heat-proof glass door. Do not open the glass door during cooking to avoid heat wastage. Never place any objects on the glass door.
After the set time you will hear an alarm signal and the oven automatically switches off. The power indicator (7) switches off, too.
To abort the cooking process, turn the TIME switch counter clockwise to the position Off, until you hear a sound. Turn the TEMP switch counter clockwise to position Low.
For removing the tray or the oven grid, use oven mitts or the provided handle! Please note the oven will be hot. There is risk of burns!
Using the Rotisserie Spit
- Stick the rotisserie spit (C) through the roast/poultry and put the rotisserie-forks on the spit.
- Hand tight the wing screws in order to secure the meat during grill process.
- Insert the crumb tray (B) into the oven in order to collect dropping fat.
Using
-
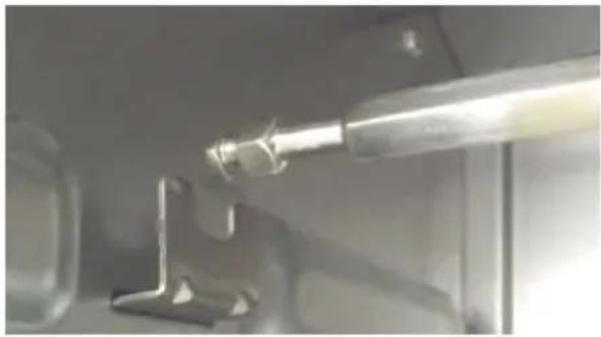
Place the rotisserie spit with the gripper (A) into the provided supports (1). First insert the spiky side of the spit into the right opening and then insert the other end of the spit into the left rotisserie support.
-
Select the desired temperature and time and close the glass door.
-
For removing the roast/poultry only use the gripper!
natural_image
Close-up of a metallic tool interacting with a metal bracket (no visible text or symbols)Left Rotisserie Support
Using the Pizza Stone
- Use the pizza stone for bread or pizza. Heat up the pizza stone before using. The longer you heat up the pizza stone, the less time is required for baking the pizza.
- Place the pizza stone on the oven grid and lightly flour the stone.
- Place the pizza, bread or similar on the stone. Please note that fatty toppings can discolour the stone. This does not impact the function of the pizza stone.
- Attention: The pizza stone is not break-proof! Do not drop the stone and do not hit the edges. Avoid strong variations in temperature. Do not immerse the hot pizza stone in cold water!
- The pizza stone becomes very hot! When placing the stone on the table always place a heat-proof mat under the stone.
Using the Crumb Tray
When using the rotisserie spit (C) and the oven grid (D) always insert the crumb tray into the oven. Crumbs and dropping fat can be collected in the crumb tray (B). Clean the crumb tray after each use.
When using ovenproof dishes for cooking, preferably always use the crumb tray. By doing this overflowing sauces and fat will not drop on the heating elements and on the bottom of the oven.
Using
Cleaning
■ Before cleaning the appliance always unplug it from power supply.
- Allow the oven to fully cool down before cleaning it. Wipe the housing with a lightly moistened cloth. Use detergent if necessary. Clean the oven interior with a moistened sponge and detergent. Dry all parts well before next use.
- Never immerse the appliance in liquids and do not use too much water for cleaning.
- Do not use aggressive chemicals or abrasives in order not to damage the surfaces.
- Clean the pizza stone while it is still warm but not hot. Use water and a brush. Do not clean the tray with abrasive chemicals. Allow food residue to soak in water and wipe with a sponge to remove.
- Do not wash the accessory in the dishwasher but only in hot soapy water.

Technical Data
| Nominal Voltage | 230 V~ 50 Hz |
| Nominal Power | 1400 W |
| Power Consumption in Off-State(no Standby Mode) | 0 W |
| Weight | 9600 g |
| Protection Class | I |
| Degree of Protection | IPX0 |
| Dimensions | 470 x 320 x 290 mm |
Accessories
| Oven Tray | 325 x 275 x 20 mm |
| Crumb Tray | 325 x 275 mm |
| Grill | 330 x 275 mm |
| Pizza Stone | 265 x 255 mm |
| Gripper | 1 Piece |
| Rotisserie Spit | 1 Piece |
| Handle | 1 Piece |
declare by our own responsibility that the product
Edelstahlofen
Stainless Steel Oven
Artikel № 86 13 54
Article No. 86 13 54
is according to the basic requirements, which are defined in the European Directives and their amendments.
2011/65/EU Restriction of the Use of certain hazardous Substances in electrical and electronic Equipment (RoHS)
2004/108/EC Electromagnetic Compatibility (EMC)
EN 55014-1:2006+A1+A2, EN 55014-2:2015,
EN 61000-3-2:2014, EN 61000-3-3:2013
2006/95/EC Low Voltage Directive (LVD)
EN 60335-1:2012+AC+A11, EN 60335-2-9:2003+A1+A2+A12+A13+AC,
EN 62233:2008
2009/125/EG Energierelevante Produkte (ErP)
2009/125/EC Energy-related Products (ErP)
CH-3425 Koppigen 8 Fairfax Road, N. Abbot TQ12 6UD
Telefon: (034) 4 13 80 00 Phone: (0844) 5 57 50 70
Telefax: (034) 4 13 80 01 Telefax: (0870) 0 66 41 48
Internet: www.westfalia-versand.ch Internet: www.westfalia.net


natural_image
Symbol of a trash bin crossed with a diagonal line, representing waste sorting or disposal (no text or labels)
Werter Kunde,
Please help avoid refuse.
If you at some point intend to dispose of this article, then please keep in mind that many of its components consist of valuable materials, which can be recycled.
Please do not discharge it in the garbage bin, but check with your local council for recycling facilities in your area.