
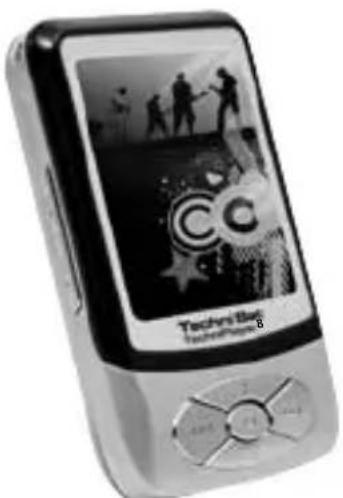
TechniPlayer 8 - Mp3 player TECHNISAT - Free user manual and instructions
Find the device manual for free TechniPlayer 8 TECHNISAT in PDF.

| Product type | MP3 player with color screen |
| Brand | TechniSat |
| Model | TechniPlayer 8 |
| Screen | 2.2-inch color |
| Audio formats | MP3, WMA, WAV |
| Video formats | AVI (recommended conversion with provided tool) |
| Image formats | JPEG |
| Text formats | TXT (e-books) |
| FM radio | Yes, 87.5 – 108 MHz |
| Recording | Voice (built-in microphone) and FM (WAV format) |
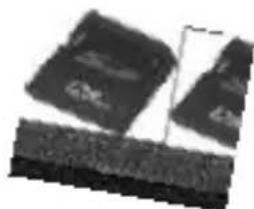
| Expandable memory | SD/MMC cards (not included) |
| Power supply | Rechargeable lithium battery 3.7 V, mains charger 5 V via USB |
| Charging time | About 5 hours (first charge 12 hours) |
| Headphone output power | 5 mW + 5 mW (32 ohms) |
| Speaker power | >200 mW |
| Connectivity | USB 2.0 |
| Equalizer | Normal, Rock, Pop, Jazz, Classical, User, MS PlayFX |
| Additional functions | Key lock, A-B repeat, file browser, screen settings, firmware update |
| Included accessories | Charger, USB cable, earphones, CD-ROM with conversion software, manual |
| Dimensions (estimated) | 90 x 50 x 15 mm |
| Weight (estimated) | 80 g |
| Maintenance | Clean with a dry cloth, do not expose to moisture |
| Safety | Use only the provided charger, do not open, unplug if there is a problem |
| Recycling | Do not dispose of with household waste, take to a recycling center |
Frequently Asked Questions - TechniPlayer 8 TECHNISAT
User questions about TechniPlayer 8 TECHNISAT
0 question about this device. Answer the ones you know or ask your own.
Ask a new question about this device
Download the instructions for your Mp3 player in PDF format for free! Find your manual TechniPlayer 8 - TECHNISAT and take your electronic device back in hand. On this page are published all the documents necessary for the use of your device. TechniPlayer 8 by TECHNISAT.
USER MANUAL TechniPlayer 8 TECHNISAT
Charging the battery 9
Built-in loudspeaker 10
Key lock 11
Switching ON/OFF 12
Function selection 13
Music 14
Repeat A-B 15
Recording 16
Song lyrics 16
Video 17
Pictures 17
FM radio 18
FM recording 21
e-book 22
Navigator 23
Settings 24
Memory card 30
Connecting to the computer 31
Disposal
Disposal information
The packaging for your unit is made entirely of recyclable materials. Please sort these appropriately and send them to back to the "Dual System". Ensure that electrical and electronics scrap items are not placed in household waste, but are disposed of properly (return to specialized shop, special waste)

Disposal of electrical and electronic equipment
The waste bin symbol on the item or on its packaging indicates that the item cannot be disposed of in normal household waste. The item must be returned to a recycling collection point for old electrical and electronic equipment.
Safety Warning
By ensuring that this device is properly disposed of, you are helping to prevent negative effects on the environment and human health that could otherwise arise. The recycling of raw materials contributes to preserving natural resources.
For more detailed information on disposing of this device, please contact your local authorities, the waste recycling service in your region or the dealer from whom you purchased this device.

Safety Warning
For your protection, you should carefully read the safety precautions before you operate your new device.
The manufacturer does not accept liability for any damage caused by improper handling or by not following the safety precautions properly.
Safety Warning
The device must only be operated with the plug-in power supply unit provided.
Do not expose the device to water droplets or spray and do not place any liquid-filled objects on the device.
The device must only be operated in a moderate climate.
Never open the device! There is a risk of electrical shock. Any necessary intervention must only be performed by trained personnel.
In the following situations you should unplug the device from the mains power and seek professional help:
The plug-in power supply unit is damaged.
The device has been subjected to moisture or liquid has got into it.
If there is a serious malfunction.
If it has suffered serious external damage.

Features
- Power supply: Battery (3.7 V), plug-in power supply unit
- Output power (earphones): 5mW + 5mW (32 Ohms)
- Output power (loudspeaker): >200mW
- Frequency range: 20 Hz - 20KHz
- Supported compression rates: 32 kbps - 320 kbps
- USB: 2.0
- Recording format: WAV
- Playback formats: AVI, MP3, WMA, WAV, TXT, JPG
VHF (FM): 87.5 MHz - 108.0 MHz
Accessories in the delivery kit
- Charger
- USB cable
- Earphones
- Installation CD-ROM
- Operating instructions
Product features
Product features
2.2" colour monitor
Music playback function
Video playback function
- JPEG viewing
- Reading of e-books
VHF radio with recording function
- Voice recording via built-in microphone
Supports SD and MMC cards
Note
- Check to see whether the complete set of accessories is in the package.
- Do not allow the device to be dropped or shaken with great force.
- Avoid damp environments. Do not setup the device in the vicinity of water or a water source.
- Do not attempt to open the device. You could damage the device and void the warranty.
- An unexpected shutdown while formatting or during a data transfer can lead to a loss of data or damage to the device.
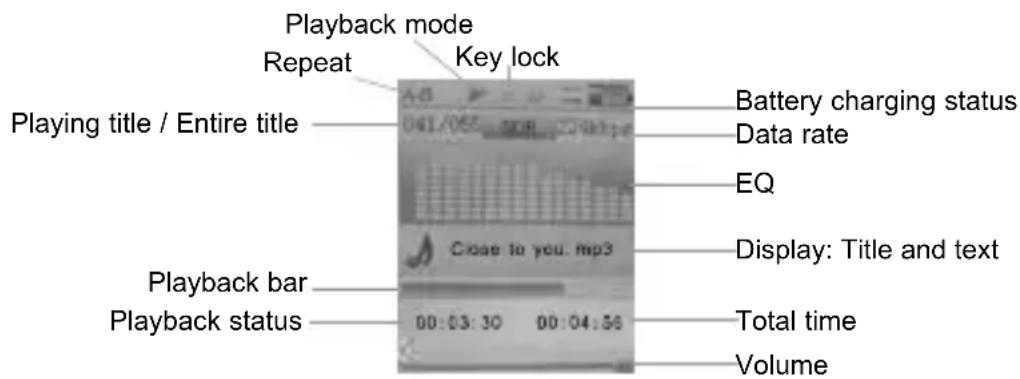
Overview
Charging the battery
If the battery charge state is no longer sufficient for operation, the empty battery symbol appears or the device switches itself off. Please recharge the battery at this time.
To do this, connect the device to the power supply unit via the USB jack and connect this to the main power supply. The battery is automatically charged.
The device is automatically switched on when charging.
The charging procedure is indicated by the charging symbol in the display.
Additional information: If the device is connected to the PC via a USB cable, the battery charges automatically.
Note
- Please only use the supplied charger to charge the battery.
- To enjoy the full capacity of the battery, it should be charged for 12 hours the first time it is charged.
- Later, a full charge will take approximately 5 hours.
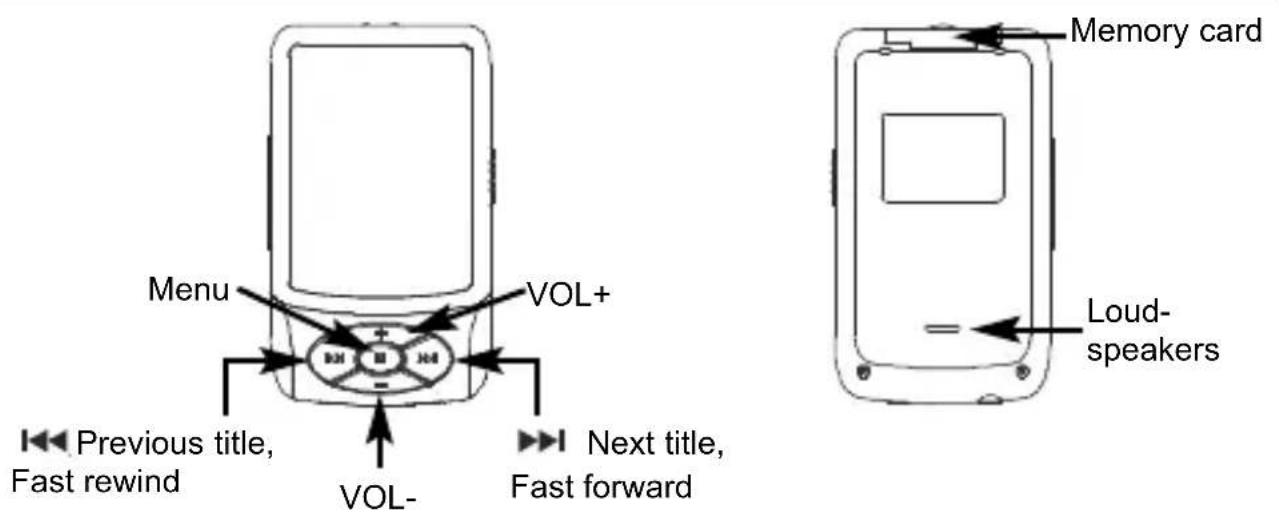
Built-in loudspeaker
Use of the built-in speaker.
The device has a built-in speaker. The speaker is located on the back of the device.
The speaker is active until a headphone is connected to the headphone jack.
If a headphone is connected to the jack, the internal speaker shuts off.
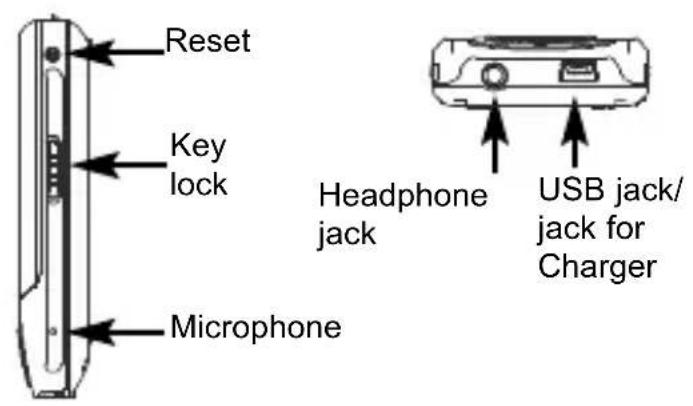
Key lock
If the key lock is activated, all key functions are disabled. This is useful for preventing unwanted operation of the device during sports or when transporting it in a briefcase or tote bag.
Slide the switch Key lock down to lock the keys.
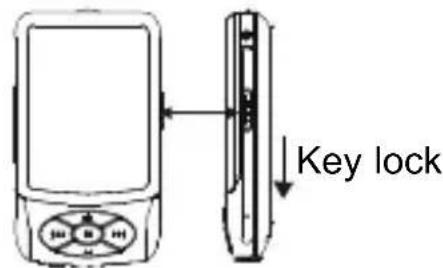
The following symbol appears.
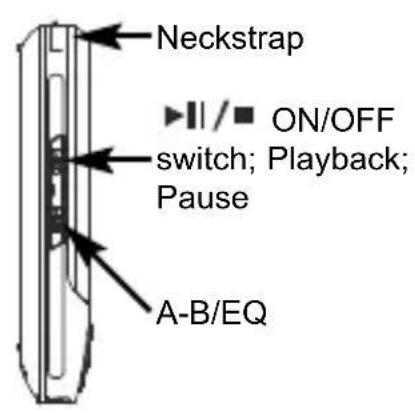
Switching ON/OFF
The device is not locked.
Switching on
While the device is switched off, press the key once (one long press). The device switches on, the display then shows the main menu.
Switching off
To switch off the device, press the keyonce (one long press) until the message "Goodbye" appears on the display. The device is now switched off.

Menu selection
If you open the main menu (press the Menu key once (long press) to go to the main menu if you are on a different level), you can highlight a menu item with the keys or VOL+/VOL-.
Briefly press the Menu key in order to go the selected menu.
Contents of the main menu

Music
When the main menu is displayed, select the menu item Music and press Menu briefly to go to the selected menu.
If you are in playback mode, briefly press the key to start. Press the key again briefly in order to pause the playback.
Press VOL+ or VOL- to control the volume.
Press in order to select the song that is to be played back.
Briefly press Menu in order to view the music list, then press VOL+ or VOL- to select a title. Then press Menu to play the title.
Music
Press Menu once (long press) in order to go the main menu.
Repeat A-B
In playback mode, briefly press A-B to go to the A-B repeat function; the starting point A is stored. Press it again. Now the ending point B is stored.
The display A-B appears on the screen and the device begins repeatedly playing the segment you have selected.
If you briefly press the key a third time, the device exits repeat mode and continues playing normally.
EQ
While the device is in playback mode, press "A-B/EQ" to select the type of music:
NORMAL - MS Play FX - ROCK - POP - CLASSIC - JAZZ - User
Music
Instructions for displaying song lyrics
The device supports the Lyric file format.
You can download the LRC files from the Internet or edit them with an editor. Copy the LRC files with the corresponding music files into the same directory of the device. Now the song texts are synchronously displayed when the music is played, if you have proceeded correctly.
Tips
You can use either WINAMP or an LRC editor to edit the song text files. For details on editing song texts, please read the corresponding operating instruction for the software.
Video/pictures
The device supports the AVI file format.
Select Video and briefly press the Menu key to go to this function.
Press to select video files.
Press VOL+ or VOL- to control the volume.
Briefly press Menu to display the list of films.
Select a title with and press Menu to start the video.
Press the Menu key once (long press) to exit this function.
Pictures
The device supports the JPG file format.
Select the item Photo in the main menu and briefly press the Menu key to go to this function.
Press the keys to make a selection.
Briefly press the Menu key to display the list of available photos.
Pictures/FM radio
Select the desired picture with and press the Menu key to display the photo.
You can page through the pictures one at a time by pressing the keys.
The photos are automatically scrolled by pressing the key.
While the list of pictures is being displayed, press the A/B key (long press) to delete the highlighted picture.
Select Yes to delete the picture.
Press Menu once (long press) to exit this menu.
FM radio
In radio mode, the cable of the earphone acts as an antenna. For good radio reception, ensure that the earphone is correctly plugged in.
In the main menu, select the function FM and press the Menu key to select the function.
Press the Menu key again to display the possible functions in the header.
FM radio
Using the keys select the desired function and activate it using the key.
Manual
Using the keys you can manually set the desired frequency.
Auto
Pressing the key automatically scans and saves all of the frequencies.
Memory
If you press the keywindow appears showing the available memory locations.
Using the VOL+/VOL- keys, select the memory location where you would like to save the set frequency.
Save the frequency using the key and confirm it with Yes.
Preset
If this function is activated, you can select the memory locations by pressing the keys.
FM recordings
Delete
When this function is activated, use the VOL + VOL keys to select the memory location you wish to delete.
Delete the memory location with the / - key and confirm with Yes.
FM recordings
While listening to a station, press the A-B key once (long press) in order to get ready to record.
Now press the A-B key to record the current station.
Press the A-B key again to stop the recording or to resume recording.
In recording mode, press A-B (long press) in order to save the recording.
Press the Menu key (long press) in order to exit recording mode. The recording is automatically saved in the "FM" folder in WAV format. Recorded files are played back in the "Music" menu.
Please read the information on page 27 regarding recording quality.
Recording
You are in the main menu. Now press Record/A-B once (long press) in order to go to recording mode.
or
In the main menu, select the function Record in order to go to recording mode.
Press A-B briefly to start the recording.
Press A-B again briefly to pause the recording or to resume recording.
To save the recording, press A-B (long press). The device is then ready for another recording.
Pressing the Menu key (long press) also stops the recording and saves it. You are returned to the main menu.
Please read the information on page 27 regarding recording quality.

e-book
In the main menu, select the option Text and press the Menu key briefly to activate the function.
Select the e-book you wish to read with the VOL+ and VOL- keys.
Press the Menu key briefly to display the selected e-book.
You can scroll through the text page by page using the keys VOL+/VOL- or
While reading the e-book, you can briefly press Menu to display the list of available books. Press to select one. Then press Menu to open and read the book.
Press the key to open a window for saving bookmarks.
Select the bookmark with the keys VOL+/VOL- and save it by pressing Menu.
Press the A-B key to display the window with the available bookmarks.
Select the bookmark with the keys VOL+/VOL- and open it by pressing Menu.
Press Menu (long press) to exit this menu.
This function supports TXT files. You can download such files from the Internet or from your PC to add new e-books to your player.
E-book/navigator
Navigation
In the main menu, select the item Navigation to display the files and folders that are saved in the memory.
A:\Internal memory
B:\SD/MMC card
Press VOL+/VOL- to scroll up and down in the list and to select files or folders.
When you have selected a folder, press Menu to open the folder.
If you are in the folder directory, press , in order to go to the last used directory.
When you have selected files, press Menu to open the currently selected file.
Navigator/settings

Delete files
Select the file to be deleted.
Now press the A/B key (long press). The prompt "Delete file?" appears.
Mark Yes with the keys / and confirm with Menu.
Settings
In the main menu, select the item Settings and briefly press Menu. This takes you to the Settings menu where you can set the corresponding device parameters.
Press VOL+ or VOL- to select entries. Then press Menu to go to these entries.
Pressing the key takes you one menu level back.
Settings
Music
Repeat mode
Press Menu to go to this menu, then press in order to select the playback mode for music.
- Once: Songs are played one at a time in normal order, the playback continues until the last item is played.
- Repeat 1: The selected song is infinitely repeated.
- Once folder: The songs in the selected folder are played once.
- Repeat folder: The songs in the selected folder are repeated.
- All once: All items are played once in normal order.
- Repeat all: All items are played in the normal order and then infinitely repeated.
- Intro: Items are played one at a time in normal order for 10 seconds each.
Settings
Play mode
- Order: The items are played in the specified order.
- Shuffle: All items are played in random order.
EQ setting
Press Menu to go to this menu, then press 山山山 to select the sound setting for the corresponding type of music.
Normal — MS PlayFX — Rock — Pop — Classic — Jazz — User EQ
MS PlayFX
Press Menu to go to this menu and select the desired audio effect with the keys:
3D Effect — Pure Bass — AutoVolume
EQ setting used
PressMenu to go to this menu.
Using the key select the frequency that you would like to change.
Set the value with the VOL+/VOL- keys.
Settings
When you have set all the frequencies according to your wishes, use the keys to highlight the Yes field and and save the setting by pressing the Menu key.
FM radio
Press Menu to go to this menu, then press 山山山 to select the desired point item.
Stereo SW
Using the keys VOL+/VOL-, select stereo ON or OFF and confirm with Menu.
FM Region
With the keys VOL+/VOL-, select the desired region and confirm with Menu.
Recording
Recording quality
With the keys VOL+/VOL-, set the recording quality to High quality or Normal quality and confirm with Menu.
Settings
Recording volume
With the keys VOL+/VOL-, set the recording volume and confirm with Menu.
Screen
Duration of background illumination
With the keys VOL+/VOL-, set the duration for which the backlighting is to remain activated and confirm with Menu.
Luminance
With the keys VOL+/VOL-, set the value for the brightness of the backlighting and confirm with Menu.
Illumination mode
With the keys VOL+/VOL-, set the illumination mode to Normal or Power saving and confirm with Menu.
Settings
System
Via ...
This menu item gives you information on the firmware, the memory capacity and the free memory space of the device.
Upgrade
Call up this menu item if you want to upgrade the firmware of the device.
Default settings
Call up the default settings if you would like to reset the device to the factory settings.
Automatic switch-off
Under this menu item, set the time interval (with no operation) after which the device automatically switches into standby mode.
Language
Under this menu item, set the OSD language.
Memory card
This device supports the SD and MMC memory cards, allowing the memory to be expanded.
Open the protective cap over the slot for the memory card and ensure that the memory card is properly inserted.
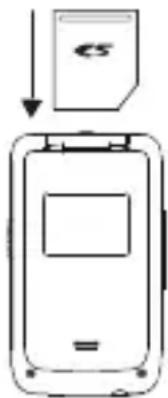
Important note!
Do not remove the card while the device is reading-in the data from the memory card into the device memory. You could lose data or damage the memory card. Only remove the memory card if the device is not operating or it is completely shutdown.
Connecting to the computer
Use the USB cable to connect to the computer. If the connection was made properly, the following symbol appears on the screen.

You can now download electronic files and music files from the computer or load them onto the PC.
Important note!
Select "FAT" to format the device. During the formatting process and during the data transfer, the device should not be disconnected or shutdown.
When you disconnect the device from the computer, please click on "Safely remove hardware". If this text appears and the screen displays "Ready," you can disconnect the device.
Converting video files
Open the CD-ROM provided and copy the Avi Converter tool folder to the hard disk.
To install the conversion software, click twice in folder Avi Converter tool stored on the hard disk on the file AVIConverter Setup.exe. Follow the instructions on the screen.
Then start the AVIConverter conversion software. Proceed in the sequence shown below.
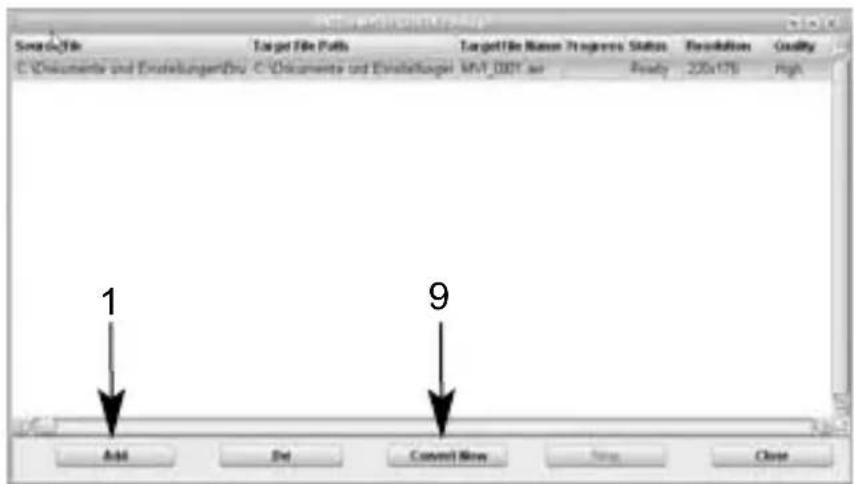
Click on Add (1). A further window is displayed.
Converting video files
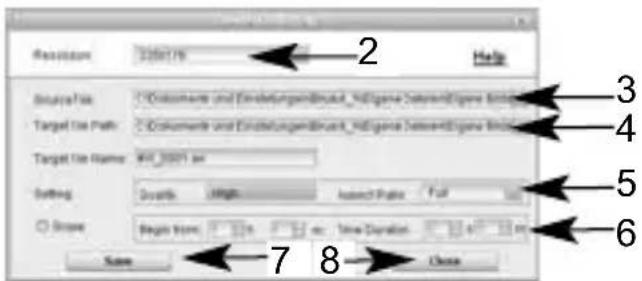
In the line Resolution, enter the resolution 220 x 176 pixels. (2)
Click in the line SourceFile on to select the file to be converted. (3)
Note!
Not all codecs are supported. The conversion software supports converting files into the following formats: RAW, AVI, DIVX, MICROSOFT, INTEL, INDEO, WMV and MPG.
Click in the line TargetFile on to select the path under which the converted files are to be saved. (4)
Please note:
The target file must end with AVI. This must be entered manually.
Converting video files
In the line Quality, enter the desired quality and the aspect ratio. The larger the available memory space, the better the quality of the video. We recommend that you select this setting based on the free memory capacity. (5)
In the line Begin from, you can select a time segment of the video file to be converted. (6)
Now click on Save to save the settings (7) and then on Close (8) to close the window.
When you have made these settings, click on ConvertNow to start the conversion; press Stop, if necessary, if you wish to terminate the conversion. (9)
FAQ
If the device does not function normally, first try to find the source of the fault using this list. It is possible that the problem can be cleared quite easily
| Problem Possible cause $olution | |
| Keys do not respond Keys in hold mode Switch off hold mode | |
| No VHF reception Earphones not correctly plugged in Plug the earphones in correctly | |
| No connection to the PC The USB cable on the player or on the PC is not correctly plugged in | Plug in the cable correctly on both devices |
| The device will not start up normally | Battery not sufficiently charged Charging the battery |
| Keys in hold mode Switch off hold mode | |
| Video files do not play. The video format is wrong. Use the software for converting the video (AVI Converter Tool on the supplied CD-ROM) | |
TechniSat
TechniPlayer 8
Your device has a CE symbol and satisfies all of the required EU standards.
Subject to changes and printing errors. Status 05/08
TechniSat and TechniPlayer 8 are registered trademarks of TechniSat Digital GmbH
- Disposal
- Disposal information
- Disposal of electrical and electronic equipment
- Safety Warning
- Features
- Accessories in the delivery kit
- Product features
- Note
- Charging the battery
- Built-in loudspeaker
- Use of the built-in speaker.
- Key lock
- Switching ON/OFF
- Switching on
- Switching off
- Menu selection
- Music
- Repeat A-B
- EQ
- Instructions for displaying song lyrics
- Tips
- Video/pictures
- Pictures
- Pictures/FM radio
- FM radio
- In radio mode, the cable of the earphone acts as an antenna. For good radio reception, ensure that the earphone is correctly plugged in.
- Manual
- Auto
- Memory
- Preset
- FM recordings
- Delete
- Recording
- e-book
- E-book/navigator
- Navigation
- Navigator/settings
- Delete files
- Settings
- Repeat mode
- Play mode
- EQ setting
- MS PlayFX
- EQ setting used
- Stereo SW
- FM Region
- Recording quality
- Recording volume
- Screen
- Duration of background illumination
- Luminance
- Illumination mode
- System
- Upgrade
- Default settings
- Automatic switch-off
- Language
- Memory card
- Important note!
- Connecting to the computer
- Converting video files
- Note!
- Please note:
- FAQ
- TechniSat
- TechniPlayer 8
Brand : TECHNISAT
Model : TechniPlayer 8
Category : Mp3 player