BO647 - Cooker BOMPANI - Free user manual and instructions
Find the device manual for free BO647 BOMPANI in PDF.
User questions about BO647 BOMPANI
0 question about this device. Answer the ones you know or ask your own.
Ask a new question about this device
Download the instructions for your Cooker in PDF format for free! Find your manual BO647 - BOMPANI and take your electronic device back in hand. On this page are published all the documents necessary for the use of your device. BO647 by BOMPANI.
USER MANUAL BO647 BOMPANI
Instructions for use and maintenance of gas, gas-electric and electric cookers. Series:

PykoBoDCTBO NO yCTaHOBKe n 3KcIIyatauHnPykoBOdCTBO NO yCT Ra3OBbIX, KOMHHNPOBaHHbIX N 3JIeKTpHuYeCKHXra3OBbIX, KOMHHNPOB IIHT. CepHN:PIIIT. CepIN:

Odyic syia th xponkai tn ouvtnponkouzivuv ypaepiou, nEKTpiKwV kai miktow. MovTea:

resistenza circolare forn0 2,0 kW
grill 2,0 kW
EQUIPAGGIAMENTO
ACCENSIONEL BRUCIATORE FORNO
Technical data and specifications 11
Installation 12-13
Ventilation 12
Positioning 12
Gas connection 12
Adapting to different types of gas 12
Replacing the injectors 12
Minimum setting 12
Electrical connection 13
Electric ignition 13
Safety device 13
For the user 13-16
Ventilation 13
Igniting the burners 13
Igniting the gas oven 13
Igniting the gas grill 13
Safety device 13
Electrical switch-on 13
Using the gas hob 14
Using the electric hot-plates 14
Using the gas oven 14
Using the gas or electric grill 14
Using the static electric oven 14
Using the static electric oven "4 New" 14
Using the multi-function electric oven 15
Using the rotisserie 15
Oven with thermostat 15
Using the minute minder 15
Using the digital end-of-cooking timer 15
Using the single-control cooking timer 15
Using the electronic timer. 15
Using the self-cleaning oven 16
Using the pan retainer 16
Advice and precautions 16
Figures 49-52
-
Thank you for choosing one of our quality products, capable of giving you the very best service. To make full use of its performance features, read the parts of this manual which refer to your appliance carefully. The Manufacturer declines all responsibility for injury or damage caused by poor installation or improper use of the appliance.
-
To ensure its appliances are always at the state of the art, and/or to allow constant improvement in quality, the manufacturer reserves the right to make modifications without notice, although without creating difficulties for users.
-
When ordering spare parts, inform your dealer of the model number and serial number punched on your appliance's nameplate, visible inside the warming compartment (if present) or on the back of the cooker.
-
APPLIANCE COMPLYING WITH THE FOLLOWING DIRECTIVES:
-
EEC 90/396
- EEC 73/23 and 93/88
- EEC 89/336 (radio-frequency inter-ference)
- EEC 89/109 (contact with foods)
FOREWORD
- Refer only to the headings and sections covering accessories actually installed on your cooker.
GB
Technical data and specifications
| Nominal external dimensions | Cookers | |
| 60x60 | ||
| Height at hob | cm. | 86,5 |
| Height with lid raised | cm. | 143,0 |
| Depth with door closed | cm. | 60,0 |
| Depth with door open | cm. | 104,0 |
| Width | cm. | 60,0 |
| Usable dimensions | 60x60 static oven | 60x60 fan oven | ||
| Width | cm. | 45 | cm. | 41 |
| Depth | cm. | 47 cm. | 38 | |
| Height | cm. | 34 cm. | 31 | |
| Volume | l. | 72 | l. | 50 |
GAS BURNERS (injectors and flow-rates) 60x60
| Gas Burner | Injector low nominal | flow-rate flow (kW) (kW) |
| G20 auxi liar 76 0,45 1,00 20 semi- rapid 94 0,60 1,65 mbar rapid | 128 0,95 2,90 oven 130 1,00 3,00 grill 99 - 1,85 ultra-rapid internal 63 2,10 4,25 ultra-rapid external | 140 |
| G30 auxi liar 50 0,45 1,00 28-30 semi-rapid 65 0,60 1,65 mbar rapid | ||
| G31 oven 37 grill 68 - 1,85 mbar ultra- rapid | ||
| G110 auxi liar 145 0,45 1,00 8 semi-rapid 190 0,60 1,65 mbar rapid | ||
| G110 8 | oven 300 1,00 3,00 grill ultra-rapid internal ultra-rapid external | 145 0,45 1,00 200 - 1,85 175 350 |
Cat.:seename plate on cover;Class 1 or 2.1
Type "X" cookers
ELECTRIC HOTPLATES
0180
1,5 kW - Normal hotplate
2,0 kW - Rapid hotplate
ELECTRIC OVEN POWER 60x60
| bottom | top | total | |
| static oven | 1,5 kW | 0,7 kW | 2,2 kW |
| multi-function oven | 1,5 kW | 0,7 kW | 2,2 kW |
| circular element | 2,0 kW | ||
| grill | 2,0 kW |
EQUIPMENT
All models are equipped with safety device for oven and grill burners.
Depending on the models, cooker may also have:
- Safety device for one or more hob burners
- Electric ignition on top burners
- Electric ignition on oven and grill burners
- Self-cleaning enamelled liners
- Oven thermostat (or tap)
Electric oven lighting - Rotisserie
- Grill burner
- Mechanical timer
- Pan retainers
- One or more electric plates
- Digital-clock end of cooking timer
- Single-control end of cooking timer
- Electronic timer
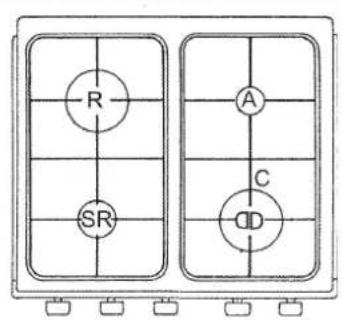
For the LAYOUT OF HOB BURNERS see the models illustrated in figure 1 at the back of this manual.
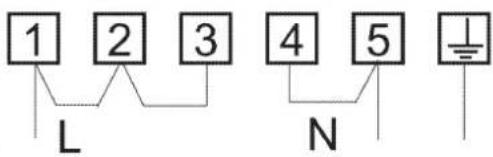
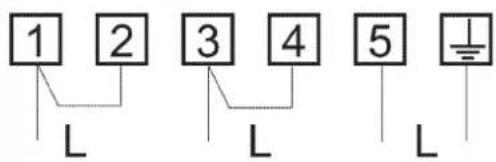
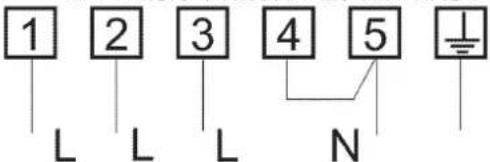
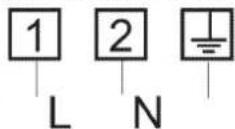
For the ELECTRIC WIRING DIAGRAM see figure 2 at the back of this manual.
The electrical power is stated on the nameplate visible inside the warming compartment (if present) or on the back of the cooker.
A copy of the nameplate is glued to the cover of this manual (for gas or gas-electric products only).
INSTALLATION
The appliance must be installed by qualified staff working in accordance with the regulations in force.
Before installing, ensure that the appliance is correctly preset for the local distribution conditions (gas type and pressure).
The presettings of this appliance are indicated on the nameplate shown on the cover.
This appliance is not connected to a flue gas extractor device. It must be installed and connected in accordance with the regulations in force.
This appliance may only be installed and may only operate in rooms permanently ventilated in accordance with national regulations in force.
VENTILATION
The rooms in which gas appliances are installed must be well ventilated in order to allow correct gas combustion and ventilation.
The air flow necessary for combustion is at least 2m^3 /h for each kW of rated power.
POSITIONING
Remove the packaging accessories, including the films covering the chrome-plated and stainless steel parts, from the cooker.
Position the cooker in a dry, convenient and draft-free place. Keep at an appropriate distance from walls which may be damaged by heat (wood, linoleum, paper, etc.).
The cooker may be installed alone or between two kitchen units; in this case, the sides of the units must withstand a temperature of 100 degrees C and they must not be higher than the cooker hob.
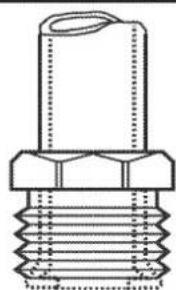
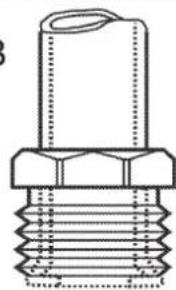
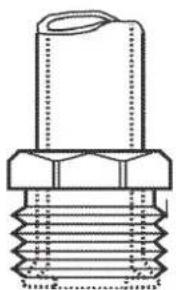
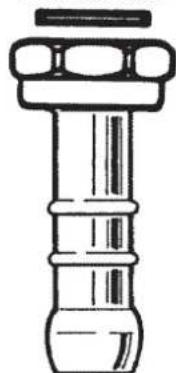
CONNECTING TO THE GAS SUPPLY
Before connecting the cooker, check that it is preset for the gas to be used. Otherwise, make the conversion as described in the section headed "Adapting to different gas types". The connection is on the right; if the pipe has to pass behind the cooker, it must be kept low down where the temperature is about 50 degrees C.
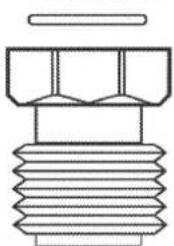
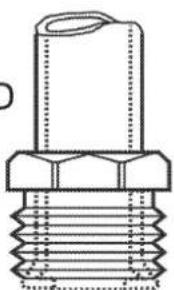
- Rigid connection (see Figure 3, diagram D):
The connection to the mains gas supply may be made using a rigid metal pipe (D). Remove the hose connector and screw the rigid union onto the threaded connection of the gas train. The union for rigid connection is amongst the cooker accessories. -
Connection using a rubber hose (see Figure 3, diagrams B and C):
-
Connect a rubber hose carrying the conformity mark currently in force to the hose connector. The hose must be replaced at the date indicated, and must be secured at both ends using standard hose clamps. It must be absolutely accessible to allow its condition to be checked along its entire length.
-
Connection using a metal hose (see Figure 3, diagram D):
-
Make the connection using a hose which complies with national standards, screwing it onto the connector with a ring seal, which is delivered amongst the cooker accessories.
-
After installation, check that all connections are airtight.
- F or operation with butane/propane, check that the gas pressure is as indicated on the nameplate.
IMPORTANT:
- Use only standard rubber hoses. For LPG, use a hose which complies with the national regulations in force.
- A void sharp bends in the pipe and keep it well away from hot surfaces.
References to the regulations covering the gas connection to the appliance: ISO 7-1.
ADAPTING TO DIFFERENT TYPES OF GAS
If the cooker is not already preset to operate with the type of gas available, it must be converted. Proceed as follows:
- Replace the injectors (see table on page 11);
- regulate the primary air flow;
- regulate the minimum settings.
N.B.: every time you change the type of gas, indicate the new type of gas on the serial number label.
REPLACING THE HOB BURNER INJECTORS (fig. 4)
- Remove the grid, the burner caps (A), and the burners (B);
- Unscrew and remove the injector in the bottom of each injector holder (C);
- replace the injector in accordance with the table in page 11, tighten and screw right down;
-
check that the system is gas-tight;
-
replace the burners, the burner caps and the grid.
With triple flame burners (fig. 4b):
- carry out the operations already described and also
- unscrew the two screws which secure the guard plate (D) and replace the side injector as indicated in the table on page 11, screw in and tighten fully.
IMPORTANT:
- N ever over-tighten the injectors;
- after replacing, check that all the injectors are airtight.
REPLACING THE OVEN BURNER INJECTOR (Fig. 5a)
- Loose the screw securing the oven bottom;
- remove the oven bottom (push back and raise);
- remove the oven burner, after taking out its fixing screw;
- replace the injector, using a 7 mm socket wrench.
REPLACING THE GRILL BURNER INJECTOR (Fig. 5b)
- Remove the burner after taking out the two screws which secure it;
- replace the injector using a 7 mm socket wrench.
IMPORTANT:
- N ever over-tighten the injectors;
- after replacing, check that all the injectors are airtight.
SETTING HOB BURNER MINIMUM LEVELS
If the cooker is to work on bottled gas (butane/propane), the tap by-pass must be screwed right down.
The cooker may be equipped with type A taps, with by-pass inside (accessed by inserting a small screwdriver into the rod) or type B taps, with by-pass on the outside on the right (accessed directly). See figure 7.
If the cooker is to work on natural gas, proceed as follows for both types of tap:
- Ignite the burner at maximum flame;
- pull off the knob, without using a lever against the control panel, which might be damaged;
- access the by-pass with a small screwdriver and back off by about 3 turns (turning the screwdriver anti-clockwise);
- turn the tap rod anti-clockwise again until it stops: the burner will be at maximum flame;
- screw the by-pass slowly back in, without pushing the screwdriver, until the flame has apparently shrunk to 1/4 of the maximum size, checking that it is sufficiently stable even in quite strong draughts.
SETTING OVEN BURNER MINIMUM LEVELS
If the cooker is to work on bottled gas (butane/propane), the thermostat by-pass must be screwed right down. If the cooker is to work on natural gas, proceed as follows:
- Remove the oven bottom (push towards the back and raise);
- ignite the oven burner, turning the knob pointer to the maximum setting;
- shut the oven door;
- access the thermostat or tap by-pass (see fig. 8);
- back off the thermostat by-pass by about 3 turns;
- after 5 or 6 minutes, turn the knob pointer to the minimum setting;
- slowly re-tighten the by-pass, watching the flame decrease in size through the window in the closed oven door until the tongue
GB
Installation
of the flame is about 4mm long. Never keep the flame too low. It must be stable even when the oven door is opened or closed quickly;
- turn off the burner and replace the oven bottom.
CONNECTING TO THE ELECTRICAL MAINS
Before making the connection, check that:
- the mains voltage is as indicated on the nameplate;
- the earth connection is in good working order.
If the socket is not easily accessible, the installation engineer must provide a switch with a contact breaking gap of 3mm or more.
If the appliance power lead is not fitted with a plug, use an approved standard type, remembering that:
- the green-yellow wire must be used for the earth connection;
- the blue wire is the neutral;
- the brown wire is live;
- the lead must never touch hot surfaces over about 75 degrees C;
- replacement leads must be of type H05RR-F or H05V2V2-F of suitable size (see diagrams in fig. 2).
- if the appliance is supplied without lead, using type H05RR-F or H05V2V2-F cable of suitable size (see diagrams in fig. 2).
IMPORTANT: the manufacturer declines all liability for damage due to failure to comply with the regulations and standards in force.
Check that the appliance is correctly connected to the earth (see diagrams in fig. 2 at the back of the manual).
FOR COOKERS WITH ELECTRIC IGNITION
The correct gaps between the electrode and the burner are shown in figures 5a,5b,6a,6b.
If no spark is generated, do not keep on trying as this might damage the generator.
Possible causes of malfunctions:
- spark plug damp, dirty or broken;
- electrode-burner gap not correct;
- spark plug wire broken or without sheathing;
- spark discharging to earth (to other parts of the cooker);
- generator or microswitch damaged;
- air has built up in the pipes (particularly if the cooker has been out of use for a long time);
- air-gas mixture incorrect (poor fuel setting).
THE SAFETY DEVICE
The correct gap between the end of the thermocouple sensor and the burner is shown in figures 5a,5b,6a,6b.
To check that the valve is working properly, proceed as follows:
- ignite the burner and leave it to work for about 3 minutes;
- turn off the burner by returning the knob to off position ( );
- after 90 seconds for hob burners, 60 seconds for oven and grill burners, turn the knob pointer to the "on" position;
- release the knob in this position and move a burning match towards the burner; IT MUST NOT IGNITE.
Time needed to excite the magnet during ignition: 10 seconds approx. Automatic tripping time, after flame has been turned off: not more than 90 seconds for hob burners; not more than 60 seconds for oven and grill burners.
IMPORTANT
- Before doing any work inside the cooker, disconnect the mains plug and shut the gas tap.
- Never use matches to check the gas circuit for leaks. If a specific control device is not available, foam or very soapy water can be used.
- When re-closing the hob, check that the electrical wires of the spark plugs (if present) are not close to the injectors, so that they cannot run across them.
For the user
HOW TO USE THE COOKER
VENTILATION
All gas cooking appliances produce heat and moisture in the rooms where they are installed. Take care to ensure that the kitchen is well ventilated; keep the ventilation openings unobstructed or install an extractor hood with fan.
In case of intensive or prolonged use, additional ventilation may be required; open a window, or increase the extractor fan power.
IGNITING THE HOB BURNERS
- Press the knob and turn it anti-clockwise until it reaches the symbol on the control panel (maximum flame position);
- at the same time, move a burning match towards the burner head;
- to reduce the flame, turn the knob further in the same direction until its pointer is against the symbol (minimum flame position).
FOR HOB BURNERS EQUIPPED WITH SAFETY DEVICE
- Press the knob and turn it anti-clockwise until it reaches the symbol on the control panel (maximum flame position);
- m ove a burning match towards the burner, keeping the knob pressed right down for about 10 seconds;
- then release the knob and check that the burner remains on. Otherwise, repeat the operation.
IGNITING THE OVEN BURNER
- Open the oven door;
- press the knob and turn it anti-clockwise to the maximum flame position;
- m ove a burning match towards the hole in the centre of the oven bottom and press the knob right down (see fig. 9);
- look through the two holes in the sides of the bottom to check that the burner has ignited, keeping the knob pressed down;
- after about 10 seconds, release the knob and check that the burner remains on. Otherwise, repeat the operation.
IGNITING THE GRILL BURNER (GAS GRILLS)
- Fit the control knob guard as shown in fig. 12;
- press the oven knob and turn it to the right until it reaches the stop;
- m ove a burning match towards the perforated burner pipe and press the knob right down (see fig. 10);
- check that the burner has ignited, keeping the knob pressed down;
- after about 10 seconds, release the knob and check that the burner remains on. Otherwise, repeat the operation.
SAFETY DEVICE
Burners equipped with this device have the advantage that they are protected if they accidentally go out. If this occurs, the supply of gas to the burner concerned is automatically cut off, preventing the hazards deriving from a leak of unburnt gas. The gas supply must be cut off within no more than 60 seconds for the oven and grill burners or 90 seconds for the hob burners.
FOR COOKERS WITH ELECTRIC IGNITION
All the above applies, except that the match is no longer required; a spark is obtained by pressing the button on the control panel once or more, or by pressing the knob of the burner to be ignited. If electronic ignition is difficult with some types of gas, set the knob on the low (small flame) setting.
- For cookers with electric ignition of the oven and grill burners, ensure the oven door is completely open when these burners are ignited;
- Do not operate the ignition device for more than 10 seconds when igniting the oven and grill burners. If the burner has not lit after these 10 seconds, stop using the device, leave the
door open and wait one minute before trying again to ignite the burner. If the ignition device malfunctions again, light the burner with a match and call the after-sales service.
IMPORTANT
- Difficulty in igniting burners is normal if the cooker has been out of use for some time. The air accumulated in the pipes will be expelled in a few seconds;
- N ever allow too much unburnt gas to flow from the burners. If ignition is not achieved within a relatively short time, repeat the procedure after returning the knob to the off position () ;
- when the oven and grill are lit for the first time, a smell may be noticed and smoke may come out of the oven. This is because of the surface treatment and oily residues on the burners.
HOW TO USE THE HOB BURNERS
Use pans of diameter suitable for the burner type. The flames must not project beyond the base of the pan. Recommended sizes:
- f or auxiliary burners = pans of at least 8 cm using the adjusting grid supplied with the cooker
- f or semi-rapid burners = pans of at least 14 cm
- for rapid and triple flame burners = pan of at least 22 cm.
N.B.: Never keep the knob at settings between the maximum flame symbol and the off position () .
FOR COOKERS EQUIPPED WITH ELECTRIC HOTPLATES
The different heat settings are obtained as follows:
- 1 = minimum setting for all hotplates;
- 6 = maximum setting for normal and rapid hotplates (with red disc);
- 0 = off
Pans must never be smaller in diameter than the hotplates and their bottoms must be as flat as possible (see fig. 11).
IMPORTANT:
- N ever leave hotplates on without pans, except when first used; leave for about 10 minutes to dry oil or moisture residues;
- if the hotplate is to be out of use for a long time, apply a little grease to its painted surface;
- do not allow spills to burn onto the hotplate, requiring the use of abrasive cleaners.
- After igniting the burner, leave the oven to heat up for about 10 minutes;
- place the food for cooking in an ordinary oven dish and place it on the chrome-plated shelf;
- place in the oven on the highest possible runners, and turn the knob pointer to the setting required;
- cooking can be observed through the window in the door with the oven light on. This will avoid opening and closing the door frequently, unless oil or fat has to be added to the dish.
IMPORTANT: never place foods directly on the drip tray for cooking; it is there only to collect any drips of fat during grilling.
N.B.: For cookers without thermostat:
- with the knob on the maximum setting 280 degrees C
- with the knob on the minimum setting = 150 degrees C
- All other temperatures between 150 and 280 degrees C are obtained approximately by positioning the knob between the maximum and minimum settings.
Never leave the knob in positions between the maximum symbol
and the off setting (
HOW TO USE THE GAS OR ELECTRIC GRILL
fit the knob guard (see fig. 12);
- For models with "Static and Multifunction Electric Oven" only, grilling is permitted with the door closed, without
using the front side;
- ignite the burner and wait a few minutes to allow it to warm up, or switch on the heating element;
- place the foods on the chrome-plated shelf;
- insert on the highest runner;
- insert the drip tray on the bottom runner;
- gently close the oven door, resting it against the knob guard;
- after a few minutes, turn the food to expose the other side to the infrared radiation (the cooking time depends on the type of food and personal taste).
N.B.: the first time the grill is used smoke will come out of the oven. Before inserting foods for cooking, wait until any oil residues on the burner have completely burnt away.
The grill must only be used at its full rated heat.
IMPORTANT: accessible parts may be hot when the grill is in use! Keep children well away.
The grill element in the top of the oven is switched on by turning the thermostat knob clockwise to the grill symbol on the control panel.
The red light will come on to show the element is in operation. The table below will serve as a guide; bearing in mind that cooking times and temperatures may vary depending on the type and amount of foods cooked and personal taste.
| Food to be Time (minutes)grilled 1st side 2nd side | ||
| Thin pieces of meat 6 4Fairly thick pieces ofmeat 8 5Thin fish or fishwithout scaleFairly thick fishSausagesToasted sandwichesSmall poultry | 10 815 1212 105 220 15 | |
STATIC ELECTRIC OVEN
- The oven shelf is designed to take normal oven dishes for cooking sweets or roasts, or is used without a pan for cooking foods under the grill.
- The drip tray is only there to collect any juice from foods and must never be used as a cooking surface.
There is a single control knob for the oven or grill.
Starting from the 0 (off) position, the knob can be turned clockwise to the following settings:
- symbol oven lamp on (it will remain on even if the knob pointer is turned to the other settings).
symbol ≈ :grill on (in roof of oven) - symbol : rotisserie start with grill on.
- symbol : conventional "static" oven cooking, the oven temperature is controlled using the thermostat knob.
Turn the knob anti-clockwise to return to the 0 (off) position.
N.B. - The yellow light switches on and off as the thermostat is tripped.
Before placing food inside, allow the oven to heat up for at least 10 minutes.
STATIC ELECTRIC OVEN " 4 New "
Starting from the 0 (off) position, the knob can be turned clockwise to the following settings:
- symbol 品 oven lamp on (it will remain on even if the knob pointer is turned to the other settings).
- symbol : slow cooking using the bottom element; the
oven temperature is regulated using the thermostat knob. - symbol : conventional "static" oven cooking, the oven temperature is controlled using the thermostat knob.
symbol : grill on.
MULTI-FUNCTION ELECTRIC OVEN
With different heating elements controlled using a selector switch and regulated by a thermostat, this oven offers various cooking methods. There are three principle sources of heat:
a) Forced heat diffusion (fan oven)
b) Spontaneous heat diffusion (static oven)
c)Infra-red rays (grill)
Starting from the position 0 (off) the selector knob can be turned clockwise to the following positions:
- symbol 空 or 空 : oven light and red warning light on, operation of fan.
- symbol or : conventional "static" oven cooking, the oven temperature is controlled using the thermostat knob.
- symbol or cooking with fan oven, on one or two levels, the oven temperature is controlled using the thermostat knob.
- symbol or :grill on (on oven top element), the thermostat knob must be set at the maximum temperature.
- symbol or nfra-red cooking with fast grill, advised for long grilling: the thermostat knob must be set at the maximum temperature.
- symbol or : quick cooking using the fan oven, the oven temperature is controlled using the thermostat knob.
- symbol or : slow cooking using fan oven, the oven temperature is controlled using the thermostat knob.
In all positions except zero (0) the red warning light and the oven light are on.
NOTE: The yellow warning light comes on according to thermostat variations. Before putting food in to be cooked, the oven should be pre-heated for at least 10 minutes.
- The oven shelf is designed to take normal oven dishes for cooking sweets or roasts, or is used without a pan for cooking foods under the grill.
- The drip tray is only there to collect any juice from foods and must never be used as a cooking surface.
- Remember that cooking times may vary if food is cooked on two shelves at the same time.
HOW TO USE THE ROTISSERIE
- fit the control knob guard as shown in figure 13.
- ignite the grill burner, or switch on the grill element;
- impale the meat for cooking on the spit and fix it in the centre of the two forks;
- insert the end of the spit into the motor drive socket;
- remove the handle from the spit;
- place the drip tray on the bottom runner of the oven;
- gently close the oven door, resting it against the knob guard;
- start the rotisserie motor by pressing the switch on the symbol.
- baste the meat from time to time. When cooked, screw the handle onto the spit and remove from the motor drive socket.
OVENS WITH THERMOSTAT
If cooking temperatures are not as set, call in an engineer to check the thermostat.
HOW TO USE THE MINUTE MINDER
Set the cooking time considered necessary by turning the timer knob clockwise. An alarm will sound at the end of the preset time.
USE OF DIGITAL-CLOCK END OF COOKING TIMER (fig.14)
The timer allows the cooking time in the oven to be set. If food does not need to bewatched, the timer can be used even when the user is absent.
Operation:
- Synchronize the digital clock (in case it is not already set due to temporary power-cuts or other reasons) pressing and turning knob A in a clock-wise direction.
-
Put food in the oven.
-
Programme in the cooking time on dial D turning without pressing knob A towards the right (max. time - 210 mins).
- T urn the thermostat knob to the desired temperature and the selector switch to the chosen cooking method.
- When cooking is finished the buzzer will sound and the oven will automatically go off; turn off the buzzer by moving the symbol A to the middle of the dial D using the knob A (turning without pressing towards the right).
- M ove the thermostat and selector switch to zero.
N.B.: For manual oven use (without the aid of the timer), set the symbol to the dial D, otherwise the oven will not be operated manually.
USE OF SINGLE-CONTROL END OF COOKING TIMER (WITHOUT CLOCK) (fig. 15)
This allows the cooking time to be programmed.
Operation:
- Move the knob to the desired cooking time (120 mins max. for the electric oven; 100 mins max. for the gas oven).
- Choose the temperature using the thermostat knob and move the selector knob to the required cooking method.
- When the programming knob is at the 0 position the oven will switch itself off. This is automatic.
- M ove the thermostat knob back to symbol.
- Move the selector knob to symbol 0.
N.B. If the timer is not used, the oven programming knob is to be set to the manual position .
USE OF THE ELECTRONIC TIMER (fig. 16)
This allows the start time and cooking duration time to be programmed.
If food does not need to be watched, this timer can be selected even when the user is absent. Soon after installation and at any electrical supply cut-outs the display flashes; the clock must then be synchronized again to allow programming.
SETTING THE TIMER TO THE CURRENT TIME
- The current time is set by pressing the 2 buttons (COOKINGTIME and STOP) and the "+" or "-" button at the same time. Any previous programmes are cancelled and the AUTO symbol flashes.
NOTE: when the AUTO symbol is flashing the oven cannot be used manually.
"AND" BUTTONS
- Pressing the "+" or "-" buttons makes time go up or down at variable speed according to how long the button is pressed for.
MANUAL USE - Press the MANUAL button: the AUTO symbol goes out (if flashing or permanently on) the SAUCEPAN symbol lights up and the oven can be used by adjusting the thermostat knob and the selector switch according to the instructions given in the manual.
AUTOMATIC OPERATION WITH END OF COOKING AND DURATION TIMERS
- Let's use an example: it is 9:25 am; you want the oven to switch on at 11 am and switch off at 12 pm (cooking time 1 hour).
- Press the COOKING DURATION button and within 5 seconds press "+" button until it shows 01.00, adjust using "-" button if necessary. The AUTO and PAN symbols come on permanently.
- Press the END OF COOKING button and within 5 seconds press "+" button until it shows 12.00. The PAN symbol goes out but the AUTO symbol remains permanently on.
- Move the oven thermostat knob to the desired temperature and the selector switch to the required cooking method; the red warning light comes on the oven light comes on and the timer is ready to start: at 11am the oven will come on automatically and the PAN symbol will light up.
- When cooking is over (12 am) the AUTO symbol flashes, the PAN symbol goes out and a buzzer sounds; to turn off the buzzer press any button.
- M over the thermostat and selector knob to the OFF position.
SEMI-AUTOMATIC OPERATION WITH COOKING DURATION SELECTION
- Let's take an example: it is 11:35 am and you want the oven to stay on for 25 minutes from now on.
- Press the COOKING DURATION button and within 5 seconds press the "+" button until it shows 00.25, adjusting the time with the "-" button if necessary. The AUTO and PAN symbols light up permanently.
- T urn the oven thermostat knob to the desired temperature and the selector switch to the required cooking method; the red warning light comes on, the oven light comes on and the oven starts to operate.
- After 25 minutes the oven and the PAN symbol go out. The AUTO symbol flashes and the buzzer tells you that cooking is over: to turn off the buzzer press any button.
- Then move the oven thermostat knob and the selector switch to the OFF position.
MINUTE MINDER
- Press the MINUTE MINDER button and choose the desired time using the "+" or "-" button.
- The BELL symbol lights up when the minute minder is in use.
- When the pre-set time is over, the buzzer sounds and the BELL symbol goes out.
BUZZER
- The buzzer sounds at the end of a programme and lasts for a maximum of 7 minutes.
- To turn it off, press any button.
- Pressing the "-" button without having previously selected a function the frequency of the signal changes. A selection from 3 possibilities can be made. The selected signal is audible as long as the "-" button is pressed.
STARTING AND CHECKING A PROGRAMME
- The programme starts after about 4 seconds of it being set.
- The set programme can be checked at any point by pushing the corresponding buttons.
PROGRAMMING ERRORS
- Example: at 12:15 pm a COOKING DURATION time of 30 minutes is set and a END OF COOKING is programmed in at 12:30 pm.
- The programme error can be rectified by changing the duration or the end of cooking time, or by pressing the MANUAL button and programming again.
- If there is a programming error the oven will not come on. ANNULLING A PROGRAMME
- A programme can be cancelled by pressing the COOKING DURATION button and then the "-" button until the display shows 0.00.
IMPORTANT: AT THE END OF EVERY PROGRAMMED COOKING OPERATION YOU ARE ADVISED TO PRESS THE BUTTON, OTHERWISE THE OVEN CANNOT BE OPERATED MANUALLY.
FOR COOKERS WITH SELF-CLEANING OVEN
The two side walls and the back are coated with a catalytic self-cleaning enamel.
Every 10-15 times it is used, leave the oven empty at full heat. The time required for cleaning depends on the condition of the oven. Some splashes tend to set hard and may clog the pores of the special coating, preventing oxidation and eliminating its self-cleaning properties. In this case, as soon as the oven has completely cooled apply very hot water to soften the deposits and use a soft brush, without detergent, to remove them. Then switch the oven back on at maximum heat for a few minutes.
(Important: never use metal brushes or abrasive substances).
USE OF THE PAN RETAINERS (fig. 17)
To insert and extract the pan retainers lightly press in both directions as shown in the figure below.
To lock the pan retainer in its vertical position, press downward the two outer sides.
GENERAL PRECAUTIONS
- Always disconnect the power supply before any work inside the oven or where live parts may be accessed.
- N ever use the warming compartment for storing inflammable liquids or items which do not withstand heat, such as wood, paper, aerosol cans, matches, etc.
- Make frequent checks on the rubber connection hose, ensuring that it is well away from hot surfaces, that there are no sharp bends or kinks, and that it is in good condition. The hose must be replaced at the latest at the indicated date and must be secured at both ends using a standard hose clamp.
- If taps become stiff to operate over time, contact the After-Sales service.
- W ash enamelled or chrome-plated parts with soapy lukewarm water or non-abrasive detergents. A metal brush may be used to remove deposits from hob burners and flame caps. Dry thoroughly.
- N ever use abrasives to clean enamelled or chrome-plated parts.
- Do not use too much water when washing the hob. Take care that no water or other substances enter the burner housing holes, as this may be dangerous.
- The spark plugs for electric ignition must be kept clean and dry; always check after use, particularly if there have been drips or overflows from pans.
- N ever close glass lids until the hob burners or hotplates have cooled completely; it might shatter or crack.
- N ever knock enamelled parts or ignition spark plugs (where present).
- The main or wall gas tap should be turned off when the cooker is not in use.
No liability is accepted for injury or damage caused by poor installation or improper use of the cooker.
In case of malfunctions, particularly gas leaks or shortcircuits, contact your engineer without delay.
RU
CopepxaHneO
TexHHueckne daHHbte HxapaKTepehCTKN 18
yCTaHOBka 18-20
Bentnla nomeeHH 18
Pa3MeIeHHe 18
IopKIOueHne K ra3OpacnpedeJIteJbHOcETn 19
HactpoHa Ha pa3JnHbIe TINbIra3a 19
3aMeHa KHKJepOB 19
PeryJnpoBka MHHMaJIbHOrO IJaMeHN 19
IoiKJIIOueHHe K 3JIeKTPOCeTH 19
3Jektpnueckoe 3aXnraHne 20
IpeoxpaHnteJbHoe
ra3OKOHpoJIbHoe yCTPOHCTBO 20
HhopmaaIy IJIy IOTpe6HTeJIe 20-24
BeHTJIaIeI IOMeIeHH 20
3axnraHne ropeJok 20
BkJIOueHHe r3OBON IyXOBKN 20
BkIIOueHHe ra3OBOrO rpnJ 20
IpeIOxpaHHTeJIbHoe ycTpOoiCTBO r30KoHTpOJI 20
3JIeKtpnueckoe 3aKnraHne 21
HcnoB3OBAHnEra3OBbIXropeJok
paobouen nobepxHocTH nIHTbl 21
HcnoIb3ObaHHe 3JIeKtpnuecknx KOHOpok 21
HcnoJb3OBAHHe r3OBOn dyXOBKn 21
HcnoJb3OBaHHe ra3OBORo HJIH
JIeKTPnueckoTo rPnIa 21
HcnoJIb3OBAHHe KOHBekUHOHHo
3JIeKTPnueckoyndyXOBKn 22
JLeKtpueckoIyXOBKn "4 New" 22
HcnoJb3OBAHHe KOMuHnPoBaHHo
HcTIOJIb3OBAHHe TIOJIHΦYHKIIHOHaJIbHOI
3JIeKTPnueckoI dyXOBKn 22
HcnoJb3OBaHneBepTeJa 22
DyXOBKn C TePMOpeRyJrTOpOM 22
HcnoJb3ObaHne TaHMepa 22
HcnoJb3ObaHne npoPpamMpyuioero
ycTpoIcTBa C uHΦpOBbIMN YacAMN 22
HcnoJb3oBaHne nporpaMMpyuioero
ycTpOncTba6e3yacOB 23
HcnoJIb3OBAHHe 3JIeKtpoHHoro
IpoPpaMMpyIOeRo yCTpOcTBA 23
HcnoIb3OBaHHe cAmooOuHaiooueiCyaXOBKn 24
HcnoB3OBaHne 3aINTHOrO OrpKaJdeHnA
paobouenOBepxHocTHnIHTbl 24
PekomehdauHnIO TexHKe 6e3oNaChocTH 24
PncyHKn 49-52
DpkaHne
BcTynJeHneE
-Haia qHpMa 6IarOaapnBac 3a Bb6op H NOKyKy Ondoro H3 Haixx BbICOKoKaHcCTBCHhBx H3dCIn. MblrpoH HoAeCCMcy To B BaIIHX pykax Hauu IINTb6dyT FyHKUHOHPoBaTBc MaKChMaJIbHOIOTaOH HauN LyuHMnpe3yJbTaAMn, ONpaBdbBaBce BaHOn OKnJaHH.C 3ToH neBIO ppeJaRaem Bam BHMaTeJbHO IpOHTaTB HAcTOIepyKOBOcTBO IN npHePckBaTcR Tex erO ykaaHH, rpepeH nTeo np6opax H ChCTeMax, KOTOpBMn OchAnHe HaaPi. AabPHKa =abPHH3ROTOBHTeB CHImae C Ce6B BCkyO OTBcTBeHHOCtB 3aH3ROTI NOBpeXJeHN, HeCNpABHOCTn H HeCyactHbE cLyuaH, NOBpe: Bbl3BaHHbE HeCO6JIIODeHNm PckOMeHaan No yCTaHOBKe Hbb3BaH. EKNJIyataUNn NNITb. KCNJIyataUNn NNITb.
-ДЯTORO,уTO6bBIByHnYcKaTbПNTbB COOTBeTcTBH N COBpCMHHbIMN TcxHOJIrCCKHM PCWCHHMAH H/HINДЯ NOCTOJHHORO NOBbIeHHa KaecTBa HaIHx H3dJIHH,ФaBPHKa OCTaBJACT3aCO0H npABo BHCCHHa KaHX JINBO H3MCHHHДaxe63 npEBapHTeJIbHO pEduPexDeHH,YTO,OINAKO, He BblBAeT npOBjem HIN 3aTpPyDHeHH pNpKcnIyataHH.
-ECJIN BO3HKNKHT Heo6xOuMocTb 3aKa3a 3aNuaCTeH,HaIO cdeLaTb 3aPoc BaWemy npOabuy, rIe CLeyetyka3aTb HOMep MOcJIH HOMCp CEPHN IIHTb, <POOTAMNOBAHHbc Ha fApBPHOH ONO3HaBaTeBJHOH TaBNIUKE.3Ta TabJNUKA MOKeT 6bITb paCNOJOKeHbHYTPH OTDCJIeCHnpa3OrpeBa TAPcJOK (ccJH eCTb) HJH Ha 3aDHei CTopoHE PJIHTb.
- IIJHTa COOTBETCTBYeT HOPMaTHBaM:
-CEE 90/396
-CEE 73/23 n 93/68
-CEE 89/336 (no ypOBHIO paHOnomex)
-CEE 89/109 (KOHTaKTnPOBaHHc C INHcBBMn NPOyKTaMH)
IIOJCHEHIE
B HactoIeM pyKOBoDCTBe npedctabJIaOT HHTepec ToJbKO Te napaPbHnH pa3deJIb, rde roBOpHTbcra O npH6opax, KOTOpBMn OcHaueHa BaHa nnHtA.
RU
TexHHueckne daHHbIe H xapakTepHCTHKN
T30BbIE FOPEJIKN (XHKJepb H MOIOHOCTH)
KaT:cmToPfabpnHnyTaBnHkyHaobJokKc
KJacc 1 nn 2-1
CTENCHb TcHIN3OJIaUNN X
3JIKTPNUECKNE KOHOPKN3JEKTPNUECKNE KOHOPKN
0180 1,5 KBT - 06bHuHa KOHΦOpKa
2.0 KBT - bICTpa KOHΦOPKa
MOUHOCTb 3JEKTPNUECKO JYXOBKN 60x60
CoeHHcHc C rHkoM MeTaJIHcCKo TpyoB (pHc. 3 A)
CoedHHHe BbnoJHReTc np NOMOHTpyb COOTBCTBYIOCh DeCHSTBYIOHM HauHOHaJIbHbIM CTaHapTaM.
Tpbya HABHINHBAeTcHa IIITyUep, Ha KOToPbI NpeBapHTbHO yCTaHaBJIHBAeTc yIIOHTHHeBHaN pOkJaKa.
CocHHHc Hc pc3HHOBbIM IaHrom (pHc. 3 Bn 3 C)
CoeHHHeHbINOHJeTcPiH NOMOHN Pe3HHOBOro IHaHra, Mapka KaToporo COOTBCTCTByCT DCNCTBYOUHM HaUNHOAJIbHBIM cTaHApTaM.Oba KOHua IIIJaHrA DOJXHbI bItb 3aKpeINJIeHbI cTaHApTHbIM 3axHMAMn. B yctAHOBJIeHHbI cPOK HeoXoHMO
PpOH3BOHHTb 3aMeHy IIIaHa H DoCTyn K HeMy DOnJxH eBtBDoCTyn (eOeMoyNopeMBoTaB HeNocpeCctBeHHo), CMOTPN PNC.7
3AMEHA XHKJIEPOB FOPEJIKN DYXOBKN (pHc. 5a)
OTKpyTNTC BnHT KpcIChHna DHa dyXOBKn.
-CHHMMTeDHO DYXOBKN(CBnraeeroHa3aHNOHMma)
-CHHMMTe ropeKy dyXOBKn, npeBaPHTeJbHo OTkpyTNB KpeRnueBn
-3aMeHHTe KHKJIep, HcnoJb3yra TopeBOI TpyuHaTbKIOH Ha 7 MM.
CHHMMTc ROpCJky, PpeBapHTeJIbHO OTKpyTHB JBa KpE\PHe ee BHTa
3aMCHNTe KHKLCp, HcIOJIb3yT TOPcBOI TpyHaTbH KIOUHa 7 MM.
-Пиу yctaHOBKe xHKJIepoB HNKoTda H3JIuHHe He 3aTARHBaHTe HIX KJIIOYOM
-ⅡocJIe 3aMeHb BcEx XHKJIepoB PPOBepbTe Hx ra3OHcnpOHnuaacMOCTb.
PEYJINPOBKA MNHMAJIbHOI OIIAMEHN IOPEJOK PABOUEHPERYJIOBEPXHOCTN JINTb
BcIyue,ecINIIHTaFyHKHONHPyeT Ha cKJHexHOMrae (I/II), PCrYJnPOuHBn BnHT DoJIxCH 6bITb 3aKpyuch DOynopa. IIHTaMOKeT 6bITb OCHAHeHa KpaHAM TnA «A,CycTAHOJIeHHBM BHyTPn PCrYJNPOBOUHBM BnHTOM(PCrYJNPOBaTB KOtOPbIMoKHO npn NOMOHN MaJIeHbKOI OTBePkn Upe3 CTepeKeHb)NJN TnTHA «B»C HApyXHBM peryJNPOBOUHBM BnHTOM C npaBOI CTOpHObl
TaeemnoJIOpeeybTaBHeNocpeCTBeHHO),CMOTpH pnc.7.
HCHHOHTPOUER eHKOHTOOHNHOEe HcNOJIb3yETcH
HIOINHOHGHMMI HTHAIHO KACKOPaHmPcJCnHbHdQcHCTBOBaTb
DDHOHNOHepo3600HePOHuaMeoTb WTYuepoB H
-3aXHTTE TROPKy N yCTaHOBHTe MaKCHMaIbHOC IIaM
-CHMHTe pykpyepyIATopa,NOTHyBeeHaceb,HeHaKImaHa nepeHIOHOHaHeBPiHTbBO H36ekahHe ee NOBpeJDeHH.
-ПИ ПОМОПМ MaJIeHbKoI OTBepTKI OTKpyTHe peRyJIpOBOuHbI BnHT IIN6JI3N3TeJIbHO Ha TPh O6OpOta (BpaIaIa OTBePTrkI npOTHB YacOBoi CTpeJIKN).
-IOBepHHTe eIpe pa3 cTepeKHeb KpaHa IpOTNB yACOBH CTpeJKN DO ERO 6IOKPOBKn. B ETOM CJIyueae ByET MAKCMaJIbHOE IIaAM
- OueHb MeIeHHO 3akpyTHTe peryIINpOBouHbBnHT, He HaKHMaHa OTBeTpKy, Do TEX nop, NOKA IIaMg He yMeHbHTcR Ha 3/4. Ipn 3ToM o6paTHTe ocOboE BHUMaHHe Ha To, YTO6bI IIaMg 6blIO DOCTaTOH OYCTOuHBbIM DaKe Ipn yMepeHOM NOTOKE BO3dyxa.
TNbI T3A
PERYJHPOBKA MHHMAJIbHOFO IJIAMEHN TOPEJKN DYXOBKN B cIyue,ecIIIHTa fyHKUHOpHyeT Ha cKHeHOM rase (I/II), peryJInPOuHb BNHT DoJKeH 6bIb 3akpyeH Do ynpa.
Ecln dIyHKUHNOHPOBAHN IINbI HCIOJb3yETc HAtypaIbHbIra3,TOHC3aBCHMOOTTHaKpaHa pCryIHpOBKa MHHMaJIbHOToIJIaMeHH BblIOJHReTc CJeDyUIMO6pA3OM
-CHHMHTe dHO dyXOBKn (cBnra ero K 3aHne cTeHKe HNOHHMa).
-3axrnte ropeky dxyOBKn H yctaHOBHTe Yka3aTeJb pcryIHPBOOHOH pyKn B NOIOXCHNC MaKCHMaJIbHOro IIJaMeHH.
KIOEPOBEOPOXPAOHOENIOBEPXHOCTN IINTBI
-HaHHTpepyJINPOBOUHbBnHTTePMOperyJIrTOpaHnKpHa (PHc.8)
OTKpyTHc pcryHPOBOHyBn BnHT npHbH3HTcIbHO Ha TpH 06oPoTa.
Ucpc356MHHTyYCTaHOBHTcYka3aTcJIbpyKNBIOJIOXCHN CHHHMAJIbHOrOIIJaMeHN.
-MeJHeH0 3aKpyTHe peryHPOBOuHbIN BHT, HabIIOda yMeHbIIeHne PJIaMeHH Yepe3 CTeKJO B IBePeI dyXOBKN (IBePua 3aKpbTa)doTexnop, Noka KOHyc PJIaMeHH He yMeHbIHTCsdo 4MMPiH6JIH3NTcJIbHO.Hc pckOMCHdyCTcCJHikOM yMcHbHaTb PJIaM. OHO DoJIXHO 6bITb CtaBHLbHM DaKe pNb6bICTpOM OTKpbBaHHn 3aKpbBaHHn DBCPbU dyXOBKn.
- BbIKIOHTe TOpEJKV HcTaHOBHTe IHO JYXOBKN Ha MeCTO
IIOKJIIOUeHNE K 3JIeKTPOCETN
IpeKJde HEM NOKIOUaTb PHTy K 3JEKTPocetH, HeoXoHNMO y6cNtBcR, qTO:
- HanpЯkeHHe BHeIIHcetH COOTBeTcByeT npaMeTpam, yka3aHHbIM Ha fa6pHouO O03HaBAtcJbHO TaJIHKc
- po3Etka 3a3eMJIeHHH yHKUHOHpyET
Ecln po3eKa IJII NOKJIUHcH H NHTbI paCIOJKeHa B TpyHOIOCTYINOM MCTe, HAJaUNK DOJXCH IIpCdyCMOTpCTB BbIKIOHATeJIb C 3a3OpOM pa3MbKaHH KOHTAKTOB paHBIM HIN IIpCBBIIaOuHM 3 MM
EcHnPiHTa yKomNJIeKToBaHa ceTeBbIM HHypOM 63 BNJKN,TO DnI NOkJIIOHeHH MoXHO HcNOJb3OBAbCTAHdAPTHyBOHJky.
RU
YCTAHOBKA
Ipn 3OM HeoXoHMO yHTbBaTcJeDyUIIee:
-JCJTO-3cJIeHbI npOBoDdoJXCH HcNOJb3OBaTbcra 3a3emJIeHHa
-ROJy60I npOBoDlaH HeHTpaH
- KopnHHeBbI npOBoI dIa HapJxKeHH cETH
-HHyp He DoJxKeH cOpnKacatbca co cTeHKaMn NHTbI, HArpeBaiouHmncs 6oJee 75^
B C Lyuae 3aMeHbI CeTeBOrO HHypa HcNoJb3OBaTb HHyp TnHa HO5RR-F HIN HO5V2V2-F NoDxOJaIero CeueHna (CMOTPh CXEmbHa pnc.2).
CCINIINTAIOCTABLCHA63CCTCBOROHHypa,INPHIOKJIIOUCHHNHCNOJb3OBaTbHHPTNIAHO5RR-F HINHIO5V2V2-FNODXOJIIIEEROceEHnRA (CMOTPH CXEMHa pHC.2).
BHIMAHHE:BHIMAHHE:
IIpoH3BOIDHTeJIb He HecET OTBeTCTBeHHOCTH 3a IOBpeKJdeHnR, Bb3BaHHbc HCCO6JIIOChNCM BbIiCyka3AHhBX TpC6OBaHHn I DeHCTByIOHx IIpaBnI NO texHnke 6e3oNaCHocTH npn IOkJIIOUeHHN IIHTb. O6raTeJIbHO IPOBepbTe, YTO IPOBOI 3a3EmJIeHHN IIPTbI IpaBnJIbHO COeIHHe C cetbIO 3a3EmJIeHHN (CMOTPH CXEMbHa pHc.2).
IINITblOCHAUEHHBIE CNTTEMON 3JELKTP03AXHNAHNRINHTbl
Touhie paCCTOHnM MEXy 3JCKTPODOM H TOPCJIKOY kA3aHbHa pnc.5a,56,6a,66.
EcH NCKpa He BbHbAeTcH, He yNOpCTByIte, T. K. MoKHO NOBpeHHTb reHepaTOP. CnCTema 3aXHraHHaMOKeT He cpaabTBaTbNo CJeDyUHM nPHuHHAM:
-BJaXHa, HEnCIIpaBHa HIN 3aIpy3HeHHa CBeya
- HenpaHbHO yTaHOBJIeHO paccToHHHe MeKdy 3JKeTPODOM HopeKoI.
- TOKONPOBODAHIN NPOBOOOK CBEUH NOBpeKdEHN OTOJIeH.
- HCKPOBOI pa3pIyXODHT B 3eMJIIO (B DpyrHx HaCTRX IINHTbl).
- NOBpeKdE HReHepaTOP NJIH MMKpOBoKJIOUaTeJIb.
CKONJIeHHe BO3dyXa B Tpy6OpPObOaX (OCo6cHNO nocJeIANTeJIbHO rnePHoDA HEnCNOJb3OBaHHN IINTbI).
- HENpaBbHbHO COCTaBJIeHa Ra3OBO3dYHHa CMEcb (HENpaBbHbHOE ropeHHe)
IPEIOXPAHHTeJIbHOE YCTPOINCTBO FA3OKOHPTOJIIPEIOXPAH
IpaBnJIbHOe paCCTOHHmeMeJdy KOHuaMHyBCTBHeJIbHO
3JIcMeHTa TcPmOnapbH I RopckoNIOka3Ho Ha pnc.5a,56,6a,66.
IyHKUHOHNPOBaHH KlaHaHa Ra3OKOHPTOJ
DeCTBOBaTb CJeDyIOUM Oba3OM
3aKHTeROpeKyHOCTaBBTEeBkIOUcHHOINpHOHN3HTcJIbHO Ha 3MHHyTbI.
BbiknoHTc ropeky H noBepHnTe pyky peryIaTopa B NOIOXeHHe 3akpbITO, 0603HaueHHoe CHMBOJOM ().
-Yepe3 90 cekynB clyuae KOHTPOJRA ropeJOK paOouen NOBepxHOCTHn Uepe3 60 cekynB clyuae ropeJOK LyXOBKn I rPHJN NOBepHyTb pUky B NIOJKeHne OTKpBTO.
OCTaBBTe pyKBy B 3TOM IOIOXCHHH H pHbIIN3HTb 3aJxKCHHyOCnNkY K TopeJIke: TOPEJKA HE I0JIKHHA 3AXEyBC.
BO BPCM3aXHHaHn Tpe6yOTc npH6JIH3HTCJIbHO 10 CCKyHdIa BO36yKJHeHH MaHIHTA.
KJanaHra3OKoHTpOJIcpa6aTbIbAEaBTOMaTHueeCKn NocJe BIKIOUeHHNIIaMeHHHe 60JIee Yem Upees 90 cekyHd Ira ropeLok paOouen NOBepxHOCTH IIHTbI H Upees 60 cekyHd Ira rOpCLOK dyXOBKNrPHJIA
IPDEUYTPEJKDEHNEIPTPEUYTPEKDEHNE
- Ipeep JIO60I Oepauee no quCTke HIN TeXOBcJyKbAHIO OTKJIouaHTe PHTy OT 3JIekTpoecTH N 3akpbBaHTe KpaH NOaH ra3a.
IpnnoKIOHcHHN HHTbK HCTOuHHky NOaun Ra3a He npOBpcnTc rcpmctuHOCT cbkoB npn NOMOHN LAmCHn EcnB B aHem pacnopjKeHHn Het cneuaJIbHbIX npnbopOB JnKoHTPOJra30OHcPiOnHuaeMOCTH, MOxHO HcNOJIb3OBaTb IChy HIN KOHcHTpnpoBAHHU MylbHyIO BODY.
YcTaHaBJIHbA Ha MeCTO paBOUyIO NOBepXHOCTb IINTHbI y6eHTecb, YTO 3JICKTPNUCCKNC INPOBOIDKN CBCUCN (CCJIN HMCIOTC) HC CONPHKACAHO TCR C KJKLEpAMN H He NepeKpbIBaOT HX.
DAHOSOPAAIINJNIOPTPESETEJEI
KAKHCIOJIb3OBATbIHTYKAKHCIOJIb3OBATbIHTY
BEHTJIYIINNIOMEUHREHBETNIYIINNIOMEIENH
3KcnIyataaRa3OBHnIHTbCOnpOBoXdAcTcBblDCJIeHHCM TeNIOBTn BJaXHOCTn B NOMEuEHN, TDe OHa yCTaHOBJeHa. IIOStomy, Heo6xOJHMO ObecneHTb BEHTNJRAUHO NOMEuEHN I NOIDepKHBaTb OTKpbTbMn ecTeCTBeHHBte BEHTNJRAUHOHHBte OTBepCTHn HIN yCTaHOBHt BblrKaH0H 3OH.
BcIyuc dIHTCJbHOro H HTCHCNBHORO HCNOJIb3OBaHHI IANTb BO3HNKaET HeoXoDMOCtB DIOIOJIHNTeJbHO BENTHJIaUN, KaK, HApnMcp, OTKpbITb OKHO N JYBCJIHHTb MOHOCtB BbHyjKeHHOH BEHTNJRAUIN H BbITJHKHO 3OHTa.
BKIOUeHHe IOpEJOK PAOueH HOBEPXHOCTN IINITbIKIOUeHHe IOpEJI
HaxMHTe H NOBepHHTe peryIHPoBOHyIO pyIKy IpOTHB JaCOBOI
CTpeJKN H yctaHOBHtB OTMeTKy HaIPOTHCBMBOJIA 06o3HaueHHoro Ha NpeeHHe NaHeJN PJIHTb (NoJOKeHne MAKCHMaJIbHOrO IIaMCHH).
-3aTe moHecHe 3axKxHHyO cHnky K ropeJIke. -Iy mChbSCHHH nAmcHH NOBopauHBaHTe pyuKY B TOM KE
HaHADABHEHHVOTAHARHHBQTMETKYHaNPOTHB CHMBOJa 10JIOXCHHC MHHHMAJIbHORO IJIAMCHHI.
BKJIOUeyHNE FOPEJOK PAOQEN IOBEPXHOCTN, OCHAIEHHbIXBXKJIIOUEHKJIANAHOM FA30KOHTPOJRAJKJIANAHOM FA30KOHTPOJIA
HaXMMHe H NoBepHHTe peRyIHHoBOHyIO pyuKy IpoTHB YacOBOH CTpeJKN H yCTaHOBHTE OTMeTKy HAnPOTNB CHMBOJa O6O3HaueHHORo Ha nepeJHn NaHeJN PJIHTb (NoJIOKeHHe MaKCHMaJIbHOrO IIAMcHn).
-3aTeM NOHeCHTe 3aXxKHeHHyIO cNHyK Ky K ropeJIke H haxMHTe Ha pyuKy Do yIopAp H depKnTe ee npKtaO B TeueHnn np6JInHtTeJbHo 10 cekyHd.
OTnyCTHTe pyuKy H y6eHNTecb, YTO ropeJka 3aJrIacb. B IPOTHBOM CJIyAc IOBTOPHTE BCE CHaHaJa.
BKJIOUeyHNE TOPEJIKN DYXOBKN
-OTKpoITe IBepeNy dyxOBKn
HOHxGtPOHaTPOe npTHBaCOBnCTpeKHN DO NOJOKeHHMAKCHMaJIbHOrO PJaMeHH.
3aTeM NOHHeCHTE 3aXeHHyO CnHcy K cHTpaIbHOMy OTBepCTHIO Ha IHe dYxOBKn H aKMTe Ha pyky Do yNopa (CMOTPN PNC.9).
He otnyckay pyukh ybeintecb B TOM, qto ropeka 3aKrtlaacb. Habnoiaa nIamy uepe3 Dba 60koBbIX OTBepCTHn Ha dHe IyXOBKn IIpNoH3HTeBHO uepe3 10 cekyHd OTNcyTHe pykny npOBepBe, He noTyxJa nn ropeKa. B IpOTNBOM Cnyae NOBTOPTB BCE ChaHaJa.
BKJIOUOHEHNE FOPEJIKNI PPHJRA (FA3OBbIN TPNJIb)
YcTaHOBHTe PnAHHy 3aHHTb pCryIHpOBOuHbX pyck OT NOTOKa rOpJrero BO3dyxa, kak yka3aHO Ha pnc.12.
HaKMHTe Ha peryIInpOBOHyIO pyKy dyXOBKn H NOBcPHTe cc BnpaBO IO KOHua.
3aTcM NOHcHcTc 3aKxCHHyO cNHy K NcpΦopHpOBaHHo Tpy6 ropeJKN HaxMMTe Ha pyKy do yIopa (CMOTpn pnc. 10).
Hc otnyckay pyky y6cnTccb. rTO rOpCJa 3aXrJacb
IpiH6JIH3HTeJIbHO uepe3 10 cekyHd OTnycHTe pyky H y6cIHTC8b, ITO rOpCJa HC nOtyXJa. B npOTHBOM Cnyac NOBTOPHTE BCE CHaJa.
PNEOXPAHHTIELHOE YCTPOINCTBO FA3OKHTPOJIANPEOXPAHHTIELHOE
IpeHMyIeCTBO OCHaIIeHHbIX 3THM ycTpoIcTBOM ropeIOK COCTOH B TOM, YTOB Clyuac HcnpoN3BOJbHO rAChHn IaMCnI cpaabTbBAe TCHTeMa 3aunHTb. DeNCTBHTeJbHO, B 3TOM cLyuae ABTomATnueckn IpckpaaactcnoaHa ra3a K NOTyXueH rOpke, IO3BOJIra TAKHM Obpa3oM n36ekaTb OnaCHOCTn yTeKN r3a. IocJe HnpoN3BOJbHO rAweHn IlaMeHN KJaNaH ra3OKoHTPOJIc paBaTbBAeT abTomaTHueCKn He 6OJIee Uem uepe3 90 ckyHd dIra rOpeIOK paOoue NOBepxHOCTN PInHTb Huepe3 60 cckyHd dIra rOpeIOK dYxOBKn HprnJ.
JIHTbl, OCHAeHHbI CNTEMOJ 3AXHARN JIKTPHueCKOHNCKPbIOJEKTPUECKOHNCKPbI
OTNIHHTN30EATHEHHeHNGIaBnBnA KpHcTKe NOBCpxHOCTKHOHOpKN
PnHn3aXnraHH TaKo Kk OINcaHO BbIe, 3a HCKIOUCHHcM TORO, YTO BMCCTO CINHKN HCIOJb3yCTcN HCKpa, NOJyuaemn Pn HaxKaTH, DaKe MHOROKpAthOM, paCNOJIOKeHHo Ha nepeHHe NaHeN KHONK, HIn Jx He HxHMaHa pykoRTky ropeJIKN, KOtopa NOLJHa 6bITB BKIOUeHa. B Clyuae, ecn rOpelka He 3aXnHraeTcN, NonpoBoBaTb eue pa3, ycTaHOHB pCry.IHPOBOHyO PyKy B NOIOKCHNE MHHMaJIbHOrO nJaMeHN (
- Ecln nIHTa OcHae HcTeMoN 3eKtpo3aKHaHraHna RopeNo nIeBHeHgOeKmOn 3eKtpo3aKHaHnropeNo KxOBKn IprHJ, pHnx BkIOueHHN IOEHHIOHIOHIOHIOHIOHIOHOIOHOIOHOIOHOIOHOIOHOIOHOIOHOIOHOIOHOIOHOIOHOIOHOIOHOIOHOIOHOIOHOIOHOIOHOIOHOIOHOIOHOIOHOIOHOIOHOIOHOIOHOIOHOIOHOIOHOIOHOIOHOIOHOIOHOIOHOIOHOIOHOIOHOIOHOIOHOIOHOIOHOIOHOIOHOIOHOIOHOIOHOIOHOIOHOIOHOIO HOIOHOIOHOIOHOIOHOIOHOIOHOIOHOIOHOIOHOIOHOIOHOIOHOIOHOIOHOIOHOIOHOIOHOIOHOIOHOIOHOIOHOIOHOIOHOio HOIO HOio HOio HOio HOio HOio HOio HOio HOio HOio HOio HOio HOio HOio HOio HOio HOio HOio HOio HOio HOio HOio HOio HOio HOio HOio HOio HOio HOio HOio HOio HOio HOio HOio HOio HOio HOio HOio HOio HOio HOio HOio HOio HOio HOio HOio HOio HOio HOio HOio HOio HOieHHy IOBepu DxyOBKn NOJIHoCTbO IOBpIToH DBepuy DxyOBKn NOJIHoCTbO IOBpIToH DxyOBKn PnB BKIoueHHOM
- Bo BpemBkIIIOeHnropeJOKdyXOBKnIrpHJI, OCHaIIeHHbIX CnCTeMoN 3JIeKTPo3aKHTAHn, He HaKHMITE Ha KHOKNy 3aKTHAHN60JIcc HcMHa10 cCKyHd. EcHn UepC3 10 cCKyHd ropeJka He 3aKTeTc, OTNyCTHTE KHOKNY, OTKPOITe DBepUy DYXOBKn HNOOxNTe NcKpaHcH McPC MHyTy IpcKd CcH NOBTOPHTb BKIOUeHHe. EcH JKe ropeJka He BKIOUaETc Np PnPHNH HeHCnPabHocTH CnCTeMbI 3JIeKTPo3aKHTAHn, To 3aKTHTE ropeJky BpyHyIO pNn NOMOIN cIIuKu, a 3aTEM BBIOBHTe CneuaHInCTa No TEXo6cLyKHBaHHIO.
1nraeepaegnnrnnnne 3nKtpo3axraHnna ropeok
TOTOBJIeHn MNOHO HbIIOaTB uepe3
THeHHyO DBepy DxyOBKn PnB BKIOueHHOM
3CKTPNCCKOM OCBCUChHH. TaKHM Oba3OM MOXHO HcCKaTb
NOCTOHHORO OTKpbIBAHN DBepu, ECIN B 3TOM Het
ONPCdCLCHHO HAo6HOCTH, KaK, HApHmCp, NOHTb
TOTOBJeeec 6IOIO KHPOM.
PPEYNPEXKDEHNEINBREHTbIBaHTe PnHrTOBIAemyo B dyXOBKe Nmuy npraMo Ha npOTHBb. OH cIyKHT TOJIbKO JToToro, YTObHa Hcero cTeKaJI BblJeIAReMbn pNnJapKe JnP. PPIMCHAHHE: IaI nIHT 6c3 TcPMOperyIaTopa;
IPEyIPEKDEHNEPIEYIPEKDEHNE
-06bHNO NocJe IINHTeJIbHOro HeHCIOJIb3OBAHnI INHTbI cpa3y Hc ydaCTc 3aKeChrTopcIKn. IpeCd 3aKHHaHHem DOCTaTOH OIOJDAtB HeCKOJIbKO CEkyH, NOKa He BbIeT CKONHBIIIICR B Tpy6OpOBdox BO3dyX.
-CTapaHTecb,UTOBiBMcTe C BbIpyCKaEMBIM H3 ropeJOK BO3dyXOM He BblIIO MHOrO Ra3a.ECLH rOpEJaHe 3aKReTcB TCHHH HCCKOJIbKHX CCKyHd,IOBTOpHTC 3aKnHaHc, IpeBaPHTeJIbHO NOBepHyB peryIINPOBOUHyO pyuKy B IOJOKeHHe 3aKpbBaHHA (),a 3aTEM BHOBb OTkpBIEe.
-KordaDyXOBKa HINrPHJbHCNOJIb3yIOTcBnepBbE,H3 OTBepCTHA DYXOBKN MOKeT NOBHTbcraDbIM HEnpNTHbII 3aIax,Bb3BaHHbIpa3ORPCBAHHcEMMaJIHPOBAHHOIOKpbITH CTeHOK DyXOBKn H OCTaTKOB MacJIAHHcTOI CMA3KH ROpEJOK.
HcNOJb3OBAHNE KOHΦOPOK ΓA3OBONΠNTbHNCIOJIb3OBAHNE HcNoJb3yIte KAcTpOJIu C dHaMeTpOM dHa, NOxOJaero K JaHHoMy pa3mepy KOHΦOpKn. PAmr He DoJXHO BbPbBaTbcN IaKAcTpOJIu. PeKOMeHdyetca:
-MAIOI TOPEJKN HIOJIb3OBaTb KAcTPOJIN DnAmETpOM 8cm, yCTaHaBJIHBAI NOCTaIBIeMByO BMeCTe C IJIHTOn CETKY IyMeHbIeHHN DnAmETpa TOpeJKN.
-ДЯсрднг rpeKn HcnoJb3ObaTb KacTpioJH dHaMeTpom 14 CM.
-ДЯбICТРОIROPEJKNHINTPOINAHROPeJKN=EMKOCTB C DHAmCTPOM HcMHeC22CM.
TpoHra ropEnka npiroDna dnnncnboa HnKacptioB Wok.
INPMUEAHHE: HN B KOEM Cnyae He OcTabJrTb pyky B INPOMeKyTOUHbIX IOJOKeHHx MEKdy CHMBOJOM MAKCImaJIbHO
JIaMeHH H NOJOKcHHeM "3aKpbTO"
INTbC 3JEKTPHUECKHMKOHΦOPKAMH
KOHΦOPKN HMCOT pa3JIHUYO HHTCHCHBHOCTb HaIpcBaHHa B 3aBHCHMOCTH OT NOJIOKeHHa peryJIaTopa.
-IOJOKEHHe1= MHIMMaJIbHOe HaIpcBaHHe BCEx KOH@pOK
- NOJOKeHHe 6 = MaKCHMaJIbHOe HaTpeBaHHe ObUHbIX H bICTpBX KOHΦOpOK (C KpaCHbIM DnCKOM)
IOIOKCHNC0=BBIKJIOUCHNC BCCX KOHΦOPOK.
He HcnoIb3yIte KAcTpOJIH C DHaAMETPOM DHa MeHbIe DHaAMETPa KOHΦOPKN. DHO KAcTpOJIH DOJIXHO 6bITb KaK MOXHO 6oJIeC NIOCKHM, YTO6bI JYUIIe npHJIeRaTB K NOBepxHOCTH KOHΦOPKN (CMOTPN PNC.11).
PPEyPPEKDEHNENPEyPPEKDEHNE
He octaIJIte KOHΦOpky BKIOueHHo 6e3 KAcTpJIN. EcJN JBe BbI HIOJIb3yete KOHΦOpKy BIIepBbIe, TO peKOMeHdyETcOCTaBHt b ee BKIOueHHo npH6JIu3HTeJIbHO Ha 10 MHyT dJIrTO, UTO6bl IpocuyHb BJIary H OCTaTKn CMa3KN Ha ee NOBepxHocTH.
- EcIn KOHΦOPKa He HcNoIb3yETcB TeueHHn DnHTeJbHOrO nepnoa BpeMeHH, peKoMeHnyETcCJIerKa Cma3aTb KInPOBoH CMA3KO CC MaJIHPOBaHHYIO NOBCpxHOCTb.
HcIOJIb3OBAHNE FA3OBOJ DYXOBKN
-10ocJIe BkIIOUeHHraOpeJIK 3aKpOte KpbHky N OCTaBbTe DxyXOBKY B TeueHHN 10 MmHYT Jla Pa3oRpeBaHH.
- yIoxHTe pIpyroTOBJIemyIO NIIHy Ha ObUHyIO cKOBOpOy 63 pyuKN H NOCTaBBTe ee Ha XPOMHPOBaHHy IO peHTKy. - IOMCCTHTc pcWETKY BMCCTC CO cKOBOPoON B dyXOBky KaM OMOHO BbHIe H ycTaHOBHTe yKa3aTeJIb pyuKn peYJrToppa B
pykapeyIaTopaBNOJIOXeHHMaKcHMaJIbHOHaRpeBa 280°C
-pykapepyJrTopaBnoJIOKeHHMHHMaJIbHOroHarpeBa 150°C
-Bce npomekytohhe TemnepaTypb MeKdy 150°C H 280°C yctaHaBnHbAHTc npH6JIH3HTeJIbHO MeKdy NOJIOXeHHem MHHMajbHorO MAKCHMaJIbHorO HaPeBa.
HnKOrda He yctaHaBnBaHte pyky peIyTAToPa B IIpOMeKyTOUHOE NOIOJoxEHNe MExdy CNMBOJaMn MaKCHMaJIbHOrO HarpeBa HOTKIOUeyHn dyXOBKn ()
NCIOIb3OBAHNE Ia30BOIg H/IM 3JEKTPNueCKOITPNJIA
- YcTaHOBHTe IlaHky dIa 3aunTbpeYIpNOBOUHbIXpyueK OT NToKa rOpAero BO3dyxa, KaK yka3aHO Ha pnc.12.
TOnbKO dIy MoJEne co "CtAtnuecko M OPMHOROHNHOHBOH 3NEKTPnueckO DxyOBKO" MOXHO NcNoJIb3OBA Tb rPnB C 3aKpbITOn DBepue, He nCnONb3yra 3auHTy pyek.
-3aXHTe rOpEly H NOOxHnTe HeCKoJbKO MHHyT, NOKa HarpeETcA LyXOBKa, HJI K E BKIOHTe 3JIeKTpueeCKyIO CnHpaJIb rPnI. - Pa3mecTHTHe Ha peIeTe KpHrTOBJIReMoE Ha rPnJc KyIIaHBe.
- YcTaHOBHTpeWTeKBy DyXOBky B caMOe BepxHee NoJIOKeHne.
-uyTB Hnke peWetKn NOCTaBbTe npOTHBeH.
-3aKpoIte DBepeU dyXOBKN, PnHcJIOHRe ee K 3aUNTHOIN IJaHKe.
HcckObKO MHHyT NpeBepHHTe KAPHBWUOC Ha rPHJIe Hnuy TaKHM OpbazOM, YTO6bl ObE CTOpOBH NOdBeprncb ODHaKOBOMY DeHCTBNO HHpKaPacHO H3JyueHN H 3aKaHnCpaBHOMePHo. (BpemI pNIROTOBJIeHN 3aBNCHT OT Tnna PPOdykTA HINDBHNYaJbHORO BKyca).
INPMMEAHHE: INBKNOCHHI rPHII BnCpBbIC MoKHO 3aMCTNtB NOBJIeHHe IbMa H3 dyXOBKn. PpeJe Yem INPcTynTHb K INHROTOBCHIO INH, pCKOMChyCTcN IODOxDaTb NOKO JIOJHOCTbIO He CROPATcK cMa3Kn HEKOTOpbIX DeTaJIe. Bo BpEm npHrTOBJIeHn INHn Ha rPHJIe He INpeBBuHaTb HOMHaJIbHyU yCTaHOBlCHHyU TCMnepaTypy.
BHIMAHHE: Ipn HcnoJb3OBaHHrpnHapxHbe qactn dYXOBKn MoryT cnIbHo harpeBaTbc. He noDnyckaTe deten 6JNkO K dYxOBKe.
3JCKTPHueckKa CnHPaJIb DyXOBKN, paCNOLOXKCHHA B CbPxHCN ee qacTH, BKIOUaETc np NOMOHN OOBOPa peYJINPOBOOHpyHK No YACOBON CTpeJIke. OTMeTKa yka3aTeJIHa pyUKe DOJIXHa COBnaTb C CHMBOLOM TpNJ HA NCPCdHcN NaHCJIc IIANTbl. IIpN BKIOUeHHN TpNJ 3aropaETc KpacHaNAMIOuKa, 0603HaauoA BkIOUChHc 3JCKTPHueckO cnHpaJIH.
Hnke npnbdeHa opHeHTnpBOHna TabuHa peKMa npHrTOBJIeHHa pa3JNUHbIX 6IIO. He 3abBaHTe, UTo 3TH npapaMeTpbl MOryt H3MeHrTbcR B 3aBCHMocTH OT KOJIueCTBa H THNa npHrTOBJIeMoN NIIHN HHHBHDyAIBHO RkyCa.
RU
HOPMALINJIOTPESHTEJEI
Xpnon Tnc eotiac uypaepiou 29
XpnoTow nAektpikwEOTIW. 29
Xpnon tou fouqvou uypaepiou 29
Xpnon Tou grill uypaepiou
Tou nEkrpiko grll. 29
Xpnon tou oTaIKOU
Zuouc kai npoeiDonoioeic 32
Eikovες 49-52
Eioaywyn
-H 3aipia pa, exxapiotwvta oac nou diaaleEate ev a nto Ta apioTa npoiovta pa, thevi va exTE ano autn Tn oukeun Tnv kautepn anofoan, onwc awata anaitei pe autn Tnv ayopa ca. I' auto ac npapaalei va diaabeetkai va akolounoete npoektikTc odnyiec tou napovtoc exyeiipoiou, laubavovtac unoyn ovo kvecs tic npaypapous nou apopouv ta dEsouap kal ta opyava nou unapxouv stn oukeun oc. O kataokuaotnc dev fepei kaiia euvn yia zmuic nou th npokknouv c avtkieeva n atoa ano lavthetaevn eykataotaon n m wotn xpon tns ouakeuhs.
-Exovtacav oKoTo nV npaywyn oukeuwv nou npoapuocovtal oLo kai nepiooTepo otic movtpvec texvikcs, kai yia ma kautepn noIoTnTa Tou npoiovtoc, n etaipia paes enipuaosetai tou biakawatoc va ePipei Tpononoineic, akopa kai xwiP npoeioinon, naVTwC xwiC va dnoiuopynei npoBnaata OTO Koivc.
-Γia Tuxov avtaaakTiká, n napayyελia npoc to kataotnua nωλnong πpenei va ouvobεuεtai ano tv ap. tou μovteλou kalov ap. μntpwou nou εival tunwévoi navw tny ivakiδa avaywρionc. Hivakiδa εival opatn avoiyovtac tv θεμoθαλaμo (av unapxεi) έπpioketai atnv niaw nλεupa tnc kouzivac.
2,0 kW - Eotia Taxeia
IXXYHAEKTPIKOY OYPNoy 60x60
AAGH INPOPTPAMMATTMOY
- Napadeiyama: 12.15 puθμεTE 30 λεπτιΔIAPKEIA ΨHEIMATOΩ KAI O xρονος TEAOYE ΨHEIMATOΩ OTIC 12.30.
-To aBooc otpuuianmuopeiva diopwoeiaaAazovtac n diapkeia nTnv wpa teLoucpsioiatoc n patowvtaCto KOpBIO XEPOKINTO kai eTa va enavaa6eTe Tov npoypaupatioo.
-Av unapEi IaBoc puBmuIc o pouPvoC dev TiBetai eAeioupyia. AKYPQENEOIPOPIPAMMATO
Mnopeite va akupwote eva npoypma natovta to nAiktpo 1APKEIA WHIMATOK kTn ouvexia To KOpBio "muXpi va eepaviotei otyn oOvyn EvdiE0.00.
\SHMANTIKO:
META TO TEAOZ KAOE IPOPAMMATIEMNOY ΦHIMATOZ SYNISTATAI NA NATHEETO KOMBIO AALIO ΦOFOYPN0Z DEN AEITOYPREI XEIPOKINHTA.
TIA KOYZINE ME AYTOKAAPIZOMENO FOYPNO
Ta duo nlaivá toixwpatá kai to mnpoivó eivai enevouéva μe autokaapizómevo opalto μe katautikn δpao.
Kahe 10-15 ynojura apnoTe va aeitoupynoi, me To oupvo aeeio kai ot neiyotn ixu. Oxpoovocou aneirai yau n th diaikaaia eaptatai ao tnv kaataoan Tou ooupvou. Mepikecs ouiec oKnpaivouv kai npopouv va emnoibioovu Tn aeitoupyia nct enevduanc. Tnv npayatikotnta ppacouv toucapouc Tou eiko oualtou kai noEeiiodon dev laubavei xupa.Tote npentie, moic o ooupvoc Kpuwoei EvteLw, vapakawote Tnv Kpouota Me nolu zetot vepo kai uakn Bouptaa, wpiic va xpnoionoiaote anoppunavtiko kai va avaes Eava to ooupvo sto paiaouu yia epika kant
2,0 kW - Plaque Rapide
PUISSANCE FOUR ELECTRIQUE 60x60
RECOMMANDATIONS IMPORTANTES:
FOURSAVEC THERMOSTAT
FUNCTIONNEMENT MANUEL
ANNULATION D'UN PROGRAMME
OVENS MET THERMOSTAAT

SR = SEMIRAPIDO
=SEMI-RAPID
=CPEH
= nuiTaxus
= SEMI-RAPIDE
=HALFSNELLEBR.
P1 = PIASTA 0 180
= HOTPLATE 0180
=3JIKTKPOKOHOPKA0180
=εστia 0180
= PLAQUE 0180
=PLAATJE 0180
SCHEMA DI COLLEGAMENTO CONNECTION DIAGRAM
CXEMAIOIKJIOUeyHnK3JEKTPOCETN
HAEKTPIKO DIAPAMMA AANSLUITSCHEMA
SCHEMA DES BRANCHEMENTS
230 V BIFASE / TWO-PHASE / DByXΦA3HbI / ΔΦAΣIKO/TWEEFSIG
400 V MONOFASE + NEUTRO / SINGLE-PHASE + NEUTRAL / OДНΟΦΑ3ΗΙΙ + ΕΗΤΡΑΙΙδ / MONΟΦΑΣΙΚΟ + OΥΔΕTEPO/ ENKELFASIG + NEURAAL / MONOPHASE + NEUTRO
Sez. cavo
Wire gauge
CeyHneKa6eJr
at kaawolou
Doorsneede kabel
3 × 6 ~mm^2
230 V TRIFASE / THREE-PHASE / TPEXΦA3HbɪN / TPIΦAΣIKO/ DRIEFASIG / TRIPHASE
Sez. cavo
Wire gauge
CeuHne Ka6eJr
at kaawou
Doorsneede kabel
4 × 4 ~mm^2
400 V TRIFASE + NEUTRO / THREE-PHASE + NEUTRAL / TPEXΦA3HbI + HENTPAJIb / TPIΦA2IKO + OYΔETEPO/ DRIEFASIG + NEURAAL / TRIPHASE + NEUTRO
Sez. cavo
Wire gauge
CeuHne KaBJIa
△iat.kaωδoiu:
5x2,5mm²
230 V BIFASE / TWO-PHASE / DBYXΦA3HbI / ΔΦAΣIKO/TWEEFSIG

3.5kW
2.2-3.5kW
0-2.2kW
Sez. cavo
Wire gauge
Ceyenhe kabela
△iT.kaawδoiU:
3 × 2.5 ~mm^2
3 × 1,5 ~mm^2
3x1 mm²
A

B

C
D