TKG FT 7 AZ - Deep fryer KALORIK - Free user manual and instructions
Find the device manual for free TKG FT 7 AZ KALORIK in PDF.


| Product type | Electric deep fryer with glass bowl, removable basket, and detachable control panel |
| Brand | Kalorik |
| Model | TKG FT 7 AZ |
| Power supply | 220-240 V ~50/60 Hz |
| Oil capacity | Minimum and maximum levels marked inside the bowl |
| Adjustable temperature | Yes, via thermostat (indicative range: 160°C to 190°C) |
| Bowl material | Glass |
| Basket material | Metal with removable handle |
| Filter | Integrated anti-odor filter in the lid, non-replaceable |
| Safety | Automatic shut-off in case of lack of oil, reset button (RAZ), do not immerse control panel |
| Control panel | ON/OFF button, thermostat, temperature indicator light |
| Cleaning | Bowl, lid, basket, and handle hand washable or dishwasher safe; control panel cleaned with a dry cloth |
| Included accessories | Basket, lid with filter, handle |
| Usage | Frying with or without lid, preheating recommended for 10 to 15 minutes |
| Oil type | Recommended frying oil, do not add water |
| Solid fat compatibility | Yes, cut into cubes and melt gradually |
| Number of manual pages | 52 pages |
Frequently Asked Questions - TKG FT 7 AZ KALORIK
User questions about TKG FT 7 AZ KALORIK
0 question about this device. Answer the ones you know or ask your own.
Ask a new question about this device
Download the instructions for your Deep fryer in PDF format for free! Find your manual TKG FT 7 AZ - KALORIK and take your electronic device back in hand. On this page are published all the documents necessary for the use of your device. TKG FT 7 AZ by KALORIK.
USER MANUAL TKG FT 7 AZ KALORIK
D
natural_image
Diagram of a mechanical device with a lever and rotating arm, showing motion direction (no text or symbols)Bild 1
natural_image
Diagram of a mechanical assembly with rotating parts and directional arrows indicating motion (no text or symbols)Bild 2
Please read these instructions carefully before using the appliance, and always follow the safety and operating instructions.
Important: People (including children) who are not able to use the appliance in a safe way, due to their physical, sensorial or mental capacity or their lack of experience or knowledge, must never use the appliance except if they are supervised by a person responsible for their safety or if they previously received instructions concerning the safe use of the appliance. Close supervision is necessary to prevent children from using the appliance as a toy.
☐ Check that your mains voltage corresponds to that stated on the appliance.
☐ Never leave the appliance unsupervised when in use.
From time to time check the cord for damages. Never use the appliance if cord or appliance shows any signs of damage. Should the cord be damaged, it must be replaced by a competent qualified electrician(*). All repairs should be made by a competent qualified electrician(*).
☐ Only use the appliance for domestic purposes and in the way indicated in these instructions.
□ Never use the appliance near hot surfaces.
Before cleaning, always unplug the appliance from the power supply.
☐ Never use the appliance outside and always place it in a dry environment.
☐ Never use accessories which are not recommended by the producer. They could constitute a danger to the user and risk to damage the appliance.
☐ Never move the appliance by pulling the cord. Make sure the cord cannot get caught in any way. Do not wind the cord around the appliance and do not bend it.
☐ Stand the appliance on a flat surface to prevent it from falling.
☐ Only use the appliance for deep-frying. Only cook friable and consumable foodstuffs.
☐ Outer jacket, inner bowl, lid, basket and handle can be washed by hand or in the dishwasher. Never immerse the control panel in water or any other liquid.
☐ Wait until the appliance has completely cooled down before moving, cleaning or storing it. Always take the appliance by the carrying handles. Always unplug the appliance before handling it.
☐ Never operate the appliance without oil in it. Ensure that the oil level is always between the minimum and maximum marks inside the bowl. Never overfill as hot oil might be ejected.
☐ It is absolutely necessary to keep this appliance clean at all times as it comes into direct contact with food.
☐ Make sure the cord never comes in contact with the hot parts of the appliance. Be aware never to touch these hot parts.
☐ Make sure the hot parts of the appliance are not exposed to inflammable materials, such as curtains, table-cloth, ... as a fire might occur.
☐ Never cover the appliance with any kind of material.
□ Never add water to your oil.
☐ Ensure that your food is as dry as possible before frying.
☐ Take particular care of the glass bowl, do not drop it onto a hard surface.
☐ Make sure that the handles are properly assembled to the basket and that they are locked in place. See section "Basket Assembly Instructions".
☐ The glass bowl is designed for use with this appliance only.
☐ Do not set a hot glass bowl on a wet or cold surface.
☐ Do not use a cracked glass bowl or a bowl having a loose or weakened handle.
☐ Your deep fat fryer is equipped with an anti-odour filter. This means you can keep the lid closed during frying. However, please clean this filter regularly (see "Cleaning" section). CAUTION: the deep fryer can reach high temperatures when in use. Oil and fat preparations might catch fire if overheated. Be extremely cautious never to leave your deep fryer in use for long periods. Do not forget to switch off the appliance once your preparation is ready and the fryer is no longer in use. Before pulling the mains plug, switch the temperature selector to the lowest position.
☐ Provide proper ventilation when using the appliance.
☐ Your appliance must never be switched on through an external timer or any kind of separate remote control system.
(1) Competent qualified electrician: after-sales department of the producer or importer or any person who is qualified, approved and competent to perform this kind of repairs in order to avoid all danger. In case of need you should return the appliance to this electrician.
UK STYLE PLUG WIRING INSTRUCTIONS (IN THE UK ONLY)
This product must only be used from a 13 amp power socket. If a BS1363 approved 13 amp plug is used, it should be fitted with a 13 amp fuse. The wires on the power cord are colour coded:
blue = neutral, brown = live, green or green & yellow = earth.
The blue wire must be connected to the terminal marked N or coloured in black.
The brown wire must be connected to the terminal marked L or coloured in red.
The green (& yellow) wire must be connected to the terminal marked E or coloured in green (& yellow).
BEFORE USING THE FRYER FOR THE FIRST TIME
- Remove the lid, basket, handle and any accessory from the appliance.
- Before using the fryer for the first time it is recommended to clean the lid, the bowl, the basket, the main housing and the handle with warm soapy water and dry thoroughly.
DISMANTLING THE DEEP FAT FRYER
- Remove the control panel from the appliance. To do this, gently pull the control panel upwards until it clicks.
• Take the bowl with your two hands and pull it up slightly. Remove the lid, basket and handle and any packaging from the appliance.
ASSEMBLING THE DEEP FAT FRYER
- Place the main housing on a dry level surface.
- Place the bowl in the appliance and lower it slowly.
- Replace the control panel and the accessories. To replace the control panel, firmly slide it downward into the location grooves on the back of the main housing. You will hear a "click" when the control panel is correctly located. NOTE: The appliance will only operate when the control panel is correctly fitted to the outer jacket.
BASKET ASSEMBLY INSTRUCTIONS
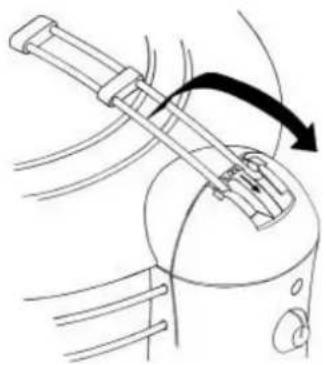
- To assemble the basket handle ready for frying, lift the basket handle and rotate in the direction of the arrow shown on the basket hinge. When the handle is in the correct position, you will hear it "click" into place. Please see fig 1 below.
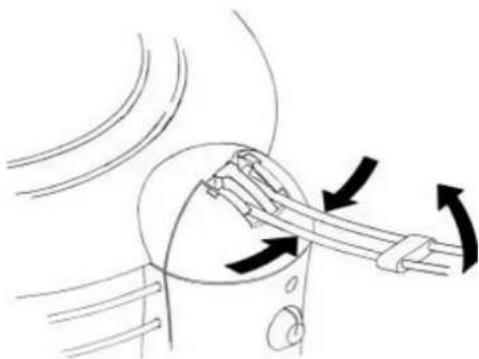
- To unlock the basket handle (for storage etc.), gently squeeze the two parallel bars together whilst at the same time gently lifting the basket handle and rotate the basket handle in the opposite direction of the arrow shown on the hinge. Please see fig 2 below.
natural_image
Diagram of a mechanical device with a lever and rotating arrow, no text or symbols presentFig 1
Lift the basket handle and rotate in the direction of the arrow shown on the basket hinge. When the handle is in the correct position, you will hear it "click" into place.
natural_image
Diagram of a mechanical assembly with rotating parts and directional arrows indicating motion (no text or symbols)Fig 2
To unlock the basket handle, gently squeeze the two parallel bars together whilst at the same time gently lifting the basket handle and rotate the basket handle.
PREHEATING
When the appliance has been switched on, set the thermostat on the desired temperature. To reach a stable and correct temperature for use, it is necessary to wait 10 to 15 minutes. During this time, the temperature control light will go on and off several times. A good preheating will allow you to have browned and crispy fries.
HOW TO USE
• We advise that you use liquid oil, which is recommended for deep fat frying.
- Make sure that the appliance is switched off. Slowly add the oil to the fryer until the required level is reached (between the minimum and maximum marks).
- Set the temperature control knob to the temperature you require. Switch on the appliance.
- When the oil is heating, the light on the front of the control box will be illuminated. When the oil reaches the desired temperature, the light will go out. The appliance is fitted with a thermostat to regulate the temperature. This will cycle on and off whilst in use to keep the temperature constant. As a result of this, the light will also cycle on and off indicating when the appliance is heating the oil and when the desired oil temperature has been reached. For best results, always wait until the appliance is at the correct temperature before adding the food.
- Place the food to be fried carefully in the basket. Gently lower the basket into the oil. For "crispier" results, we recommend using the fryer without the lid. WARNING: Be careful of spitting hot oil.
- Always switch off the appliance and unplug from the power supply after use or whilst unattended.
- Should you accidentally switch ON your deep fat fryer without oil or fat, or without the minimum amount of oil/fat required, the deep fat fryer will automatically cut out to prevent overheating.
- If this should happen, firstly switch off and unplug the deep fat fryer. Wait until the element cools down. Locate the reset hole on the bottom of the main housing directly under the control panel, place your finger inside the cord storage area and push upward onto the small red button. This will reset the deep fat fryer. Your deep fat fryer is now ready to use. To make sure this does not happen again, please read the instruction manual carefully.
- Should you wish to use solid fat, turn the temperature knob to its lowest position. Cut the solid fat into cubes of size 15-20 mm. Make sure there are enough solid fat cubes to cover the heating element. Switch on the deep fat fryer and rotate the temperature dial until the light comes on. After the light goes off, rotate the dial again until it comes on. Repeat this until all the oil has melted. After all the oil has melted, the temperature dial can be set to the desired cooking temperature. Be careful to never add too much solid fat and always ensure that the level is between the min and max marks. After the fryer has cooled down, this type of fat will solidify. Note: if you do not add enough solid fat, the reset button may operate as described.
CLEANING
• Unplug the deep fat fryer.
- Wait until the unit has completely cooled down before cleaning. Show care when touching the temperature probe of the control panel as this may still be hot after some time.
• DO NOT IMMERSE THE CONTROL PANEL IN ANY LIQUID.
- Follow the section 'Dismantling the deep fat fryer'
- Do not use strong detergents or abrasive cloths/liquids as this will damage the deep fat fryer. Clean the fryer with warm soapy water. It may help to soak the parts for a short time. If you choose to use a dishwasher, there will be some discoloration of the parts. This will not affect the fryer's performance.
• To clean the control box, wipe with a dry cloth.
- CARE OF THE GLASS BOWL: Do not use strong detergents or abrasive cloths/liquids, as this will damage the bowl. Clean the bowl with warm soapy water. The bowl is suitable for
cleaning in the dishwasher. If there is still some residue, then it may help to soak the parts for a short time.
• Thoroughly dry all parts. Check that the plug/pins on the bowl are completely dry.
- Your fryer is supplied with a grease filter lid. The filter does not need replacing. The lid can be cleaned in hot soapy water or in a dishwasher. Always make sure that the lid is completely dry before replacing the lid onto the fryer.
- Change the oil regularly. Pour out old oil using the pouring lip on the bowl. Dispose of oil thoughtfully.
• Clean your deep fat fryer regularly. This will prolong the lifespan of your deep fat fryer.
• To assemble – see the section 'Assembling the deep fat fryer'.
STORING
- Wait until the deep fat fryer has completely cooled down before storing.
- The unit can be stored with the oil inside. Ensure the lid is tightly closed to avoid dust getting into the oil.
TEMPERATURE GUIDE FOR BEST RESULTS
FOOD TEMPERATURE (°C) TIME (MINUTES)
| Breaded fillet of fish | 170 | 5-6 | |
| Scampi | 170 | 3-5 | |
| Chicken breast | 175 | 3-4 | |
| Breaded chicken pieces | 170 | 12-15 | |
| Onion rings | 180 | 3 | |
| Breaded mushrooms | 180 | 2-3 | |
| Broccoli fritters | 185 | 2-3 | |
| Courgette fritters | 185 | 2-3 | |
| Celery in batter | 180 | 2-3 | |
| Chips First Stage | 160 | 8-10 | |
| Chips Second Stage | 190 | 3-4 |
PROTECTION OF THE ENVIRONMENT - DIRECTIVE 2002/96/EC
In order to preserve our environment and protect human health, the waste electrical and electronic equipment should be disposed of in accordance with specific rules with the
implication of both suppliers and users. For this reason, as indicated by the symbol □ on the rating label or on the packaging, your appliance should not be disposed of as unsorted municipal waste. The user has the right to bring it to a municipal collection point performing waste recovery by means of reuse, recycling or use for other applications in accordance with the directive.
FR MODE D'EMPLOI
POUR VOTRE SECURITE
natural_image
Diagram of a mechanical device with a lever and rotating arrow, no text or symbols presentFig. 1
natural_image
Diagram of a mechanical assembly with rotating parts and directional arrows indicating motion (no text or symbols)Fig. 2
natural_image
Diagram of a mechanical device with a lever and rotating arrow, no text or symbols presentFig 1
natural_image
Diagram of a mechanical assembly with rotating parts and directional arrows (no text or labels)Fig 2
natural_image
Diagram of a mechanical device with a lever and rotating arm, showing motion direction (no text or symbols)Fig 1
natural_image
Diagram of a mechanical assembly with rotating components and directional arrows (no text or labels)Fig 2
natural_image
Diagram of a mechanical device with a lever and rotating arm, showing motion direction (no text or symbols)Fig 1
natural_image
Diagram of a mechanical assembly with rotating parts and directional arrows indicating motion (no text or symbols)Fig 2
natural_image
Diagram of a mechanical device with a lever and rotating arrow, no text or symbols presentFig 1
natural_image
Diagram of a mechanical assembly with rotating components and directional arrows indicating motion (no text or labels)Fig 2
Copies of the I/B. Please reproduce them without any changes except under special instruction from Team International BELGIUM. The pages must be reproduced and folded in order to obtain a booklet A5 (+/- 148.5 mm width x 210 mm height). When folding, make sure you keep the good numbering when you turn the pages of the I/B. Don't change the page numbering. Keep the language integrity.
natural_image
Diagram of a mechanical device with a lever and rotating arm, showing motion direction (no text or symbols)Rys.1
natural_image
Diagram of a mechanical assembly with rotating components and directional arrows indicating motion (no text or labels)Rys. 2
natural_image
Diagram of a mechanical device with a lever and rotating arrow, no text or symbols presentFig 1
natural_image
Diagram of a mechanical assembly with directional arrows indicating motion (no text or symbols)Fig 2
Copies of the I/B. Please reproduce them without any changes except under special instruction from Team International BELGIUM. The pages must be reproduced and folded in order to obtain a booklet A5 (+/- 148.5 mm width x 210 mm height). When folding, make sure you keep the good numbering when you turn the pages of the I/B. Don't change the page numbering. Keep the language integrity.
51
TKG FT 7 AZ - 091009
TKG FT 7 AZ

| Deutsch | 6 |
| English | 11 |
| Français | 16 |
| Nederlands | 21 |
| Español | 26 |
| Português | 31 |
| Italiano | 36 |
| Polska | 41 |
| Română | 46 |


- D
- Bild 1
- Bild 2
- UK STYLE PLUG WIRING INSTRUCTIONS (IN THE UK ONLY)
- BEFORE USING THE FRYER FOR THE FIRST TIME
- DISMANTLING THE DEEP FAT FRYER
- ASSEMBLING THE DEEP FAT FRYER
- BASKET ASSEMBLY INSTRUCTIONS
- PREHEATING
- HOW TO USE
- CLEANING
- STORING
- TEMPERATURE GUIDE FOR BEST RESULTS
- PROTECTION OF THE ENVIRONMENT - DIRECTIVE 2002/96/EC
- FR MODE D'EMPLOI
- POUR VOTRE SECURITE
- Rys.1
- Rys. 2
- TKG FT 7 AZ
Brand : KALORIK
Model : TKG FT 7 AZ
Category : Deep fryer