
MEPK9050 - Range hood M-SYSTEM - Free user manual and instructions
Find the device manual for free MEPK9050 M-SYSTEM in PDF.
| Product type | Cooker hood |
| Brand | M-System |
| Model | MEPK9050 |
| Power supply | 220-240 V ~ 50 Hz |
| Number of speeds | 3 (Low, Medium, High) |
| Lighting | 2 low-voltage lamps (12 V AC) |
| Filter type | Non-stick grease filter + Charcoal filter |
| Grease filter cleaning | Soak in water at 40-50°C with detergent or dishwasher at 60°C |
| Hood cleaning | Every 2 months with hot water and mild detergent; unplug before cleaning |
| Installation | Reinforced ceiling (≥40 kg), hole diameter 170 mm, air outlet to outside |
| Ceiling load capacity | ≥ 40 kg |
| Exhaust duct diameter | 170 mm |
| Exhaust type | Via flexible duct to outside |
| Recommended ambient temperature | Well-ventilated room |
| Usage | Household use only |
| Charcoal filter maintenance | Replace regularly; do not hot wash |
| Safety precautions | Unplug before cleaning; do not use with open flames; installation by a professional |
| Troubleshooting | Check fan blockage, capacitor, lighting, oil leaks, vibrations |
| Replaceable parts | Motor, capacitor, fan, lighting, grease filter, charcoal filter |
| Power cable length | Not specified – use an equivalent type cord if damaged |
| Warranty | According to supplier's conditions; requires purchase receipt |
| Number of manual pages | 48 |
Frequently Asked Questions - MEPK9050 M-SYSTEM
User questions about MEPK9050 M-SYSTEM
0 question about this device. Answer the ones you know or ask your own.
Ask a new question about this device
Download the instructions for your Range hood in PDF format for free! Find your manual MEPK9050 - M-SYSTEM and take your electronic device back in hand. On this page are published all the documents necessary for the use of your device. MEPK9050 by M-SYSTEM.
USER MANUAL MEPK9050 M-SYSTEM
E info.be @ boretti.com
Belgium
INHOUD
VEILIGHEIDSWAARSCHUWING
- Notice
- Feature
3....Installation - Notice of installation
- .Safety Warning
- Use
- Maintenance
- Abnormity And Solution
NOTICE
Thank you for choosing our cooker hood. Please read the instruction manual carefully before use.
The installation work must be undertaken by a qualified and competent fitter.
The manufacturer disclaims all liability for any damage or injury caused as a result of not following instructions for installation contained in the following text.
The cooker hood is used on 220 / 240v 50Hz
FEATURE
- The cooker hood uses high quality materials, and is made with a streamlined design.
- Equipped with a large power low noise electric motor and centrifugal leaf, it produces strong suction, low noise, non stick grease filter and easy to clean.
- With the isolated low voltage circuit board control, 12vAC input, the lights are therefore safer.
- Special wind tunnel construction and oil collector design, free dirt will be absorbed in a second.
INSTALLATION
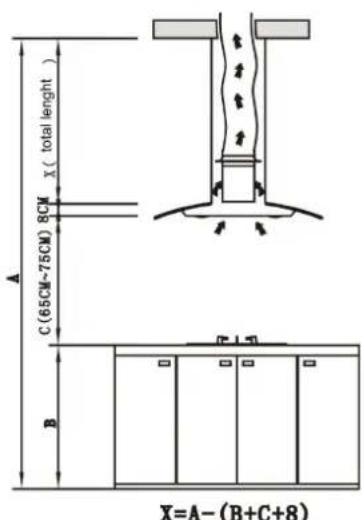
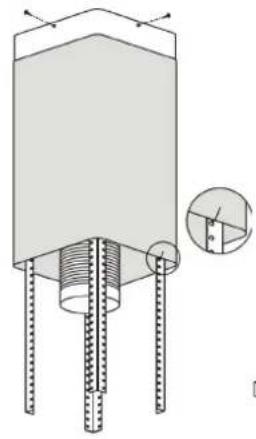
1 The ceiling must bear at least 40kgs weight, and the thickness of the ceiling must be □30MM , see pic 2. Drill 1^170mm round hole in the ceiling.
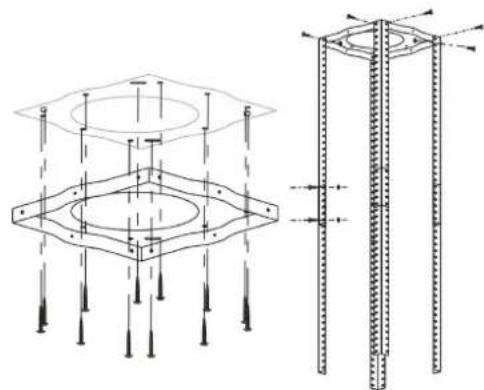
2 According to the hanging board, drill 12 holes in the ceiling, see pic 2. 12 ST640mm big flat screws will be used to fix the hanging board on the ceiling, and then 8 M410 screws and a M4 nut with gasket will be used to connect the angle iron into the hanging board, see pic 1. After calculating the length of the angle iron, 16 M410 big flat screws and a M4 nut with gasket should be used to connect the angle iron and another angle iron (the overlap length of angle iron can not be less 100MM).
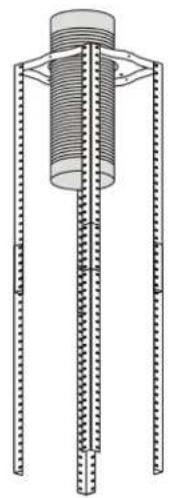
3 Let one side of the extensible pipe go outside through the hole of 170MM, see pic 3.
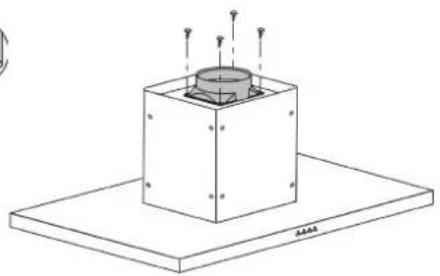
4 4 ST48 big flat screws will be used to connect the internal chimney into the hanging board. Then put up the external chimney, two hooks will be used to put up the external chimney in order to the next installation, see pic 4.
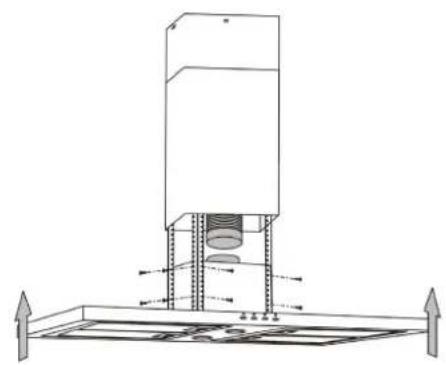
5 4 ST48 big flat screws will be used to install the outlet, see pic 5.
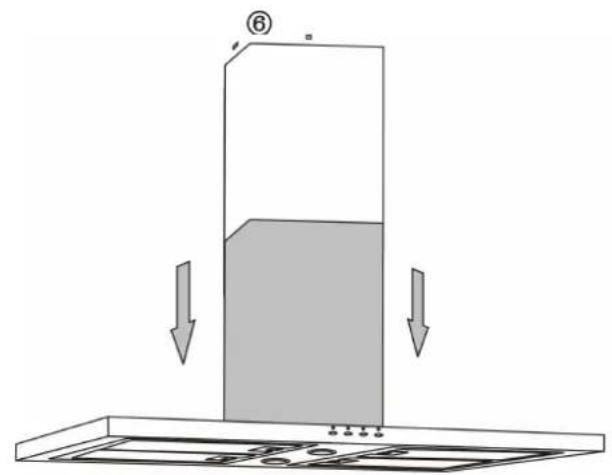
6 Hold up the hood, 16M4^*10 big flat screws will be used to connect the hood body into angle iron, see pic 6.
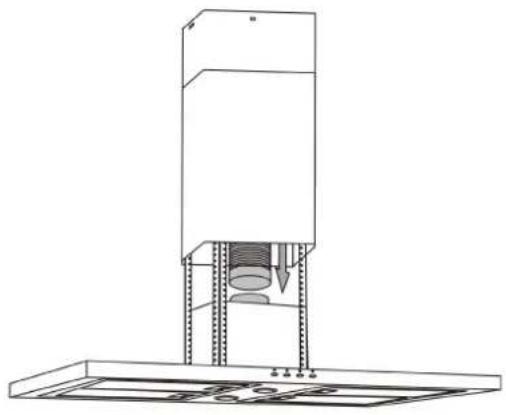
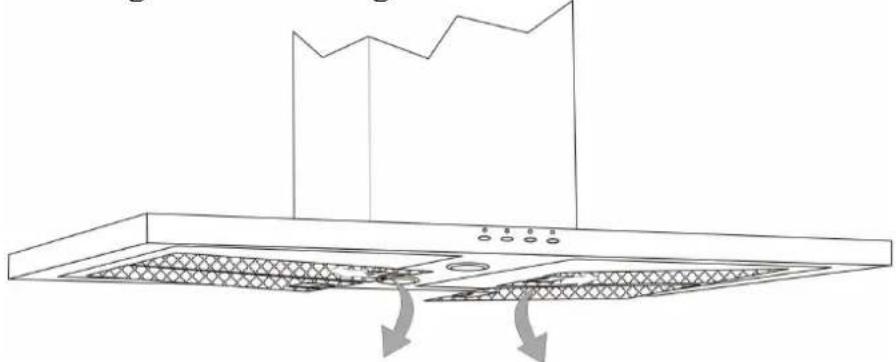
7 Put the extendable pipe on the outlet, see pic.7; after ensuring everything is ok, put down the hook and the external chimney, then the installation is complete, see pic 8.
①
(2)
(3)
(4)
⑤
(8)
⑦
NOTICE OF INSTALLATION
- Before installation, please ensure the area is clean to avoid suction of the remaining bits of broken wood and dust.
- It cannot share the same air ventilation tube with other appliances such as gas tube, warmer tube, and hot wind tube.
- The bending of ventilation tube should be ≤ 120^ , parallel or above the start point and should be connected to the external wall.
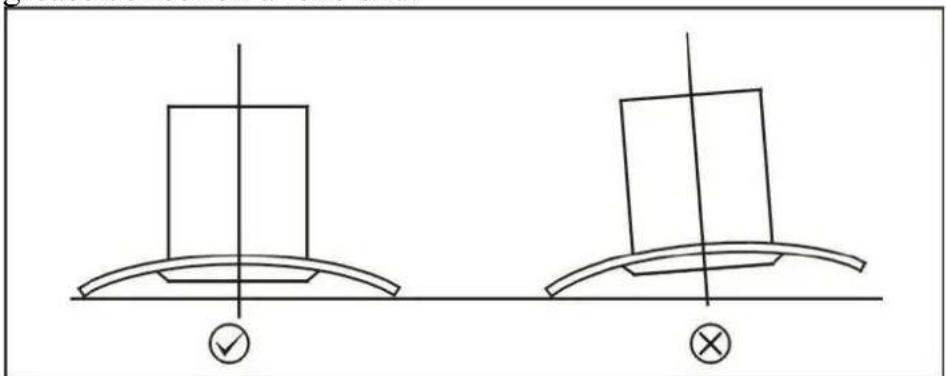
- After installation, make sure that the extractor is level to avoid grease collection at one end.
SAFETYWARNING
Keep your children from using the cooker hood.
Your cooker hood is for domestic use only, not suitable for barbecue , roast shop and other commercial use.
Any installation work must be carried out by a qualified electrician or competent person.
The cooker hood and its filter mesh should be cleaned regularly in order to keep in good working order.
Before cleaning, always ensure that you have switched your cooker hood off.
Clean the cooker hood according to the instruction manual and keep the cooker hood from the danger of burning.
No fire for drying your cooker hood.
If there is any fault with your cooker hood, please call the service department appointed by agent for servicing.
Please keep the room draughty when your cooker hood and gas hob are working
Do not exhaust the gas from cooker hood through the same heated flue which is for the gas from gas hob and other kitchen appliances.
Before installation and usage, read all the instructions and make sure that the voltage (V) and the frequency (Hz) indicated on your cooker hood are exactly the same as the voltage (V) and the frequency (Hz) in your home.
In order to get the most out of your cooker hood, please read the instruction manual before installing & using, and keep it in a safe place.
Ensure that you could get our guarantee for your cooker hood, please provide the warranty card and purchase receipt, or the guarantee will not be offered.
USE
Electronic Button
- Push t he low button, the indicating light 1 on, and the motor runs at low speed. Push it again and the motor will stop.
- Push the middle button, the indicating light 2 on, and the motor runs at mid speed. Push it again and the motor will stop
- Push the high button, the indicating light 3 on, and motor runs on high speed. Push it again and the motor will stop
- Push the light button; the indicating light 4 on, and the two lighting lamps will come on. Push it again and the lamps will turn off.
Indicatorlight ① ② ③ ④

Pic6A
MAINTENANCE
1. The cleaning of the carbon grease filter mesh
The filter mesh is made of high-density stainless steel. Please do not use the corrosive detergent on it. Keeping this filter clean will keep the appliance running correctly. Please strictly follow the guidelines below. Method 1: Put the mesh into 40 - 50c clean water, pour on detergent, and soak for 2-3 mins. Wear gloves and clean with a soft brush. Please do not apply too much pressure, as the mesh is delicate and will damage easy.
Method 2: If instructed to do so, it can be put into a dishwasher, set the temperature at around 60 degrees.
2. Notice of cleaning cooker hood
A. To protect the main body from corrosion over a long period of time, the cooker hood should be cleaned with hot water plus non corrosive detergent every two months.
B. Please do not use abrasive detergent for it will damage the body.
C. Keep the motor and other spare parts free from water, as this will cause damage to the appliance.
D. Before cleaning the appliance please remember to cut off power
E. The carbon filter shouldn't be exposed to heat.
F. Please don't tear open the fixed bar around the carbon filter
G. If the plug or cord is damaged, please replace it with special soft cord.
ABNORMITY AND SOLUTION
| Fault Cause | Solution | |
| Light on, but motor does not work | The leaf blocked Get rid of the block. | |
| The capacitor damaged Replace capacitor | ||
| The motor jammed bearing damaged | Replace motor | |
| The internal with of motor off or a bad smell from the motor | Replace motor | |
| Light does not work, motor does not work | Beside the above mentioned, check the following: | |
| Light damaged Replace lights | ||
| Power cord looses Connect the wires as per the electric diagram | ||
| Oil leakage | One way valve and the air ventilation entrance are not tightly sealed | Take down the one way valve and seal with glue |
| Leakage from the connection of U-shaped section and cover | Take U-shaped section down and seal with soap or paint | |
| Shake of the body The | leaf damaged and causes shaking | Replace the leaf |
| The motor is not tightly hanged | Lock the motor tightly | |
| The body is not tightly hanged | Fixed the body tightly | |
| Insufficient suction The | distance between the body and the gas top too long | Readjust the distance |
| Too much ventilation from open doors or windows | Choose a new place and resemble the machine | |
| The machine inclines The | The fixing screw not tight enough | Tighten the hanging screw and make it horizontal |
| The hanging screw not tight enough | Tighten the hanging screw and make it horizontal | |


Brand : M-SYSTEM
Model : MEPK9050
Category : Range hood