
Reference Sub - Subwoofer KLIPSCH - Free user manual and instructions
Find the device manual for free Reference Sub KLIPSCH in PDF.

| Product type | Subwoofer |
| Brand | Klipsch |
| Model | Reference Sub |
| Category | Active subwoofer |
| Connectivity | LFE input (RCA), stereo line inputs (RCA), high-level inputs (binding posts) |
| Controls | Volume (top panel), phase (0°/90°/180°), crossover frequency (40-120 Hz), main power, auto power |
| Power supply | Mains 220-240 V, 50/60 Hz (standard plug) |
| Auto Power Function | Automatic on/off with signal detection |
| Recommended placement | Near a wall or in a corner for optimal bass |
| Maintenance | Dust with a dry cloth; clean grille with vacuum brush |
| Safety | Do not expose to water or moisture; do not block ventilation openings; unplug during storms |
| Warranty (United States and Canada) | 5 years (excluding electronics), 2 years for electronic components |
| Warranty outside USA/Canada | Per local laws, contact your dealer |
| Repairability | No user-serviceable parts; refer to a professional |
| Standards | UL6500, CSA E60065, FCC Class B, ICES-003, CE (73/23/EEC, 89/336/EEC) |
Frequently Asked Questions - Reference Sub KLIPSCH
User questions about Reference Sub KLIPSCH
0 question about this device. Answer the ones you know or ask your own.
Ask a new question about this device
Download the instructions for your Subwoofer in PDF format for free! Find your manual Reference Sub - KLIPSCH and take your electronic device back in hand. On this page are published all the documents necessary for the use of your device. Reference Sub by KLIPSCH.
USER MANUAL Reference Sub KLIPSCH
natural_image
Three electronic audio speakers with metallic frames and sound dividers, displayed against a plain background (no text or symbols visible)IMPORTANT SAFETY INSTRUCTIONS
- READ these instructions.
- KEEP these instructions.
- HEED all warnings.
- FOLLOW all instructions.
- DO NOT use this apparatus near water.
-
CLEAN ONLY with dry cloth.
-
DO NOT block any ventilation openings. Install in accordance with the manufacturer's instructions.
-
DO NOT install near any heat sources such as radiators, heat registers, stoves, or other apparatus (including amplifiers) that produce heat.
-
DO NOT defeat the safety purpose of the polarized or grounding type plug. A polarized plug has two blades with one wider than the other. A grounding type plug has two blades and a third grounding prong. The wider blade or the third prong are provided for your safety. If the provided plug does not fit into your outlet, consult an electrician for replacement of the obsolete outlet.
-
PROTECT the power cord from being walked on or pinched, particularly at plugs, convenience receptacles, and the point where they exit from the apparatus.
-
ONLY USE attachments/accessories specified by the manufacturer.
-
USE only with a cart, stand, tripod, bracket, or table specified by the manufacturer, or sold with the apparatus. When a cart is used, use caution when moving the cart/apparatus combination to avoid injury from tip-over.
-
UNPLUG this apparatus during lightning storms or when unused for long periods of time.
-
REFER all servicing to qualified service personnel. Servicing is required when the apparatus has been damaged in any way, such as power-supply cord or plug is damaged, liquid has been spilled or objects have fallen into the apparatus, the apparatus has been exposed to rain or moisture, does not operate normally, or has been dropped.

This symbol indicates that there are important operating and maintenance instructions in the literature accompanying this unit.

This symbol indicates that dangerous voltage constituting a risk of electric shock is present within this unit.
WARNING: To reduce the risk of fire or electrical shock, do not expose this apparatus to rain or moisture.
WARNING: Voltages in this equipment are hazardous to life. No user-serviceable parts inside. Refer all servicing to qualified service personnel.
CAUTION: Changes or modifications not expressly approved by the manufacturer could void the user's authority to operate this device.
ABOUT YOUR KLIPSCH PURCHASE
Thank you for your purchase of a Klipsch subwoofer. After reading this manual and connecting your system, you will hear the result of over 55 years of stringent engineering and class-leading research and development. Please be sure to fill out the warranty card at the back of this manual or online at www.klipsch.com so we are better able to serve you. Again, thank you for choosing Klipsch and we hope that your subwoofer brings life to your music and movies for many years.
PLACEMENT
Although your Reference Series subwoofer will perform well in a wide variety of locations, you will get the most out of it by following some simple guidelines:
- Although the subwoofer's orientation is not critical, avoid placing the front (driver) side of the cabinet up against a wall.
- The subwoofer's output will increase as it is moved closer to walls, with maximum output achieved when it is placed in a corner. If practical, always place the subwoofer against or near a wall.
- In most rooms, a subwoofer will deliver smoothest bass response when placed in a corner away from room openings, such as doors.
- If you are using more than one subwoofer, you will usually achieve the best performance by placing them together in the same area rather than by spacing them apart.
CONNECTION AND ADJUSTMENT
Make all connections with the power turned off on your subwoofer and main amplifier. Your subwoofer has three sets of input connections on its back panel: (1) a single LFE-Direct RCA jack that bypasses the internal crossover; (2) a pair of RCA jacks for line-level stereo (or mono) input; and (3) a set of terminals for connection to speaker outputs on a receiver or amplifier. In addition, there are four controls on the back panel: (1) Main Power; (2) Auto Power On/Off; (3) Phase; and (4) Lowpass Crossover Frequency. The Volume Level control is located on the upper right side panel of the subwoofer.
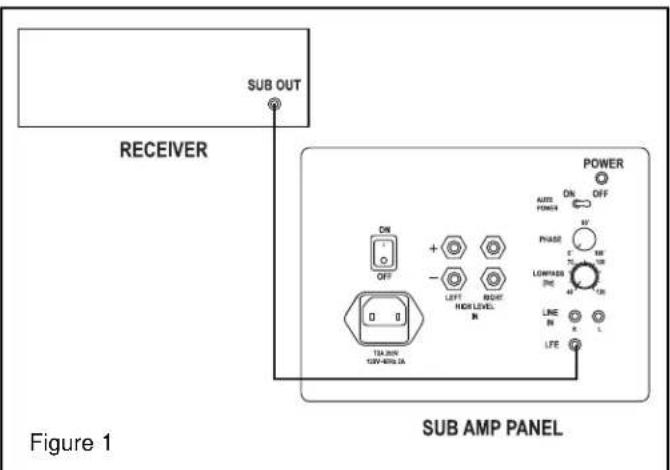
Digital Surround Receiver or Processor Connection — Today's Dolby Digital® (AC-3) and DTS® digital surround receivers and processors have line-level subwoofer outputs and built-in subwoofer crossovers. If your system is built around one of these, it will almost always be best to connect the subwoofer output on the receiver or processor to the subwoofer's LFE Direct input. (See Figure 1.) This will bypass the subwoofer's internal crossover and should only be done if these can be managed internally in the receiver. Use a shielded, high quality subwoofer interconnect cable of appropriate length with RCA plugs on each end. Your dealer can help you select a suitable cable. Be sure to go into your receiver or processor's speaker setup menu and set Subwoofer to "On" or "Yes." Your receiver or processor may have additional bass management abilities beyond simply activating the subwoofer output. Consult your receiver or processor's owner's manual or your dealer for more information on the proper bass management settings for your system.
Power — Set the subwoofer's Main Power switch to "Off." Then plug the power cord into an AC outlet. You can turn the power on and off manually using the switch, or you can leave the Main Power turned on and set the Auto Power switch to "On," which will automatically turn the subwoofer on when a signal is detected at one of the inputs and off after a period of inactivity. We recommend Auto Power "On" for most systems.
Crossover Adjustment — Using the LFE Direct input bypasses the Crossover Frequency control on the back panel. Your receiver or processor will handle the crossover function. Most use a single, set frequency between 80Hz and 100Hz. If your receiver or processor gives you a choice of crossover frequencies, 80Hz is usually a good starting point. Refer to the adjustment section for more information. In that case, start with the frequency that comes closest to matching the specified low-frequency limit of the smallest speakers in the system. After completing the other adjustments, you may want to experiment with moving the frequency up and down a little, to see if a different setting works slightly better. If the crossover frequency is set higher than 100Hz, the subwoofer should be in the front of the room near the front main speakers.
Volume Control — Adjust the subwoofer's Level to get a smooth transition between its output and that of the main speakers. Your receiver or processor will have a subwoofer level control in its speaker setup menu, so you will have to go back and forth a bit between it and the Level control on the subwoofer itself. In the end, you should wind up with the menu control somewhere in the middle of its range. Strive for bass that is solid but not overblown or boomy.
Phase Control — In some installations the setting of the Phase Control may not make much difference, whereas in others it may be necessary to go back and forth between the Phase and the Level controls for a while in order to get the very best blend with the main speakers. Since each control setting (including the one for crossover frequency in the receiver or processor) affects the optimum settings for the others, it often takes a while to get everything dialed in just right. Start with the phase knob at 0° and play a recording with a prominent, repeating bass line in your listening position. Repeat this process with the control in the 90° and 180° positions. Use the setting that yields the greatest bass output.
Analog Surround Receiver / Processor or Two-Channel Stereo System Connection — Some analog A/V receivers and processors (without Dolby Digital® or DTS® capability) have a line-level subwoofer output. Others have left- and right-channel line-level outputs, as do some stereo receivers and integrated amplifiers. All separate stereo preamps and surround processors
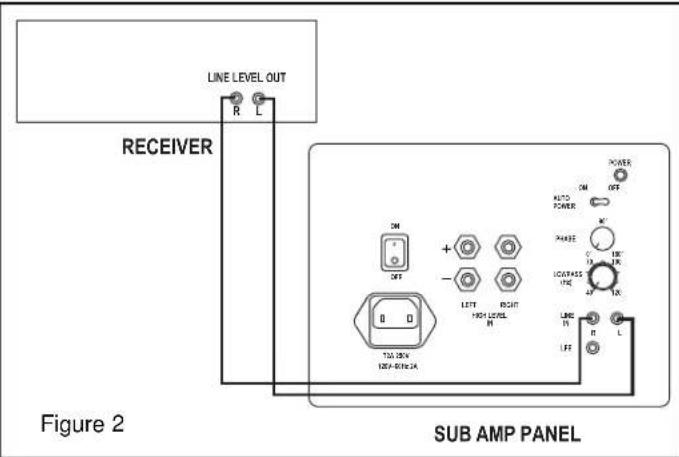
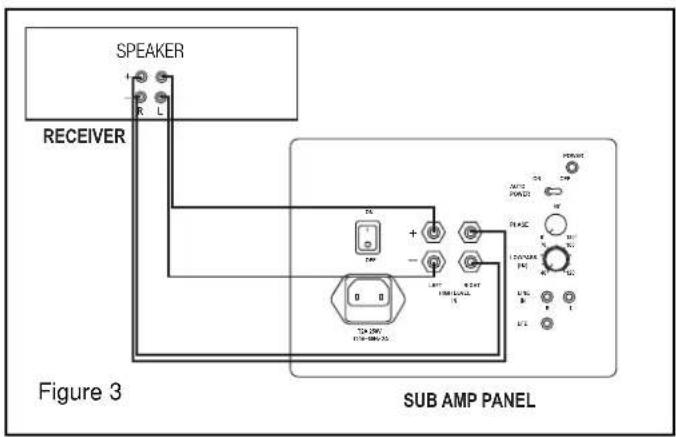
have line-level outputs. These outputs can be connected to your subwoofer's main line-level inputs. (See Figure 2.) You will need one or two shielded, high quality interconnect cables of appropriate length with RCA plugs on each end. Your dealer can help you select suitable cables. If your system does not provide any of these outputs, you will need to connect the subwoofer's Speaker Level inputs to your receiver or integrated amplifier's speaker outputs. (See Figure 3.)
- Subwoofer Output — Connect the subwoofer output jack to one of the line-level input jacks on the subwoofer. Do not use the LFE Direct Input.
- Preamp Outputs on Receiver or Integrated Amplifier — If your receiver or integrated amplifier has spare preamplifier outputs for its front left and right channels, connect these to the line-level input jacks on the subwoofer.
- Pre-out/Main-in Loops on Receiver or Integrated Amplifier — Some receivers and integrated amplifiers have their preamplifier and power amplifier stages connected externally via jumpers. If yours has its left and right front channels connected this way, you can connect your subwoofer to those preamp outputs. You will need a pair of Y-adaptors, each with two male RCA plugs and one female RCA jack. Remove the jumpers for the two channels. For each, plug one leg of a Y-adaptor into the preamp output jack and another into the main amp input jack. Plug the cables leading to the subwoofer into the female ends of the Y-adaptors.
- Separate Preamplifier or Surround Processor — You will need a pair of Y-adaptors, each with one male RCA plug and two female RCA jacks. Unplug the cables leading from the front left- and right-channel outputs on the preamp or processor and plug the Y-adaptors into them. For each channel, plug the cable leading to the power amplifier into one of the RCA jacks on the Y-adaptor and the cable leading to the subwoofer into the other.
- Speaker Outputs — Connect the subwoofer's Speaker Level inputs to the same outputs on your receiver or integrated amplifier as your front left and right speakers. This involves running a second set of wires from the left and right speaker outputs to the subwoofer. Maintain correct polarity, with positive (+, red) outputs connected to the positive inputs and negative (−, black) outputs connected to the negative inputs. Make sure that there is no metal-to-metal contact between the positive and negative sides of either connection at either end. Failure to observe this precaution can result in amplifier malfunction or damage. The subwoofer can be connected to a secondary or "B" main channel output of your apmplifier if the volume of your main speakers is unaffected when both outputs are selected.
Power — Set the subwoofer's Main Power switch to "Off." Then plug the power cord into an AC outlet. You can turn the power on and off manually using the switch, or you can leave the Main Power turned on and set the Auto Power switch to "On," which will automatically turn the subwoofer on when a signal is detected at one of the inputs and off after a period of inactivity. We recommend Auto Power "On" for most systems.
Adjustment — Start by setting the Crossover Frequency control to the approximate low-frequency limit of your main left and right front speakers. If you don't have their specifications, take an educated guess based on the size of the speakers. A large speaker will usually work down to lower frequencies than a small speaker. So for a large floorstanding loudspeaker, you might start with the Crossover Frequency set all the way down to 40Hz, whereas for very small satellite speakers you might want to turn it all the way up to 120Hz. Typical bookshelf speakers would tend to be in the 50Hz to 80Hz range. If the crossover frequency is set higher than 100Hz, the subwoofer should be in the front of the room near the front main speakers.
Play a variety of music recordings containing strong but not overpowering bass. Adjust the subwoofer's Level control until the music sounds consistently warm and natural. If you have trouble getting enough low bass without the sound becoming boomy, it probably means the Crossover Frequency is set too high. Try turning it down a bit at a time until the problem goes away. If the sound is thin until you turn the subwoofer Level up so much that the lower bass is too prominent, start by varying the setting of the Phase control. If that does not entirely solve the problem, you probably need to raise the Crossover Frequency.
General Comment About Adjustments: Since any change in the setting of one control tends to change the optimum settings for the others to some degree, the adjustment process is very interactive and involves a great deal of trial and error. If after a period of listening and calibration you're still not happy, it may mean that you need to experiment a little with the location of the subwoofer. That, of course, also interacts with everything else. Again, patience is a virtue. The end result will be well worth the effort.
CARE AND CLEANING
The only thing you should ever need to do to your subwoofer is to dust it occasionally. Never apply any abrasive or solvent-based cleaner or any harsh detergent. You can clean the grille with the brush attachment of a vacuum cleaner.
REFERENCE SERIES
CERTIFICATIONS
Complies with UL6500 and CAN/CSA E60065; Approved under the verification provision of FCC Part 15 as a Class B Digital Device. This Class B digital apparatus complies with Canadian ICES-003. Eligible to bear the CE mark, Conforms to European Union Low Voltage Directive 73/23/EEC; Conforms to European Union EMC Directive 89/336/EEC.
This device complies with Part 15 of the FCC Rules. Operation is subject to the following two conditions: (1) this device may not cause harmful interference, and (2) this device must accept any interference received, including interference that may cause undesired operation.
NOTE: This equipment has been tested and found to comply with the limits for a Class B digital device, pursuant to part 15 of the FCC Rules. These limits are designed to provide reasonable protection against harmful interference in a residential installation. This equipment generates, uses and can radiate radio frequency energy and, if not installed and used in accordance with the instructions, may cause harmful interference to radio communications. However, there is no guarantee that interference will not occur in a particular installation. If this equipment does cause harmful interference to radio or television reception, which can be determined by turning the equipment off and on, the user is encouraged to try to correct the interference by one or more of the following measures:
- Reorient or relocate the receiving antenna.
- Increase the separation between the equipment and receiver.
- Connect the equipment into an outlet on a circuit different from that to which the receiver is connected.
- Consult the dealer or an experienced radio/TV technician for help.
WARRANTY — U.S. AND CANADA ONLY
The Warranty below is valid only for sales to consumers in the United States or Canada. KLIPSCH, L.L.C. ("KLIPSCH") warrants this product to be free from defects in materials and workmanship (subject to the terms set forth below) for a period of five (5) years from the date of purchase. During the Warranty period, KLIPSCH will repair or replace (at KLIPSCH's option) this product or any defective parts (excluding electronics and amplifiers). For products that have electronics or amplifiers, the Warranty on those parts is for a period of two (2) years from the date of purchase.
To obtain Warranty service, please contact the KLIPSCH authorized dealer from which you purchased this product. If your dealer is not equipped to perform the repair of your KLIPSCH product, it can be returned, freight paid, to KLIPSCH for repair. Please call KLIPSCH at 1-800-KLIPSCH for instructions. You will need to ship this product in either its original packaging or packaging affording an equal degree of protection.
Proof of purchase in the form of a bill of sale or receipted invoice, which is evidence that this product is within the Warranty period, must be presented or included to obtain Warranty service.
This Warranty is invalid if (a) the factory-applied serial number has been altered or removed from this product or (b) this product was not purchased from a KLIPSCH authorized dealer. You may call 1-800-KLIPSCH to confirm that you have an unaltered serial number and/or you purchased from a KLIPSCH authorized dealer.
This Warranty is only valid for the original purchaser and will automatically terminate prior to expiration if this product is sold or otherwise transferred to another party.
This Warranty does not cover cosmetic damage or damage due to misuse, abuse, negligence, acts of God, accident, commercial use or modification of, or to any part of, the product. This Warranty does not cover damage due to improper operation, maintenance or installation, or attempted repair by anyone other than KLIPSCH or a KLIPSCH dealer which is authorized to do KLIPSCH warranty work. Any unauthorized repairs will void this Warranty. This Warranty does not cover product sold AS IS or WITH ALL FAULTS.
REPAIRS OR REPLACEMENTS AS PROVIDED UNDER THIS WARRANTY ARE THE EXCLUSIVE REMEDY OF THE CONSUMER. KLIPSCH SHALL NOT BE LIABLE FOR ANY INCIDENTAL OR CONSEQUENTIAL DAMAGES FOR BREACH OF ANY EXPRESS OR IMPLIED WARRANTY ON THIS PRODUCT. EXCEPT TO THE EXTENT PROHIBITED BY LAW, THIS WARRANTY IS EXCLUSIVE AND IN LIEU OF ALL OTHER EXPRESS AND IMPLIED WARRANTIES WHATSOEVER, INCLUDING BUT NOT LIMITED TO, THE WARRANTY OF MERCHANTABILITY AND FITNESS FOR A PRACTICAL PURPOSE.
Some states do not allow the exclusion or limitation of incidental or consequential damages or implied warranties so the above exclusions may not apply to you. This Warranty gives you specific legal rights, and you may have other rights, which vary from state to state.
WARRANTY OUTSIDE THE UNITED STATES AND CANADA
The Warranty on this product if it is sold to a consumer outside of the United States or Canada shall comply with applicable law and shall be the sole responsibility of the distributor that supplied this product. To obtain any applicable warranty service, please contact the dealer from which you purchased this product, or the distributor that supplied this product.
IMPORTANTES CONSIGNES DE SÉCURITÉ
À PROPOS DE VOTRE ACHAT DE PRODUIT KLIPSCH
Figure 3
SUB AMP PANEL
ÜBER IHR KLIPSCH-PRODUKT
Figure 1
SUB AMP PANEL
Figure 1
SUB AMP PANEL
SOBRE SEU PRODUTO KLIPSCH
Figure 1
SUB AMP PANEL
Figure 1
SUB AMP PANEL
Figure 3
SUB AMP PANEL
Register your new Klipsch product now at www.klipsch.com!
Cut along dotted line and mail.
For multiple speaker purchases, please fill out only one warranty card.
Name:
Street Address:
City/State/Zip:
Home Phone:
Work Phone:
E-mail Address:
Would you like to receive the latest product updates and news via e-mail? ☐ Yes ☐ No
Product Purchase
Model and serial number must be included to honor your warranty card. For multiple speaker purchases, please fill out only one warranty card.
Model Serial Number
Model Serial Number
Model Serial Number
Model Serial Number
Model Serial Number
What store did you purchase your Klipsch products from?
Store Name: State:
How did you hear about Klipsch? □ Audio/Home Theater Magazine □ Other Magazine □ TV
□ Radio □ Newspaper □ Trade Show □ Friend □ Retail Dealer □ Direct Mail
Have you purchased Klipsch products before? ☐ Yes ☐ No
If yes, what products?
Product Name(s):
When do you hope to purchase additional loudspeakers? □ 6 mos. - 1 yr. □ 1-2 yrs.
How likely are you to consider Klipsch products for your upcoming purchases?
□ Very likely □ Somewhat likely □ Doubtful
If doubtful, why? □ Don't carry product I'm looking for □ Too expensive
□ Klipsch dealer too far away □ Other
Please tell us about you!
□ Married □ Single □ Student □ Male □ Female
Age: □ 15-17 □ 18-24 □ 25-35 □ 36-45 □ 46-55 □ 55-64 □ 65+
Annual Household Income: □ Under \25,000 □ \25-35,000 □ \35-50,000 □ \50-75,000
□ \75-100,000 □ \100,000+

3502 Woodview Trace, Suite 200 Indianapolis, Indiana 46268 USA 1·800·KLIPSCH • www.klipsch.com
Make sure you return your warranty card so that we may keep you up-to-date on new Klipsch products and promotions. If you have any questions, contact your local authorized Klipsch dealer.
For your records:
Model:
Date Purchased:
Indianapolis, IN 46268 USA
3502 Woodview Trace, Suite 200
Kipscy Audio Technologies
Stamp Here
Postage
FIRST CLASS
place