SECCO 200 - Dehumidifier Sonnenkönig - Free user manual and instructions
Find the device manual for free SECCO 200 Sonnenkönig in PDF.
| Product type | Compression dehumidifier (refrigeration) |
| Brand | Sonnenkönig |
| Model | SECCO 200 |
| Power supply | 220 V ~ 50 Hz |
| Water tank capacity | 4 liters |
| Dehumidification technology | Refrigeration (compressor) |
| Adjustable humidity range | 40% to 80% in 5% increments |
| Programming (timer) | Programmable on/off (24 h) |
| Fan speeds | 2 speeds: low and high |
| Automatic defrost function | Yes, cycle adjusted according to temperature (5 °C to 12 °C: every 30 min; 12 °C to 20 °C: every 45 min) |
| Digital display | Displays room humidity, set humidity, or timer time |
| Integrated UV-C emitter | Yes (for air sanitation) |
| Adjustable air flap | Yes, motorized tilting activated by button |
| Mobility | Casters and carrying handle |
| Auto shut-off when tank full | Yes, with red light indicator and beep |
| Air filter cleaning | Removable filter, washable with warm water and mild detergent |
| Housing cleaning | Soft damp cloth |
| Continuous drainage hose | Yes (inner diameter 9 mm, cap included) |
| Operating temperature | 5 °C to 35 °C |
| Warranty | 24 months (with proof of purchase) |
| Certifications | CE, compliant with EN 60335, EN 55014, etc. |
Frequently Asked Questions - SECCO 200 Sonnenkönig
User questions about SECCO 200 Sonnenkönig
0 question about this device. Answer the ones you know or ask your own.
Ask a new question about this device
Download the instructions for your Dehumidifier in PDF format for free! Find your manual SECCO 200 - Sonnenkönig and take your electronic device back in hand. On this page are published all the documents necessary for the use of your device. SECCO 200 by Sonnenkönig.
USER MANUAL SECCO 200 Sonnenkönig
natural_image
Line drawing of a portable air purifier with wheels and top panel (no text or symbols)DE
Inhaltsverzeichnis
4 Operating Instructions
text_image
7 6 5 4 3 2 1 LAV GENTAGE TIME POWER A Vnatural_image
Line drawing of a portable air purifier with a side-mounted unit (no text or symbols)natural_image
Technical line drawing of a mechanical device with no visible text or symbolsWichtig
natural_image
Line drawing of a mechanical device with a pointer above it (no text or symbols)natural_image
Line drawing of a portable air purifier with directional arrows indicating flow or movement (no text or symbols)Direktablauf
natural_image
Line drawing of a portable air conditioner unit with cooling fan and wheels (no text or symbols)natural_image
Line drawing of a portable air purifier device with no visible text or symbols2. Luftfilter reinigen
natural_image
Illustration showing a faucet spraying water onto a solar panel, and a tilted rectangular object with curved lines on the same panel (no text or symbols)- Anbringen des Luftfilters
text_image
Technical line drawing of a portable air purifier with labeled components and directional arrows indicating parts of the casing.
natural_image
Line drawing of a portable air conditioner unit with attached cable and fan (no text or symbols)Abstand
natural_image
Line drawing of a portable air purifier with wheels and top panel (no text or symbols)FR
Sommaire
natural_image
Line drawing of a portable air purifier with control panel and wheels (no text or symbols)natural_image
Technical line drawing of a mechanical device with no visible text or symbolsImportant
natural_image
Line drawing of a mechanical device with a pointer above it (no text or symbols)natural_image
Line drawing of a portable air purifier with wheels and control panel (no text or symbols)Évacuation directe
natural_image
Line drawing of a portable air conditioner unit with cooling fan and wheels (no text or symbols)natural_image
Line drawing of a portable air purifier device with no visible text or symbolsnatural_image
Illustration showing a faucet spraying water onto a solar panel, and a close-up of the same panel being tilted (no text or symbols)text_image
Technical line drawing of a portable air purifier with labeled components and directional arrows indicating parts of the casing.
natural_image
Line drawing of a portable air conditioner unit with attached cable and fan (no text or symbols)Modifications techniques
natural_image
Line drawing of a portable air purifier with wheels and top panel (no text or symbols)IT
Indice
natural_image
Line drawing of a portable air purifier with a side-mounted lid and wheels (no text or symbols)natural_image
Technical line drawing of a mechanical device with no visible text or symbolsImportante
natural_image
Simple line drawing of a cylindrical device with a pointer above it (no text or symbols)natural_image
Line drawing of a portable air purifier with internal compartments and wheels (no text or symbols)Scarico diretto
natural_image
Line drawing of a portable air conditioner unit with cooling fan and wheels (no text or symbols)natural_image
Illustration showing a faucet spraying water onto a solar panel, and a tilted rectangular object with curved lines on the same panel (no text or symbols)text_image
Technical line drawing of a portable air purifier with labeled components and directional arrows indicating parts of the casing.natural_image
Line drawing of a portable air conditioner unit with attached cable and fan (no text or symbols)Distanza
natural_image
Line drawing of a portable air purifier with wheels and top panel (no text or symbols)GB
Index
1 Safety instructions....57
2 Features 59
3 Product diagram....60
4 Operating instructions....61
5 Operation....64
6 Maintenance 66
7 Troubleshooting 69
8 Technical data....70
9 Warranty / Disposal / Technical change 71
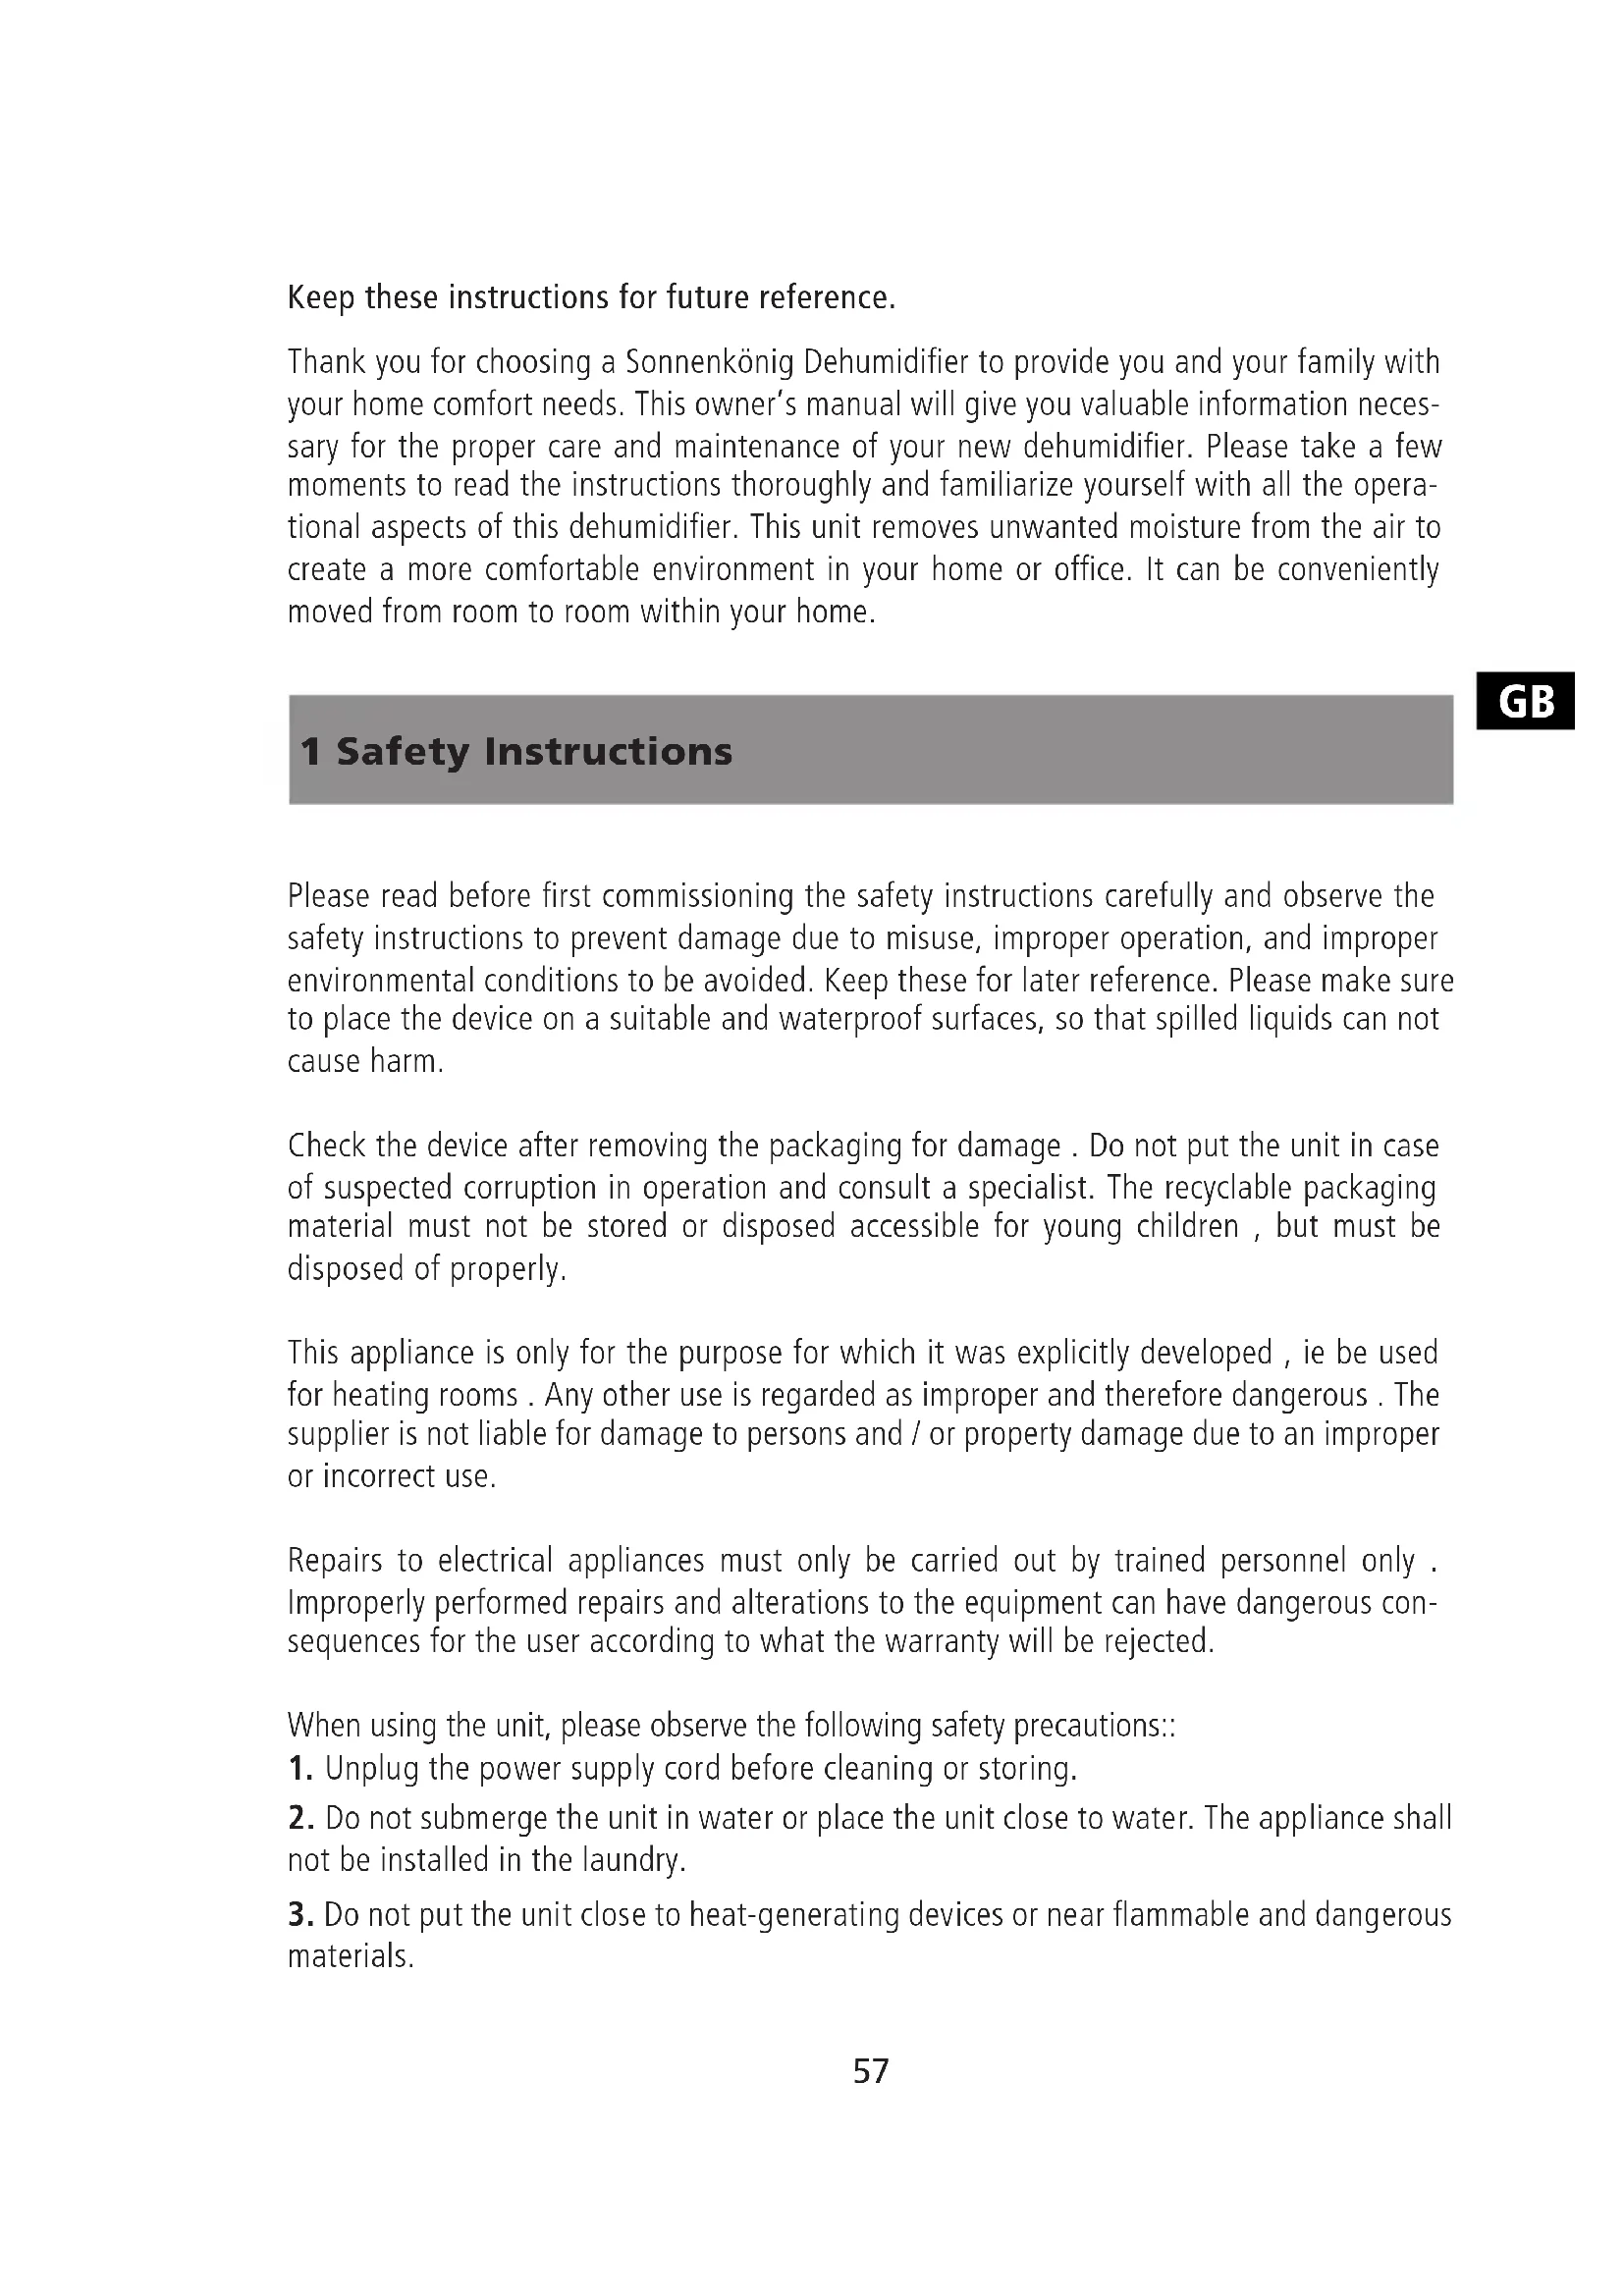
Keep these instructions for future reference.
Thank you for choosing a Sonnenkönig Dehumidifier to provide you and your family with your home comfort needs. This owner's manual will give you valuable information necessary for the proper care and maintenance of your new dehumidifier. Please take a few moments to read the instructions thoroughly and familiarize yourself with all the operational aspects of this dehumidifier. This unit removes unwanted moisture from the air to create a more comfortable environment in your home or office. It can be conveniently moved from room to room within your home.
1 Safety Instructions
Please read before first commissioning the safety instructions carefully and observe the safety instructions to prevent damage due to misuse, improper operation, and improper environmental conditions to be avoided. Keep these for later reference. Please make sure to place the device on a suitable and waterproof surfaces, so that spilled liquids can not cause harm.
Check the device after removing the packaging for damage. Do not put the unit in case of suspected corruption in operation and consult a specialist. The recyclable packaging material must not be stored or disposed accessible for young children, but must be disposed of properly.
This appliance is only for the purpose for which it was explicitly developed, ie be used for heating rooms. Any other use is regarded as improper and therefore dangerous. The supplier is not liable for damage to persons and / or property damage due to an improper or incorrect use.
Repairs to electrical appliances must only be carried out by trained personnel only. Improperly performed repairs and alterations to the equipment can have dangerous consequences for the user according to what the warranty will be rejected.
When using the unit, please observe the following safety precautions::
- Unplug the power supply cord before cleaning or storing.
- Do not submerge the unit in water or place the unit close to water. The appliance shall not be installed in the laundry.
-
Do not put the unit close to heat-generating devices or near flammable and dangerous materials.
-
Never put your fingers or objects into the air intake or the air outlet.
- Discard water that has collected in the tank as required.
- Do not operate the dehumidifier in a closed area, such as inside a closet, as it may cause a fire.
- Do not use the unit near edible items, objects of art or scientific materials.
- Install the condensate drain pipe with a downward gradient to make sure that condensed water can drain continuously.
-
The appliance must be positioned in such a way that the plug is accessible.
-
The appliance shall be installed in accordance with local and national wire regulations.
-
The appliance is intended for indoor use only.
-
The appliance cannot be used in public transportation.
-
This device can be used by children aged 8 years and above and persons with reduced physical, sensory or mental abilities or lack of experience and knowledge if they have been given supervision or instruction concerning the safe use of the equipment and understand the resulting risks. Children should not play with the appliance. Cleaning and user maintenance shall not of children without supervision performed werden. Be sure to place the device on a suitable surface and waterproof, so that the liquid spilled can not cause any damage. Kinder younger than 3 years must be kept away unless they are constantly supervised. Children from 3 years and younger than 8 years may switch the device only when they are supervised or concerning the safe use of the equipment have been trained and understand the resulting risks, provided that the device is placed in its normal position of use or is installed. Children from 3 years and younger than 8 years can not insert the plug into the outlet, do not regulate the device, do not clean the appliance and / or not carry out the maintenance by the user. Children should be supervised to ensure they do not play with the appliance.
-
(CE) N 842/2006: R410A is a kind of fluorinated greenhouse gas covered by the Kyoto Protocol. Its total global warming potential (GWP) is 1300.
-
WARNING: Do not operate the UV-C emitter when it is removed from the housing of the appliance.
-
This appliance contains a UV-C emitter.
-
Unintended use of the appliance or damage to the housing may result in the escape of dangerous UV-C radiation. UV-C radiation may, even in little doses, cause harm to the eyes and skin.
-
Appliances that are obviously damaged must not be operated.
-
Do not repair the UV light by yourself. When experiencing any problem, please contact a professional service for help.
2 Features
Powerful Dehumidifying Capability
Using refrigeration technology, the dehumidifier powerfully removes moisture from the air to decrease the humidity level of the room and keep the indoor air dry and comfortable.
Lightweight Portable Design
The dehumidifier is built to be compact and lightweight. The casters on the bottom of the unit make it easy to move it from room to room.
GB
Low Temperature Operation with Automatic Defrost
When the unit is running at a room temperature of 5^ C to 12^ C, it will stop every 30 minutes to defrost. When the unit is running at a room temperature of 12^ C to 20^ C, it will stop every 45 minutes to defrost
Adjustable Humidistat
Adjust the desired humidity level at the humidistat.
Timer On / Off
Program the unit to turn on and off automatically.
Quiet Operation
The dehumidifier operates with a low-noise level.
Energy Efficient
The power consumption of the unit is very low
3 Product diagram
GB
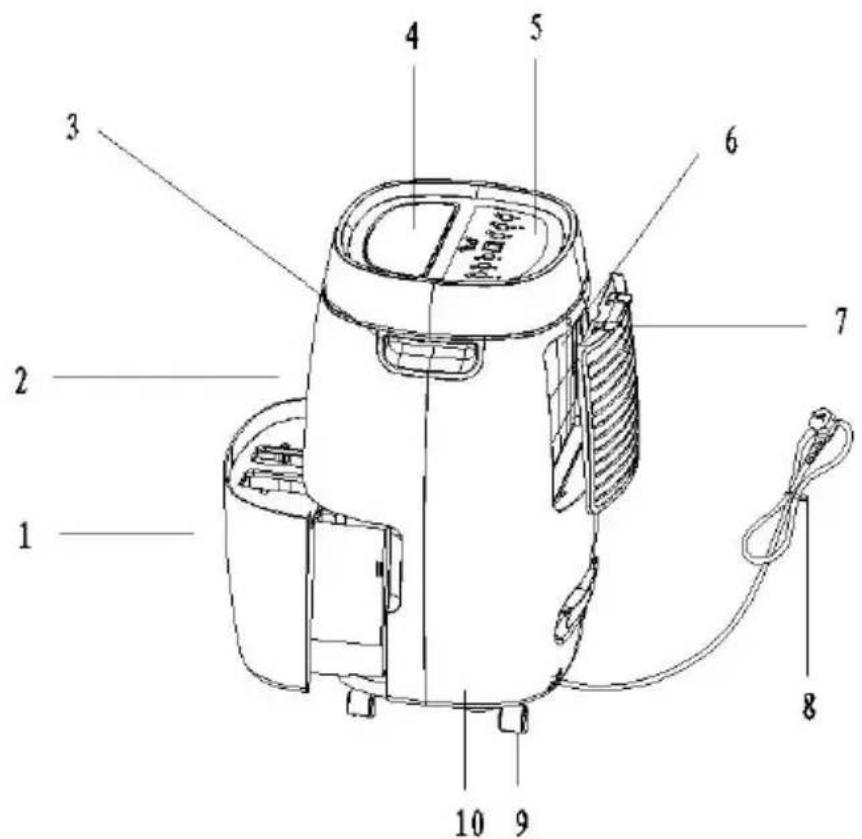
text_image
1 2 3 4 5 6 7 8 9 10- Water tank
- Front panel
- Handle
- Air outlet louver
-
Control panel
-
PU filter (Optional)
- Frame
- Power cord
- Caster
- Rear panel
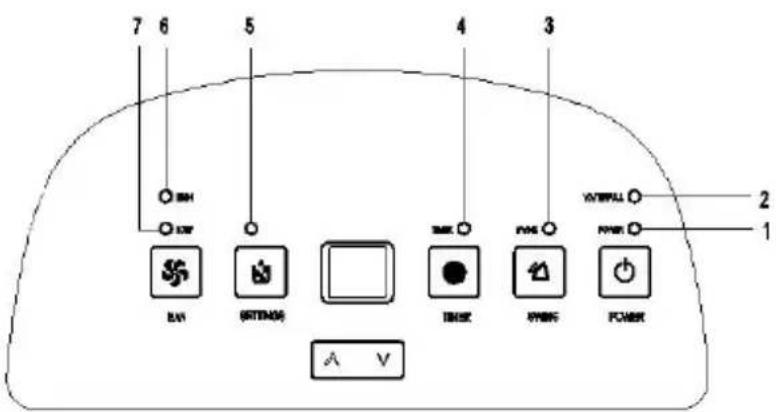
4 Operating instructions
text_image
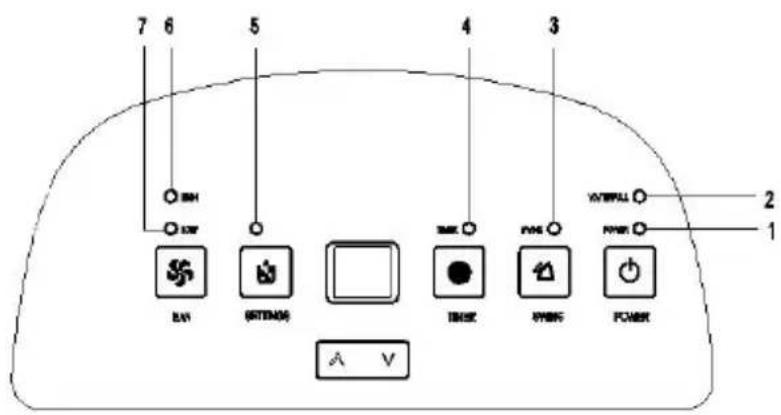
7 6 5 4 3 BH SW RV RITMOS TOMX PWRG POWER A V 2 1| 1. Power | Green | Power LED |
| 2. Water full | Red | Water full LED |
| 3. Swing | Green | Swing LED |
| 4. Time | Green | Timer LED |
| 5. Setting | Green | Set LED |
| 6. High | Red | High-fan LED |
| 7. Low | Green | Low-fan LED |

1. Power indicator light
The power indicator light will light up in green when the unit is plugged in, regardless of whether the unit is operating or not.
2. Water full indicator light
The water full indicator light will turn on in red when the drainage tank is full. if the light is on, empty the water from the drainage tank and make sure the tank is properly positioned again.
3. Swing Indicator Light
When the swing indicator light turns on, the louver will swing.
4. Timer indicator light
The timer indicator light will turn on in green when you have programmed the times for the unit to turn on and turn off automatically.
5. Setting indicator light
The setting indicator light will light up in green when you are setting the humidity level.
6. High indicator light
The high indicator light will light up in green when you program the unit to run the fan at high speed.
7. Low indicator light
The low indicator light will light up in red when you program the unit to run the fan at low speed.
Humidity Level, Timer, Digit display
The digit indicator features three functions:
- When the unit is plugged in, it will indicate the room humidity level.
- When you set the humidity level, it will indicate the humidity level you have selected.
- When you program the time for the unit to turn on and off, it will show the time.
- When the room humidity is lower than 35%, it will show "LO".
- When the room humidity is higher than 95%, it will show "HI".
Push Button Functions
Power Push Button
Press the button once to start operation, the default humidity level is 60%. Press it again to stop operation.
Swing push button
Press the button once to swing the air outlet louver, ilt will stop when you press the button again.

Timer Push Button
- Setting a start time
When the appliance is plugged in, press the Timer button first and then press Up/Down to set the start time. - Setting an end time.
- Press the timer key and the arrow key to reset the timer.
Humidity Push Button
Press to set the desired humidity level in the room, which can be set in the order of: 60%, 65%, 70%, 75%, 80%, 40%, 45%, 50%, 55%, 60%. After reaching the desired humidity, both the compressor and the fan go to standby and are activated at the time when the room humidity exceeds the desired level of humidity.
Fan Speed Push Button
Press to set the desired fan speed. It can be adjusted between high speed and low speed.
Up / Down button
Press the Timer button first and then press the Up/Down button to set the time. Pressing the Up/Down button once, adds/deducts 1 hour.
Press the Humidity button first and then press the Up/Down button to set the humidity level. Pressing the Up/Down button once, adds / deducts 5%.
5 Operation
1. Turning the Unit On:
When the unit is plugged in, a buzzer will beep and the humidity indicator will show the default humidity level at 60% with a low fan speed.
Press the POWER button to start operation.
GB
2. Open the Air Outlet Manually
Before you start the unit, please make sure that the louver is open. If the louver is closed, the unit may overheat.
3. Stop Operation
Press the POWER button to stop dehumidification.
Never stop the unit by unplugging the power supply cord.
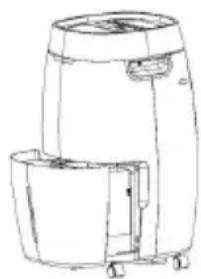
Draining the Collected Water
When the drainage tank is full, the water full indicator light will turn on, the appliance operation will stop operating automatically and the buzzer will beep 15 times to alert the user, that the water needs to be emptied from the drainage tank.
- Lightly press on the sides of the tank with both hands and pull the tank out gently.
natural_image
Line drawing of a portable air purifier with a side-mounted lid and wheels (no text or symbols)- Discard the collected water.
natural_image
Technical line drawing of a mechanical device with no visible text or symbolsNote
- DO not remove the float from the water tank. The water full sensor will no longer be able to detect the water level correctly without the float and water may leak from the water tank.
natural_image
Line drawing of a mechanical device with a small inset showing a hand holding a tool (no text or symbols)-
If the drainage tank is dirty, wash it with cold or lukewarm water. Do not use detergent, scouring pads, chemically treated dust cloths, gasoline, benzene, thinner, or other solvents, as these can scratch and damage the tank and cause water leakage.
-
When replacing the drainage tank, press the tank firmly into place with both hands. If the tank is not positioned properly, the "TANK FULL" sensor will be activated, and the dehumidifier will not operate.

natural_image
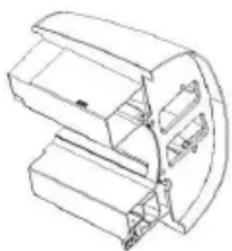
Line drawing of a portable air purifier with wheels and internal compartments (no text or symbols)Continuous Water Drainage
The unit features a continuous drainage port. Using a plastic pipe (with an inner diameter of 9 mm) the water in the drainage tank can be continuously drained through the continuous drainage port on the unit.
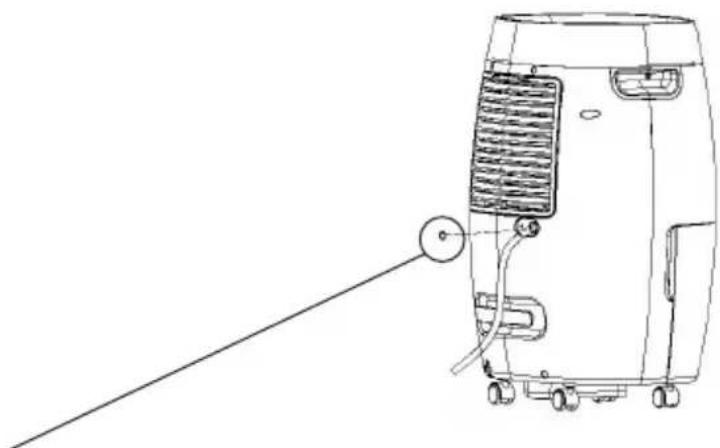
natural_image
Line drawing of a portable air conditioner unit with cooling fan and wheels (no text or symbols)This stopper is inserted after removing the tank, so that the direct drain can function properly.
6 Maintenance
Cleaning the Dehumidifier
Wipe it with a soft damp cloth.
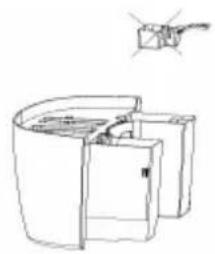
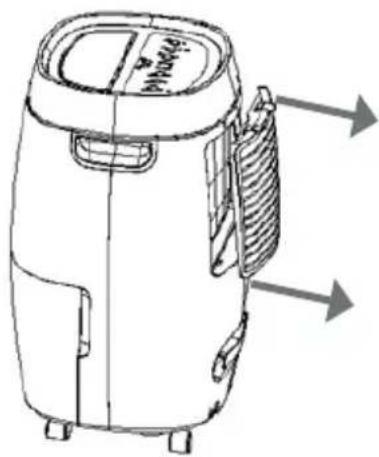
To Clean the Air Filter
- Remove the frame first and then pull out the filter.
GB
text_image
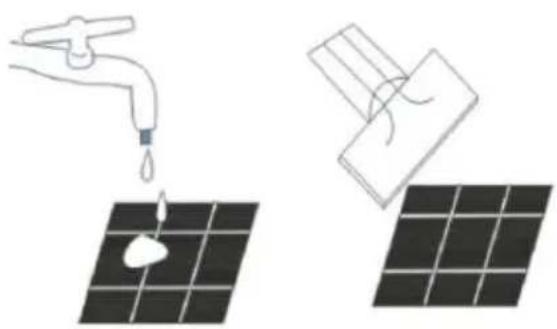
Air purifier Air Air- Cleaning the air filter
Lightly run a vacuum cleaner over the surface of the air filter to remove dirt. If the air filter is exceptionally dirty, wash it with warm water and a mild cleanser and dry it thoroughly.
natural_image
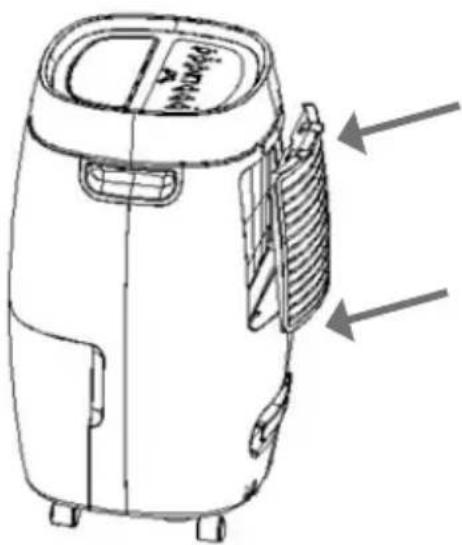
Illustration showing a faucet spraying water onto a solar panel, and a close-up of the same panel being tilted (no text or symbols)- Reattaching the air filter Smoothly insert the filter into the unit.
text_image
Technical line drawing of a portable air purifier with labeled components and directional arrows indicating parts of the casing.GB
Storing the Dehumidifier
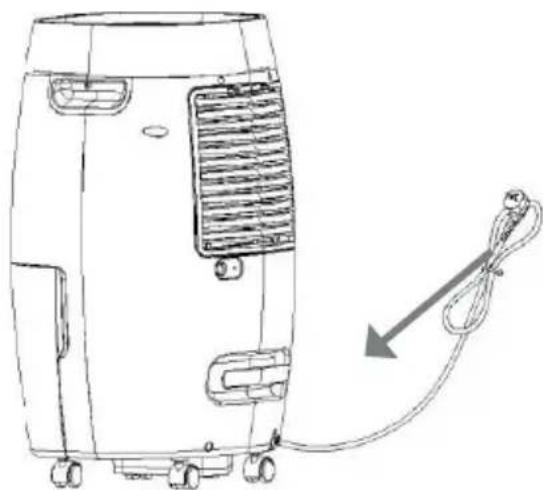
When the unit is not being used for a long period of time and you want to store it, note the following steps:
- Empty any water left in the drainage tank.
- Fold up the power cord and put it into the cord rack on the bottom of the rear panel.
- Clean the air filter.
- Store it in a cool and dry place.
natural_image
Line drawing of a portable air conditioner unit with attached cable and fan (no text or symbols)Clearance
Maintain the minimum clearance around the dehumidifier when the unit is operating as shown in the drawing.
GB
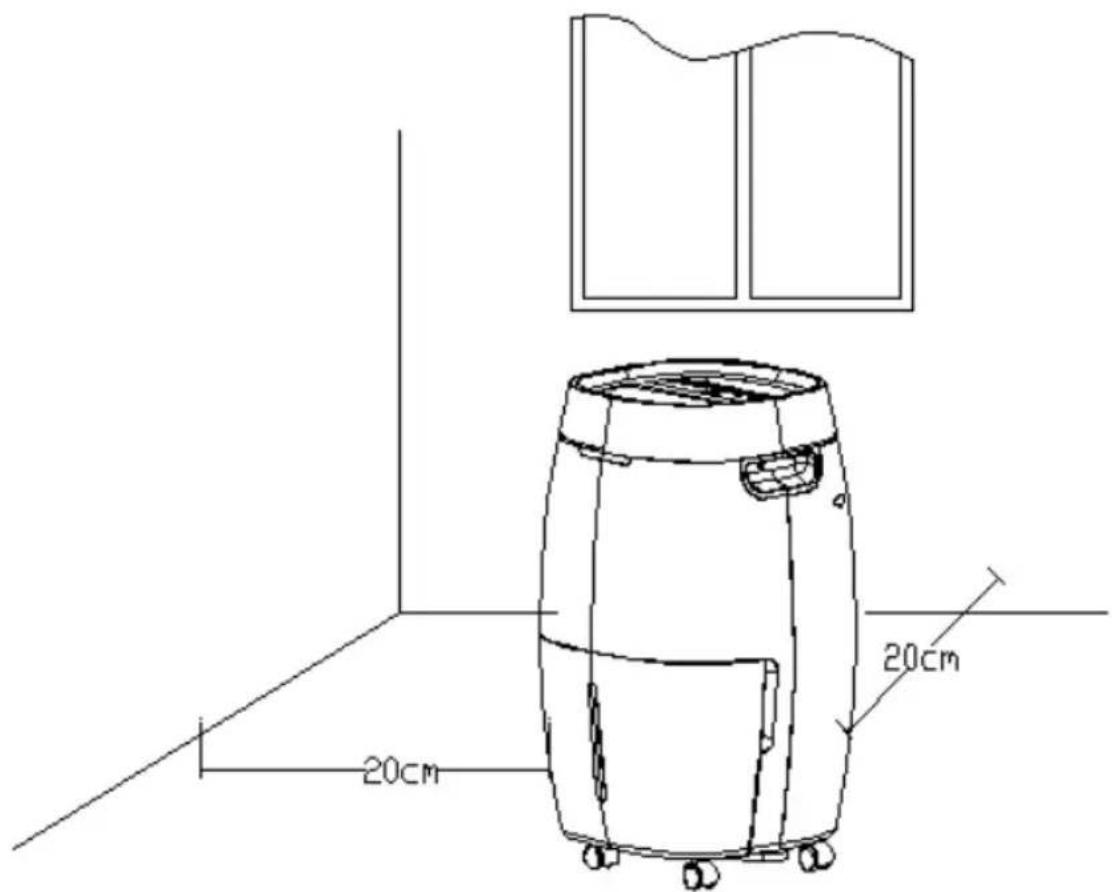
text_image
20cm 20cm7 Troubleshooting
If you experience any of the problems listed below, please check the following points before calling customer service.
| Problem Possible cause Solution | ||
| The unit does not operate. | Has the power cord been disconnected? | Plug the power cord into the outlet. |
| Is the tank full indication lamp blinking? (The tank is full or in a wrong position.) | Empty the water in the drainage tank and then reposition the tank. | |
| Is the temperature of the room above 35°C or below 5°C?. | The protection device is activated and the unit cannot be started. | |
| The dehumidifying function does not work. | Is the air filter clogged? | Clean the air filter as explained under „Cleaning the Dehumidifier“. |
| Is the air intake or the air outlet blocked? | Clear the blockage from the air intake or the air outlet. | |
| No air is discharged. Is the air filter clogged? | Clean the air filter as explained under „Cleaning the Dehumidifier“. | |
| Operation is noisy. | Is the unit tilted or on unstable ground? | Move the unit to a solid, stable location. |
| Is the air filter clogged? | Clean the air filter as explained under „Cleaning the Dehumidifier“. | |
GB
8 Technical Data
| MODEL SECCO 200/300/400 | |
| POWER SUPPLY | 220V ~ ,50Hz |
| WATER TANK CAPACITY 4I / 8I / 8I | |
GB
The dehumidification capacity is rated at a room temperature of 35^ C with a relative humidity of 95%. If specifications are improved after this printing, the product nameplate will reflect the new specifications. The operational temperature is between 5^ C and 35^ C. If the room temperature is outside of this range, the unit will not operate properly.
9 Warranty / Disposal / Technical change
Warranty
The Products are controlled just before delivery. If despite a lack of your product, try trustfully your seller. Please bring your receipt, as this is to be submitted for each warranty. The guarantee period is 24 months from date of purchase.
Disposal
The device must be disposed of properly. The device can be distributed free of charge for disposal at each dealer.
Technical changes
Reserving technical changes in technology and design
CE Declaration of Conformity
This device complies with the following standards:
EN 60335-2-40:2003/A13:2012
EN 60335-1:2012/A11:2014
EN 62233:2008
EN 55014-1:2006/A2:2011
EN 55014-2:1997/A2:2008
EN 61000-3-2:2014
EN 61000-3-3:2013
Firma
Armin Schmid
Olensbachstrasse 9-15
CH-9631 Ulisbach
Tel. Int. +41 71 987 60 60
Tel. Nat. 0848870850
www.sonnenkoenig.ch
Firma
Armin Schmid