
3850e - Dehumidifier EBAC - Free user manual and instructions
Find the device manual for free 3850e EBAC in PDF.
| Product type | Dehumidifier |
| Brand | Ebac |
| Model | 3850e |
| Operating temperature | 3 °C to 35 °C |
| Water extraction | 1 to 2.5 L/day |
| Tank capacity | Approximately 2.5 L |
| Operating modes | SMART, MAX, Drying clothes, Air purification, Standby |
| Integrated timer | 2 h, 4 h, 8 h |
| Fan speed | 2 speeds: silent (1) and high (2) |
| Smart Control technology | Yes (patented) |
| Filter | Washable filter, monthly cleaning, replacement every 4 months |
| Power supply | Mains 220-240 V, 50 Hz |
| Power consumption | Approximately 300 W |
| Compressor | Silent rotary compressor |
| Display | Bright screen with indicators |
| Full tank indicator | Red light |
| Automatic defrost | Yes |
| Maintenance and cleaning | Filter cleaning and regular tank emptying |
| Safety | RCD 30 mA protection, do not immerse |
| Spare parts and repairability | Parts available from dealer or customer service |
| General information | Designed and manufactured in the United Kingdom |
| Dimensions (W × D × H) | Approximately 40 × 30 × 60 cm |
| Weight | Approximately 15 kg |
Frequently Asked Questions - 3850e EBAC
User questions about 3850e EBAC
0 question about this device. Answer the ones you know or ask your own.
Ask a new question about this device
Download the instructions for your Dehumidifier in PDF format for free! Find your manual 3850e - EBAC and take your electronic device back in hand. On this page are published all the documents necessary for the use of your device. 3850e by EBAC.
USER MANUAL 3850e EBAC
natural_image
Line drawing of a hand inserting a component into a car intake manifold (no text or symbols)natural_image
Illustration of a hand pouring liquid from a container onto a surface (no text or symbols)natural_image
Technical line drawing of a curved panel or cover structure with internal grid patterns, shown from two different angles (no text or symbols)natural_image
Line drawing of a hand holding a device with a handle, no text or symbols presentSchéma B
natural_image
Simple line drawing of a solar panel with a black arrow pointing to it (no text or symbols)Schéma C
natural_image
Illustration of a hand pressing a button on a device panel (no text or symbols visible)Schéma D
www.ebac.com/contact
Ketton Way, Aycliffe Business Park, Newton Aycliffe, County Durham, DL5 6SQ
Tél: +44 (0) 845 634 1392 (GB)
Fax: +44 (0) 1388 609845
www.ebac.com

natural_image
Line drawing of a hand inserting a component into a car intake manifold (no text or symbols)natural_image
Illustration of a hand pouring liquid from a container onto a surface (no text or symbols)natural_image
Technical line drawing of a curved panel or cover structure with internal grid patterns, shown from two different angles (no text or symbols)natural_image
Simple line drawing of a solar panel with a black arrow pointing to it (no text or symbols)Diagramm C
natural_image
Illustration of a hand pressing a button on a device (no text or symbols visible)Schéma D
www.ebac.com/contact
Ketton Way, Aycliffe Business Park, Newton Aycliffe, County Durham, DL5 6SQ
Tel: +44 (0) 845 634 1392 (GB)
Fax: +44 (0) 1388 609845
www.ebac.com

natural_image
Line drawing of a hand inserting a component into a car intake manifold (no text or symbols)Om leeg te maken, open de reservoirdeur.
natural_image
Illustration of a hand pouring liquid from a container onto a surface (no text or symbols)natural_image
Technical line drawing of a curved panel or cover structure with internal grid patterns, shown from two different angles (no text or symbols)www.ebac.com/contact
Ketton Way, Aycliffe Business Park, Newton Aycliffe, County Durham, DL5 6SQ
Tel: +44 (0) 845 634 1392 (GB)
Fax: +44 (0) 1388 609845
www.ebac.com

natural_image
Line drawing of a hand inserting a component into a car intake manifold (no text or symbols)natural_image
Illustration of a hand pouring liquid from a container onto a surface (no text or symbols)natural_image
Technical line drawing of a curved panel or cover structure with internal grid patterns, shown from two different angles (no text or symbols)natural_image
Line drawing of a hand holding a device with a handle, no text or symbols presentDiagrama B
natural_image
Simple line drawing of a solar panel with a black arrow pointing to it (no text or symbols)Diagrama C
natural_image
Illustration of a hand pressing a button on a device (no text or symbols visible)Diagrama D
www.ebac.com/contact
Ketton Way, Aycliffe Business Park, Newton Aycliffe, County Durham, DL5 6SQ
Tel: +44 (0) 845 634 1392 (GB)
Fax: +44 (0) 1388 609845
www.ebac.com

natural_image
Line drawing of a hand inserting a component into a car intake manifold (no text or symbols)natural_image
Illustration of a hand pouring liquid into a container (no text or symbols)natural_image
Technical line drawing of a curved panel with grid and rectangular cutouts, shown from two different angles (no text or symbols)natural_image
Line drawing of a hand holding a device with a handle (no text or symbols)Schema B
natural_image
Diagram of a solar panel array with an arrow pointing to one panel (no text or symbols present)Schema C
natural_image
Illustration of a hand pressing a button on a device panel (no text or symbols visible)Schema D
www.ebac.com/contact
Ketton Way, Aycliffe Business Park, Newton Aycliffe, County Durham, DL5 6SQ
Tel: +44 (0) 845 634 1392 (GB)
Fax: +44 (0) 1388 609845
www.ebac.com

Technical and Safety Information 57
Setting up your dehumidifier 58
SMART Control ^TM 58
3000 Series Parts 59
Settings & Controls 60
Emptying the water container 62
Cleaning the filter 62
Troubleshooting 63
Introduction
At Ebac we pride ourselves on being the dehumidifier experts. With over 45 years experience we have helped over 1 million customers remove excess moisture from their homes. Our range of products (all designed and manufactured in the UK) reflects our years of expertise and provides an option for every home.
The first time you plug in your new Ebac dehumidifier you'll begin to realise the difference it will make to your home. You'll be amazed at just how much water this quiet, yet powerful unit extracts and stores in its container. It's sure to get you thinking where it all comes from and where it's been going all those years.
Incredibly, the average family produces 20 pints/12 litres of moisture a day. However, that's one fact you needn't worry about now. Your Ebac dehumidifier is designed to cope with everything you do that adds even more moisture to the British climate. Everything from showering to washing up, boiling a kettle to breathing; they all add moisture to the air.
Once your condensation problem is under control, your dehumidifier will extract from 1 to 2.5 litres of water per day.
This manual will help you get the very best out of your Ebac and not only protect your home from the damaging effects of condensation and damp, but also improve the quality of your air.
Unpacking your dehumidifier
Please ensure that all packaging is disposed of or stored safely where it will not be a danger to children or pets.
In the unlikely event of having to return your dehumidifier for repair, cardboard packaging will be required. You may wish to consider this before disposing of the packaging.
Stand your dehumidifier upright for a minimum of 2 hours before switching on.
Technical and Safety information
Min Operating Temperature 3°C Max Operating Temperature 35°C
- Do not use the machine if the power cord or cabinet are damaged.
- If the flexible power cord is damaged it must be replaced by an identical cord which is available from Ebac Limited or an Ebac authorised distributor.
- Do not poke objects into any grilles on the machine.
- Ebac has a policy of constant development and, therefore, reserves the right to change specifications without prior notice.
- Do not use the machine without the permanent drainage bung in place on the back of the machine.
- Your dehumidifier should not be located in such a way that it will become an obstacle or hazard.
- Your dehumidifier should not be placed directly at the top of the stairs.
- To protect against electrical shocks, do not immerse unit, plug or cord in water, or spray with liquids.
- Do not use an extension cord or double adapter.
- Ensure Power supply is RCD protected at 30mA.
- UK product is shipped with a fuse in the mains plug. This is not necessary for EU products as they do not have a fuse.
Setting up your dehumidifier for maximum performance
Location
Unless you have a particular area in need, we suggest that you place your dehumidifier in the coldest, dampest part of the home or alternatively in a central location ensuring that safety is paramount.
Since moisture rises, first floor location is preferable.
Place the dehumidifier away from direct heat source. As the unit uses a cold surface to collect moisture, direct heat will reduce its ability to do so.
Doors should be kept ajar to ensure good air flow throughout the home.
Your dehumidifier will not operate should the temperature drop below 3^ c.
Operation
Unless you have a severe problem with excess moisture or damp, we recommend plugging in the dehumidifier and running on SMART Control (see Switching on your Dehumidifier, page 7)
Your dehumidifier should run on this setting continuously for 24-48 hours when switching on for the first time.
It will then switch on and off automatically at the most economical times to keep the humidity at the correct level.
In the event of needing to increase air flow and water collection, the dehumidifier can be run on MAX for a set period of Time or Continuously.
Comfort
The compressor will make a humming noise similar to that of your fridge freezer. We recommend that the dehumidifier is not placed directly onto a hard floor as this will increase and amplify the sound.
To ensure that your sleep pattern is not disturbed, the dehumidifier is best suited to be located away from your bedroom door.
Smart Control
Set your Ebac 3000 to Smart Control™ and let it do all the hard work. Ebac's patented Smart Control™ technology continuously monitors and learns about environmental factors in and around your home so that it knows when it needs to work and when it doesn't. This reduces running time and ensures lower running costs.
Throughout this manual Smart Control ^TM will be referred to as SMART Mode.
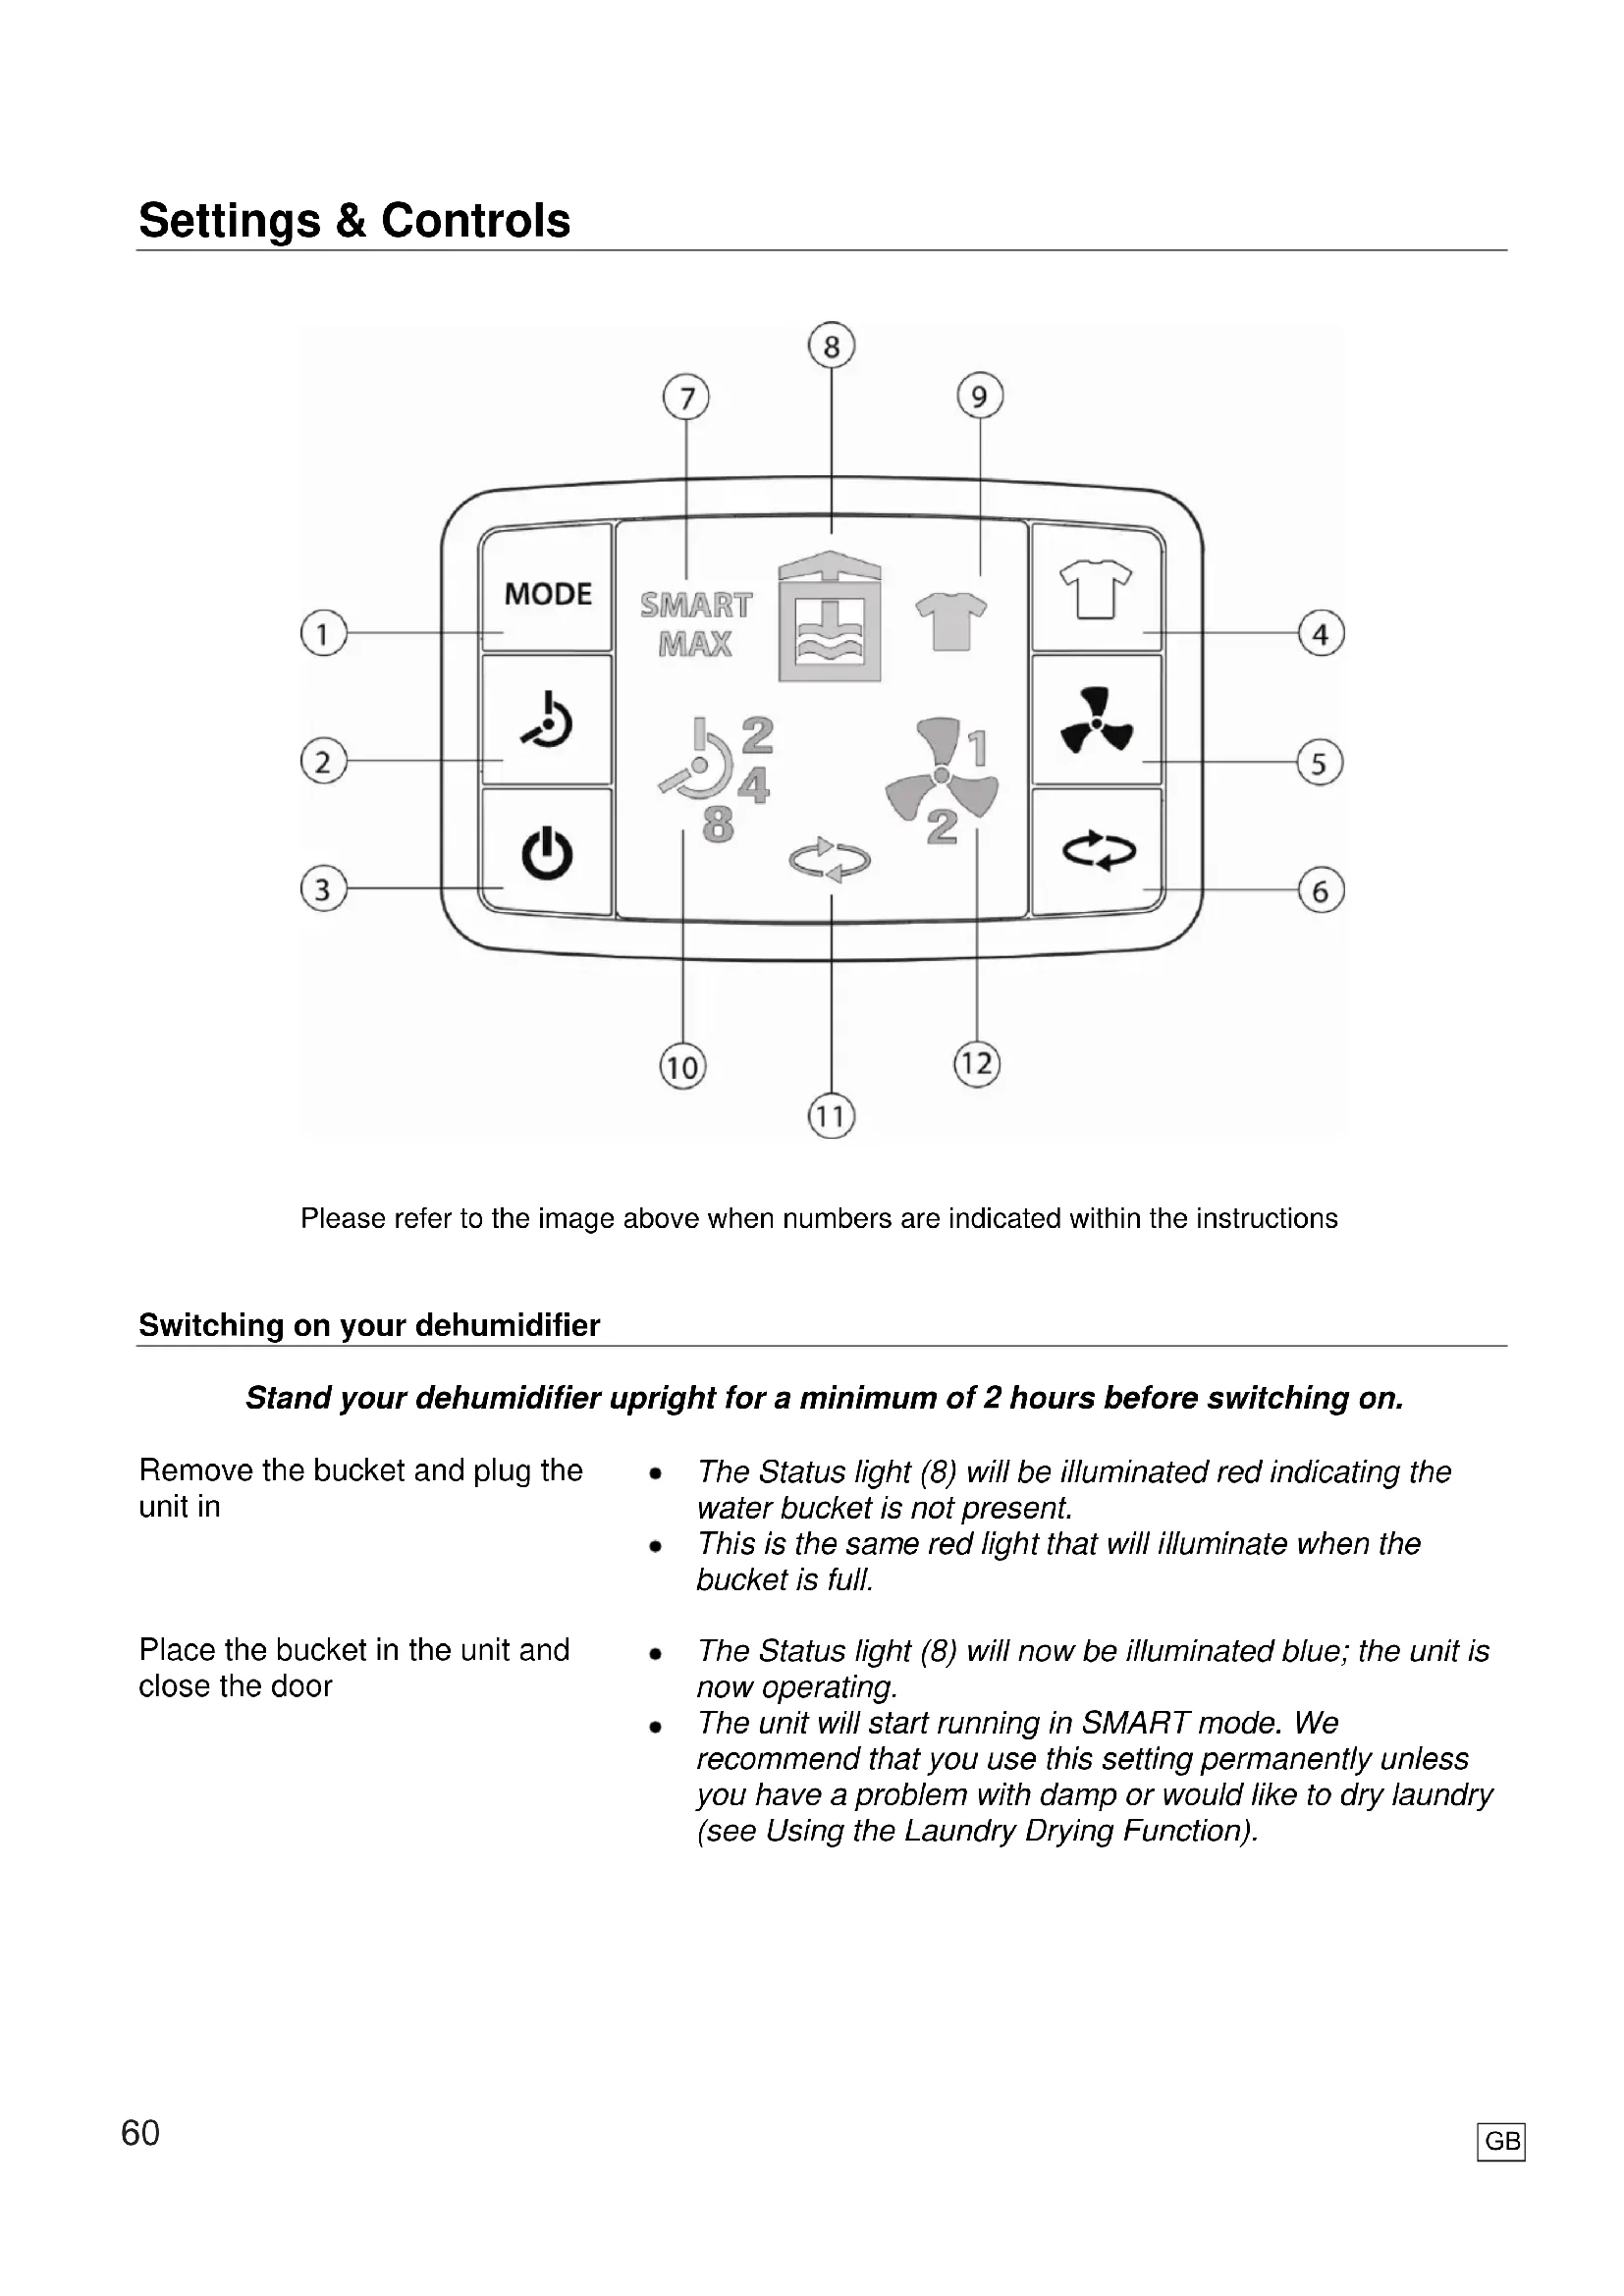
Please refer to the image above when numbers are indicated within the instructions
Switching on your dehumidifier
Stand your dehumidifier upright for a minimum of 2 hours before switching on.
Remove the bucket and plug the unit in
Place the bucket in the unit and close the door
- The Status light (8) will be illuminated red indicating the water bucket is not present.
- This is the same red light that will illuminate when the bucket is full.
- The Status light (8) will now be illuminated blue; the unit is now operating.
- The unit will start running in SMART mode. We recommend that you use this setting permanently unless you have a problem with damp or would like to dry laundry (see Using the Laundry Drying Function).
Selecting different Modes
| Press the MODE button (1) and MAX will illuminate on the display | The unit is now running at MAX capacity on a fan speed setting of 2 (high). The unit will now run continuously. |
| Press the MODE button (1) again and SMART will illuminate on the display | This unit is operating in SMART mode and the fan speed will decrease to 1 (quiet/normal). |
| Changing the Fan Speed | |
| Press the FAN button (5) to cycle through the fan speeds | The FAN symbol (12) will illuminate showing either a number 1 (quiet/normal) or number 2 (high) depending on the speed selected.Fan speed can only be changed in SMART, MAX or AIR PURIFYING Mode. |
| Using the Laundry Drying Function | |
| Press the LAUNDRY button (4) and the laundry symbol (9) will illuminate | The unit is now set to operate at the highest fan speed at maximum capacity.The unit will run for the highlighted time (10) before reverting to SMART Mode. |
| Press the TIMER button (2) to change the length of time LAUNDRY mode will operate | The order the times will cycle through is as follows: 2hrs – 4hrs – 8hrs – 2hrs |
| Using the Air Purifying Mode | |
| Press the AIR PURIFYING button (6) and symbol (11) will illuminate | The unit is now in Air Purifying mode. The dehumidifier will now stop extracting moisture from the air and simply pull air through the filter to remove any impurities before re-circulating it. |
| Set unit to Quiet (slow) Air Purifying mode | Press the fan button (5) until a number 1 is illuminated next to the fan symbol (12). |
| Set unit to high speed Air Purifying mode | Press the fan button (5) until a number 2 is illuminated next to the fan symbol (12). |
| Using the Timer Function | |
| Press the TIMER button (2) to cycle through the options | The order the times will cycle through is as follows: 2hrs – 4hrs – 8hrs – 2hrsThe Timer function is available in MAX and LAUNDRY DRYING modes. |
| Switching unit to Standby | |
| Press the STANDBY button (3) | The Status light (8) will now be illuminated orange; the unit is now in STANDBY mode. |
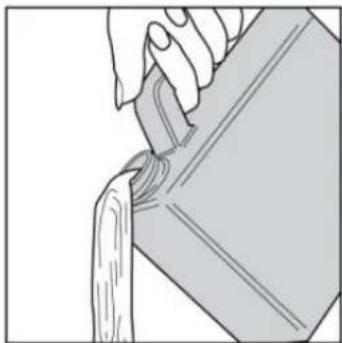
Emptying the water container
The Status symbol on the control panel will illuminate red when the container is full. When this occurs, water collection stops.
natural_image
Line drawing of a hand inserting a component into a car intake manifold (no text or symbols)To Empty, Open the water container access door

natural_image
Illustration of a hand pouring liquid from a container onto a surface (no text or symbols)The container can then be removed and emptied as shown.
Replace the container back into the dehumidifier with the outlet on the left hand side and gently close the door.
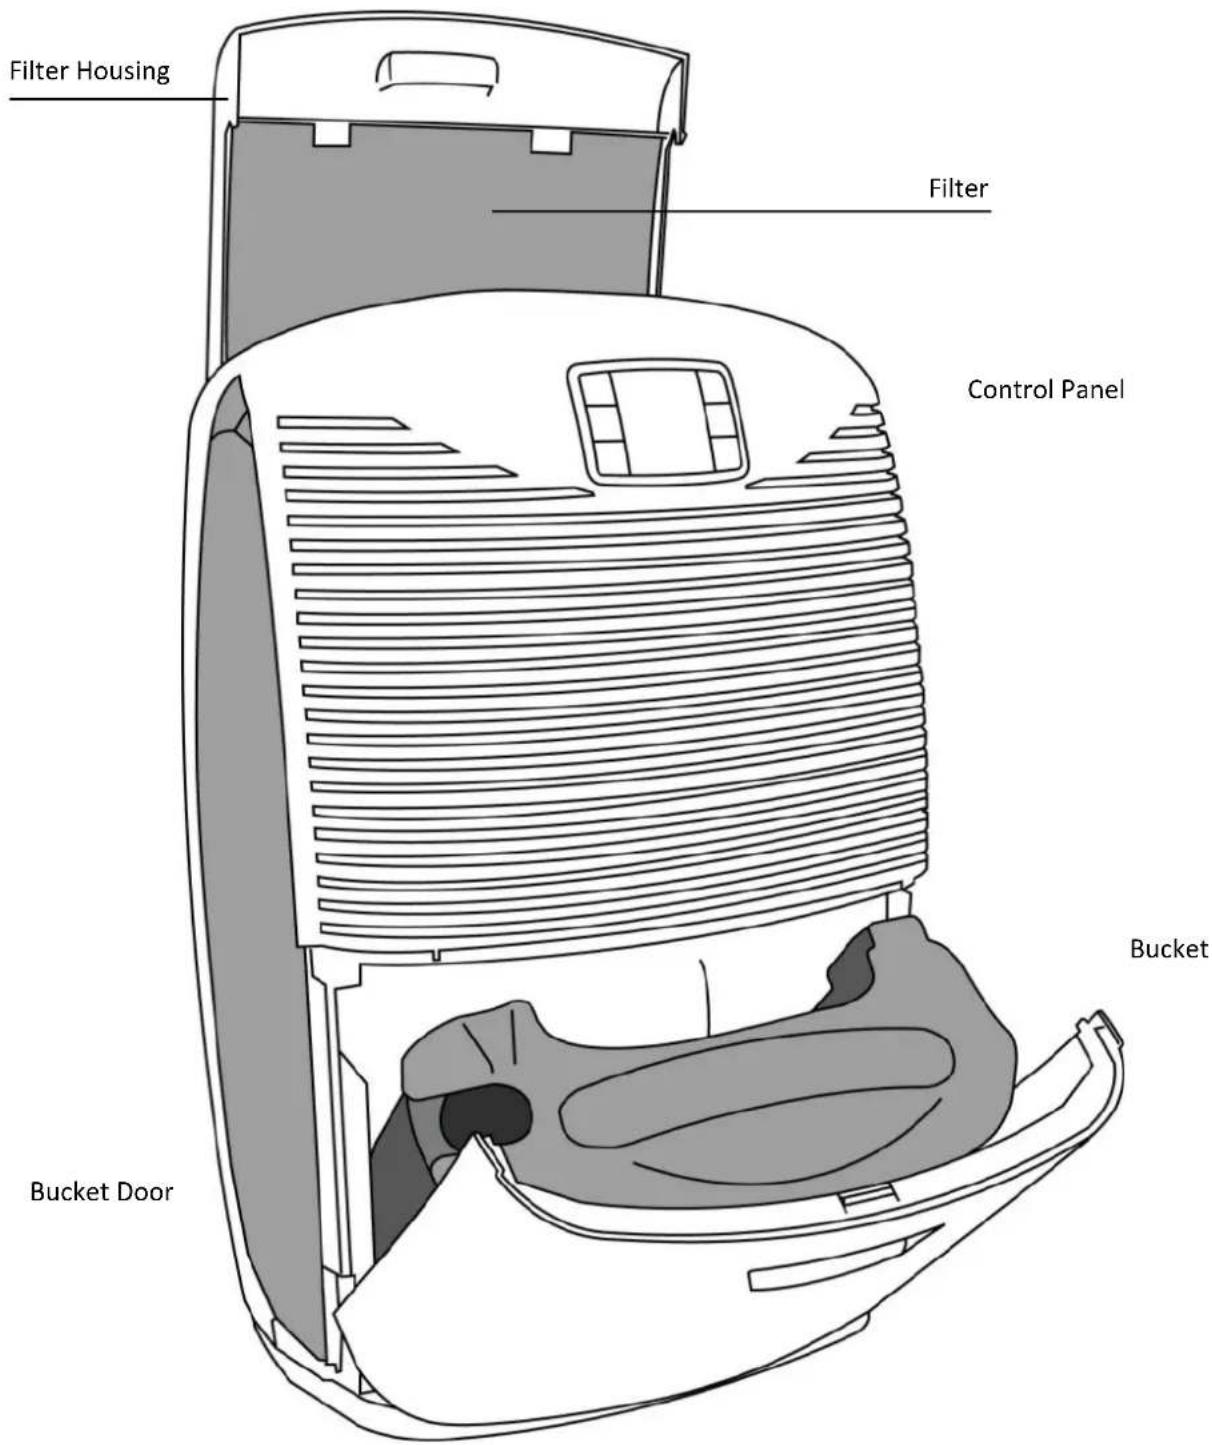
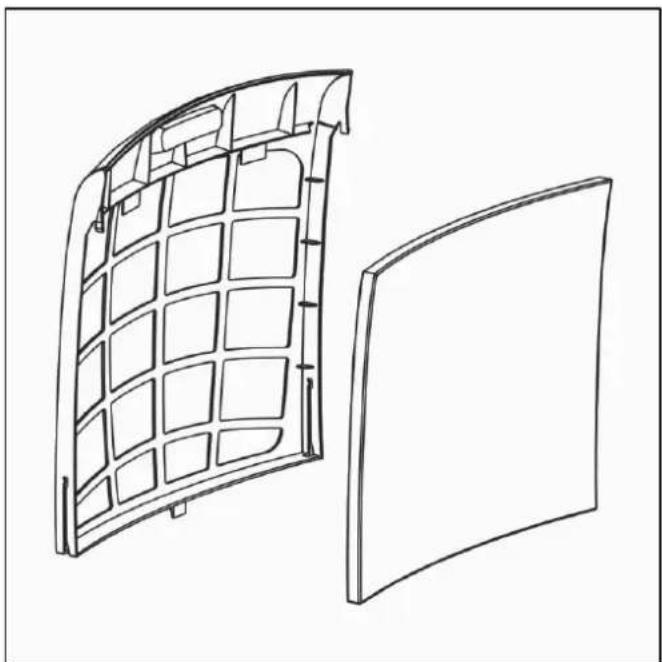
Cleaning the filter
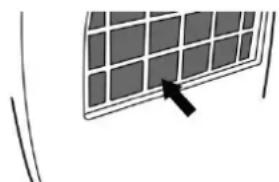
Your Ebac 3000 has a filter to remove dust from the air.
This filter should be cleaned every month and replaced every 4 months. Failure to do this will reduce the performance of your dehumidifier and may over time lead to a permanent reduction in performance.
natural_image
Technical line drawing of a curved panel or cover structure with internal grid patterns, shown from two different angles (no text or symbols)Remove the filter from the rear of the unit by sliding the filter housing upwards
Take the filter out of the housing and clean the filter using a vacuum cleaner with a soft furnishings attachment
Slide the filter housing back on to the rear panel of the unit
For accessories such as filters, contact your local supplier or visit www.ebac.com
Troubleshooting
| The unit has no powerAre there any signs of power to the unit, is the display illuminated, is the fan blowing or Compressor running? | Is the unit plugged into a power supply?Is the mains supply working?Has the fuse been replaced? | - Check someone hasn't disconnected the unit.- Try another appliance in the socket, there may be no power from the socket.- We suggest that you replace the fuse with the correct type for this model, if it continues to blow the fuse the unit is faulty (UK plug only) |
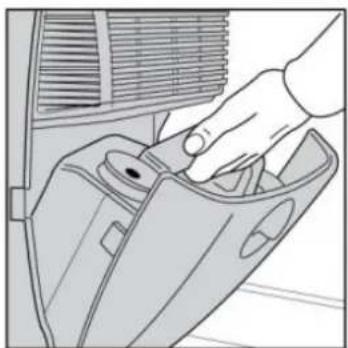
There is a constant red light on the unitIs the display showing a red light constantly as if the water container is not present or is full?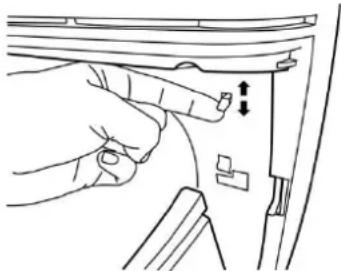 Diagram A Diagram A | Is the water container inserted and empty?Does the float inside the water container move freely?Is the micro-switch present? | - Remove and replace the water container, ensuring it is inserted correctly - See Emptying the Water Container, pg6.- Remove and empty any water from the water container. Now turn the container upside down and visually check that the float moves freely.- Check the micro-switch lever (plastic lever located behind the bucket - See Diagram A) is present and working correctly. When you press this lever the fan should start up and the display should illuminate. |
| The unit is noisyPlease bear in mind that there will always be a level of noise due to the fan & compressor, this will typically be louder than your fridge freezer. | Have you had the unit for a sufficient length of time?Is the unit positioned correctly?Is the unit excessively noisy? | - It is normal for a new customer to think that the unit is noisy, within a week or 2 it will just become a background noise.- If the unit is on wooden/laminated flooring this could make the unit sound louder, within a week or 2 it will just become a background noise.- Some noise is normal due to the compressor and refrigeration circuit however if you believe the unit has become louder it may require a repair. |
Troubleshooting Cont...
| The unit has a low water collectionThe unit is operating as normal but appears to be collecting less water. | Is the unit being run on economy setting?Have you had the unit for a sufficient length of time?Have the weather conditions changed recently? | – The economy setting is not suitable for all conditions try running the unit on AUTO and see if the collection increases.– As a new customer, you may feel that the collection of water has reduced after the initial installation, this is normal.– If the weather is very cold / freezing there is less moisture in the air and the unit will collect less water. |
| The unit is not collecting any waterThe unit is operating as normal but is collecting NO water. | Is the unit on the correct setting?Has the unit been running for a reasonable period of time?Is the unit being operated close to a heat source? | – Ensure it is not being run on a Fan only setting.– 24 hours should be sufficient time for you dehumidifier to collect water however we also suggest running the unit on the Maximum setting for 24 hours.– Ensure the unit is placed in a suitable location – See Placing you dehumidifier for maximum performance. |
The unit is overflowingThe unit is operating as normal but is continuing to operate after the water container is full. Diagram B Diagram B | Does the float inside the water container move freely?Does the unit continue to operate when the water container is not present?Is the micro-switch lever present? | – Remove and empty the water container. Now turn the container upside down to check that the float moves freely – See Diagram B.– Remove the water container from the unit. The red light should be illuminated and the compressor should not operate.– Check the micro-switch lever (plastic lever located inside the bucket cavity – See Diagram A, pg9) is present and working correctly. When you press this lever the fan should start up and the display should illuminate. |
Troubleshooting Cont...
The unit is icing up
The unit is operating as normal but is creating a lot of ice at the rear of the unit.
natural_image
Simple line drawing of a solar panel with a black arrow pointing to it (no text or symbols)Diagram C
• Is there thick ice on the coil which does not disappear?
- Is the unit being run in the correct environment?
- It is normal for a thin layer of ice or frost to form on the coil - See Diagram C, but this will disappear when the unit defrosts.
- The unit should be run in a domestic environment with an ambient temperature of 3^ or above?
The unit is leaking
The unit is operating as normal but is leaking water.

natural_image
Illustration of a hand pressing a button on a device (no text or symbols visible)Diagram D
• Is the back of the unit leaking?
• Is the container leaking?
• Is the unit on a level surface?
- Ensure that the drainage bung is inserted correctly in the rear of the unit – See Diagram D.
- Check that the container has no leaks by filling it with water over a sink.
- The unit may leak if it is not placed on a level surface. Your dehumidifier should always be placed on a level surface for this reason.
There is a problem with the display
The unit appears to be operating as normal but the display is incorrect (Froze / No Fan Symbol etc)
- Have you tried resetting the unit?
- Unplug the unit and plug it back in. This will reset the unit and may resolve the problem.
The unit is damaged
The unit has been delivered damaged or has become damaged since purchase.
- Can the damaged part be replaced?
- If the Water Container / Filter Housing are damaged, we can supply a replacement without the need to return the unit to us.
- If the damaged part cannot be replaced we recommend you contact the customer service team on +44 (0) 845 634 1392, or from the retailer you purchased from, who will advise the best course of action.
All information contained in this section can be found on our website and in the unlikely event of needing to return your dehumidifier for a repair, please go to:
www.ebac.com/contact
Alternatively call our customer service team on +44 (0) 845 634 1392 during normal hours, or the retailer you purchased from with the following information to hand:
- Dehumidifier serial number (located on a rating plate behind the water container)
- Your postcode and when and where you purchased your dehumidifier.
- Online
Log on to www.ebac.com
customer.services@ebac.com
- Telephone
+44 (0) 845 634 1392

DEHUMIDIFIERS
Ebac Limited
Ketton Way, Aycliffe Business Park, Newton Aycliffe, County Durham, DL5 6SQ
Tel: +44 (0) 845 634 1392 (GB)
Fax: +44 (0) 1388 609845
www.ebac.com

Where you see this symbol on any of our electrical products or packaging, it indicates that the relevant electrical products should not be disposed of as general household waste in Europe. To ensure the correct waste treatment of the product, please dispose of it in accordance with any applicable local laws or requirements for disposal of electrical and electronic equipment in so doing, you will help to conserve natural resources and improve standards of environmental protection in treatment and disposal of electrical waste.
Ref: DIL001-V2


- www.ebac.com/contact
- Introduction
- Unpacking your dehumidifier
- Technical and Safety information
- Setting up your dehumidifier for maximum performance
- Location
- Operation
- Comfort
- Smart Control
- Switching on your dehumidifier
- Stand your dehumidifier upright for a minimum of 2 hours before switching on.
- Emptying the water container
- Cleaning the filter
- Troubleshooting
- Troubleshooting Cont...
- The unit is icing up
- The unit is leaking
- There is a problem with the display
- The unit is damaged
Brand : EBAC
Model : 3850e
Category : Dehumidifier