
CB 992 - Vacuum Cleaner BOMANN - Free user manual and instructions
Find the device manual for free CB 992 BOMANN in PDF.
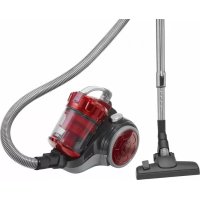
| Product type | Vacuum cleaner |
| Brand | Bomann |
| Model | CB 992 |
| Power supply | 230 V, 50 Hz |
| Cable length | Not specified (yellow and red marks for unwinding) |
| Power control | Yes (low, medium, high) |
| Full bag indicator | Yes |
| Air regulator | On the hose handle |
| Bag capacity | Not specified |
| Motor protection filter | Washable (hot water, no detergent) |
| Exhaust filter | Washable (hot water, no detergent) |
| Included accessories | Upholstery brush, 2-in-1 nozzle (crevice tool and brush), floor nozzle, telescopic tube |
| Filter maintenance | Approximately every 10 bag changes |
| Safety | Do not vacuum liquids, hot ashes, sharp objects; do not use without filter |
| Warranty | 24 months (wear parts not covered) |
| Storage | Parking position on the back of the appliance |
Frequently Asked Questions - CB 992 BOMANN
User questions about CB 992 BOMANN
0 question about this device. Answer the ones you know or ask your own.
Ask a new question about this device
Download the instructions for your Vacuum Cleaner in PDF format for free! Find your manual CB 992 - BOMANN and take your electronic device back in hand. On this page are published all the documents necessary for the use of your device. CB 992 by BOMANN.
USER MANUAL CB 992 BOMANN
Compartment à accessoires (13):
General Safety Instructions
- Read the operating instructions carefully before putting the appliance into operation and keep the instructions including the warranty, the receipt and, if possible, the box with the internal packing.
- The appliance is designed exclusively for private use and for the envisaged purpose. This appliance is not fit for commercial use. Do not use it outdoors (except if it is designed to be used outdoors). Keep it away from sources of heat, direct sunlight, humidity (never dip it into any liquid) and sharp edges. Do not use the appliance with wet hands. If the appliance is humid or wet, unplug it immediately. Do not put it in water.
- When cleaning or putting it away, switch off the appliance and always pull out the plug from the socket (pull on the plug, not the cable) if the appliance is not being used and remove the attached accessories.
- Do not operate the machine without supervision. If you should leave the workplace, always switch the machine off or remove the plug from the socket (pull the plug itself, not the lead).
- To protect children from the dangers posed by electrical appliances, make sure that the cable is hanging low and that children do not have access to the appliance.
- Check the appliance and the cable for damage on a regular basis. Do not use the appliance if it is damaged.
- Do not try to repair the appliance on your own. Always contact an authorized technician. To avoid the exposure to danger, always have a faulty cable be replaced only by the manufacturer, by our customer service or by a qualified person and with a cable of the same type.
- Use only original spare parts.
- Pay careful attention to the following "Special Safety Instructions".
Special Safety Instructions
- Do not suck up liquids!
- Do not suck up hot ashes or pointed or sharp objects!
- Do not use the appliance in humid rooms!
- Never use without the filter. Check that the filter is inserted correctly!
- hair, clothing and body parts away from the vacuum nozzle during use!
- Keep the vacuum cleaner away from sources of heat like radiators, ovens, etc.!
Start-up
GB
Overview of the Components
1 Cable
2 On/off switch
3 Vacuum power regulator
4 Carrying handle
5 Cable-winding key
6 Dust bag filling display
7 Hose connection
8 Vacuum hose
9 Handle for opening the dust bag compartment
10 Dust bag compartment
11 Suction tube, 2-part
12 Floor nozzle
13 Accessory compartment
14 Hook on the suction tube
15 Parking assistance (not shown)
Accessories:
Upholstery nozzle
"2-in-1" nozzle (groove and brush nozzle)
- Insert the connection head of the suction hose (8) into the hose connector (7) until its locks in place (use the recess to guide you). In order to release the hose again, please press the buttons once more on the connection head.
- Keep the buttons pressed down and then pull out the hose.
- Please insert the 2 parts of the suction tube (11) into one another (section with the hook facing downwards) and then attach it to the handle section.
- Then assemble the floor nozzle (12) and/or the accessories.
Using the Appliance
- Unwind the length of cable (1) you require.
- Insert the mains plug into a correctly installed safety socket (230 V, 50 Hz) and then switch the machine on using the on/off switch (2).
- Set the vacuum power with the vacuum power regulator (3).
- Vacuum at a steady speed. There is no need to exert pressure.
- Attention: pay attention to the range that can be covered with the cable length.
Vacuum power regulator:
Low vacuum power: For curtains and delicate fabrics
Medium vacuum power: For long-pile velour carpets and textile flooring
High vacuum power: For sturdy rugs and floors
Cable winding device:
Pull out the cable (1) up to the maximum length indicated with the yellow mark.
Never pull the cable out up to the red mark as the cable winding can be damaged.
Said damages are not covered by the warranty.
GB
Winding:
Press the cable (5) winding button and guide the cable. Hold the cable to avoid wrapping.
Accessory Compartment (13):
Pull open the lid of the accessory compartment to access the integrated accessories (upholstery nozzle, crevice nozzle/brush nozzle). Take out the nozzle you require:
Nozzle accessories:
Crevice nozzle/Brush nozzle: To vacuum corners and slits
"2-in-1" nozzle: When this is folded together (as stored in the compartment) it can be used as a groove nozzle. If you would like to use the brush nozzle, pull the brush section in the direction of the arrow until it locks in place.
Upholstery nozzle: To clean upholstery, curtains, etc.
Floor nozzle: To clean carpets or smooth surfaces.
Releasing the accessories: Pull these off while turning slightly.
Air Slide:
Open the air slide on the handle of the hose to regulate the air supply or to clear off any particles sticking to the nozzle.
Dust bag replacement display (6):
Hold the hose up into air. If the dust bag change display lights up, the bag is full. Please change it.
Changing the dust bag:
Remove the mains plug from the socket. Then open the lid of the dust bag compartment (10) by pressing the button (9). Remove the bag holder, press the button with the spring together in order to release the bag and then pull the dust bag out of holder. Press the button again and fix a new bag in place. Re-insert the bag holder and then close the lid so that its locks in place.
Filter: Your appliance has two filters.
Motor protection filter (inlet filter):
The inlet filter is located in the dust bag compartment. The filter is located vertically in the rear section of the dust housing. Remove the filter by pulling upwards. Clean the engine protection filter after 10 dust bag changes. If necessary, the filter can also be washed in warm water without any additives. Place it back into place only once it is completely dry!
Outlet filter:
The appliance is also equipped with an outlet filter. It is located on the rear part of your appliance behind a ventilation grid. Open the ventilation grille by pressing the button above it. Then pull the grille out towards the front. Remove the filter and clean as described above. Fit the filter back into place and close the ventilation grid by following the steps above in the opposite order.
Cleaning and storage
Cleaning
- Pull the plug out of the socket before cleaning!
- Clean the casing with a dry cloth.
Storage
- Let the iron cool down completely.
- Wind the cable completely.
- Please place the machine in a vertical position and insert the hook (14) on the suction tube into the parking assistance (15) on the back.
This device has been tested according to all relevant current CE guidelines, such as electromagnetic compatibility and low voltage directives, and has been constructed in accordance with the latest safety regulations.
Subject to technical changes without prior notice!
Guarantee
The device supplied by our Company is covered by a 24 month guarantee starting on the date of purchase (receipt).
During the life of the guarantee any fault of the device or its accessories *) ascribable to material or manufacturing defects will be eliminated free of charge by repairing or, at our discretion, by replacing it. The guarantee services do not entail an extension of the life of the guarantee nor do they give rise to any right to a new guarantee!
Proof of the guarantee is provided by the proof of purchase. Without proof of purchase no free replacement or repair will be carried out.
If you wish to make a claim under the guarantee please return the entire machine in the original packaging to your dealer together with the receipt.
^* Damage to accessories does not mean automatic free replacement of the whole machine. In such cases please contact our hotline. Broken glass or breakage of plastic parts are always subject to a charge.
GB
Defects to consumables or parts subject to wearing (e.g. motor pistons, kneading blades, drive shafts, spare remote control, spare toothbrushes, saw blades, etc.) as well as cleaning, maintenance or the replacement of said parts are not covered by the guarantee and hence are to be paid!
The guarantee lapses in case of unauthorized tampering.
After the expiry of the guarantee
After the expiry of the guarantee repairs can be carried by the competent dealer or repair service against the payment of the ensuing costs.
Regulator sityssania:
Niski stopien ssania: Do firanek, materiałów delikatnych.
Ioxayncta He BbITnBaTe CeTeBOH shyp (1) daJeE XeJIToM MeTKN. HnB KOem Clyuae He BbITraBaTe ero Do KpaCHoM MeTKN, 3TO MOxET pINBeCTN K NOJOMKe MexAHn3Ma CMaTbIBaHnA. Ioo6hBiE NOLOMKn He NOnaJaOT POp rapaHTnIO.
CmatbibaHne:
HaXmTe Ha KhONky (5) MexaHn3Ma CMaTbIBaHnI N NOMaJIeHbKy NOdaBaIte Ka6eIb. DePxNTe Ka6eIb KpeIKO B pyKax, YTO6bl IpeIoTbPaTb erO xJIecTaHne.
OTcEK npHnAdJeXHoCTei (13):
BCTpoEHbIe npHnAdJnxHOCTN (y3KOE cONlO, KOM6HnHpOBaHHa JcETKa/JeTka
dIra MmRKO Me6Ei) HaxoJrTcN IOd KpbIshKo OTcKa npHaJdxHocTei.
BbHbTe Heo6xOIMyIO HacaIky:
Conna-Hacaikn:
Pbilecochna uetka/ CoIIO-ueTka: IydaJIeHnI PbII IN B UeJax n na3ax
HacaKa"2B1": BCLOXeHHOM Bnde (B 3TOM Bnde HacaKa XpaHnTcB OTeCeKe) ee MOxHO npImeHrTa KaK y3Koe cOnI. EcIn Heo6Odma UETka, TO BbITAHnTE ee B HApPaBHeHHN CTpeJKN, DO MExaHnueCKo FHKcauIN.
ConnoIyMraKoMBeHn:IyOuNCTKNMaRKOMyBeHn,3aHaBecenntT.I.
PiiecochnaIeTKa:IyOuNCTKNKOBPOBnIgAdknxNoBepxHOCTeN.
ChTne hacaikn: NotaHyb c JleKIM npOBopaHbaHneM.
Bo3duuHa 3acnoHka:
OTKpbIbA Bo3DyHHyO 3acNOHky Ha pyKOaTke nbilecoCa MoXHO peRyIInpOBaTb cnly NOTOKa BO3Dyxa nn OCBO6OuNTb cOnlO OT npucocabuxcxr K Hemy npedmetob.
ИнданkaTopсмениMeшka-пьilec6opнka(6):
IobimTe nbinecochyTOpybBy B BO3dyx.Ecnn HndkaTOp CMeHb MeuKa- nblne6bOpnka CBETTCra, TO OH noLOH. IoxaanyCTa CMeHnte erO.
CmeHa MeIka- nblnc6bOpHnKa:
BbInbTe BnIKy n3 po3eKn. OTkpoIte npn NOMOu KNOHKn (9) KpbIshky otceKa NJIec6OpHnka (10). BbInbTe DEpXaTeJb C MeUKom-NTbJIeC6OpHNKOM, HaxMMTE KONKc c npxHOn, YTObbl OCB6oDHTb MEwOK-NbJIeC6OpHNK, IN BbITAHNTe eO n3 DEpXaTeJb. HaxMMTe Eue pa3 KONKY IN BCTaBBTe HOBbIMeUOKNIIeC6OpHNK. BCTaBBTe DEpXaTeJb C MeUkom-NTbJIeC6OpHNKOM o6paTHO. 3akpoIte KpbIshKy TaK, YTObbl OHa 3aueJKNHylacb.
RUS
TapaHTnA TepaTeTc npB BCKpbITn N3dEJIy NOCTOpOHHIMN JINUaMn.
После rapаNTи
IocJe OKOHuaHnI Cpoka rapaHTnI, pEmoHT n3dJI nnPOn3BOJNTc 3a OnilaTy, COOTBETCTByUOIMM MaCTepCKmN IJI NpyHKTaMn CepBnCHOrO O6CnyXbAHnI.
Technische Daten
Modell:CB992
- Compartment à accessoires (13):
- General Safety Instructions
- Special Safety Instructions
- Start-up
- GB
- Overview of the Components
- Accessories:
- Using the Appliance
- Vacuum power regulator:
- Cable winding device:
- Winding:
- Accessory Compartment (13):
- Nozzle accessories:
- Air Slide:
- Dust bag replacement display (6):
- Changing the dust bag:
- Outlet filter:
- Cleaning and storage
- Cleaning
- Storage
- Guarantee
- After the expiry of the guarantee
- Regulator sityssania:
- CmatbibaHne:
- OTcEK npHnAdJeXHoCTei (13):
- Conna-Hacaikn:
- Bo3duuHa 3acnoHka:
- ИнданkaTopсмениMeшka-пьilec6opнka(6):
- CmeHa MeIka- nblnc6bOpHnKa:
- RUS
- После rapаNTи
- Technische Daten
Brand : BOMANN
Model : CB 992
Category : Vacuum Cleaner