
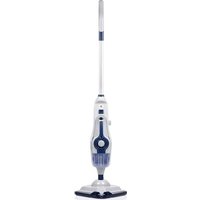
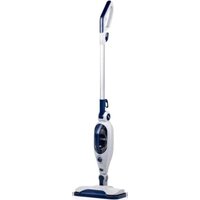
Aquaclean M3180 - Steam cleaner DIRT DEVIL - Free user manual and instructions
Find the device manual for free Aquaclean M3180 DIRT DEVIL in PDF.
| Product type | Steam cleaner |
| Brand | Dirt Devil |
| Model | Aquaclean M3180 |
| Voltage | 230 V~, 50/60 Hz |
| Power | 1500 W |
| Water tank capacity | Approx. 0.6 L |
| Disinfectant tank capacity | Approx. 0.25 L |
| Power cord length | Approx. 6 m |
| Weight (without accessories and empty tanks) | Approx. 3.3 kg |
| Operating time per fill | Approx. 12 to 15 minutes |
| Heat-up time | Approx. 35 to 45 seconds |
| Protection rating | IPX4 |
| Compatible floor types | Hard floors (tile, stone, linoleum, laminate) and short-pile carpets (with optional soleplate) |
| Steam function | With or without disinfectant |
| Disinfectant tank | Yes, for Dirt Devil specific product |
| Power-on indicator | Yes |
| Steam readiness indicator | Yes |
| Overheat protection | Yes |
| Water filter | Removable water filtration cartridge |
| Included accessories | 2 microfiber cloths, filtration cartridge, manual |
| Cloth care | Wash at 60 °C, no bleach, no tumble dryer |
| Warranty | 24 months |
Frequently Asked Questions - Aquaclean M3180 DIRT DEVIL
User questions about Aquaclean M3180 DIRT DEVIL
0 question about this device. Answer the ones you know or ask your own.
Ask a new question about this device
Download the instructions for your Steam cleaner in PDF format for free! Find your manual Aquaclean M3180 - DIRT DEVIL and take your electronic device back in hand. On this page are published all the documents necessary for the use of your device. Aquaclean M3180 by DIRT DEVIL.
USER MANUAL Aquaclean M3180 DIRT DEVIL
Dirt Devil
Operating Manual Steam mop
GB
natural_image
Line drawing of a mechanical device with a cylindrical component and a connecting rod (no text or symbols)natural_image
Technical diagram of a mechanical assembly with a magnified inset showing a circular component (no text or symbols present)natural_image
Technical line drawing of a mechanical device with a tool inserted, showing a base and component (no text or symbols)natural_image
Technical line drawing of a mechanical component with a hand holding a screwdriver (no text or symbols)natural_image
Line drawing of a hand holding a tool, showing a handle and grip mechanism (no text or symbols)natural_image
Technical line drawing of a mechanical component with a handle and mounting bracket (no text or symbols)natural_image
Illustration of a hand pressing down on a mechanical component with a black arrow indicating downward motion (no text or symbols)natural_image
Illustration of a hand pressing down on a car interior with a black downward arrow indicating the action (no text or symbols present)
ACHTUNG:
natural_image
Illustration of a hand pressing down on a mechanical component with a black arrow indicating force direction (no text or symbols)! WARNING:
natural_image
Illustration of hands using a tool to cut thick black cables, showing a curved arrow indicating motion (no text or symbols)natural_image
Line drawing of a hand holding a cord and plug attached to a vacuum cleaner's airbag (no text or symbols)
WARNUNG:
natural_image
Illustration of hands assembling a mechanical component with an upward arrow indicating assembly (no text or symbols present)
natural_image
Illustration of a hand holding a mechanical component with a highlighted section (no text or symbols)Thank you for buying the universal steam cleaner AquaClean and for your confidence in us.
Scope of delivery (Fig. 1)
| 1 Handle | 14*Carpet glider base, optional* |
| 2 Upper cable storage device with clip to secure power cord | 15 Micro-fibre cleaning cloth (2 units, 90% polyester, 10 % polyamide) |
| 3 Handle | 16 Disinfectant tank |
| 4 Central console | 17 Mains control light |
| 5 Steam base | 18 Steam ready indicator |
| 6 Locking screw (pre-installed) | 19 Disinfectant regulator |
| 7 Lower cable storage device | 20*Refilling container, optional* (only for use with disinfectant) |
| 8 Water filter cartridge | |
| 9 Water tank | 21*Disinfectant, optional* (only for use in the disinfectant tank) |
| 10 Locking screw (pre-installed) | 22 Operating manual |
| 11 Carrying handle | * i. e. included in the scope of delivery depending on model and features |
| 12 Steam button | |
| 13 Power cord with plug |
Technical data
| Type of appliance : Steam mop |
| Model name : Universal steam cleaner AquaClean |
| Model number : M318 (-0/-1/.../-8/-9) |
| Voltage : 230 V~, 50/60 Hz |
| Power : 1500 W |
| Max. operating time per tank : approx. 12–15 minutes filling (depending on steam use) |
| Steam availability : after approx. 35–45 seconds |
| Water tank : approx. 0.6 l |
| Disinfectant tank : approx. 0.25 l |
| Power cord length : approx. 6 m |
Weight (without accessories: approx. 3.3 kg and with the tanks empty)


IPX4
Technical and design specifications may be changed in the course of continuous product improvement. © Royal Appliance International GmbH
1 Safety instructions.... 30
1.1 Concerning the Operating Manual.... 30
1.2 Re: Certain groups of person 30
1.3 Concerning hot steam and hot parts of the appliance 31
1.4 Concerning the optionally supplied disinfectant 32
1.5 Concerning the power supply 33
1.6 Re: Appropriate Use 34
2 Assembly 35
2.1 Unpacking.... 35
2.2 Assembly 36
3 Filling the tanks.... 39
3.1 Filling the water tank.... 39
3.2 Filling the disinfectant tank 40
4 Steam cleaning.... 41
4.1 Before starting steam cleaning 41
4.2 Uncoiling the power cord quickly 42
4.3 Steam cleaning without the addition of disinfectant.... 42
4.4 Steam cleaning with the addition of disinfectant.... 43
4.5 Refreshing carpets 44
4.6 Putting the device into the neutral position.... 44
5 After use 45
5.1 Winding up the power cord 45
5.2 Taking care of the micro-fibre cleaning cloth 46
5.3 Transporting the device 46
5.4 Storing the device 46
6 Maintenance 47
6.1 Checking/replacing the water filter cartridge 47
6.2 Cleaning the housing 48
7 Troubleshooting.... 49
7.1 Before you send in the appliance 49
7.2 Accessories and spare parts 50
7.3 Supply sources 50
7.4 If the appliance is defective 50
7.5 Disposal 50
8 Warranty 51
8.1 Warranty conditions.... 51
8.2 In case of a warranty claim.... 51
1.1 Concerning the Operating Manual

Violation of these instructions may cause injury or damage the appliance. We take no responsibility for damage due to violation of these operating instructions.
- Read this operating manual completely before working with the appliance.
- Keep the operating manual in a safe place.
- Include the operating manual if you pass the appliance on to someone else.
Important notes for your safety are specially marked. Always observe these notices to avoid accidents and damage to the appliance.

WARNING:
Warning concerning health hazards describing possible risks of injury.

ATTENTION:
Warning concerning possible dangers to the appliance or other objects.
NOTE:
Highlights tips and information for you.
1.2 Re: Certain groups of person

This appliance is not intended to be used by persons (including children) with impaired physical, sensory or mental abilities or insufficient experience or knowledge, unless they are supervised by a person responsible for their safety or have been instructed in the proper use of the appliance by this person. Keep the appliance out of reach of people of these groups.
Children should be supervised in order to make sure that they do not play with the appliance and its accessories. Children must not be allowed to stand or sit on the appliance.
- Packing material must not be used to play with. There is danger of suffocation.
- Keep the disinfectant inaccessible to children. If they swallow any, there is a danger of poisoning!
■ People with sensory problems, especially with reduced sensitivity to temperature differences, must use great caution when working with this appliance.
1.3 Concerning hot steam and hot parts of the appliance

- Never direct the steam base at persons, animals, or plants. Always point the steam base downwards towards the surface to be cleaned. Even then, take care that parts of your body never get under the steam base. Never operate the appliance without wearing shoes. There is a danger of scalding.
■ Never lay the appliance on its side during operation. Never use the appliance in a horizontal position, let alone over your head. Never leave the appliance on and unsupervised. There is a danger of scalding. - Do not point the steam base at electrical appliances, power sockets, cables, etc. Be even more careful where there are recessed sockets in the floor or similar. There is a risk of electric shock.
- Do not use the appliance to clean pressure containers or containers where you are unsure of the content. There is danger of them bursting or exploding.
- Let hot appliances and accessories, especially the micro-fibre cleaning cloth, cool off before touching them. Carry the appliance by its handle or carrying handle only.
■ Take care not to use the steam cleaner on one spot for too long. Otherwise, the surface might be damaged.
■ Provide adequate ventilation during and after your cleaning work.

1.4 Concerning the optionally supplied disinfectant

- Keep the disinfectant inaccessible to children. If they swallow any, there is a danger of poisoning!
The disinfectant is harmful to health. Keep it away from the eyes and mucous membranes in particular. Carefully pour it into the disinfectant tank. If supplied, use the refilling container provided to do so. If you have sensitive skin, wear gloves when filling.
■ Wash your hands after handling the disinfectant. - Do not clean surfaces which come into contact with food with the steam mop or the disinfectant.
What to do in an emergency, i. e. after the disinfectant has not been used properly:
If the disinfectant has got into your eyes:
- If you are wearing contact lenses, remove them immediately.
- Rinse out your eyes immediately and thoroughly in clean water for at least 10 minutes.
- Consult a doctor if your eyes remain irritated.
If you have swallowed the disinfectant:
- First rinse out your mouth with plenty of water.
- Dilute the content of your stomach with plenty of water.
- Do not induce vomiting!
- Consult a doctor as a precaution.
If you have inhaled the vapours:
- Go into the open air.
- If you have trouble breathing, consult a doctor immediately!
If the disinfectant has come into contact with skin or clothes:
- Immediately wash the affected skin with water.
- Take off the relevant pieces of clothing and wash them before wearing them again.
1.5 Concerning the power supply
The appliance is operated with electrical power which means there is always a risk of electric shock. So please observe the following in particular:
- Make sure that the steam base is always on the surface to be cleaned during operation. Never lay the device on its side or operate it in the air! Otherwise, liquid could flow into the engine and cause a short circuit!
- Keep the steam base away from the power cord when in operation. power cords must not come into contact with any sources of heat or damp. Otherwise there is a danger of the power cord getting damaged which could lead to an electric shock.
- Always pull directly on the plug if you want to disconnect the appliance from the mains. Never pull on the power cord. Never carry the appliance by its power cord. It could get damaged.
- Always completely uncoil the power cord before use. Take care that the power cord is not bent, pinched, or rolled over and ensure it does not come into contact with heat sources.
- Never immerse the appliance in water or other liquids; keep it away from rain and moisture. Never touch the plug with wet hands.
- Only operate the appliance if your mains voltage is the same as that indicated on the appliance's type plate. The wrong voltage can destroy the appliance.
- Only connect the appliance to 3-pole safety sockets.
- If possible, do not use extension cords. If you must use an extension cord, use only safety-certified, water-protected single extension cords (no multi-socket distributors) designed for the high power consumption of the appliance.
- Always check the power cord for possible damage before using the appliance.
- Pull the plug from the socket immediately after use. Before cleaning or performing maintenance on the appliance, ensure that the plug has been removed from the socket.
1.6 Re: Appropriate Use

This appliance may only be used in households. It is not suitable for industrial or commercial use.
Only use the steam mop in households for cleaning normally dirty, flat hard floors, e. g. tiles, stone floors, linoleum, and other smooth, coated surfaces, that can withstand the high temperature, pressure and moisture of hot steam.
If the carpet glider base is in place, the steam mop can also be used to refresh short-pile carpets, runners, etc.
Any other use is considered inappropriate and is prohibited.
It is especially forbidden:
To clean:
- Persons, animals or plants, including clothing that is still being worn.
- Surfaces that are dirtied by substances hazardous to health. The hot steam could dissolve and release these substances.
- Textiles, leather, furniture, walls, window panes, uncoated, lacquered, oiled or waxed wood or parquet flooring, or surfaces made of soft or shiny plastic material. These might be damaged.
Use:
- in the proximity of explosive and flammable materials, at pressure containers or containers where you are unsure of the content.
- as a humidifier or as a space-heating system.
- in a less than fully assembled state or with accessories other than those cited in these instructions.
- on surfaces which come into contact with food.
- without the tanks inserted or with an empty water tank.
- in a horizontal position or even over your head.
- without a clean micro-fibre cleaning cloth.
- outdoors.
- To fill the water tank with liquids other than cold water. Additives in the water tank, such as the disinfectant, make using the appliance unsafe.
- Filling the disinfectant tank with liquids other than those supplied and disinfectant that has been ordered from us. Other products make using the appliance unsafe.
2 Assembly
2.1 Unpacking
- Unpack the appliance and all its accessories.
- Check the contents for completeness and possible damage. Information regarding scope of delivery ▷Page 28, "Overview".
ATTENTION:
Always transport/send the appliance in its original packaging to avoid transport damage. Keep the packaging for such an event. Dispose of no longer needed packaging material according to the applicable regulations of your country.
NOTE:
Immediately contact your dealer if you have found damage resulting from transport.

2.2 Assembly
natural_image
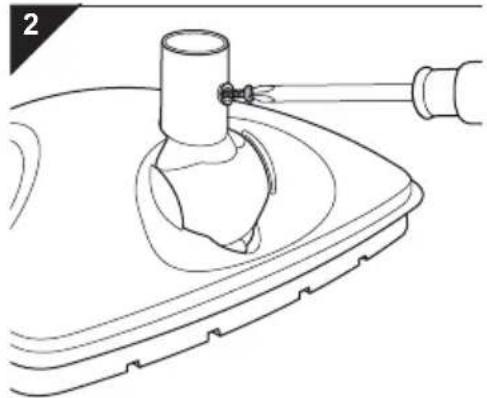
Technical line drawing of a mechanical component with a cylindrical shaft and attached pipe (no text or symbols)- Place the steam base on a flat surface.
- Screw the pre-installed cross-head screw out of the adapter on the steam base using a cross-head screw-driver (Fig. 2).
natural_image
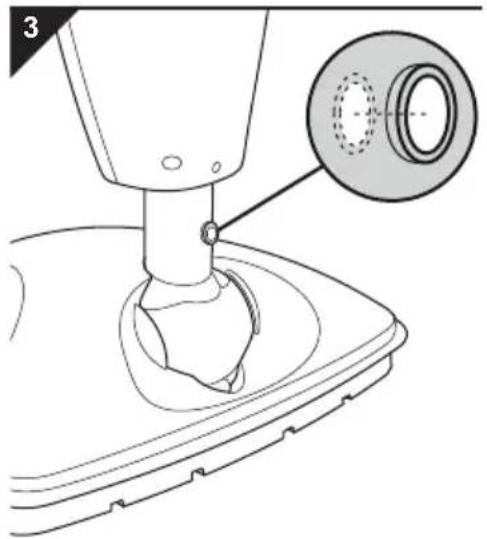
Technical diagram of a mechanical assembly with a magnified inset showing a circular component (no text or symbols present)- Push the central console powerfully into the adapter on the steam base as far as it will go.
NOTE:
The hole in the adapter must be visible through the hole of the central console (Fig. 3). Otherwise, it will not be possible for the screw to engage fully.

natural_image
Technical line drawing of a mechanical device with a tool inserted, showing no text or symbols- Screw the cross-head screw you just took out into the hole provided (Fig. 4). Tighten the screw by hand.
2 Assembly
5
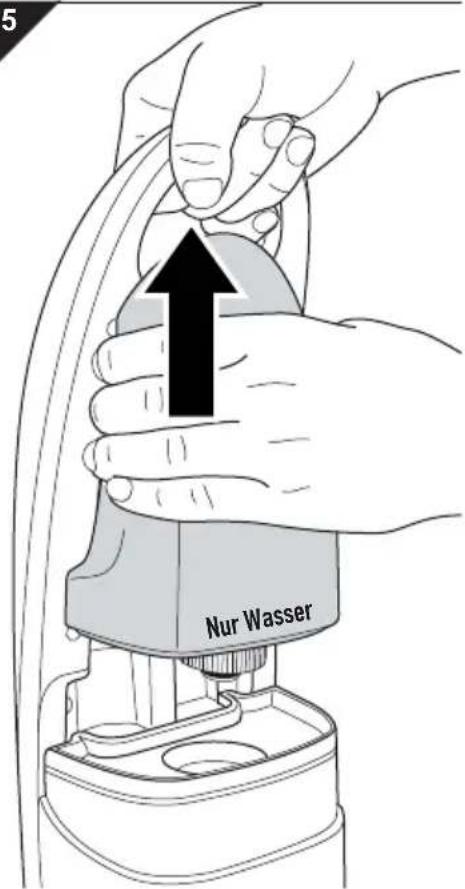
- Hold the appliance firmly by the carrying handle and pull the water tank up and out of the console (Fig. 5).
6
natural_image
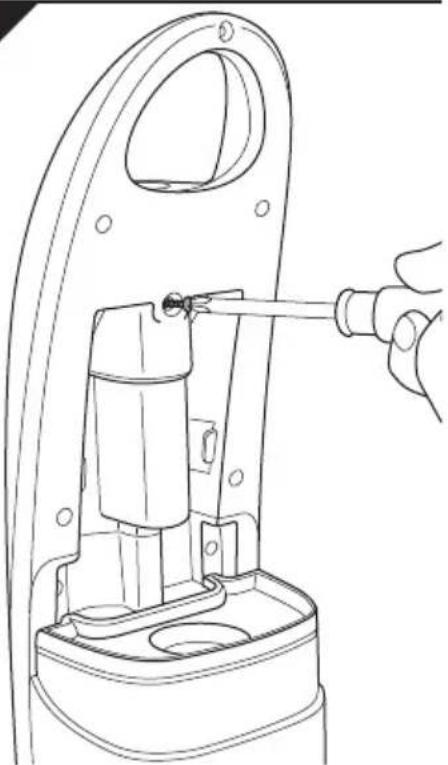
Technical line drawing of a mechanical component with a hand holding a screwdriver (no text or symbols)- Screw the pre-installed safety screw out of the central console (Fig. 6).
2 Assembly
natural_image
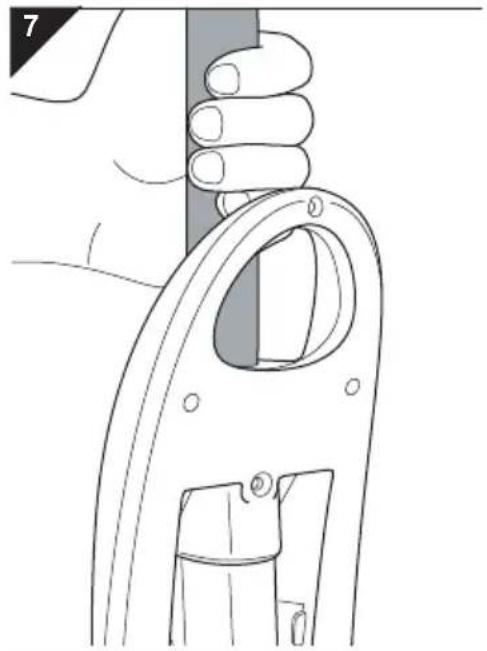
Line drawing of a hand holding a tool, showing a handle and grip mechanism (no text or symbols)- Now powerfully insert the handle into the central console from the top (Fig. 7) until it will go no further.
NOTE:
The hole in the handle must be visible through the hole of the central console. Otherwise, it will not be possible to get the screw all the way through.
natural_image
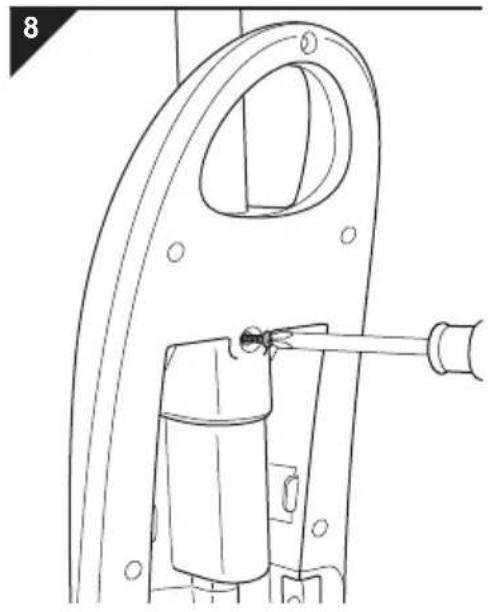
Technical line drawing of a mechanical component with a handle and mounting bracket (no text or symbols)- Screw the safety screw you removed before back on by hand (Fig. 8).
natural_image
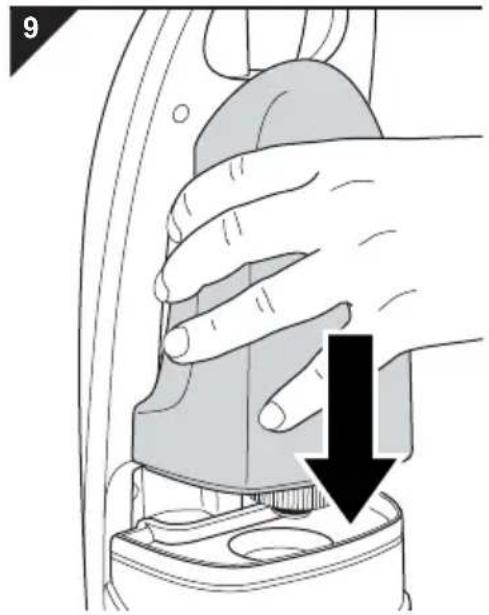
Illustration of a hand using a tool to adjust a component, with a black arrow indicating the process (no text or symbols present)- Put the water container back on (Fig. 9).
NOTE:
If you want to start steam cleaning immediately, we recommend taking this opportunity to fill the water tank with water before reattaching it, ▷Chapter 3.1, “Filling the water tank”.
3.1 Filling the water tank
10


ATTENTION:
First, pull the plug out of the plug socket. Otherwise, the appliance might run without water and get damaged.
- Put the appliance into the neutral position by straightening the handle until it is at about 90^ to the steam base, you can feel it lock into place, and the appliance remains standing without support.
- Hold the appliance firmly by the carrying handle and pull the water tank up and out of the console (Fig. 10).
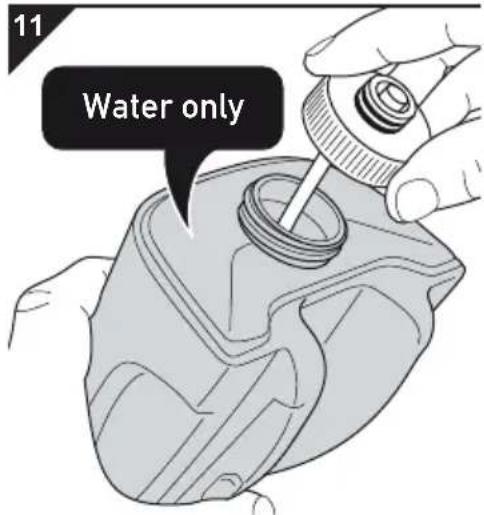
- Twist the tank cap anti-clockwise and take it completely off the tank (Fig. 11).
- Fill the water tank with clear, cold tap water no higher than just under the filling nozzle (Fig. 11).

WARNING:
Danger of injury! Do not add disinfectant or any other additives such as cleaning agents, alcohol, perfumes or chemicals into the water tank. These make use of the appliance unsafe.
NOTE:
Do not overfill the tank. Take into consideration that the tube at the lid also takes up some space after being screwed on.
12
natural_image
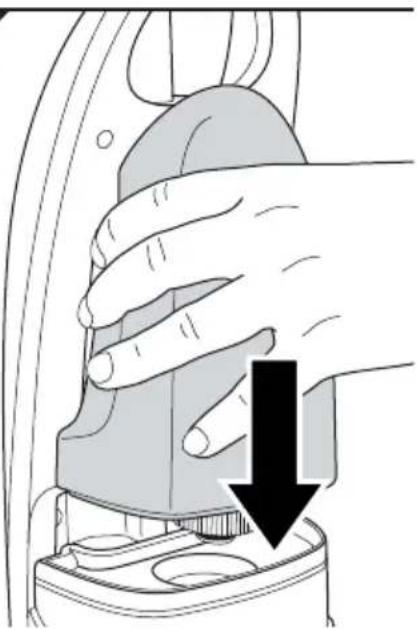
Illustration of a hand using a tool to press down a component, with a black arrow indicating the downward motion (no text or symbols present)- Turn the tank cap clockwise until it is completely back on the water tank (Fig. 11).
- Put the water tank back on powerfully (Fig. 12).
- Check that it is securely fitted.

3.2 Filling the disinfectant tank

! WARNING:
Health hazard! Only use the disinfectant supplied or ordered from us. The device has been designed for and tested with this disinfectant. Do not mix this disinfectant. Other products may make using the appliance unsafe.
WARNING:
Health hazard! Always make sure you store the disinfectant in a place that is inaccessible to children, particularly after filling the disinfectant tank and before steam cleaning.
NOTE:
If you do not have any original disinfectant available, simply leave the disinfectant tank empty. You can still steam clean with the steam mop normally. In this case, set the disinfectant regulator (Fig. 1/19) to 'OFF'.
- Put the appliance into the neutral position, ▷Chapter 4.6, "Putting the device into the neutral position".
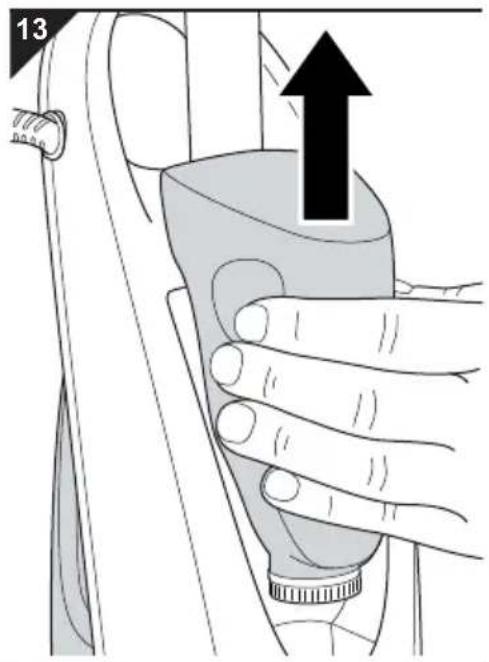
- Hold the appliance firmly by the carrying handle and pull the disinfectant tank up and out of the console (Fig. 13).
- Twist the tank cap anti-clockwise and take it completely off the disinfectant tank (Fig. 14).
- Pour in the undiluted disinfectant carefully into the disinfectant tank no higher than just under the filling nozzle.
NOTE:
If the optional refilling container (Fig. 1/20*) is included in the scope of delivery, only use it to safely fill the tank with disinfectant. When the disinfectant tank is empty, the content of a refilling container filled to the MAX mark fits into the disinfectant tank.
NOTE:
Also observe the instructions on the disinfectant bottle.
- Screw the tank lid back onto the disinfectant tank fully (Fig. 14).
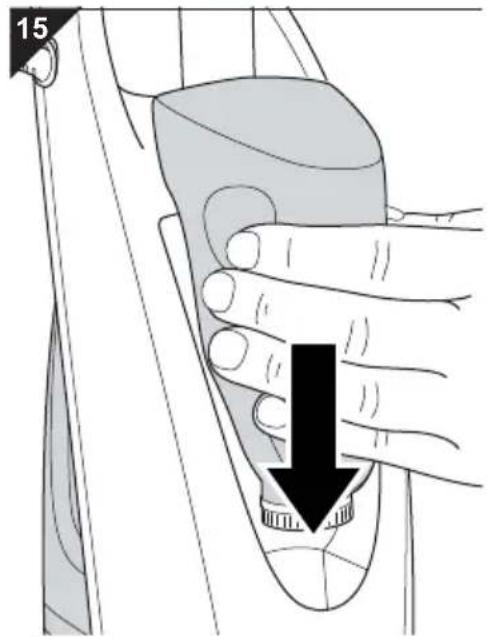
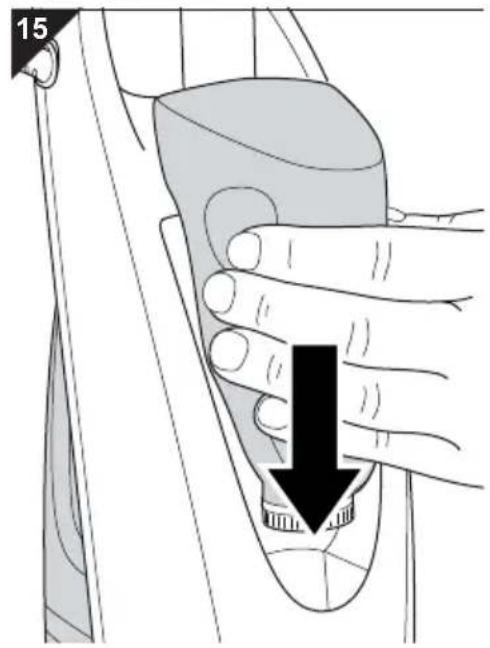
- Push the disinfectant tank powerfully back into the console (Fig. 15).
4.1 Before starting steam cleaning
WARNING:
Danger of injury! Check appliance and power cord before each use. A damaged appliance must never be used.
ATTENTION:
Before starting cleaning, check whether the surface to be cleaned is suitable for steam cleaning. Always follow the cleaning recommendations of the material manufacturers. The steam mop is definitely not suitable for use on uncoated wooden floors, soft plastics, and high-quality furnishings. Cold glass surfaces can shatter as a result of heat shock.
ATTENTION:
Operate the device only with the water tank filled. Ensure that the water level in the water tank is always above the MIN mark. Although the appliance is fitted with overheating protection, running it without water would shorten the appliance's service life.
NOTE:
The steam mop has overheating protection. It will switch off automatically if overheated (e.g. due to an empty water tank). If this happens, pull the mains plug and refill the water tank ▷Chapter 3.1, “Filling the water tank”. Wait for about 45 minutes. Once the steam mop has cooled down you can switch it on again.
NOTE:
It is recommended to first sweep or vacuum-clean floors to remove loose dirt before using the steam cleaner on them.
NOTE:
Provide adequate ventilation during and after your cleaning work.
4.2 Uncoiling the power cord quickly
natural_image
Illustration of hands using a tool to cut thick black strips, no text or symbols present4.3 Steam cleaning without the addition of disinfectant
WARNING:
Danger of electric shock! Always completely uncoil the power cord. Otherwise there is a danger of underestimating the reach of the appliance, over-exerting the power cord, and possibly damaging it.
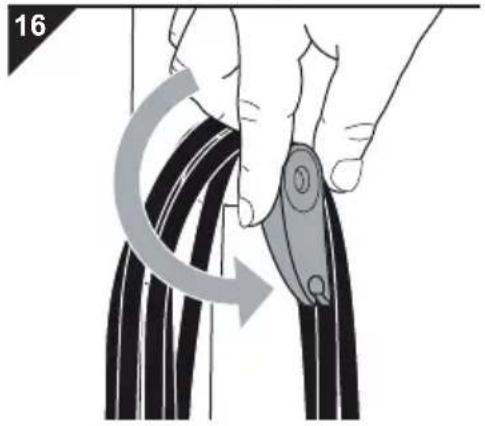
- Turn the upper coil storage device down and anti-clockwise through 180^ (Fig. 16).
- Take the entire coil from the upper and lower coil storage device.
- Secure the cable to the clip of the upper coil storage device so you do not run over it during operation.
WARNING:
Danger of scalding! Always point the steam jet downwards towards the surface to be cleaned. Never lay the appliance on its side during operation. Using the appliance in a horizontal position or even over your head is forbidden.
ATTENTION:
Only use sockets whose voltage matches the voltage given on the type plate of the appliance. Only use sockets with a ground/safety contact.
- Check that the water tank is full. If not, fill it ▷Chapter 3.1, "Filling the water tank".
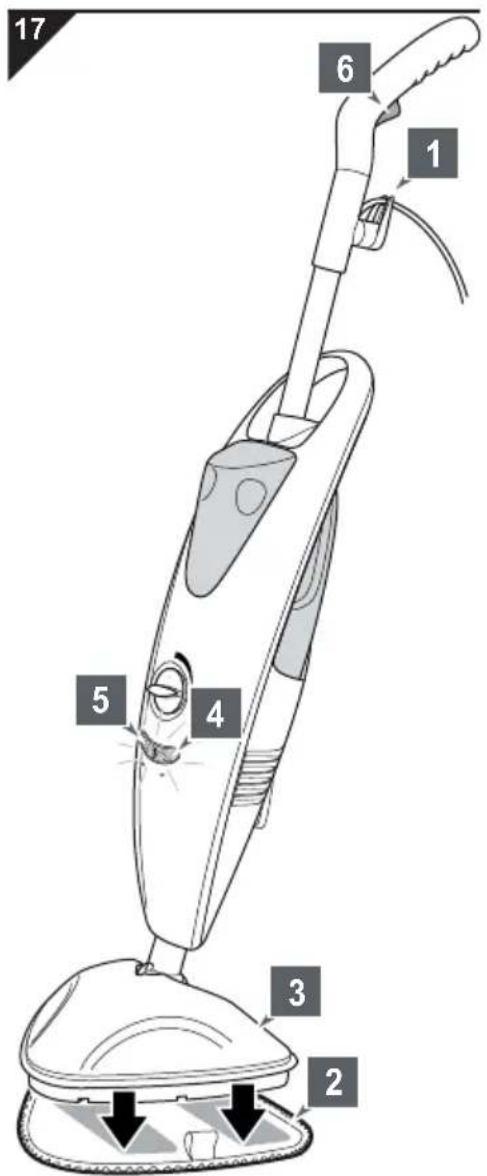
- Unwind the power cord (▷Chapter 4.2, “Uncoiling the power cord quickly”) and secure it in the clip of the upper cable-storage device (Fig. 17/1).
- Place a clean micro-fibre cleaning cloth (Fig. 17/2) on the ground so that its two Velcro strips face upwards.
- Now place the steam base (Fig. 17/3) exactly onto the micro-fibre cleaning cloth. This attaches the cloth to the appliance.
- Insert the plug into a mains socket.
- The mains control light (Fig. 17/4) goes on.
- The appliance is now heating up.
- Wait about 35–45 seconds until the steam ready indicator (Fig. 17/5) lights up.
- Now press the steam button (Fig. 17/6) on the handle and keep it depressed whilst you want to emit steam.
4.4 Steam cleaning with the addition of disinfectant
- To steam-clean, move the appliance back and forth slowly.
NOTE:
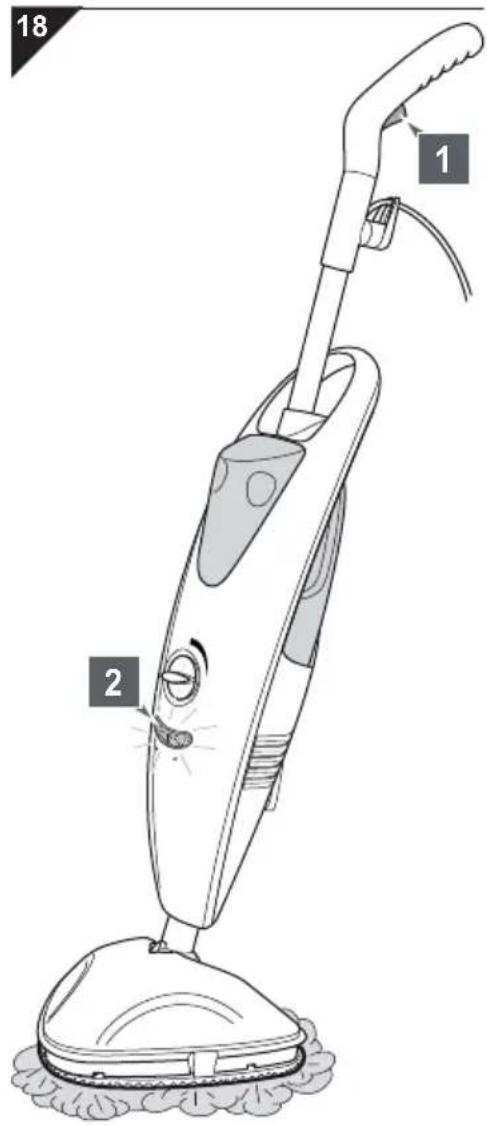
If the steam ready indicator goes out, you can continue working. Only if the steam produced is no longer sufficient, should you release the steam button (Fig. 18/1) and wait until the steam ready indicator (Fig. 18/2) lights up again. Then, as required, you can wet the micro-fibre cleaning cloth again by depressing the steam button whilst you want to emit steam.
! WARNING:
Danger of falling! Always be especially careful when cleaning smooth floors as well as steps and stairs! Only work with moderate amounts of steam when cleaning smooth floors, otherwise a moisture film will be left on the floor. Using less steam also ensures quicker drying and reduces the risk of slipping.
ATTENTION:
Do not leave the appliance standing still when in operation. Keep it moving continuously. Otherwise there will be increased danger of damaging the surface to be cleaned.
-
Pull out the plug just before finishing the cleaning process and use up the remaining steam reserves.
-
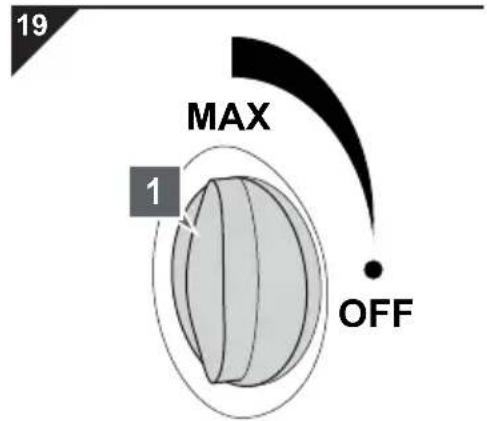
Turn the disinfectant regulator (Fig. 19/1) in the MAX direction according to how much disinfectant you want to add.
- Proceed as described in ▷Chapter 4.3, "Steam cleaning without the addition of disinfectant".
NOTE:
Disinfectant will be added to the jet of steam until the disinfectant tank is empty or you turn the regulator back to the OFF position.
- Cover each stretch of floor several times (at least 3) so that a closed film of disinfectant is produced.
4.5 Refreshing carpets
natural_image
Diagram of a vacuum cleaner with labeled parts (1 and 20), showing mechanical components and airflow direction arrows (no text or symbols beyond labels)4.6 Putting the device into the neutral position
ATTENTION:
Always comply with the cleaning instructions of the manufacturer of the carpet. Before starting cleaning, check whether the particular floor surface is suitable for steam cleaning.
NOTE:
Your steam mop is not suitable for deep cleaning carpets or for removing stubborn stains. Even adding disinfectant cannot change this. To remove stubborn stains, we recommend, before using the steam cleaner, working on the stain beforehand with a commercial chemical cleaner, provided the particular flooring permits this.
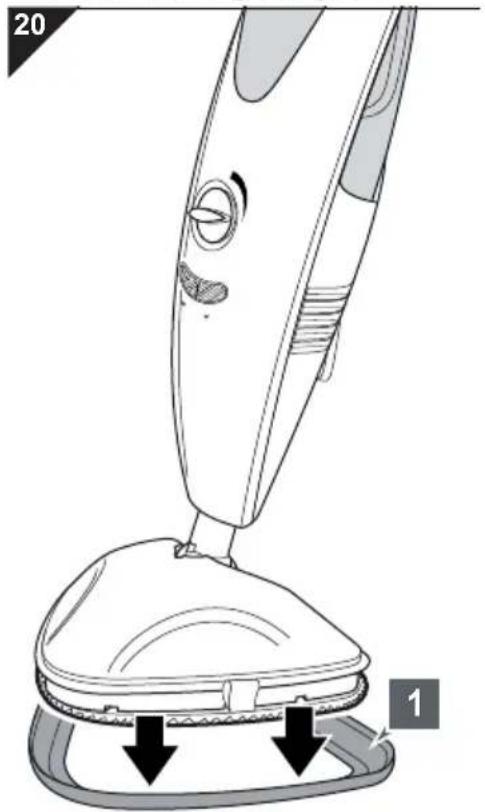
- Put the carpet glider base (Fig. 20/1) under the steam base with the attached micro-fibre cleaning cloth. Otherwise you will not be able to move back and forth effectively on this surface.
- Proceed as described in ▷Chapter 4.3, "Steam cleaning without the addition of disinfectant" or ▷Chapter 4.4, "Steam cleaning with the addition of disinfectant".
! WARNING:
Danger of injury! To avoid risk, keep to the following sequence at the end of the cleaning process:
- Pull out plug.
- Use up steam reserves completely.
- Put device into the neutral position.
- Allow appliance to cool for five minutes.
- Wind up the power cord.
- Remove micro-fibre cleaning cloth.
-
Dry micro-fibre cleaning cloth or wash if required.
-
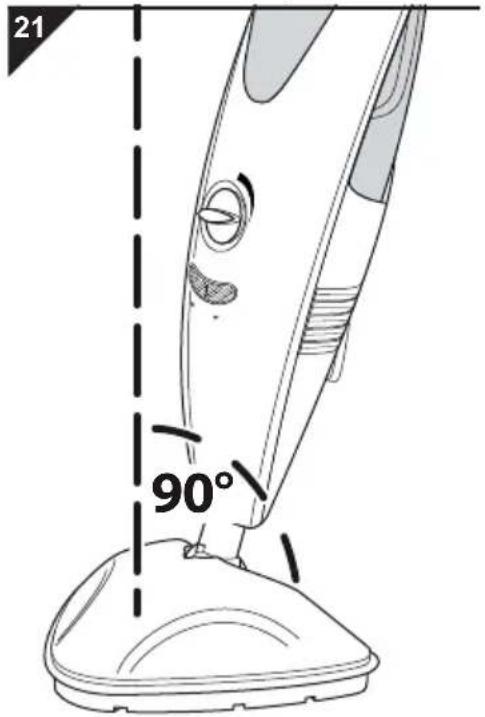
Put the appliance into the neutral position by straightening the handle until it is at about 90° to the steam base (Fig. 21), you can feel it lock into place, and the appliance remains standing without support.
-
Wind up the power cord, ▷ Chapter 5.1, "Winding up the power cord".
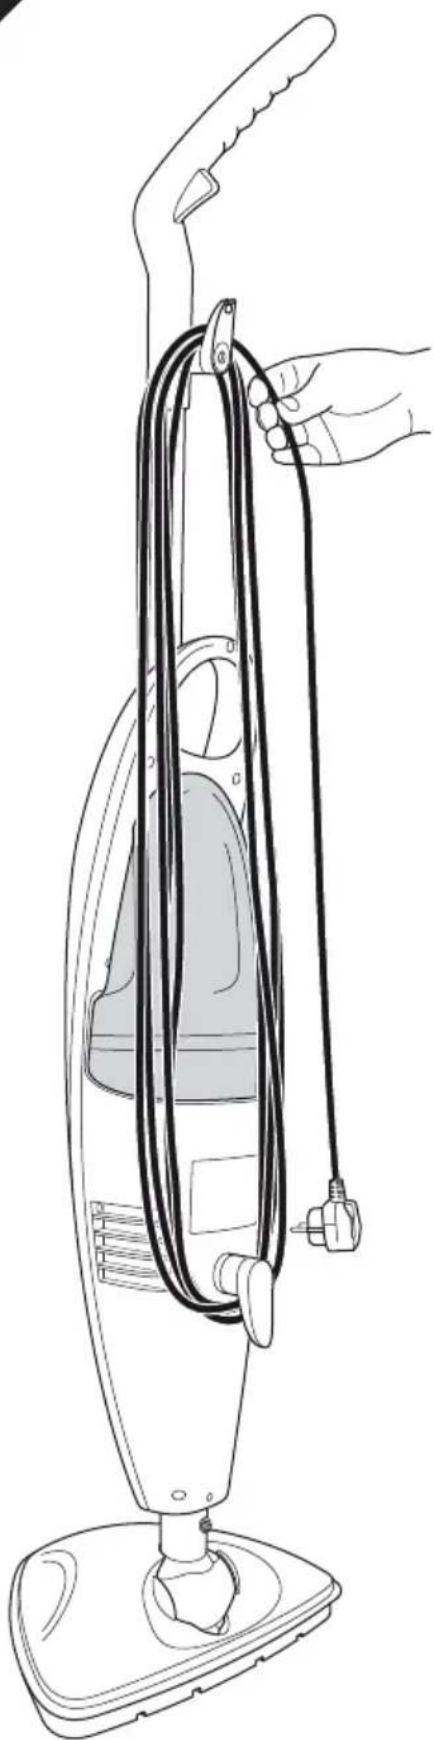
5.1 Winding up the power cord
22
natural_image
Line drawing of a hand holding a black cord connected to a vacuum cleaner's airbag (no text or symbols)
WARNING:
Danger of tripping! Wind up the power cord as soon as you have finished cleaning. Otherwise the power cord is a tripping hazard.
- If this has not yet been done, turn the upper cable storage device clockwise through 180^ right to the end.
- Now wind the power cord around the lower and upper cable storage devices as shown (Fig. 22).
- Remove the micro-fibre cleaning cloth and allow to dry or wash if required, ▷Chapter 5.2, "Taking care of the micro-fibre cleaning cloth".

5.2 Taking care of the micro-fibre cleaning cloth
WARNING:
Danger of scalding! The appliance continues to run. Even after you have pulled the mains plug from the socket, hot steam will continue to be available.
ATTENTION:
As soon as it has cooled off, remove the micro-fibre cleaning cloth from the steam base. Otherwise, germs and mould might develop.
ATTENTION:
It is best to wash the micro-fibre cleaning cloth after each cleaning session. Comply with the following care information in doing so.
Care for the micro-fibre cleaning cloth as follows:
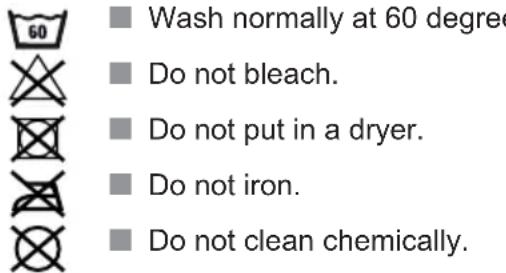
■ Wash normally at 60 degrees.
Do not bleach.
Do not put in a dryer.
Do not iron.
Do not clean chemically.
5.3 Transporting the device
ATTENTION:
Carry the appliance by its handle (Fig. 1/1) or the carrying handle (Fig. 1/11) only.
■ Before sending, empty the tanks and allow them to dry completely.
5.4 Storing the device
ATTENTION:
Never put away the appliance with a wet micro-fibre cleaning cloth. Otherwise the floor might be damaged.
■ Always keep the appliance away from sources of heat or damp and keep it out of reach of children. Also ensure that the appliance is never exposed to cold, not to mention frost.
■ Before long-term storage, empty the tanks and allow them to dry completely.
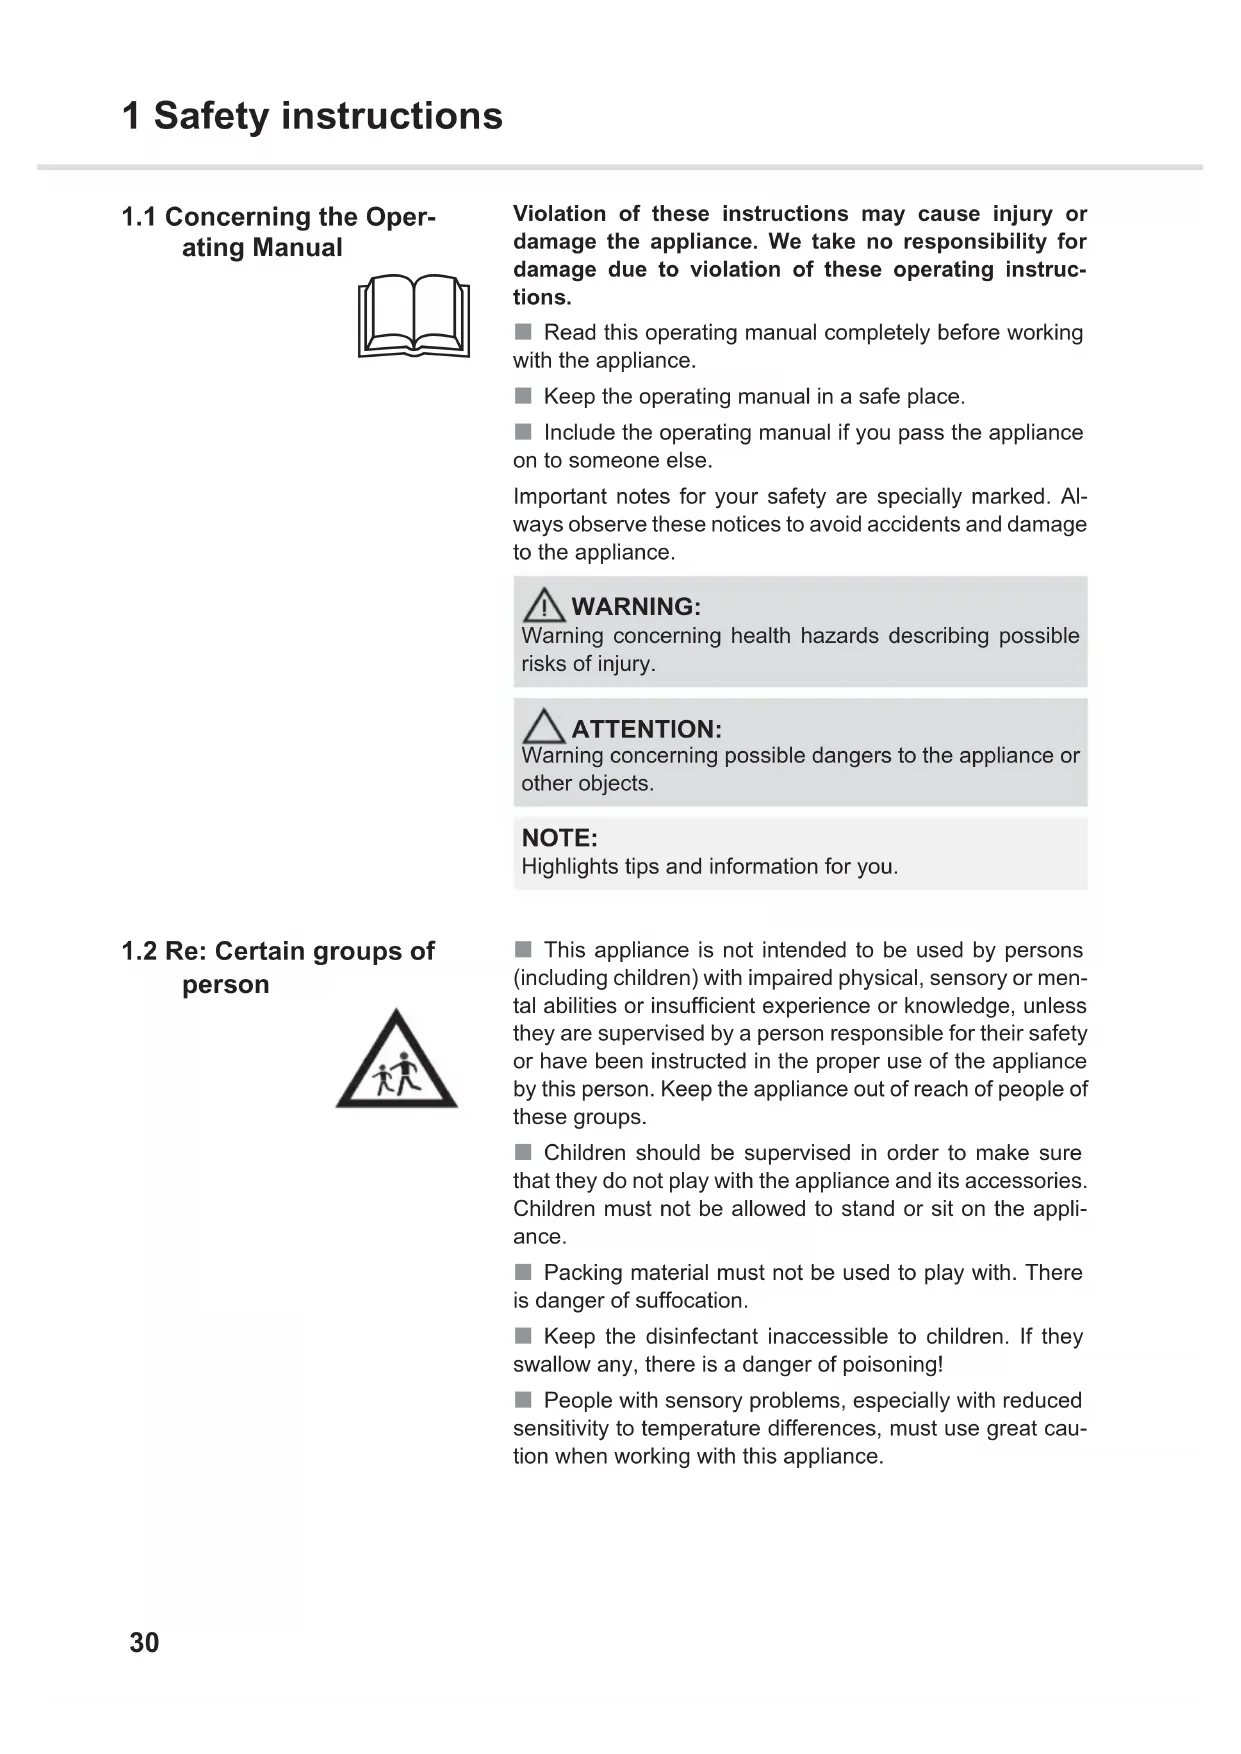
6.1 Checking/replacing the water filter cartridge
natural_image
Illustration of a hand holding a mechanical component with an upward arrow indicating motion (no text or symbols present)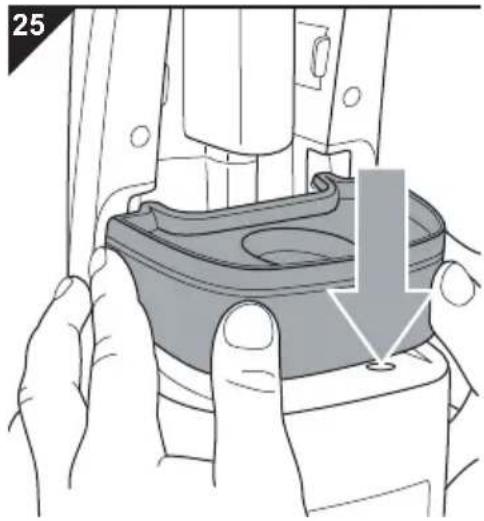
natural_image
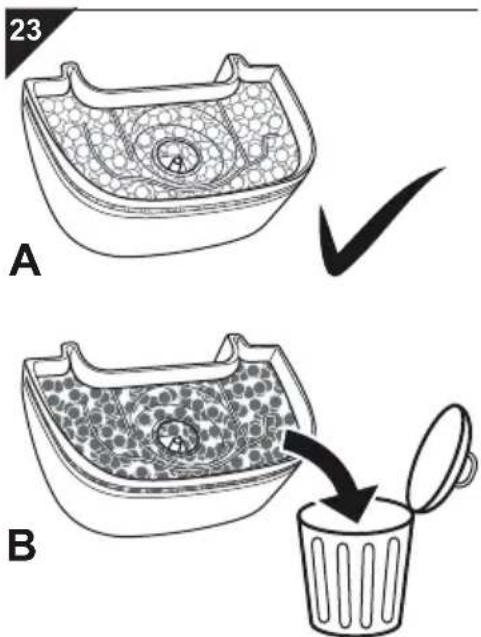
Illustration of a hand holding a mechanical component with a downward arrow indicating a process (no text or symbols present)There is always a small quantity of lime in your home's tap water. For this reason we have installed a water filter cartridge which is designed to remove the lime particles before the water runs through the appliance.
Check the water filter cartridge (Fig. 23) every time you fill the water tank, ▷Chapter 3.1, "Filling the water tank".
When first supplied, the filter medium on the inside of the cartridge is a very light colour (Fig. 23/A). If when you check it you discover that the filter medium on the inside of the cartridge has significantly changed colour (Fig. 23/B) compared to its supply state or less steam is emitted, replace the cartridge as follows:
- Switch off the device, put it into the neutral position and pull the plug from the socket, ▷ Chapter 4.6, "Putting the device into the neutral position".
- Remove the water tank, ▷ Chapter 3.1, "Filling the water tank".
- Check the colour of the cartridge. If the inside of the cartridge has changed colour considerably compared to the supply state (Fig. 23/B), the cartridge has to be replaced.
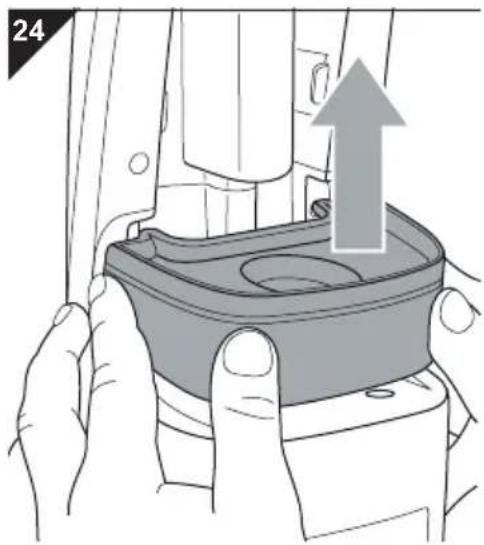
- If the water filter cartridge has to be replaced, pull it up and out of the console powerfully (Fig. 24).
- Then replace the water filter cartridge with a new one (order no.: ▷Chapter 7.2, “Accessories and spare parts”).
NOTE:
You can dispose of the worn-out water filter cartridge with your household waste.
- Push the new cartridge powerfully back into the console (Fig. 25).
- Put the water tank back on, ▷Chapter 3.1, "Filling the water tank").
- Make sure that both the elements are securely fastened to each other.
6.2 Cleaning the housing
⚠ WARNING: Danger of injury! Before you clean the appliance, switch off the appliance and unplug the mains plug, ▷Chapter 4.6, "Putting the device into the neutral position".
△ ATTENTION: Do not use cleaning or scouring agents or alcohol, as these might damage the appliance's housing.
- Only clean the outside of the housing using a slightly damp cloth.
7.1 Before you send in the appliance
Before contacting your authorised Royal dealer, Royal service partner or appliance market, first follow the procedure in the following table to check if you can solve the problem yourself.

WARNING:
Danger of injury! Never use a defective appliance! Always switch off the appliance, put it into the neutral position, and disconnect it from the mains before starting troubleshooting ▷Chapter 4.6, "Putting the device into the neutral position".
| Problem Possible cause Solution | ||
| Appliance will not go into operational readiness mode or suddenly stops producing steam. | Water tank has not be mounted correctly. | Mount the water tank again, ▷Chapter 3.1, “Filling the water tank”. |
| Water tank is empty. | 1. Switch off the device, put it into the neutral position, and pull the plug from the socket, ▷Chapter 4.6, “Putting the device into the neutral position”.2. Fill the water tank, ▷Chapter 3.1, “Filling the water tank”.3. If the overheating protection has tripped, wait about 45 minutes before connecting the appliance again. | |
| The overheating protection device has tripped due to an empty water tank. | ||
| Cleaning performance is not satisfactory even though the appliance is working fine. | The floor was not cleaned beforehand with a vacuum cleaner or brush. | Ensure that the floor has been cleared of loose dirt before cleaning with the steam mop. |
| Stains are stubborn. Repeat the cleaning process several times.If that is not enough, remove the stain before steam cleaning. | ||
| Micro-fibre cleaning cloth is dirty. | 1. Switch off the device, put it into the neutral position, and pull the plug from the socket, ▷Chapter 4.6, “Putting the device into the neutral position”.2. Wait for about 5 minutes. You can now remove the cold micro-fibre cleaning cloth and replace with a fresh one, ▷Chapter 7.2, “Accessories and spare parts”. | |
| Water filter cartridge is worn out. | Replace the water filter cartridge, ▷Chapter 6.1, “Checking/replacing the water filter cartridge”. | |
NOTE:
If you cannot solve the problem following the above table, contact our service hotline ( Page 51, "Warranty") or the Royal customer service ( Page 172, "International Service").
7.2 Accessories and spare parts
| Item number Contents | |
| 0318001 Water filter cartridge | |
| 0318002 Micro-fibre cleaning cloth set (3 units) | |
| 0318004 Carpet glider base | |
| 0319002 Set of 3 bottles of disinfectant |
7.3 Supply sources
Accessory parts and spare parts can be reordered. You can get these:
■ at the Dirt Devil online shop at www.dirtdevil.de
by e-mailing Ersatzteilshop@dirtdevil.de
or from the companies: ▷Page 172, "International Service"
7.4 If the appliance is defective
Never use a defective appliance or operate an appliance with a defective power cord. If the power cord of the appliance is damaged, it must be replaced by the manufacturer, their authorised service representative, or a similarly qualified person to avoid danger.
Refer a defective appliance or an appliance with a damaged power cord to an authorised dealer or the Royal Appliance service for repair. Address ▷Chapter 8.2, “In case of a warranty claim”.
7.5 Disposal

Dispose of the appliance in compliance with the environmental protection laws of your country. Electrical waste may not be disposed of together with domestic waste. Use local old-appliance collection points instead.
The water filter cartridge is made from environmentally compatible material and can be disposed of with domestic waste.
8.1 Warranty conditions
We offer a warranty of 24 months from the date of purchase for the appliances we sell.
Within this warranty period, we will correct all defects free of charge that are due to material or manufacturing faults, either by repair work or replacing the appliance or accessories, at our discretion (damage to accessory parts does not automatically lead to the entire appliance being replaced). Damage due to inappropriate use (operation on wrong voltage or type of current, connecting to unsuitable power supplies, breakage, etc.) are exempt from warranty, as are normal wear and minor defects that only negligibly affect the appliance's value or serviceability.
Interventions by unauthorised parties and the use of spare parts not supplied by Royal Appliance make the warranty null and void. Consumable parts are not included in the warranty and therefore must be purchased by the customer!
The warranty is only valid if the date of purchase has been acknowledged by the dealer's stamp and signature on the warranty card or if a copy of the invoice is included with the appliance that has been sent in. Warranty work does not extend the warranty period nor does it constitute a claim for a new warranty!
8.2 In case of a warranty claim
Send us the appliance with empty and dry tanks and a short description of the fault in printed letters. Head your accompanying letter with the comment 'warranty claim'. Send it to the following address, including the warranty card or a copy of the receipt:

▷Page 172, "International Service"

Merci beaucoup !
natural_image
Line drawing of a mechanical device with a cylindrical component and a connecting rod (no text or symbols)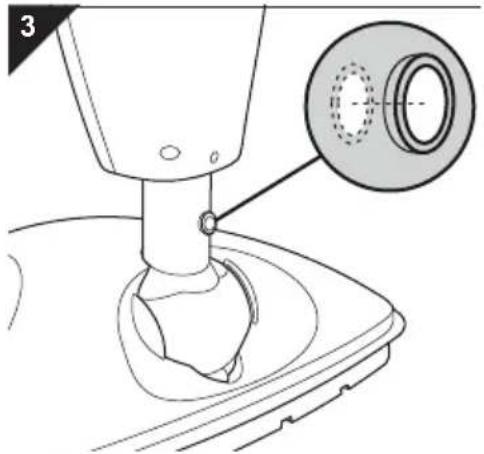
natural_image
Technical diagram of a mechanical assembly with a magnified inset showing a circular component (no text or symbols present)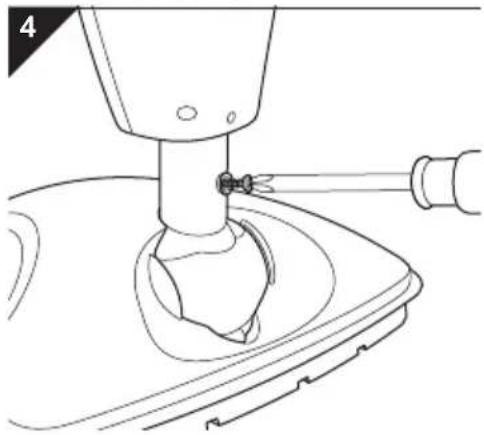
natural_image
Technical line drawing of a mechanical device with a base and handle (no text or symbols)natural_image
Technical line drawing of a mechanical component with a tool inserted, showing internal structure and mounting holes (no text or symbols)natural_image
Line drawing of a hand holding a tool, showing a handle and grip mechanism (no text or symbols)natural_image
Technical line drawing of a mechanical component with a handle and mounting bracket (no text or symbols)natural_image
Illustration of a hand pressing down on a car interior component with a black arrow indicating downward motion (no text or symbols)natural_image
Illustration of a hand using a tool to press down a car seatbelt, with a black arrow indicating the downward motion (no text or symbols present)ATTENTION:
natural_image
Illustration of a hand pressing down on a car seatbelt with an upward arrow indicating motion (no text or symbols)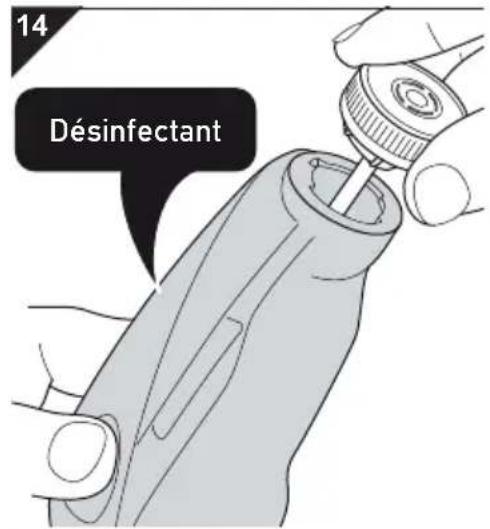
natural_image
Illustration of a hand pressing down on a car seatbelt with a black arrow indicating the grip (no text or symbols present)! AVERTISSEMENT:
natural_image
Illustration of a hand using a power tool to cut thick black strips, with a curved arrow indicating the process (no text or symbols present)
AVERTISSEMENT:
natural_image
Line drawing of a vacuum cleaner with attached cable and handle, no text or symbols present
AVERTISSEMENT:
natural_image
Illustration of hands assembling a mechanical component with an upward arrow (no text or symbols)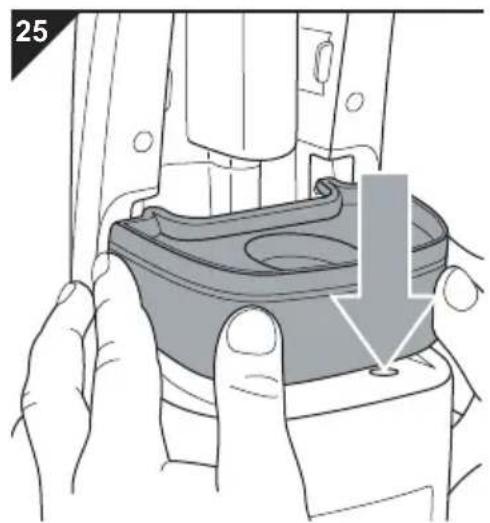
natural_image
Illustration of hands assembling a mechanical component with a highlighted section (no text or symbols)▷Page 172, "International Service"

DE
Royal Appliance International GmbH
Abt. Kundenservice
Jagenbergstraße 19
41468 Neuss
DEUTSCHLAND
Tel.: +49 (0) 180 - 501 50 50*
Fax: +49 (0) 2131 - 60 90 60 95
www.dirtdevil.de
info@dirtdevil.de
The image contains a single, solid black rectangular shape on a white background. According to the correction guidelines, such stylistic or background lines must be ignored by the OCR result. Therefore, the corrected OCR text is: [Empty]
Royal Appliance Espana, SL
Royal, Dirt Devil, Stellar
C/Cronos, N° 20, Portal 2,3° 13
28037 Madrid
ESPAÑA
Tel: +34 - 902 - 43 06 63
FR
OPM France Nant'Est entreprise
TD "MEDJIMURKA" D.D.
Trg Republike 6
40000 Čakovec
HRVATSKA
Tel.: +385 - 40 - 31 27 60
Fax: +385 - 40 - 32 86 61
HU
Aspico Kft.
Puskás Tivadar út.4.
9027 Győr
MAGYARORSZÁG
Tel.: +36 - 96 - 51 12 91
szerviz@aspico.hu
IT
Smart s.r.l.
Via Tintoretto, 12
21012, Cassano Magnago, (VA)
ITALIA
OBSŁUGA GWARANCYJNA I
SERWISOWA
QUADRA-NET Sp. z o.o.
DYSTRYBUTOR I GWARANT
DSV Sp. z o.o. S.K.A. Gdynia,
Plac Kaszubski 8
SI
Strojinc Ciril s.p.
Koseskega ul. 1a
1000 Ljubljana
SLOVENIJA
Tel: +386 -1- 42 28 489
SK
Aspico Slovakia s r.o.
Kracanska 40/104

- Dirt Devil
- ACHTUNG:
- ! WARNING:
- WARNUNG:
- Safety instructions.... 30
- Assembly 35
- Filling the tanks.... 39
- Steam cleaning.... 41
- After use 45
- Maintenance 47
- Troubleshooting.... 49
- Warranty 51
- Concerning the Operating Manual
- WARNING:
- ATTENTION:
- NOTE:
- Re: Certain groups of person
- Concerning hot steam and hot parts of the appliance
- Concerning the optionally supplied disinfectant
- What to do in an emergency, i. e. after the disinfectant has not been used properly:
- Concerning the power supply
- Re: Appropriate Use
- Any other use is considered inappropriate and is prohibited.
- It is especially forbidden:
- Assembly
- Unpacking
- Assembly
- Filling the water tank
- Filling the disinfectant tank
- Before starting steam cleaning
- Uncoiling the power cord quickly
- Steam cleaning without the addition of disinfectant
- Refreshing carpets
- Putting the device into the neutral position
- Winding up the power cord
- Taking care of the micro-fibre cleaning cloth
- Transporting the device
- Storing the device
- Checking/replacing the water filter cartridge
- Cleaning the housing
- Before you send in the appliance
- Accessories and spare parts
- Supply sources
- If the appliance is defective
- Disposal
- Warranty conditions
- In case of a warranty claim
- Merci beaucoup !
- ! AVERTISSEMENT:
- AVERTISSEMENT:
- DE
- The image contains a single, solid black rectangular shape on a white background. According to the correction guidelines, such stylistic or background lines must be ignored by the OCR result. Therefore, the corrected OCR text is: [Empty]
- FR
- HU
- IT
- SI
- SK
Brand : DIRT DEVIL
Model : Aquaclean M3180
Category : Steam cleaner