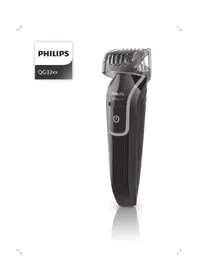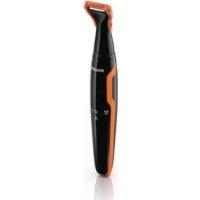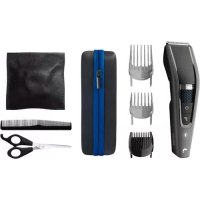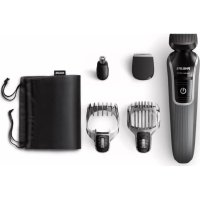
PHILIPS HQC688 - Electric mower

HQC688 - Electric mower PHILIPS - Free user manual and instructions

Find the device manual for free HQC688 PHILIPS in PDF.

📄 68 pages English EN Download 💬 AI Question 10 questions ⚙️ Specs
Notice PHILIPS HQC688 - page 2
Pick your language and provide your email: we'll send you a specifically translated version.
Product typeElectric trimmer
BrandPhilips
ModelHQC688
Power supplyRechargeable via mains (check voltage)
Charging timeApproximately 12 hours (do not exceed 24 hours)
Battery lifeApproximately 50 minutes
Cutting heightsFrom 4 mm to 40 mm (adjustable via combs)
Combs includedSmall comb (positions 1-7: 4-21 mm) and large comb (positions 8-14: 24-40 mm)
Use while plugged inPossible only if batteries are discharged, not fully charged
CleaningBrush supplied, do not use water or abrasive products
Replacement of shaving unitWith an original Philips unit
Operating temperatureCharging and storage between 15°C and 35°C
SafetyDo not open the appliance while plugged in; avoid contact with water
RecyclingRemovable batteries for special waste disposal

Frequently Asked Questions - HQC688 PHILIPS

How to charge the Philips HQC688 trimmer?
Make sure the appliance is switched off. Plug the connector into the appliance, then the plug into the mains socket. The indicator light comes on. Charging takes approximately 12 hours. Do not exceed 24 hours of charging.
What is the battery life after a full charge?
Once fully charged, the trimmer offers a battery life of approximately 50 minutes.
How to adjust the cutting height?
Use the small comb (positions 1 to 7, heights from 4 to 21 mm) or the large comb (positions 8 to 14, heights from 24 to 40 mm). Turn the adjustment zoom to the desired position.
Can I use the trimmer while plugged in?
Yes, but only if the batteries are completely discharged. Wait a few minutes before turning it on. Do not use it while plugged in if the batteries are charged.
How to clean the trimmer?
After use, switch off and unplug the appliance. Remove the comb. Open the shaving unit and clean it with the supplied brush. Never use water, abrasives or solvents.
When should the shaving unit be replaced?
Replace the shaving unit if it is worn or damaged. Use only an original Philips shaving unit.
What to do if the trimmer no longer works?
Check the charge. If it is charged but does not work, contact Philips Consumer Service via the number in the warranty leaflet.
How to remove the batteries for recycling?
Unplug the appliance and run it until it stops. Open the shaving unit, remove the metal clip, the protective plate, the adjustment zoom, the cover and the printed circuit board. Break a part of the circuit, open the plastic holder and remove the batteries. Do not dispose of batteries with household waste.
Where to find spare parts for the HQC688?
Spare parts (shaving unit, etc.) are available from authorized Philips service centers or on their website.
What are the important safety precautions?
Never use the appliance in water. Charge and store at a temperature between 15°C and 35°C. Do not open the appliance while plugged in. Protect it from dust and moisture.

User questions about HQC688 PHILIPS

0 question about this device. Answer the ones you know or ask your own.

Ask a new question about this device

The email remains private: it is only used to notify you if someone responds to your question.

No questions yet. Be the first to ask one.

Download the instructions for your Electric mower in PDF format for free! Find your manual HQC688 - PHILIPS and take your electronic device back in hand. On this page are published all the documents necessary for the use of your device. HQC688 by PHILIPS.

USER MANUAL HQC688 PHILIPS

Blue square icon with white sun and mountain silhouette (no text or symbols)

Blue square sign with white asterisks and a temperature symbol '-℃' (no additional text or symbols)

  • Check if the voltage indicated on the mains plug corresponds to the mains voltage in your home before you connect the appliance.
  • Make sure the appliance does not get wet.
  • Charge and store the appliance at a temperature between 15° and 35°C.
  • Protect the instruction video from dust, humidity, too high or too low temperatures and magnetic fields (i.e. television sets or loudspeakers).
  • Do not open the protective flap of the video cassette and do not touch the tape.
  • If the video is stored in a cold environment, do not use it until it has reached room temperature.
  • Insert the video cassette with the window facing upwards.

Charging

Charge the appliance fully before you start using it for the first time.

Make sure the appliance is switched off while charging.
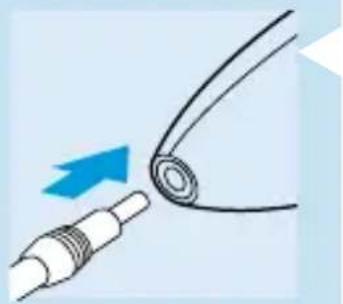
Illustration of a medical device with a blue arrow pointing to a curved tube or cable (no text or symbols present)

1 Insert the appliance plug into the appliance.

2 Insert the mains plug into the wall socket.

  • The pilot light will go on to indicate that the appliance is charging.
    It will take approx. 12 hours to fully charge the battery.
    Do not charge the appliance for more than 24 hours.

A fully charged appliance has a cordless clipping time of up to 50 minutes.

Corded clipping

  • To clip with the hair clipper connected to the mains:
    Switch the hair clipper off, connect it to the mains and wait a few seconds before switching it on. If the battery is completely empty: wait a few minutes before switching the appliance on.
    Do not run the appliance from the mains when the battery is fully charged.

Preparing for clipping

- See also the booklet 'Modelling and styling' and the instruction video.

Clipping with comb attachment:

Select the small or large comb attachment, depending on the desired hair length (see table).

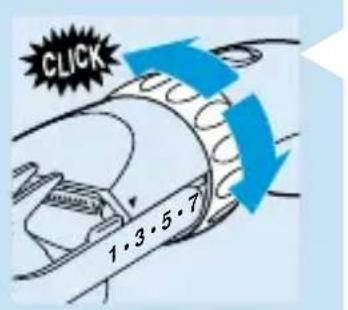
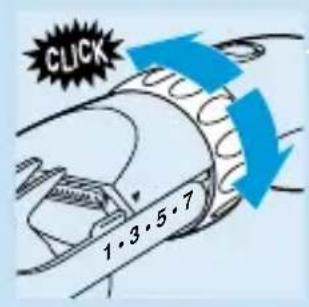
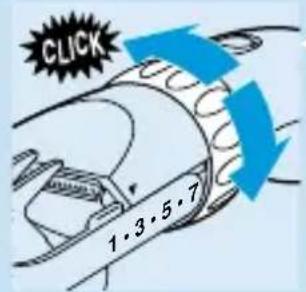
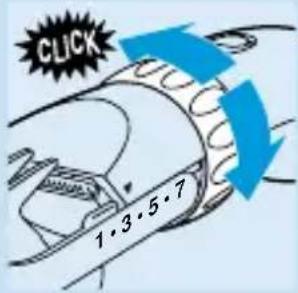
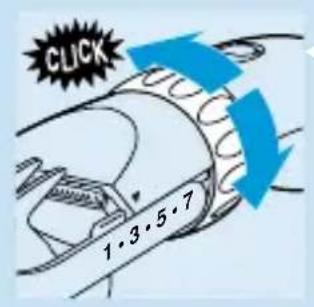
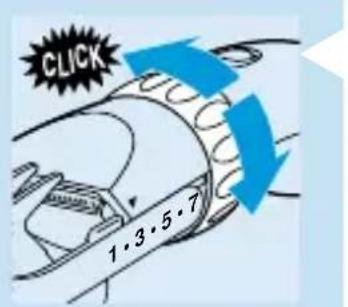
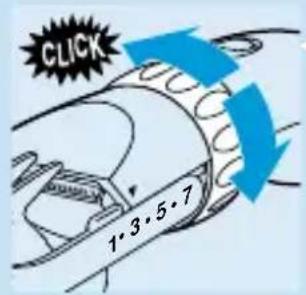
1 Slide the comb holder into the guiding grooves of the appliance until you hear a click.
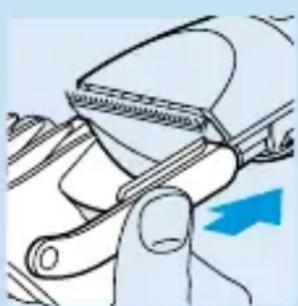
Illustration of a hand using a tool to adjust or install a mechanical component, with no visible text or symbols.

CLICK 1.3.5.7

2 Turn the Precision Zoom Lock™ to the desired hair length setting (see table).
3 Switch the appliance on.

If a lot of hair has accumulated in the comb, remove the comb attachment and blow and/or shake the hair from the comb.

Cutting length settings

Small comb Large comb setting hair length setting hair length

1 4 mm 8 24 mm
27 mm 9 27 mm
3 10 mm 10 30 mm
4 13 mm 11 33 mm
5 16 mm 12 35 mm
6 19 mm 13 38 mm
7 21 mm 14 40 mm
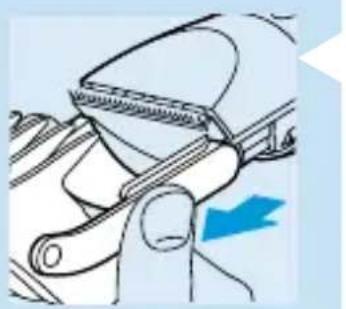
Illustration of a mechanical clamp or grip mechanism with a blue arrow indicating direction (no text or symbols present)

Clipping without comb attachment

1 Remove the comb attachment by pulling it off the appliance.

Clean and recharge the appliance every time you have used it.

Cleaning

Do not use abrasives, scourers or liquids such as alcohol, petrol or acetone to clean the appliance.
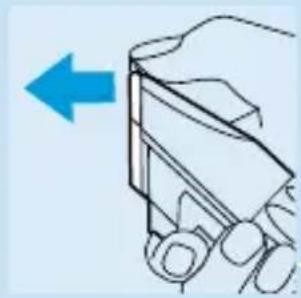
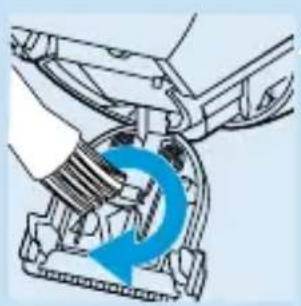
Illustration of a hand holding a cart with scissors, no text or symbols present

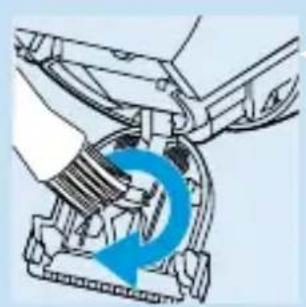
Mechanical assembly diagram showing a rotating component with a blue arrow indicating rotational motion (no text or symbols present)

CLICK

1 Make sure the appliance is switched off and disconnected from the mains before you start cleaning it.
2 Remove the comb attachment.
3 Open the cutting unit.
4 Clean the cutting unit and the inside of the appliance with the brush supplied.
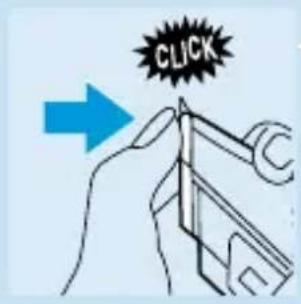
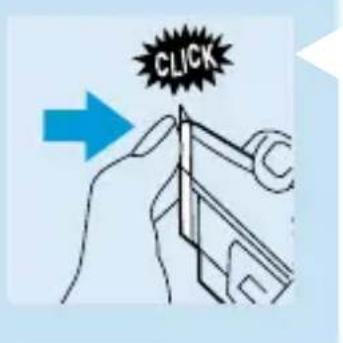
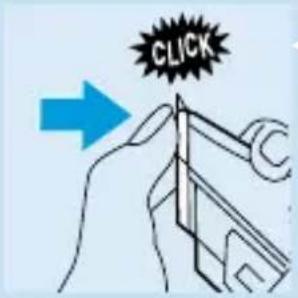
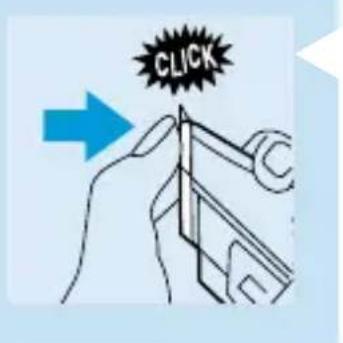
5 Close the cutting unit.Push the cutting unit until you hear a click.

Replacement

A worn or damaged cutting unit should only be replaced with an original Philips cutting unit.

1 Remove the old cutting unit.
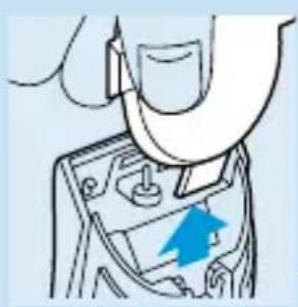
2 Place the two lugs of the new cutting unit into the guiding slots and push the unit back onto the appliance.
Line drawing of a hand using a tool to press or install a device with a blue arrow pointing to the component (no text or symbols present)

Environment

The built-in rechargeable battery contains substances which may pollute the environment.

Remove the rechargeable battery when you discard the appliance.

Do not throw the battery away with the normal household waste but dispose of it at an official collection point.

You can also take the appliance to a Philips service centre, where staff will be happy to help you remove the battery and dispose of it in an environmentally safe way.
Line drawing of a hand inserting a device into a device panel with a blue arrow indicating direction (no text or symbols)

1 Disconnect the appliance from the mains and let the appliance run until the motor stops.
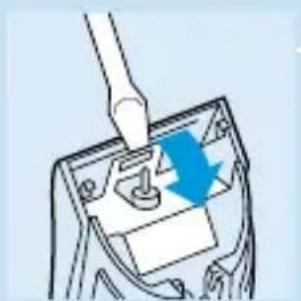
Illustration of a hand using a tool to press a component with a blue arrow indicating direction (no text or symbols)

2 Open and remove the cutting unit.

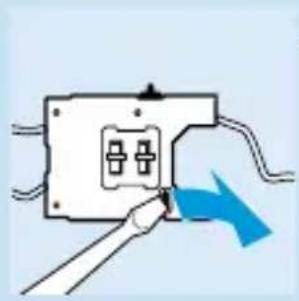
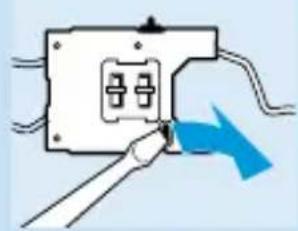
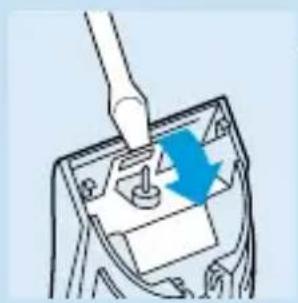
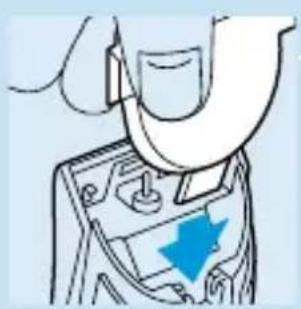
3 Remove the metal clip by means of a screwdriver.
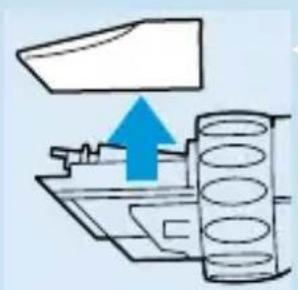
Diagram of a mechanical component with a blue arrow indicating upward motion (no text or symbols)

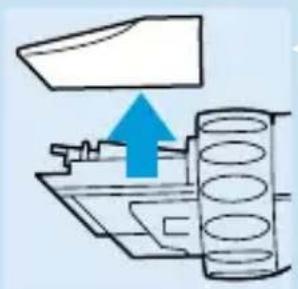
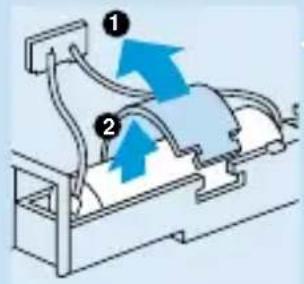
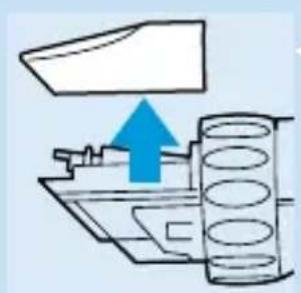
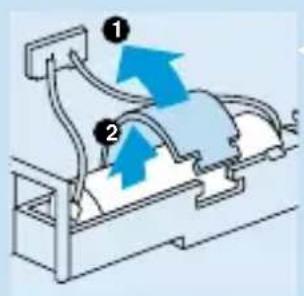
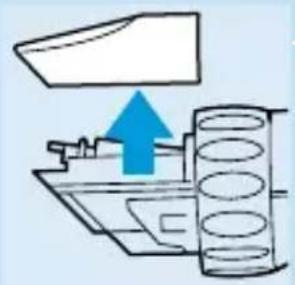
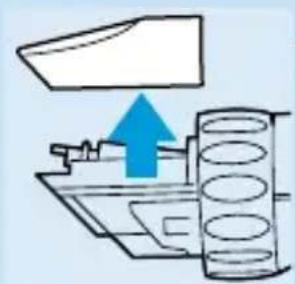
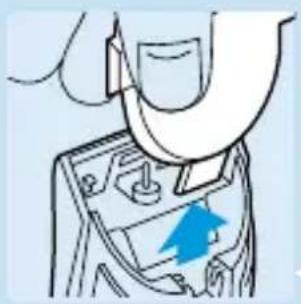
4 Remove the cover plate.

Diagram of a mechanical component with a blue arrow indicating direction (no text or symbols)

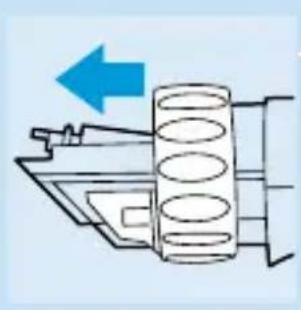
5 Remove the Precision Zoom Lock™ by pulling it in the direction of the cutting unit.
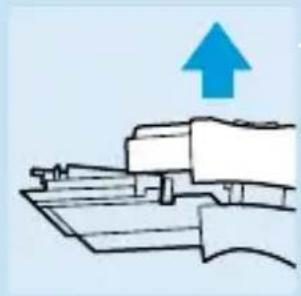
Illustration of a hand holding a document with a blue upward arrow (no text or symbols)

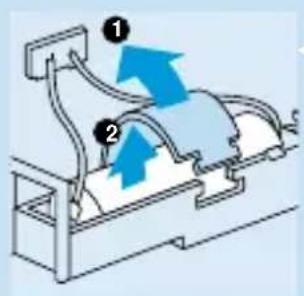
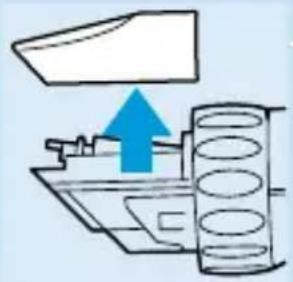
6 Remove the cover.

Mechanical assembly diagram showing a blue arrow pointing to a component on a platform (no text or symbols present)

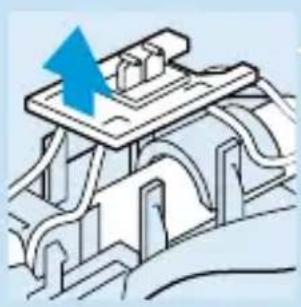
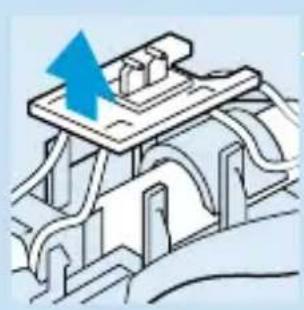
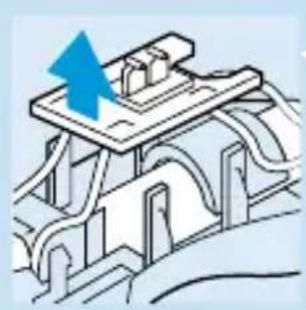
7 Pull out the printed circuit board.
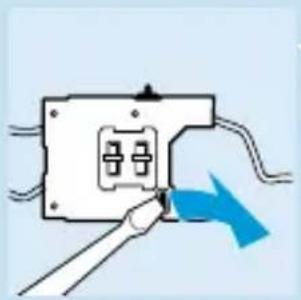
Illustration of a hand inserting a plug into an electrical outlet with a blue arrow indicating direction (no text or symbols)

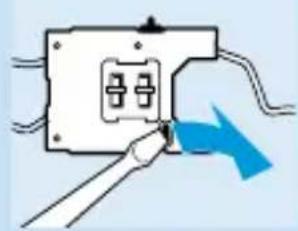
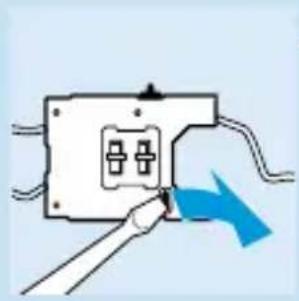
8 Insert a screwdriver into the small slot in the printed circuit board marked with an arrow. Push the screwdriver down until part of the printed circuit board breaks off.
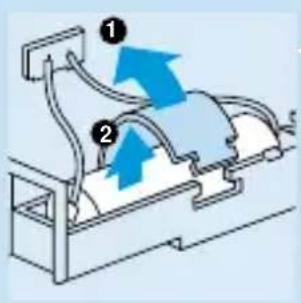
Diagram of a mechanical device with labeled components and directional arrows indicating flow or movement.

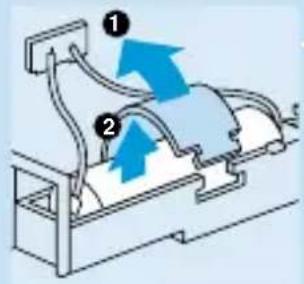
9 Open the plastic battery holder and take out the rechargeable battery.

Dispose of the battery and the other components in an environmentally safe way.

Do not connect the appliance to the mains again after it has been opened!

For telephone numbers of the Philips Helpdesk, see the Worldwide Guarantee leaflet.

W ichtig

Illustration of a cable being inserted into a wire, with a blue arrow indicating the direction (no text or symbols)

CLICK 1.3.5.7

Diagram of a mechanical assembly with a blue arrow indicating upward motion (no text or symbols)

Diagram of a mechanical assembly with a blue arrow indicating direction (no text or symbols present)

Illustration of a hand inserting a plug into an electrical outlet with a blue arrow indicating direction (no text or symbols)

Diagram showing two labeled components (① and ②) with directional arrows indicating movement or flow, possibly illustrating a mechanical or fluid system.

Blue square icon with a white sun and mountain silhouette (no text or symbols)

Blue square sign with white asterisks and a temperature symbol '-℃' below, no readable text or data.

CLICK 1.3.5.7

CLICK

Illustration of a hand inserting a plug into an electrical outlet with a blue arrow indicating direction (no text or symbols)

Diagram of a mechanical device with labeled components and directional arrows indicating motion or flow

Blue square icon with white sun and mountain silhouette (no text or symbols)

Blue square sign with white asterisks and a temperature symbol '-℃' (no additional text or symbols)

CLICK 1.3.5.7

Schoonmaken

CLICK

Vervanging

Diagram of a medical or laboratory setup with a blue arrow pointing to a component, no visible text or symbols

Diagram of a mechanical assembly with a blue arrow indicating upward motion (no text or symbols)

Blue square icon with white sun and mountain silhouette (no text or symbols)

Blue square sign with white asterisks and a temperature symbol '-℃' (no additional text or symbols)

1 Enchufe la clavija correspondiente al aparato.

2 Enchufe la clavija correspondiente a la red.
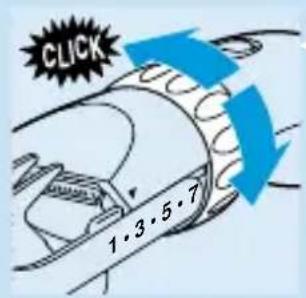
CLICK 1·3·5·7

CLICK

Diagram showing a mechanical assembly with a blue arrow indicating upward motion (no text or symbols)

Diagram of a mechanical or electrical component with no visible text, numbers, or symbols

Illustration of a hand inserting a plug into an electrical outlet with a blue arrow indicating direction (no text or symbols)

Diagram of a mechanical device with labeled components and directional arrows indicating motion or flow

Blue square icon with a white sun and mountain silhouette, no text or symbols present.

Blue square sign with white asterisks and a temperature symbol (-°C), no readable text or data

CLICK 1.3.5.7

Illustration of a hand inserting a plug into an electrical outlet with a blue arrow indicating direction (no text or symbols)

Diagram showing two labeled components (① and ②) with directional arrows indicating movement or flow, likely illustrating a mechanical or fluid system.

Blue background with white sun icon and mountain silhouette (no text or symbols)

Blue square sign with white asterisks and a temperature symbol (-°C), no readable text or data.

CLICK 1.3.5.7

Limpeza

Diagram showing a blue upward arrow pointing to a mechanical component with circular cutouts (no text or symbols)

Blue square icon with a white sun and mountain silhouette, no text or symbols present.

Blue square sign with white asterisks and a temperature symbol (-°C), no readable text or data

Blue square icon with a white sun and mountain silhouette (no text or symbols)

Blue square sign with white asterisks and a curved line, no readable text or symbols

CLICK 1.3.5.7

Mechanical assembly diagram showing a gear meshing with a blue circular arrow indicating rotational motion (no text or symbols)

Illustration of a hand using a stylus to press a device with a blue arrow indicating action (no text or symbols present)

Diagram of a mechanical assembly with a blue arrow indicating upward motion (no text or symbols)

Manual assistant
Powered by Anthropic
Waiting for your message
Product information

Brand : PHILIPS

Model : HQC688

Category : Electric mower