
FM 24 D - Oven Ariston Thermo - Free user manual and instructions
Find the device manual for free FM 24 D Ariston Thermo in PDF.
| Product Type | Multifunction Built-in Oven |
| Brand | Ariston Thermo |
| Model | FM 24 D |
| Useful Dimensions | Width 40 cm, Depth 39 cm, Height 34 cm |
| Useful Volume | 53 liters |
| Electrical Supply | 220-230 V ~ 50 Hz |
| Total Power | 2200 - 2300 W |
| Energy Consumption | 0.5 kWh to reach 200°C, 1.0 kW to maintain 200°C |
| Number of Programs | 5 (static, fan-assisted, grill, double grill, gratin) |
| Cooking Types | Static, Fan-assisted (convection), Grill, Double grill, Gratin oven |
| Interior Lighting | 25 W lamp, E14 socket, resistant to 300°C |
| Door | Glass, optional third glass kit for child safety |
| Timer | Mechanical timer with alarm (max 210 min) |
| Cooking Programmer | Manual, semi-automatic and automatic (programmable start/end) |
| Safety | Automatic shut-off at end of cooking, omnipolar switch, mandatory grounding |
| Cleaning | Clean with warm water and mild detergent, avoid abrasive products |
| Installation | Built-in, heat-resistant cabinet, rear ventilation required |
| Spare Parts | Use only original parts via authorized after-sales service |
| Repairability | Repairs exclusively by authorized after-sales service center |
| Weight | Not specified (estimated ~30 kg) |
Frequently Asked Questions - FM 24 D Ariston Thermo
User questions about FM 24 D Ariston Thermo
0 question about this device. Answer the ones you know or ask your own.
Ask a new question about this device
Download the instructions for your Oven in PDF format for free! Find your manual FM 24 D - Ariston Thermo and take your electronic device back in hand. On this page are published all the documents necessary for the use of your device. FM 24 D by Ariston Thermo.
USER MANUAL FM 24 D Ariston Thermo
GB Multifunction oven with 5 programs Instructions for installation and use 10
natural_image
Technical line drawing of a cabinet or enclosure with structural beams and a door (no text or symbols)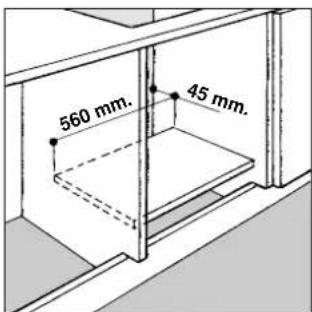

natural_image
Diagram showing a device with a circular inset highlighting a mechanical component (no text or symbols present)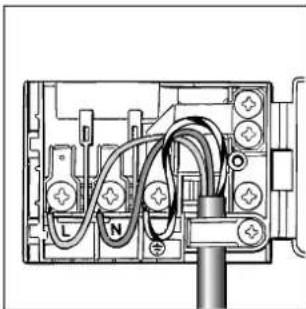
natural_image
Pure electrical circuit lines without any symbols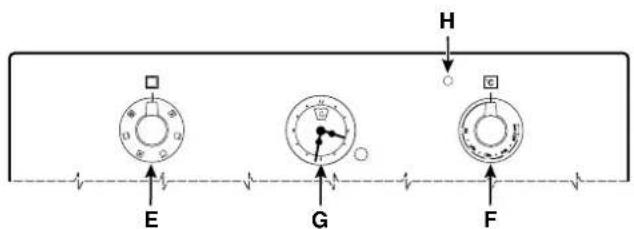
flowchart
graph TD
    A["Start"] --> B["E"]
    B --> C["F"]
    C --> D["G"]
    D --> E["H"]
    style A fill:#f9f,stroke:#333
    style B fill:#ccf,stroke:#333
    style C fill:#cfc,stroke:#333
    style D fill:#fcc,stroke:#333
    style E fill:#ffc,stroke:#333

Attenzione
natural_image
Interior ceiling view showing a mechanical component with a circular head and a cylindrical component inserted into a wall (no text or symbols visible)Important
To maintain the EFFICIENCY and SAFETY of this appliance, we recommend:
- call only the Service Centers authorized by the manufacturer
• always use original Spare Parts
1 This appliance is intended for non-professional use within the home.
2 Before using the appliance, carefully read the instructions contained in this manual, as they provide important information for ensuring safe installation, use and maintenance. Keep this manual as a reference guide.
3 After the packing has been removed, make sure the appliance has not been damaged during transport. If you have any doubts, do not use the appliance. Call a qualified technician for assistance. For safety purposes, keep all packing materials (plastic bags, polystyrene foam, tacks, etc.) away from children, as they are a potential source of injury.
4 The appliance must be installed by a qualified technician in accordance with the manufacturer's instructions. Improper installation due to a failure to follow these instructions can cause injury or damage to persons, animals or property. The manufacturer will not be held liable for such damages.
5 The appliance's electrical system is safe and secure only when it is correctly connected to an appropriately earthed system which complies with electrical safety regulations. Make sure this basic safety requirement has been complied with. If in doubt, have it checked by a qualified technician.
6 The manufacturer will not be held liable for damages caused by the improper earthing of the appliance.
7 Before connecting the appliance, make sure the specifications on the rating plate correspond to those of your power supply.
8 Make sure that the current of the electrical system and the outlets are sufficient for the maximum rated output indicated on the rating plate. If in doubt, contact a qualified technician for assistance.
9 A multipolar switch, with a contact break of 3 mm or more, must be fitted for installation.
10 If the socket and the appliance plug are incompatible, have the socket replaced with an appropriate one by a qualified technician, who should also make sure, in particular, that the wires connected to the socket are appropriate for the total power absorbed by the appliance. In general, the use of adapters, multiple sockets and/or extensions is not recommended. If they must be used, utilise only those single or multiple adapters and extensions which comply with the current safety regulations. However, make sure not to exceed the current rating marked on the single adapters and extensions, or the maximum power marked on the multiple adapter.
11 Do not leave the appliance plugged in when not necessary. Turn off the main appliance switch when it is not in use.
12 Do not block openings or slots which serve to ventilate the oven or to disperse heat.
13 The supply cord of this appliance must never be changed
by the user. If the cord is damaged, or must be replaced, contact only those service centres authorised by the manufacturer for assistance.
14 This appliance must only be used for the purpose for which it was designed. All other uses (for heating for example) is considered improper and, therefore, dangerous. The manufacturer will not be held liable for damages arising from improper, incorrect, or unreasonable use.
15 When using electrical appliances, the following basic rules must be observed:
- never touch the appliance when your hands or feet are wet.
- never use the appliance if you are barefoot.
- use extensions, if necessary, with extreme caution.
- never pull the supply cord, or the appliance itself, to disconnect the plug from the electrical socket.
- never leave the appliance exposed to the weather (rain, sun, etc.)
- never let children or persons unfamiliar with the appliance use it without appropriate supervision.
16 Before doing any cleaning or maintenance of the appliance, disconnect it from the supply mains, either by removing the plug from the socket, or by turning off the main appliance switch.
17 In case of a defect or breakdown, switch off the appliance, close the gas cock, and do not tamper with the oven. For repairs contact only authorised service centres for assistance and make sure only original spare parts are used. Failure to do so could impair the safety of the appliance.
18 If you decide not to use the appliance any longer, make it unserviceable by unplugging the appliance from the mains and cutting the supply cord. Make any potentially dangerous parts safe, this precaution is particularly important for protecting children who might play with, or in, unused or abandoned appliances.
19 Keep children away from the appliance when the grill or oven are in use because some of the accessible parts could become extremely hot.
20 Remember that a child's skin is much more sensitive than an adult's and, therefore, can be burned more easily. Keep children away from the appliance during or immediately after use until the appliance cools. In particular, the door of the oven can become very hot during extended cooking times at high temperatures.
21 Oven gloves or similar protection should be used when moving containers in or out of hot ovens and care should be taken to avoid contact with hot surfaces of exposed skin on wrists or arms.
22 Petrol and other inflammable solvents should not be used in the vicinity of the appliance whilst it is in use.
23 Make sure the knobs are in the “·”/“o” position when the appliance is not in use.
Installation
Important: the appliance must be disconnected from the power supply before making any adjustments or performing any maintenance, etc.
Installing built-in ovens
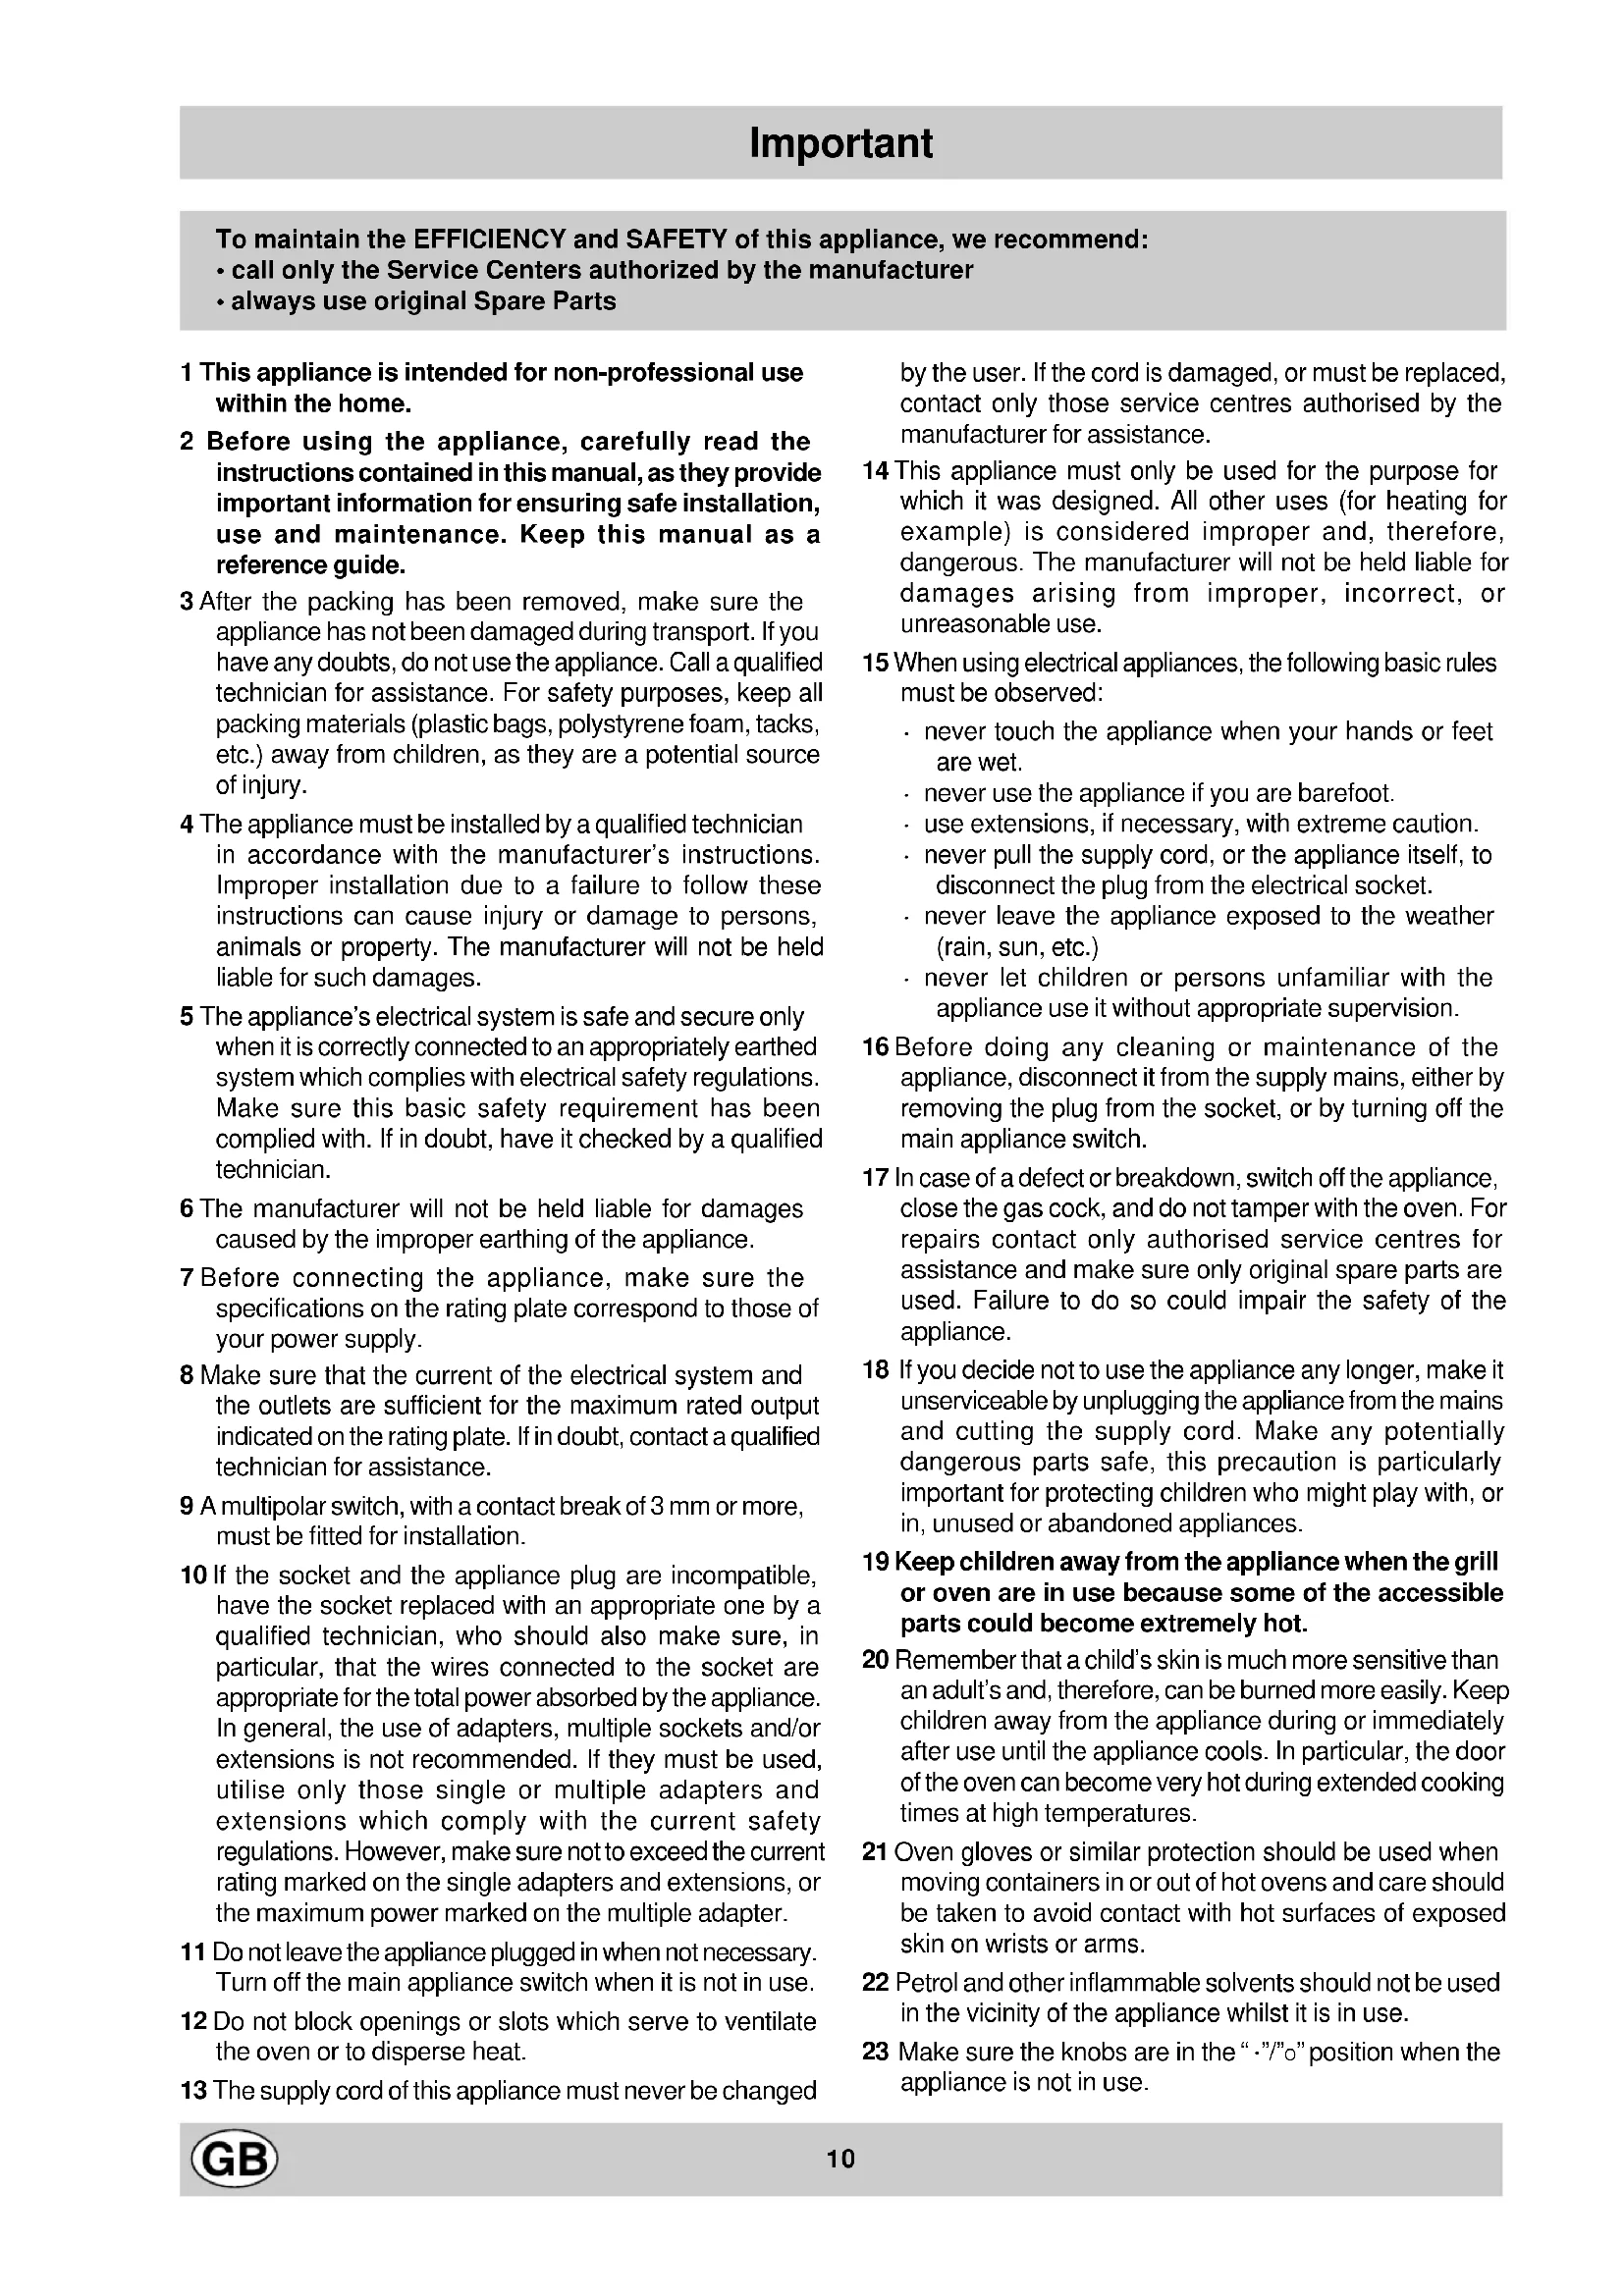
To insure that your built-in oven operates properly, the cabinet must have the proper characteristics. The dimensions of the cabinet opening are indicated in figure;
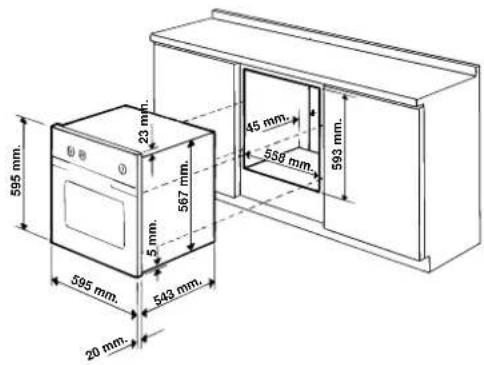
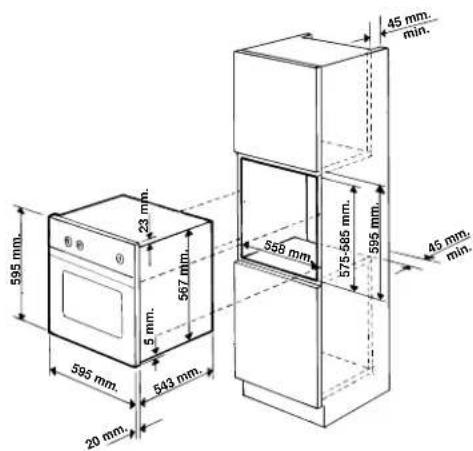
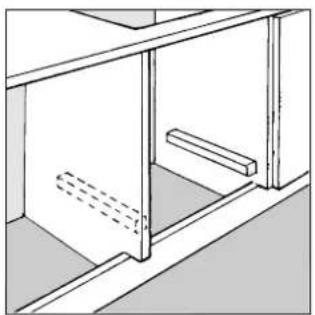
These dimensions apply for installation both beneath the counter and overhead. To ensure adequate ventilation, the opening should not have a back panel. Preferably, the oven should be positioned on two strips of wood. If the support surface is continuous, it must have an opening of at least 45 x 600 mm.
natural_image
Technical line drawing of a cabinet or shelf assembly with no visible text or symbols
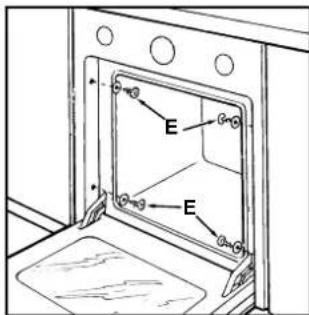
To fix the oven to the cabinet, open the oven door, insert the 4 wood screws into the 4 holes on the perimeter of the frame, and tighten them (only a few models). The panels of the adjacent cabinets must be made of heat resistant material. In particular, the glues used in cabinets covered with wood veneer must resist temperatures of up to 100^ .
In compliance with safety regulations, once the appliance is installed there must be no contact with electric parts. All the parts designed to ensure protection must be fastened in such a manner that a tool must be used to remove them.
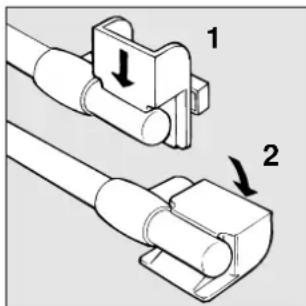
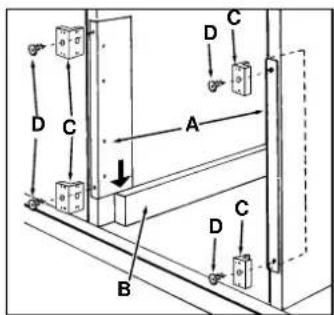
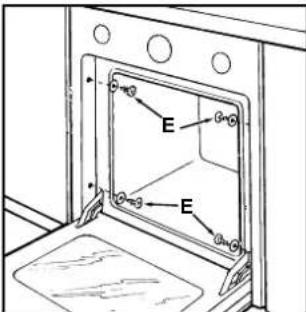
Fastening the Oven to the Cabinet
- Position the "A" brackets so that they are flush against the oven support strips (B).
- Position the cleats (C) on the "A" brackets as shown in the figure so that the thickness of the sides of the cabinet, indicated on the cleat, is facing you.
- Fasten the brackets and the cleats to the edge of the side of the cabinet using the "D" screws.
- Fasten the oven to the cabinet using the screws and plastic washers (E).
Electric Connection
Ovens with a three-pole power supply cable are designed to operate with alternated current at the supply frequency and voltage indicated on the data plate (at the bottom of the oven dashboard). The earthing conductor of the cable is the yellow-green conductor.
natural_image
Diagram showing a device being inserted into a box, with an arrow indicating the process (no text or symbols present)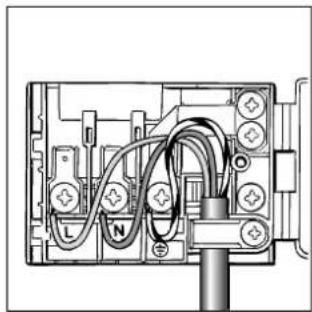
natural_image
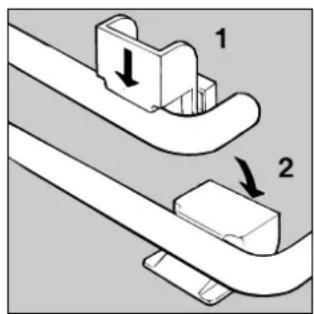
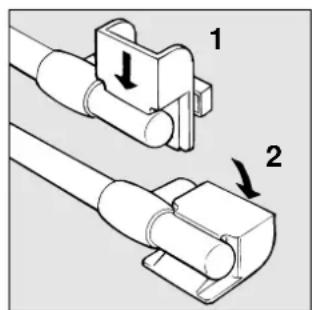
Pure electrical circuit lines without any symbolsFeeding cable installation
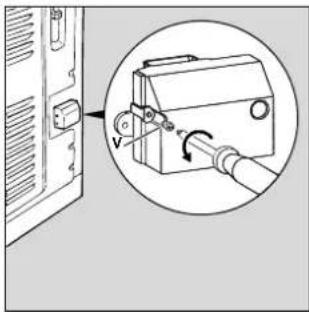
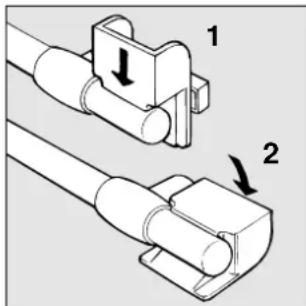
Terminal blok opening:
Unscrew screw "V"
Pull and open the junction blok lid
For the installation of the feeding cable carry out the following operations:
- unscrew the screw of the cable stop and three screws of the contacts: L-N-( )
- fix the small cables under the heads of the screws remembering to observe the colours: Blue (N) Brown (L) Yellow-Green (÷)
• fix the feeding cable in the special cable stop and close the cover.
Connecting the supply cord to the mains
The appliance must be directly connected to the mains by attaching a multipolar switch between the appliance and the mains. The multipolar switch must have a minimum of 3 mm of space between the contacts, be sized to the load, and comply with current regulations (the switch must not be able to disconnect the earth conductor). The supply cord must be positioned so that no part of it reaches a temperature of 50 °C higher than room temperature.
Before making the connection, make sure that:
- the limiter valve and the residential wiring can support the appliance load (see rating plate);
- the mains system is properly earthed in compliance with current regulations and provisions;
- there is easy access to the socket or the multipolar switch after the appliance is installed.
N.B.: never use reducers, adapters, or shunts because they can cause over-heating and burns.
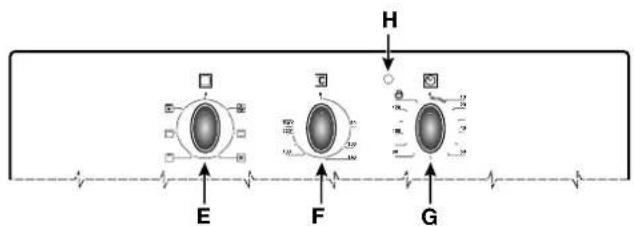
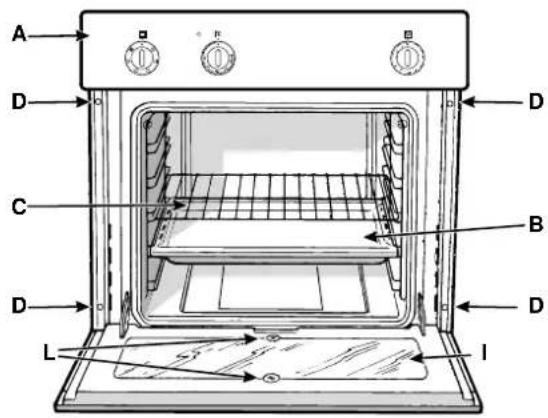
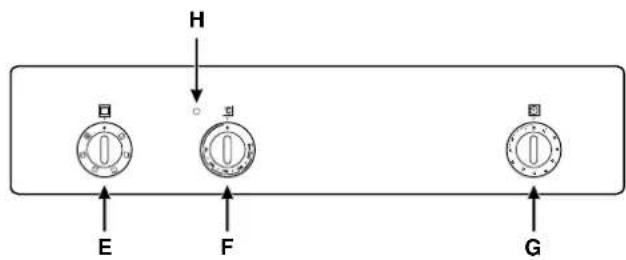
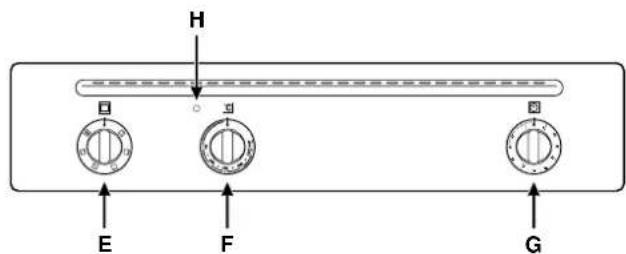
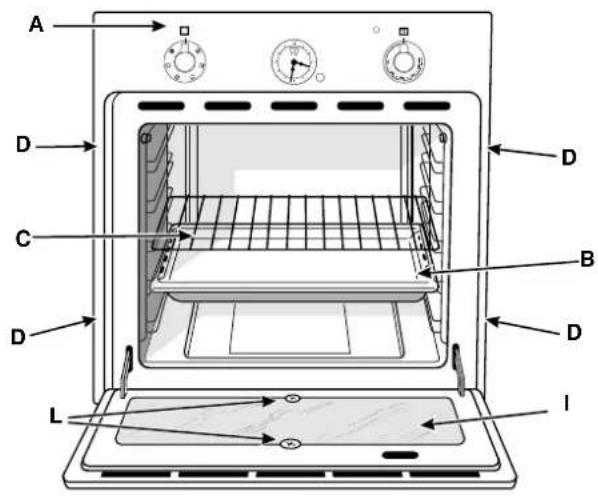
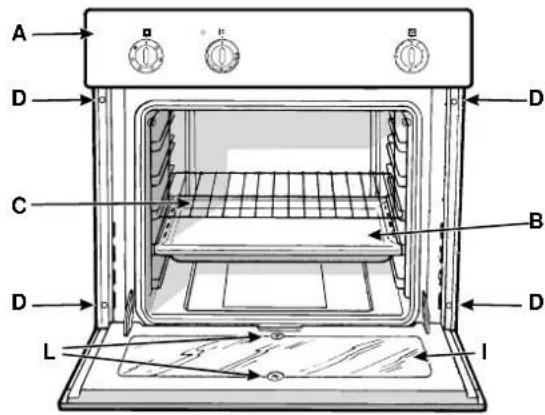
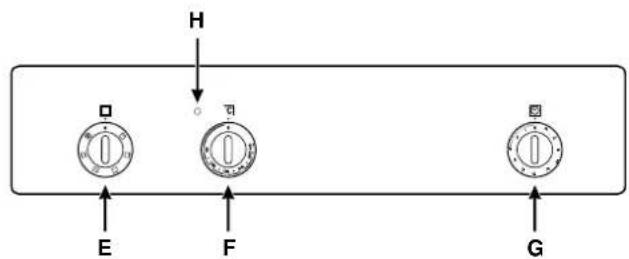
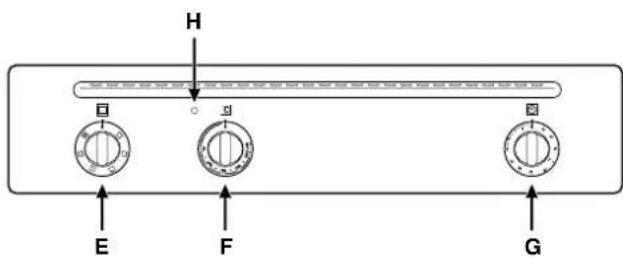
Oven description
A Control panel
B Grill pan or hob
C Oven wire shelf
D Holes for fixing screws
E Selector knob
F Thermostat knob
G Timer knob
H Thermostat indicator
I Glass oven door
L Support screws for glass oven door
flowchart
graph TD
    H --> A["Stage E"]
    H --> B["Stage F"]
    H --> C["Stage G"]
    A --> E
    B --> F
    C --> G

Technical characteristics
Oven size:
- width cm 40
- depth cm 39
- height cm 34
Consumption:
- to reach 200°C kWh 0.5
- to maintain 200°C for 1 hr kWh 1,0
total consumption: kWh 1,5
Oven size: 53 lt
Voltage and frequency:
220-230V\~50Hz

This appliance conforms with the following European Economic Communitary directives:
- 73/23/EEC of 19/02/73 (Low Voltage) and subsequent;
- 89/336/EEC of 03/05/89 (Electromagnetic Compatibility) and subsequent;
- 93/68/EEC of 22/07/93 and subsequent.
Instructions for use
To select the different functions, use the control devices located on the cooker control panel.
Important: in order to use the oven or the grill manually, that is without the end of cooking time programmer, set the fixed reference index of the facia to the symbol 🤨
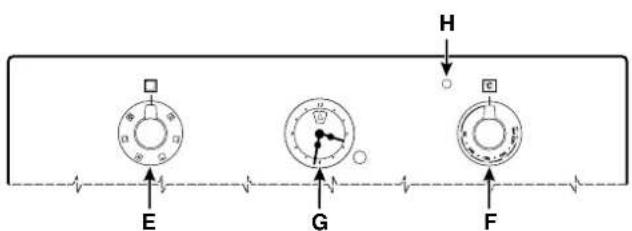
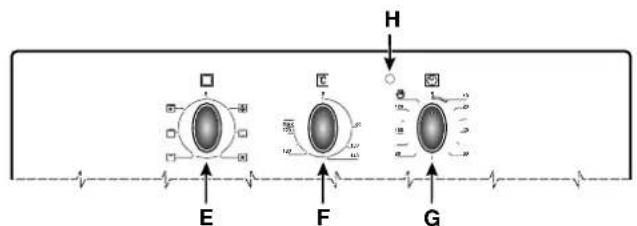
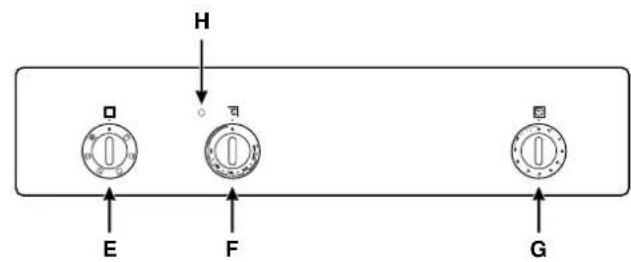
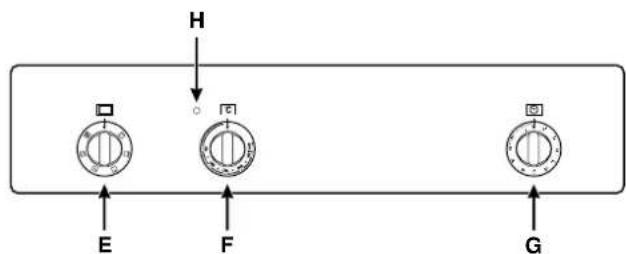
The oven knobs
Two controls are provided for selecting the different oven functions and baking temperature. The knobs on the control panel for the different cooking functions are:
E - for selection (identified by the symbol
F - for thermostat settings (identified by the symbol C) For knob settings different from idle or "o", the oven light switches on; setting the knob on the symbol ⚠ allows switching on the oven light without activating any heating element.
1. The "static" oven
- Knob position "E": □
- Knob position "F": choose between 60°C and Max
When this position is selected, the oven light and the two upper and lower heating elements come on. It is the typical grandmother-style oven which Indesit has produced so as to reach an exceptional degree of temperature distribution and of energy saving. The static oven is unbeatable when cooking dishes containing two or more ingredients which make up a single course, for example: pork ribs with cabbage, Spanish-style salted cod, stockfish all'anconetana, tender veal with rice etc... Excellent results are obtained when cooking beef or veal dishes such as: stews, hotpots, goulash, game, pork leg or shoulder etc...which need to be cooked slowly with the constant addition of stock or liquid. It is still the best way of cooking dry biscuits, tea cakes etc... as well as fruit in general. Use only one shelf when using the static oven as the use of more than one shelf produces bad temperature distribution. By using the various shelves available, you can balance the amount of heat between the upper and lower part of the oven. There is more heat in the lower part of the oven when using the second or the first shelf from the bottom.
2. The "ventilated" oven
- Knob position "E": ☒
- Knob position "F": choose between 60 and 200°C
In the ventilated oven with hot-air forced circulation, heat is moved around the food by a turbine located at the bottom of the oven. It is this air which cooks and browns the food evenly and thoroughly. Since the heat in the ventilated oven is constant and even throughout, different dishes can be cooked at the same time as long as they require similar cooking times. Two shelves can be used contemporarily by following the instructions in the paragraph "Cooking contemporarily on two shelves". Some advice on food which we recommend to be cooked in the ventilated oven: excellent results are obtained with first courses which need to be gratined and which require quite a long cooking time, for example: lasagna, baked pasta, risottos, vol-au-vents etc... Excellent results are obtained when roasting meat as better temperature distribution allows for the use of lower temperatures which reduce juice dispersion, keeping meat tender and avoiding shrinkage. The ventilated oven is particularly recommended for cooking fish with the addition of very little dressing, thus keeping its look and flavour unchanged. Excellent results are obtained when stewing vegetables such as cabbage, turnips, carrots, courgettes, aubergines, peppers.
Desserts: sure results are obtained when baking leavened cakes such as sponge cakes, tea-buns, croissants. The ventilated oven function can also be used for defrosting white or red meat, fish, bread, by setting a temperature of 80°-100°C. To defrost more delicate food, set a temperature of 60°C or just use cold-air circulation by setting the thermostat knob at 0°C.
Attention: before using the oven and grill for the first time, turn the oven on for approximately one half hour. Make sure that the oven is empty, the thermostat on high, the door open, and the room properly ventilated. The odor which can be detected at times is due to the evaporation off the substances used to protect the oven and the grill during the period between the and installation of the appliance.
3. The "grill"
- Knob position "E": ☐
- Knob position "F": Max
Food is cooked in the grill by the downward unidirectional thermal rays produced by an incandescent electric heating element. The high, direct grill temperature immediately browns meat, thus stopping juice dispersion and keeping meat more tender. The grill is particularly recommended for cooking dishes requiring a high superficial temperature: beef and veal steaks, entrecote, fillet steaks, hamburgers etc...
4. The "double grill"
- Knob position "E": □
- Knob position "F": Max
A larger-than-normal grill with a completely new design: cooking efficiency is increased by 50%. The double grill heat even reaches corner areas.
Note: the grill (functions 3, 4) must be used with the door closed.
5. The "gratin" oven
- Knob position "E": ☒
- Knob position "F": choose between 60 and 200°C
It combines unidirectional thermal rays with forced air circulation inside the oven. This stops superficial burning and increases the penetrating power of heat. Excellent results are obtained when the ventilated grill is used for cooking mixed meat and vegetable kebabs, sausages, pork ribs, lamb cutlets, devilled chicken, quails, pork fillet etc... The ventilated grill is unbeatable for cooking trout, tuna, cod, bream, stuffed squid etc...
Oven light
Turn Knob "E" to switch on the light. It lights the oven and remains lit whenever an electric heating element in the oven is turned on.
Timer knob (G) (present only on a few models)
To use the timer the ringer must be wound up by turning the knob one full turn clockwise; then turn it back to the desired time so that the number of minutes on the knob matches the reference mark on the panel.
End of Cooking Time Timer Knob (G) (present only on a few models)
In order to use the end of cooking time programmer knob turn the knob clockwise by almost one complete turn in order to wind the alarm; now turn back to set the time required, positioning the fixed reference index on the facia to the number of minutes you wish to set. At the end of the cooking time, the alarm goes off and the oven or grill switches off automatically.
When the oven and grill are off, the end of cooking time programmer can be used as a standard minute counter.
Forced air ventilation
Some models come equipped with a cooling fan which is activated by turning knob "E". While the oven is in use, the fan is always on. So, it is quite possible to feel a current of cold air coming out of the oven from between the panel and the oven door.
3rd glass-door
You can buy a special kit to reduce door temperature when the oven is on and save energy. If there are little children in the house, this kit is a must. The kit code number is 039888 or 039104 (for traditional models with plate-metal door) and it may be purchased for installation from an authorised dealer or a Technical Assistance Service centre indicated in the list included with the appliance documents.
Handle
Attention: when the oven is on, steam escapes from the slot on the right end of the handle. Keep hands away from this area.
For ovens with tubular handles, there is a special protective device which is fitted during cooking to keep steam away from the front of the oven.
Important
Do not place casseroles on the bottom tray of the oven. These not only prevent uniform baking but the heating element under the bottom tray will burn the food underneath. In addition the casseroles prevent proper air circulation in ventilated ovens. Moreover, this bottom tray is convex to ensure major resistance to deformations and is therefore not a level surface.
Country Style Clock and Timer
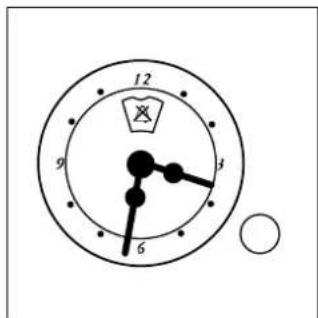
How to Set the Current Time
The oven must be connected to the power supply
Pull the knob and turn it in the clockwise direction to set the time
N.B.: The clock is electric. Therefore, in the event of a power outage, the clock will stop for the entire time the oven remains without power. When the power comes back on, the clock must be reset to the current time
Timer Feature
The timer operates by counting down a given period of time. This feature does not, however, turn the oven on or off. It merely emits an acoustical alarm when the time has run out.
How to Set the Timer
Turn the knob until the indicator is set on the length of time desired (using the inside numbers). The time is clearly visible through the transparent window on the indicator itself.
The timer will begin to count down immediately.
The sound will stop automatically after approximately 2 minutes and the timer will be set to the ⚡ symbol (clock function).
To turn off the buzzer, or to use only the clock, set the indicator on the Symbol.
The cooking programmer
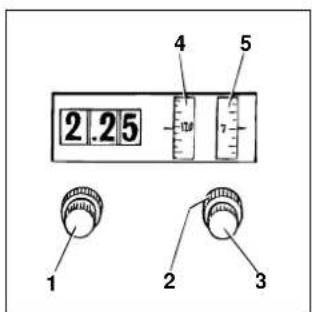
The cooking programmer (only on a few models) The figure shows the programmer controls. All the necessary settings can be made knobs 1, 2 and 3.
Knob 1
Turn knob clockwise to set correct digital clock time (for example: when installing the appliance, after current failures, to set ahead or back, etc.)
Knob 2
Turn knob clockwise to set the following:
– cooking time (maximum 210 minutes);
- sound signal turn-off (setting)
-manual oven operation (setting)
The above signals appear on dial 4.
Knob 3
Press in and turn the knob clockwise or counter clockwise to set the starting cooking time on dial 5.
When setting the clock, make sure the time shown on the clock is synchronized with the time indicated on dial 5.
Manual oven operation
The oven can be used normally, that is without any programming. In this case turn knob 2 of the programmer clockwise till symbol loincides with the pointer on dial 4.
Semiautomatic oven operation
Normal cooking start, programmed end of cooking: place the food in the oven; turn knob 2 of the programmer
clockwise and on dial 4 set the minutes required to complete the cooking; turn the oven knob to the the desired temperature. Make sure the time shown by the clock is synchronized with the time indicated on dial 5.
Automatic oven operation
Place the food in the oven:
turn knob 2 clockwise to set the required cooking time on dial 4;
press in and turn knob 3 clockwise to set the cooking start time on dial 5;
turn the oven knob to the desired temperature. When cooking is completed the "0" on dial 4 will be opposite the pointer; this setting indicates the oven is no longer on. A sound signal tells the user cooking is ended. To stop the sound signal, turn knob 2 clockwise till symbol ✗is opposite the pointer on dial 4.
Example of programmer setting with oven operating automatically:
End of cooking time: 7 p.m. (or 19.00 hours continentals time).
Cooking time: 2 hours.
Place the food in the oven: turn knob 2 clockwise to set the cooking time on dial 4 (that is, 2 hours); press in and turn knob 3 clockwise to set the cooking start time on dial 5 at 5 p.m. (or 17.00 hours); turn the oven control knob to the desired temperature.
After completing these operations, the programmer will make the oven operate automatically from 5 p.m. to 7 p.m.
Minute timer
The programmer can serve as a timer only if no automatic programs have been set up and the oven is off. To use the timer, turn knob 2 clockwise to set the required time on dial 4. The maximum programmable time is 210 minutes. To stop the sound signal, turn knob 2 clockwise till symbol appears opposite the pointer on dial 4.
Programmed cooking
Programmed cooking is no different from normal cooking. The programmer system can control the cooking time while the user is out or doing other tasks; consequently, foods requiring no particular attention while cooking are to be preferred for automatic cooking operations.
The programming of a time past 12 p.m., if you calculate by continental time, must always be referred to by using the first 12 hours of the day, for example: the time 20.00 hours must be understood as 8 and so on; therefore, it is possible to program cooking 12 hours in advance.
Important
To use the oven without any programming it is necessary:
-
When setting the clock, make sure the time shown on the clock is synchronized with the time indicate on dial "5".
-
Turn knob "2" of the programmer clock-wise till symbol 🏠 coincides with the pointer on dial "4".
Cooking advice
The “multifunction” cooker offers a wide range of alternatives which allows you to cook any type of food in the best possible way. Various functions allow heat to be directed as required: upward, downward or evenly and with the required intensity. With time, you will learn to make the best use of this versatile cooker. The following indications are only approximate and may be varied according to your own personal experience.
Cooking on one or more shelves
Should you need to use two grids, use only function 2 ☒ "ventilated oven" which is the only solution for this process.
- The oven has 5 grids. When using the ventilated cooking function, use two of the three centre grids; the first and top grids are in direct contact with the hot air which may burn delicate foods;
- Use the 2nd and 4th grids from the bottom for general use, and the 2nd grid for foods which require more heat. For example when roasting meat at the same time with other foods, place the roast on the 2nd grid leaving the 4th grid for more delicate food;
- When cooking foods with different cooking times and temperatures at the same time, set an average temperature; place the delicate food on 4th grid and remove the food with shorter cooking time first;
- Use the dripping pan on the bottom grid and the grill on the top grid;
- When cooking pizza on two grids, use the 2nd and 4th grids at a temperature of 220^ . Preheat the oven for at least 15 minutes before placing the pizza in the oven. Generally cooking on the 4th grid is slower; remember to remove the pizza from the 2nd grid first and leave the pizza on the 4th grid to cook several minutes longer;
- When baking cakes on two grids, use the 3rd and the 4th grids. Never use the 2nd grid since it is too hot.
Using the grill
The 5 programmes oven offers 2 different grilling functions.
Use position 3 ☐ "grill" for small portions consumption in this position is only 1200 W, but allows small portions such as toasted sandwiches, frankfurters etc... to be cooked perfectly. Place the food in the middle of the grill since only the central part of the upper heating element is on. Food which in any corner of the grill will not be cooked.
Position 4 ☐ "The double grill" allows food to be cooked in all parts of the grill.
Important: the oven door must be closed when using the grill, not only to obtain better results but also for energy-saving (approximately 10%). When using the grill functions, it is advisable to position the thermostat knob at the maximum setting so as to obtain maximum grill efficiency, which is based on infrared ray production. It is still possible however, to set a lower grill temperature if necessary, just by turning the thermostat knob to the required temperature.
When utilizing the grill, place the rack at the lower levels (see cooking table). To catch grease or fat and prevent smoke, place a dripping-pan at the bottom rack level.
Practical advice for oven cooking
| Position selector knob | Food to be cooked Weight (Kg) | Position cooking shelves upward | Time pre-heating (minutes) | Position thermostat knob | Time cooking (minutes) | |
| 1 Static oven | Pork ribs | 0,5 | 2 | 15 | 200 | 35 |
| Roast veal | 0,5 | 2 | 15 | 200 | 30 | |
| Duck | 0,5 | 1-2 | 15 | 200 | 30-35 | |
| Meringues | - | 2 | 10 | 100 | 60-75 | |
| Biscuits | - | 2 | 10 | 140 | 15-20 | |
| 2 Ventilated Oven | Pizza | 1 | 2 | 15 | 220 | 20-35 |
| Lasagna | 1 | 3 | - | 180 | 30-35 | |
| Baked tagliatelle | 1 | 3 | - | 180 | 20-30 | |
| Lamb | 1 | 2 | - | 180 | 40-45 | |
| Chicken | 1 | 2 | - | 180 | 60-75 | |
| Mackerel | 1 | 2 | - | 180 | 50-55 | |
| Bream | 1,5 | 2 | - | 180 | 55-60 | |
| Chocolate cake | 1 | 3 | 10 | 160 | 50-60 | |
| Leavened cakes | 0,5 | 3 | 15 | 160 | 30-40 | |
| Pies | 1 | 3 | 15 | 180 | 35-40 | |
| Fruit cakes | 1 | 2 | 15 | 180 | 50-60 | |
| Buns | 0,5 | 2 | 15 | 160 | 40-45 | |
| 3 Grill | Sole and cuttle fish | 1 | 4 | 5 | Max | 8 |
| Calamary kebabs and prawns | 1 | 4 | 5 | Max | 4 | |
| Cod steaks | 1 | 4 | 5 | Max | 10 | |
| Grilled vegetables | 1 | 3-4 | 5 | Max | 8-10 | |
| 4 Doble Grill | Veal steaks | 1 | 4 | 5 | Max | 15-20 |
| Chops | 1,5 | 4 | 5 | Max | 25 | |
| Hamburgers | 1 | 3 | 5 | Max | 7 | |
| Mackerel | 1 | 4 | 5 | Max | 20-25 | |
| 5 "Gratin" Oven | Grilled chicken | 1,5 | 2 | 5 | 200 | 55-60 |
| Stuffed squid | 1,5 | 2 | 5 | 200 | 40-45 | |
N.B: the baking times indicated are approximate and may vary according to your personal taste and experience.
Routine maintenance and cleaning of the oven
Before each operation, disconnect the oven from the electricity. To assure the long life of the oven, it must be thoroughly cleaned frequently, keeping in mind that:
- the enamelled parts are washed with warm water without using any abrasive powders or corrosive substance which could ruin them;
- the inside of the oven should be cleaned fairly often while it is still warm using warm water and detergent, followed by careful rinsing and drying;
- the electric plates are cleaned with a damp cloth and they should be lubricated with a little mineral oil while they are still warm;
- Stainless steel may become marked if it comes into contact with very hard water or harsh detergents (containing phosphorous) for long periods of time. After cleaning, it is advisable to rinse thoroughly and dry. It is also recommended to dry any water drops.
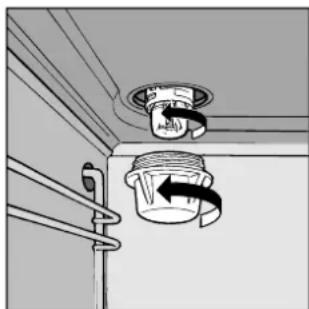
Replacing the oven lamp
• Unplug the oven from the mains;
- Remove the glass cover of the lamp-holder;
- Remove the lamp and replace with a lamp resistant to high temperatures (300°C) with the following
characteristics:
- Voltage 230V
- Wattage 25W
- Type E14
- Replace the glass cover and connect the oven to the mains.
natural_image
Diagram of a ceiling-mounted air vent with a coiled hose and directional arrow indicating airflow (no text or symbols)Attention
natural_image
Pure technical line drawing of a cabinet or enclosure structure without any text, numbers, or symbols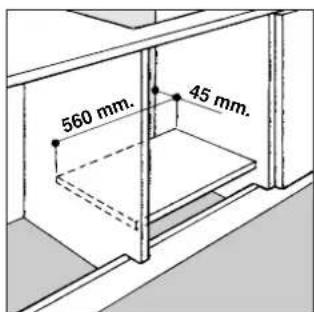
natural_image
Diagram showing a device with a lock and a magnified inset highlighting the internal mechanism (no text or symbols present)
natural_image
Pure electrical circuit lines without any symbols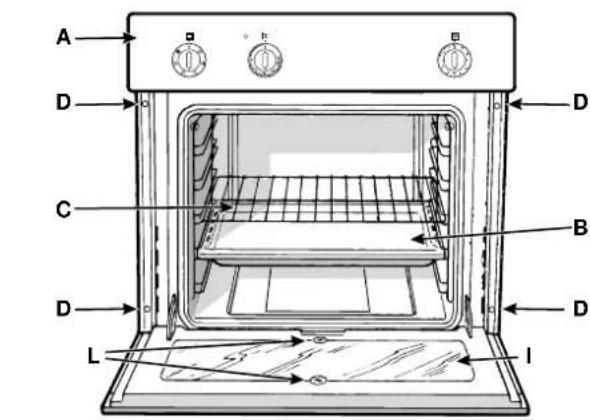

- Position bouton "E":
- Position bouton "F": Max
Attention
natural_image
Diagram of a ceiling-mounted device with a circular component and directional arrow indicating motion (no text or symbols)
- Attenzione
- Important
- Installation
- Installing built-in ovens
- Fastening the Oven to the Cabinet
- Electric Connection
- Feeding cable installation
- Connecting the supply cord to the mains
- Oven description
- Technical characteristics
- Oven size:
- Consumption:
- This appliance conforms with the following European Economic Communitary directives:
- Instructions for use
- The oven knobs
- The "static" oven
- The "ventilated" oven
- The "grill"
- The "double grill"
- The "gratin" oven
- Oven light
- Forced air ventilation
- 3rd glass-door
- Handle
- Country Style Clock and Timer
- How to Set the Current Time
- Timer Feature
- How to Set the Timer
- The cooking programmer
- Knob 1
- Knob 2
- Knob 3
- Manual oven operation
- Semiautomatic oven operation
- Automatic oven operation
- After completing these operations, the programmer will make the oven operate automatically from 5 p.m. to 7 p.m.
- Minute timer
- Programmed cooking
- Cooking advice
- Cooking on one or more shelves
- Using the grill
- Routine maintenance and cleaning of the oven
- Replacing the oven lamp
- Attention
Brand : Ariston Thermo
Model : FM 24 D
Category : Oven