
UWK820012Z - Fridge Küppersbusch - Free user manual and instructions
Find the device manual for free UWK820012Z Küppersbusch in PDF.
| Product Type | Wine Cellar |
| Brand | Küppersbusch |
| Model | UWK820012Z |
| Temperature Zones | 2 independent zones (upper and lower) |
| Temperature Range | Upper zone: 5°C to 13°C; Lower zone: 13°C to 22°C |
| Cooling System | Fan-assisted cooling |
| Interior Lighting | LED (temporary or permanent lighting) |
| Display | Digital screen with measured temperature |
| Alarms | Door open (>60s) and temperature deviation |
| Special Modes | ECO (4 days), Silent, Duo (uniform temperature) |
| Humidification System | Water tank and charcoal filter (annual replacement) |
| Defrosting | Automatic |
| Door | Reversible (left or right opening) |
| Electrical Connection | 230 V ~ 50 Hz, grounded plug, 10 A fuse |
| Recommended Ambient Temperature | +16°C to +38°C |
| Installation | Free space of 70 mm around, flat and level surface |
| Safety | Grounding mandatory, do not use extension cord |
| Cleaning | Soft cloth, warm water, mild detergent; do not use abrasive solvents |
Frequently Asked Questions - UWK820012Z Küppersbusch
User questions about UWK820012Z Küppersbusch
0 question about this device. Answer the ones you know or ask your own.
Ask a new question about this device
Download the instructions for your Fridge in PDF format for free! Find your manual UWK820012Z - Küppersbusch and take your electronic device back in hand. On this page are published all the documents necessary for the use of your device. UWK820012Z by Küppersbusch.
USER MANUAL UWK820012Z Küppersbusch
Please read the users and installation instructions carefully before installation of the appliance and before starting to use it.
Links: oberes Lagerfach
For your safety and correct usage, before installing and first using the appliance, read this user manual carefully, including its hints and warnings. To avoid unnecessary mistakes and accidents, it is important to make sure that all people using the appliance are thoroughly familiar with its operation and safety features. Save these instructions and be sure that they remain with the appliance if it is moved or sold, so that anyone using it throughout its life, will be properly informed on its usage and safety notices.
For the safety of life and property, keep the precautions of these user's instructions as the manufacturer is not responsible for damages caused by omission.
Safety for children and others who are vulnerable people
This appliance can be used by children aged from 8 years and above and persons with reduced physical, sensory or mental capabilities or lack of experience and knowledge if they have been given supervision or instruction concerning use of the appliance in a safe way and understand the hazards involved. Children shall not play with the appliance. Cleaning and user maintenance shall not be made by children without supervision. Keep all packaging away from children as there is risk of suffocation. If you are discarding the appliance, pull the plug out of the socket, cut the connection cable (as close to the appliance as you can) and remove the door to prevent children playing from suffering an electric shock or from closing themselves inside it. Cleaning and maintenance by the user should not be performed by children, unless they have more than 8 years and they are being watched. Keep the appliance and cord out of reach of children under 8 years. If this appliance, featuring a magnetic door seals, is to replace an older appliance having a spring lock (latch) on the door or lid, be sure to make the spring lock unusable before you discard the old appliance. This will prevent it from becoming a death trap for a child.
General safety
WARNING — If the supply cord is damaged, it must be replaced by the manufacturer, its service agent or similarly qualified persons in order to avoid a hazard.
WARNING - This appliance is intended to be used in household and similar applications such as
- staff kitchen areas in shops, offices and other working environments;
- farm houses and by clients in hotels, motels and other residential type environments;
- bed and breakfast type environments;
- catering and similar non-retail applications;
WARNING - Do not store explosive substances such as aerosol cans with a flammable propellant in this appliance.
WARNING - Keep ventilation openings, in the appliance enclosure or in the built-in structure, clear of obstruction.
WARNING - Do not use mechanical devices or other means to accelerate the defrosting process, other than those recommended by the manufacturer.
WARNING - Do not damage the refrigerant circuit.
WARNING - Do not use electrical appliances inside the food storage compartments of the appliance, unless they are of the type recommended by the manufacturer.
WARNING — The refrigerant and insulation blowing gas are flammable. When disposing of the appliance, do so only at an authorized waste disposal centre. Do not expose to flame.
Refrigerant
The refrigerant isobutene (R600a) is contained within the refrigerant circuit of the appliance, a natural gas with a high level of environmental compatibility, which is nevertheless flammable. During transportation and installation of the appliance, ensure that none of the components of the refrigerant circuit becomes damaged. The refrigerant (R600a) is flammable.
Caution risk of fire
If the refrigerant circuit should be damaged:
- Avoid opening flames and sources of ignition.
- Thoroughly ventilate the room in which the appliance is situated. It is dangerous to alter the specifications or modify this product in any way. Any damage to the cord may cause a short circuit, fire, and/or electric shock.
Electrical safety
The power cord must not be lengthened. Make sure that the power plug is not crushed or damaged. A crushed or damaged power plug may overheat and cause a fire. Make sure that you can access the main plug of the appliance. Do not pull the main cable. If the power plug socket is loose, do not insert the power plug. There is a risk of electric shock or fire. You must not operate the appliance without the interior lighting lamp cover. The fridge is only applied with power supply of single phase alternating current of 220 240V / 50Hz . If fluctuation of voltage in the district of user is so large that the voltage exceeds the above scope, for safety sake, be sure to apply A.C. Automatic voltage regulator of more than 350W to the fridge. The fridge must employ a special power socket instead of common one with other electric appliances. Its plug must match the socket with ground wire.
Please note:
That wine cooler is delivered in "Low-power mode". Press the minus key for 5 seconds to switch off the low-power mode. Five warning signals will sound to confirm that the appliance has switched off to the low-power mode (details p.21).
Daily use
Do not store flammable gas or liquids in the appliance. There is a risk of an explosion. Do not operate any electrical appliances in the appliance (e.g. electric ice cream makers, mixers etc.). When unplugging always pull the plug from the mains socket.do not pull on the cable. Do not place hot items near the plastic components of this appliance. The appliances manufacture storage recommendations should be strictly adhered to. Refer to relevant instructions for storage. Do not place the appliance in direct sunlight. Keep burning candles jumps and other items with naked flames away from the appliance so that do not set the appliance on fire. The appliance is intended for keeping food stuff and/or beverages in normal household as explained in this instruction booklet. The appliance is heavy. Care should be taken when moving it. Never use the base, drawers, doors etc. to stand on or as supports. To avoid items falling and causing injury or damage to the appliance, do not overload the door racks or put too much food in the risper drawers.
Energy savings
- The appliance should be installed in a cool place (but with a temperature above 16^ ), away from heating source (other household appliances) and away from direct sunlight.
- Keep the device away from heating sources and do not expose it to direct sunlight.
- The room where the appliance is placed must be ventilated. Never cover the vents.
- Do not open the door more than necessary.
Humidity system
The appliance is equipped with a system for maintaining an appropriate level of humidity. If humidity is too low, fill up the small plastic tank on the top shelf up to not more than 34 full. Check water level regularly and add water if necessary.
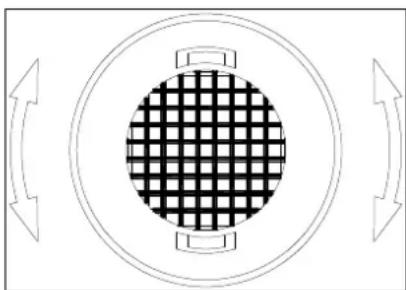
If the wine cooler is equipped with a charcoal filter, the filter will need to be replaced once a year.
- Turn the filter 90^ clockwise or anti-clockwise and remove the filter.
- Insert the new filter and turn it 90^ clockwise or anti-clockwise until it locks into position.

EWK880-0-2Z
UWK8200-1-2Z
The appliance must stand upright for 24 hours before it is put into operation.
Putting the appliance into operation
Remove the external and internal packaging and clean the outside of the appliance with a clean, dry cloth. Clean the interior with a soft, damp cloth.
Your appliance will operate best and use the least amount of energy if you do not install it near a source of heat (heater, cooker, etc.), if it is not subjected to direct sunlight and if it is not installed in a room that is too cold. The surrounding temperature must be in the range of +16^ and +38^ .
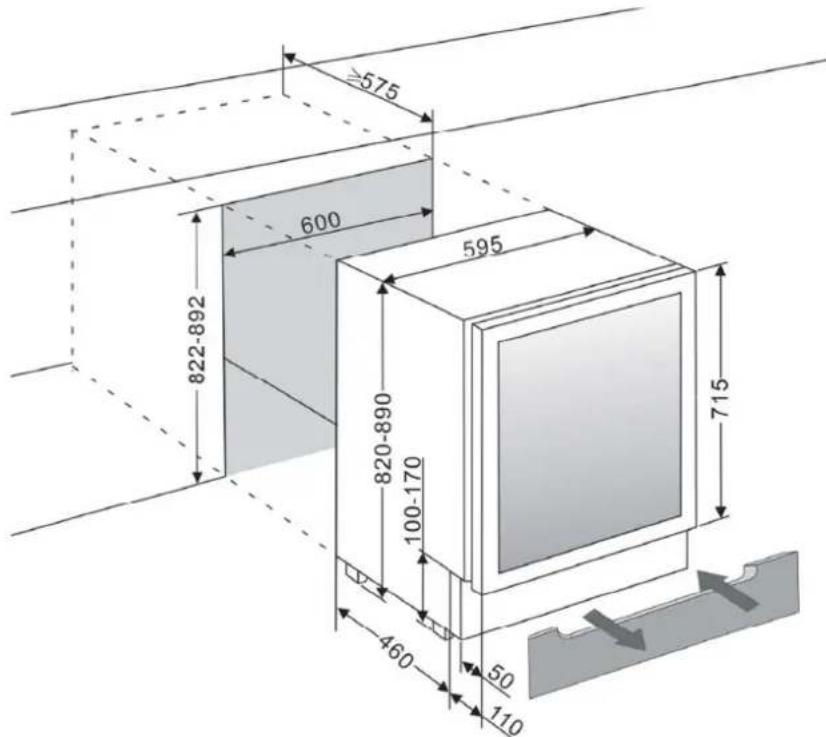
For appliances that cannot be built in or appliance without front ventilation, a clearance of 70~mm must be maintained between the wall the sides and the back and top of the appliance. Do not cover this clearance and do not put anything into it as the appliance will not function properly if the air cannot circulate. The appliance must stand horizontally and be wedged to prevent movement and resulting noises.
It must be possible for air to circulate freely on the front of the appliance.
The user alone will be liable for faults caused by failure to comply with the installation instructions.
Your wine refrigerator is fitted with a reversible door. Should you wish to change the opening direction, please following the instructions in section "Changing the Door Hinge", page 16.
Electrical connection
The appliance is fitted with a mains cable and a plug for 230 V single phase / 50 Hz according to the EC directive. It is absolutely essential to connect the appliance to an earthed wall socket with protection again at least 5 A. Insert the mains plug.
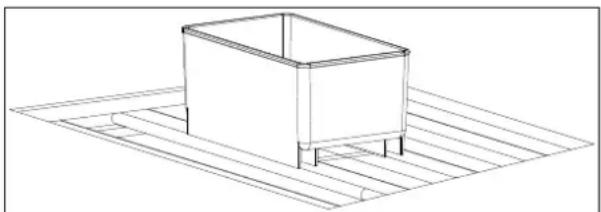
Removing the shelves
- Open the door completely to prevent damaging the door gasket.
- Pull the shelf out far enough for the notches on the sides to be aligned with the plastic stops.
- Lift up the shelf and remove it. Make sure that the shelves are correctly positioned when you put them back.
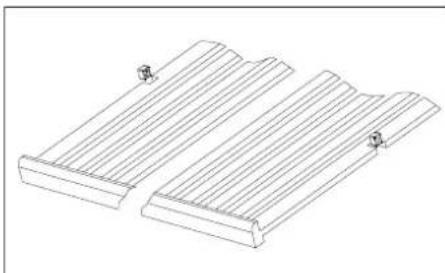
You only need to pull the shelves out forwards by approximately 1/3 to be able to access the bottles more easily. The shelves have an emergency stop to prevent them from being pulled out too far when loaded.
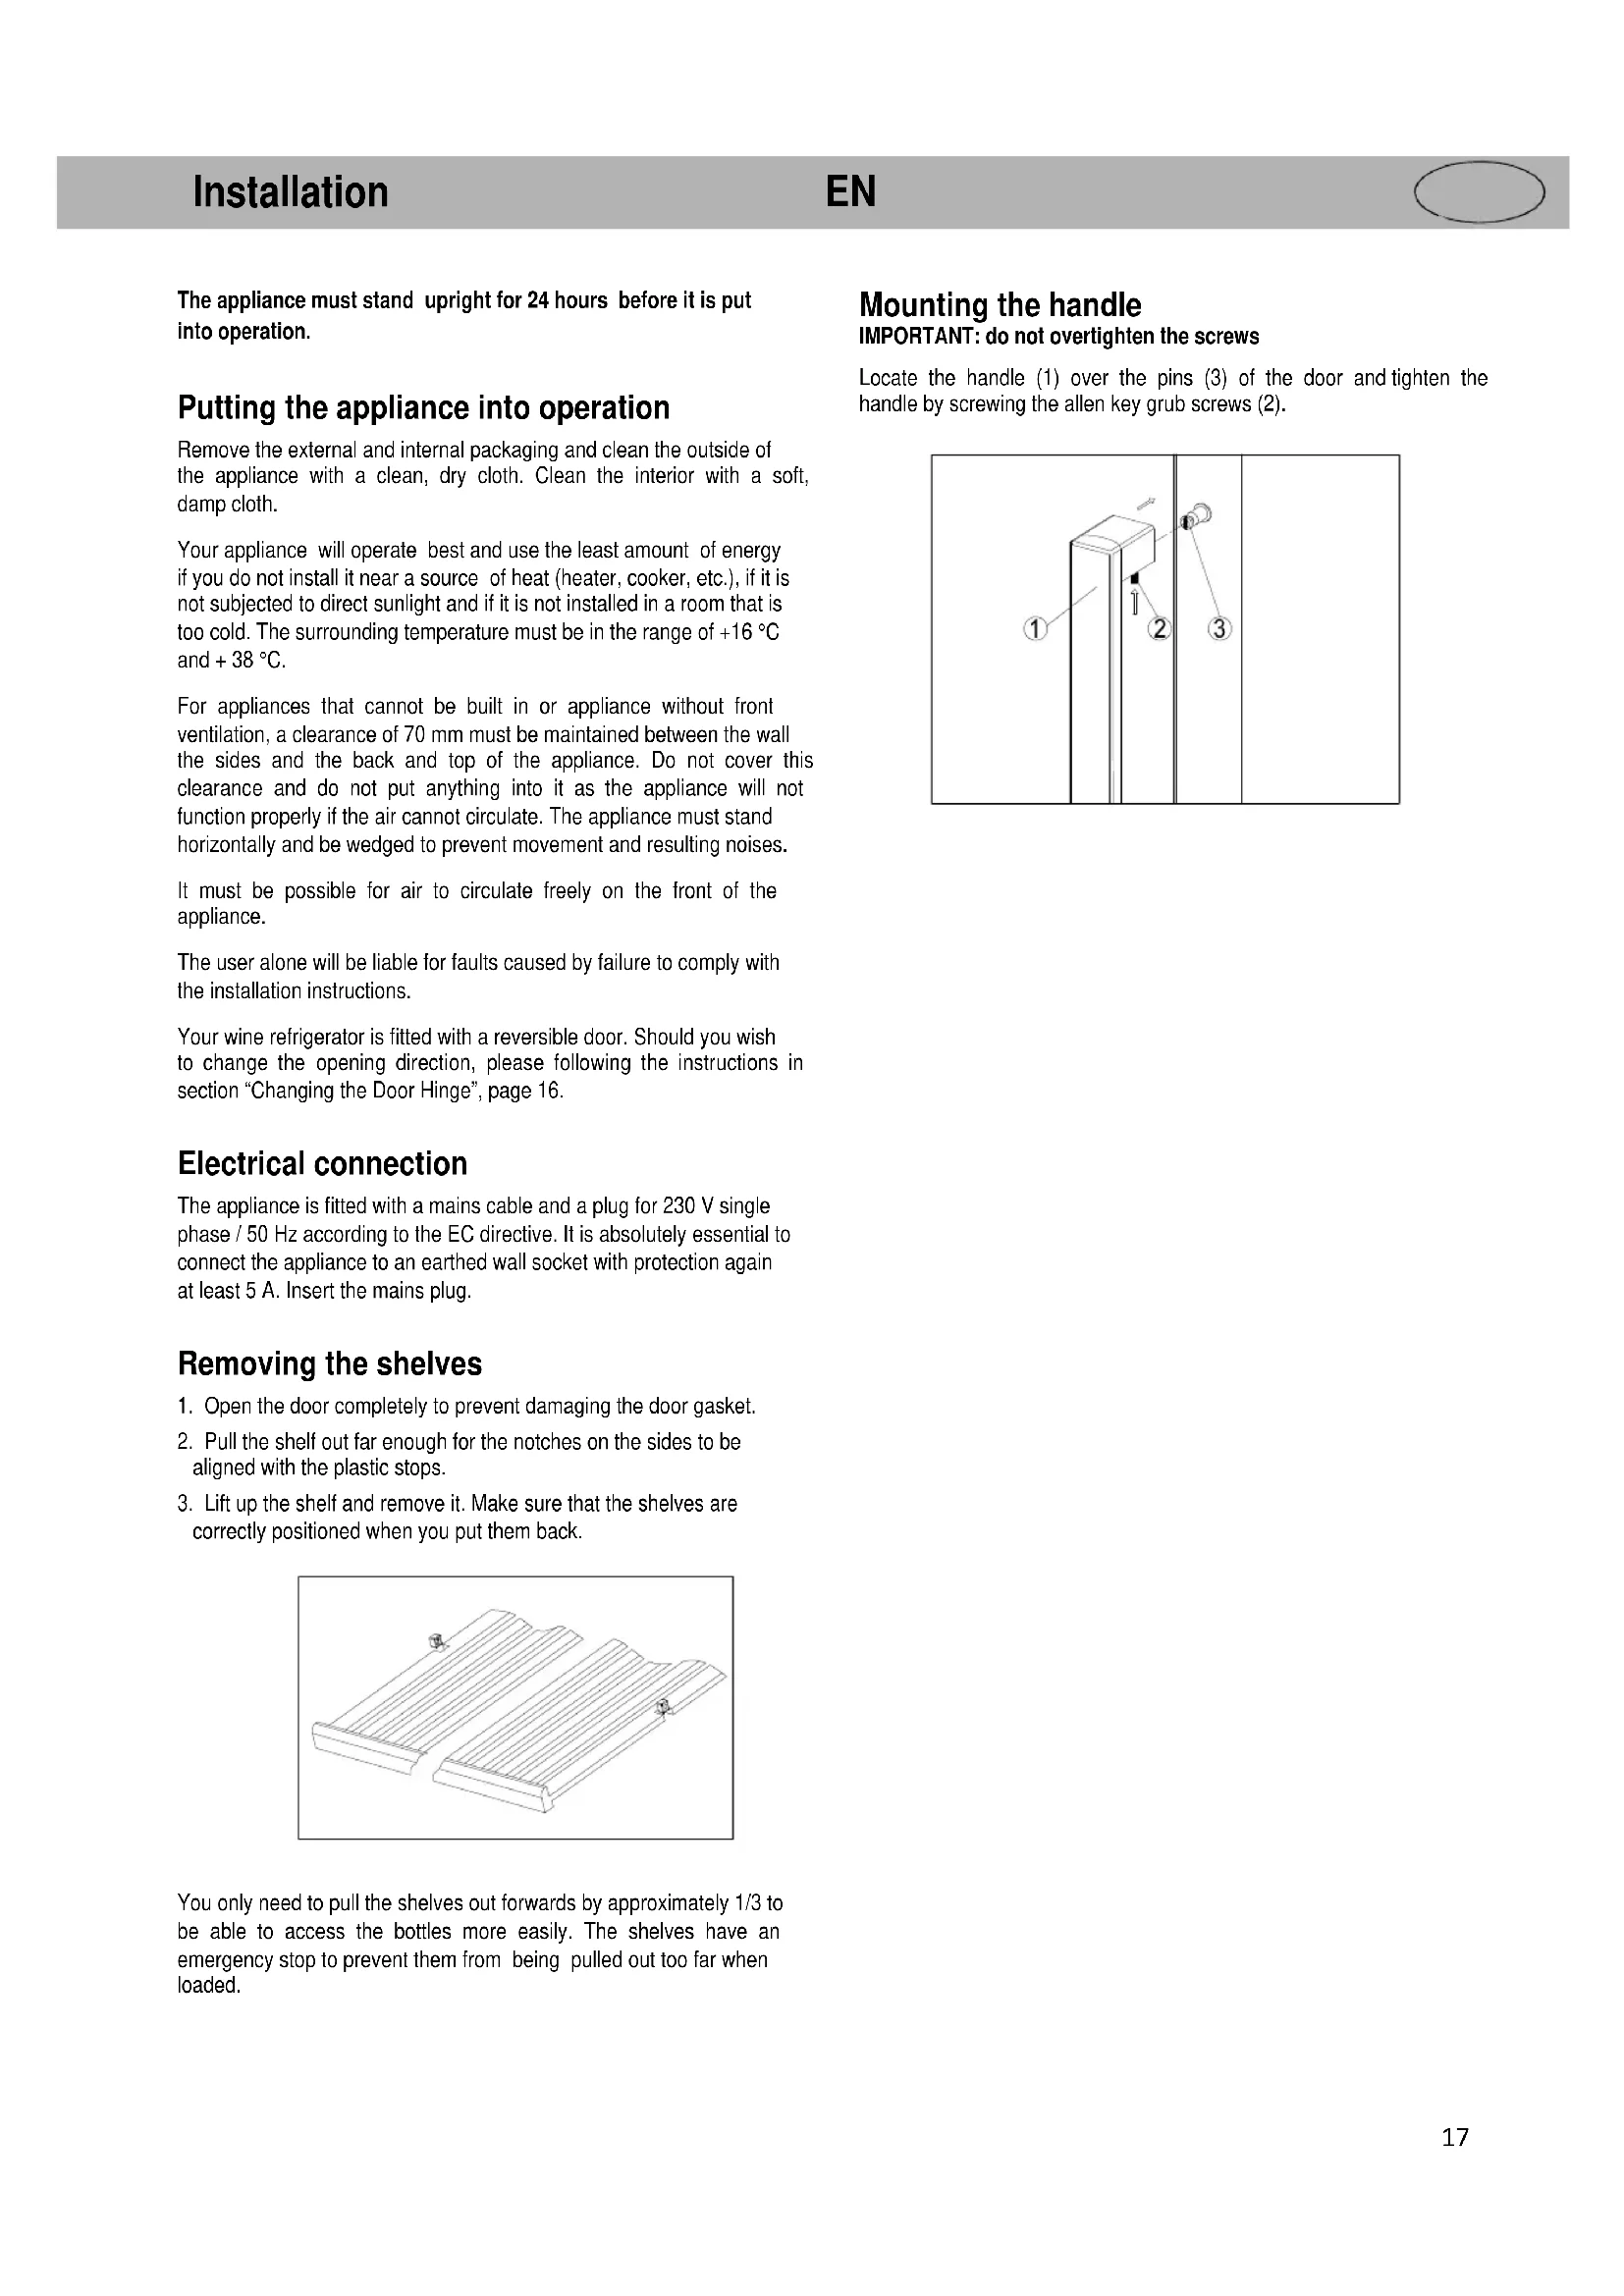
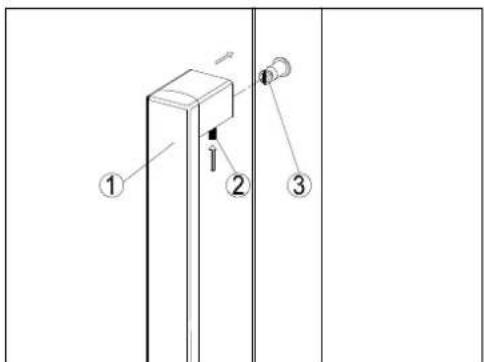
Mounting the handle
IMPORTANT: do not overtighten the screws
Locate the handle (1) over the pins (3) of the door and tighten the handle by screwing the allen key grub screws (2).
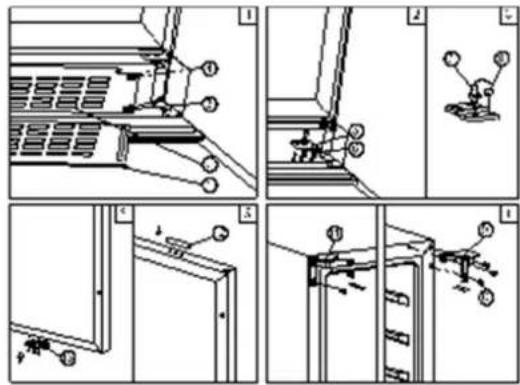
Reversible door for EWK880-0-2Z
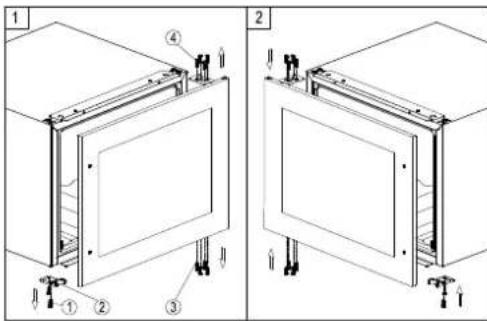
Your wine refrigerator is fitted with a reversible door.
Please follow the procedure below to change the opening direction:
- Switch off the appliance before carrying out any work on it by pulling the mains cable out of the power supply socket.
- Please note:
- Keep all the parts you remove in a safe place for remounting the door.
- Remove the glass door by unscrewing the eight lock screws 3 and 4. Be careful to hold the glass door firmly after removing the screws and place it on a padded surface to avoid the risk of damage.
- Unscrew and transfer the door supporter 2 to the opposite side.
- Rotate the glass door 180^ and refit the glass door to the opposite side. Then screw and tighten it after the door is leveled.
- Reassembly the ventilation grilles. Remove the ventilation grille 0,2 and the adjustable ventilation grille 0,1 by unscrewing the screws 0,3\& 0,4 (Fig.1)
- Remove the bottom hinge o,5 by unscrewing the four lock screws o,6. Be careful to hold the glass door firmly after removing the screws. (Fig. 2)
- Gently pull down to remove the glass door from the right top hinge and place it on a padded surface to avoid the risk of damage. Then remove the right top hinge o.9. (Fig. 4)
- Unscrew and transfer hinge pin o,7 and/or door stopper o,8of the bottom hinge to the opposite side. (Fig. 3)
- Pop out the cover caps on the left side of cabinet and use them to cover the screw holes on the right hand side.
- Screw the alternative left top hinge o,11, included in the fittings, on the left hand side of cabinet. (Fig. 4)
- Rotate the door 180^ and relocate the door to the designated position. Then screw the bottom hinge assembly on the left designated position and tighten it after the door is leveled.
- Transfer the handles & plugs to the opposite positions and then reassembly the ventilation grilles.
Loading
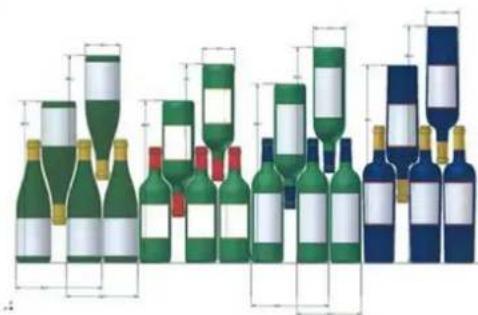
The indicated maximum numbers of bottles which can be stored are only reference numbers to give you an idea of how many bottles the appliance can hold (the same as the capacity in litres for refrigerators).
The numbers were ascertained in tests carried out with a sample bottle: the bottle for "Bordeaux light 75 cl" (the standard shows the geographic origin for each bottle shape - Bordeaux, Burgundy, Provence, etc. - and a type - traditional, heavy, light, flute, etc. - each with its own specific diameter and height).
Theoretically, in an extreme case, more bottles could be stored by stacking a single type of bottle without shelves, but a "varied" collection of wines is made up of a large variety of bottles and the practical handling of such a collection limits the number of bottles stored in the wine refrigerator. You will probably store fewer bottles than the maximum number indicated.
Bottle types
Here you see different 75-ml bottles of Burgundy and Bordeaux wine with different dimensions.
There are of course many other shapes and contents.
There are different methods for storing the bottles depending on the height, diameter and method of mixing the bottles.
For example, if you only fill the wine refrigerator with Burgundy wine, you will remain below the quantity calculated for Bordeaux wine by about 30% .
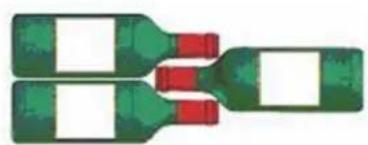
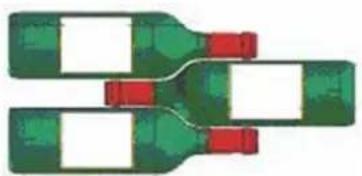
Crossed arrangement
Top down, neck on neck: pay attention to the difference in depth!
Top down, neck between the bottle bodies: more loading capacity
Opinions may vary and the ambient temperatures are different, but the following generally apply:
Vintage Bordeaux - reds 16-17°C
Vintage Burgundy - reds 15-16°C
Vintage dry white wines 14-16°C
Light, fruity, young reds 11-12°C
Rosés from the Provence region, new wines 10-12°C
Dry whites and red table wines 10 - 12^
White table wines 8 - 10^
Champagnes
Liqueur wines
7-8°C
6^
Attention!
- Only store sealed bottles.
- Do not overload the appliance.
- Do not open the door more often than absolutely necessary.
- Do not cover the shelves with aluminium foil or any other material which may prevent air from circulating.
Storing the wine refrigerator
Leave the settings as they are if you do not use your wine refrigerator for some time.
If the refrigerator is not used for some time:
- Remove all the bottles from the wine refrigerator.
- Pull the plug out of the socket.
- Clean the interior and exterior of the appliance thoroughly.
- Leave the door open to prevent condensate, odours and mildew from developing.
The surrounding temperature must be in the range of +16^ and +38^ .
The performance of the wine refrigerator may be impaired if these surrounding temperatures exceed this temperature range.
Please note
When you use the appliance for the first time or put it into operation again after not using it for a long time, the selected temperature and the temperature indicated on the display may differ. This is completely normal and it is due to the operation time until the response time is reached. After a few hours of operation the two temperatures will be the same.
You will need to wait at least three minutes before restarting the appliance after its has been disconnected from the power supply or after a short circuit. The appliance will not switch on if you attempt to restart it before this time has lapsed.
The control panel
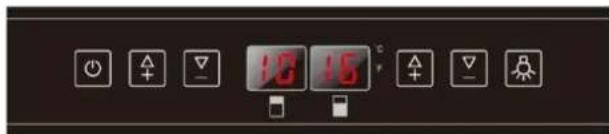
Left: upper compartment
Right: lower compartment
Switching on the appliance
To switch the appliance on or off, press the key at least 5 seconds.
Interior lighting
To switch the LED interior lighting on and off.
Plus and minus keys
To increase the temperature by 1^ each time a key is pressed.
To decrease the temperature by 1^ each time a key is pressed.
Setting the temperature control
- The unit has two separate temperature zones. The temperature of both zones can be set between 5^ and 22^ (41°F and 72°F). The lower temperature zone is ideal for storing white and red wine at a setting of 13^ to 22^ (55°F to 72°F). The upper temperature zone is suitable for storing champagne and white wine at a setting of 5^ to 13^ (41°F to 55°F).
- When the unit is plugged in for the first time, the unit will power up automatically to the preset defaults. The preset temperature at the factory for UPPER temperature zone is 10^ ( 50^ ) and for LOWER temperature zone is 16^ ( 60^ ).
- You can press the left side plus and minus keys to control the internal temperature of the UPPER temperature zone and press the right side plus and minus keys to control the internal temperature of the LOWER/RIGHT temperature zone. When you press either key at the first time, the display will show the last temperature set previously.
- IMPORTANT: The temperature set for the LOWER temperature zone must always be just as high as or higher than that in the UPPER temperature zone. For optimal performance, the set temperature of the two zones should differ by at least 4^ ( 7F^ ) (For example 8^ and 12^ ).
- The temperature that you desire to set will increase 1^ or 1^ if you press the plus key once, on the contrary the temperature will decrease 1^ or 1^ if you press the minus key. The display flashes while you make the setting.
After the temperature has been set, the display shows the current inner temperature of the particular temperature zone. - To view the set temperature at any time, press the plus or minus key, the set temperature will temporarily flash in the display for 5 seconds. Then the display shows the current inner temperature again.
Temperature display
ATTENTION! During normal operation, the temperature display shows the temperature inside the wine refrigerator.
Alarm of the appliance will sound when:
- A different temperature is being programmed
- The temperature in one of the zones deviates by more than 5^ from the temperature originally programmed. The display will flash only if the temperature rises or falls abnormally.
Interior lighting
The interior lighting can either be
- Switched on briefly: In this case the light will go on when you open the door and go off when you close the door. This is the standard mode.
- Switched on permanently:
The light will remain switched on until you press the key again.
Door alarm
An alarm will be triggered and the display will begin to flash if the door is not closed properly for more than 60s. The alarm will stop and the display will stop flashing as soon as the temperature that has been set is reached. However, if the noise made by the alarm is a nuisance, you can switch it off by pressing the key once. The display will continue to blink until the temperature setting has been reached, and the alarm will be automatically re-activated.
ECO mode
This mode can be used to switch off the temperature alarm, the display and the interior lighting for four days. The temperature inside the wine refrigerator is maintained.
To activate the ECO mode, press the keys at the same time for 5 seconds. Four signals will sound in confirmation. The wine cooler will then operate in this mode for 4 days.
Low-power mode
The wine cooler has been designed to store your wine safely under perfect conditions for long periods. Annoying noises may nevertheless occur in the case of ventilated cooling systems. You may select the low-power mode to stop the annoying noise made by the fan. To do so, keep the plus key pressed for 5 seconds. Three warning signals will sound to confirm that the appliance has switched to the low-power mode.
Press the minus key for 5 seconds to switch off the low-power mode. Five warning signals will sound to confirm that the appliance has switched to the low-power mode.
Defrosting
The appliance carries out automatic defrost cycles. When the cooling cycle is finished, the refrigerated parts of the appliance are automatically defrosted. The water resulting from the defrosting is channelled into an evaporation tray on the back of the appliance close to the compressor. The heat from the compressor evaporates the water in the tray.
Dual mode
In dual mode, you have the option to set the same temperature for both storage compartments
Proceed with the setting of the two compartments as described in "Setting the temperature control". Once both displays show the same temperature, you have the option to settle this uniform temperature synchronously over the two outer temperature selector buttons
If you want to leave the dual mode, you can regulate the over the two inner temperature selector buttons or
Before you clean your appliance (at regular intervals), you will need to disconnect it from the power supply (pull out the plug) or open the safety fuse.
Remove all the shelves, etc. from the interior.
We recommend that you clean the inside and outside (front, sides and top) of your wine refrigerator with a gentle, lukewarm detergent solution before you use it the first time and following this at regular intervals. Rinse the appliance with clear water and allow it to dry completely before you use it again. Do not use any solvents or scouring agents.
Wash the shelves with a gentle detergent solution and dry them with a soft, dry cloth.
You may perceive residual odours when you switch the wine refrigerator on the first time. If you do, leave the appliance to operate at the coldest operating temperature for a few hours. The cold will get rid of any odours.
You can solve many standard problems yourself without needing to call Customer Service. Try the suggestions below:
| PROBLEM | POSSIBLE CAUSE REMEDY | |
| Appliance does not operate | Appliance is not connected to a power supply. The appliance is turned off. Circuit breaker has tripped or a fuse has blown. | Connect the appliance. Switch on the appliance. Switch on circuit breaker or replace fuse. |
| Appliance is not cold enough | The temperature is not set correctly. The ambient temperature could require a different temperature setting. The door was opened too often. The door was not closed completely. Door is not hermetically sealed. The condenser is too dirty. The ventilation opening is blocked or too dusty. | Check the set temperature. Set a different temperature. Do not open the door more often than necessary. Close door properly. Check the door seal and clean or replace. Clean the condenser when necessary. Clear the obstructions and clean off the dust. |
| Appliance turns itself on and off frequently | The room temperature is higher than average. A large amount of bottles has been added to the unit. The door is opened too often. The door is not closed completely. The door gasket does not seal properly. | Put the appliance in a cooler place. Leave the appliance to work for a while until the set temperature has been reached. Do not open the door more often than necessary. Close door properly. Check the door seal and clean or replace. |
| The light does not work. | Appliance is not connected to a power supply. Circuit breaker has tripped or a fuse has blown. The light was switched off on the control panel. | Connect the appliance. Switch on circuit breaker or replace fuse. Switch on the light. |
| Vibrations | The appliance is not properly level. Level the appliance with the adjustable feet. | |
| The appliance seems to make too much noise | The rattling noise may come from the flow of the refrigerant, which is normal. As each cycle ends, you may hear gurgling sounds caused by the flow of refrigerant in your appliance. If temperature fluctuations occur, the contraction and expansion of the inner walls may cause popping and crackling noises. | |
| The appliance is not properly level. | Level the appliance with the adjustable feet. | |
| The door will not close properly | The appliance is not properly level. The door was reversed and not properly re-installed. The gasket is dirty. The shelves are out of position. | Level the appliance with the adjustable feet. Check the door hinge and reassemble correctly. Clean the door gasket. Check the shelves and refit correctly. |
| Display "E0", "E1", "E2", "E3", "E4", "E5", "E6" or "E7" | "E0" indicates a communication error for 3 zone models. "E1" or "E2" indicates that the air temperature sensor has failed. "E3" or "E4" indicates that the defrost sensor in the evaporator has failed. "E5" indicates a defrost heater failure. "E6" indicates a solenoid valve failure. "E7" indicates a door switch failure. | Call for service. |
| The alarm sounds | Has the appliance door been open for longer than 60 seconds? If not, then the temperature has risen higher or fallen lower than the temperature that has been set. This could be due to: • The appliance door being opened too often. • The ventilation opening being covered or too dusty. • A lengthy interruption to the power supply. • A large amount of bottles has been added to the unit. | If yes, close the door. • Do not open the door more often than necessary. • Clear the obstructions and clean the dust. • Leave the appliance to work for a while until the set temperature has been reached. |
| The icon "--" is lit up and flashing in the temperature display. | The temperature display is out of the range. | Only temperatures within the display range 16~99°F/-9~37°C can be shown. If the temperature is not within this range, the icon "--" will be displayed instead. That is normal. |
Gauge : compartment supérieur
Links: bovenste opbergvak
Rechts: lagere opbergvak
Inschakelen

- Safety for children and others who are vulnerable people
- General safety
- Refrigerant
- Caution risk of fire
- Electrical safety
- Please note:
- Daily use
- Energy savings
- Humidity system
- Putting the appliance into operation
- Electrical connection
- Removing the shelves
- Mounting the handle
- Reversible door for EWK880-0-2Z
- Loading
- Bottle types
- Crossed arrangement
- Attention!
- Storing the wine refrigerator
- Please note
- The control panel
- Switching on the appliance
- Interior lighting
- Plus and minus keys
- Setting the temperature control
- Temperature display
- Door alarm
- ECO mode
- Low-power mode
- Defrosting
- Dual mode
- Inschakelen
Brand : Küppersbusch
Model : UWK820012Z
Category : Fridge