
RW424260 - Refrigerator GAGGENAU - Free user manual and instructions
Find the device manual for free RW424260 GAGGENAU in PDF.
| Product type | Temperature-controlled wine cellar |
| Brand | Gaggenau |
| Model | RW424260 |
| Storage capacity | 64 bottles (Bordeaux 0.75 L) |
| Number of temperature zones | 2 independently adjustable zones |
| Temperature range | +5°C to +20°C |
| Dimensions (H x W x D) | 1221-1225 x 560-570 x min. 550 mm (niche) |
| Weight | Approx. 80 kg (estimate) |
| Power supply | 220-240 V, 50 Hz, fuse 10-16 A |
| Climate class | SN (10°C to 32°C), N (16°C to 32°C), ST (16°C to 38°C), T (16°C to 43°C) |
| Refrigerant | R600a (flammable) |
| Ventilation | Adjustable fan for cellar climate |
| Interior lighting | LED with dimmer, laser class 1M |
| Filtration | Active charcoal filter (replace annually) |
| Defrosting | Automatic |
| Temperature alarm | Yes, with mute |
| Child safety | Yes, control lock |
| Door material | Glass door |
| Cleaning | Soft cloth, warm water, mild dish soap |
| Spare parts | Available via Gaggenau after-sales service (filter ref., etc.) |
| Repairability | Service interventions reserved for after-sales (laser, refrigeration circuit) |
Frequently Asked Questions - RW424260 GAGGENAU
User questions about RW424260 GAGGENAU
0 question about this device. Answer the ones you know or ask your own.
Ask a new question about this device
Download the instructions for your Refrigerator in PDF format for free! Find your manual RW424260 - GAGGENAU and take your electronic device back in hand. On this page are published all the documents necessary for the use of your device. RW424260 by GAGGENAU.
USER MANUAL RW424260 GAGGENAU
natural_image
Front view of a rectangular storage cabinet with horizontal shelves and a central control panel (no text or symbols visible)natural_image
Illustration showing a hand holding a tool near a plug, with a separate diagram of a hook and a washer (no text or symbols)natural_image
Diagram of a refrigerator with a door and front panel, showing a black arrow pointing to the door (no text or symbols present)natural_image
Mechanical assembly diagram showing a bracket with downward force arrows and mounting points (no text or symbols)natural_image
Diagram showing a curved arrow interacting with a vertical panel, indicating rotation or movement (no text or symbols present)natural_image
Technical line drawing of a window frame with mounting bracket and hanging clips (no text or symbols)natural_image
Technical line drawing of a door handle assembly with a tool inserted (no text or symbols)natural_image
Diagram of a window frame with screw fasteners and directional arrows indicating movement (no text or symbols)natural_image
Technical diagram of a structural beam with two hanging fasteners and mounting brackets (no text or symbols)Hinweis!
natural_image
Technical diagram showing a door frame with attached fixtures and a close-up of a mechanical component (no text or symbols present)Ihr neues Gerät

natural_image
3D rendering of a ceiling structure with a star-shaped opening and circular recess (no text or symbols)natural_image
Diagram of a structural connection with an arrow indicating upward motion, no text or symbols presentEinlagerungsskizze
natural_image
Diagram of a circular component with internal flow arrows indicating rotation or movement (no text or symbols)Congratulations 22....
Safety and warning information 22 ....
Before you put the appliance into operation 22 .....
Technical safety 22....
During use 23 ....
Children in the household 23 .....
General requirements 23
Directions for disposal 23
Disposal of packaging 23
Disposal of old appliances 24
Installation notes 24
Installation location 24
Climate classes 24
Recess 24
Ventilation 25
Transporting the appliance 25
Electrical connection 25
Installing the appliance 26
Replace the door hinge if necessary 26
Installation dimensions 27
Fixing and mounting 27
Your new appliance 30
Control panel 30
Switching on the appliance 31
Adjusting the temperature 31
Fan 31
Temperature Alarm 31
Childproof lock 32
Appliance illuminating power 32
Interior lighting, LED 33
Features 34
Pull-out bottle racks 34
Storage diagram 34
Practical tips for storing wine 34
Drinking temperatures 34
Air exchange through active carbon filter 35 .....
Defrosting 35
Switching off the appliance 35
Putting the appliance out of service 35
Cleaning the appliance 35
Care instructions for stainless steel surfaces .... 36
Operating noises 36
Normal noises 36
Avoiding noises 36
Rectifying minor faults yourself 37
After-sales service 38
Congratulations
By purchasing your new wine cooler, you have chosen a modern, high-quality household appliance.
Only when it is at the right temperature does good wine allow its aroma and flavour to fully unfold for your enjoyment. Our wine cooler slowly and steadily brings your wine to the ideal temperature. There are two independently controlled temperature zones, allowing simultaneous storage of both red and white wines at the optimum drinking temperature.
Your new appliance features economic energy consumption.
Each appliance that leaves our factory is carefully checked to ensure that it functions correctly and is in perfect condition.
If you have any questions, in particular with regard to setting up and connecting the appliance, our after-sales service will be happy to help. See the After-sales service section
You can find further information and a selection of our products on our website.
Read and follow these instructions as well as the setup instructions and all included information.
Safety and warning information
Before you put the appliance into operation
Read the usage and assembly instructions carefully. They contain important information on setting up, using and maintaining the appliance.
Retain all documents for later use or for subsequent owners.
Technical safety
The appliance contains a small quantity of the environmentally-friendly, though flammable, refrigerant R600a. Make sure that the pipes of the refrigerant circuit are not damaged during transport or installation. If refrigerant sprays out, it can ignite or cause eye injuries.
In the event of damage
- Keep open flames or sources of ignition away from the appliance,
• Unplug appliance plugs,
•Ventilate the room well for a few minutes,
• Inform the after-sales service.
The more refrigerant an appliance contains, the larger the room must be in which it stands. If there is a leak and the room is too small, a flammable gas-air mixture may form.
The room must be at least 1 m^3 in size for each 8 g of refrigerant. The amount of refrigerant in your appliance is listed on the rating plate inside the appliance.
Power cord changes and other repairs must be performed only by the after-sales service. Incorrect installations and repairs can pose significant risk to the user.
Laser radiation
The appliance is equipped with class 1M lasers for lighting.
Risk of eye damage
Do not look directly into the laser beam with optical instruments.
Repairs to the laser equipment must only be carried out by the after-sales service or authorised specialists.
During use
- Never use electrical appliances inside the appliance (e.g. heaters, electric ice makers, etc.). Risk of explosion.
- Never defrost or clean the appliance with a steam cleaning device. The steam may reach electrical parts and trigger a short circuit or cause an electric shock. Risk of electric shock.
- Do not store products with flammable propellant gases (e.g. spray cans) or explosive substances inside the appliance. Risk of explosion.
- Do not misuse the base, rails, doors etc. as a step or support.
- For defrosting and cleaning, unplug the appliance from the mains or switch off the fuse. Pull on the mains plug, not on the connecting cable.
- Only store high proof alcohol tightly sealed and in an upright position.
- Do not contaminate plastic parts or door seals with oil or grease. Plastic parts and door seals will otherwise become porous.
- Never cover or block ventilation openings for the appliance.
- Persons with limited physical, sensory or psychological capacities or those without sufficient knowledge must only use this appliance under supervision or with detailed instructions.
Children in the household
- Do not give packaging or packaging parts to children. Danger of suffocation from cardboard boxes and films.
- The appliance is not a child's toy.
- For appliances with a door lock: Keep the key out of the reach of children.
General requirements
This appliance is designed exclusively for the storage of wine.
This appliance is intended for household use only.
The appliance is interference-suppressed in line with EU directive 2004/108/EC.
The refrigeration circuit has been checked for leak tightness.
This appliance corresponds to the relevant safety requirements for electrical appliances (EN 60335/2/24).
Directions for disposal
Disposal of packaging
The packaging protects your appliance from damage during transport. All of the materials used are environmentally friendly and can be recycled. Please help by disposing of the packaging in an environmentally-responsible manner.
You can obtain information about current disposal routes from your specialist dealer or local council.
Installation notes

Disposal of old appliances
Old appliances are not valueless waste. Valuable raw materials can be recovered by environmentally-friendly disposal.

This appliance is marked in accordance with European directive 2002/96/EC regarding old electric and electronic appliances (waste electrical and electronic equipment - WEEE). The directive specifies the framework for EU-wide return and re-use of old appliances.

For worn-out appliances:
- Pull out the mains plug.
- Cut through the connecting cable and remove it together with the mains plug.
- Remove the doors.
- Do not remove shelves and containers, so that it is harder for children to climb into the appliance.
- Do not allow children to play with worn-out appliances. Risk of suffocation.
Refrigerators contain refrigerant as well as gases in the insulation material. Refrigerant and gases must be disposed of properly. Do not damage the refrigerant circuit pipes before disposing of them properly.
Installation location
The ideal installation location is a dry, well ventilated room. The installation location should not be exposed to direct sunlight or be near a source of heat, such as a cooker or heater. If installation near a source of heat is unavoidable, a suitable insulating plate must be fitted or the following minimum distances from the heat source must be observed:
- 30 mm from electric cookers,
- 300 mm from oil- or coal-fired cookers.
The floor at the installation site must not sag. Strengthen the floor if necessary.
Climate classes
The climate class is specified on the rating plate. It indicates the room temperature range in which the appliance can be operated.
| Climate class Permissible room temperature | |
| SN | +10°C to 32 °C |
| N +16 °C to 32 °C | |
| ST +16 °C to 38 °C | |
| T +16 °C to 43 °C | |
Recess
The appliance must be installed in a suitable recess.
The recess must be aligned using a spirit level. It must be securely screwed to the adjacent unit or to the wall.
The recess must have sufficient ventilation openings at the base of the unit (front) and the unit housing (top).
Ventilation
Never cover the ventilation openings at the base of the unit (front) or in the unit housing (top). Otherwise the refrigerating unit has to work harder, which increases power consumption.
The following dimensions must be used:
Depth of the ventilation shaft at the rear wall of the unit: min. 38 mm
Ventilation cross-sections in the base of the unit and in the unit housing (top): min. 200 cm ^4
Transporting the appliance

Warning!
Risk of injury from shards of glass.
During transport at a height of more than 1500 m, the glass panels in the door can break. The fragments of glass have sharp edges and can cause serious injuries.
The appliance should be packed and kept upright for transport.
Note!
To protect the glass door, only remove the transportation lock once the appliance is in the recess.
Fasten the transportation lock each time before the appliance is transported.
Electrical connection
The socket for connecting the appliance must be freely accessible. Connect the appliance to a 220 - 240 V/50 Hz alternating current supply via a socket which has been correctly installed. The socket must be fitted with a 10 to 16 A fuse.
Do not use any extension cables or distributors.
In the case of appliances operated outside Europe, check whether the voltage and type of current specified on the rating plate conform to the values of your electricity grid. The rating plate is at the bottom left inside the appliance. If the power cord needs to be replaced, this must be carried out only by an expert.

Warning!
The appliance must not be connected to an electronic energy saving plug (e.g. Ecoboy; Sava Plug) or an inverter that converts direct current to 230 V alternating current (e.g. solar energy systems, boat electrical systems).
Risk of injury due to heavy door.
Replacing glass doors requires two people.

flowchart
graph TD
    A["Component 3"] --> B["Component 4"]
    B --> C["Component 5"]
    C --> D["Final Assembly Unit"]
    style A fill:#f9f,stroke:#333
    style B fill:#ccf,stroke:#333
    style C fill:#cfc,stroke:#333
    style D fill:#fcc,stroke:#333
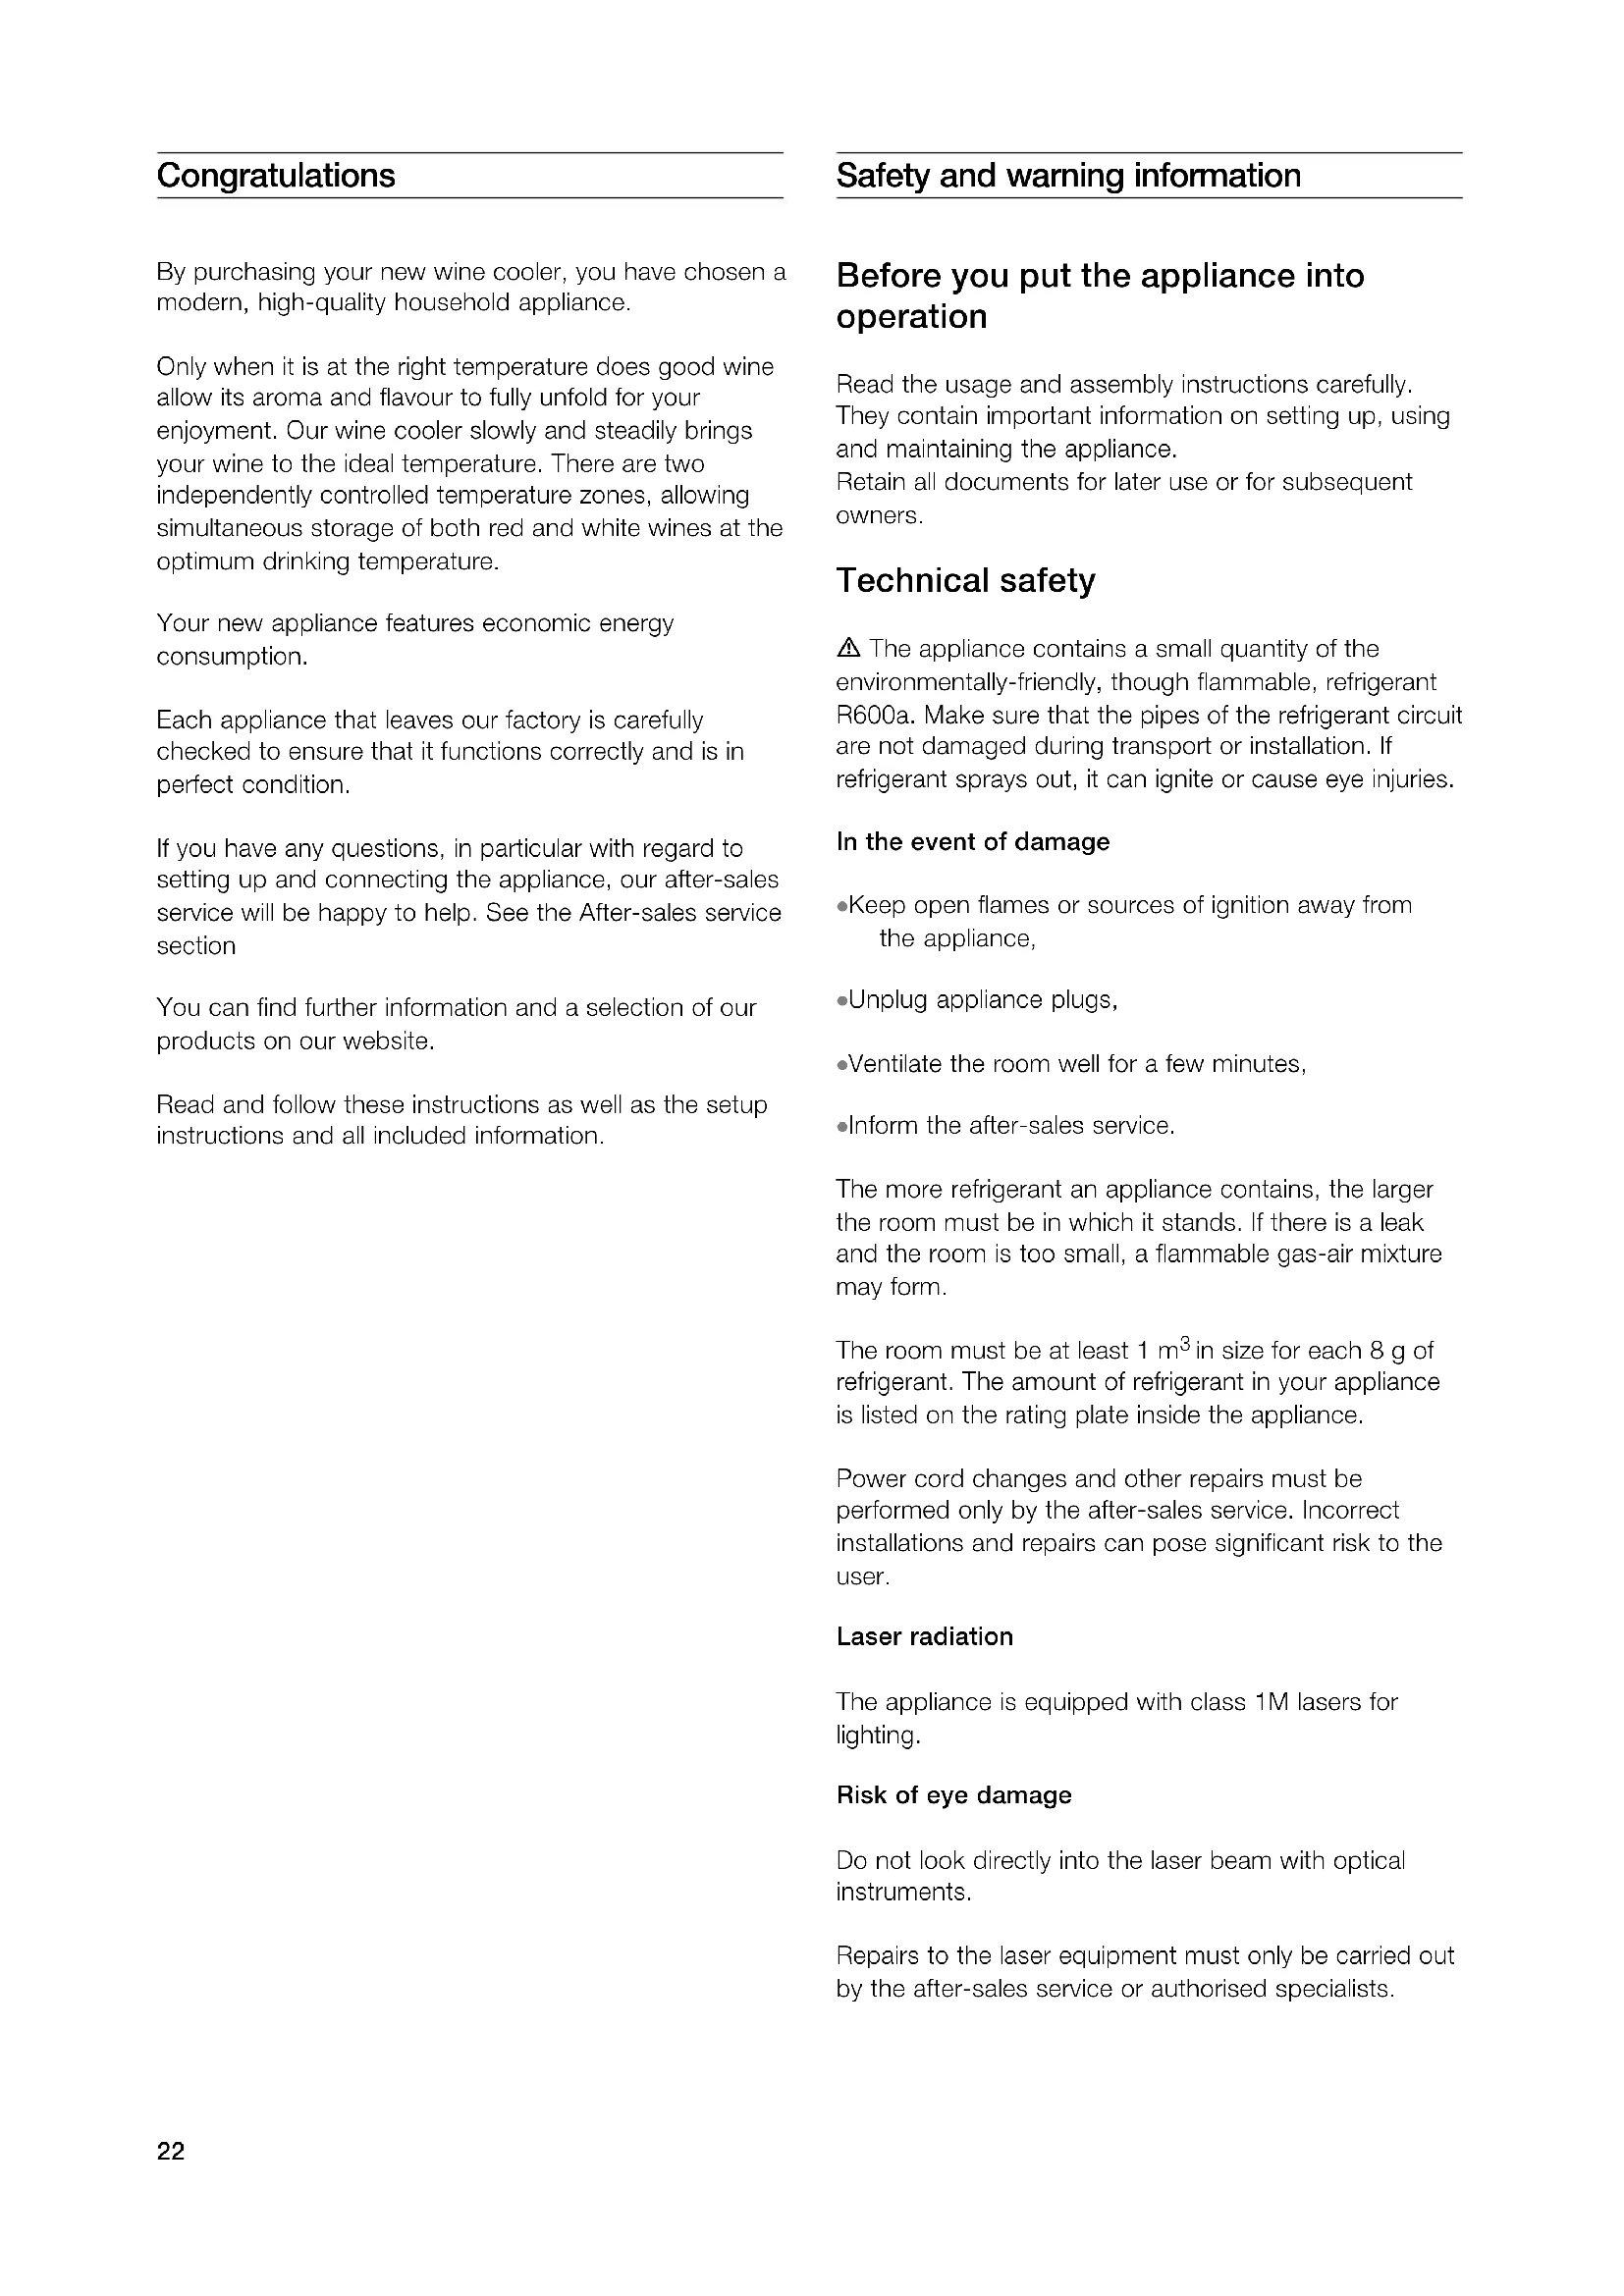
Installation dimensions

Fixing and mounting
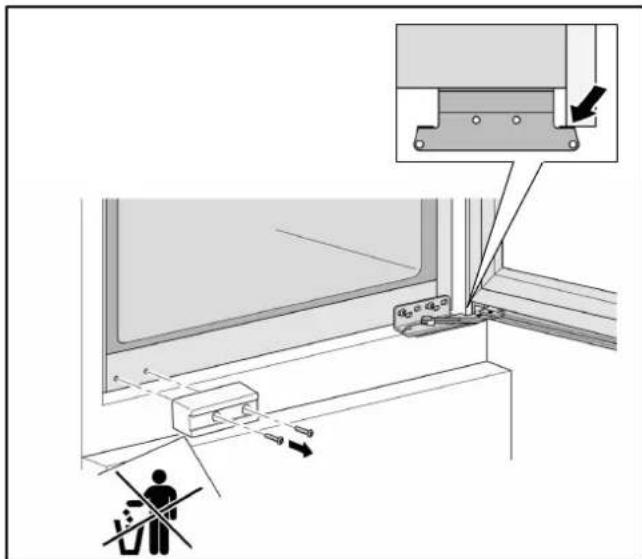
- Remove the connecting cable from the rear of the appliance.
- Remove the cable clip (to prevent vibration noises).
- Using a cord, lay the connecting cable in such a way that the appliance can be connected easily after installation.
-
Slide the appliance 23 of the way into the recess. Take care not to trap the connecting cable while doing so.
-
Turn the adjustable feet all the way in.
natural_image
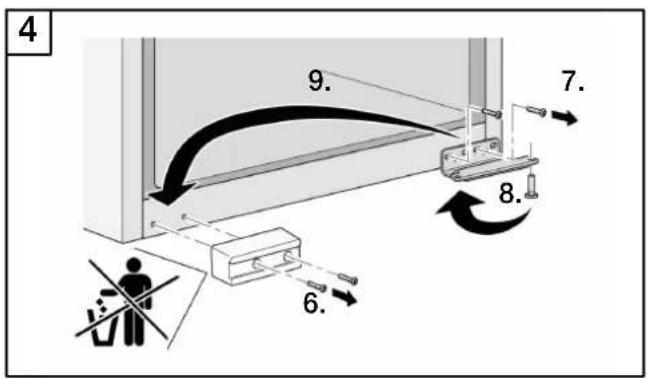
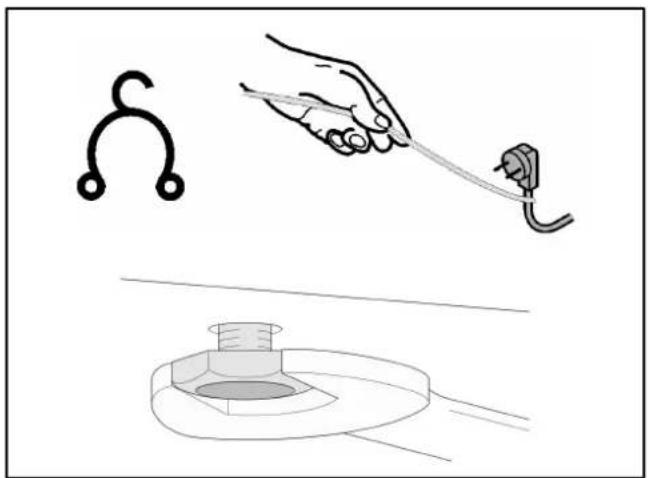
Illustration showing a hand holding a tool near a plug, with a separate diagram of a hook and a washer (no text or symbols)- If the kitchen unit walls are 16 mm thick: Place the spacer on the outside of the upper hinge. Do not cover the hole.
natural_image
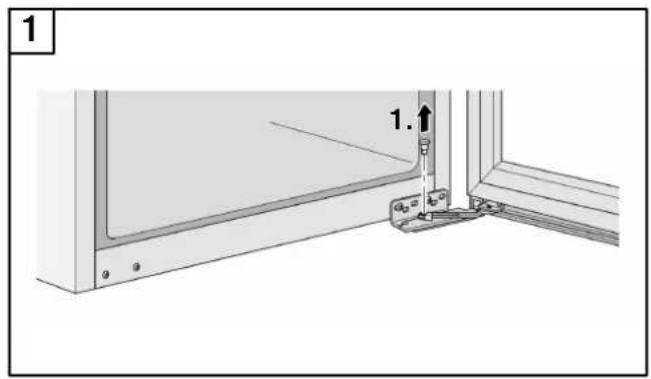
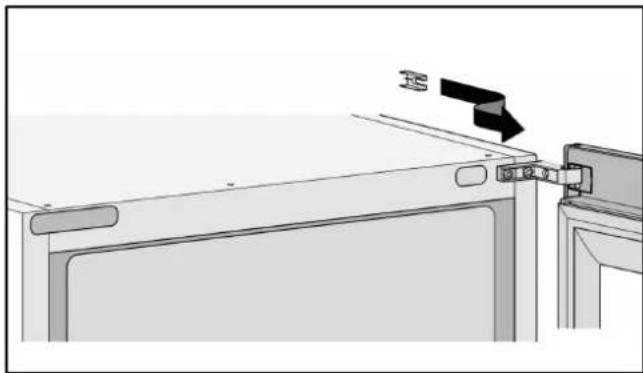
Diagram of a device with a black arrow pointing to a component, no text or symbols present- Place the compensating panel over the predrilled holes on the top of the appliance and fix in place using 3 screws (3.5 x 9.5 mm from the accessories kit).
natural_image
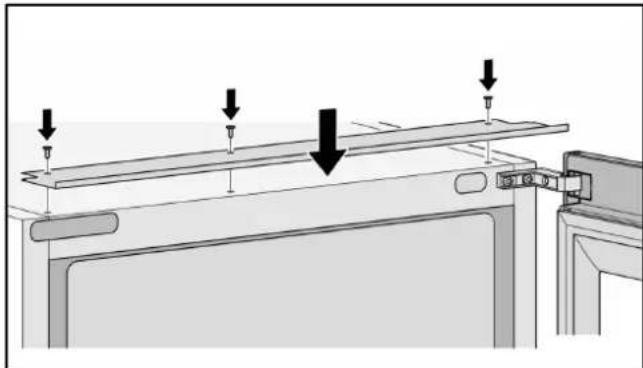
Diagram of a mechanical assembly with arrows indicating force or movement (no text or symbols present)- Shorten the cover strip to the height of the recess and stick to the side wall of the appliance on the door opening side.
natural_image
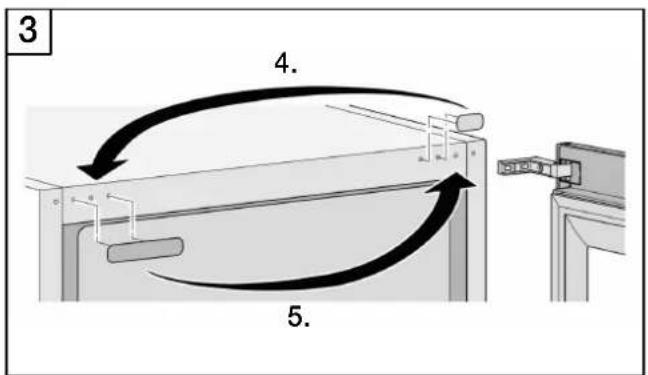
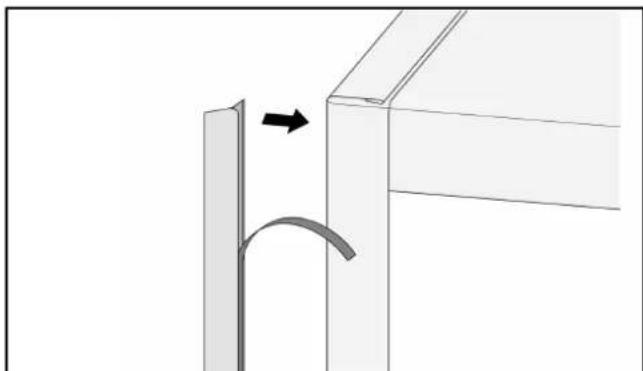
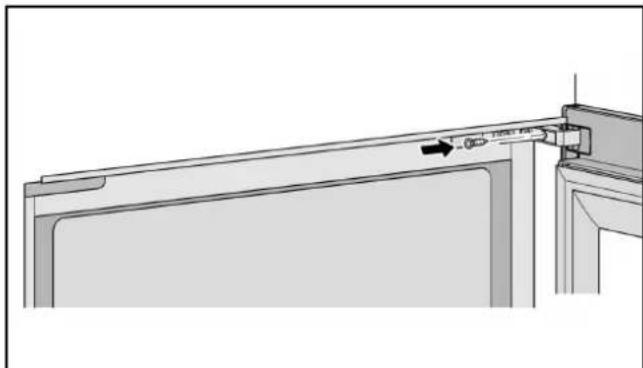
Diagram showing a curved arrow interacting with a vertical panel, indicating rotation or movement (no text or symbols present)- Push the appliance into the recess until the lower hinge stop butts against the front edge of the wall of the unit.
-
Unscrew the transport lock. Keep the transport lock for transporting it again in the future.
-
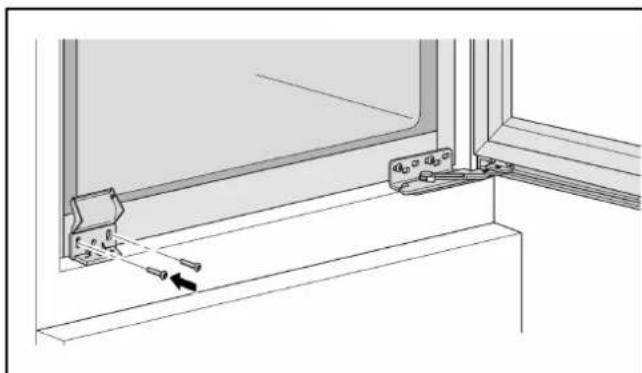
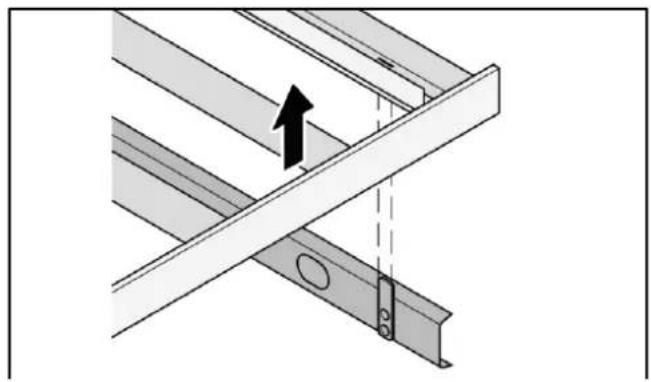
Use the two screws to fasten the mounting angle for the door transport lock to the appliance.
natural_image
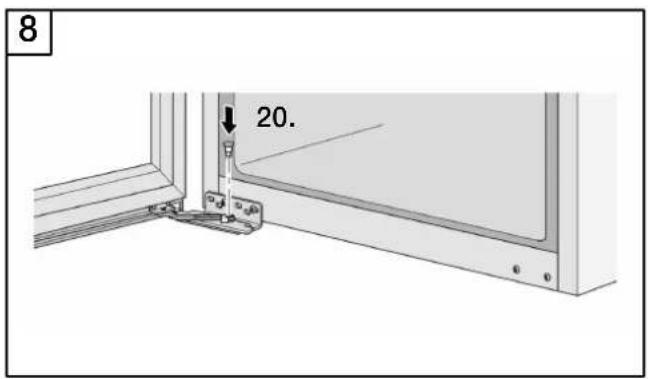
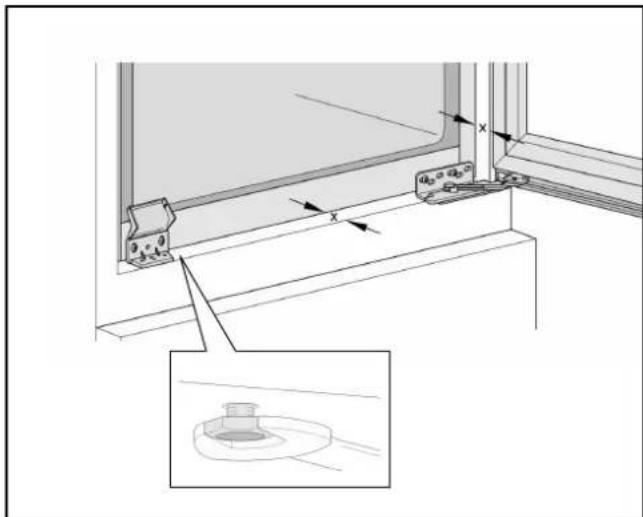
Technical line drawing of a window frame with mounting bracket and hanging clip (no text or symbols)- Align the appliance using the adjustable foot on the door opening side:
The mounting angle must be flush with the front edge of the kitchen unit floor.
The distance (x) between the front edge of the kitchen unit wall and the front edge of the appliance must be the same all the way around.
The side of the upper hinge must rest against the wall of the kitchen unit.
Note!
The spanner for making the adjustments is included with the appliance.
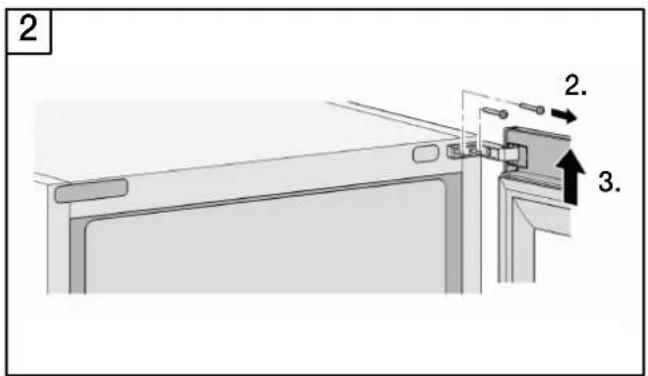
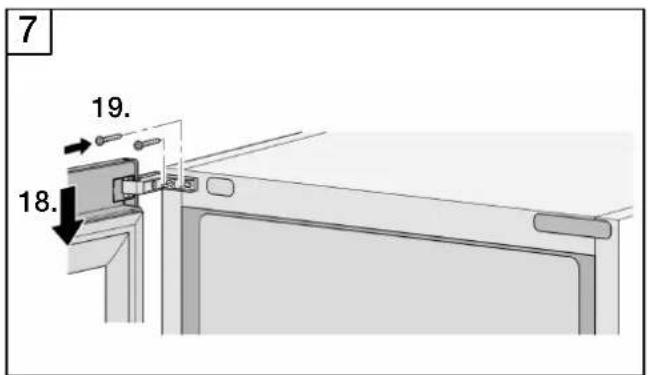
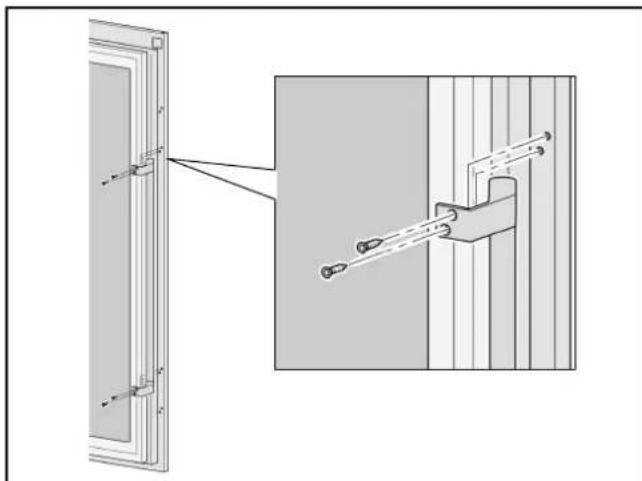
- Fasten the upper hinge to the wall of the kitchen unit using 1 screw (4 x 29 mm from the accessories kit).
natural_image
Technical line drawing of a door frame with a tool inserted, showing no text or symbols-
Fasten the lower hinge to the floor of the kitchen unit using 2 screws (4 x 19 mm from the accessories kit).
-
Fasten the mounting angle to the floor of the kitchen unit using 2 screws (4 x 19 mm from the accessories kit) and close.

natural_image
Diagram of a window frame with screwdrivers and directional arrows indicating movement (no text or symbols)- Fasten the compensating panel to the ceiling of the kitchen unit using 2 screws (4 x 14 mm from the accessories kit).

natural_image
Technical diagram of a structural beam with two hanging weights and mounting brackets (no text or symbols)Note!
Remove the protective film before mounting the handle.
The top and bottom centre-punched markings on the appliance door are not for mounting the handle.
- Fasten the handle by screwing 2 screws (3.5 x 9.5 mm from the accessories kit) through the centre-punched markings on the appliance door. Apply more pressure to the screws in order to pierce the metal sheet.
natural_image
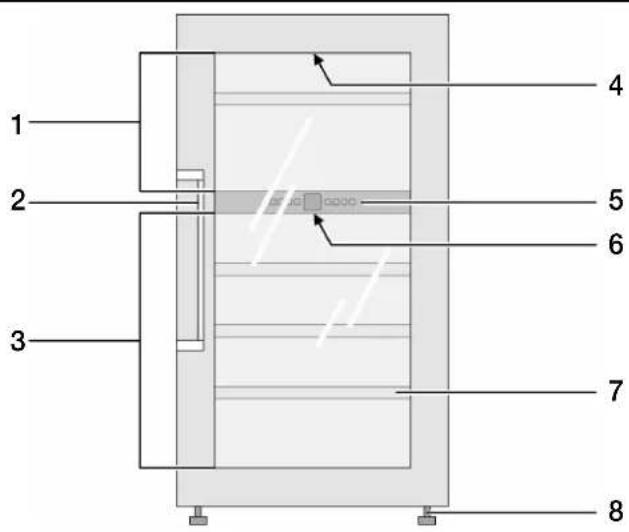
Technical diagram showing a door frame with attached components and a close-up of a mechanical assembly (no text or symbols)Your new appliance
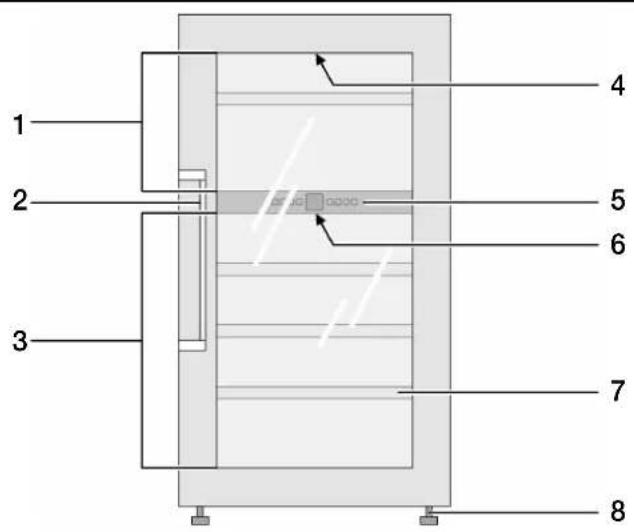
- Upper compartment
- Handle
- Lower compartment
-
Interior lighting, upper compartment
-
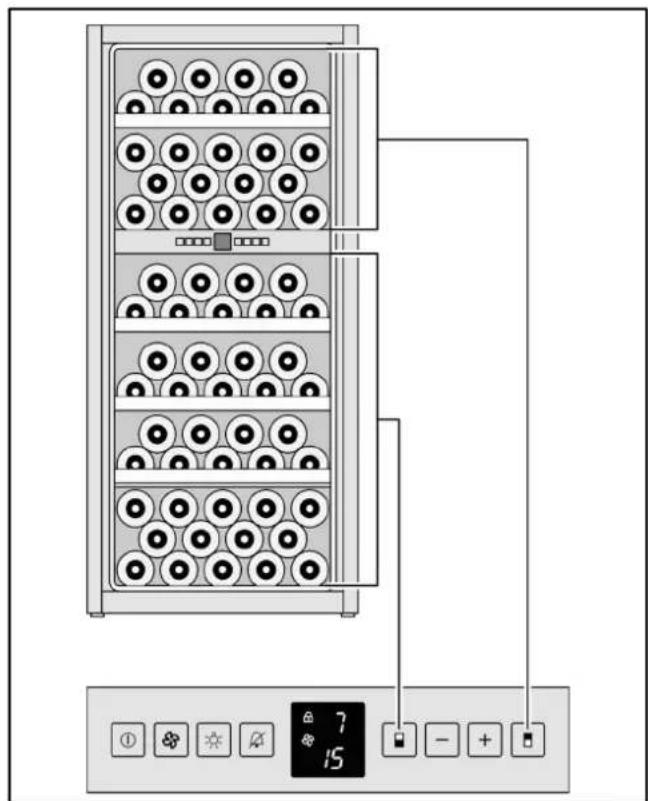
Control panel
- Interior lighting, lower compartment
- Pull-out bottle racks
- Feet
Control panel
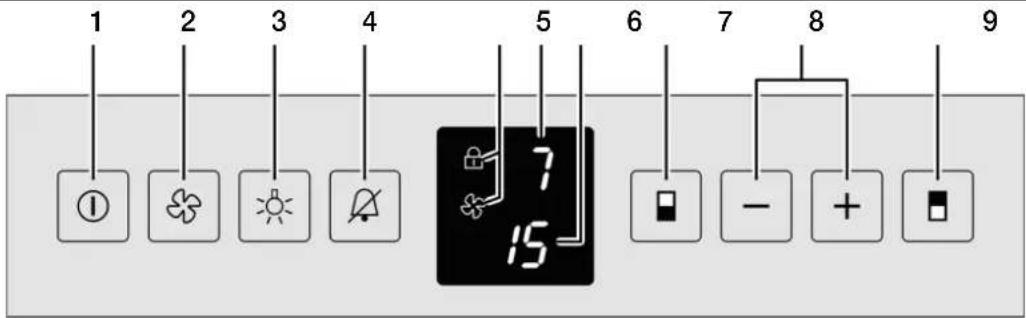
- On/off button
- Fan button
- Interior lighting button
- Alarm off button
-
Display showing which functions are on
-
Temperature display, upper compartment
- Temperature display, lower compartment
- Selection button, lower compartment
- Plus and minus buttons to adjust the temperature
- Selection button, upper compartment

Childproof lock

Fan
Switching on the appliance
- Press the on/off button until the temperature display lights up.
Adjusting the temperature
The temperature in the two compartments can be set independently of each other, from +5 °C to +20 °C. We recommend a setting of +8 °C to +12 °C.
- Press the selection button for the upper or lower compartment. The corresponding temperature display flashes.
- Adjust the temperature using the plus or minus button: Plus button: Increase the temperature (warmer) Minus button: Decrease the temperature (colder).
Each time you press a button, the adjustment value changes by 1 °C.
Approx. 5 seconds after the last button was pressed, the temperature display switches and indicates the actual temperature.
Fan
For long-term storage of wine, the fan should be switched on. The fan creates a climate in the interior of the appliance which replicates that of a wine cellar. The increased humidity caused by this prevents the corks from drying out.

- Press the fan button. The fan symbol appears in the display. The fan runs continuously.
Switching the fan off:
- Press the fan button. The fan symbol disappears from the display. The fan runs only when the refrigeration unit is running.
Temperature Alarm
The audible warning signal helps you protect your wine from unfavourable temperatures.
It sounds if the interior of the appliance is too cold or too warm. The temperature display flashes simultaneously.
It sounds continuously if the door remains open for longer than 60 seconds.
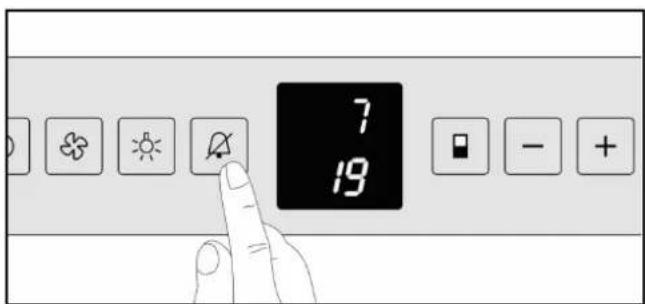
Switching off the alarm:
- Press the Alarm off button.
The temperature display continues to flash until the alarm condition has ended.
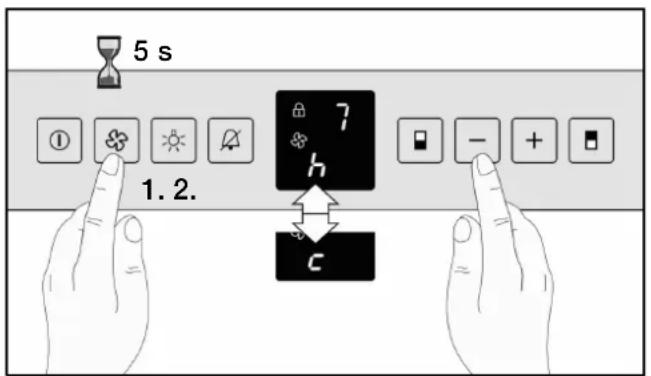
Childproof lock
The childproof lock can be used to protect the appliance from being switched off unintentionally.
- Press the fan button for approx. 5 seconds. A "c" flashes in the display for the childproof lock or an "h" for the interior lighting.
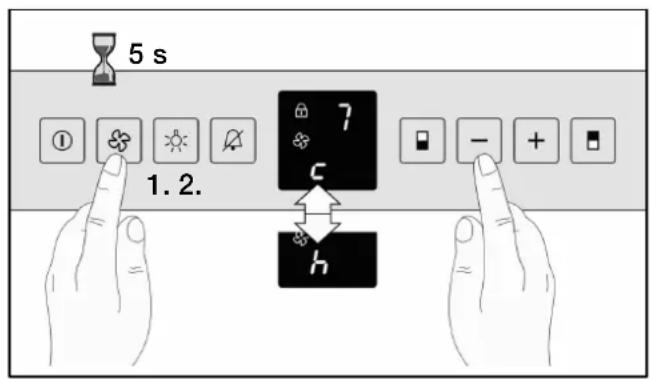
- Press the minus button until "c" appears in the display.
- Press the fan button. A "c1" or a "c0" flashes on the display.
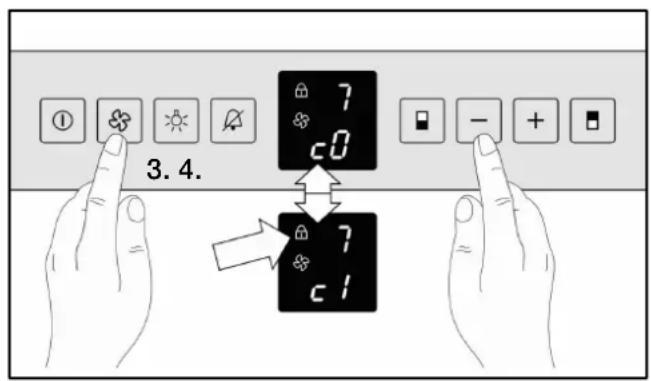
- Use the plus or minus button to switch the childproof lock on or off:
“c0”: Childproof lock switched off
“c1”: Childproof lock switched on.
When the childproof lock is on, the lock symbol lights up in the display.
- Press the fan button to confirm the flashing value.
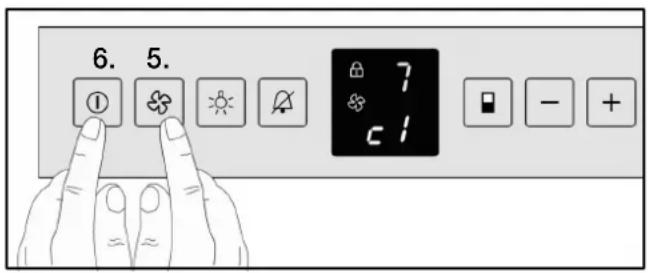
- Press the on/off button to exit the adjustment mode.
Appliance illuminating power
- Press the fan button for approx. 5 seconds. An "h" flashes in the display for the interior lighting or a "c" for the childproof lock.
- Press the minus button until "h" appears in the display.
Interior lighting, LED
- Press the fan button. The current value for the illuminating power flashes in the display.
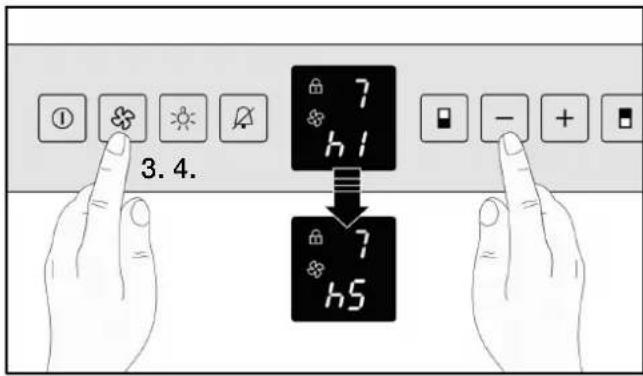
- Adjust the illuminating power in the display using the plus or minus button:
"h1": Minimum illumination power to
"h5": Maximum illumination power.
- Press the fan button to confirm the flashing value.
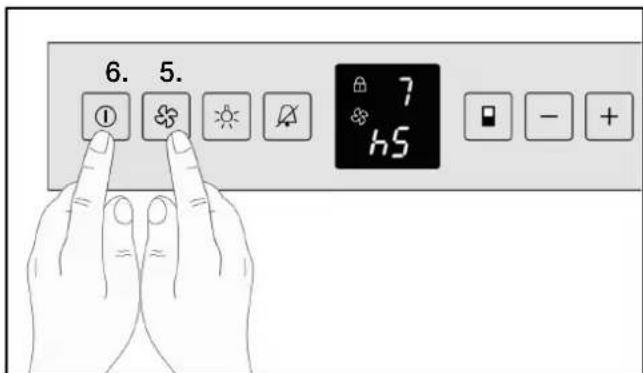
- After the display changes, press the on/off button to exit the adjustment mode and close the door. After approx. 1 minute, the light changes to the brightness you have set.
Both the upper and lower compartments have integrated, maintenance-free LED lighting with dimmer effect.
When the door is opened, the brightness slowly increases from 0 to the individually-controlled maximum luminosity. Closing the door has the reverse effect.
Caution. LED lighting
Laser radiation, class 1M (standard IEC 60825). Do not look directly into the laser beam with optical instruments. Risk of eye damage! Repairs to the laser equipment must only be carried out by the after-sales service or authorised specialists.

natural_image
3D diagram of a mechanical component with a star-shaped feature and a circular recess (no text or symbols)Making individual adjustments to the maximum luminosity.
- Press the interior lighting button.
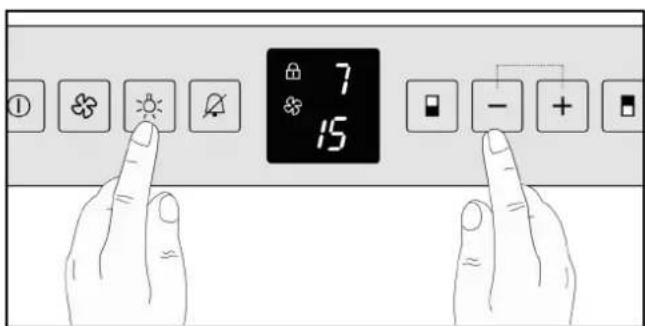
- Press and hold the interior lighting button and adjust the luminosity using the plus or minus button: Plus button: brighter Minus button: darker.
The interior lighting can also be switched on permanently for presentation purposes:
- Press the interior lighting button.
- To switch off the permanent light, press the interior lighting button again.
Features
Pull-out bottle racks
The pull-out bottle racks allow easy access to the wine bottles.
The pull-out bottle racks can be removed for cleaning.
natural_image
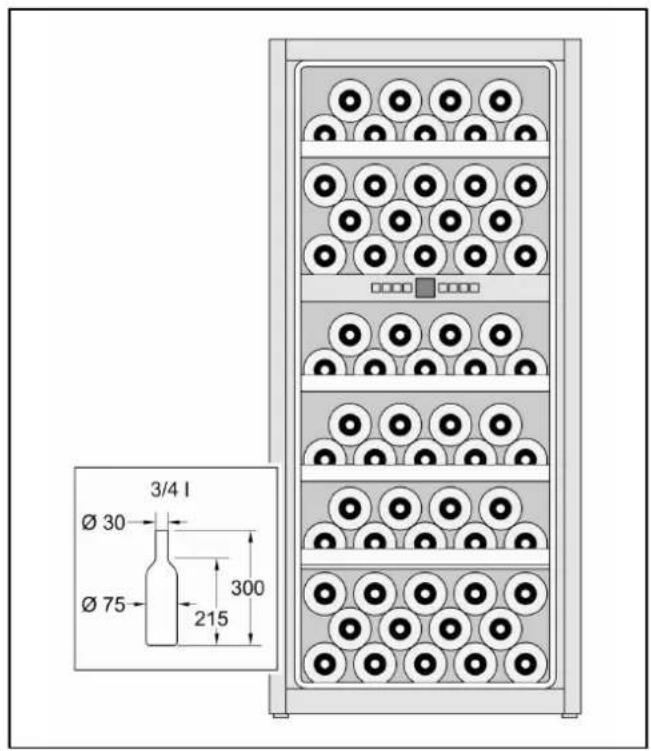
Diagram showing a structural joint with an arrow indicating direction, no text or symbols presentStorage diagram
Capacity: 64 bottles (0.75 l Bordeaux bottles)
Practical tips for storing wine
- Bottled wine must be stored unpacked - not in boxes or cartons.
- Old bottles must be laid in such a way that the cork is always wet. There should never be an air gap between the wine and the cork.
- Before the wine is drunk, it should be "warmed up" (chambré) slowly: For example, place rosé wine on the table approx. 2 - 5 hours before drinking, red wine approx. 4 - 5 hours before drinking. The wine will then be at the correct drinking temperature. White wine, on the other hand, can be placed directly on the table. Sparkling wine and Champagne should be cooled in the refrigerator shortly before drinking.
- Please note that wine should always be cooled to a slightly lower temperature than the ideal serving temperature as its temperature increases by 1 to 2^ as soon as it is poured into a glass.
Drinking temperatures
The correct serving temperature is crucial for the proper taste of the wine and therefore for your drinking pleasure.
We recommend serving wine at the following drinking temperatures:
Wine type Drinking
temperature
| Large Bordeaux red 18 °C | |
| Côtes du Rhône red/Barolo 17 °C | |
| Large Burgundy red/Bordeaux red 16 °C | |
| Port 15 °C | |
| Young Burgundy red 14 °C | |
| Young red wines 12 °C | |
| Young Beaujolais/all white wines with little residual sugar | 11 °C |
| Old white wines/large Chardonnay 10 °C | |
| Sherry 9 °C | |
| Young white wines, late vintage onwards | 8 °C |
| White wines Loire/Entre-deux-Mers | 7 °C |
Air exchange through active carbon filter
Wines continue to develop according to their environmental conditions. This means that the quality of the air is crucial for their conservation. For this reason, both the upper and lower compartments are fitted with an active carbon filter in the interior rear wall.
We recommend that you replace the active carbon filter every year. The active carbon filters can be obtained via the after-sales service or from a GAGGENAU specialist dealer.
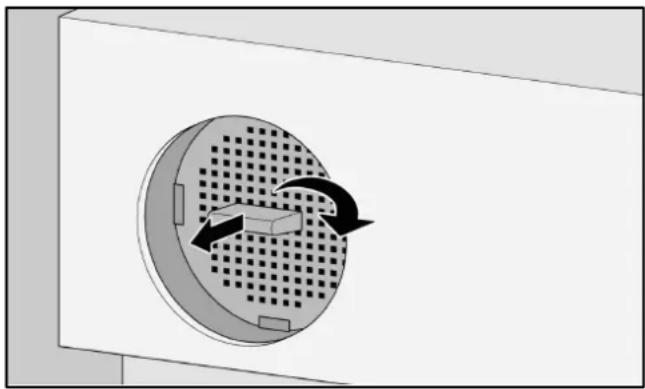
Replacing the active carbon filter:
- Hold the active carbon filter by the handle and turn 90^ to the right or left.
- Pull out the active carbon filter.
natural_image
Diagram of a circular component with internal flow arrows indicating rotation or movement (no text or symbols)- Insert a new active carbon filter with the handle in a vertical position.
- Hold the active carbon filter by the handle and turn 90^ to the right or left, until it engages.
Defrosting
The appliance defrosts automatically. The collected moisture is directed through the condensation outlet to the external evaporation pan. The condensation evaporates under the heat from the refrigeration unit.
Switching off the appliance
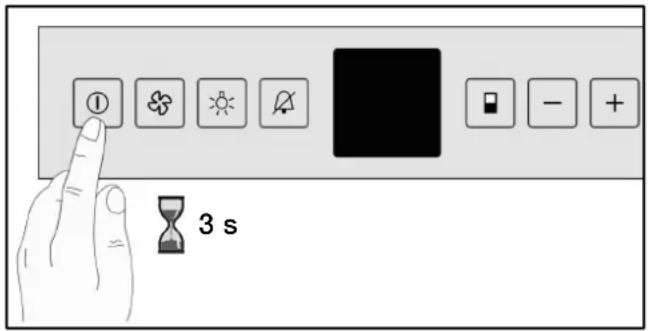
- Press and hold the on/off button for approximately 3 seconds until the temperature display goes out.
Putting the appliance out of service
If the appliance is put out of service for an extended period of time:
- Switch off the appliance.
- Unplug the appliance from the mains or switch off the circuit breaker.
- Clean the appliance.
- Leave the door open, to prevent odours from forming.
Cleaning the appliance
Warning!
Never clean the appliance with a steam cleaning device. The steam may reach live electrical parts in the appliance and cause a short circuit or cause an electric shock. The steam may damage the plastic surfaces.
Never clean the shelves or containers in the dishwasher. The parts may warp.
Do not use arenaceous or acidic cleaning agents or solvents or those containing chloride.
- Switch off the appliance.
- Unplug the appliance from the mains or switch off the circuit breaker.
- Clean the appliance using a soft cloth, lukewarm water and some pH-neutral cleaning agent. The water used for cleaning must not penetrate the control panel or lighting.
Operating noises
- Clean the glass door with a commercially available glass cleaner and a soft cloth.
- Only clean the door seal with clean water, and rub it dry thoroughly.
- Remove dirt on ventilation openings using a vacuum cleaner.
- Remove deposits in the drainage opening using a thin device e.g. a cotton bud.
- After cleaning: Plug the appliance into the mains or switch on the fuse.
Care instructions for stainless steel surfaces
Use “Chromol” cleaning agent for cleaning stainless steel surfaces.
This cleaning agent is available on the market under the name “Chromol” or from your after-sales service under
ID No. 310359 as 500 ml aerosol can and
ID No. 166787 as 50 ml sample bottle.
To prevent damage to the surfaces, under no circumstances use abrasive sponges, metal brushes, sharp-edged implements or scouring agents. Chemically aggressive cleaning agents such as defrosting spray, oven spray, solvents or stain removers must not be used either.
Normal noises
Humming - the refrigeration unit is running. The circulation fan is running.
Bubbling, whirring or gurgling noises - refrigerant is flowing through the pipes.
Clicking - refrigeration unit (motor) is switching on or off.
Avoiding noises
The appliance is positioned unevenly
Align the appliance using a spirit level (see "Installing the appliance").
Pull-out bottle racks are wobbling or sticking
Check the removable pull-out bottle racks and replace them if necessary.
Containers are touching
Move bottles or containers apart slightly.
Before you call the after-sales service:
Check whether you can rectify the fault yourself by using the notes below. You must bear the costs for consultations with the after-sales service yourself - even during the warranty period.
| Fault | Possible causes Remedy | |
| Temperature differs significantly from the setting. | In many cases, all you need do is switch the appliance off for 5 minutes.If the temperature is too warm, check after a few hours to see if the temperature has changed.If the temperature is too cold, check the temperature again the following day. | |
| The appliance has no cooling capacity, the interior lighting and the display do not light up. | Power failure; the fuse has been tripped; the mains plug is not firmly inserted. | Check whether there is power. The fuse must be switched on. |
| The refrigeration unit switches on increasingly frequently and for longer periods. | The appliance door is opened frequently. | Do not open the appliance door unnecessarily. |
| The ventilation openings are covered. | Remove obstacles and dirt. | |
| The appliance is too close to a heat source or the ambient temperature is too high. | See the "Installation site" section. | |
| The refrigeration unit is running for a long time. | The refrigeration unit switches to a low speed when there is low refrigeration requirement. | Although this increases the running time, it saves energy. This is normal for energy saving models. |
| Mould on wine bottles. As in other types of storage, some mould may form, depending on the kind of label adhesive used. | Carefully remove any adhesive residue from the bottles. | |
| The temperature is not cold enough. | The ventilation openings are covered. | Remove obstacles and dirt. |
| The appliance door is not closed properly. | Close the appliance door. | |
| The appliance door is opened frequently. | Do not open the appliance door unnecessarily. | |
| The appliance is too close to a heat source or the ambient temperature is too high. | See the "Installation location" section. | |
| The interior lighting does not light up. | The appliance is switched off. Switch on the appliance. | |
| The interior lighting is faulty or the cover is damaged. | Make sure that you inform the after-sales service. | |
| The temperature display shows F0 to F5. | Appliance malfunction. Make sure that you inform the after-sales service. | |
After-sales service
Check whether you can remedy the fault yourself, using the instructions in the "Rectifying minor faults yourself" section. You can find an after-sales service in your area in the telephone directory or the after-sales service directory.
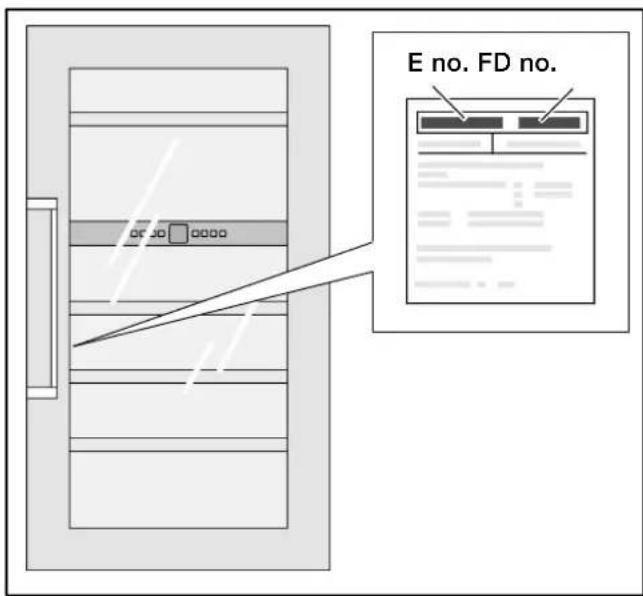
When you call the after-sales service, please quote your product number (E no.) and the production number (FD no.) of your appliance.
Please help us to avoid unnecessary journeys by quoting the appliance and production number. In doing so, you will save related cost overruns.
You will find this information on the rating plate.
Sommaire
Félicitations! 40 ......
natural_image
Illustration showing a hand holding a tool near a plug, with a separate diagram of a hook and a washer (no text or symbols)natural_image
Diagram of a refrigerator with a door and front panel, showing a black arrow pointing to the door (no text or symbols present)natural_image
Diagram of a mechanical assembly with downward arrows indicating force or movement (no text or symbols present)natural_image
Diagram showing a mechanical joint or bracket with an arrow indicating rotation, no text or symbols presentnatural_image
Technical line drawing of a window frame with latch and lock components (no text or symbols)natural_image
Diagram of a window frame with screw fasteners and directional arrows indicating movement (no text or symbols)natural_image
Technical diagram of a structural beam with two hanging fasteners (no text or symbols)Remarque!
natural_image
Technical diagram showing a door panel connected to a wall-mounted tool, with an inset close-up of the component (no text or symbols present)natural_image
Diagram of a rack-mounted server unit with multiple circular components and connected indicator lights (no text or symbols)natural_image
Architectural detail showing a star-shaped opening and circular recess (no text or symbols)natural_image
Diagram showing a structural connection between two beams with an arrow indicating direction (no text or symbols)Schéma de stockage
natural_image
Diagram of a circular component with internal flow arrows indicating rotation or movement (no text or symbols)natural_image
Illustration showing a hand holding a tool over a wire with a hook, and a close-up of a mechanical component (no text or symbols)natural_image
Diagram of a refrigerator with a door and front panel, showing a black arrow pointing to the door (no text or symbols present)natural_image
Diagram of a mechanical assembly with downward arrows indicating force or movement (no text or symbols present)natural_image
Diagram showing a curved arrow interacting with a vertical panel, indicating rotation or movement (no text or symbols present)natural_image
Technical line drawing of a window frame with hanging clips and a scroll, no text or symbols presentnatural_image
Technical line drawing of a mechanical assembly with a tool inserted into a bracket (no text or symbols)natural_image
Diagram of a window frame with screw fasteners and directional arrows indicating movement (no text or symbols)natural_image
Technical diagram of a structural beam with two hanging weights and mounting brackets (no text or symbols)Indicazione!
natural_image
Technical diagram showing a door panel connected to a wall-mounted tool, with an inset close-up of the component (no text or symbols present)natural_image
3D rendering of a ceiling structure with a star-shaped opening and circular recess (no text or symbols)natural_image
Diagram showing a structural connection between two beams with an arrow indicating direction (no text or symbols)natural_image
Diagram of a circular component with internal flow arrows indicating rotation or movement (no text or symbols)natural_image
Illustration showing a hand holding a tool near a plug, with a separate diagram of a hook and a washer (no text or symbols)- Bij 16 mm dikke meubelwanden:
natural_image
Diagram of a refrigerator with a door and front panel, showing a black arrow pointing to the door (no text or symbols present)natural_image
Diagram of a mechanical assembly with downward arrows indicating force or movement (no text or symbols present)natural_image
Diagram showing a curved arrow interacting with a vertical panel, indicating rotation or movement (no text or symbols present)natural_image
Technical line drawing of a window frame with mounting bracket and hanging clips (no text or symbols)natural_image
Technical line drawing of a door handle assembly with a tool inserted (no text or symbols)natural_image
Diagram of a window frame with screw fasteners and directional arrows indicating movement (no text or symbols)natural_image
Technical diagram of a structural beam with two hanging weights and mounting brackets (no text or symbols)Aanwijzing!
natural_image
Technical diagram showing a door panel connected to a wall-mounted tool, with an inset close-up of the component (no text or symbols present)Uw nieuwe apparaat
natural_image
Diagram of a rack-mounted server unit with multiple circular components and connected cables (no text or symbols)Ventilator inschakelen:
natural_image
3D diagram of a mechanical component with a star-like feature and a central hole (no text or symbols)natural_image
Diagram showing a structural connection between two beams with an arrow indicating direction (no text or symbols)Indelingstekening
Capaciteit: 64 flessen (0,75 l Bordeauxflessen)

natural_image
Diagram of a circular component with internal flow arrows indicating rotation or movement (no text or symbols)- Hinweis!
- Ihr neues Gerät
- Einlagerungsskizze
- Congratulations
- Safety and warning information
- Before you put the appliance into operation
- Technical safety
- In the event of damage
- Laser radiation
- Risk of eye damage
- During use
- Children in the household
- General requirements
- Directions for disposal
- Disposal of packaging
- Installation notes
- Disposal of old appliances
- Installation location
- Climate classes
- Recess
- Ventilation
- Transporting the appliance
- Warning!
- Note!
- Electrical connection
- Installation dimensions
- Fixing and mounting
- Your new appliance
- Control panel
- Switching on the appliance
- Adjusting the temperature
- Fan
- Temperature Alarm
- Childproof lock
- Appliance illuminating power
- Interior lighting, LED
- Caution. LED lighting
- Features
- Pull-out bottle racks
- Storage diagram
- Practical tips for storing wine
- Drinking temperatures
- Air exchange through active carbon filter
- Replacing the active carbon filter:
- Defrosting
- Switching off the appliance
- Putting the appliance out of service
- Cleaning the appliance
- Operating noises
- Care instructions for stainless steel surfaces
- Normal noises
- Avoiding noises
- After-sales service
- Sommaire
- Remarque!
- Schéma de stockage
- Indicazione!
- Aanwijzing!
- Uw nieuwe apparaat
- Indelingstekening
Brand : GAGGENAU
Model : RW424260
Category : Refrigerator