MBR70 - Cooker BORETTI - Free user manual and instructions
Find the device manual for free MBR70 BORETTI in PDF.
User questions about MBR70 BORETTI
0 question about this device. Answer the ones you know or ask your own.
Ask a new question about this device
Download the instructions for your Cooker in PDF format for free! Find your manual MBR70 - BORETTI and take your electronic device back in hand. On this page are published all the documents necessary for the use of your device. MBR70 by BORETTI.
USER MANUAL MBR70 BORETTI
natural_image
Close-up of metallic mechanical components with no visible text or symbolsBORETTI
NL
FR
ES
EN
natural_image
Close-up of a metallic mechanical component with no visible text or symbols
natural_image
Close-up of metallic mechanical components with no visible text or symbolsVOORWOORD
natural_image
Completely black image with no visible content, text, or symbols.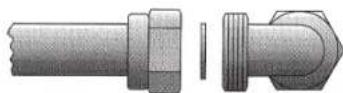
fi guur 1

natural_image
Symbol of a trash bin crossed out by two diagonal lines (no text or numbers present)
natural_image
Circular mechanical dial with adjustment knob and control knob (no text or symbols)natural_image
Close-up of a metallic circular mechanical knob with central hub and four square buttons (no text or symbols visible)natural_image
Completely black image with no visible content, text, or symbols.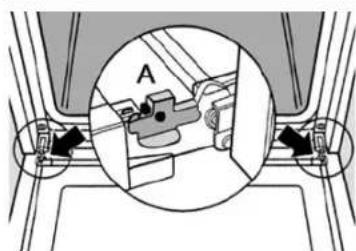
natural_image
Technical diagram of a mechanical assembly with labeled component A, showing no readable text or symbols.fi guur 3
natural_image
Illustration of a person holding a folded paper or sheet with a lightning bolt symbol (no text or symbols present)fi guur 4

natural_image
Technical diagram of a mechanical assembly with no visible text or symbolsfi guur 5
natural_image
Illustration of a hand using a tool to cut a mechanical component with an upward arrow and downward arrow (no text or symbols)fi guur 6

natural_image
Illustration of a meat being cut with a skewer, showing a cut of meat on a plate (no text or symbols)fi guur 7
Sluit de deur half
natural_image
Gray rectangular object with a curved handle and a small hole, resembling a tray or scraper (no text or symbols visible)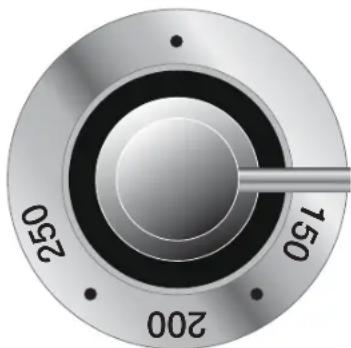
natural_image
Close-up of a circular mechanical knob with concentric rings and a central pointer (no text or symbols visible)fi guur 8
natural_image
Circular mechanical dial with numbered segments (0, 4, 8) and a pointer labeled '12' (no text or symbols beyond labels)fi guur 9
Visbrander Ovale pan
natural_image
Completely black image with no visible content, text, or symbols.
natural_image
Person in protective gear handling a large cylindrical object on a gas stove (no visible text or symbols)
natural_image
Interior view of a kitchen with a stainless steel pot and circular stove burner (no text or symbols visible)
natural_image
Illustration of a hand using a tool to adjust a mechanical component (no text or symbols present)fi guur 11
text_image
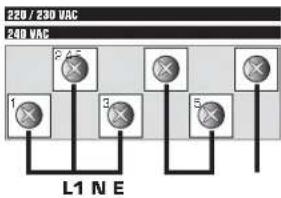
200 / 400 VAC 3N 415 VAC 3N 220 / 230 VAC 3N 240 VAC 3N L1 L2 L3 N E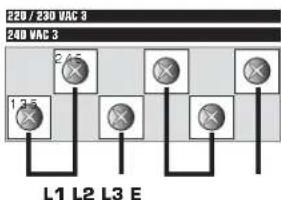
flowchart
graph TD
    A["220 / 230 VAC 3"] --> B["1"]
    A --> C["2"]
    A --> D["2"]
    A --> E["×"]
    A --> F["×"]
    A --> G["×"]
    H["240 VAC 3"] --> I["1"]
    H --> J["2"]
    H --> K["×"]
    H --> L["×"]
    H --> M["×"]
    N["L1"] --> O["×"]
    P["L2"] --> Q["×"]
    R["L3"] --> S["×"]
    T["E"] --> U["×"]
flowchart
graph TD
    A["300/400 VAC 2N"] --> B["×"]
    C["415 VAC 2N"] --> D["×"]
    E["×"] --> F["×"]
    G["×"] --> H["×"]
    I["×"] --> J["×"]
    K["×"] --> L["×"]
    M["×"] --> N["×"]
    O["×"] --> P["×"]
    Q["L1"] --> R["×"]
    S["L2"] --> T["×"]
    U["N"] --> V["×"]
    W["E"] --> X["×"]
    Y["×"] --> Z["×"]
natural_image
Close-up of metallic mechanical components with no visible text or symbolsINTRODUCTION
natural_image
Completely black image with no visible content, text, or symbols.
Illustration 1

natural_image
Symbol of a trash bin crossed out by two diagonal lines (no text or numbers present)
natural_image
Circular mechanical dial with adjustment knob and control knob (no text or symbols)natural_image
Close-up of a metallic circular mechanical knob with central hub and four square buttons (no text or symbols visible)natural_image
Completely black image with no visible content, text, or symbols.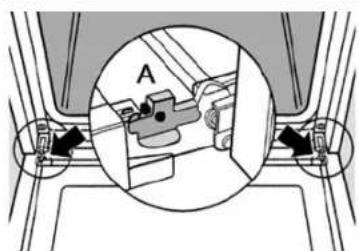
natural_image
Mechanical assembly diagram showing a circular component labeled 'A' with internal components and mounting brackets (no text or symbols beyond label)illustration 3

natural_image
Illustration of a person inserting a card into a folder (no text or symbols visible)illustration 4
natural_image
Technical diagram of a mechanical assembly with no visible text or symbolsillustration 5

natural_image
Hand using a tool to cut a black arrow on a wooden surface (no text or symbols visible)illustration 6

natural_image
Illustration of a meat being cut with a skewer, alongside a photo of a roasted dish (no text or symbols)illustration 7
natural_image
Completely black image with no visible content, text, or symbols.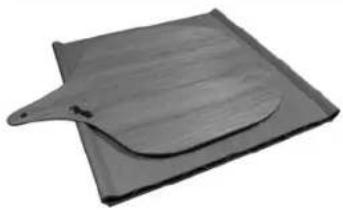
natural_image
Gray rectangular object with a curved cutout, possibly a tray or placket (no text or symbols visible)
natural_image
Close-up of a circular mechanical knob with concentric rings and a central pointer (no text or symbols visible)illustration 8
natural_image
Close-up of a circular mechanical dial with numbered segments and a pointer (no text or symbols beyond numbers)illustration 9
Four ventilé au gaz
natural_image
Completely black image with no visible content, text, or symbols.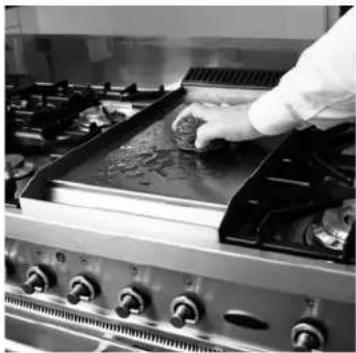
natural_image
Person in protective gear handling a large cylindrical object on a gas stove (no visible text or symbols)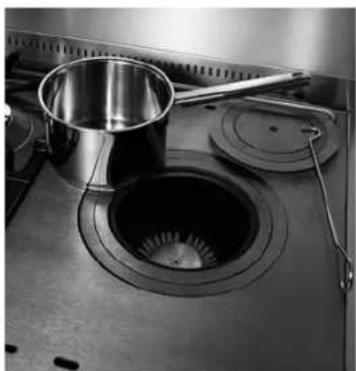
natural_image
Interior view of a kitchen with a stainless steel pot and circular stove burner (no text or symbols visible)
natural_image
Illustration of a hand using a tool to adjust a mechanical component (no text or symbols present)illustration 11
natural_image
Close-up of metallic mechanical components with no visible text or symbolsPREÁMBULO
natural_image
Completely black image with no visible content, text, or symbols.
fi gura 1
natural_image
Symbol of a trash bin crossed with no text or numbers, representing prohibition or restriction (no text present)
natural_image
Circular mechanical dial with indicator lights and symbols (no readable text or labels)natural_image
Close-up of a metallic circular mechanical knob with central hub and four square buttons (no text or symbols visible)natural_image
Completely black image with no visible content, text, or symbols.
natural_image
Technical diagram of a mechanical assembly with labeled component A, showing no readable text or symbols.fi gura 3

natural_image
Illustration of a person holding a folded paper or document with a lightning bolt symbol (no text or symbols present)fi gura 4

natural_image
Technical diagram of a mechanical assembly with no visible text or symbolsfi gura 5
natural_image
Hand using a tool to cut a black arrow on a wooden surface (no text or symbols visible)fi gura 6

natural_image
Illustration of a meat being cut with a skewer, showing a cut of meat on a plate (no text or symbols)fi gura 7
natural_image
Gray rectangular object with a curved handle and a small hole, resembling a tray or scraper (no text or symbols visible)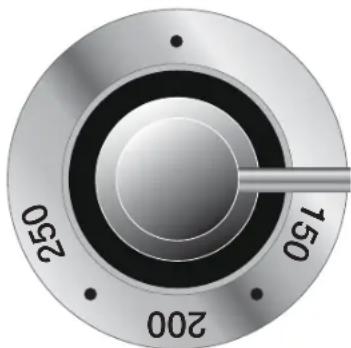
natural_image
Close-up of a circular mechanical knob with concentric rings and a central pointer (no text or symbols visible)fi gura 8
natural_image
Circular mechanical dial with numbered segments and a pointer, no text or symbols presentfi gura 9
natural_image
Completely black image with no visible content, text, or symbols.
natural_image
Person in protective gear handling a large cylindrical object on a gas stove (no visible text or symbols)
natural_image
Interior view of a kitchen with a stainless steel pot and circular stove burner (no text or symbols visible)
natural_image
Illustration of a hand using a tool to adjust a mechanical component (no text or symbols present)fi gura 11
text_image
300 / 400 VAC 3N 415 VAC 3N 220 / 230 VAC 3N 240 VAC 3N L1 L2 L3 N E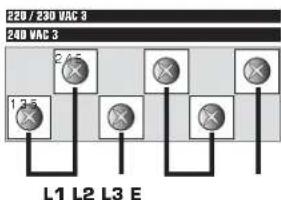
flowchart
graph TD
    A["220 / 230 VAC 3"] --> B["1"]
    A --> C["2"]
    A --> D["2"]
    A --> E["×"]
    A --> F["×"]
    A --> G["×"]
    H["240 VAC 3"] --> I["1"]
    H --> J["2"]
    H --> K["×"]
    H --> L["×"]
    H --> M["×"]
    N["L1"] --> O["×"]
    P["L2"] --> Q["×"]
    R["L3"] --> S["×"]
    T["E"] --> U["×"]
flowchart
graph TD
    A["200/400 VAC 2N"] --> B["L1"]
    C["415 VAC 2N"] --> D["L2"]
    E["2.5"] --> F["N"]
    G["2.5"] --> H["E"]
    I["2.5"] --> J["N"]
    K["2.5"] --> L["E"]
    M["2.5"] --> N["N"]
    O["2.5"] --> P["E"]
    Q["2.5"] --> R["N"]
    S["2.5"] --> T["E"]
    U["2.5"] --> V["N"]
    W["2.5"] --> X["E"]
Potencias y valores
NL
natural_image
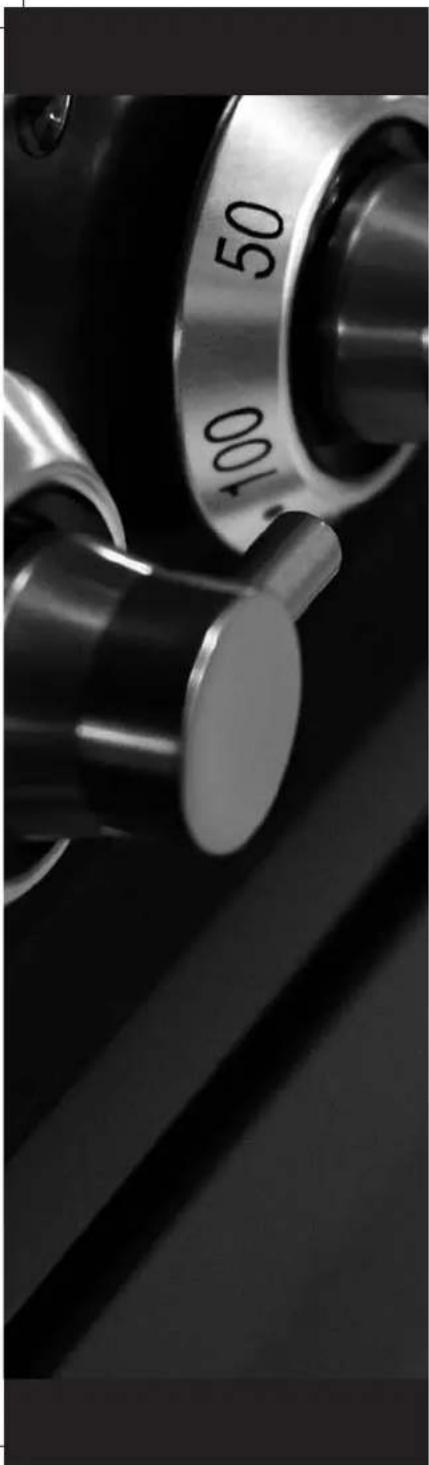
Close-up of a mechanical knob with dual rings and a central knob (no text or symbols visible)FOREWORD
Congratulations! You are now the official owner of a Boretti range cooker. In the coming years, you will discover the absolute joy of cooking with a Boretti range cooker.
In designing your Boretti range cooker, we have kept you, the cook, in mind at all times. This is why you are not holding a user guide the size of a telephone directory in your hands, but a very clear and concise manual. Your range cooker is the same way. That is to say, easy to use and convenient.
We recommend that you read this manual carefully before using your Boretti range cooker in order to avoid problems.
If you have any questions about this product after reading the manual or when using your Boretti, we will be happy to hear from you.
We wish you lots of cooking pleasure!
Boretti
Contents
Foreword
For the Installer 77
- General Installation Instructions
- Electrical Connection
- Gas Connection
Before First Use 79
- Safety Instructions
- Environmental Regulations
- Cleaning Before First Use
Operating the Programmable LCD Clock 81
- Setting the Correct Time
- Manual Function
- Adjusting the Audio Signal
- The Timer
- Pre-Programmed Baking
Operating the Gas Oven Programmable LCD Clock 83
- Setting the Correct Time
- Setting the Timer
- Adjusting the Audio Signal
Operating the Programmable Analog Clock 84
- Setting the Correct Time
- Manual Function
- Timer with Automatic Countdown
- Pre-Programmed Baking
Instructions for Oven Use 85
- Descriptions of the Various Oven Functions
- Quick-Start Function
- Grill (oven)
- Using the Rotisserie
- Casing Cooling
- Dismantling the Oven Door
- Dismantling the Oven Glass Panel
- Removing the Inside Panels from the Oven
- Cleaning the Oven Cavity(s)
- Using the Built-In Thermometer
- Pizza Pan
Using a Ventilated gas Oven 89
- Igniting the Gas Oven
- Gas Oven Grill
- Gas Oven Fan
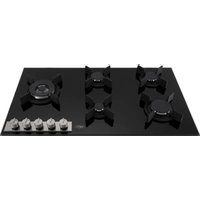
The Cooktop 91
- General Information Gas Burners
- Wok Burner
- Fry Top
- Cleaning the Fry Top
- Coupe de Feu
- Adjusting the Gas Burners
- Cast Iron Grill Plate
- Cleaning the Cooktop
- Ceramic Cooktop
Technical Details 95
- Table for Built-In Thermometer
Troubleshooting - Installation Diagrams
- Power and Values
For the Installer
General Installation Instructions
Your Boretti must be installed by a qualified technician according to legal/locally applicable codes and ordinances.
Before you start installation or reparation work, make sure that the range cooker is not connected to the power source.
Your Boretti can be installed against a wall that is higher than the counter, such as a tall appliance cabinet or a closed wall, at a distance of at least 50 mm from the side of the range cooker, as illustrated in Drawing A. There must be at least 650 mm of space between the cooktop and any shelf or hood placed above it.
Your Boretti range cooker has a standard height of approximately 91 cm. If your Boretti has been fitted with round adjustable legs, you can also purchase these in a taller version. The range cooker can then be adjusted to a height between 91 and 97 cm. It is recommended to align the cooktop with the top of the counter. We also recommend that the range cooker be perfectly level in order to ensure proper functioning.
The strip with ventilation slots included with your range cooker is only mandatory for use with a ventilated gas oven, and only when it is closed off on the upper-back side by tiles or a wall. You do not need to use these for a model with a regular electric oven; that range cooker can be placed directly against a back wall or tiles.
In order to ensure proper functioning, we advise you to use your range cooker in a well-ventilated area. This is especially important for range cookers that are connected to bottled gas (butane/propane). Butane/propane (bottled gas) is heavier than air. As a result, the gas will sink low to the ground (only in case of leakage). Therefore, there must be sufficient ventilation to disperse gas at ground level. Under no circumstances may the gas bottles be placed below the living area (basement/crawl space). This also applies to empty or half-empty gas bottles.
Electrical Connection
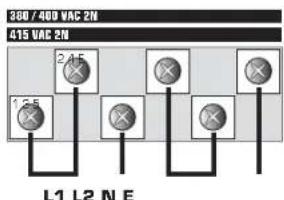
Check whether voltage and capacity agree with the features mentioned on your Boretti's type plate. Under no circumstances may this plate be removed. The fuses and home mains voltage installation must comply with the range cooker's requirements. The connection to the electrical supply may be either fixed, or a plug and socket. In the latter case, the plug and socket outlet must comply with applicable regulations. The connection must be grounded, regardless of type. Before connecting, make sure the electricity source is properly grounded. Avoid use of reducers, adaptors, extension cables or by-passes.
Caution:
See Page 98 for the correct installation diagrams. All six screws must always be well tightened.
Boretti is not liable for damage to persons or objects as a result of non-compliance or partial compliance with the instructions listed above, or as a result of modifications made to the range cooker.
Caution: All range cookers are factory delivered with a mono-phase connection in the connection block at the back of the range cooker. If connection is made to multiple phases, you must comply with (local) codes and ordinances.
Gas Connection
The connection with a rubber tube that complies with applicable regulations must be made in such a way that the length of the tube is not more than 1.5 meters; make sure the tube does not touch moving parts, or has a kink. Before using the range cooker, always check whether the following requirements have been met:
- it must be possible to inspect the supply line along its entire length (max. 1.5 m).
- the supply line must not be subject to tensile forces or make sharp turns.
- the supply line must not touch sharp objects or corners.
- the supply line must not touch walls heated to more than 50^ at any point.
Caution: After connecting your Boretti, use soap suds to check for leaks. Never do this with a flame.
Caution: A gas tube has a limited lifespan. Make sure you replace it with a new one in a timely fashion.
Boretti recommends connecting your range cooker with a fl exible metal GIVEG tube which can be purchased from Boretti. The maximum length of these tubes is 1 meter and they have an unlimited lifespan.
Caution: If your Boretti is connected to mains gas using a fi xed (copper) line, you must always use a fi ber gasket (Figure 1).
Caution: For range cookers placed in Belgium the optional Boretti gas line cannot be used. In Belgium it is mandatory to use a BVG approved gas line.

natural_image
Completely black image with no visible content, text, or symbols.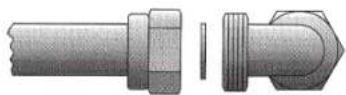
Figure 1

natural_image
Symbol of a trash bin crossed with two diagonal lines (no text or numbers present)Before First Use
Safety Instructions
This manual is part of the range cooker. It must be kept nearby during the entire lifespan of the range cooker.
We recommend reading this manual carefully before using the range cooker.
The range cooker must be installed by a qualified technician in compliance with installation instructions as described in the previous chapter.
This range cooker is suitable for household use, and complies with current EU guidelines. The range cooker has been manufactured to cook and bake foods. Boretti is not liable for unauthorized use of the appliance, such as heating up a space.
Never block the openings and slots of your Boretti, so that proper ventilation is ensured.
This also applies to the air vents on the top/back of the cooktop, however, only in case of a ventilated gas oven.
Immediately after installation, the range cooker should be thoroughly tested, and any malfunctions reported.
Never place pans or objects on the range cooker if they do not have a smooth and fl at bottom surface.
Never place combustible products in your oven. Unexpected ignition could result in fire.
The range cooker is designed for use by adults – never allow children to remain near the range cooker unsupervised.
Certain parts such as the grill element can become extremely hot. Therefore do not allow children to play or be near the range cooker.
After every use, verify that all control knobs are set to "off".
In case of doubt regarding the safety instructions of your Boretti, we urgently recommend that you call Boretti. You will find our phone numbers on the back of this manual.
Do not use parchment paper when grilling.
Never put combustible objects or products that could melt at low temperatures in the storage space below the oven.
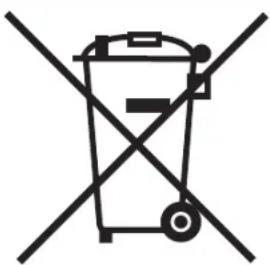
Environmental Regulations
Never leave packaging unsupervised. Separate the various packing materials by type, and take them to the nearest waste sorting station in your municipality.
We use non-polluting and therefore environmentally-friendly and recyclable materials for the packaging of our products. We ask for your cooperation in making sure that the packing materials are processed properly. Addresses for collection, recycling and processing centers are available at your dealer or the appropriate local institutions. Never simply dump packaging or parts of it. This could be a choking hazard for children, particularly the plastic bags. You are also responsible for proper processing of the old appliance.
Important: take the appliance to a local company authorized to collect discarded household appliances. With proper processing, valuable materials can be recycled in an intelligent fashion. Before you dispose of your appliance, it is important that you remove the door, and leave the racks in functional position in order to avoid children getting shut into the oven cavity while playing.
In addition, you should cut off the electrical power cord, and remove it together with the plug. The guidelines determine standards for collection and recycling of discarded appliances which apply to the entire European Union.
Cleaning Before First Use
It is recommended to thoroughly remove all packaging residue from the range cooker, followed by cleaning according to the guidelines. Before first use of the oven, you should heat the oven at full power for 30 minutes. An unpleasant scorching smell will develop during this initial heating. This is normal.
We recommend that you ventilate the kitchen area thoroughly during initial heating.
text_image
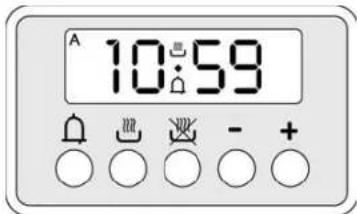
A 10:59Operating the Programmable LCD Clock
None of the oven functions will work before you have activated the clock on your Boretti. You will recognize this by a full blinking display. This might occur before first use, or following a power disturbance. Functions for ventilated gas ovens are different from multifunctional ovens. The programmable clock functions only work on ovens 60 and 80 cm wide. If you have a range cooker with 2 ovens, the clock will normally only work for the left-hand oven. When programming the oven, if the A blinks and an audio signal is heard, an error has occurred. Choose the manual function to override previous settings.
Setting the Correct Time
Adjust the digital clock by pressing on the buttons and using the + and - button at the same time. Set the correct time in this way.
Manual Function
You can activate the manual function by simultaneously pressing buttons and. The letter A will disappear, and a symbol showing a pan will appear. Any programs you set earlier will be canceled by this procedure.
Adjusting the Audio Signal
You can set the audio signal by pressing the - button until you hear a signal you like. Your range cooker will remember the setting chosen and will use the tone you selected from that moment on.
The Timer
Select the timer function by pressing the button and using the + and - buttons to determine the desired cook time. While the time
counts down, the clock symbol will remain lit up. When the cook time has ended, an audio signal will sound. When using this function, your oven must be switched off manually. If you want the oven to switch off automatically, you must use the pre-programmed baking function set to the desired cook time.
Pre-Programmed Baking
1. Pre-Programmed Baking Function with Cook Time
This function allows you to use the oven for a certain period of time, after which the oven will switch off. Press the button 🎨 and use the + and - buttons to set the desired cook time. The A symbol will appear in the display. Press the button 🔊, if you want to see at what time the oven will switch off. After the cook time has ended, the oven will switch off automatically and the audio signal will sound. The A will blink while the audio signal sounds. By pressing buttons 🎨 and 🎨 at the same time, you will cancel the preset program, and you can now use the manual function for the oven.
2. Programmed Baking Function with Preset Start and End Time
You can use this function to set both the start and end time for your oven. Press on the button and use the + and - buttons to set the cook time for your dish. An A will appear in the display. Next, press on the button and use the + and - buttons to set the end time. Then adjust the oven temperature and select the desired oven function. The oven will now switch on and off at your selected times. When the oven switches off, an audio signal will sound automatically. By pressing on the buttons and at the same time, you will cancel the preset program and you can now use the manual function for the oven.
Caution: Some dishes are perishable and cannot remain in an uncooled oven for an extended period of time.
Caution: Take preheating time into account when determining the cook time in using the automatic baking function with preset start and end times.
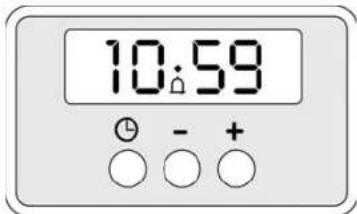
Operating the Programmable LCD Clock of a Gas Oven
Setting the Correct Time
Press on the button ⏻ once. Then immediately press on the + and - to adjust the minutes. Press on the button ⏻ again, and hold until the hour starts to blink. You can now use the + and - buttons to set the hour.
Setting the Timer
Press on the + and - buttons to set the desired cook time. A symbol ☐ will show in the display, indicating that the timer has been set. The display only indicates time left until the alarm sounds, current time will not be shown during this period. After the set time has passed, an alarm will sound that you can switch off by pressing on the button ⏻.
Adjusting the Audio Signal
You can adjust the audio signal by pressing the – button until you hear a tone you like. Your range cooker will remember the chosen setting and will use the tone you selected from then on.
NOTE: It may occur that your Boretti with gas oven has five buttons. In this case two buttons will have no function.
Operating the Programmable Analog Clock of a Gas Oven
If the small display (Fig. 2d) shows a "0", the child-proof lock has been activated for your oven, and therefore it cannot be used. If the hand symbol shows on the display (Fib 2d), the oven is set to manual. You can activate the manual function by turning the button (Fig. 2e) to the right, without pressing on it.
Setting the Correct Time
Press on the button and turn it to the right until the current time is shown. The time is shown by the hands shown in Figure 2a and 2b.
Manual Function
You can select the manual function by turning the button (Fig 2e) to the right until the hand is displayed (Fig. 2d). Using this function, you can set the desired temperature and oven function, and use the oven immediately.
Timer with Automatic Countdown
It is easy to set the desired cook time by turning the button (Fig. 2e) to the right, without pressing on it, until you see the desired cook time in the small display (Fig. 2d). Cook time can be set to a maximum of 180 minutes.
Next, choose the temperature and the oven function. After the selected cook time has ended, an audio signal will sound. The oven will switch off. You can switch off the audio signal by setting the button (2e) to manual.
Pre-Programmed Baking
1. Programmed Baking Function with Preset Start Time
In order to adjust the oven in such a way that it will switch on without switching off automatically after cook time has ended, you must follow these steps:
Turn the button (Fig 2e) to the right until "O" appears in the display (Fig. 2d). Carefully pull the button towards you, and turn it to the right until the hand (Fig. 2c) indicates your desired start time. Let go of the button, and now turn it to the right until the hand appears in the display. Now select the correct baking function and temperature.
Caution: When using this function, the oven must be switched off manually!
Caution: Some dishes are perishable and cannot remain in an uncooled oven for an extended period of time.
Caution: Take preheating time into account when determining the cook time for the automatic baking function with preset start and end times.
2. Programmed Baking Function with Preset Start and End Times
In order to adjust the oven in such a way that you can determine the end time before starting, follow these steps:
Turn the button (Fig 2e) to the right until "O" appears in the display (Fig. 2d). Carefully pull the button towards you, and turn it to the right until the hand (Fig. 2c) indicates your desired start time. Next, turn the button until the desired cook time appears in the display (Fig. 2d). Maximum adjustable cook time is 180 minutes. Now set the oven to desired oven function and adjust the temperature. Your oven will switch on at the time selected, and continue for the period set by you. After the cook time has ended, the oven will switch off automatically and an audio signal will sound. You can switch off the signal by turning the button to the right until the hand appears in the display.
text_image
12 11 1 C 10 2 E B 8 3 4 7 6 AFigure 2
natural_image
Circular mechanical dial with indicator lights and a pointer, no text or symbols presentcontrol knob: electric ovens 60 and 80 cm wide
natural_image
Close-up of a metallic circular mechanical knob or dial with no visible text or symbolscontrol knob: electric ovens 30 and 40 cm wide
Instructions for Oven Use
Descriptions of Various Oven Functions
Caution: Before using the gas oven, we refer you to the chapter "Using a Ventilated Gas Oven"
In order to make a selection from the following oven functions, turn the oven knob to the left until the function you want shows at the top. Then choose the temperature. Depending on the operating clock setting, the oven will start to preheat. See Chapter "Quick-Start" on page 86 for instructions about accelerated preheating.

Thaw Function
The thaw function will switch on the fan in the back of the oven so that an air stream will start flowing which will slightly speed up the thawing of your dish. This function cannot be compared with, for example, a microwave oven. You must also make sure that the oven is clean, because raw, unprocessed foods are being handled.

Convection Heating
The heat is supplied directly by the heating element mounted in the back of the oven around the fan. This adjustment is very suitable for baking or roasting a complete meal. It is possible to cook on several levels because of the circulating heat. Often convection heating is the most popular function of the oven.
Caution: This function is also called "intensive baking", because it is an effective way to cook. In many cases, this function will also reduce the cook time of a dish.

Circulation Grilling
The heat generated by the grilling element will be evenly distributed throughout the oven by the fan in the back of the oven. This is suitable for grilling such foods as pork chops, sausages, skewers, etc.
Caution: The oven door should be closed during grilling.

Grilling
Conventional grilling with the grilling element only. This is suitable for grilling such foods as chicken and roasts. It is also often used for cooking au gratin, or preparing deserts with caramelized sugar.
Caution: The oven door should be closed during grilling.

Top Heat
This should be used to slowly brown the top of a dish, but can also be used to cook a dish au gratin more slowly than when using the grill.

Bottom Heat
This function is very suitable for dishes that need to rise. It can be used in combination with the convection function. In other words, if the product has risen, it can continue to bake with the convection function. This function is also commonly used to prepare pizzas.

Top and Bottom Heat
A function that works like a conventional oven, but includes a top heating element. It can be used for all dishes that could also be prepared in a convection oven.

Lighting
The light in the oven will switch on as soon as you select any particular oven function. If you prefer to prepare a dish without using the oven light, turn the knob 1 posi-
tion up from your selection and then turn it back to the correct selection.
Caution: Ovens 60 and 80 cm wide are always multifunctional unless you ordered a ventilated gas model.
Caution: Ovens 30 and 40 cm wide are always conventional. These ovens offer grilling, top heat, bottom heat and top and bottom heat.
Quick-Start Function
The Quick-Start function is ideal for anyone who wants to preheat their 60 to 80 cm wide electric oven more quickly. You use the Quick-Start function by setting the oven control knob to "thaw" and adjusting the temperature to the desired setting. The oven will now use all available heat sources to reach the desired temperature. As soon as the oven has reached the correct temperature, the orange light will switch off. Then select the desired oven function.
Caution: The Quick-Start function can be used for selected end temperatures between 180 and 250^ . Any advantages at lower end temperatures are negligible. Never use the Quick-Start function for more than 30 minutes at a time.
Grill Oven
Some range cookers are fi tted with a separate grill oven. This grill oven actually works exactly like a regular one, but includes additional functions. The grill oven is standard fi tted with telescopic gliders which simplify putting the dish in and removing it. In order to catch juices or food spills, we recommend that the black drip pan included with your oven always be used.
Caution: The oven door should be closed when using the grill oven.
Using the Rotisserie
Place the item on the rotisserie. Use two meat clamps to make sure the meat is secure, and the weight is distributed evenly across the rotisserie. This will prevent the rotisserie motor from overheating. Place the rotisserie in its holder, and insert the end into the rotisserie motor opening. Select the grilling function, and set the desired cook time. Always place a drip pan beneath the dish.
Casing Cooling System
Every Boretti range cooker is fitted with a so-called casing cooling system. This ensures that the outside of the range cooker remains at an acceptable temperature. A sensor in the range cooker ensures that if the temperature becomes too high, the forced cooling switches on automatically. It may continue to cool even after the oven has been switched off. In part because of this system, it is possible to place a Boretti range cooker between kitchen cabinets.
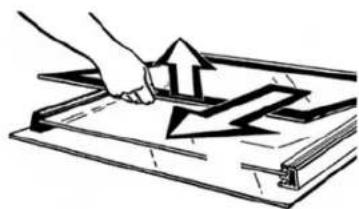
Dismantling the Oven Door
It is easy to remove the door from your Boretti range cooker. Please follow these instructions: Open the oven door completely. Move the fitted brackets to an upright position (Fig. 3a)
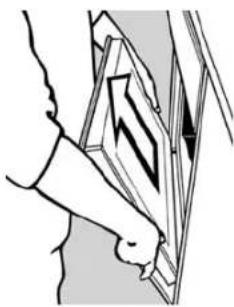
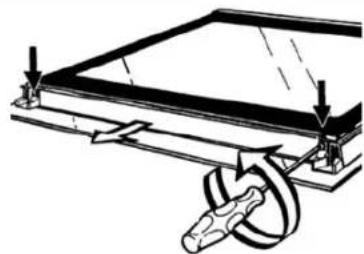
Close the door halfway. Without using force, pull the door slowly towards you (Fig. 4). Attaching the door is done in reverse order. However, you must make sure that the little slots underneath the bracket fi t onto the frame of the range cooker. This may take some practice.

natural_image
Completely black image with no visible content, text, or symbols.
text_image
AFigure 3
natural_image
Illustration of a person holding a folded paper or document with a lightning bolt symbol (no text or symbols present)Figure 4

natural_image
Technical diagram of a mechanical assembly with no visible text or symbolsFigure 5
Dismantling the Oven Glass Panel
In order to remove the glass panel from a Boretti oven door, take the following steps:
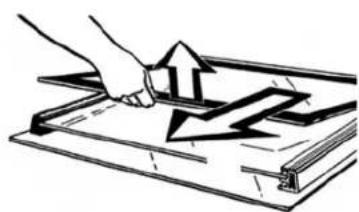
Remove the oven door according to the instructions above. Unscrew the two stainless steel screws (Fig. 5) at the top and the bottom of the glass panel, and gently remove the glass panel (Fig. 6). You can now clean it thoroughly. When you reinstall the panel, make sure that the stainless steel strips clamp the panel properly.
Cleaning the Oven Cavity(s)
Wait until the oven has cooled down completely, then clean it with lukewarm water and a mild cleaning agent. Never use knives, steel-wool pads or other abrasive products or objects for cleaning purposes. This might damage the fi nish on the inside of your oven. Make sure that food spills are removed after every cooking session, in order to prevent damage. An additional advantage of regular cleaning is that there will be fewer unpleasant odors the next time you use the oven.

natural_image
Hand using a tool to cut a black arrow on a wooden surface (no text or symbols)Figure 6
Removing the Inside Panels from the Oven
In order to remove the inside panels from the oven, follow these steps:
- open the oven door completely
- remove all racks and baking sheets from the oven cavity
There are two large screws that you can unscrew on the sides, after which the side panels can be easily removed.
Using the Built-In Thermometer
Some range cookers are fitted with a so-called built-in thermometer. When the oven is cold, insert the thermometer's probe into the dish, and the plug into a special connection that is on the left side of the oven (Fig. 7). Two values will appear on the display: The value on the left will indicate the temperature of the thermometer, and the value on the right will indicate the preset temperature, which can be adjusted using the + and - button on the control panel. When the preset temperature has been reached, the oven will switch off and you will be warned by an audio signal. You can switch the sound off by pressing on any button on the operating panel.
natural_image
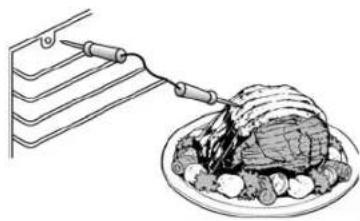
Illustration of a meat being cut with a skewer, showing a cut of meat on a plate (no text or symbols)Figure 7
Remove the thermometer from the connection after the oven has cooled down. Of course you can remove the probe from the dish earlier, so that the dish can be taken from the oven. The oven thermometer has a reach from 0 – 99°C.
Caution: insert the thermometer into the center of the dish, and avoid bones or fatty areas in order to achieve a more accurate reading.
See Page 95 for a cooking chart.
Pizza Stone
The Pizza Stone is made from select heat-resistant clay, which was baked at a temperature of 1320°C. The stone is resistant to damage from temperature changes, as well as being scratch and dust free. The special design with air channels keeps the weight down, and decreases preheating time. Heat is distributed evenly throughout the clay, so that the entire surface has the same temperature and your pizza will have the same temperature and color all over.
Place the pizza stone in the oven during preheating. As soon as the oven reaches its preset temperature, place the dish on the pizza stone. Use parchment paper so that the dish can easily be placed into, and removed from the oven. In addition, your pizza stone will not become soiled, so that you do not have to clean it.
The best way to clean it is by removing food spills with a spatula or knife. Place the stone back into the oven, and heat up the stone. Then clean it with a scrubbing pad, and rinse with warm water.
Caution: Do not use cleaning agents.
The pizza stone may discolor over time. This has no influence on the performance of the pizza stone.
natural_image
Gray rectangular object with a curved handle and a small hole, resembling a tray or scraper (no text or symbols visible)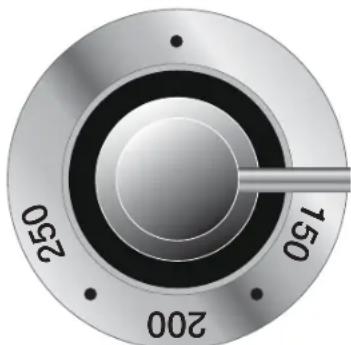
natural_image
Close-up of a metallic circular dial with concentric rings and a pointer, showing no text or symbols beyond measurement markings (0250, 150, 200).Figure 8
The Ventilated Gas Oven
Caution: An upright stainless steel strip will be provided with your range cooker. This absolutely must be installed on a ventilated gas range cooker in order to guarantee proper venting.
Ovens 60 and 80 cm wide can be purchased as ventilated gas ovens if this is technically possible (this is not an option for all models, and this choice can only be made on purchasing the range cooker). The advantage of a gas oven is that less moisture is extracted from the food, so that it is tastier. A disadvantage of the system is, however, that a number of functions can no longer be used due to a lack of electrical heating elements.
Igniting the Gas Oven
In order to light the gas burner in the oven, you must open the oven door completely, otherwise the spark ignition will not function. Next, press on the temperature control knob (Fig. 8) and set it to the desired temperature.
When the burner lights up, it may take 10 to 15 seconds before you can let go of the knob. This is related to the thermocouple, which is a safety feature of your Boretti. Leave the door open for another minute before closing it. You will not receive a visual warning that the gas oven has reached the correct temperature.
Here are a few useful tips for ensuring that the Boretti range cooker with ventilated gas oven has reached the correct temperature. If the oven is switched on, the burner will work at full power to reach the correct temperature as soon as possible. You will hear the usual hissing that is normal for a gas burner. When the correct temperature has been reached, the hissing will be noticeably less loud. You can barely hear the burner, or not at all. You can also look through the small holes in the bottom of the oven to see whether the burner
is burning at full power. The flame will become smaller when the correct temperature has been reached, because it switches to the lowest setting. It will take approximately 8 minutes for the oven to reach a temperature of 180^ C.
It is prohibited to close off the ventilation slots at the top back side of the appliance with a stainless steel wall, tiles, etc. You must use the stainless steel strip provided.
Gas Oven Grill
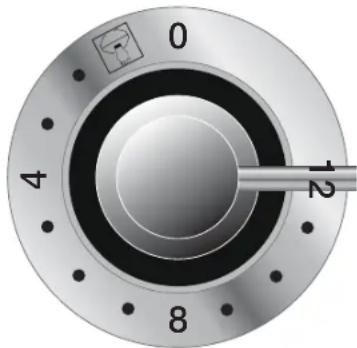
The gas oven grill can be used in the same way as in the electric oven. It is important to know that the grill will stop functioning as soon as the gas oven is operational. When switching on the grill, in contrast to switching on the oven, the door does not have to remain open for a full minute. Because the grill is electric (also in gas ovens) a separate control knob has been fitted with positions from 0 – 12. (Fig. 9)
Caution: The oven door should be closed when using the grill.
Gas Oven Fan
As soon as you switch on your gas oven or electric grill, you can switch on the fan in the back wall separately by turning the grill control knob (Fig. 9) past position 12. By switching the grill knob to the off position, the fan will be switched off. The advantage of switching on the fan is that there will be improved heat distribution throughout the oven, so that it will be easier to prepare multiple dishes in the ventilated gas oven. Please take into account that this is not the same as the convection function in the electric oven, and a substantial difference in temperature will remain inside the oven. The closer to the heat source (i.e. the gas burner or grill), the hotter it will be.
Caution: the grill will not work if the gas burner is on. It is therefore not possible to use the gas burner and grill at the same time.
Caution: When you use the gas burner together with the fan, you must switch both control knobs to the off position when the dish is done.
If you only switch off the oven burner, the grill element will become active.
text_image
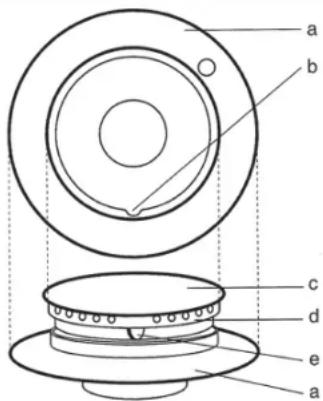
a b c d e aFigure 10
A) Aluminum base
B) Groove in base
C) Cast iron burner cap
D) Brass flame distributor ring
E) Ridge on the flame distributor ring
The Cooktop
General Information about Gas Burners
Always use pots and pans with a level and smooth bottom, which have the correct diameters for optimal results.
See the following chart for correct diameters:
Burner Diameter
Semi-rapid burner 14 tot 20 cm
Rapid burner 20 tot 24 cm
Wok burner 22 tot 28 cm *
Fish burner Ovale pan
*Applies to the bottom of the pan.
Boretti gas burners consist of three parts, namely the base (Fig. 10a), the brass flame distributor ring (Fig 10b) and the cap (Fig. 10c). There are two holes in the base, one of which is for the spark ignition, and the other for the thermocouple. The thermocouple safety system ensures that the gas flow is cut off as soon as the flame is extinguished by, for example, a draft. The thermocouple must be heated thoroughly before you can let go of the knob for the burner to remain on. If you release the knob too quickly, the burner will switch off because the thermocouple has been insufficiently heated.
After pressing the knob, you will hear the spark ignition click. It is now active for all burners. The speed with which the flame ignites depends on the position chosen. You can experiment until you have found the quickest way to light your stove. Once the flame is burning, keep the knob suppressed for at least 10 seconds in order to activate the thermocouple safety system. If you release the knob too quickly, the flame will extinguish.
Caution: It is very important for the brass flame distributor ring (Fig. 10d) to be positioned correctly on the base (Fig. 10a). You must verify that
the ridge on the brass flame distributor ring (Fig. 10e) is placed exactly in the groove (Fig. 10b) of the aluminum base. In addition, the burner must always be placed level to the surface in order to prevent discoloration.
Not all of the burners have the same capacity, and therefore result in different cook times. The least powerful burner (semi-rapid burner) is normally used for sauces, soups and braised dishes.
Based on the power of this burner, we recommend using a Boretti simmer plate.
Caution: When using the back burners, make sure the pots do not touch the wall or back surface, because the pots will become very hot and the wall might not be heat proof. Make sure there is always at least 2 cm of space between the wall and the pots.
Caution: Make sure that the handles and grips do not protrude, so that you will not bump into them accidentally and the pans fall from the cooking area.
Wok Burner
Boretti wok burners have 3 rings. Together these provide balanced power of 4.3 kW max. This power is more than enough to be able to stir fry in the proper manner. When lighting this burner, the outside ring will ignite first, after which the two inner rings will ignite. This is normal. Please take a shorter cook time into account because of the increased capacity of this burner.
Fry-top
The Fry Top is a multifunctional griddle on which an enormous range of dishes can be prepared. A DVD has been made about the Fry-Top so that you can discover exactly how it works, what the possibilities are, and how to clean it. This DVD can be watched as streaming video on the website, but will also be included with your range. If the DVD has inadvertently not been included, you can request a copy from Boretti.
Ignite the Fry-Top burner and select a low setting. After 8 – 10 minutes the Fry-Top is ready for use. Next, evenly spread a little oil on the griddle (never use butter on the Fry-Top) after which you can put the food directly onto the griddle. Frying will be slower on the Fry-Top, yet the dish will not start to simmer. Because the food is seared quickly, it loses less moisture.
Cleaning the Fry Top
When the food is ready, remove it from the Fry-Top and pour a little water onto the Fry-Top before leaving to enjoy your food. The water will soak any food residues, which you can then scrape off with the spatula included. It will make clean-up much easier. Beware of steam that will rise from the Fry-Top – it is hot! When the griddle has cooled down almost completely, spray on a little Fry-Top cleaner and scrub with the steel wool pad included. Finally, use a moist cloth and your Fry-Top will be like new. If necessary, use a soft scrubbing pad for the small nooks and crannies.
Coupe de Feu
The Coupe de Feu is made of solid cast iron, and allows one or more pots or pans to be placed directly onto the cooking surface. The plate is heated by a sub-surface gas burner. The plate will generate heat which is not too intense beneath the pan, and will distribute it evenly across the cooking surface. This makes it possible to cook a dish slowly. This is especially useful for dishes like sauces and braised dishes. Light the burner approximately 5 minutes before use, so that the cast iron plate will have plenty of time to heat up. The same amount of time is needed for the plate to cool down. The middle of the Coupe de Feu is hottest, and the edges will be cooler. If you require a more intense heat, you can also choose to remove one or more rings. Without constantly needing to adjust the knob, this allows you to determine the amount of heat generated.
Caution: It is normal that the Coupe de Feu will show a little surface rust after time. We recommend regularly rubbing the Coupe de Feu with a little oil to prevent this. The rings, or any other cast iron parts, should never be cleaned in the dishwasher.

natural_image
Completely black image with no visible content, text, or symbols.
natural_image
Person in protective gear handling a large cylindrical object on a gas stove (no visible text or symbols)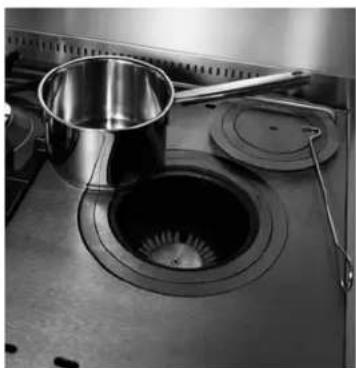
natural_image
Interior view of a kitchen with a metal bowl, stove, and pipe (no visible text or symbols)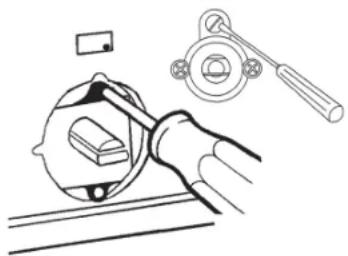
natural_image
Illustration of a hand using a tool to adjust a mechanical component (no text or symbols present)Figure 11
Adjusting the Gas Burners
You can easily adjust or trim the gas burners yourself. You can do this if, for example, if the range has been converted to another type of gas, or you would like stronger or weaker gas flow. Ignite one burner at a time, and switch to the lowest position. Pull out the knob of the burner in question, and place a small screwdriver in the opening just above the pin of the knob (Fig. 11). Right above the pin, you will see a small brass screw which you will use to adjust the gas flow. Turn to the left for a higher flame, and to right for a lower one.
Cast Iron Grill Plate
The cast iron grill plate is ideal for roasting meat. Position the grill plate on one of the burner grates which is suitable for your type of grill plate, and switch on the burner. After about 10 minutes the grill plate will be thoroughly heated and ready for use. It is best to clean the grill plate with some suds and hot water.
Cleaning the Cooktop
Aluminum Burner Base
The aluminum bases (Fig. 10a) will lose their original sheen after use. This is normal. The aluminum burner bases can be cleaned with a scrubbing pad.
Brass Flame Distributor Ring
The brass flame distributors (Fig. 10d) will normally discolor slightly after use. The flame distributor rings can be cleaned with a scrubbing pad.
Burner Grates and Burner
The cast iron burner grates and caps can also discolor slightly after use. It is best to clean them with a mild detergent and brush. After cleaning, make sure to dry the parts very carefully to prevent rusting. The cast iron parts can be treated with oil occasionally.
Drip Tray
The range cooker drip tray must never be scrubbed. It is best to clean it with a mild detergent and cloth. Avoid excessive water use near the white spark ignition of the gas burners.
Caution: never clean individual range cooker parts in the dishwasher.
The Ceramic Cooktop
The ceramic zones are controlled by knobs with 13 positions. In "O" position, the zone is switched off. The ceramic zone is activated as soon as a position between 1 – 12 is selected. If you select a position, the zone will emanate a red glow and emit heat to both the pan as well as the ceramic glass.
Some zones have an extension zone. This can be activated by turning the knob related to the zone in question past 12. By turning the knob past 12 again, the extension zone will be switched off.
There is a residual heat indicator lamp for each zone, which indicates that the zone is hot. The lamp will continue to burn as long as the zone is hot, even after it has been switched off.
Important instructions:
Do not leave the cooking zones switched on if no pot or pan is on them. Avoid temperature changes to the glass ceramic cooktop. For example, do not pour cold water on a hot cooktop. Make sure the pan completely covers the cook zone, and that it is in the middle of the zone.
Avoid contact between sugar, synthetic fabrics or aluminum foil and the hot glass plate. These materials could cause damage to the vitroceramic surface, or even cause it to crack: switch off the appliance and remove these from the surface immediately (warning: risk of burn injuries!)
You can clean the ceramic cooktop just like any other glassware, with a soft and moist cloth. There are special cleaning agents for ceramic glass plates.
Chart for Built-In Thermometer
Dish Core Temperature
| BeefBeefRare 40-45 °CMedium 50-55 °CWell-done 60-65 °CRoast 80-85 °C |
| Pork | |
| Fillet 65-70 °C | |
| Roast 80-85 °C | |
| Chops 75-80 °C | |
| Marinated chops 65-70 °C | |
| Meatloaf 70-75 °C |
| VealRoast | 70-75 °C |
| Hare | ||
| Saddle | 60-70 °C | |
| Saddle filet | ||
| Rare 40-45 °C | ||
| Medium 50-55 °C | ||
| Well-done 60-65 °C | ||
| LambLeg 80-85 °C |
| PoultryVarious | 70-75 °C |
| Fish | ||
| Fish | 70-80 °C |
Caution: Insert the probe of the oven thermometer into the center of the dish, and avoid bones or any fatty areas in order to get an exact reading.
Troubleshooting
Electric oven:
| Malfunction Possible Cause Solution | ||
| The (large) oven does not work. | The clock has not been set to manual. | Set the clock to manual; see chapters about operating digital/analog clocks. |
| Neither oven works. | One or more screws in the connector block have not been suffi ciently tightened. | Open the connection block and tighten all screws. |
Gas Oven:
| Malfunction Possible Cause Solution | ||
| The spark ignition is not working. | The door has not been opened completely. | Open the door completely. |
| The burner is diffi cult or impossible to light. | The spark ignitor is dirty or dusty. | Clean the spark plug with a cloth. |
| The burner switches off when the door is closed. | Because of air movement, the fl ames near the thermocouple have been temporarily extinguished. | Leave the door open for at least a minute so that the thermocouple has been suffi ciently heated. |
| The oven switches off after about 10 minutes. | The lowest position has not been set properly. | Contact technical service. |
| The grill does not work. | The gas burner knob has not been switched to off. | Turn the gas burner knob to the off position. |
Gas Burner:
| Malfunction Possible Cause Solution | ||
| When I push on 1 knob, all of the spark plugs ignite. | This is normal. | Not applicable. |
| The burner is diffi cult or impossible to ignite. | The spark ignitor is dusty or dirty. | Clean the spark plug with a cloth. |
| The burner is diffi cult or impossible to ignite. | The fl ame distributor ring has not been placed in the base properly. | Position the fl ame distributor in such a way that it can no longer turn and is attached to the base. |
| The burner is diffi cult or impossible to ignite. | The base is not level. | Replace the base and make sure it is level. |
| Malfunction Possible Cause Solution | ||
| The burner switches off as soon as the knob is released. | The thermocouple is not hot enough. | After the fl ame has been lit, keep the knob fi rmly pressed down for another 8 to 10 seconds. |
| The burner switches off as soon as the knob is released after 10 seconds. | The knob has not been pushed down far enough. | Try again, and keep the knob fi rmly pressed down. |
| The burner switches off in the lowest position. | The lowest position has been adjusted too low, so that the thermocouple is not hot enough. | Set the lowest setting a little higher, see section about adjusting the lowest position. |
| The spark ignition keeps clicking. | The ignition switch is wet (because of food spills or cleaning). | The ignition will continue to click until all the moisture has dried up. This is not harmful, but it is annoying. In order to have the switch dry more quickly, it will help to switch on the oven to its highest temperature. |
Ceramic Cooktop:
| Malfunction Possible Cause Solution | ||
| Half of the zones do not work. | One of the groups has not been connected properly. | Check the connection and tighten the screws. |
| Half of the zones do not work. | Something is wrong with one of the fuses. | Replace the fuse in question in the fuse box. |
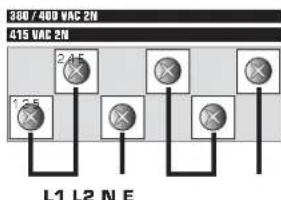
Connection Diagrams
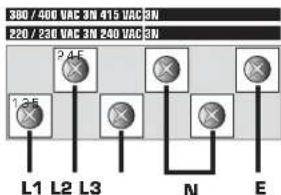
Caution: You must comply with local codes and ordinances. Always have your range cooker installed by a qualified technician. Boretti is not liable for malfunctions or damage as a result of incorrect installation.
flowchart
graph TD
    A["1"] --> B["×"]
    C["2"] --> D["×"]
    E["3"] --> F["×"]
    G["4"] --> H["×"]
    I["5"] --> J["×"]
    B --> K["L1 N E"]
    D --> K
    F --> K
    H --> K
    J --> K
flowchart
graph TD
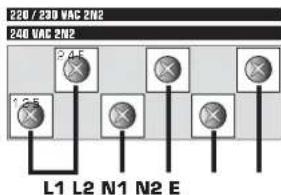
A["240 VAC 2N2"] --> B["L1 L2 N1 N2 E"]
A --> C["×"]
A --> D["×"]
A --> E["×"]
A --> F["×"]
A --> G["×"]
A --> H["×"]
A --> I["×"]
A --> J["×"]
text_image
300 / 400 VAC 3N 415 VAC 3N 220 / 230 VAC 3N 240 VAC 3N L1 L2 L3 N E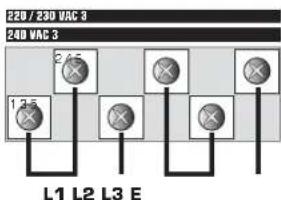
flowchart
graph TD
    A["220 / 230 VAC 3"] --> B["1"]
    A --> C["2"]
    A --> D["2"]
    A --> E["×"]
    A --> F["×"]
    A --> G["×"]
    H["240 VAC 3"] --> I["1"]
    H --> J["2"]
    H --> K["×"]
    H --> L["×"]
    H --> M["×"]
    N["L1"] --> O["×"]
    P["L2"] --> Q["×"]
    R["L3"] --> S["×"]
    T["E"] --> U["×"]

flowchart
graph TD
    A["2.5"] --> B["L1"]
    C["3.5"] --> D["L2"]
    E["4.5"] --> F["E"]
    style A fill:#f9f,stroke:#333
    style C fill:#f9f,stroke:#333
    style E fill:#f9f,stroke:#333
    style B fill:#ccf,stroke:#333
    style D fill:#ccf,stroke:#333
    style F fill:#ccf,stroke:#333
Power and Values
NL
| Burner | Semi-rapid | Rapid | Wok | Fish | Coup de Feu | Gas Oven 60 | Gas Oven 90 |
| Nominal Capacity (kW) | 1,80 | 2,60 | 4,30 | 3,10 | 2,60 | 2,50 | 3,50 |
| Minimum flow rate (kW) | 0,60 | 0,62 | 1,70 | 1,00 | 0,62 | 0,90 | 1,30 |
| Diameter (spray nozzle) | Semi-rapid | Rapid | Wok | Fish | Coup de Feu | Gas Oven 60 | Gas Oven 90 |
| G25 - 25 mbar | 0,97 | 1,23 | 1,55 | 1,35 | 1,23 | 1,17 | 1,50 |
| G30 / G31 - 30 mbar | 0,62 | 0,78 | 1,00 | 0,82 | 0,78 | 0,75 | 0,90 |
BE
| Burner | Semi-rapid | Rapid | Wok | Fish | Coup de Feu | Gas Oven 60 | Gas Oven 90 |
| Nominal Capacity (kW) | 1,80 | 2,60 | 4,30 | 3,10 | 2,60 | 2,50 | 3,50 |
| Minimum flow rate (kW) | 0,60 | 0,62 | 1,70 | 1,00 | 0,62 | 0,90 | 1,30 |
| Diameter (spray nozzle) | Semi-rapid | Rapid | Wok | Fish | Coup de Feu | Gas Oven 60 | Gas Oven 90 |
| G25 - 25 mbar | 0,97 | 1,17 | 1,50 | 1,30 | 1,17 | 1,17 | 1,40 |
| G30 / G31 - 30 mbar - 28...30/37 mbar | 0,62 | 0,78 | 1,00 | 0,82 | 0,78 | 0,75 | 0,90 |
ES
| Burner | Semi-rapid | Rapid | Wok | Fish | Coup de Feu | Gas Oven 60 | Gas Oven 90 |
| Nominal Capacity (kW) | 1,80 | 2,60 | 4,30 | 3,10 | 2,60 | 2,50 | 3,50 |
| Minimum flow rate (kW) | 0,60 | 0,62 | 1,70 | 1,00 | 0,62 | 0,90 | 1,30 |
| Diameter (spray nozzle) | Semi-rapid | Rapid | Wok | Fish | Coup de Feu | Gas Oven 60 | Gas Oven 90 |
| G25 - 25 mbar | 0,97 | 1,17 | 1,50 | 1,30 | 1,17 | 1,17 | 1,40 |
| G30 / G31 - 30 mbar - 28...30/37 mbar | 0,62 | 0,78 | 1,00 | 0,82 | 0,78 | 0,75 | 0,90 |

natural_image
Close-up of a metallic mechanical component with flanges and central hub (no visible text or symbols)