Barista - Coffee machine BORETTI - Free user manual and instructions
Find the device manual for free Barista BORETTI in PDF.
User questions about Barista BORETTI
0 question about this device. Answer the ones you know or ask your own.
Ask a new question about this device
Download the instructions for your Coffee machine in PDF format for free! Find your manual Barista - BORETTI and take your electronic device back in hand. On this page are published all the documents necessary for the use of your device. Barista by BORETTI.
USER MANUAL Barista BORETTI
natural_image
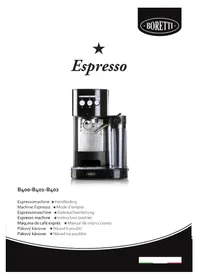
Exterior view of a modern BORETTO espresso machine (no visible text or symbols on the device body)VOORWOORD
WAARSCHUWING: Oppervlak is heet.
natural_image
Symbol of a trash bin crossed with no text or numbers, indicating no waste or discharge (no text present)Problemen oplossen
Description technique 21
Installation 22
Description technique
Installation et raccordement
text_image
Prohibition sign showing a trash bin crossed with a diagonal line and a horizontal bar below, indicating no waste or discharge.The Barista espresso machine was developed in response to the increasing demand from those who wish to enjoy the enticing aroma and taste of a freshly-made espresso or cappuccino but for whom a traditional machine would be too bulky or expensive to have at home.
The machine has a built-in water tank and therefore does not need to be connected to a water pipe. The water in the tank is electronically regulated. The machine can easily be reset in order to prevent problems due to incorrect use.
The cost-effective quality and reliability of the components, sturdy materials and user-friendly controls guarantee a top-class espresso.
We hope you enjoy your Barista espresso machine.
Boretti
Contents
Important Information
Regarding This Handbook 46
Important Information for the User 46
Description of External Components 48
Description of Technical Components 49
Installation 50
Coffee Dosage Setting 52
Brewing (Espresso) Coffee 53
Using the Steam Wand 54
Maintenance 55
Technical Data 55
Environmental Regulations 55
Troubleshooting 56
Warranty Conditions 57
Important Information Regarding This Handbook
We recommend that you read this handbook carefully. It contains important information about correct installation, use and maintenance of the machine. Keep this handbook in a safe place so that you can consult it at any time if necessary. It must always be available for those who use the machine and for service technicians. The technicians must be informed if the machine is being used in a manner other than as intended or if there are any other risks.
The instructions in this handbook are in no way a substitute for the safety instructions and technical data on the machine or the packaging concerning the installation and functioning of the machine.
This handbook is an essential part of the machine. In the event of loss, you can request a new copy from your supplier or from Boretti.
This handbook contains the current manufacturing requirements. These may be changed in the future.
Boretti is free to modify this handbook without updating previous editions except in exceptional cases.
This machine is to be operated according to the instructions in the handbook by a responsible adult, installation technician and/or service technician.
Boretti is not liable for any damage caused by incorrect or improper use and maintenance. Boretti accepts no liability for damage to persons or objects caused by incorrect installation.
Important Information Regarding Use of the Barista
This machine is designed for the sole purpose of preparing coffee, hot water and steam for hot drinks. All other uses are incorrect and, therefore, dangerous. This machine is designed for domestic use.
The machine consists of non-toxic, durable components which are easily accessible for cleaning and maintenance. The end user must be an adult, sufficiently trained to operate the appliance properly. This excludes use by children or non-responsible persons.
To ensure efficient and correct operation it is essential to follow the manufacturer's instructions concerning the periodic maintenance carried out by authorized technicians in compliance with local standards and laws. The installation technician, the user and the person in charge of maintenance are obligated to inform the manufacturer of any defects or damage which could negatively affect the safety of the original installation.
The installation technician must check the surrounding area to ensure that safe and hygienic use are guaranteed.
The user is responsible for personal use of the machine. Do not expose the machine to environmental elements (direct sunlight, rain, etc.)
When the machine is not in use for an extended period of time, it should be emptied completely and stored in an area with a temperature that is above freezing ( 0^ C or 32^ F). This will prevent any possible damage to pipes and the boiler. All maintenance procedures must be carried out exclusively by authorized technicians and all spare parts must be original parts.
Any modifications to or opening of the machine performed by persons not authorized by the manufacturer will void all warranties covering the machine. The motor-pump must be positioned far from hydraulic pipes, heat sources, and electrical appliances unless it is protected by a water-resistant, ventilated enclosure.
Never pull the power supply cord.
Never use cleaning products of any sort to clean the inside of the machine.
To reduce the risk of electrical shock, avoid operating the machine with wet hands or feet and do not operate the machine barefoot. The machine must be connected to a grounded power outlet.
The coffee delivery group, the spout and the steam and hot water wands may not be touched when the machine is on. They are hot and could cause burns.
Never operate the machine without water.
The machine must be operated with clean water. The machine includes a water filter that purifies the water and rids it of mineral deposits, significantly increasing the machine's life span. If you do not use this filter the warranty will become void! Ensure that the water filter is replaced or cleaned every two months. You can obtain new filters from your supplier or from Boretti. If this instruction is not followed the warranty will become void!
Mineral deposits may obstruct the machine's water supply, which may cause damage to the machine and possibly personal injury. It is therefore very important that the water filter is replaced or cleaned in a timely manner. You can clean the filter by placing it in a salt bath. You can clean the filter a maximum of four times, after which you will have to replace it with a new one.
The machine may only be filled with drinking water.
The machine has to be switched off whenever it is left unattended by the operator.
Dry tea and coffee cups carefully before placing them on the cup-tray.
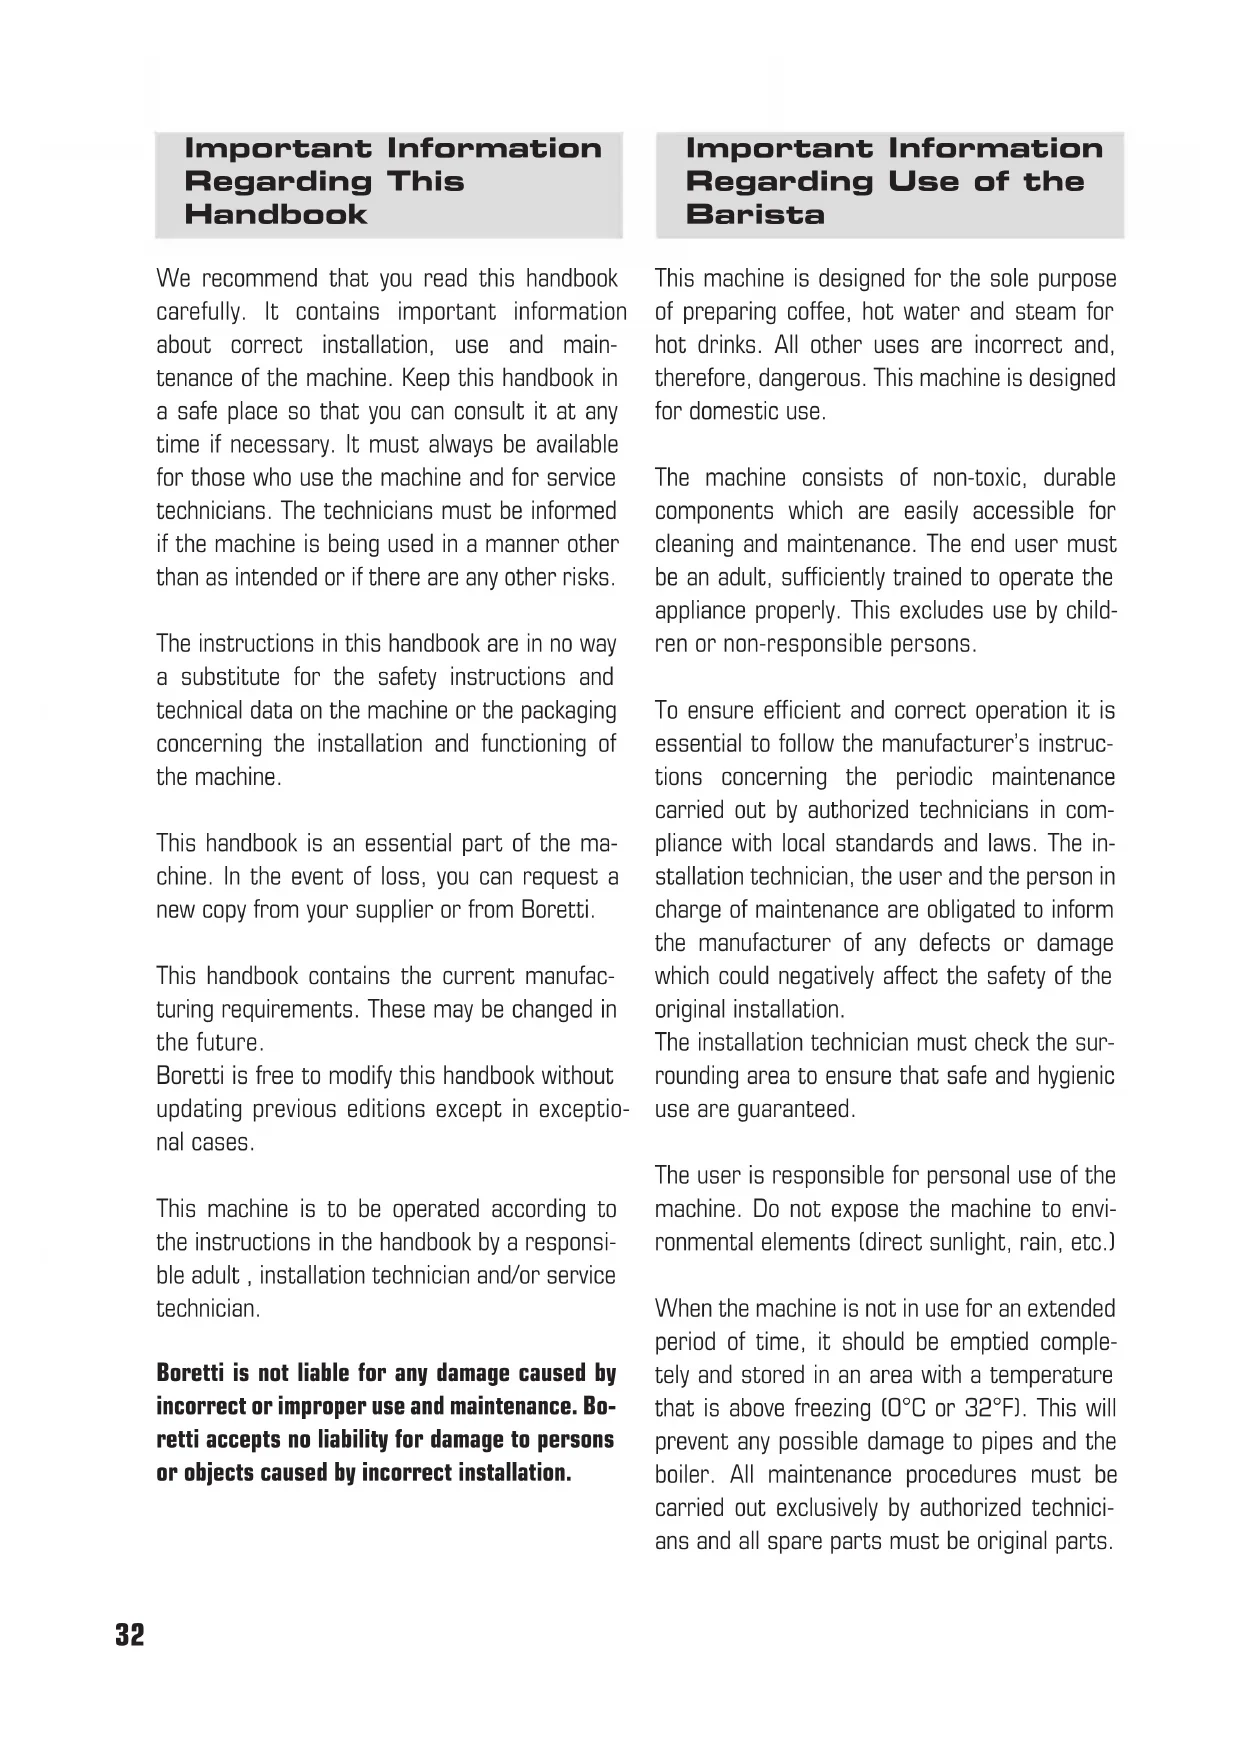
Description of External Components
No. Description
1 Heated cup-tray
2Warninglights
3 Hot water wand control knob
4 Touch-pad for coffee delivery control
5 Hot water wand
6 Coffee delivery group
7 Filter holder
8 Adjustable rubber feet
9 Drip tray with grid
No. Description
10 Removable catch basin
11 Steam wand
12 Pilot lights
13 Main switch
14 Coffee delivery and drainage solenoid valve
15 Pressure gauge for boiler
16 Steam wand control knob
17 Water tank (underneath cup-tray)
text_image
17 1 2 3 4 5 6 16 15 14 13 7 12 BORETTI Fig. 1 10 911 8Technical Description
The main components of the Barista are the following:
Boiler:
Contains hot water and steam. Water needed to brew coffee is not taken from the boiler but from the heat exchanger (see below).
Coffee Delivery Group and Heat Exchanger: This is the component where the filter holder is inserted. The hot water goes to the delivery group. This is where the pre-infusion, infusion and brewing process of the coffee begins. The heat exchanger is located inside the boiler and its purpose is to heat up the fresh water coming from the internal tank to the correct temperature.
Heating Source:
An electric heater heats the water in the boiler.
Electric Pump:
This component is used to increase the water pressure to the correct water pressure needed for espresso coffee preparation, which is 9 bar.
Steam Valve and Wand:
This valve delivers hot steam for milk frothing as well as for heating water and other drinks (cocoa, tea...).
Hot Water Faucet:
This faucet delivers hot water to prepare hot drinks such as tea, cocoa, etc..
- Pressure gauge - Indicates the boiler pressure.
- Pressure switch - This is used to keep the water boiler temperature constant by controlling the heating elements based on the boiler pressure.
- Electronic Control Unit (ECU): Electronic circuitry used to monitor and control the internal tank water level, as well as to adjust the delivery quantities automatically via the programmable touch-pad.

Control and Monitoring Devices:
Installation
Installation Warning
PLEASE READ CAREFULLY
The manufacturer has tried too foresee all possible safety provisions to ensure the safety of the users. However, different installation or equipment relocation conditions can cause situations which cannot be controlled or foreseen. Therefore, it is absolutely necessary to evaluate all remaining risks and to heed the following suggestions:
- This machine is safe only if appropriately connected to an efficient grounding system complying with the applicable safety standards in the country where the machine will be installed. The manufacturer assumes no liability for accidents due to non-compliance with the above-mentioned standards, since incorrect installation may result in injury to persons and animals as well as damage to property. This appliance must always be directly connected to the power supply and the use of extension cords or loose connections is strictly forbidden.
- Do not leave packing items such as plastic bags, Styrofoam, nails, etc. lying around, because children or other people could get hurt. All defects and discrepancies must be immediately reported to the persons authorized for installation and maintenance of the machine.
-
If the power supply cord is damaged it must be replaced immediately and solely by service staff qualified or authorized by the manufacturer in order to prevent danger to people, animals and property.
-
Check the integrity of all components and do not install defective or damaged parts. Ask for replacement of any defective or damaged parts.
- Check and verify that the power outlet supply voltage is the same shown on the rating-plate of the appliance. This is located underneath the removable catch basin.
- The customer has to protect the power outlet used for the machine by means of a safety switch system (against overload) that complies with the applicable standards and laws.
- Installation of the included water softener is mandatory. If the softener is not used the warranty will become void.
- The machine may not be placed in the direct vicinity of a heat source such as an oven or hot plate.
- When installing the machine, a multipolar main switch that has contacts with intervals equivalent to or greater than 3 mm should be connected, as stipulated by the safety standards. Any unreliable cable connection is not permitted.
- The machine must be placed on a flat and stable surface, leaving a minimum clearance of 30 mm from walls.
- The machine may only be used in combination with the included water filter.
Placement and Connection
Remove the machine from its packaging, fill up the internal water tank and connect the machine to an appropriate power outlet through the power supply cord.
The installation procedure must be performed in accordance with the local electrical and safety regulations of the country where the machine is being used.
The correct placement and installation procedure for the machine is described below (see fig. 1):
Remove the cup-tray (01) or hold it by the edges and slide it forward until you can get to the top opening of the internal water tank below (17).
Fill up the water tank with (approximately) 3 liters of drinking water and place the included water filter into the tank.
After 5 minutes connect the thin hose to the water filter. Make sure to connect the hose while the filter is still inside the tray with water in order to prevent it from emptying.
Place the cup-tray back to its original position.
Set the main switch (13) to the "ON" position and verify that the built-in pilot light is lit, thus indicating that the machine's electrical circuits are being supplied with power.
You will hear the boiler being filled and heated automatically. Wait until the boiler's manometer (15) indicates 1.2 bar (approx. after 15 min.).
Open the steam valve (16) for a few seconds and then close it again.
Wait until the correct working pressure has been attained again; the machine is now ready for use.
ALARMS
If the internal water tank remains empty, all of the machine's functions will be automatically blocked by the Electronic Control Unit (ECU) in order to prevent damage to the heating element. This will be indicated by flashing LED warning lights (02) located on the touch-pad (04).
If this occurs you must first turn the machine off. Subsequently control whether the water tank is filled.
If the tank is filled it is possible that there is still too much air in the water filter. Disconnect the filter and immerse the filter into the water tank again for 5 minutes. Then reconnect the filter as described above.
To reset normal working conditions, turn the main switch (13) to "OFF" first, then repeat the procedure described above.
IMPORTANT NOTICE!!!
All refill and cleaning procedures must be carried out with the machine disconnected from the power outlet.
The manufacturer accepts no liability for injury and damage to persons or property caused by incorrect installation and/or use of the machine.
Coffee Dosage Setting
See also Fig. 02 below:
-
Prepare and fill the filter holder with approximately 7 grams of ground coffee and attach the filter to the delivery group. Place the appropriate cup(s) underneath the filter holder spout(s).
-
Push and hold down the "star" key (5) for few seconds until all LEDs on the touchpad switch ON to access the programming mode.
-
Push the key related to the selected dosage: the relevant LED switches ON.
-
Push the same key again when the correct quantity of coffee has been reached: the relevant LED switches OFF.
-
Repeat steps 2, 3 and 4 for setting the dosage of the remaining dosage keys.
Note:
Programming the keys has to be completed within 10 seconds (per key), otherwise the programming mode will automatically switch OFF.
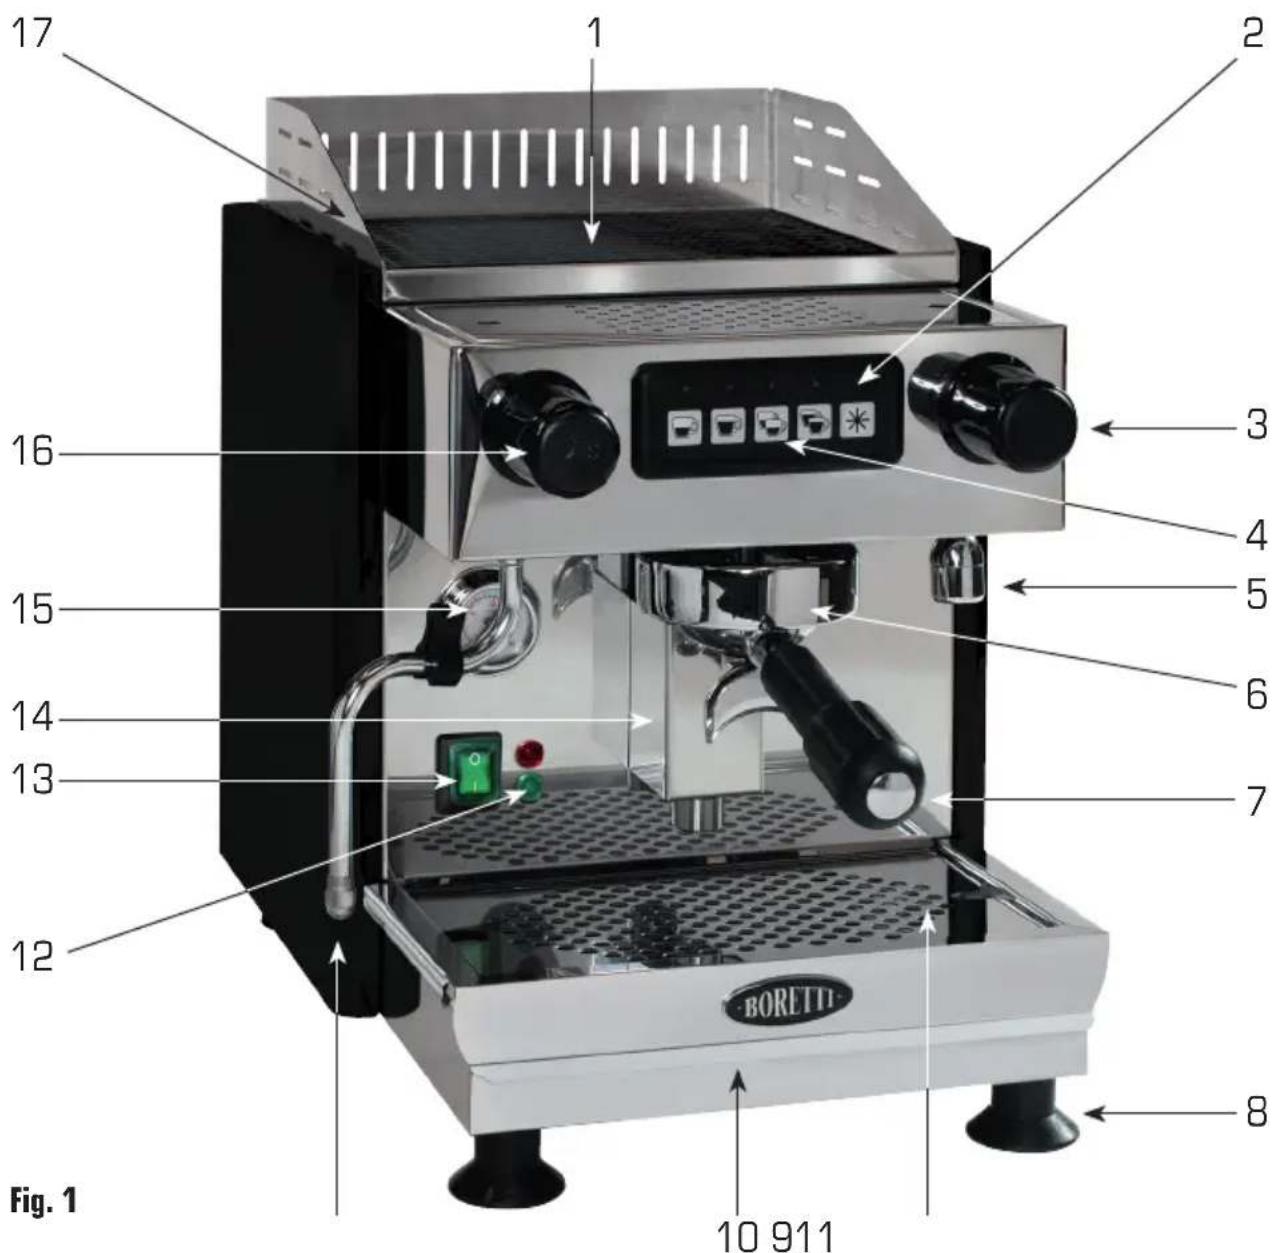
No. Description
1 Automatic dosage for espresso, single cup
2 Automatic dosage for large coffee, single cup
3 Automatic dosage for espresso, 2 cups
4 Automatic dosage for small coffee, 2 cups
5 "Star" key
text_image
1 2 3 4 5Fig. 2
Brewing (Espresso) Coffee
Brewing a Single Espresso Cup:
-
Fill the filter holder with one spout with approximately 6-8 grams of ground coffee.
-
Press the coffee down.
-
Remove any ground-coffee overflows from the filter holder surface.
-
Insert the filter holder into the delivery group; turn the handle towards the left to enable insertion, then turn the holder handle towards the right until it locks into place. Make sure that you turn the holder firmly and that the holder is solidly in place.
-
Place an empty cup underneath the filter holder spout.
6a. For automatic dosing press touch-key 1 or 3 on the touch-pad (fig. 2). The coffee will come out of the spout and stop automatically.
6b. For manual dosing press the "star" key on the right side of the touch-pad and wait until the coffee comes out of the spout. Once you have attained the desired quantity press the "star" key once more.
- When the coffee brewing procedure is completed, remove the filter holder and throw away the coffee dregs.
Brewing 2 Cups:
-
Fill the filter holder with two spouts with approximately 12-16 grams of ground coffee. 2. Press the coffee down by using the press available in the dosing grinder.
-
Remove any ground-coffee overflows from the filter holder surface.
-
Insert the filter holder into the delivery group; turn the handle towards the left to enable insertion, then turn the holder handle towards the right until it locks into place. Make sure that you turn the holder firmly and that the holder is solidly in place.
-
Place two empty cups underneath the filter holder spouts.
6a. For automatic dosing press touch-key 2 or 4 on the touch-pad (fig. 2). The coffee will come out of the spout and stop automatically.
6b. For manual dosing press the "star" key on the right side of the touch-pad and wait until the coffee comes out of the spouts. Once you have attained the desired quantity press the "star" key once more.
- When the coffee brewing procedure is completed, remove the filter holder and throw away the coffee dregs.
Using Coffee Pads:
The Barista can also be used with coffee pads. If you use coffee pads, replace the filters in the filter holders with the included coffee pad filters. Proceed as follows to replace the filter:
-
Place a small flat screwdriver between the filter and the filter holder and raise the filter.
-
Remove the filter from the filter holder.
-
Place the desired filter into the filter holder and click it firmly into place.
Using the Steam Wand
Making Steam
To make steam for warm drinks, place the correct wand into the pitcher that contains the drinks to be heated. Turn the knob in a counterclockwise direction and heat the drink to the required temperature.
WARNING: Although the boiler is fitted with a vacuum-release valve, always open the steam valve before introducing it into the drink to be heated to prevent possible back flows inside the boiler.
Milk Frothing
Due to the Barista's limited steam capacity (compared to the bigger units), the steam wand is fitted with a smaller four-hole steam tip to extend the steaming time rather than the steaming flow-rate.
In this way, the machine's heating element can produce faster steam pressure recovery. A few basic rules:
- Always use whole milk.
- Milk should always be cold (just taken out of the fridge).
- The steam tip should be placed in the milk approximately 1-2 cm deep.
- The steam arm should be tilted in such a way that the steam wand moves in circles in the milk while taking in some air from the top.
- The steam valve knob should be opened proportionally to the amount of frothing required.
WARNING: Risk of burns!
Handle holders and containers with care when steaming drinks.
Hot Water Preparation
To prepare hot water in a pitcher, pot or cup, rotate the knob of the hot water wand in a counter-clockwise direction until you have attained the requested quantity.
WARNING: Risk of burns!
Keep hands away from areas covered by the hot water outlet. Use the relevant control knob only after the drink container has been appropriately placed on the drip-tray (12).
Maintenance
Manufacturer-recommended cleaning procedures to be performed at the end of each workday:
- Clean the seal of the coffee delivery group with a soft brush.
- Rinse the filter basket and filter holder with warm water and add a special cleaning product that is suitable for daily cleaning of coffee machines.
- Place the filter holder complete with the closed filter onto the coffee delivery group.
- Press the "star" key for coffee delivery. Unscrew the filter holder slightly until water flows along the edges. Push the "star" key again after 15 seconds. Remove the filter holder and take out the closed filter.
- Clean the drip-tray regularly and empty the catch basin so that the catch basin does not overflow.
- Clean the cup-tray with a soft cloth.
- Clean the steam wand and spout thoroughly with a non-abrasive, damp cloth immediately after each use to prevent clogging of the steam holes and to keep the taste of previously steamed drinks from lingering. Do it without touching the wand directly. WARNING: The surface is hot.
Manufacturer-recommended weekly cleaning procedures:
-
The delivery group and the spray plates must be cleaned with a cleaning product that is specially formulated for espresso machines and that is suitable for periodic cleaning. Place one teaspoon of the cleaning product into the closed filter and then into the delivery group.
-
Push the "star" key and wait about 30 seconds. Press the "star" key once more to stop and allow the cleaning product to work.
-
After the product has been left for 30 seconds press the "star" key again. Unscrew
the filter holder slightly until water flows along the edges. Push the "star" key again after 30 seconds.
- Remove the filter holder and continue cleaning. Finally, brew one cup of coffee to remove any residual detergent taste.
Technical Data
Dimensions: 320(W) x 450(D) x 430(H) mm Net weight: 35 kg
Power supply voltage: 230V 1-phase - 50 Hz
Environmental Regulations
Should you wish to discard the machine for any reason, please comply with the following: Take the machine to the local authorized company that collects discarded household appliances. Correct processing enable valuable materials to be recycled in an intelligent manner. Before discarding your machine it is important that you cut off the power supply cord and remove it together with the plug. This machine has been accorded the appropriate mark in accordance with European Directive 2002/96EG regarding discarded electric and electronic equipment. This directive determines the standards for the collection and recycling of discarded equipment that apply to the entire territory of the European Union.
natural_image
Symbol of a trash bin crossed with no text or numbers, representing waste sorting or restriction (no text present)
Troubleshooting
| Problem Cause Solution | ||
| The appliance won't switch ON | Main switch is OFF | Set main switch in ON |
| Machine switch is OFF | Set machine switch to ON | |
| Wrong connection to power supply | Contact a service technician for maintenance | |
| Delivery group doesn't make enough coffee | Water tank is empty | Refill the water tank |
| Pump failure | Contact service technician | |
| Clogged wand | Clean the wand | |
| Electronic control unit failure | Contact service technician | |
| Delivery group valve failure | Contact service technician | |
| Coffee dregs are wet | Coffee grinding is too fine | Adjust grinding level |
| Delivery group is not at the correct temperature | Wait for the machine to reach the correct temperature | |
| Delivery group valve doesn't work properly | Clean the delivery group's exhaust system | |
| Coffee delivery is too slow | Coffee grinding is too fine | Adjust grinding level |
| Filter holder is dirty | Replace filter and clean filter holder more frequently | |
| Delivery group is clogged | Contact service technician | |
| Injector or valve is partially clogged | Replace injector or valve | |
| Coffee delivery is too fast | Coffee grinding is too rough | Adjust grinding level |
| Coffee is cold | Heat-exchanger or heating element coated with limestone | Contact service technician for maintenance |
| Pressure-switch contacts are oxidized | Clean pressure-switch contacts | |
| Defective electrical connections | ||
| Heating element is burned out | Contact service technician to check the connections | |
| Replace heating element | ||
Warranty Conditions
The warranty period is 24 months from the date of invoice. The warranty applies exclusively to defective parts.
If the machine has been delivered in damaged condition, you must report this immediately to your supplier or Boretti. If the damage is not reported on the same business day (or the next business day if the former is not possible), Boretti cannot be held liable for the damage.
Boretti is not liable for damage stemming from incorrect installation or maintenance, problems that occurred because the included water filter was not used or was not replaced/cleaned in a timely manner, irregularities caused by disruptions in the customer's electrical and hydraulic network, employment of unauthorized persons, seals, rubber, filters and wear-and-tear parts.
Not included in to the warranty conditions are incorrect use of the machine and non-observance of the maintenance instructions and the instructions in this maintenance and technical handbook.
Furthermore, all problems stemming from the failure to conduct (periodic) cleaning or stemming from limestone deposits are not covered by Boretti's warranty conditions.
Boretti recommends that you have the Barista checked every six months by a qualified Boretti employee to ensure optimal functioning and performance of the machine. To order maintenance you can call one of the numbers listed below. This periodic check is not covered by the warranty conditions.
For technical problems please contact Boretti's technical service department:
The Netherlands +31(0)20-4363525 Belgium +32(0)3-4508180

text_image
BORETTIBORETTI B.V.
De Dollard 17
1454 AT Watergang
T +31(0)20-4363439
F +31(0)20-4361326
E info@boretti.com
The Netherlands
N.V. BORETTI S.A.
Rupelweg 16
2850 Boom
T +32(0)3-4508180
F +32(0)3-4586847
E info.be@boretti.com
Belgium