SHSS 12 B2 - Vacuum Cleaner SILVERCREST - Free user manual and instructions
Find the device manual for free SHSS 12 B2 SILVERCREST in PDF.
Download the instructions for your Vacuum Cleaner in PDF format for free! Find your manual SHSS 12 B2 - SILVERCREST and take your electronic device back in hand. On this page are published all the documents necessary for the use of your device. SHSS 12 B2 by SILVERCREST.
USER MANUAL SHSS 12 B2 SILVERCREST
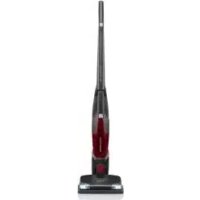
Introduction Congratulations on the purchase of your new appliance. You have selected a high-quality product. The operating instructions are part of this product. They contain important information on safety, usage and disposal. Before using the product, familiarise yourself with all handling and safety guidelines. Use the product only as described and for the range of applications specifi ed. Please also pass these operating instructions on to any future owner(s). Intended use This appliance has been designed exclusively for vacuum cleaning dry surfaces and dry residues. This appliance is intended solely for use in private homes. Do not vacuum people or animals with this appliance. Any other usage of or modifi cation to the appliance is deemed to be improper usage and carries the risk of serious personal injury. The manufacturer accepts no liability for damages that result from improper use of the appliance or are caused by the incorrect operation of it. The appliance is not intended for commercial use. Package contents Handheld vacuum cleaner Brush nozzle Crevice tool Extension handle with fl oor nozzle Cradle (with charging socket) Charger Operating instructions Check the delivery contents for completeness immediately after unpacking. Appliance description Figure A: 1 Grip, hand element 2 On/Off switch 3 Charge indicator lamp 4 Hand element
Dust fi lter 7 Coarse fi lter 8 Dirt container Figure B: 9 On/Off switch 0 Grip q "Grip" release w "Hand element" release e Hand element recess r Rotary brush t LED lamp Figure C: z Brush nozzle u Crevice tool i Charger o Charger barrel jack p Holder for brush nozzle a Holder for crevice tool s Charging socket d Cradle (with charging socket) IB_100116_SHSS12B2_LB1.indb 32 19.09.14 14:0633 SHSS 12 B2
50/60 Hz 300 mA Max. Output: 13.5 V 500 mA Type designation: SHSS 12 B2-1 Protection class: II / Floor nozzle Nominal power: 5 W Protection class: III / Input voltage: 10.8 V 1800 mAh Appliance Input voltage/current: 13.5 V 500 mA Nominal power: 75 W Protection class: III / Batteries: 10.8 V/1800 mAh Li-ion battery Battery Pack: 3 cells each of 3.6 V Operating time with full battery charge (depending on fl oor covering): approx. 15 min. Charging time with empty battery: 5–6 hours Safety guidelines DANGER – ELECTRIC SHOCK! ► Do not charge or use the appliance outdoors. ► Never use the handheld vacuum cleaner if the cable, plug or casing are damaged. ► To avoid risks, arrange for damaged power cables and/or plugs to be replaced as soon as possible by a qualifi ed specialist or by our Customer Services. ► Arrange for repairs to be carried out only by specialist workshops. Under no circumstances should you open the appliance yourself. Repairs that are not carried out by a specialist workshop could lead to physical injuries. ► Before charging the appliance, make sure that the mains voltage corresponds to the voltage indicated in the technical data for the charger. ► Never touch the mains adapter/charger or the appliance with wet or damp hands. ► Do not use the mains adapter/charger with an extension cable; connect the mains adapter directly to a power socket. IB_100116_SHSS12B2_LB1.indb 33 19.09.14 14:0634 SHSS 12 B2
WARNING! RISK OF INJURY! ► Do not change any accessories while the appliance is switched on. ► Do not use the handheld vacuum cleaner for vacuuming up water or other liquids. ► Do not use the handheld vacuum cleaner for vacuuming up sharp objects or glass shards. ► Never vacuum up burning matches, glowing ashes or cigarette butts. ► Do not use the handheld vacuum cleaner for vacuuming up chemical products, stone dust, gypsum, cement or similar particles. ► This appliance is not suitable for use with infl ammable and explosive substances or chemical and aggressive liquids. ► Always store the appliance indoors. To prevent accidents, keep the appli- ance in a dry location when not in use. ► Under extreme conditions, leaks in the battery cells may occur. In the event that battery fl uid comes into contact with skin or eyes, the aff ected area must be rinsed off with water immediately. Contact a physician. ► This appliance may be used by children aged 8 years and above and by persons with limited physical, sensory or mental capabilities or lack of ex- perience and knowledge, provided that they are under supervision or have been told how to use the appliance safely and are aware of the potential risks. Children must not use the appliance as a plaything. Cleaning and user maintenance tasks may not be carried out by children unless they are supervised. IB_100116_SHSS12B2_LB1.indb 34 19.09.14 14:0635 SHSS 12 B2
WARNING! RISK OF INJURY! ► Use only accessories recommended by the manufacturer. ► The mains adapter may not be used for other purposes. ► Always grip the power plug to disconnect the appliance from the power supply. ► Always be sure to keep the handheld vacuum cleaner away from heating elements, ovens or other heated appliances and surfaces. ► Always make certain that the ventilation slits are not obstructed. A blocked ventilation circuit can result in overheating and damage to the appliance. ► Take special care when using the handheld vacuum cleaner on stairs. ► This product contains rechargeable batteries. Do not throw the appliance into a fi re and do not subject it to high temperatures. There is a risk of explosion! ► Always remove the fl oor nozzle from the handle before cleaning the rotary brush to avoid accidental starting of the rotary brush. ATTENTION! MATERIAL DAMAGE! ► Do not use the handheld vacuum cleaner without the dust fi lter inserted. ► Do not use the mains adapter for a diff erent product and do not attempt to charge this appliance with a diff erent charger. Use only the charger supplied with this appliance. ► Never charge non-rechargeable batteries! IB_100116_SHSS12B2_LB1.indb 35 19.09.14 14:0636 SHSS 12 B2
This appliance is supplied with non-charged batteries. The batteries must be charged for 6 hours before the fi rst use. ■ Remove all packaging materials as well as foils and stickers Charging the appliance NOTE
Ensure that the appliance is switched off before starting to charge the batteries. ■ To charge the appliance, connect the charger i to a mains socket and insert the barrel jack o into the charging socket s on the cradle d. Feed the cable through the cable channel on the charging socket s, so that the cradle d is not resting on the cable. ■ Place the handle with the attached hand element 4 onto the cradle d. The red control lamp 3 illuminates. When the appliance is fully charged, the indicator light 3 illuminates green. Assembly/disassembly Connecting the hand element to the handle/removal from handle Fig. 1 Fig. 2 ■ To connect the hand element 4 to the handle, push the tip of the hand element 4 into the opening in the hand element recess e. ■ Then press the grip 1 of the hand element 4 into the handle so that the hand element 4 clicks fi rmly into position (Fig. 1). ■ To remove the hand element 4 from the handle, press the "Hand element" release w. ■ Then pull the hand element 4 upwards and forwards out of the hand element recess e (Fig. 2). IB_100116_SHSS12B2_LB1.indb 36 19.09.14 14:0637 SHSS 12 B2
The suction opening must always be open and unblocked. Blockages lead to overheating and damage to the motor. ► Do not vacuum shag pile carpet with the fl oor nozzle. The rotary brush r can get caught in the carpet and block! NOTE
Make certain that the dust fi lter 6 and the coarse fi lter 7 are always inserted before using the appliance. ► As soon as the suction power of the appliance begins to diminish noticeably, connect the appliance to the charger i. Using the hand element with the handle
1) Insert the hand element 4 into the hand
element recess e as described in the chapter "Assembly/disassembly".
2) Fold out the grip 0 by pressing the "Grip"
release q and at the same time pulling the grip 0 upwards.
3) Switch on the appliance using the on/off
switch 9. The LED lamp t on the fl oor nozzle will illuminate and the rotary brush r starts turning.
4) Guide the fl oor nozzle over the area to be
vacuumed. Hold the grip 0 so that the fl oor nozzle moves smoothly over the fl oor.
5) Press the on/off switch 9 when you have
fi nished vacuuming. The rotary brush r stops and the LED lamp t goes out. Using the hand element
1) Remove the hand element 4 from the hand
element recess e as described in the chapter "Assembly/disassembly".
3) Set the on/off switch 2 to start vacuuming the
4) When you have fi nished vacuuming, press the
on/off switch 2 again. Cleaning and care WARNING! RISK OF INJURY! ► Always disconnect the charger i from the mains socket and remove the barrel jack o from the charging socket s on the cradle d before cleaning the cradle d. ► Always remove the hand element 4 from the hand element recess e on the handle before cleaning the hand element 4, the handle or the rotary brush r. To achieve the best results, empty the dirt container 8 and clean the dust fi lter 6 after every use. ATTENTION! MATERIAL DAMAGE!
Do not use abrasive or aggressive cleaning materials. These could damage the surface of the appliance! NOTE
The LED lamp t is maintenance-free. The LEDs cannot be changed. IB_100116_SHSS12B2_LB1.indb 37 19.09.14 14:0638 SHSS 12 B2
2) Press both buttons
5 and, at the same time, pull the dirt container 8 upwards. You can now lift this off upwards/forwards.
3) Remove the dust fi lter 6 by pulling it out with
your fi ngers. Rinse the dust fi lter 6 in clear water and let it air dry. Do not use hot air to dry the dust fi lter 6.
4) Then remove the coarse fi lter 7 also by simply
pulling it out. Fig. 3
5) Empty the dirt container 8.
6) Now you can re-insert fi rst the coarse fi lter 7
and then the dust fi lter 6.
7) Replace the dirt container 8 by fi rst inserting
the catch into the notch in the hand element 4 and then pushing the front part of the dirt con- tainer 8 fi rmly downwards so that the dirt container 8 clicks fi rmly into place. Cleaning the appliance Wipe the appliance with a damp cloth. For stubborn dirt, wipe, adding mild detergent to the cloth. Ensure that the appliance is completely dry before the next use. Cleaning the rotary brush The rotary brush r can become covered in residues, such as hair, after a while. To remove this dirt, you can remove the rotary brush r (Fig. 4).
1) Turn the fl oor nozzle upside down.
2) Push the catch on the cover plate to the rear
so that you can remove the cover plate.
broad end onto the drive shaft so that the rotary brush r hooks into place.
5) Then push the other end into the mount so that
the rotary brush r sits straight in the fl oor nozzle.
6) Replace the cover plate and fasten it fi rmly into
Storage ■ When you are not using the appliance, place it on the cradle d. ■ You can store the crevice tool u and the brush nozzle z on the rear side of the cradle d in the holder for the brush nozzle p and the holder for the crevice tool a. ■ Store the appliance in a dust-free and dry location. Troubleshooting The appliance is not working. ■ The battery is not charged. ♦ Connect the appliance to the charger i. ■ The appliance is defective. ♦ Contact the Customer Service department. The appliance is running but hardly sucking up any dirt. ■ The battery is not suffi ciently charged. ♦ Connect the appliance to the charger i. ■ The dirt container 8 is full. ♦ Empty the dirt container 8. ■ The dust fi lter 6 is blocked. ♦ Clean the dust fi lter 6. The appliance will not charge. ■ The charger i is not correctly connected to the socket/mains plug. ♦ Check the connections of the charger i. ■ The charger i is defective. ♦ Contact the Customer Service department. Warranty and service You are provided a 3-year warranty on this appliance, valid from the date of purchase. This appliance has been manufactured with care and inspected meticulously prior to delivery. Please retain your receipt as proof of purchase. In the event of a warranty claim, please contact your Customer Service unit by telephone. This is the only way to guarantee free return of your goods. The warranty only covers claims for material and manufacturing defects, not for damage sustained during carriage, components subject to wear and tear or damage to fragile components such as switches or batteries. This appliance is intended solely for private use and not for commercial pur- poses. The warranty shall be deemed void in the case of misuse or improper handling, use of force and interventions which have not been carried out by one of our authorised Service centres. Your statutory rights are not restricted by this warranty. The warranty period is not prolonged by repairs eff ected under the warranty. This also applies to replaced and repaired components. Any damage and defects present at the time of purchase must be reported immediately after unpacking, but no later than two days after the date of purchase. Repairs eff ected after expiry of the warranty period shall be subject to charge. Service Great Britain Tel.: 0871 5000 720 (£ 0.10/Min.) E-Mail: kompernass@lidl.co.uk IAN 100116 Hotline availability: Monday to Friday 08:00 - 20:00 (CET) IB_100116_SHSS12B2_LB1.indb 39 19.09.14 14:0640 SHSS 12 B2
Disposal Disposal of the appliance Under no circumstances should you dispose of the appliance in the normal domestic waste. This product is subject to the provisions of European Directive 2012/19/EU. Dispose of the appliance via an approved waste disposal company or your municipal waste disposal facility. Please observe applicable regulations. Please contact your waste disposal facility if you are in any doubt. Disposal of (rechargeable) batteries Used batteries may not be disposed of in household waste. Consumers are legally obliged to dispose of bat- teries at a collection point in their community/city district or at a retail store. The purpose of this obligation is to ensure that batteries are disposed of in an environmentally congruent manner. Only dispose of batteries when they are fully discharged. ATTENTION! MATERIAL DAMAGE!
If you open the housing and dispose of the batteries, the appliance will be irreparably damaged!
1) Before you start removing the battery, discharge
3) Undo the 5 screws on the rear of the hand
element 4 and pull the two halves of the housing apart.
4) Remove the motor from the housing half.
5) Undo the two screws on the plastic bracket
that holds the blue battery and remove the plastic bracket.
6) Use pliers to cut the cable that leads to the
blue battery. Make sure that you do not short- circuit the bare cable ends with the metal parts of the pliers.
7) Remove the battery and dispose of it in an
environmentally friendly manner. The packaging is made from environ- mentally friendly material and can be disposed of at your local recycling plant. Importer