Freestyle 4XL - Stroller QUINNY - Free user manual and instructions
Find the device manual for free Freestyle 4XL QUINNY in PDF.

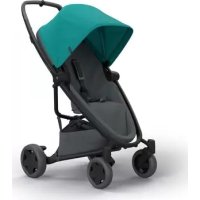
| Product type | 3-wheel all-terrain stroller |
| Brand | Quinny |
| Model | Freestyle 4XL |
| Recommended age | From birth to 4 years |
| Maximum child weight | 20 kg |
| Stroller weight | Approx. 12 kg |
| Folded dimensions | Approx. 85 x 60 x 35 cm |
| Unfolded dimensions | Approx. 100 x 70 x 110 cm |
| Wheels | Pneumatic, swivel front wheel, rear wheels with parking brake and handbrake |
| Maximum tire pressure | 28 PSI / 1.8 Bar |
| Safety harness | 5-point, height adjustable |
| Backrest positions | 3 positions: seated, semi-reclined, reclined |
| Height-adjustable handlebar | Yes |
| Adjustable footrest | 2 positions |
| Canopy | Removable, with snap buttons |
| Storage basket | Under the seat, max capacity 5 kg |
| Car seat compatibility | Maxi-Cosi (up to 13 kg) via included adapters |
| Carry cot compatibility | Dreami (up to 9 kg) |
| Safety bar | Removable, not usable in rear-facing position |
| Frame material | Aluminum |
| Safety standards | NFS 54-001, prEN 1888:2002, BS 7409:1996 |
| Care instructions | Frame cleaned with a damp cloth; seat cover hand washable |
| Warranty | 12 months |
Frequently Asked Questions - Freestyle 4XL QUINNY
User questions about Freestyle 4XL QUINNY
0 question about this device. Answer the ones you know or ask your own.
Ask a new question about this device
Download the instructions for your Stroller in PDF format for free! Find your manual Freestyle 4XL - QUINNY and take your electronic device back in hand. On this page are published all the documents necessary for the use of your device. Freestyle 4XL by QUINNY.
USER MANUAL Freestyle 4XL QUINNY
Col. Alfonso XIII Mixcoac
01420 México, D.F.
Mexico
Tel. +525 5563 8244
Fax +525 5611 6630
E-mail: dbbmex@aol.com
NEDERLAND
Dorel Juvenile Group Europe
Postbus 6071
5700 ET Helmond
www.quinny.com
NORGE
ENG Norway AS
PB 130
NO-1601 Fredrikstad
Tel. (0047) 69 30 05 55
Fax (0047) 69 30 05 54
E-mail: salg@engbaby.com
ÖSTERREICH
Dorel Germany
Vertrieb Österreich
1st Pugachevskaya Str. 17
RUS - 107392 Moscow
SCHWEIZ
Kinderwelt R. Natale
69, Kaki Bukit Avenue 1
Shun Li Industrial Park
Singapore 417947
Tel. (65) 6 844 1188
Fax (65) 6 844 1189
E-mail: bidhyper@singnet.com.sg
SLOVENIA
Sitrade d.o.o.
Na Skali 5
SI-4000 Kranj
Tel. +38 64 23 69 340
Fax +38 64 23 69 341
E-mail: info@sitrade.si
www.sitrade.si
SOUTH AFRICA
Anchor International
Gold Reef Industrial Park
Unit C 1
Booysens Reserve
JHB.
Tel. 002711-835-3715/3716/2530
Fax 002711 - 835 - 3718
E-mail: anc.int@mweb.co.za
SOUTH KOREA
Babywaltz
Deungchon dong
Gangseo Gu
6887 Seoul
Tel. 82 2 2063 4040
Fax 82 2 2063 4041
E-mail: baby-waltz@hanmail.net
SUOMI
ENG Finland
Raisionkaari 50
21200 Raisio
Finland
Tel. +358 2436 3600
Fax +358 2438 0550
E-mail: terhi.rapo@eng-mail.com
SVERIGE
ENG Sweden
Portgatan 19
28350 Osby
SWEDEN
Tel. +46 479 19234
Fax:+46 479 19441
E-mail: catharina.streling@brio.se
TAIWAN
B & B Group/Topping Prosperity Inc.
4F, No. 2, Lane 222,
Tun Hwa North Road, Taipei
Tel. (02) 27 17 50 42
Fax (02) 25 14 99 83
E-mail bnbco@ms12.hinet.net
THAILAND
Diethelm
翔盛國際貿易股份有限公司
台北市敦化北路222巷2號4樓
Sukhumvit Road 2535
Bangchak
Prakanong
1050 Bangkok
Tel. 662 332 6060-89
Fax 662 332 6127
E-mail: pinsudao@spd.diethelm.co.th
E-mail: anuchidi@spd.diethelm.co.th
TÜRKİYE
Grup Plaza
Küçükbakkalköy -ISTANBUL
Tel: 0216 573 62 00 (8 hat)
Fax: 0216 573 62 09
www.grupbaby.com
UKRAINE
Europroduct
4th floor, 53b
Arnautskaya St
270023 Odessa
Tel. 00 380 482 227 338
Fax 00 380 482 345 812
Dorel Juvenile Group U.K.
Hertsmere House
Shenley Road
Borehamwood, Hertfordshire WD6 1TE
Tel. (020) 8 236 0707
Fax (020) 8 236 0770
Instructions for use/Warranty
IMPORTANT: Keep for future reference
natural_image
Black and white photo of a St}_3 family baby stroller with twin canopy and matching case (no visible text or symbols)BY MAXI-COSI BY

AY MAXI-00SI AV

Always Ahead

FREESTYLE
4
natural_image
Mechanical assembly diagram showing a tool interacting with a bracket, with an inset highlighting the process (no text or symbols present)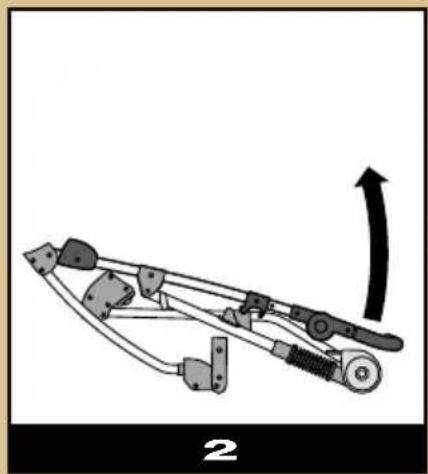
natural_image
Mechanical linkage diagram showing a lever mechanism with an arrow indicating rotational motion (no text or symbols)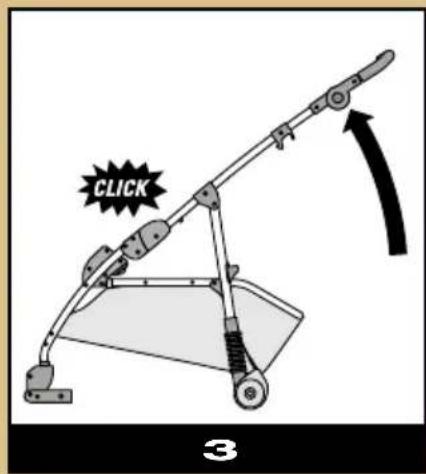
natural_image
Circular mechanical component with radial spokes and central hub, labeled '5/8 7' below (no other text or symbols)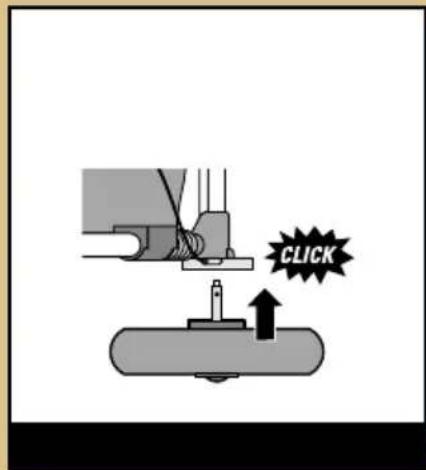
natural_image
Mechanical assembly diagram showing a hand operating a workpiece with a cylindrical component and a downward arrow indicating motion (no text or symbols)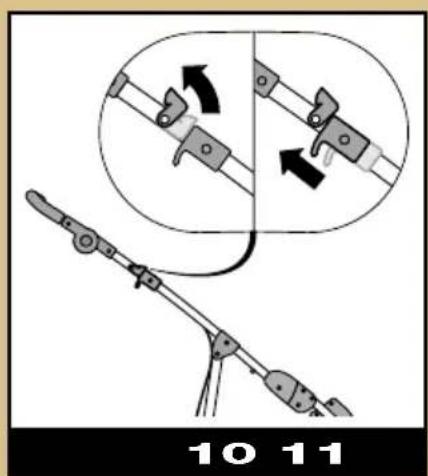
natural_image
Mechanical linkage diagram showing a lever mechanism with a curved arrow indicating rotational motion (no text or symbols)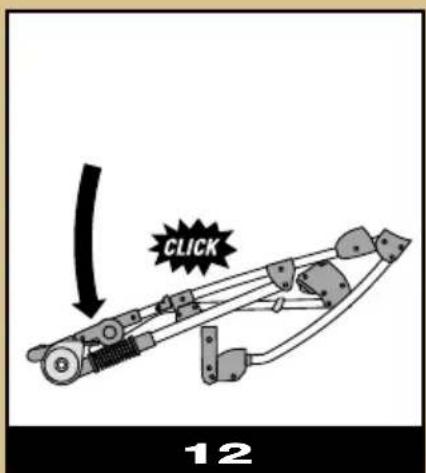
natural_image
Mechanical assembly diagram showing a connector with a valve and adjustment knob (no text or symbols)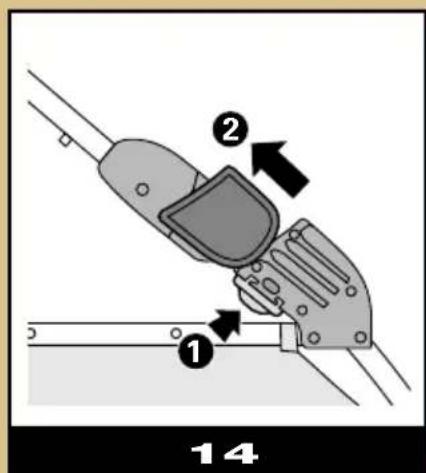
natural_image
Diagram of a hairdryer with motion arrows indicating movement, labeled '21' at bottom (no text or symbols on diagram itself)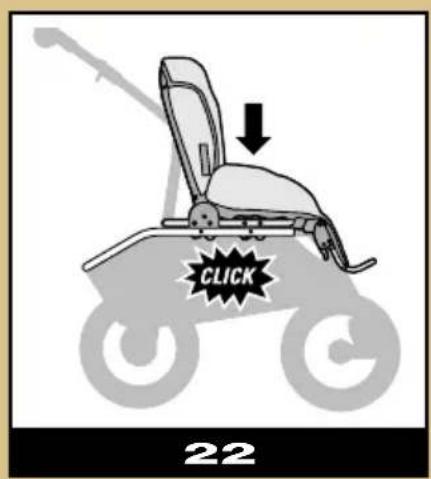

natural_image
Diagram of a mechanical belt system with two vertical bars and bidirectional arrows indicating movement (no text or symbols)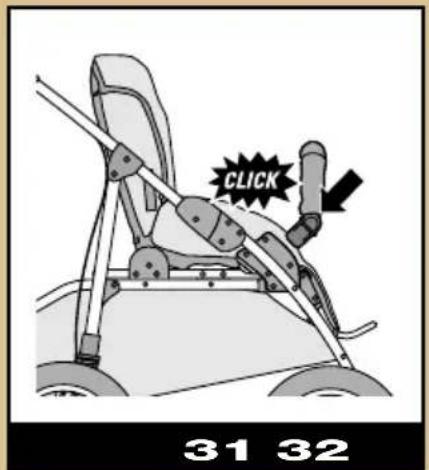
natural_image
Illustration of a bicycle seat with a close-up inset showing the cable being inserted (no text or symbols)NL
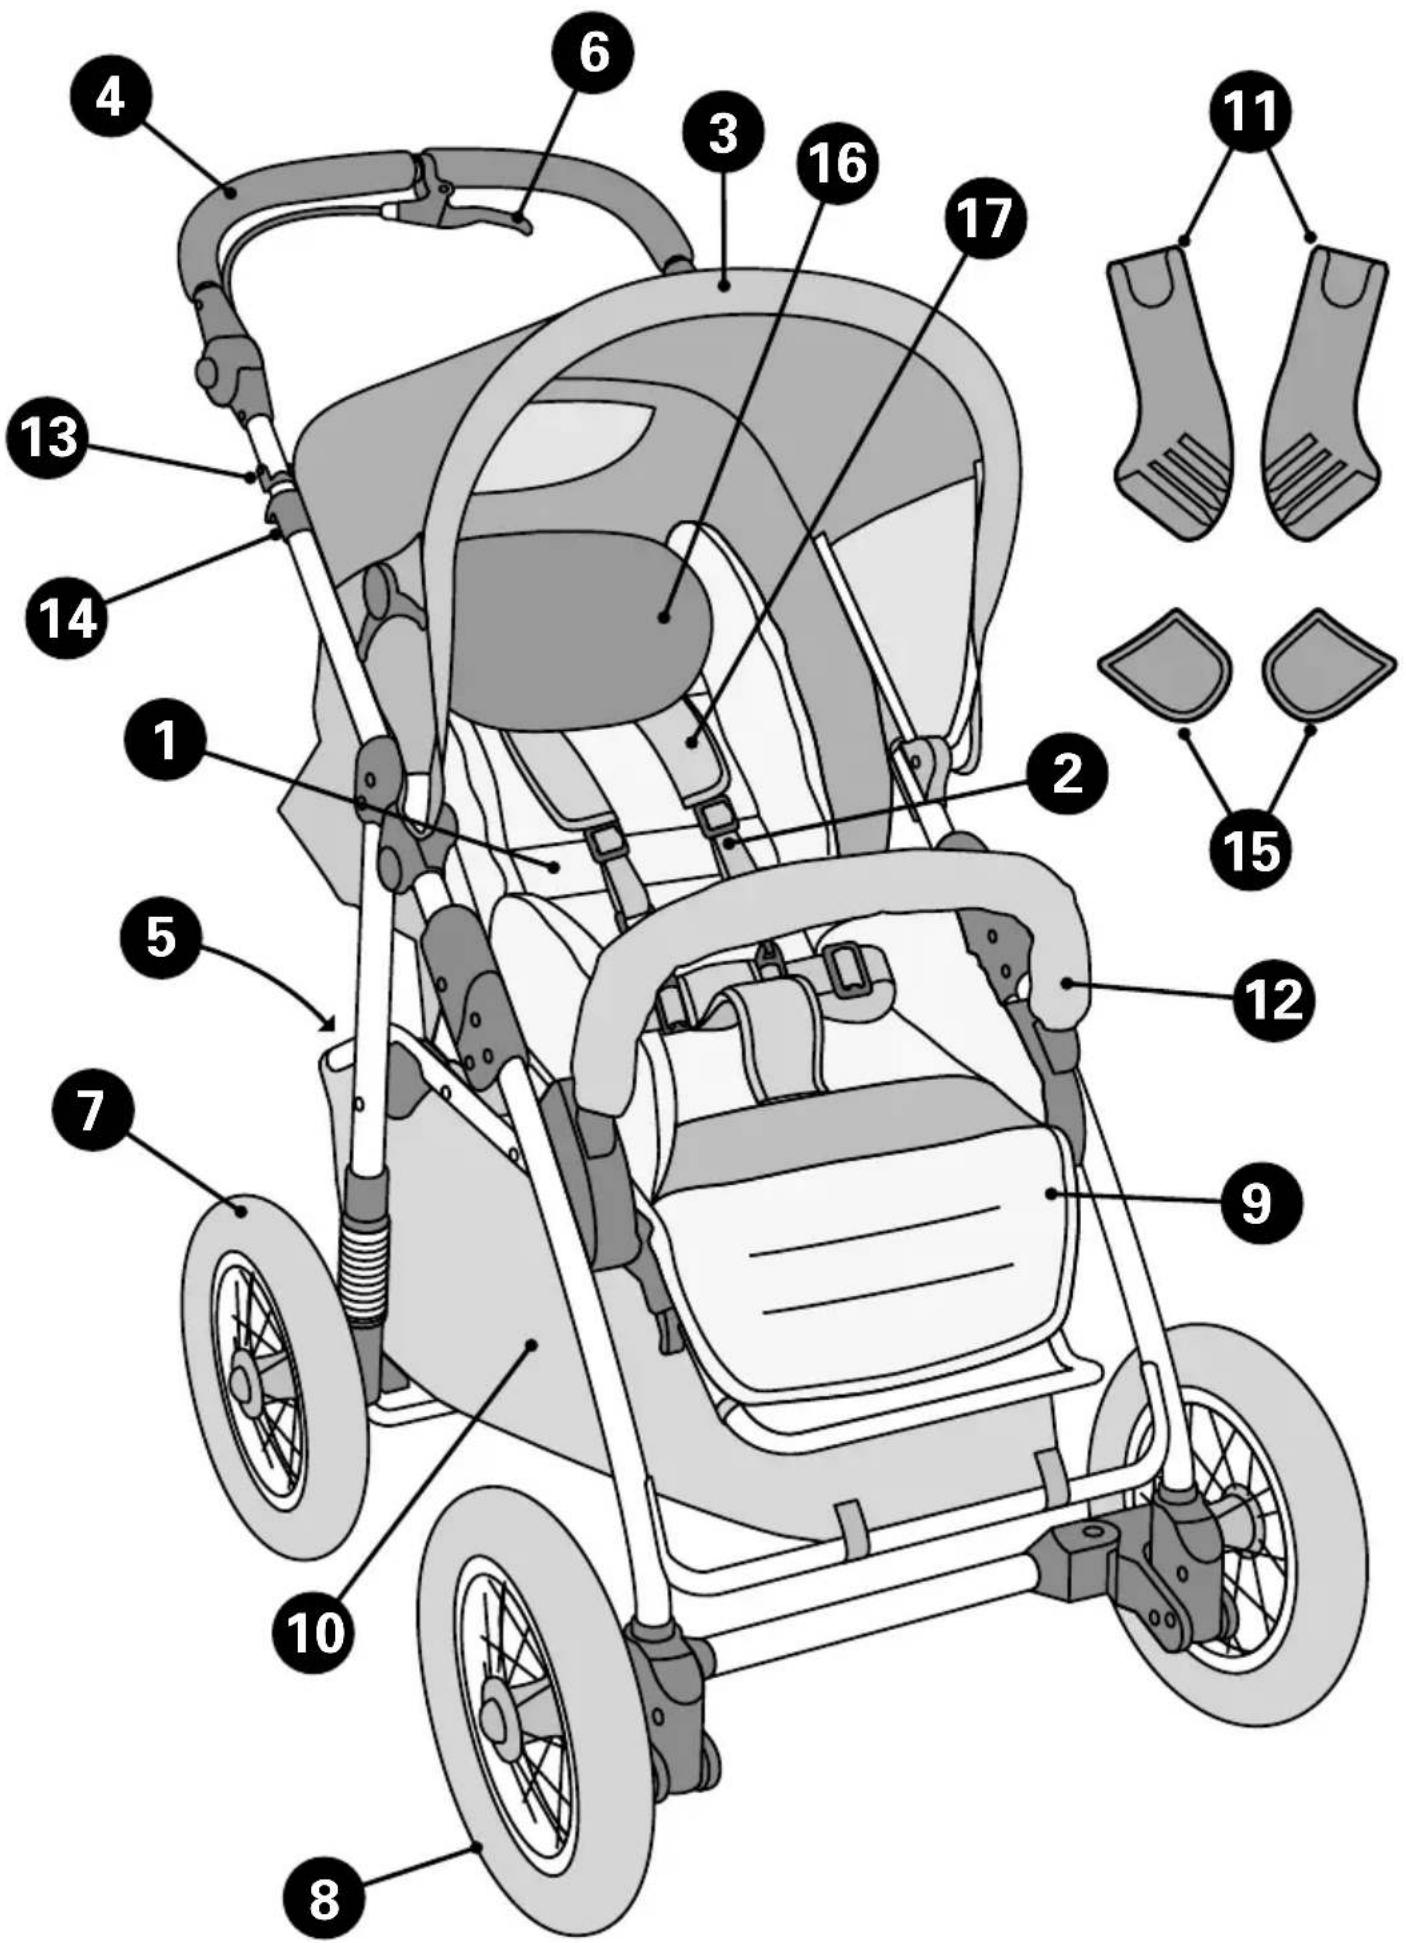
1 Wandelwagenzitje
2 Veiligheidsharnas
3 Zonnekap
4 Duwer
5 Parkeerrem
6 Bijrem
7 Achterwiel
8 Self-steering front wheel
9 Footrest
10 Shopping basket
11 Adapters
12 Safety bar
13 Fold lock
14 Transport safety lock/ handlebar safety lock
15 Guard
16 Adjustable/removable head rest
17 Belt pads
F
1 Hamac
Promenade Shopping Center C3
Curacao
Tel. 00 5999 7360755
Fax 00 5999 7360744
E-mail: lgiliam@cura.net
CYPRUS
Xen. J. Demetriades & Son Ltd.
156, Anexartisias Street
3604 Lemesos
Tel. 35 72 53 65 261
Fax 35 72 53 52 092
E-mail: xdl@spidernet.com.cy
www.demetriades.com.cy
DANMARK
BabySam A.m.b.A.
Egelund A 27-29
6200 Aabenraa
Denmark
Tel. 74 63 25 10
Fax 74 63 25 11
E-mail: mail@babysam.dk
DEUTSCHLAND
Dorel Germany
Unit 1B, G/F, Lippo Centre
89 Queensway
Admiralty
Hong Kong
Tel. (852) 28 10 86 22
Fax (852) 28 68 25 22
E-mail: customerservice@ebabyasia.com
Chup Shing Trading Co Ltd.
Block A, 7/F, Unit J
25-31 Kwai Fung Crescent
Marvel ind. Bldg.
Kwai Chung
Hong Kong
Tel. 24 22 21 01
Fax 24 89 10 92
www.o3baby.com.hk
Media Commerce d.o.o.
Majstorska 5
CMP Savica Sanci jug
10000 Zagreb
Kroatië
Tel. 00385-1-240 65 00 / -1-240 65 01
Fax 00385-1-240 64 99
E-mail: media-commerce@zg.te.Ihr
LEBANON
Gebran Geahchan & Sons
Azar Bldg.
Horch Tabet
Po Box 55134
Sin El Fil
Tel. 961 1 482369
Fax 961 1 486997
MAGYARORSZÁG
Re-Con-Tra KFT
Badacsonyi u. 24
1113 Budapest
Tel. (01) 209 26 32/209 26 33
Fax (01) 209 26 34
E-mail: recontra@recontra.hu
MALAYSIA
Sin Lee Enterprises
2, Jalan Masyhur 3
Taman Perindustrian Cemerlang
81800 Ulu Tiram, Johor
Malaysia
Tel. (60) 7 861 8388
Fax (60) 7 861 8218
E-mail: bidhyper@singnet.com.sg
MALTA
Rausi Company Limited
J.P.R. Buildings
Ta' Zwejt Street
San Gwann Industrial Estate
San Gwann SGN 09, Malta
Tel. +356 21 44 56 54
Fax +356 21 44 56 57
E-mail: rausi.info@rausi.com.mt
WARNING: Read the instruction manual carefully and keep it for future reference. Not following the instructions in this manual may endanger the safety of your child.
WARNING: Your child's safety is your responsibility.
WARNING: Never leave your child unattended in a pushchair.
WARNING: Prior to use, check to ensure all interlocking devices are secured.
WARNING: Articles hung on the handle bar may cause the pushchair to become unstable and can increase the risk of tipping.
WARNING: Always secure your child with the safety harness and always use the crotch strap together with the lap and shoulder belts, even when using the footmuff.
WARNING: The plugs and the valves of the wheels must be sufficiently tightened to avoid any hazard due to small parts which may be swallowed. Also keep the hand pump out of the reach of children.
WARNING: To ensure your child's safety, we advise against skating or running with the pushchair.
WARNING: Check that the pram body or seat unit attachment devices are correctly engaged.
GENERAL INSTRUCTIONS
- Only use the Freestyle 4 XL for one child at a time.
- The Freestyle 4 XL is suitable for children from birth to 4 years of age (maximum weight 20 kg). When used with a Maxi-Cosi car safety seat or Dreami carrycot, the maximum weight shown on the car safety seat or carrycot applies.
- It is advisable to only use the Freestyle 4 XL as a buggy once your child is able to sit unassisted.
- We advise against using the pushchair insert for children younger than 6 months old.
- Always make sure that the Freestyle 4 XL is completely unfolded and that the safety locks are properly secured before placing your child in the Freestyle 4 XL.
- Keep children away from moving parts while folding, unfolding or adjusting the Freestyle 4 XL.
- Always use the parking brake when parking the Freestyle 4 XL, even when just standing still.
- The bicycle-style handbrake should only be used as an extra brake. It should never be used as a parking brake.
- Inspect and clean the Freestyle 4 XL regularly. Never use harsh cleaning agents or lubricants.
- Never lift the Freestyle 4 XL or use on escalator or stairs when there is a child in the pushchair.
- Use original accessories and manufacturer-approved parts only.
- No alterations may be made to the product. If you have any complaints or problems, please contact your supplier or importer.
- Keep all plastic packaging material out of the reach of children and pets, as these materials pose a choking hazard.
- The Freestyle 4 XL has been approved in accordance with: NFS 54-001, prEN 1888:2002, BS 7409:1996.
UNFOLDING/ASSEMBLY (see illustrations 1 – 12)
To unfold
- The frame has been secured by means of a handlebar safety lock to prevent it from unfolding during transport.
- Release the lock by pulling the left handlebar safety lock in the direction of the arrow (1).
- Pull the handlebar upwards (2) until it "clicks" into the handlebar safety lock (3).
- Check this by pushing down on the handlebar.
- Push both release buttons at the same time, and then pull the handlebar into the desired position (4).
Mounting the wheels
- The 2 wheels with the brake cylinder should be mounted as rear wheels.
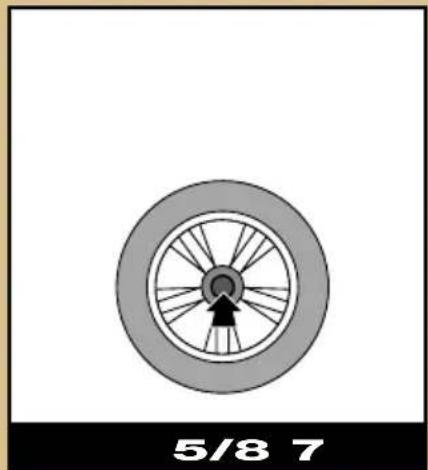
- Press the button in the middle of the hubcap (5/8) while pushing the axle into the axle opening (7).
- Check to make sure the wheel is secure.
- Check the tyre pressure and inflate the tyre if necessary (see maintenance section for the maximum tyre pressure allowance).
Removing the wheels
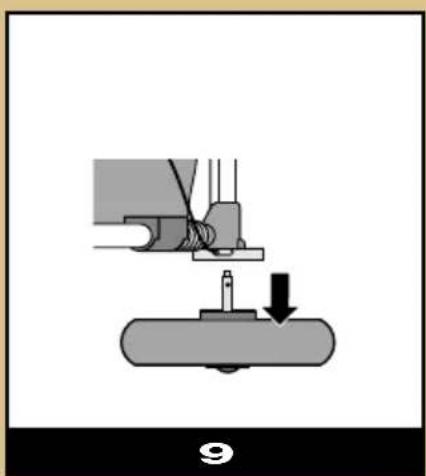
- To disassemble the rear wheels, press the button on the hubcap (5/8) and pull the wheel out of the axle opening (9).
Adjusting the handlebar
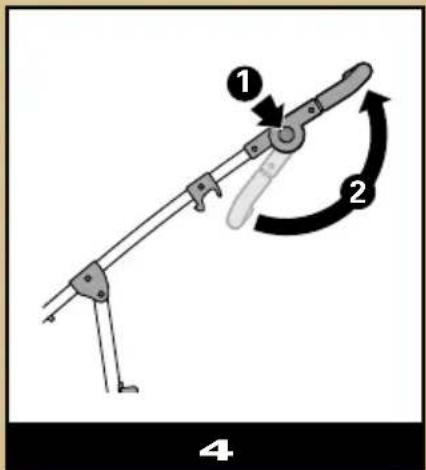
- To adjust the height of the handlebar, push the release buttons at the same time (4.1) and rotate the handlebar into the desired position (4.2).
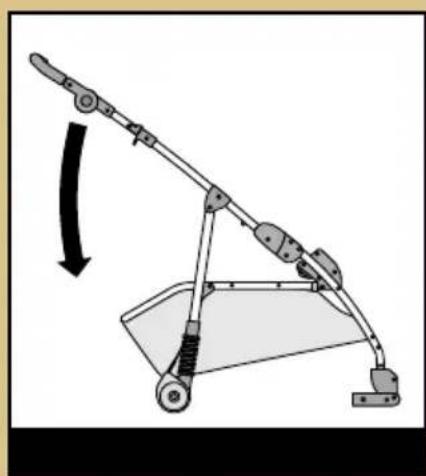
Folding
- Fold up the sun canopy (see "Attaching/removing sun canopy").
- Place the back of the pushchair seat in the reclining position (see "Adjusting the back").
- Place the footrest in the highest position (see "Footrest").
- Tilt up the fold lock above the right handlebar safety lock (10).
- Pull the left and right handlebar safety lock upwards and push the handlebar forward until the Freestyle 4 XL is folded (11).
- Make sure that the handlebar safety lock "clicks" into the transport safety lock (12).
- Remove the wheels and pushchair seat (see "Attaching pushchair seat") to make the pushchair even smaller.
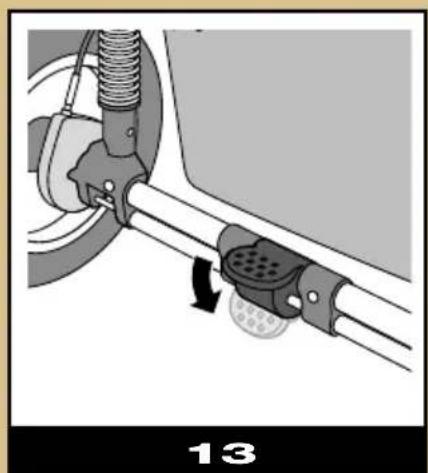
PARKING BRAKE (see illustration 13)
- Always use the brake when parking the Freestyle 4 XL, "also when at a standstill".
- Step on the pedal on the rear axle to lock the wheels (13).
- Release the parking brake by pulling the pedal upward.
- The handbrake is for slowing down and should not be used as a parking brake. The handbrake works on both rear wheels. If you squeeze the handbrake too firmly or quickly, there is a risk that you will stumble over the Freestyle 4 XL, thus endangering your child.
- Always check whether the wheels are locked.
INSTRUCTIONS FOR USE
For use with the Dreami carrycot (up to 9 kg)
and the Maxi-Cosi car safety seat (up to 13 kg) (see illustrations 14 - 20)
Attaching the adapters
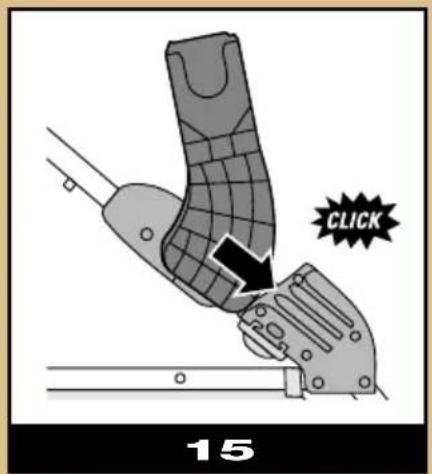
- First remove the guards by moving the red button under the adapter connections outward while pushing the guards upward (14).
- Slide the adapter marked A into the right-hand side and the adapter marked B into the left-hand side of the adapter attachment.
- Continue sliding until you hear a "click" (15).
- Check to make sure the adapters are secure.
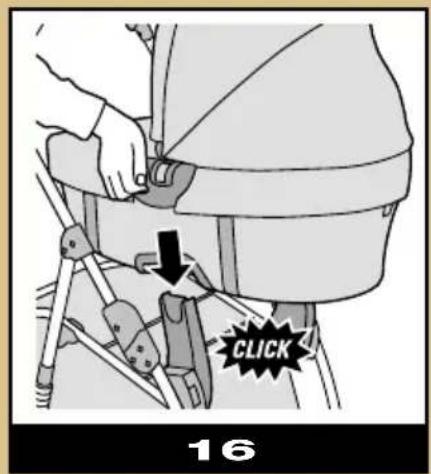
Placing the Dreami carrycot
- Unfold the pushchair and place the carrycot onto the adapters with the foot end between the sides of the handle (16).
- Check to make sure the carrycot is fastened securely.
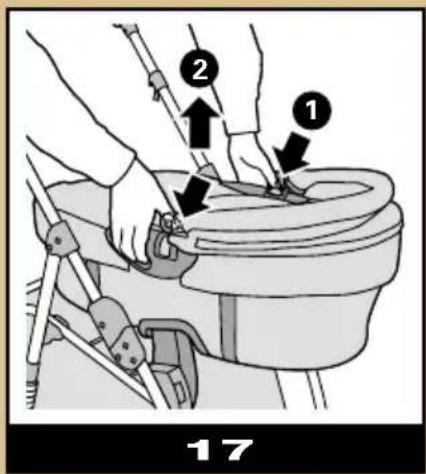
Removing the Dreami carrycot
- Place your thumbs on the control buttons on both sides of the carrycot (17.1).
- Push in the buttons while lifting the carry cot from the Freestyle 4 XL (17.2).
Fitting the Maxi-Cosi car seat
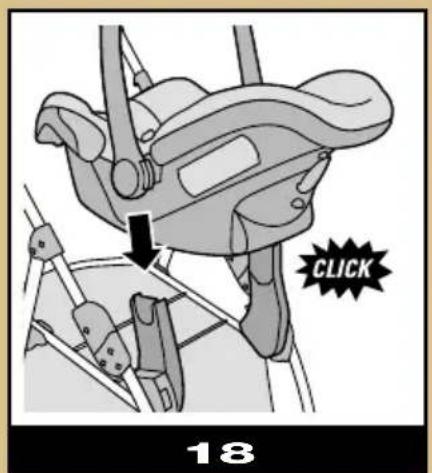
- Unfold the pushchair and place the car safety seat onto the adapters with the foot end between the sides of the handle (18).
- Check to make sure the car seat is fastened securely.
Removing the Maxi-Cosi car seat
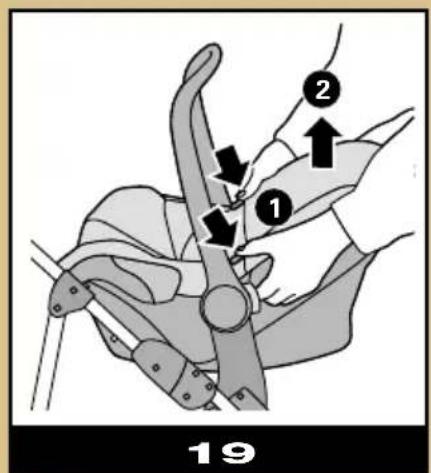
- Place your thumbs on the control buttons on both sides of the car seat (19.1).
- Push in the buttons while lifting the car seat from the Freestyle 4 XL (19.2).
Removing the adapters
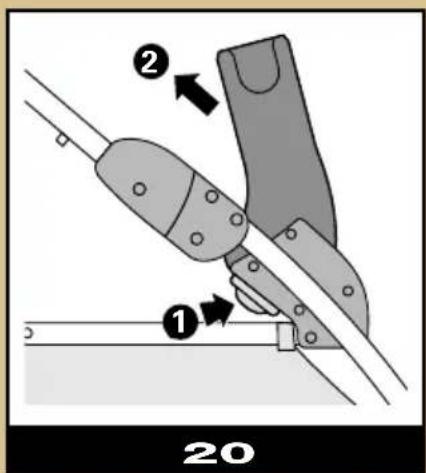
- Remove the adapters by moving the red button under the adapters outward (20.1) while sliding the adapters upwards (20.2).
- Place both guards back in the adapter connections.
When used as a pushchair (see illustrations 21 - 34)
Placing the pushchair seat
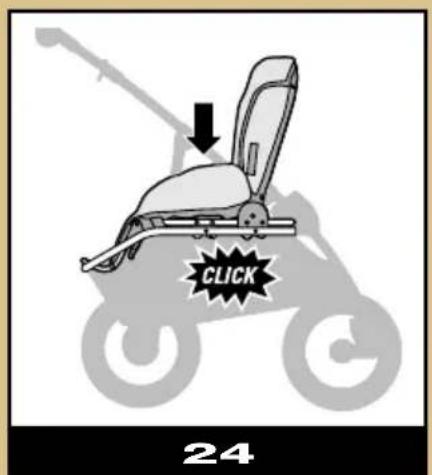
- The pushchair seat can be used either forward-facing or backward-facing (22/24).
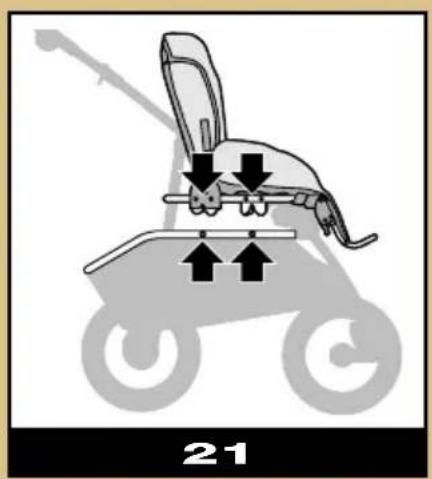
- Attach the pushchair seat by placing it with the hooks under the seat bottom on both the rods on the frame (21).
- Press the pushchair seat downwards on both rods until it "clicks" (22).
- Check to make sure the pushchair seat is secure by pulling on it.
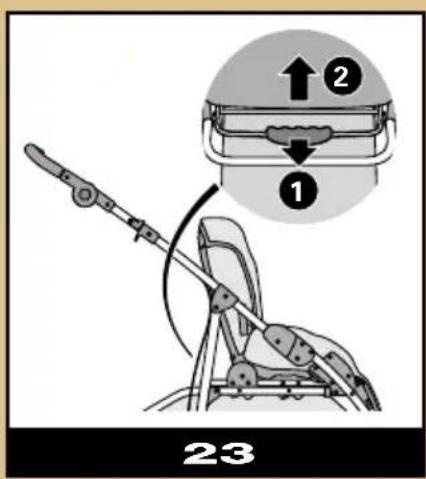
- Remove the pushchair seat by pulling on the handle (on the back of the seat bottom) and pulling the pushchair seat upward (23).
Footrest
- The footrest can be adjusted into 2 positions.
- Press both buttons under the footrest at the same time (25.1) and move the footrest to the desired position (25.2).
- IMPORTANT: Never let your child sit or stand on the footrest.
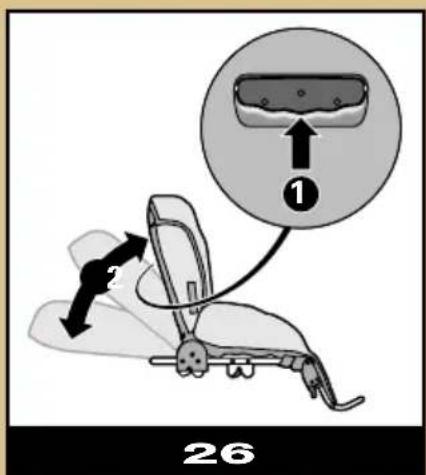
Back adjuster
- The back of the pushchair seat has multi-positional adjustment.
- To adjust the back, pull the handle in the middle of the back upward (26.1) while pushing the back up or down (26.2).
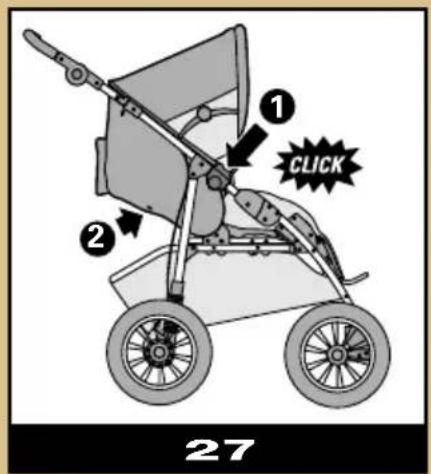
Attaching/removing sun canopy
- Push both ends of the sun canopy onto the tubes below the plastic part of the back leg and above the projection on the tubes (27.1).
- Fasten the 2 snaps on the back of the sun canopy to the pushchair seat (27.2).
- To remove the sun canopy, unfasten the snaps and pull off the sun canopy.
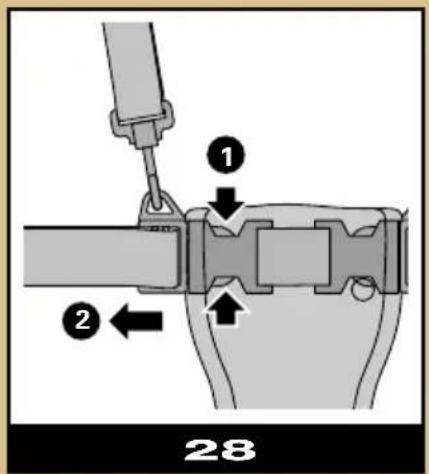
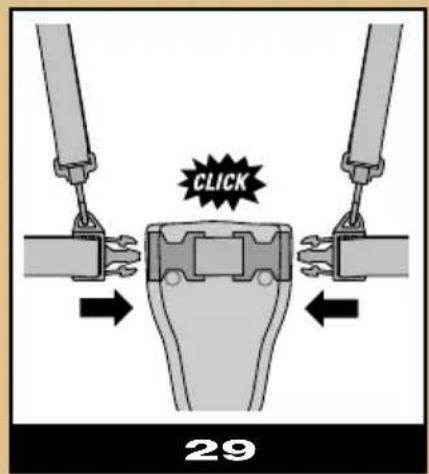
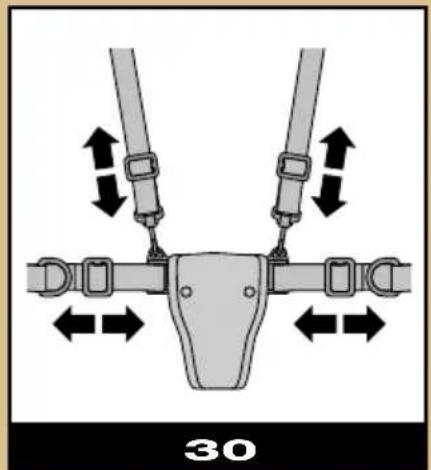
Safety harness
- Apply the brakes on the Freestyle 4 XL.
- Make sure the safety harness is loosened before placing your child (carefully!) into the seat.
- Fasten the lap and shoulder belts to the crotch strap (29).
- Adjust the belts to the size of your child by lengthening or shortening the belts using the clasps (30).
- Push the buttons to open the fastener (26).
- There are D rings for securing an additional safety harness. Make sure any safety harness you use meets the following standard: BS 6684.
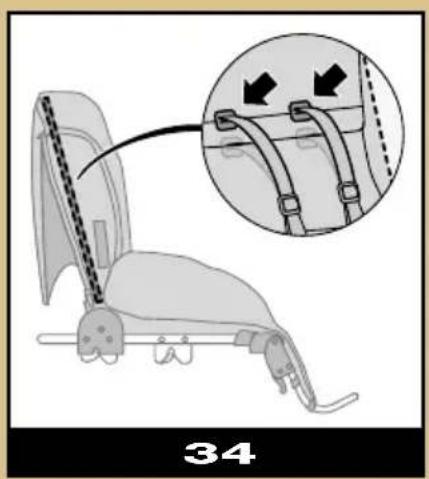
- The shoulder belts are height adjustable. To adjust the height, open the cover on the back and move the clasp in both the cover as well as the reinforcement board (34).
Safety bar
- Place the 2 ends of the safety bar into the openings on the adapter connections (31).
- Important: Always fasten your child securely using the safety harness.
- Remove the safety bar by pushing both buttons on the end while pulling up the safety bar.
- Important: The safety bar cannot be used when using the seat in a rearward-facing position.
SHOPPING BASKET
- The maximum weight allowance for the shopping basket under the Freestyle 4 XL is 5 kg.
- The other storage compartments on the pushchair have a maximum weight allowance of 0.5 kg.
- IMPORTANT: Only use the storage compartments provided and do not exceed the maximum weight allowance.
MAINTENANCE
- Check whether everything functions properly on a regular basis.
- If the Freestyle 4 XL has been damaged (i.e. in-flight, transport damage), have the product checked/ repaired by your supplier before using it again.
- For reasons of safety, always use original parts.
- To ensure the long-lasting use of the Freestyle 3XL, dry it off with a soft rag after using it in rainy weather.
- Clean the frame using a damp cloth. Do not use any abrasive detergents.
- Do not use lubricants, as these attract dirt and dust.
- Note: Oil and grease will damage the functioning of the handbrake.
- The cover, basket and pillow can be washed by hand in lukewarm water using a regular detergent (see "Washing instructions").
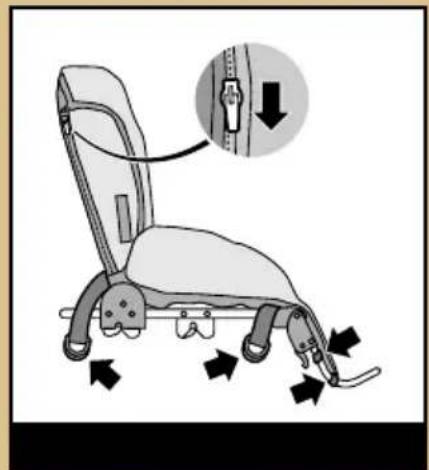
Removing the cover (see illustrations 32 - 33)
- Remove the pushchair seat from the Freestyle 4 XL (see "Attaching pushchair seat").
- Unzip the zippers on the side (32 detail).
- Loosen the straps under the seat bottom and on the back and remove the elastic under the footrest (32).
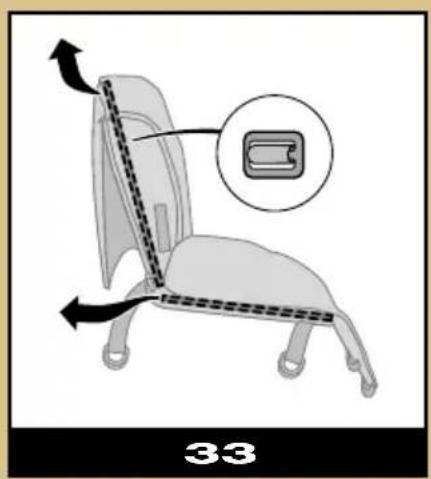
- Remove the reinforcement boards from the back and the seat through the top and the opening with Velcro (33).
- Remove the shoulder belts by tilting the clasp and pushing them through the board.
Reattaching the cover
- Place back the reinforcement boards, making sure the belts are fastened properly.
- Fasten the elastic and straps to the metal frame.
- Zip up the zippers.
- Never use the pushchair seat without the reinforcement boards or safety harness.
Wheels
- The tyres can be inflated up to a maximum pressure of 28 PSI/1.8 Bar. The tyres are equipped with air valves and can be inflated using the pump supplied or a bicycle pump with adapter.
- If the inner tube has a puncture, you can repair it as you would a bicycle tyre or have it repaired at a bicycle repair shop.
- Always deflate the tyres when taking the Freestyle 4 XL on an aircraft, as the tyres could burst due to the pressure difference.
- The pushchair may be prone to rusting/tarnishing if used on a beach. Riding through seawater is therefore not advised. Clean the wheels thoroughly after visiting the beach.
- Clean the wheels and axles often and remove any sand or dirt before assembling them.
- The tyres may leave behind black marks on some surfaces (particularly smooth floors like parquet, laminate and linoleum).
ACCESSORIES
Dreami carrycot
Rain/wind cover
Footmuff
Seat insert
The use of non-original accessories can have an adverse effect on the working of the Freestyle 4 XL.
QUESTIONS?
Contact your supplier or importer (see address on the back).
WARRANTY
- The guarantee period takes effect on the date of purchase and is valid for a period of 12 months.
The warranty applies to material and manufacturing faults only. The date of purchase can only be proven using an original sales receipt. The guarantee only applies to the first owner and is not transferable. The guarantee is only valid for products that have not been modified by the user. - In the case of defects contact your supplier. If your supplier cannot help you, he will send the product back to the manufacturer together with a clear description of the complaint and the original proof of purchase with date. Exchange or refund is not possible. Repairs do not give right to extension of the guarantee period.
- The manufacturer is not responsible for damage other than that to the product produced by the manufacturer.
The guarantee is not valid if
- The Product is not returned to the manufacturer with the original proof of purchase.
- The defects found are the result of incorrect use or maintenance, i.e. recommendations in the instruction manual have not been followed.
- Discolouration, damage to the fabric or watermarks due to washing or rainwater.
- The defect is the result of negligence or damage to the fabric or frame due to a blow to the pushchair.
- The defect is the result of an accident or aircraft travel.
- The defect is the result of overburdening (exceeding the maximum weight allowance for child and items being carried).
- The defect is the result of using a standing board for a second child.
- There is normal wear and tear to the wheels, tyres and/or fabric, which can be expected with daily use.
- The product has been involved in a “collision” with, for example, a pavement curb or heavy shop door. The wheels and/or axles will no longer be aligned or may bend, as a result of which the pushchair will not track well.
- Damage to surfaces, such as plastic laminate floors, due to tyre marks.
- The above guarantee conditions have not been fulfilled in some other way.
IMPORTANTE: A lire en premier!
Notities/Notizen/Notes/Notas