
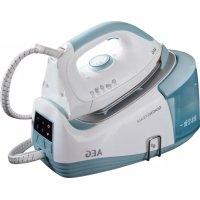
CompactPower DBS7146 - Iron AEG - Free user manual and instructions
Find the device manual for free CompactPower DBS7146 AEG in PDF.
| Product type | Steam station |
| Brand | AEG |
| Model | CompactPower DBS7146 |
| Power supply | 220-240 V, 50/60 Hz |
| Soleplate | CARESSIUM™ ceramic |
| Water tank | Removable, capacity not specified |
| Boiler | Integrated, with safety cap |
| Steam functions | Continuous steam, steam burst, vertical steam |
| Steam setting | Low, medium, high (AUTO/MANUAL) |
| ECO mode | Yes, energy saving up to 20% |
| Temperature | Adjustable by selector, indicator light |
| Handle | Ergonomic |
| Cord storage | Integrated into the base of the generator |
| Cleaning and maintenance | Descaling every 2 months with recommended AEG ECF5 descaler |
| Recommended water | Tap water, filtered (AEG AquaSense) or distilled water |
| Safety | Manual shutdown via power button, boiler safety cap |
| Spare parts | Available from AEG after-sales service |
| Weight | Not specified in the manual |
| Dimensions | Not specified in the manual |
| Warranty | Manufacturer's warranty (refer to the provided document) |
Frequently Asked Questions - CompactPower DBS7146 AEG
User questions about CompactPower DBS7146 AEG
0 question about this device. Answer the ones you know or ask your own.
Ask a new question about this device
Download the instructions for your Iron in PDF format for free! Find your manual CompactPower DBS7146 - AEG and take your electronic device back in hand. On this page are published all the documents necessary for the use of your device. CompactPower DBS7146 by AEG.
USER MANUAL CompactPower DBS7146 AEG
natural_image
Black and white photo of an AEG compact power iron with attached cable, no visible text or symbols on the device itself.CompactPower™ DBS7146GR
GB Instruction book......21-27
Before using the appliance for the first time, please read the safety advice on page 22 carefully.

GB

D
Teile
A. Dampf-Knopf
B. Weicher Griff
C. Temperatur-Justiermarke
D. Temperatur-Wahlscheibe
CONSERVEZ CES INSTRUCTIONS ET RESPECTEZ-LES.
natural_image
Illustration of a steam iron with visible iron handle and body (no text or symbols)D
natural_image
Close-up of a metallic mechanical component with smooth surfaces and a clip (no visible text or symbols)-
Öffnen Sie den Wassertankdeckel. Füllen Sie den Wassertank mit kaltem Wasser. Es wird empfohlen, mit dem AquaSense™-Wasserfilter gefiltertes Wasser ohne Verunreinigungen oder Kalkrückstände zu verwenden. Alternativ empfehlen wir die Verwendung von destilliertem Wasser oder einer Mischung aus 50 % destilliertem und 50 % Leitungswasser, falls das Leitungswasser besonders hart ist. Leeren Sie den Wassertank, um Fremdpartikel, die vom Herstellungsprozess zurückgeblieben sind, herauszuspülen.
-
Ανοίξτε το καπάκι του δοχείου νερού. Γεμίστε το δοχείο νερού με κρύο νερό. Συνιστάται να χρησιμοποιείτε φίλτραρισμένο νερό AEG AquaSense, για την αφαίρεση ρύπων όπως άλατα. Διαφορετικά, χρησιμοποιήστε αποσταγμένο νερό ή ένα μείγμα από 50% αποσταγμένο νερό και 50% νερό βρύσης, αν το νερό της βρύσης είναι ιδιαίτερα σκληρό. Αδειάστε το δοχείο νερού για να το εξπλύνετε από τυχόν ξένα σωματίδια τα οποία ενδέχεται να έχουν παραμείνει από την κατασκευαστική διαδικασία.
-
Open het deksel van de watertank. Vul de watertank met koud water. Het wordt aanbevolen om AEG AquaSense met gefilterd water te gebruiken, waardoor onzuiverheden zoals kalkaanslag worden verwijderd. Gebruik anders gedestilleerd water of een mengsel van 50% gedestilleerd water, 50% kraanwater als het kraanwater erg hard is. Leeg het waterreservoir voor het uitspoelen van door het productieproces achtergebleven vreemde deeltjes.
-
Ouvrez le couvercle du réservoir d'eau. Remplissez le réservoir d'eau froide. Il est recommandé d'utiliser de l'eau filtrée avec la carafe AEG AquaSense pour éliminer les impuretés telles que le calcaire. Vous pouvez également utiliser de l'eau distillée ou un mélange d'eau distillée (50 %) et d'eau du robinet (50 %) si l'eau du robinet est particulièrement calcaire. Videz le réservoir d'eau pour éliminer particules et dépôts.

natural_image
Close-up of a camera lens with a circular 'MAX' label, no other text or symbols visiblenatural_image
Close-up of a black iron iron with a circular dial indicator (no visible text or symbols)-
Wenn die Temperaturanzeige leuchtet, wird die Dampfbügelstation vorgewärmt. Sobald die Anzeige erlischt, ist die Station einsatzbereit. Drücken und halten Sie den Dampfknopf einige Sekunden lang gedrückt, bis Dampf austritt. Halten Sie den Knopf noch ein paar Sekunden länger gedrückt, um das Dampferzeugungssystem zu reinigen.
-
'Отан η ενδεικτική λυχνία θερμοκρασίας ανάψει, ο ατμοσταθμός προθερμαίνεται. 'Отан η λυχνία σβήσει, είναι έτοιμο για χρήση. Πατήστε παρατεταμένα το κουμπί ατμού για μερικά δευτερόλεπτα για δημιουργηθεί ατμός. Στη συνέχεια, πατήστε παρατεταμένα για μερικά ακόμα δευτερόλεπτα για να καθαρίσει το σύστημα παραγωγής ατμού.
-
Wanneer het temperatuurindicatielampje gaat branden, warmt het stoomstation op. Wanneer het lampje dooft, dan is het apparaat klaar voor gebruik. Houd de stoomknop gedurende enkele seconden ingedrukt voor stoom. Houd vervolgens nog enkele seconden ingedrukt om het stoomopwekkingssysteem te reinigen.
-
Lorsque l'indicateur de température s'allume, la centrale vapeur préchauffe. Lorsque le voyant s'éteint, elle est prête à être utilisée. Maintenez le bouton vapeur enfoncé pendant quelques secondes pour obtenir de la vapeur. Maintenez-le enfoncé pendant quelques secondes de plus pour nettoyer le système de génération de vapeur.
Gebrauchsanleitung / Οδηγίες λειτουργίας Gebruiksaanwijzing / Consignes d'utilisation
natural_image
Two steam iron machines emitting smoke, no text or symbols visibleD
natural_image
Illustration of a steam iron emitting steam, showing airflow and motion (no text or symbols)-
Um die Dampffunktion zu aktivieren, drücken Sie den Dampfknopf 3 bis 5 Sekunden lang, und lassen Sie ihn los, um einen konzentrierten Dampfstrahl auszugeben. Wenn Sie den Dampf-Knopf ausgelöst haben achten Sie bitte darauf, dass kein Dampf mehr austritt, bevor Sie den Dampfbügler auf die Bügeleisen-Ablage zurückstellen. Wir empfehlen, den Dampfknopf nur über einen kurzen Zeitraum zu betätigen. Vorsicht! Es darf kein Dampf ausgegeben werden, wenn das Bügeleisen auf der Station steht.
-
Για να ενεργοποιήσετε τη λειτουργία ατμού, πατήστε το κουμπί ατμού για 3-5 δευτερόλεπτα και αφήστε το κουμπί για να εκτοξευτεί πεπιεσμένος ατμός. Όταν απελευθερώσετε το κουμπί, ψεκάστε προς τα πάνω τον ατμό, πρίν τοποθετήσετε πίω σ το σίδερο στο σύστημα. Συνιστάται να χρησιμοποιείτε το κουμπί ατμού για μικρά χρονικά διαστήματα. Προσοχή! Μην απελευθερώνετε ατμό όταν το σίδερο βρίσκεται όρθιο στη βάση του.
-
Voor het activeren van de stoomfunctie, drukt u gedurende 3 - 5 seconden op de stoomknop. Laat de knop los om een geconcentreerde straal stoom te produceren. Wanneer u de stoomknop loslaat, dient alle stoom te zijn verdwenen voordat u het strijkijzer terugplaatst op het stoomstation. Het wordt aanbevolen dat de stoomknop slechts voor korte perioden wordt gebruikt. Let op! Gebruik geen stoom als het strijkijzer op de steun rust.
-
Pour activer la fonction vapeur, appuyez sur le bouton vapeur pendant 3 à 5 secondes, puis relâchez-le pour produire un jet de vapeur concentré. Lorsque vous relâchez le bouton vapeur du fer, assurez-vous avant de le reposer que la vapeur ne se diffuse plus. Il est recommandé de n'appuyer sur le bouton vapeur que pendant de courtes périodes. Attention ! Ne libérez jamais de vapeur lorsque le fer est placé sur sa base.
-
Kontinuierliche Dampffunktion (AUTO): Drücken und halten Sie den Dampfknopf gedrückt, und bewegen Sie den Schieberegler für die Dampfaktivierung nach vorne, um den Dampfknopf zu sperren. Lassen Sie beide Schalter los. Daraufhin wird ein kontinuierlicher und gleichmäßiger Dampfstrahl ausgegeben. Um den Dampfknopf wieder zu entsperren und den kontinuierlichen Dampfstrahl zu unterbrechen, (AUTO-Dampffunktion), bewegen Sie den Schieberegler für die Dampfaktivierung nach hinten.
-
Λειτουργία συνεχούς παροχής ατμού (AUTO): Πατήστε παρατεταμένα το κουμπί ατμού και μετακινήστε το μοχλό ενεργοποίησης ατμού προς τα εμπρός για να κλειδώσετε το κουμπί ατμού. Αφήστε και τα δύο κουμπιά. Ο ατμός θα εκτοξεύεται συνεχόμενα και σταθερά. Για να ξεκλειδώσετε το κουμπί ατμού και να διακόψετε τη συνεχόμενη εκτόξευση ατμού (λειτουργία ατμού AUTO), πιέστε το μοχλό ενεργοποίησης ατμού προς τα πίσω.
-
Continue (AUTO) stoomfunctie: Houd de stoomknop ingedrukt en beweeg de schuifregelaar voor de stoomactivatie naar voren om de stoomknop te vergrendelen. Laat beide knoppen los. Er wordt nu een gelijkmatige, ononderbroken stoomstraal geproduceerd. Om de stoomknop te ontgrendelen en de continue stoomstraal (AUTOMATISCHE stoom) te stoppen, drukt u de schuifregelaar voor stoomactivatie naar achteren.
-
Fonction Vapeur en continu (AUTO) : Appuyez sur le bouton vapeur et maintenez-le enfoncé tout en déplaçant l'activateur vapeur vers l'avant pour verrouiller le bouton vapeur. Relâchez les deux boutons. Le fer produit un jet de vapeur continu. Pour déverrouiller le bouton vapeur et arrêter la production continue de vapeur (AUTO), poussez l'activateur vapeur vers l'arrière.
natural_image
Close-up of a white AEG air vent with two rotary switches and indicator lights (no text or symbols visible)D
natural_image
Close-up of a metallic tool tip with water flowing from it (no text or symbols visible)natural_image
Illustration of a steam iron with visible iron, iron handle, and cord (no text or symbols)natural_image
Close-up of a white fabric or towel with a black strap, no visible text or symbolsD
natural_image
Close-up of a device with labeled parts A and B, showing a cartoon character inside a container (no readable text or symbols)natural_image
Close-up of a kitchen sink with a white container and plastic lid, no visible text or symbolsnatural_image
Close-up of a device with labeled parts A and B, showing internal components and a skull symbol (no readable text or symbols beyond labels)- Füllen Sie die Entkalkermischung in den Dampferzeuger, und befestigen Sie die Sicherheitsabdeckung des Dampferzeugers. Lassen Sie die Mischung bei Raumtemperatur ein bis zwei Stunden ziehen (dieser Zeitraum kann bei übermäßiger Verkalkung auf maximal 8 Stunden verlängert werden).
- Ρίξτε το μείγμα στο μπόιλερ και σφίξτε το κάλυμμα ασφαλείας του μπόιλερ. Αφήστε το για μία έως δύο ώρες σε θερμοκρασία δωματίου (αν χρειαστεί, αυξήστε το χρόνο έως και 8 ώρες).
- Vul het mengsel in de boiler en draai de veiligheidsdop van de boiler vast. Laat het 1 tot 2 uur bij kamertemperatuur inweken (verhoog de inweektijd indien noodzakelijk; max. 8 uur).
- Versez la solution dans la chaudière et serrez le bouchon de sécurité de la chaudière. Laissez agir pendant une ou deux heures à température ambiante (ou plus longtemps si nécessaire, sans dépasser 8 heures). Videz la chaudière.
natural_image
Close-up of a kitchen electric shaver with water flowing from its side (no text or symbols visible)- Kippen Sie die Mischung aus. Füllen Sie den Dampferzeuger mit klarem Wasser, und kippen Sie es aus. Wiederholen Sie diesen Schritt einige Male, bis keine Rückstände mehr zu sehen sind und kein Entkalkergeruch mehr wahrzunehmen ist. Füllen Sie den Dampferzeuger vor dem Zusammenbau mit einem Messbecher voll klarem Wasser. SCHÄDEN, DIE DURCH KALKBEDINGTE VERSTOPFUNG ENTSTANDEN SIND, SIND VON DER GARANTIE AUSGENOMMEN. Lassen Sie den Dampferzeuger nach der Reinigung nicht leer, sondern befüllen Sie ihn mit etwas Wasser (vor dem Schließen).
- Αδειάστε το μείγμα. Γεμίστε το μπόιλερ με καθαρό νερό και αδειάστε το. Επαναλάβετε αυτό το βήμα αρκετές φορές ἐως ότου να φύγουν όλα τα άλατα και να μην υπάρχει πλέον η μυρωδιά του αφαλατικού. Προτού επανασυναρμολογήσετε το μπόιλερ, ρίξτε ξανά ένα φλιτζάνι καθαρού νερού. Η ΕΓΓΥΗΣΗ ΔΕΝ ΚΑΛΥΠΤΕΙ ΤΥΧΟΝ ΒΛΑΒΕΣ ΠΟΥ ΠΡΟΚΑΛΟΥΝΤΑΙ ΑΠΟ ΕΜΦΡΑΞΗ ΛΟΓΩ ΑΛΑΤΩΝ. Μόλις τελειώσετε το καθάρισμα, μην αδειάσετε εντελώς το μπόιλερ, αλλά αφήστε μέσα λίγο νερό (πριν το ξανακλείσετε).
- Giet het mengsel af. Vul de boiler met schoon water en giet deze af. Herhaal deze stap enkele keren totdat de aanslag en de ontkalkingsgeur weg zijn. Plaats een maatbeker met schoon water in de boiler terug vóórdat u deze opnieuw monteert. DE GARANTIE DEKT GEEN SCHADE DIE WORDT VEROORZAAKT DOOR VERVUILING TEN GEVOLGE VAN KALKAANSLAG. Laat het verwarmingselement niet volledig leeg zodra u het hebt gereinigd, maar zorg ervoor dat er een beetje water in blijft staan (voordat u het weer sluit).
- Remplissez la chaudière d'eau et videz-la. Répétez cette opération plusieurs fois jusqu'à ce que le calcaire soit éliminé et que l'odeur du détartrant ait disparu. Versez à nouveau un verre mesureur d'eau pure dans la chaudière avant de réassembler le fer. LA GARANTIE NE COUVRE PAS LES DOMMAGES CAUSÉS PAR LES DÉPÔTS DE CALCAIRE. Une fois le nettoyage terminé, laissez toujours un peu d'eau dans la chaudière (avant de la refermer à nouveau).
natural_image
Illustration of a steam iron with attached circuit board (no text or symbols)
GB
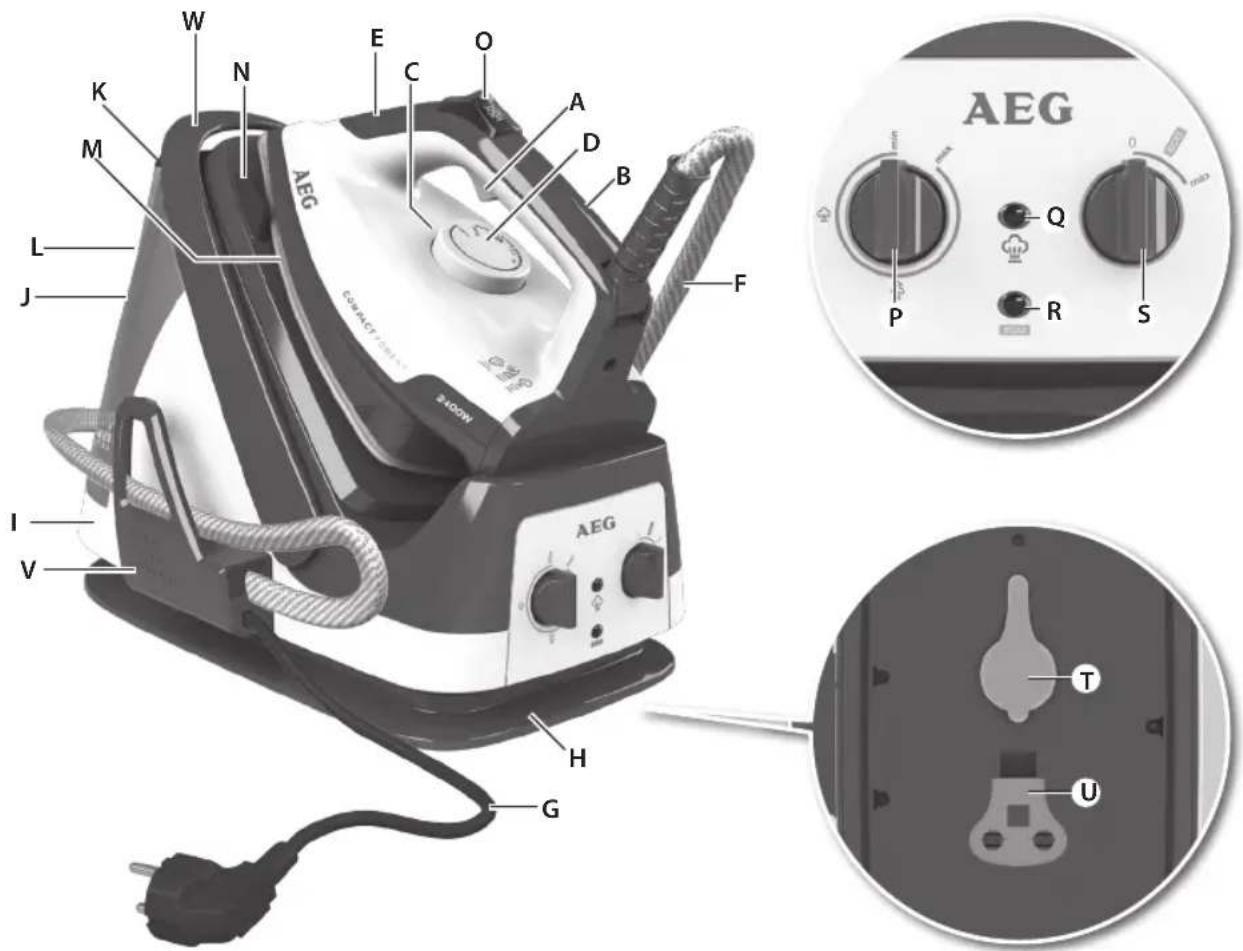
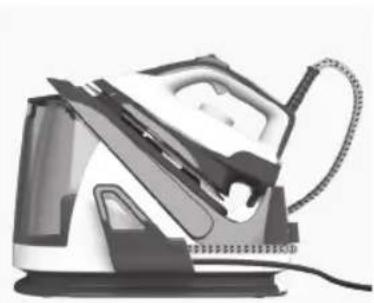
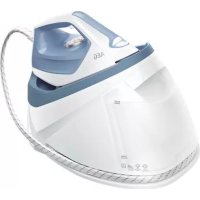
Components
A. Steam button
B. Soft handle
C. Temperature alignment mark
D. Temperature selector
E. Temperature indicator light
F. Steam pipe
G. Power cord
H. Power cord storage
I. Boiler unit
J. Water tank
K. Water tank lid
L. Maximum water level indicator
M. CARESSIUM™ ceramic soleplate
N. Iron rest
O. Steam activation slider (AUTO-MANUAL STEAM)
P. Steam level control knob
Q. Steam level indicator light
R. Power indicator light
S. Power knob
T. Boiler safety cap
U. Boiler flat key
V. Steam cord storage
W. Carry handle
Read the following instruction carefully before using machine for the first time.
GB
- This appliance can be used by children aged from 8 years and above and persons with reduced physical, sensory or mental capabilities or lack of experience and knowledge if they have been given supervision or instruction concerning use of the appliance in a safe way and understand the hazards involved.
• Children shall not play with the appliance.
- Cleaning and user maintenance shall not be made by children without supervision.
- Keep the iron and its cord out of reach of children less than 8 years of age when it is energized or cooling down.
- The surfaces are liable to get hot during use Ⓗ.
- This product is appropriate for use with tap water. It is recommended to use AEG AquaSense filtered water, taking out impurities like limescale. Otherwise use destilled water. If the tap water is particularly hard, use a mix of 50% destilled water and 50% tap water.
- The appliance may only be connected to a power supply whose voltage and frequency comply with the specifications on the rating plate!
- The iron is not to be used if it has been dropped, if there are visible signs of damage on the iron or its cord or if it is leaking.
- The appliance must only be connected to an earthed socket.
- If the appliance or the supply cord is damaged, it must be replaced by the manufacturer, its service agent or similarly qualified person, in order to avoid hazard.
- The iron must be used and rested on a stable surface. When placing the iron on its stand, ensure that the surface on which the stand is placed is stable.
- Never leave the appliance unattended while connected to the supply mains.
- The appliance must be switched off and the mains plug withdrawn each time after use, before cleaning and maintenance.
- The plug must be removed from the socket outlet before the water reservoir is filled with water.
- The mains cable must not come into contact with any hot parts of the appliance.
- Do not immerse the appliance in water or any other liquid.
- Do not exceed the maximum filling volume as indicated on the appliances.
- The filling aperture must not be opened during use.
- Before refilling of the water reservoir, please remove plug from socket.
- This appliance is intended for domestic use only. The manufacturer cannot accept any liability for possible damage caused by improper or incorrect use.
- Do not pour vinegar, descalers or other scented substances into the tank. Otherwise the warranty may be revoked.
- Warning! Before cleaning, always disconnect the plug from the power point and allow the iron to cool down on its stand grille.
The appliance confirm to the Directive 2006/95/CE and to Directive EMC 2004/108/CE. ALWAYS KEEP THESE INSTRUCTIONS.
Ironing chart
GB
Fabric Temperature setting Ironing recommendation
| Acrylic | ● | Dry iron on wrong side. |
| Acetate | ● | Dry iron on wrong side while still damp or use spray to dampen. |
| Nylon & Polyester | ● | Iron on wrong side while still damp or use spray to dampen. |
| Rayon | ● | Iron on wrong side of fabric. |
| Viscose | ● | Mainly dry iron. Steam can be used under manufacturer's instructions. |
| Silk | ● | Iron on wrong side. Use an ironing cloth to prevent shine marks. |
| Cotton blends | ●● | Check label and follow manufacturer's instructions. Use setting fo the fibre requiring lowest setting. |
| Wool & wool blends | ●● | Steam iron on wrong side or use ironing cloth. |
| Cotton | ●●● | Dry iron while still damp or use spray to dampen. Use steam medium to high. |
| Corduroy | ●●● | Steam iron on wrong side or use ironing cloth. |
| Linen | ●●●to "max" | Iron on wrong side or use ironing cloth to prevent shine marks, especially with dark colours. Dry iron while still damp or use spray to dampen. Use steam medium to high. |
| Denim | ●●●to "max" | Use maximum steam. |
| Varied ironing speed and fabric dampness might cause optimal setting to differ from that recommended in the table! | ||
Getting started
natural_image
Illustration of a steam iron with visible steam covers and handle (no text or symbols)GB
- Before first use. Remove all adhesive remains and gently rub with a dampened cloth. Position the steam generator iron horizontally on the ironing-board or on a heat resistant, secure surface at the same height as an ironing-board. Unwind and straighten the power cord and the steam cord. When turned on for the first time, temporary vapours/ odours may occur.

natural_image
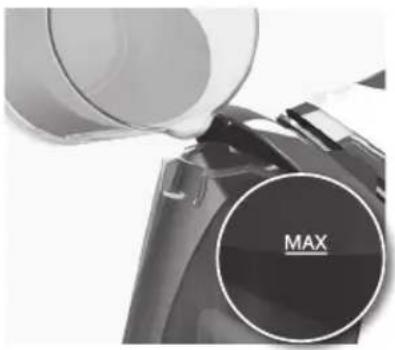
Close-up of a metallic mechanical component with curved surfaces and mounting brackets (no visible text or symbols)- Open the water tank lid. Fill the water tank using cold water. It is recommended to use AEG AquaSense filtered water, taking out impurities like limescale. Otherwise use destilled water. If the tap water is particularly hard, use a mix of 50% destilled water and 50% tap water. Empty the water tank to rinse out any foreign particles which may remain from the manufacturing process.
natural_image
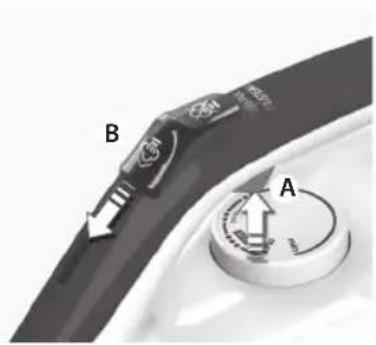
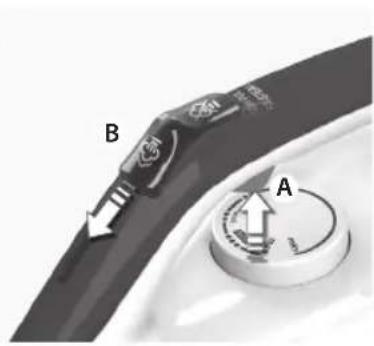
Close-up of a black camera with a circular 'MAX' label, no visible text or symbols on the device itself.- Always refill the water tank to MAX level using cold water (A). Replace the water tank lid. Caution! Never operate the appliance without any water in the tank.
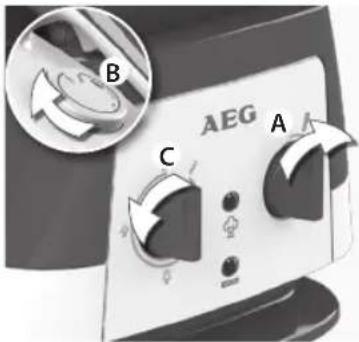
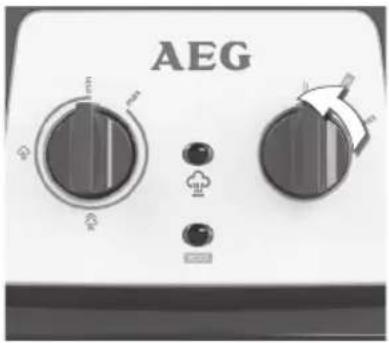
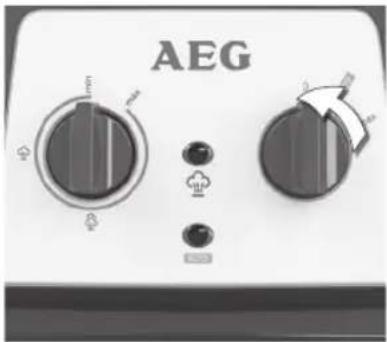
- Connect the steam generator iron to the mains supply. Turn the power knob (A) clockwise to MAX. Turn the temperature selector clockwise to maximum setting (B). The temperature indicator light on the iron will illuminate. Then, select a steam level by turning the steam level control knob between low - medium - high steam (C).

- The steam generator is equipped with ECO setting.
Ironing on ECO setting (ECO setting needs to be selected on both temperature dial and control panel) instead of MAX setting saves up to 20 % energy consumption. ECO setting is using lower pressure, producing lower steam rate but delivering faster heat-up time.
natural_image
Close-up of a white industrial machine knob with a black handle and indicator lights (no visible text or symbols)- When the temperature indicator light turns on, the steam station is pre-heating. When the light turns off, it is ready to be used. Press and hold the steam button for some seconds to get steam. Then hold for a few more seconds in order to clean the steam generating system.
Operating instructions
natural_image
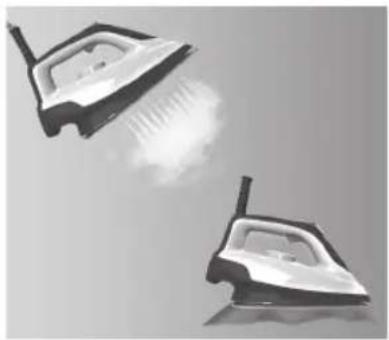
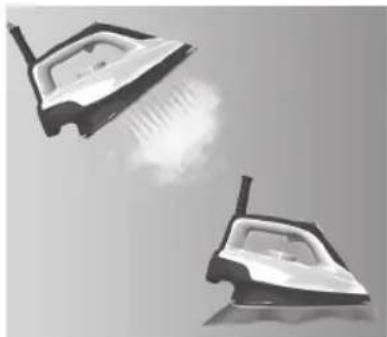
Two steam iron machines emitting steam, one emitting smoke or vapor, against a plain background (no text or symbols)GB
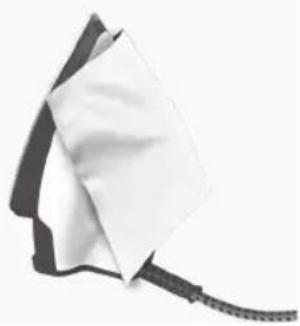
- Iron an old towel, to ensure that any residues inside the iron are not transferred to the laundry. If necessary, wipe the soleplate with a slightly damp cloth.
natural_image
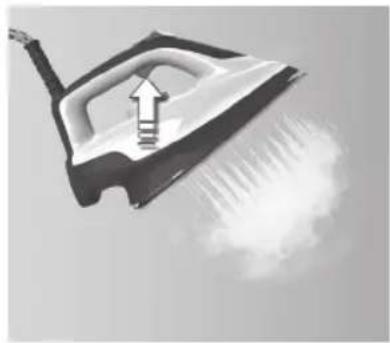
Electric iron with steam emission, showing airflow and smoke trail (no text or symbols)- To activate the steam function, press the steam button for 3-5 seconds, release the button to eject a concentrated jet of steam. When releasing the button, use up the steam before putting it back on the iron rest of the steam station. It is recommended that the steam button is used for short periods. Caution! Never release steam while the iron is standing on its rest.
- Continuous (AUTO) steam function: Press and hold the steam button, and move the steam activation slider forward, to lock the steam button. Release both buttons. A jet steam will eject continuously and steadily (AUTO STEAM). To unlock the steam button and stop the continuous jet steam, press the steam activation slider backwards.
- Turn off the iron by turning the power knob counterclockwise.
natural_image
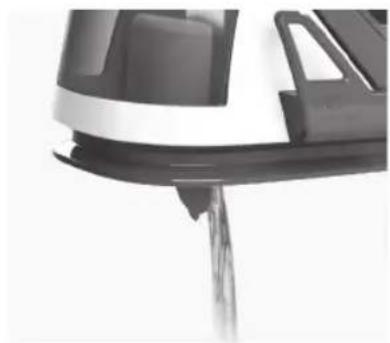
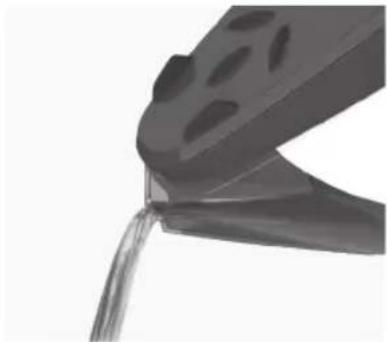
Close-up of a metallic tool tip with water flowing from it (no text or symbols visible)- Always cool the iron fully on the iron rest before stowing away. Once the iron is cool, empty the water tank. Store the steam generator iron on the iron rest.
natural_image
Exterior view of a steam iron with visible iron rack and handle (no text or symbols)- Always store the cord by the cord storage on the generator base. NEVER wind the power cord around the iron.
Cleaning
natural_image
Close-up of a white fabric or towel with a black strap, no visible text or symbols13. Always store iron on its heel rest.
To clean exterior surfaces, use a damp soft cloth and wipe dry. Caution: Do not use any chemical solvents, as these will damage the surface.
natural_image
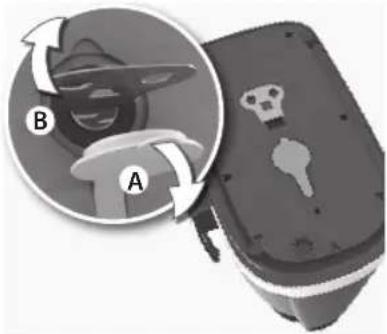
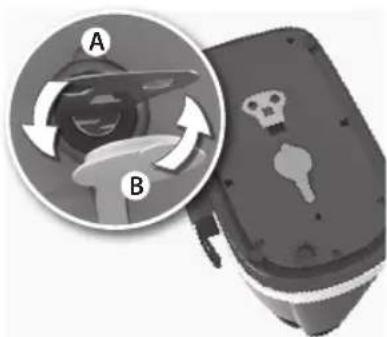
Illustration of a device with labeled parts A and B, showing a stylized face and gear icon (no text or symbols beyond labels)1. Position the appliance so that the boiler safety cap is uppermost.
Remove the rubber cover, unscrew the boiler safety cap using the flat key enclosed in the bottom. Turn the appliance upside-down over a sink and completely empty the boiler.
natural_image
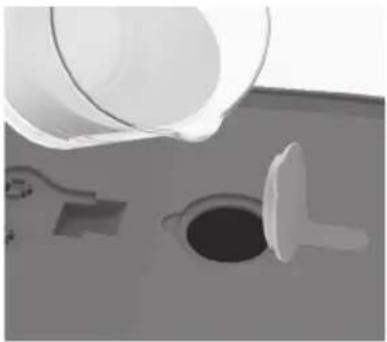
Close-up of a white container pouring liquid into a circular opening, with other small components visible (no text or symbols)- Mix a descaler agent and water at the specified ratio, prepare at least 300ml descaler mixture. (Use recommended ratio for the mixture, if there is much scaling, properly increase the proportion of descaler.) Note: We recommend to use the descaler ECF5 from AEG. Please follow the water/ descaler liquid ratio instructions on the bottle. We recommend to clean the product every 2 months.
natural_image
Close-up of a black electronic device with labeled parts A and B, showing internal components and a circular inset view (no text or symbols on main body)3. Fill the mixture into the boiler and tighten the boiler safety cap.
Soak for one to two hours under room temperature (increase the soaking time if necessary; max 8 hours).
natural_image
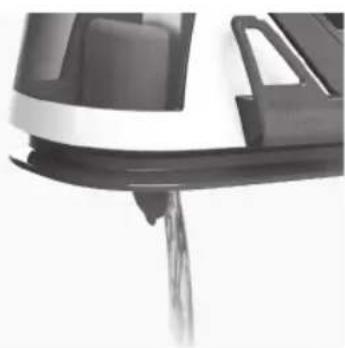
Close-up of a kitchen appliance with a water drain, showing liquid flowing from its side (no text or symbols visible)- Pour out the mixture. Fill the boiler with clean water, then pour it out. Repeat this step for several times until the scales are removed and there is no longer a descaler smell. Place back one measuring cup of clean water in the boiler before reassembling.
THE WARRANTY DOES NOT COVER DAMAGE CAUSED BY CLOGGING DUE TO LIME.
Once cleaning is done, do not keep the boiler completely empty but leave some water still there (before closing it again).
natural_image
Black and white photo of a steam iron with handle and cooling fan (no text or symbols visible)5. When finished using the appliance, turn the temperature dial to the OFF ("MIN") position.
Store the iron on the iron rest. Note: Do not store the iron with water in the tank.
Troubleshooting
GB
| Problem Possible cause Solution | ||
| Soleplate is not heating even though iron is turned on. | Connection problem Check main power supply cable, plug and outlet. | |
| Temperature control is in MIN position. Select adequate temperature. | ||
| Iron does not produce steam. Not enough water in tank. Fill water tank (see "Getting started", no 2). | ||
| Steam control is selected in non-steam position ('MIN'). | Set steam control between positions of minimum steam and maximum steam. | |
| Selected temperature is lower than that specified to use with steam. | Increase temperature to at least ●●● | |
| Steam jet and vertical steam jet function does not work. | Steam jet function was used very frequently within a short period. | Put iron on horizontal position and wait before using steam jet function. |
| Iron is not hot enough. Adjust the proper temperature to steam ironing (up to ●●● Put iron in vertical position and wait until temperature indicator light turns off. | ||
| Water leaks from the soleplate during ironing. | The iron is not hot enough. Set the temperature dial to a temperature (●●● to maximum) suitable for steam ironing. Put the iron on its heel and wait until the light has gone out before you start ironing. | |
| Flakes and impurities come out of the soleplate during ironing. | You have used hard water, which has caused scale flakes to develop in the water tank. | Press and hold the steam button for about one minute to get steam. Then hold one more minute in order to clean the steam generating system. Iron an old towel, to ensure that any residues inside the iron are not transferred to the laundry. |
| Water leaks from the soleplate while the iron is cooling down or after it has been stored. | The iron has been put in horizontal position while there is still water in the water tank. | Empty the water tank and set the steam control to position off before storing the iron. |
| Brown streaks come out of the soleplate while ironing and stain the linen. | You have used chemical descaling agents. | Do not use any descaling agents. |
| Fabric fibres have accumulated in the holes of the soleplate and are burning. | Clean the soleplate with a damp soft cloth. | |
| Fabrics might not be properly rinsed or the garments are new and have not been washed before ironing. | Please rinse the laundry properly again. | |
Disposal
Recycle the materials with the symbol

Put the packaging in applicable
containers to recycle it.
Help protect the environment and human health and to recycle waste of electrical and electronic appliances.
Do not dispose appliances marked with

the symbol ■ with the household waste. Return the product to your local recycling facility or contact your municipal office.


www.aeg-home.com
Printed on recycled paper


With Electrolux, the choice of professionals.
AEG

- D
- Teile
- GB
- Components
- Read the following instruction carefully before using machine for the first time.
- Ironing chart
- Getting started
- Operating instructions
- Cleaning
- Always store iron on its heel rest.
- Position the appliance so that the boiler safety cap is uppermost.
- Fill the mixture into the boiler and tighten the boiler safety cap.
- THE WARRANTY DOES NOT COVER DAMAGE CAUSED BY CLOGGING DUE TO LIME.
- When finished using the appliance, turn the temperature dial to the OFF ("MIN") position.
- Troubleshooting
- Disposal
Brand : AEG
Model : CompactPower DBS7146
Category : Iron