B100 - Ice machine BORETTI - Free user manual and instructions
Find the device manual for free B100 BORETTI in PDF.

| Product type | Ice cream maker with built-in compressor |
| Brand | Boretti |
| Model | B100 |
| Bowl capacity | 800 to 1000 ml |
| Functions | Ice cream, cooling, mixing |
| Maximum operating time | 60 minutes |
| Adjustable timer | 5 to 60 minutes |
| Built-in compressor | Yes (no pre-freezing required) |
| Control panel | LCD screen, POWER, MENU, START/PAUSE buttons, rotary knob |
| Removable bowl | Yes |
| Included accessories | Plastic spatula, measuring cup |
| Cleaning of removable parts | Wash with hot water and dish soap; spatula and measuring cup dishwasher safe |
| Cleaning of the housing | Damp cloth and mild detergent |
| Safety | Automatic shut-off at end of cycle, motor protection against jamming |
| Power supply | 230 V ~ 50 Hz (standard estimate) |
| Warranty | 2 years (accessories and wear parts: 6 months) |
| Use | Domestic |
Frequently Asked Questions - B100 BORETTI
User questions about B100 BORETTI
0 question about this device. Answer the ones you know or ask your own.
Ask a new question about this device
Download the instructions for your Ice machine in PDF format for free! Find your manual B100 - BORETTI and take your electronic device back in hand. On this page are published all the documents necessary for the use of your device. B100 by BORETTI.
USER MANUAL B100 BORETTI
natural_image
Black rectangular electronic device with a circular top and 'BORETTI' logo on the front (no visible text or symbols on body)B100 - B101 - B102
natural_image
Two black-and-white icons: a triangular warning symbol with an exclamation mark and an open book (no text or symbols present)natural_image
Recycling symbol icon with three chasing arrows forming a triangle (no text or labels)natural_image
Recycling symbol icon with three chasing arrows inside a rounded square (no text or labels)natural_image
Recycling symbol icon with three chasing arrows forming a triangle (no text or labels)All of our products are always submitted to a strict quality control before they are sold to you.
Should you nevertheless experience problems with your device, we sincerely regret this.
In that case, we kindly request you to contact our customer service.
Our staff will gladly assist you.

+32 14 21 85 71

info@linea2000.be
Monday – Thursday: 8.30 – 12.00 and 13.00 – 17.00
Friday: 8.30 – 12.00 and 13.00 – 16.30
This appliance has a two year warranty period. During this period the manufacturer is responsible for any failures that are the direct result of construction failure. When these failures occur the appliance will be repaired or replaced if necessary. The warranty will not be valid when the damage to the appliance is caused by wrong use, not following the instructions or repairs executed by a third party. The guarantee is issued with the original till receipt. All parts, which are subject to wear, are excluded from the warranty.
If your device breaks down within the 2-year warranty period, you can return the device together with your receipt to the shop where you purchased it.
The guarantee on accessories and components that are liable to wear-and-tear is only 6 months.
The guarantee and responsibility of the supplier and manufacturer lapse automatically in the following cases:
- If the instructions in this manual have not been followed.
- In case of incorrect connection, e.g., electrical voltage that is too high.
- In case of incorrect, rough or abnormal use.
- In case of insufficient or incorrect maintenance.
- In case of repairs or alterations to the device by the consumer or non-authorised third parties.
- If the customer used parts or accessories that are not recommended or provided by the supplier / manufacturer.

SAFETY INSTRUCTIONS
When using electrical appliances, basic safety precautions should always be taken, including the following:
- Read all instructions carefully. Keep this manual for future reference.
■ Make sure all packaging materials and promotional stickers have been removed before using the appliance for the first time.
■ Make sure children cannot play with the packaging material.
■ This appliance is intended to be used in household and similar applications such as:
■ staff kitchen areas in shops, offices and other working environments;
- farm houses;
■ by clients in hotels, motels and other residential type environments;
■ bed and breakfast type environments.
This appliance is not intended for use by persons (including children) with reduced physical, sensory or mental capabilities, or lack of experience and knowledge, unless they have been given supervision or instruction concerning use of the appliance by a person responsible for their safety.
■ Children should be supervised to ensure that they do not play with the appliance.
This appliance can be used by children aged from 16 years and above and persons with reduced physical, sensory or mental capabilities or lack of experience and knowledge if they have been given supervision or instruction concerning use of the appliance in a safe way and understand the hazards involved. Children shall not play with the appliance. Cleaning and user maintenance shall not be made by children unless they are older than 8 and supervised.
- Keep the appliance and its cord out of reach of children younger than 16 years.
■ The appliance must be disconnected from its power source when not in use, during service and when replacing parts. Allow to cool before putting on or taking off parts, and before cleaning the appliance.
- If the supply cord is damaged, it must be replaced by the manufacturer, its service agent or similarly qualified persons in order to avoid a hazard.
■ CAUTION: In order to avoid a hazard this appliance must not be supplied through an external switching device, such as a timer, or connected to a circuit that is regularly
switched on and off by the utility.
- Never leave the appliance unattended while it is functioning.
- Do not use or store this appliance outdoors.
- Do not use this appliance for other than intended use.
- Check carefully that the voltage and frequency of the power net match the indications on the rating label of the appliance.
- The plug must be plugged into an appropriate outlet that is installed and grounded in accordance with all local standards and requirements.
- Only use the utensils delivered with the appliance.
- Do not operate this appliance with a damaged cord or plug or in the event the appliance malfunctions or has been damaged in any manner. Return the appliance to the DOMO Service Department or its service agent for examination, repair, or electrical or mechanical adjustment. Do not try to repair the appliance yourself.
- To protect against electrical shock or burns, do not immerse unit, cord, or plug in water or other liquid.
- Do not operate the appliance with wet hands.
- A short power supply cord is provided to reduce the risk of becoming entangled in or tripping over a longer cord. DO NOT USE WITH AN EXTENSION CORD.
- Unwrap the cord completely to prevent overheating of the cord.
- Do not let the power supply cord hang over the edge
of a counter, or touch hot surfaces.
- Do not allow the power cord supply to run underneath or around the unit.
- Make sure the appliance is correctly assembled, then plug the cord in the wall outlet. To disconnect, turn controls to "OFF" or "o" position, then remove the plug from the wall. Never pull the cord or appliance to remove the plug from the socket.
- Do not use the appliance if there is any water in it or the parts are still wet after cleaning.
- Do not use the appliance without ingredients.
- Handle with great care when using sharp accessories like knives. Only touch the accessories when they stopped moving inside the appliance.
- Failure to maintain this appliance in a clean condition could adversely affect the life of the appliance and possibly result in a hazardous situation.
- Any injury or damage caused by failure to comply with these rules are at your own risk. Neither the manufacturer, importer, or the supplier may be held liable.
SAVE THESE INSTRUCTIONS FOR FUTURE REFERENCE.
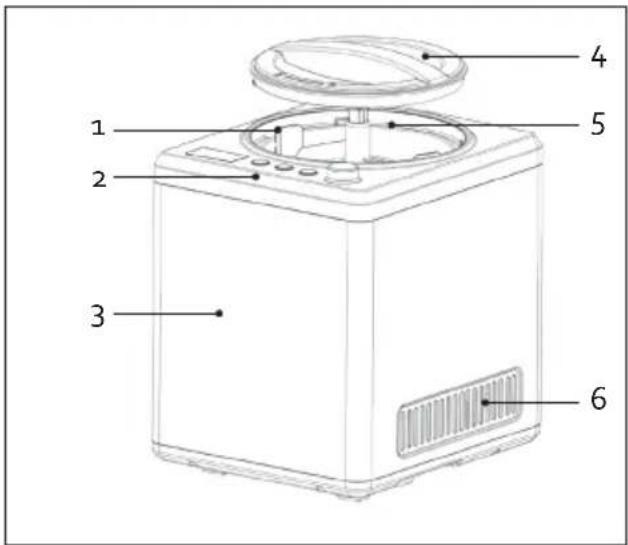
PARTS
- Mixer
- Control panel
- Housing
- Transparent lid
- Removable bowl
- Ventilation grid
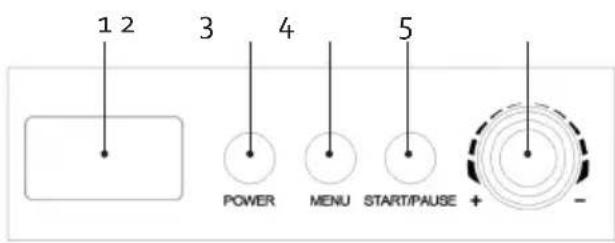
CONTROL PANEL
- Display
- Power button
- Menu button for cooling, mixing and ice cream
- START/PAUSE button
- Turning knob to set the time (max. 60 min.)
BEFORE THE FIRST USE
CLEANING
Thoroughly clean all parts of the ice cream maker that will come into contact with the ice cream: the fixed bowl, the removable bowl, the mixer, the lid, the measuring cup and the spatula. Dry the parts thoroughly before using them.
PREPARING THE INGREDIENTS
- Prepare the ingredients according to the recipe you want to make.
- Pour the mixture into the removable bowl.
Caution: The total volume of the ingredients cannot exceed 800-1,000 ml. The ice cream will expand when it is mixed.
Caution: It is not needed to place the bowl into the freezer beforehand. Thanks to the built-in compressor the ice cream maker freezes while mixing.
ASSEMBLING
- Make sure that the appliance is unplugged.
- Place the ice cream maker on a flat, stable surface.
- Place the removable bowl into the fixed bowl in the machine.
- Place the mixer into the removable bowl by sliding the mixer over the axis in the bowl, so that it falls into position. The image shows which parts of the mixer and the axis should be lined up.
- Place the transparent lid onto the bowl and turn it counter clockwise to lock it.
★ USE
- Plug in the ice cream maker. The display will indicate «oo:oo»
- Press the POWER button, it will light up. The appliance is now switched on and the display will indicate «60:00».
- Press the MENU button to choose the program you'd like to run.
- Ice cream: to make ice cream. Standard time: 60 min.
- Cooling: keep the contents of the bowl cool, without them being mixed. Standard time: 30 min.
-
Mixing: mix the ingredients, without them being cooled further. Standard time: 10 min.
-
You can adjust the standard time with the turning knob, minimum 5 min. and maximum 60 min.
-
Press the START/STOP button. The ice cream maker will start mixing. The background light of the display will stay lit up during the entire process. The remaining time and the temperature are alternately displayed.
-
If you want to stop or restart the mixer during the process, press the START/STOP button shortly. The compressor will still keep freezing.
-
To completely stop the process and return to the initial start-up state, hold down the START/STOP button for longer than 3 seconds.
-
When the set time has passed, the appliance will automatically stop operating and produce 3 beeping sounds. The LCD display will indicate «oo:oo» and the background light will blink.
-
Shut the appliance off with the power button and remove the bowl.
-
Scoop the ice cream out of the bowl with a plastic spatula and put the ice cream into a different bowl or container. Do not use metal objects in the bowl to avoid scratching. Caution: Never knock the removable bowl or the edge of the bowl onto for instance a table to remove the ice cream. This will damage the bowl.
Tip: After 60 minutes on the Ice Cream function, it's possible for the ice cream to still be a bit soft. If you like, however, you can use the cooling function for about 30 minutes to give the ice cream a stronger consistency. You can of course adjust this to your own preferences.
Optional: Quick Ice
You can speed up the process with heat removal by conduction between the two bowls
- Pour a measure of food-grade alcohol (60 proof or higher for example brandy) or brine in the fixed bowl.
- To make the brine, mix 35ml water with 8g salt or 2 teaspoons.
- The measuring glass enable you to put in exactly the right amount. It holds 35ml about 5 tablespoons.
- To check that you have added the right amount of brine or food-grade alcohol, lower your removable bowl into position, then lift it out again. The whole of the outer surface should be wet.
- To avoid oxidation spots, make sure you remove all the liquid with a sponge or a wad of kitchen paper after use.
ATTENTION: It is very important to clean the appliance after using the brine.
PROLONGED COOLING
When the appliance is not switched off after the end of the mixing process, the appliance will automatically switch to prolonged cooling. The appliance will cool for another 2 hours in total - with intervals of 10 minutes - to maintain the consistency of the ice cream. When the compressor starts functioning the display indicates the cool function ✦ After 2 hours, the ice cream maker will switch back to its initial start-up status.
ADJUSTING THE TIME DURING THE MIXING PROCESS
When the appliance is operating, you can simply adjust the duration by turning the turning knob either to the left or to the right.
ADDING TIME AFTER THE MIXING PROCESS
When the mixing process has ended and the appliance has switched back to its initial start-up status, you can set the time again and press the START/STOP button to mix the ice cream a little longer. For example because it was not hard enough yet.
SELF-PROTECTION FUNCTION OF THE MOTOR
When the ice cream becomes too hard, the motor could get blocked. The self-protection function makes sure that the motor is automatically stopped in that case.
★ CLEANING AND MAINTENANCE
■ Before cleaning, pull the plug from the wallsocket.
- Clean the stainless steel housing with a damp cloth and some mild detergent.
- Wash the following loose parts in warm water with soap: transparent lid and removable bowl. The other loose parts (spatula & measuring cup) may be washed in the dishwasher.
- Never immerse the appliance in water.
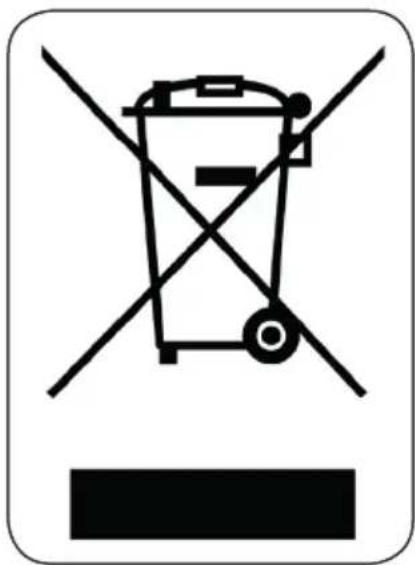
★ ENVIRONMENTAL GUIDELINES
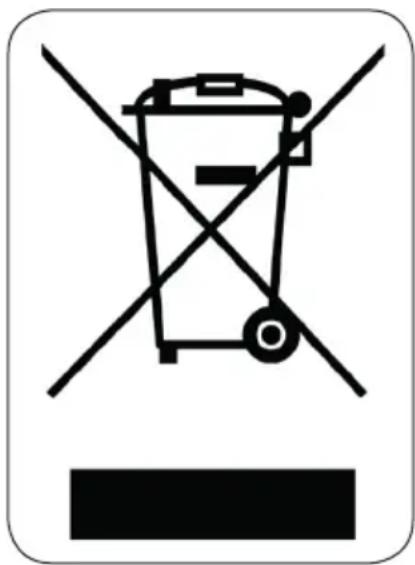
This symbol on the product or on its packaging indicates that this product may not be treated as household waste. Instead it must be brought to the applicable collection point for recycling of electrical and electronic equipment. By ensuring this product is disposed of correctly, you will help prevent potential negative consequences for the environment and human health, which could otherwise be caused by inappropriate waste handling of this product. For more detailed information about recycling of this product, please contact your local city office, your household waste disposal service or the shop where you purchased the product.
natural_image
Recycling symbol icon with three chasing arrows forming a triangle (no text or labels)The packaging is recyclable. Please treat the packaging ecologically.

GARANTIA
natural_image
Recycling symbol icon with three chasing arrows inside a rounded square (no text or labels)TUHLE PŘÍRUČKU USCHOVEJTE I PRO DALŠÍ UŽIVATELE.
★ ČÁSTI
OHLED NA ŽÍVOTNÍ PROSTŘEDÍ