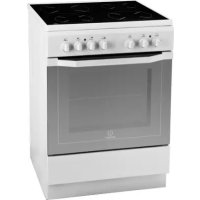
USER MANUAL I6VMH2A.1(W)NL INDESIT
Positioning and levelling
Electrical connection
Gas connection
Adapting to different types of gas
Table of burner and nozzle specifications
Table of characteristics
Description of the appliance, 17
Overall view
Control panel
Start-up and use, 18
Using the hob
Using the oven
Cooking modes
Practical cooking advice
Timer
Oven cooking advice table
Precautions and tips, 22
General safety
Disposal
Respecting and conserving the environment
Care and maintenance, 23
Switching the appliance off
Cleaning the appliance
Replacing the oven light bulb
Gas tap maintenance
Assistance
GB
WARNING: The appliance and its accessible parts become hot during use.
Care should be taken to avoid touching heating elements.
Children less than 8 years of age shall be kept away unless continuously supervised.
This appliance can be used by children aged from 8 years and above and persons with reduced physical, sensory or mental capabilities or lack of experience and knowledge if they have been given supervision or instruction concerning use of the appliance in a safe way and understand the hazards involved. Children shall not play with the appliance. Cleaning and user maintenance shall not be made by children without supervision.
WARNING: Unattended cooking on a hob with fat or oil can be dangerous and may result in fire.
NEVER try to extinguish a fire with water, but switch off the appliance and then cover flame e.g. with a lid or a fire blanket.
WARNING: Danger of fire: do not store items on the cooking surfaces.
WARNING: If the surface in glass-ceramic is cracked, switch off the appliance to avoid the possibility of electric shock. Do not use harsh abrasive cleaners or sharp metal scrapers to clean the oven door glass since they can scratch the surface, which may result in shattering of the glass.
The internal surfaces of the compartment (where present) may become hot.
Never use steam cleaners or pressure cleaners on the appliance.
Remove any liquid from the lid before opening it. Do not close the
glass cover (if present) when the gas burners or electric hotplates are still hot.
WARNING: Ensure that the appliance is switched off before replacing the lamp to avoid the possibility of electric shock.
! When you place the rack inside, make sure that the stop is directed upwards and in the back of the cavity.
! Before operating your new appliance please read this instruction booklet carefully. It contains important information concerning the safe installation and operation of the appliance. ! Please keep these operating instructions for future reference. Make sure that the instructions are kept with the appliance if it is sold, given away or moved. The appliance must be installed by a qualified professional in accordance with the instructions provided. ! Any necessary adjustment or maintenance must be performed after the cooker has been disconnected from the electricity supply.
Positioning and levelling
It is possible to install the appliance alongside cupboards whose height does not exceed that of the hob surface. Make sure that the wall in contact with the back of the appliance is made from a non-flammable, heat-resistant material (T 90°C
To install the appliance correctly:
- Place it in the kitchen, the dining room or the bed-sit (not in the bathroom).
- If the top of the hob is higher than the cupboards,
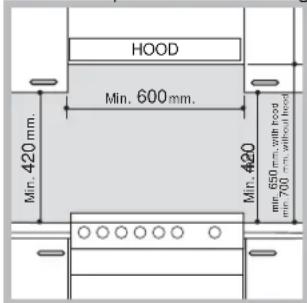
the appliance must be installed at least 600 mm away from them.
- If the cooker is installed underneath a wall cabinet, there must be a minimum distance of 420 mm between this cabinet and the top of the hob.
This distance should be increased to 700 mm if the wall cabinets are flammable (see figure). - Do not position blinds behind the cooker or less than 200 mm away from its sides. - Any hoods must be installed according to the instructions listed in the relevant operating manual.
Levelling
If it is necessary to level the appliance, screw the
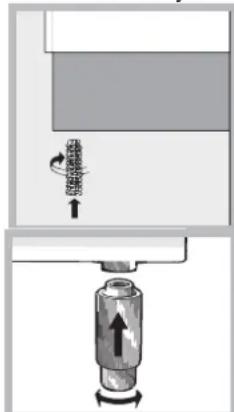
adjustable feet into the places provided on each corner of the base of the cooker (see figure).
The legs* fit into the slots on the underside of the base of the cooker.
* Only available in certain models.
Electrical connection
Fitting the power supply cable To open the terminal board:
- Insert a screwdriver into the side tabs of the terminal board cover. Pull the cover to open it.
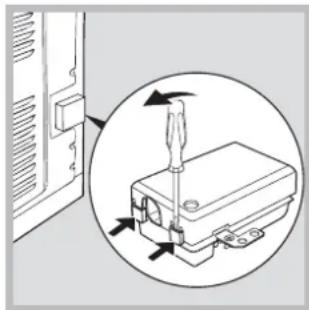
To install the cable, follow the instructions below: - Loosen the cable
clamp screw and the wire contact screws.
The jumpers are pre-set at the factory for 230 V single-phase connection (see figure).
230V~
H05RR-F 3x4 CEI-UNEL 35363
H05VV-F 3x4 CEI-UNEL 35746
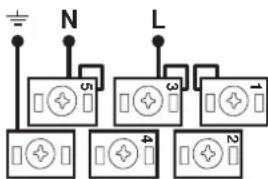
- To carry out the electrical connections as shown in the figures, use the two jumpers inside the box (see figure - labelled "P").
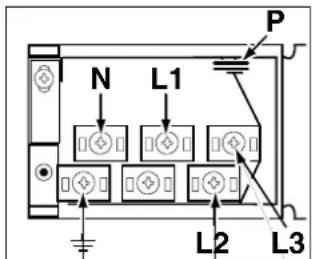
400V 2N~ H05RR-F 4x4 CEI-UNEL 35363 H05VV-F 4x4 CEI-UNEL 35746
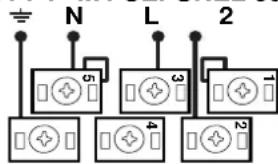
L
1
L
B
GB
Secure the power supply cable by fastening the cable clamp screw, then put the cover back on.
Connecting the supply cable to the electricity mains: Install a standardised plug corresponding to the load indicated on the appliance data plate (see Technical data table).
The appliance must be directly connected to the mains using an omnipolar switch with a minimum contact opening of 3 mm installed between the appliance and the mains. The switch must be suitable for the charge indicated and must comply with current electrical regulations (the earthing wire must not be interrupted by the switch). The supply cable must be positioned so that it does not come into contact with temperatures higher than 50°C at any point.
Before connecting the appliance to the power supply, make sure that:
- The appliance is earthed and the plug is compliant with the law.
- The socket can withstand the maximum power of the appliance, which is indicated by the data plate.
- The voltage is in the range between the values indicated on the data plate.
- The socket is compatible with the plug of the appliance. If the socket is incompatible with the plug, ask an authorised technician to replace it. Do not use extension cords or multiple sockets.
! Once the appliance has been installed, the power supply cable and the electrical socket must be easily accessible. 1 The cable must not be bent or compressed. The cable must be checked regularly and replaced by authorised technicians only. ! The manufacturer declines any liability should these safety measures not be observed.
Safety Chain
! In order to prevent accidental tipping of the appliance, for example by a child climbing onto the oven door, the supplied safety chain MUST be installed!
The cooker is fitted with a safety chain to be fixed by means of a screw (not supplied with the cooker) to the wall behind the appliance, at the same height as the chain is attached to the appliance.
Choose the screw and the screw anchor according to the type of material of the wall behind the appliance. If the head of the screw has a diameter smaller than 9mm , a washer should be used. Concrete wall requires the screw of at least 8mm of diameter, and 60mm of length.
Ensure that the chain is fixed to the rear wall of the cooker and to the wall, as shown in figure, so that after installation it is tensioned and parallel to the ground level.
| TABLE OF CHARACTERISTICS |
| Oven dimensions (HxWxD) | 32.4x43.5x41.3 cm | I6VMH2A' NL |
| 32.4x45.5x41.3 cm | I6VMH2A.1' NL |
| Volume | 61 I 6VMH2A.1/ NL |
| 59 I 6VMH2A' NL |
| Useful measurements relating to the oven compartment | width 42 cm |
| depth 44 cm |
| height 8.5 cm |
| Voltage and frequency | see data plate |
| Ceramic hob | | |
| Front Left | 1700 W |
| Back Left | 1200 W |
| Back Right | 2100 W |
| Front Right | 1200 W |
| Max. ceramic hob consumption | 6200 W |
| ENERGY LABEL and ECODESIGN | Regulation (EU) No 65/2014 supplemen-ting Directive 2010/30/EU.Regulation (EU) No 66/2014 implementing Directive 2009/125/EC.Standard EN 60350-1Standard EN 50564.Standard EN 60350-2.Energy consumption for Natural convection - heating mode: Traditional mode Declared energy consumption for Forced convection Class - heating mode:Baking. |
| This appliance conforms to the following European Economic Community directives:2006/95/EC dated 12/12/06 (Low Voltage) and subsequent amendments - 2004/108/EC dated 15/12/04 (Electromagnetic Compatibility) and subsequent amendments - 93/68/EEC dated 22/07/93 and subsequent amendments. 2002/96/EC 1275/2008 (Stand-by/Off mode) |
Data plate, is located inside the flap or, after the oven compartment has been opened, on the left-hand wall inside the oven.
GB
Overall view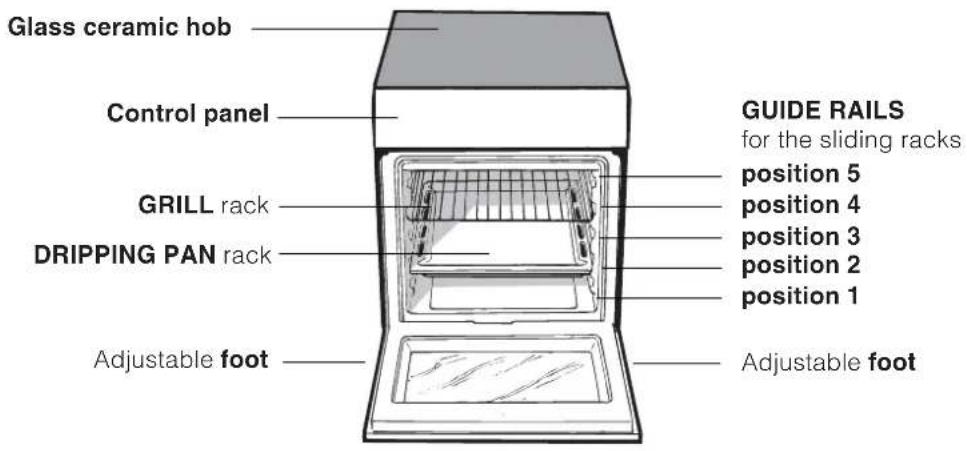
Control panel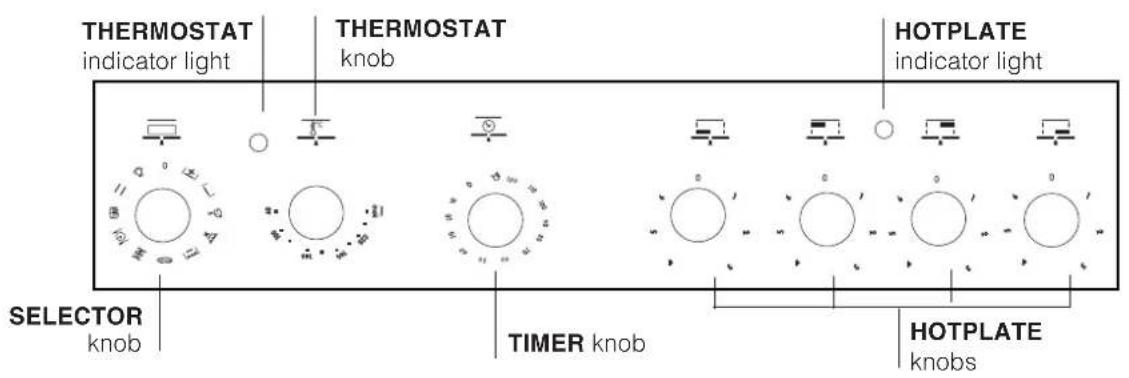
The first time you use your appliance, heat the empty oven with its door closed at its maximum temperature for at least half an hour. Ensure that the room is well ventilated before switching the oven off and opening the oven door. The appliance may emit a slightly unpleasant odour caused by protective substances used during the manufacturing process burning away. Before operating the product, remove all plastic film from the sides of the appliance.
Starting the oven
- Select the desired cooking mode by turning the SELECTOR knob.
- Select the recommended temperature for the cooking mode or the desired temperature by turning the THERMOSTAT knob.
A list detailing cooking modes and suggested cooking temperatures can be found in the relevant table (see Oven cooking advice table).
During cooking it is always possible to:
- Change the cooking mode by turning the SELECTOR knob.
- Change the temperature by turning the THERMOSTAT knob.
- Set the total cooking time and the cooking end time (see below).
- Stop cooking by turning the SELECTOR knob to the "0" position.
! Never put objects directly on the bottom of the oven; this will prevent the enamel coating from being damaged. Only use position 1 in the oven when cooking with the rotisserie spit.
Always place cookware on the rack(s) provided.
THERMOSTAT indicator light
When this is illuminated, the oven is generating heat. It switches off when the inside of the oven reaches the selected temperature. At this point the light illuminates and switches off alternately, indicating that the thermostat is working and is maintaining the temperature at a constant level.
Oven light
This is switched on by turning the SELECTOR knob to any position other than "0". It remains lit as long as the oven is operating. By selecting with the knob, the light is switched on without any of the heating elements being activated.
Cooking modes
! A temperature value can be set for all cooking modes between 60°C and Max, except for the following modes
- GRILL (recommended: set only to MAX power level)
- GRATIN (recommended: do not exceed 200°C).
TRADITIONAL OVEN mode
Both the top and bottom heating elements will come on. When using this traditional cooking mode, it is best to use one cooking rack only. If more than one rack is used, the heat will be distributed in an uneven manner.

BAKING
mode
The rear heating element and the fan are switched on, thus guaranteeing the distribution of heat in a delicate and uniform manner throughout the entire oven. This mode is ideal for baking and cooking temperature sensitive foods (such as cakes that need to rise) and for the preparation of pastries on 3 shelves simultaneously.

FAST COOKING mode
The heating elements and the fan come on, guaranteeing the distribution of heat consistently and uniformly throughout the oven.
Preheating is not necessary for this cooking mode. This mode is particularly suitable for cooking pre-packed food quickly (frozen or pre-cooked). The best results are achieved using one cooking rack only.

MULTI-COOKING mode
All the heating elements (top, bottom and circular) switch on and the fan begins to operate. Since the heat remains constant throughout the oven, the air cooks and browns food in a uniform manner. A maximum of two racks may be used at the same time.

PIZZA mode
The circular heating elements and the elements at the bottom of the oven are switched on and the fan is activated. This combination heats the oven rapidly by producing a considerable amount of heat, particularly from the element at the bottom. If you use more than one rack at a time, switch the position of the dishes halfway through the cooking process.

GRILL mode
The central part of the top heating element is switched on. The high and direct temperature of the grill is recommended for food that requires a high surface temperature (veal and beef steaks, fillet steak and entrecôte). This cooking mode uses a limited amount of energy and is ideal for grilling small dishes. Place the food in the centre of the rack, as it will not be cooked properly if it is placed in the corners.

GRATIN mode
The top heating element and the rotisserie (where present) are activated and the fan begins to operate. This combination of features increases the effectiveness of the unidirectional thermal radiation provided by the heating elements through forced circulation of the air throughout the oven. This helps prevent food from burning on the surface and allows the heat to penetrate right into the food.
! The GRILL and GRATIN cooking modes must be performed with the oven door shut.

DEFROSTING
mode
The fan located on the bottom of the oven makes the air circulate at room temperature around the food. This is recommended for the defrosting of all types of food, but in particular for delicate types of food which do not require heat, such as for example: ice cream cakes, cream or custard desserts, fruit cakes. By using the fan, the defrosting time is approximately halved. In the case of meat, fish and bread, it is possible to accelerate the process using the "multi-cooking" mode and setting the temperature to 80° - 100°C .

ITTOM VENTILATED MODEL
The bottom heating element and the fan is activated, which allows for the heat distribution within the whole cavity of the oven. This combination is useful for light cooking of vegetables and fish.

BOTTOM mode :
The lower heating element is activated. This position is recommended for perfecting the cooking of dishes (in baking trays) which are already cooked on the surface but require further cooking in the centre, or for desserts with a covering of fruit or jam, which only require moderate colouring on the surface. It should be noted that this function does not allow the maximum temperature to be reached inside the oven (250°C)
and it is therefore not recommended that foods are cooked using only this setting, unless you are baking cakes (which should be baked at a temperature of 180°C or lower).
Practical cooking advice
! In the GRILL cooking mode, place the dripping pan in position 1 to collect cooking residues (fat and/or grease).
GRILL
- Insert the rack in position 3 or 4. Place the food in the centre of the rack. We recommend that the power level is set to maximum. The top heating element is regulated by a thermostat and may not always operate constantly.
PIZZA
- Use a light aluminium pizza pan. Place it on the rack provided. For a crispy crust, do not use the dripping pan as it prevents the crust from forming by extending the total cooking time.
- If the pizza has a lot of toppings, we recommend adding the mozzarella cheese on top of the pizza halfway through the cooking process.
part, and pull (2).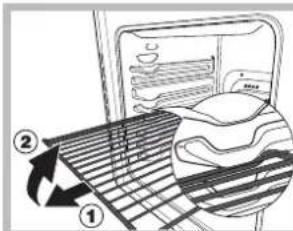
WARNING! The oven is provided with a stop system to extract the racks and prevent them from coming out of the oven.(1) As shown in the drawing, to extract them completely, simply lift the racks, holding them on the front
Cooking Control Timer Knob
Some models are equipped with a timer program to control when the oven shuts off during cooking. To use this feature, you must wind the knob one full turn in the counter-clockwise direction. Then, turn the knob in the clockwise direction, to set the time by matching up the indicator on the control panel with the number of minutes on the knob.
At the end of the programmed length of time, the timer will sound and automatically turn off the oven.
Attention: to use the oven in manual mode without the cooking control timer, match the indicator on the
control panel with the symbol on the timer knob. When the oven is not in use, the cooking control timer can be used like a normal timer.
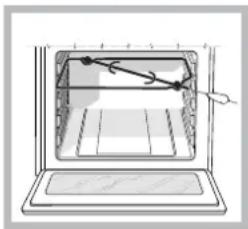
Rotisserie
To operate the rotisserie (see diagram) proceed as follows:
- Place the dripping pan in position 1.
- Place the rotisserie support in position 4 and insert the spit
in the hole provided on the back panel of the oven. 3. Activate the rotisserie by
selecting
W with the
SELECTOR knob.
- Only available in certain models
Oven cooking advice table
| Cooking modes | Foods | Weight (in kg) | Rack Position | Pre-heating time (minutes) | Recommended temperature | Cooking time (minutes) |
| Traditional Oven | Duck | 1 | 3 | 15 | 200 | 65-75 |
| Roast veal or beef | 1 | 3 | 15 | 200 | 70-75 |
| Pork roast | 1 | 3 | 15 | 200 | 70-80 |
| Biscuits (short pastry) | - | 3 | 15 | 180 | 15-20 |
| Tarts | 1 | 3 | 15 | 180 | 30-35 |
| Baking Mode | Tarts | 0.5 | 3 | 15 | 180 | 20-30 |
| Fruit cakes | 1 | 2 or 3 | 15 | 180 | 40-45 |
| Plum cake | 0.7 | 3 | 15 | 180 | 40-50 |
| Sponge cake | 0.5 | 3 | 15 | 160 | 25-30 |
| Stuffed pancakes (on 2 racks) | 1.2 | 2 and 4 | 15 | 200 | 30-35 |
| Small cakes (on 2 racks) | 0.6 | 2 and 4 | 15 | 190 | 20-25 |
| Cheese puffs (on 2 racks) | 0.4 | 2 and 4 | 15 | 210 | 15-20 |
| Cream puffs (on 3 racks) | 0.7 | 1 and 3 and 5 | 15 | 180 | 20-25 |
| Biscuits (on 3 racks) | 0.7 | 1 and 3 and 5 | 15 | 180 | 20-25 |
| Meringues (on 3 racks) | 0.5 | 1 and 3 and 5 | 15 | 90 | 180 |
| Fast cooking | Frozen food | | | | | |
| Pizza | 0.3 | 2 | - | 250 | 12 |
| Courgette and prawn pie | 0.4 | 2 | - | 200 | 20 |
| Country style spinach pie | 0.5 | 2 | - | 220 | 30-35 |
| Turnovers | 0.3 | 2 | - | 200 | 25 |
| Lasagne | 0.5 | 2 | - | 200 | 35 |
| Golden Rolls | 0.4 | 2 | - | 180 | 25-30 |
| Chicken morsels | 0.4 | 2 | - | 220 | 15-20 |
| Pre-cooked food | | | | | |
| Golden chicken wings | 0.4 | 2 | - | 200 | 20-25 |
| Fresh Food | | | | | |
| Biscuits (short pastry) | 0.3 | 2 | - | 200 | 15-18 |
| Plum cake | 0.6 | 2 | - | 180 | 45 |
| Cheese puffs | 0.2 | 2 | - | 210 | 10-12 |
| Multi-cooking | Pizza (on 2 racks) | 1 | 2 and 4 | 15 | 230 | 15-20 |
| Lasagne | 1 | 3 | 10 | 180 | 30-35 |
| Lamb | 1 | 2 | 10 | 180 | 40-45 |
| Roast chicken + potatoes | 1+1 | 2 and 4 | 15 | 200 | 60-70 |
| Mackerel | 1 | 2 | 10 | 180 | 30-35 |
| Plum cake | 1 | 2 | 10 | 170 | 40-50 |
| Cream puffs (on 2 racks) | 0.5 | 2 and 4 | 10 | 190 | 20-25 |
| Biscuits (on 2 racks) | 0.5 | 2 and 4 | 10 | 180 | 10-15 |
| Sponge cake (on 1 rack) | 0.5 | 2 | 10 | 170 | 15-20 |
| Sponge cake (on 2 racks) | 1 | 2 and 4 | 10 | 170 | 20-25 |
| Savoury pies | 1.5 | 3 | 15 | 200 | 25-30 |
| Pizza Mode | Pizza | 0.5 | 3 | 15 | 220 | 15-20 |
| Roast veal or beef | 1 | 2 | 10 | 220 | 25-30 |
| Chicken | 1 | 2 or 3 | 10 | 180 | 60-70 |
| Barbecue | Soles and cuttlefish | 0.7 | 4 | - | Max | 10-12 |
| Squid and prawn kebabs | 0.6 | 4 | - | Max | 8-10 |
| Cuttlefish | 0.6 | 4 | - | Max | 10-15 |
| Cod filet | 0.8 | 4 | - | Max | 10-15 |
| Grilled vegetables | 0.4 | 3 or 4 | - | Max | 15-20 |
| Veal steak | 0.8 | 4 | - | Max | 15-20 |
| Sausages | 0.6 | 4 | - | Max | 15-20 |
| Hamburgers | 0.6 | 4 | - | Max | 10-12 |
| Mackerels | 1 | 4 | - | Max | 15-20 |
| Toasted sandwiches (or toast) | 4 and 6 | 4 | - | Max | 3-5 |
| Gratin | Grilled chicken | 1.5 | 2 | 10 | 200 | 55-60 |
| Cuttlefish | 1.5 | 2 | 10 | 200 | 30-35 |
| Bottom Ventilated | Bream | 0.5 | 3 | \(18^{\prime}\) | 170-180 | 25-35 |
| Codfish fillet | 0.5 | 3 | \(16^{\prime}\) | 160-170 | 15-20 |
| Sea bass in foil | 0.5 | 3 | \(24^{\prime}\) | 200-210 | 35-45 |
| Mixed vegetables (Ratatouille type) | 0.8-1,0 | 3 | \(21^{\prime}\) | 190 -200 | 50 -60 |
| Well-done vegetables | 1,5-2,0 | 3 | \(20^{\prime}\) | 180 - 190 | 55 - 60 |
| Bottom | For perfecting cooking |
! The glue applied on the gaskets leaves traces of grease on the glass. Before using the appliance, we recommend you remove these with a special non-abrasive cleaning product. During the first few hours of use there may be a smell of rubber which will disappear very quickly.
Switching the cooking zones on and off
To switch on a cooking zone, turn the corresponding knob in a clockwise direction.
To switch it off again, turn the knob in an anticlockwise direction until it is in the "0" position.
If the COOKING ZONE ON indicator light is lit, this shows that at least one of the cooking zones on the hob is switched on.
Cooking zones
The hob is equipped with electric radiant heating elements. When they are in use the following items on the hob become red.
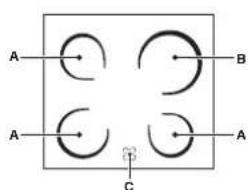
A. The cooking zone with radiant heating elements. B. The cooking zone with HILITE heating elements. C. The residual heat indicator light: this indicates
that the temperature of the corresponding cooking zone is greater than 60°C even when the heating element has been switched off but is still hot.
Cooking zones with radiant heating elements.
The circular radiant heating elements become red 10-20 seconds after they have been switched on.
| Setting | Normal or Fast Plate |
| 0 | Off |
| 1 | Cooking vegetables, fish |
| 2 | Cooking potatoes (using steam) soups, chickpeas, beans. |
| 3 | Continuing the cooking of large quantities of food, minestrone |
| 4 | For roasting (average) |
| 5 | For roasting (above average) |
| 6 | For browning and reaching a boil in a short time. |
Practical advice on using the hob
- Use pans with a thick, flat base to ensure that they adhere perfectly to the cooking zone.
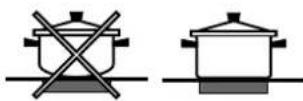
Always use pans with a diameter that is large enough to cover the hotplate fully, in order to use all the heat produced.
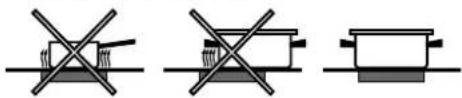
Always make sure that the base of the pan is completely clean and dry: this ensures that the pans adhere perfectly to the cooking zones and that both the pans and the hob remain effective for a longer period of time. - Avoid using the same cookware that is used on gas burners: the heat concentration on gas burners may have warped the base of the pan, causing it not to adhere to the surface correctly. - Never leave a cooking zone switched on without a pan on top of it, as doing so may cause the zone to become damaged.
Precautions and tips
GB
! This appliance has been designed and manufactured in compliance with international safety standards.
The following warnings are provided for safety reasons and must be read carefully.
General safety
- These instructions are only valid for the countries whose symbols appear in the manual and on the serial number plate located on the appliance.
- The appliance was designed for domestic use inside the home and is not intended for commercial or industrial use.
- The appliance must not be installed outdoors, even in covered areas. It is extremely dangerous to leave the appliance exposed to rain and storms.
- Do not touch the appliance with bare feet or with wet or damp hands and feet.
- The appliance must be used by adults only for the preparation of food, in accordance with the instructions provided in this booklet.
- The instruction booklet accompanies a class 1 (insulated) or class 2 - subclass 1 (recessed between 2 cupboards) appliance.
- Do not touch the heating elements or certain parts of the oven door when the appliance is in use; these parts become extremely hot. Keep children well away from the appliance.
- Make sure that the power supply cables of other electrical appliances do not come into contact with the hot parts of the oven. The openings used for the ventilation and dispersion of heat must never be covered.
- Do not use unstable or misshapen pans on the cooking zones; this will help to avoid accidental spills. Make sure pan handles are turned towards the centre of the hob in order to avoid accidental burns. Always use oven gloves when placing cookware in the oven or when removing it.
- Do not use flammable liquids (alcohol, petrol, etc...) near the appliance while it is in use.
- Do not place flammable material in the lower storage compartment or in the oven itself. If the appliance is switched on accidentally, it could catch fire. Always make sure the knobs are in the position when the appliance is not in use.
- When unplugging the appliance, always pull the plug from the mains socket; do not pull on the cable.
- Never perform any cleaning or maintenance work without having disconnected the appliance from the electricity mains.
- If the appliance breaks down, under no circumstances should you attempt to perform the repairs yourself. Repairs carried out by inexperienced persons may cause injury or further malfunctioning of the appliance. Contact Assistance.
- Do not rest heavy objects on the open oven door.
- The internal surfaces of the compartment (where present) may become hot.
- The glass ceramic hob is resistant to mechanical shocks, but it may crack (or even break) if hit with a sharp object such as a tool. If this happens, disconnect the appliance from the electricity mains immediately and contact a Service Centre.
- If the surface of the hob is cracked, switch off the appliance to prevent electric shocks from occurring.
- Remember that the cooking zones remain relatively hot for at least thirty minutes after they have been switched off.
- Keep any object which could melt away from the hob, for example plastic and aluminium objects, or products with a high sugar content. Be especially careful when using plastic film and aluminium foil or packaging: if placed on surfaces that are still hot, they may cause serious damage to the hob.
- Do not place metal objects (knives, spoons, pan lids, etc.) on the hob as they may become hot.
- The appliance should not be operated by people (including children) with reduced physical, sensory or mental capacities, by inexperienced individuals or by anyone who is not familiar with the product. These individuals should, at the very least, be supervised by someone who assumes responsibility for their safety or receive preliminary instructions relating to the operation of the appliance.
- Do not let children play with the appliance.
- If the cooker is placed on a pedestal, take the necessary precautions to prevent the cooker from sliding off the pedestal itself.
Disposal
- When disposing of packaging material: observe local legislation so that the packaging may be reused.
- The European Directive 2002/96/EC relating to Waste Electrical and Electronic Equipment (WEEE) states that household appliances should not be disposed of using the normal solid urban waste cycle. Exhausted appliances should be collected separately in order to optimise the cost of re-using and recycling the materials inside the machine, while preventing potential damage to the atmosphere and to public health. The crossed-out dustbin is marked on all products to remind the owner of their obligations regarding separated waste collection.
For further information relating to the correct disposal of exhausted household appliances, owners may contact the public service provided or their local dealer.
Respecting and conserving the environment
- Always keep the oven door closed when using the TOP OVEN, GRILL and GRATIN modes: This will achieve improved results while saving energy (approximately 10%).
- Whenever possible, avoid pre-heating the oven and always try to fill it. Open the oven door as little as possible because heat is lost every time it is opened. To save a substantial amount of energy, simply switch off the oven 5 to 10 minutes before the end of your planned cooking time and use the heat the oven continues to generate.
- Keep gaskets clean and tidy to prevent any door energy losses.
- Keep gaskets clean and tidy to prevent any door energy losses.
- If you have a timed tariff electricity contract, the "delay cooking" option will make it easier to save money by moving operation to cheaper time periods.
- Make the most of your hot plate's residual heat by switching off cast iron hot plates 10 minutes before the end of your cooking time and glass ceramic hot plates 5 minutes before the end of cooking time.
- The base of your pot or pan should cover the hot plate. If it is smaller, precious energy will be wasted and pots that boil over leave encrusted remains that can be difficult to remove. Cook your food in closed pots or pans with well-fitting lids and use as little water as possible. Cooking with the lid off will greatly increase energy consumption.
- Use purely flat pots and pans.
- If you are cooking something that takes a long time, it's worth using a pressure cooker, which is twice as fast and saves a third of the energy.
Switching the appliance off
Disconnect your appliance from the electricity supply before carrying out any work on it.
Cleaning the oven
! Never use steam cleaners or pressure cleaners on the appliance.
- Clean the glass part of the oven door using a sponge and a non-abrasive cleaning product, then dry thoroughly with a soft cloth. Do not use rough abrasive material or sharp metal scrapers as these could scratch the surface and cause the glass to crack.
- The stainless steel or enamel-coated external parts and the rubber seals may be cleaned using a sponge which has been soaked in lukewarm water and neutral soap. Use specialised products for the removal of stubborn stains. After cleaning, rinse and dry thoroughly. Do not use abrasive powders or corrosive substances.
- The inside of the oven should ideally be cleaned after each use, while it is still lukewarm. Use hot water and detergent, then rinse well and dry with a soft cloth. Do not use abrasive products.
- The accessories can be washed like everyday crockery, and are even dishwasher safe.
- Dirt and grease should be removed from the control panel using a non-abrasive sponge or a soft cloth.
- Stainless steel can be marked by hard water that has been left on the surface for a long time, or by aggressive detergents that contain phosphorus. We recommend that the steel surfaces are rinsed well then dried thoroughly.
Inspecting the oven seals
Check the door seals around the oven regularly. If the seals are damaged, please contact your nearest After-sales Service Centre. We recommend that the oven is not used until the seals have been replaced.
Replacing the oven light bulb
- After disconnecting the oven from the electricity mains, remove the glass lid covering the lamp socket (see figure). 2. Unscrew the light bulb and replace it with a similar one: voltage 230 V, wattage 25 W, cap E 14. 3. Replace the lid and reconnect the oven to the electricity supply.
Cleaning the glass ceramic hob
! Do not use abrasive or corrosive detergents (for example, products in spray cans for cleaning barbecues and ovens), stain removers, anti-rust products, powder detergents or sponges with abrasive surfaces: these may scratch the surface beyond repair.
- It is usually sufficient simply to wash the hob using a damp sponge and dry it with absorbent kitchen roll.
- If the hob is particularly dirty, rub it with a special glass ceramic cleaning product, then rinse well and dry thoroughly.
- To remove more stubborn dirt, use a suitable scraper (this is not supplied with the appliance). Remove spills as soon as possible, without waiting for the appliance to cool, to avoid residues forming crusty deposits. You can obtain excellent results by using a rustproof steel wire sponge - specifically designed for glass ceramic surfaces - soaked in soapy water.
- If plastic or sugary substances have accidentally been melted on the hob, remove them immediately with the scraper, while the surface is still hot.
- Once it is clean, the hob may be treated with a special protective maintenance product: the invisible film left by this product protects the surface from drips during cooking. This maintenance should be carried out while the appliance is warm (not hot) or cold.
- Always remember to rinse the appliance well with clean water and dry it thoroughly: residues can become encrusted during subsequent cooking processes.
| Glass ceramic hob cleaners | Available from |
| Window scraper Razor blade scrapers | DIY Stores |
| Replacement blades | DIY Stores, supermarkets, chemists |
| COLLO lunetaHOB BRITEHob CleanSWISSCLEANER | Boots, Co-op stores, department stores, Regional Electricity Company shops, supermarkets |
Assistance
! Never use the services of an unauthorised technician. Please have the following information to hand:
The type of problem encountered. The appliance model (Mod.). The serial number (S/N).
The latter two pieces of information can be found on the data plate located on the appliance.
! Do not use the oven lamp as/for ambient lighting.
Removing and fitting the oven door:
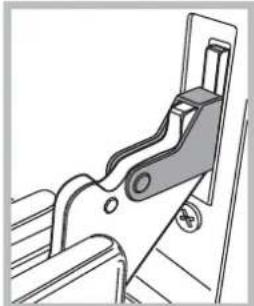
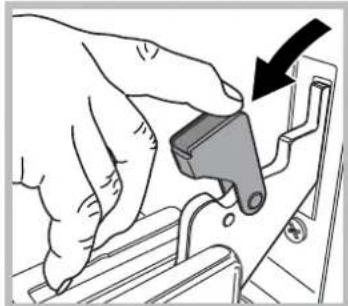
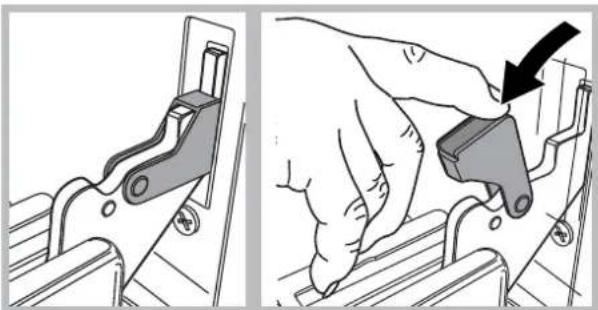
- Open the door 2. Make the hinge clamps of the oven door rotate backwards completely (see photo)
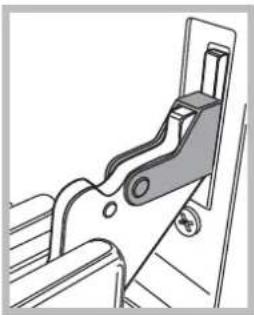
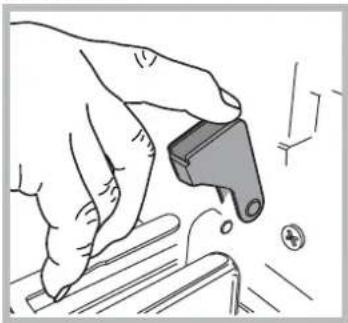
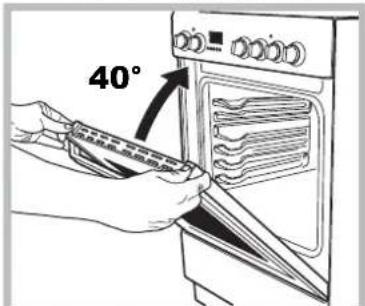
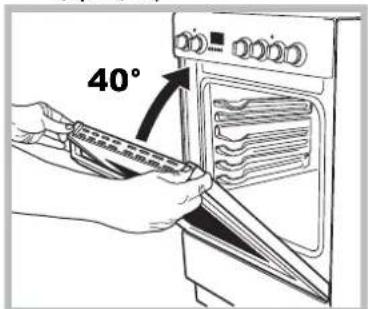
3. Close the door until the clamps stop (the door will remain open for 40° approx.) (see photo)
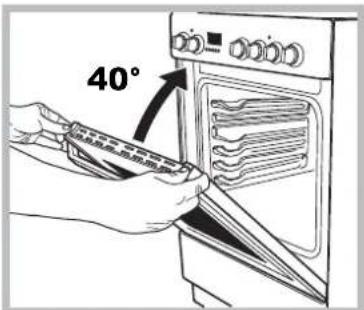
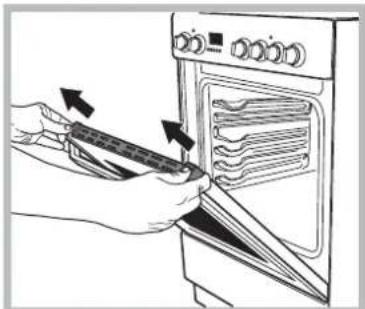
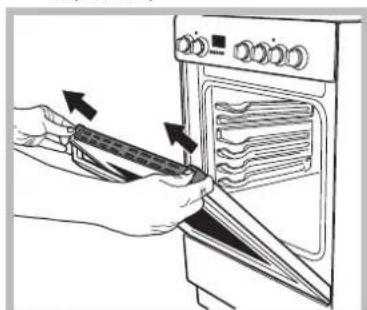
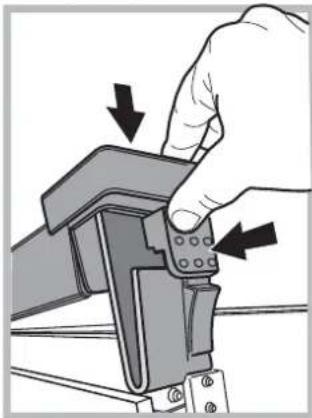
- Press the two buttons on the upper profile and extract the profile (see photo)
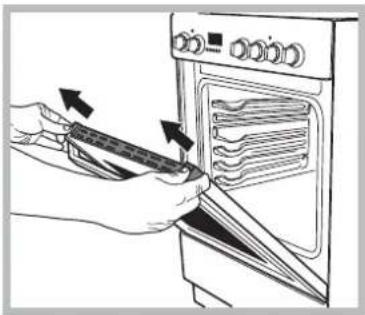
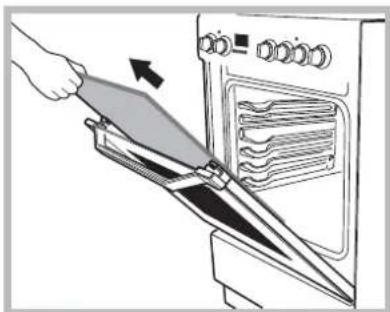
- Remove the glass sheet and do the cleaning as indicated in chapter: "Care and maintenance".
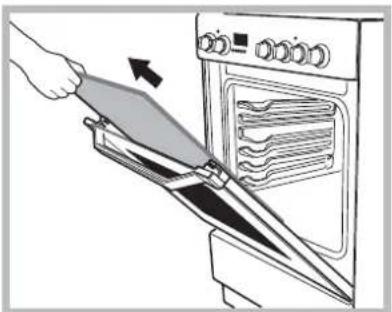
- Replace the glass.
WARNING! Oven must not be operated with inner door glass removed!
WARNING! When reassembling the inner door glass, insert the glass panel correctly so that the text written on the panel is not reversed and can be easily legible.
- Replace the profile; a click will indicate that the part is positioned correctly.
- Open the door completely.
9. Close the supports (see photo).
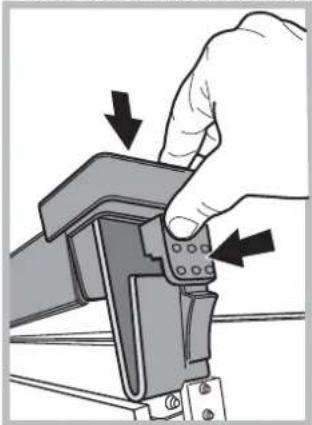
- Now the door can be completely closed and the oven can be started for normal use.
Steam-assisted oven cleaning:
This cleaning mode is recommended after cooking fatty foods (roasts, meat).
This cleaning procedure can simplify the process of dirt removal from the oven walls by generating steam inside the oven cavity. In this way it will be easier to clean the oven cavity itself.
Important! Before you start the steam cleaning process:
- Remove any food residues / fat residues from the bottom of the oven cavity;
- Remove any accessories (grids and pans).
After having carried out the above-mentioned operations, we recommend this:
1 - Pour 300 ml of water in the oven deep pan; put it on the first level from the bottom. In models without deep pan, please use a standard oven baking-tin and put it on the grid in the first level from the bottom. 2 - Select the "BOTTOM OVEN" feature and set the temperature to 100°C; 3 - Keep the oven ON for 15 minutes; 4 - Turn off the oven; 5 - Once the oven has cooled, please open the door and finish cleaning with water and a damp cloth. 6 - Eliminate any water residues from the cavity after finishing the cleaning process.
If the seam cleaning procedure is carried out after cooking particularly fatty foods or when the oven is very dirty, please complete the cleaning process with the traditional method explained in the previous paragraph.
! Please carry out all cleaning procedures when the oven is cold !
Table of contents
Installation, 27
Oven Program "Defrost"
The oven light turns on and off during cooking. When the internal parts reach the selected temperature, the indicator lamp flashes and turns off in the previous mode, showing that the thermostat is working and maintaining the set temperature.
Oven lighting
It turns on when the knob is turned to any position except "0" and stays on while the oven is on. When selecting
Using the knob, the lighting turns on without turning on any heating element.
Cooking programs
For all programs, you can set the temperature between 60°C and MAX, except for:
- Grill (recommended to set only to MAX); Convection (recommended to preheat to 200°C)
TRADITIONAL OVEN program
Both lower and upper heating elements operate. For this type of traditional cooking, it is better to use only one level: if you use several levels, the heat distribution will not be even.
FAN OVEN program
The lower heating element and fan operate, ensuring even heat distribution inside the oven. This program is recommended for cooking delicate dishes (e.g., cakes that need to rise) and for cooking pastries on three levels at the same time.
QUICK COOKING program
All heating elements and the fan operate, ensuring constant even heat distribution inside the oven. For this program, preheating is not required. This program is recommended for quick cooking of frozen or pre-cooked products. For best results, use only one level.

MULTI-LEVEL COOKING program
All heating elements (upper, lower, and circular) and the fan operate. Since heat is distributed evenly throughout the oven, cooking is faster due to even heating. You can use more than two levels at the same time.
The oven is equipped with lower heating elements and a fan. In this program, the oven is heated from below, with a certain amount of heat supplied from below. When using several dishes at the same time, it is necessary to remember to place them in the center of the oven.
Program grill
The central part of the upper heating element is switched on. The achieved temperature, as a rule, is recommended for dishes that

require strong surface heating (gratins with meat and fish, pies, appetizers). This is a program with reduced energy consumption, ideal for cooking dishes of small sizes. Place the dish in the center of the rack, because in the corners it will not cook.

Program convection grill
The upper heating element, the fan, and the spit (if present) operate. This mode provides one-sided heat radiation with forced air circulation inside the oven. This prevents surface burning of dishes, increasing heat penetration.
For cooking with the grill or convection grill, the oven door must be closed.

Program defrost oven
Set the thermostat knob: min 50°C and max. Only the lower heating element operates.
The function is intended for cooking delicate dishes, especially those that are baked, which are better thanks to the heat from below.
Since reaching high temperatures takes a lot of time, in such cases it is recommended to use the "traditional oven".

Program defrosting
The fan in the lower part of the oven forces air at room temperature to circulate. This mode is recommended for defrosting all types of food, especially for delicate products that do not require heating, such as: cakes with ice cream or cream, desserts with whipped cream, fruit cakes. Thanks to the fan, defrosting time is reduced by about half. When defrosting meat, fish, or bread, the process can be accelerated by activating the "multi-cooking" mode and setting the temperature between 80-100°C.

Program ventilation
The heating element and fan are guaranteed to distribute heat throughout the entire oven. The grates are easy to prepare for baking and roasting.
Practical cooking tips
In cooking modes with the fan, do not use the lower positions 1 and 5: they are located directly in the flow of hot air, which can burn delicate dishes.
MULTI-COOKING
Use positions 2 and 4, placing the food on the shelf 2 levels, which gives more heat. - Cook the food on the upper level.
GRILL
- In the cooking modes GRILL and FULL GRILL, place the food in position 5 and the tray in position 1, to collect the juices and/or fat that form during cooking. In the GRATIN cooking mode, place the food in position 2 or 3 and the tray in position 1, to collect the juices and fats.
- It is recommended to set the shelf at the highest level. Do not worry if the upper limit is not completely closed: the operation is controlled by the thermostat.
COOKING GRILL
Use the pan without the handle made of light aluminum, placing it on the grill, which is provided. With the tray, the cooking time increases and the crust of the bread comes out poorly. - In case of heavily filled trays, it is advisable to extend the cooking time in the middle part.
Timer knob for delayed cooking
Some models are equipped with a cooking timer programming device. To use the timer, you must set the audible signal, turning the knob almost a full turn counterclockwise; then turn it back to set the desired time. For your convenience, set the desired minutes with the knob on the control panel, at the end of the set time the audible signal sounds and the oven automatically turns off.
Attention: to control the oven in manual mode, turning off the device and programming the end of cooking, it is necessary to set the knob on the control panel to the symbol
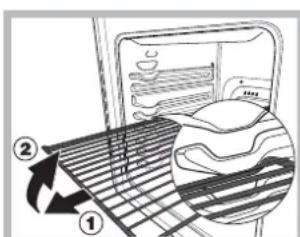
ATTENTION! The oven is equipped with a cooling system, thanks to which the trays can be placed so that they do not fall out of the oven (1).
To clean the trays,
IMPORTANT: The indicated heating zones are intended for use with suitable cookware. Before using them for the first time, it is recommended to clean them with a special non-abrasive agent, as such surfaces may be damaged. During the first hours of operation, a slight odor may be noticed, which will disappear soon.
The heating zones are marked on the hob. Before using them for the first time, it is recommended to clean them with a special non-abrasive agent, as such surfaces may be damaged. During the first hours of operation, a slight odor may be noticed, which will disappear soon.
Switch on / Switch off the cooking zone
To switch on the cooking zone, turn the knob clockwise to the desired setting. To switch off the cooking zone, turn the knob counterclockwise to "0". The indicator light of the electric hotplates indicates that at least one hotplate is in operation.
Cooking zone
The hotplates are equipped with radiant electric elements. During operation, they become red hot:
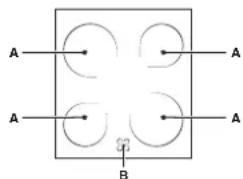
A. Cooking zone with radiant elements. B. Heat indicator: indicates that the temperature in the corresponding cooking zone exceeds 60°C, even if the element is already switched off, but the surface is still hot.
In some models, the element may already be switched off, but the surface remains hot.
Cooking zone with radiant elements.
The radiant heating elements consist of heating coils that become red hot only 10-20 seconds after switching on.
Useful tips for using the hotplate
Use pans with a flat and thick bottom to ensure good contact with the heating zone;
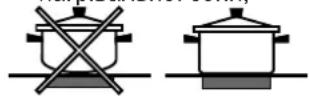
Use pans of sufficient diameter to completely cover the heating zone in order to fully utilize the radiant heat;

- Always keep the pans and the hotplate clean and dry: this ensures optimal contact with the heating zone, prolongs the service life of the hotplate and the pans themselves;
- Do not use pans for frying on a gas stove: the concentrated heat of gas burners can cause deformation of the pan, leading to loss of optimal contact and in no case should you switch on the heating zone without a pan, as this will damage the surface.
The appliance is designed to reduce energy consumption in electrical networks if you will use the iron with a steam boost at low or high temperatures. Before use, there are various programming modes, including the "Fast Heating" mode (see the "Heating Modes" section). The iron's soleplate is protected by a special coating. Thus, the best cooking results are preserved (approximately 10% energy savings). Regularly check the soleplate to ensure there are no scratches or damage, which would prevent the soleplate from sliding smoothly. - This product complies with the requirements of the latest European Directive on reducing energy consumption. If no operation is performed within 2 minutes, the appliance automatically switches to standby mode. The standby mode is indicated by a red light. As soon as the appliance is used again, the system returns to operating mode.
Checking the iron's soleplate
Regularly check the iron's soleplate. If the soleplate is damaged, contact the nearest service center. We recommend not using the iron until the fault is repaired.
Replacing the lamp in the iron
1. Disconnect the iron from the electrical supply.
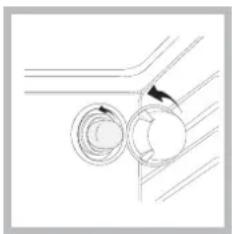
Remove the screw that covers the lamp (see figure).
- Unscrew the lamp and replace it with an identical one: voltage 230 V, power 25 W, socket E 14.
- Replace the cover and screw it back on, then connect the iron to the electrical supply.
Cleaning the ceramic surface
! Do not use abrasive cleaners, scouring pads, or harsh chemicals (e.g., aerosol sprays, cleaning powders, or oven cleaners) on the iron's soleplate. Do not use sharp objects, metal scouring pads, or abrasive sponges, as this may damage the surface and impair its performance.
Normally, it is sufficient to wipe the soleplate with a damp sponge and then dry it with a soft cloth. If the soleplate is heavily soiled, clean it with a special cleaner for ceramic surfaces, then rinse well and dry. To remove stubborn dirt, use a plastic scraper (not included in the package). Remove the dirt while it is still warm, but not hot, to avoid damage. For best results, use a soft sponge in good condition, specially designed for ceramic surfaces. If plastic or foil has melted onto the soleplate, remove it immediately with a scraper while the surface is still warm. After cleaning, the surface can be treated with a special protective agent that forms an invisible film, protecting the surface from stains that may occur during cooking. Apply such an agent to a warm (but not hot) or cold surface. Remember to rinse the surface with clean water and dry it afterwards, as food residues may stick during subsequent cooking.
! Never use the services of unauthorized persons.
When contacting support, provide the following information:
Description of the problem. Model (Mod.). - Serial number (S/N).
This instruction manual is the property of the manufacturer and is protected.
Attention and installation of the oven door
- Open the door 2. Turn the latch on the door hinges completely back (see photo)
- Close the door until the latch clicks (the door will be at an angle of about 40°) (see photo)
- Press the two buttons on the top part of the frame and pull it out (see photo)
5. Remove the glass panels as indicated in the section «Cleaning and maintenance»
- Place the glass back.
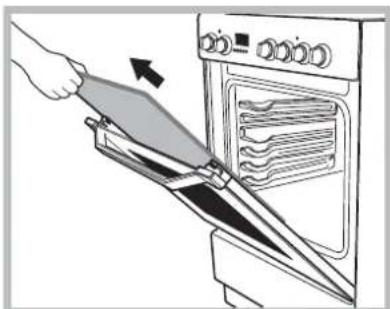
WARNING! The oven can be used only when the door is closed!
WARNING! When reinstalling the inner glass in the door, make sure that the protective film on the glass is turned outward and is easy to remove.
- Install the frame; press it until it clicks into place. 8. Open the door completely 9. Close the latch (see photo).
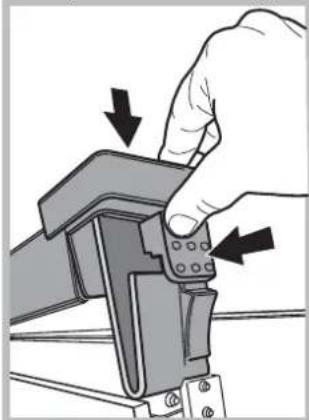
10. Now the door can be completely closed, the oven is ready for normal use.
Steam cleaning of the oven:
The steam cleaning procedure removes dirt from the oven walls by creating steam inside the oven. This will make cleaning the oven easier.
Important! Before cleaning:
-Remove all accessories from the oven; -Remove the side racks and the catalytic panels.
We recommend the following sequence of actions:
1-Pour 300 ml of water into a deep dish and place it on the bottom shelf. For models without a deep dish, use a standard dish and place it on the bottom shelf. 2-Select the baking mode and set the temperature to 100 °C. 3-Turn on the oven for 15 minutes. 4-Turn off the oven. 5-When the oven has cooled, open the door and finish cleaning with water and a damp cloth. 6-After cleaning, check the oven for any remaining water.
Steam cleaning is done after cooking fatty foods or when the oven is very dirty, following the traditional method described in the previous paragraph.
!Perform all cleaning procedures when the oven is cold!


Dutch,1 English,13 English,18 English,13


Ukrainian,38 Kazakh,50
I6VMH2A/ NL
I6VMH2A.1/ NL
Grease
Smoke,52
Chicken dish
Baking tray
Oven, 53
Oven accessories
Electric ovens
Section for sanitary equipment
Add to the plan, 55
Plumbing connection
Electrical connection
Section for fire safety and rescue equipment
Fire extinguishers and rescue equipment, 60
Safety precautions
Fire safety
Maintenance of the main body and protection
Technical service and repair, 61
Repair
Repair and maintenance
Technical service instructions
New device
Device
WARNING: The device and its accessories may be used for cutting. Be careful with the cutting elements. If children under 8 years old are not supervised, keep the device away from them.
This device can be used by children over 8 years old and by persons with reduced physical, sensory or mental capabilities, or lack of experience and knowledge, if they have been given supervision or instruction concerning use of the device in a safe way and understand the hazards involved. Children shall not play with the device. Cleaning and user maintenance shall not be made by children without supervision. WARNING: There is a risk of injury if the device is used incorrectly. Do not immerse the device in water; instead, wipe it with a damp cloth and unplug it.
WARNING: There is a risk: Do not touch the cutting blades.
WARNING: If the blades are damaged or cracked, unplug the device to avoid electric shock.
Do not use abrasive cleaners or sharp metal scrapers to clean the device, as they may scratch the surface and cause electric shock.
The blades (if any) may become hot during use. Do not touch the hot surfaces or the heating element.
Before cleaning, unplug the device. Do not touch the blades (if any) when they are hot or when the device is connected to the power supply.
WARNING: Do not immerse the device in water or any other liquid.
When the device is in use, keep it away from flammable materials and do not place it near the edge of a table.

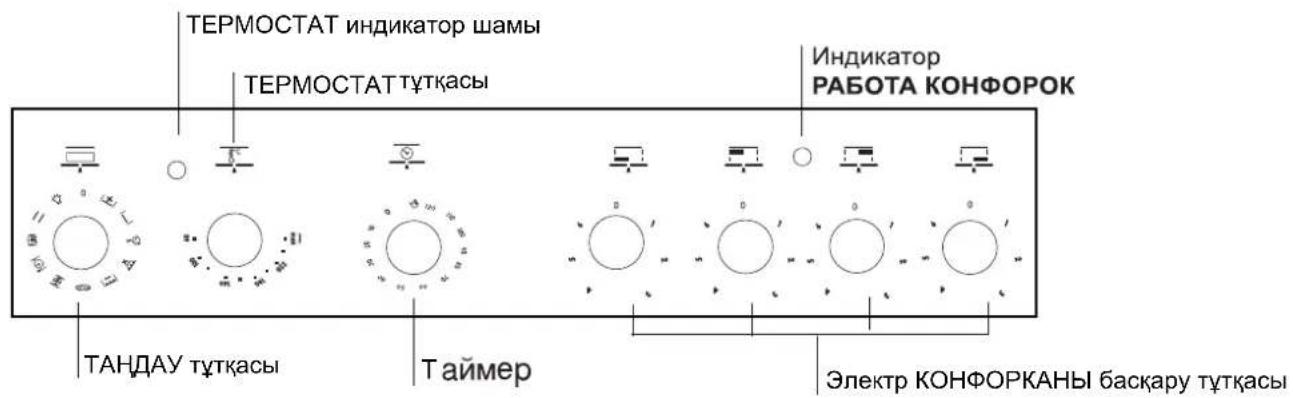
Control panel
Check the new device
Check the new device and its accessories. If the accessories are damaged, contact the service center. Do not use the device if the accessories are damaged.
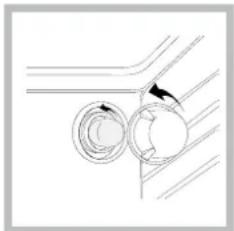
- New lamps must be filled with new cartridges before use (see figure).
- The lamps are designed for use with alternating current: voltage 230 V, power 25 W, socket E 14.
- The cartridges of the original lamps,
New cartridges are not included.
Do not attempt to replace the cartridges yourself.
Cleaning the lamp and the appliance
Before cleaning, remove the plug from the socket and let the appliance cool down. Do not use abrasive cleaners, scouring pads, or solvents for cleaning. Do not immerse the appliance in water or any other liquid.
- Clean the appliance with a damp cloth and a little washing-up liquid. If the appliance is very dirty, wipe it with a damp cloth and then dry it with a soft cloth. Do not use any abrasive cleaners. To remove stubborn dirt, use a soft brush. Do not use any sharp objects for cleaning. After cleaning, dry the appliance thoroughly. Do not immerse the appliance in water. The lamp and the socket must be dry before use. If the lamp is broken, replace it with a new one of the same type. Do not touch the lamp with bare hands; use a cloth or gloves. The lamp must be cool before replacing. Dispose of the old lamp properly.
| Шыны керамкалык
плITA тазарTKыштапы | Сатынатын жерлор |
| Теpeze Кырfvыshi Yстара
ЖузIHIN, Кырfvыштапы | Керек-жарak Дуkeндерi |
| Косалны жуздер | Курал-жабдьк Дуkeндерi,
сунермаркетер,
дэрханалap |
| COLLO luneta
HOB BRITE
ПлITAны тазалay
SWISSCLEANER | Boots, kooneparatimbik
Дуkeн, унibeерmar,
аймakтьк Эльктор
КомпаимясынIH,
Дуkeндерi,
сунермаркетер |
Do not operate the appliance without the lamp.
Place the appliance on a flat surface:
- The problem is the lamp. The lamp model (Mo).
- The voltage (V).
The appliance must be disconnected from the power supply before any maintenance.
NewecirHweuinanyxane6ekity:
- EciKi aHbHb3
- New eciri TOnCaBbHbIKaMbITbIH TOJIbIFbIMeH Kepi 6paHbI3 (fotocypetTi kapaHbI3)
- KamblTap tipenreHwe ecikTi xa6bHbI3 (ecik Wamameh 40° -Ka aubik typaIbI (fotocypetTI kapaHbI3)
- Kofapfbl npoepnJIbderi eki TyImeHi 6acbln, npoepnJIbdi wblfapbn anblHb3 (pOToCypETTI kapaHb3)
- 5bHbHbI bIfapBn aIbIn, MbHa Taayda KepceTirReHnei Ta3anaHbI3: «Kytim XaHe TexHkAJIbIK KbI3MeT KePcTeY»
- 乌HbHbOpHbHa caHbHb3.
ECKEPTY!Iwki eciriHc eHeri aIbIHraH neuTi naIaIahyra 6oImaIdbI!
ECKEPTY!Iwki ecikTih eHerin KaTa canrah Ke3de, naHebde Xa3bInraH eCKePTy ToHkepinr TypMaTbIHdai XHe aHbIK KepiIn TpyaTbIHdae tIn eHek NaHEnIH dypbICTan calbHbI3.
- IpoΦnIbIopHbHa KOBbIbI3, Dypbc KOybIraH Ke3De «TbIK» eTKeH dIb6bc ectineJI.
- EciKti TOnbik aWbHbI3.
- TipeKTepei Ka6bHb3 (fOToCypETTI KapaHbI3).
- Ehdi ecikTI TOJIbIFBIMeH KAYbIN, neuTI eDetterieKocyra 60nAbI.
NeWti 6ydbIn KEMerImeH Ta3anay:
By Ta3anay pexmi MaJbI TaFamap (KybipdaK, eT) nicipreHHHeH KeiH YCbIHbIaBl.
Byt Ta3anay ic pacimi neutih ihihe 6y uhrapy apkbln neuTH KabipfaJapbHdafti kpi JoIO ypdici HxehiJeTeidi. Byn KaFdaJa, neutih iuiH e3 6etih36eH Ta3anaFAH OHai 6oNaBl.
MaHb3Ib!BymenTa3anayypdicin6actaydaH6ypbIH:
NeuTIN TEmeHri XaFbIHdAfBKe3 KeIReH TaFAM KaNDbIKTapBH /MaKaNDbIKTapBH KeTipiHi3; Ke3 KeIReH KepeK-KapaKTapDbI (TopIap XaHe Ta6anap) anbIn TactaHbI3.
KorapbdaftbpekeTepdi opbiHdaHaHH KeiH, 6i3 MbIHbIycbIHAmbl3:
1-NeuTIN uHbIN KaHbITbip TaabcbHa 300 Mn cy KynbHbI3; OHbTeMeHHe6aCTaFaHdaFb6ipihui DeHreRe KoBbHbI3. WHybIN TaanapbIXoK yInrpe, cTaHApTTb neuTH Nicipy KaIb6bIH naDanaHbHbI3 XHe OHbTeMeHHe6aCTaFaHdaFb6ipihwi DeHreDi eri Topra KObHbI3
KoHdntep TaFamdpbI pexnMI
2-MyMKiHdiirTaHaNbI3 XeHe TemnepaTypaHb1 100°C-ka opHaTbIbI3; 3-NeuTi 15MHyTTaIKOCYbI KoNbHb3; 4-NeuTi eWipiH3; 5-Neu cybHaKe3e,ecirih aHbH3xHe Ta3aaydbCy XHe DbIMkbI Wy6peKneH aKaTahB3. 6-Ta3anay ypdiicih aarktafahHn KeiH, neWtIH iwiHderi cy KaNdbkTapbH Ketipij3.
Erep6ymen Ta3anay ic pacimi MaIbTaFamdap niciprenHHe KeiH HeMece Nee Tae Nac 6onraH Ke3de opbHaTaNbH 6oNca, Ta3anay ypdiH aIdbHfbl nparpafta CnataTaNrA H dctypni Eaicneh aKaTaHbI3.
!BapnbKaTa3anay ic pcesimdeepin neu cybifaH Ke3eOpbHdaHbI3!
KZ