
iKick iK350 - Speaker KICKER - Free user manual and instructions
Find the device manual for free iKick iK350 KICKER in PDF.

| Product Type | Stereo speaker with docking station for iPod/iPhone |
| Brand | Kicker |
| Model | iKick iK350 |
| Dimensions (H x W x D) | 103 x 381 x 178 mm |
| Weight | 3.3 kg (7.38 lb) |
| Power Supply | 12 V DC, 3 A (AC adapter included) |
| Output Power | 2 x 10 W RMS (1% THD) |
| Frequency Response | 65 Hz – 20 kHz |
| Woofer | 102 mm (4 in) full-range |
| Tweeter | 13 mm (1/2 in) silk dome |
| Passive Radiator | 114 x 114 mm (4.5 x 4.5 in) rear |
| Connectivity | Dock for iPod/iPhone, 3.5 mm auxiliary input, RCA composite video output, RCA audio output |
| Controls | Rotary control (volume, menu) and infrared remote control |
| Display | LCD for system menu (volume, treble, bass, source) |
| Standby Consumption | Continuous iPod charging in standby |
| Maintenance and Cleaning | Dry cloth only; do not use detergent |
| Safety Precautions | Do not expose to water, do not obstruct ventilation (10 cm clearance), avoid heat sources |
| Warranty | Check with retailer for terms |
Frequently Asked Questions - iKick iK350 KICKER
User questions about iKick iK350 KICKER
0 question about this device. Answer the ones you know or ask your own.
Ask a new question about this device
Download the instructions for your Speaker in PDF format for free! Find your manual iKick iK350 - KICKER and take your electronic device back in hand. On this page are published all the documents necessary for the use of your device. iKick iK350 by KICKER.
USER MANUAL iKick iK350 KICKER
The KICKER iKICK iK350 Digital Stereo System for iPhone and iPod is designed for "Livin' Loud" with your iPhone and iPod in the home environment. The iK350 is fully featured with dual full-range 4" (102mm) KICKER drivers and 1/2" (13mm) Mylar tweeters driven by a powerful stereo amplifier with digital signal processing. The 4.5" (114mm) square passive radiator (subwoofer) on the back of the iK350 balances the sonic output, adding the punchy low-frequency response that put KICKER subwoofer on the map. The rotary control and infrared remote allow simple, streamlined control of your iK350 Stereo System. The iK350 can be used with any 4th generation or newer iPod. In addition, the iK350 boasts a wide range of connectivity options including stereo RCA outputs, composite video output, and a 1/8" stereo auxiliary input for incorporating additional audio devices with your iK350 Stereo System. Note: Third Generation and older iPods work by connecting their headphone output to the auxiliary input on the rear of the iK350.
DOCKING YOUR iPod
- Attach the included Adjustable Device Support to the docking bay.
- Connect your iPod to the iK350's dock connector.
- Plug the power cable into the DC input on the back of the iK350.
- Plug the 2-prong electrical plug into a surge protected electrical outlet.
The iK350 will begin to authenticate your iPod. During this time, the "DOCK" LED will flash until authentication is complete. If "DOCK" continues to flash after 60 seconds, authentication has failed; Disconnect and reconnect the iPod. If problems persist, test another iPod or iPhone device, or contact KICKER support or Apple support.
- Press the rotary control knob to exit Standby mode and activate the iK350.
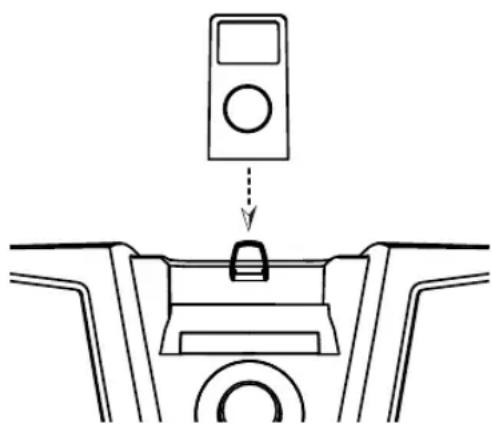
Figure 1
PERFORMANCE
The iK350 docking station has been optimized to match the sonic output of the iPod with the iPod's EQ in the "Off" setting. The iPod's "Sound Check" should also be off; otherwise you may experience poor bass response and lower volume levels in your music.
Model: iK350
Speaker Design 2 - Way
Woofer Size, in (mm) 4 (102)
Tweeter Size, in (mm) 1/2 (13)
Tweeter Design Mylar
Passive Radiator Size, in (mm) 4.5 X 4.5 (114 X 114)
RMS Power, Watts @ 1% Total Harmonic Distortion 2X10
Effective Frequency Range, Hz 65-20K
Power Supply, Volts (Ampere) 12 (3)
Height, in (mm) 8 (203)
Width, in (mm) 15 (381)
Depth, in (mm) 7 (178)
Weight, lb (kg) 7.38 (3.3)
Figure 2
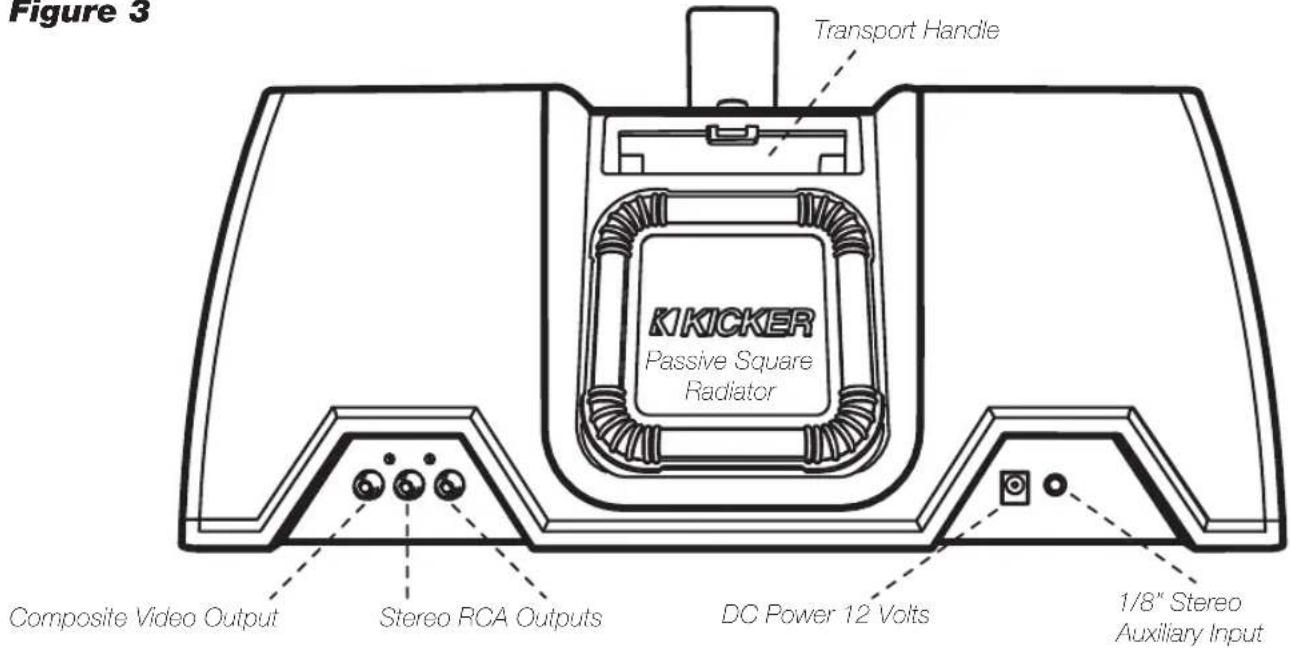
Figure 3
IMPORTANT SAFETY INSTRUCTIONS
Read and follow all the instructions listed in this manual. Follow all safety and procedural recommendations to prevent damage to your self, your KICKER product, or your portable entertainment device.
The iK350 should not be used near water or in an environment where exposure to liquids is possible. This includes but is not exclusive to areas where splashing, dripping, leaks, spills, and exposure to rain can occur. Liquid containers should not be placed on or near the iK350 Stereo System. The iK350 Stereo System should not be cleaned with liquid cleaners. Use only a dry cloth to clean the iK350. Only use the iK350 in areas with adequate open ventilation allowing at least 4" of space on all sides of the iK350. Do not set the iK350 on any surface or cover the iK350 with any object that could impede the airflow to and from the iK350 Stereo System. The iK350 should not be placed near any source of heat. This includes but is not limited to stoves, radiators, heating elements, electronic heat sources, and areas where excessive solar heat can be generated. Do not install the iK350 near any flame or place any flammable objects near the device. The power outlet used to provide power to the iK350 should be accessible at all times. The polarized 2-prong electrical plug has a wide blade and narrow blade that should fit into the corresponding wide and narrow receiving connections of your electrical outlet. Do not force the plug into the outlet. If the plug provided with the unit does not fit, consult with an electrician to upgrade the electrical outlet accordingly. The power cord should be situated in a way that protects it from being pinched, walked on, tripped over, or accidentally pulled from the electrical outlet or the electrical input on the iK350. Do not run the cable through doorways or underneath objects that could damage the wire or tear the insulating material surrounding the wire. Only use the manufacturer supplied power supply with the iK350. We recommend using a surge protector/power conditioner and unplugging the iK350 during any electrical storms or situations that could cause voltage fluctuations in the electrical system.
USING THE SYSTEM MENU ROTARY CONTROL
The iK350 Stereo System's rotary control provides an intuitive user interface. The System Menu options listed on the LED display below are available for adjustment by the rotary control. The rotary control knob is used as a push-button to power on the iK350 and to scroll through the menus available on the LED display. Turning the rotary control knob allows you to adjust the parameters of the selected menu.

Figure 4
After plugging the power supply into the DC input on the back of the iK350, the unit will be in "Standby" mode, as displayed by the LED display on the System Menu. Tum the power on by pushing the rotary control button once. When the power is on, the DOCK" LED will be illuminated on the System Menu.
Volume: By default, the iK350 will be in volume control mode. Turn the rotary knob to adjust the volume up or down. The rotary control will automatically revert to volume control mode after a short time period if any other menus have been selected.
To scroll through the other menus, simply use the rotary control as a push-button. Each single button push will take you from one menu to the next, rotating through TREB>BASS>DOCK/AUX and back to the volume control.
Treble: To adjust the treble on the iK350, use the rotary control as a push-button to scroll through the menus until the "TREB" menu is displayed on the LED display. Turn the rotary control knob clockwise to increase treble and counterclockwise to reduce treble.
Bass: To adjust the bass level on the iK350, use the rotary control as a push-button to scroll through the menus until the "BASS" menu is displayed on the LED display. Turn the rotary control knob clockwise to increase bass and counterclockwise to reduce bass.
Input Source (DOCK/AUX): To enable the auxiliary input on the iK350, an external device must be plugged into the 1/8" stereo auxiliary input on the back of the unit. Use the rotary control as a push-button to scroll through the menus until your current input source (DOCK/AUX) is flashing. Turn the rotary control clockwise and count-clockwise to switch between AUX and DOCK input. You may also enable auxiliary input by using the Mode button on your remote control to cycle through menus, then pressing the up/down arrows to select your input source.
Standby: In "Standby" mode, the iK350 will be powered down, but your docked iPod will continue to charge as long as a power source is plugged into the DC input on the back of the iK350. To enter standby mode simply press and hold the rotary control button until the unit turns off and "STBY" is illuminated.
USING THE REMOTE CONTROL
The Infrared Remote Control enables you to control your iPod and access the iK350 System Menu from a convenient location. With the fully featured remote control it is easy to access all of your iPod's music and/or video content.
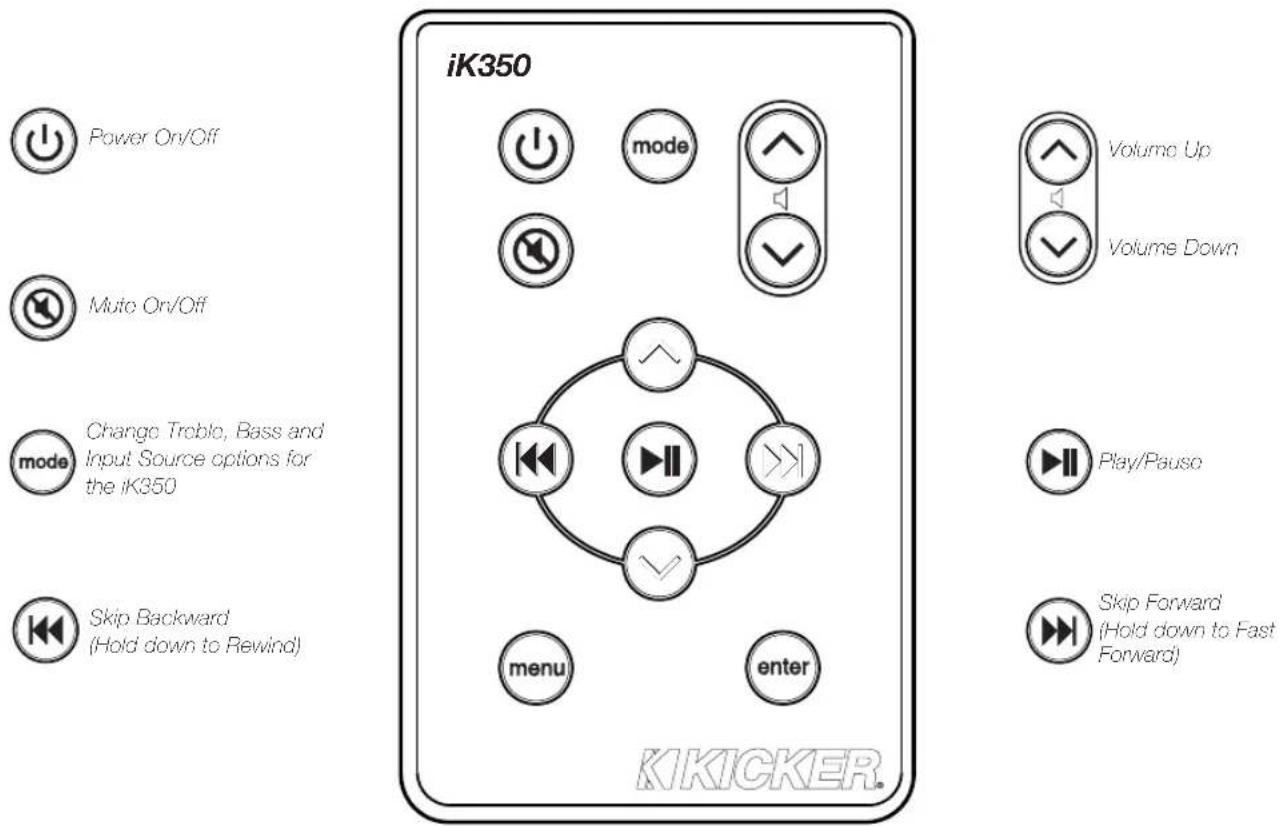
Figure 5

Navigate upward through the iPod menu directory or increase values within the IK350 System Menu. Press the up arrow while in the Input Source Menu to enable the Aux input.

Navigate downward through the iPod menu directory or reduce values within the iK350 System Menu. Press the down arrow while in the Input Source Menu to disable the Aux input.

Make selections and enter subdirectories within the iPod.

Navigate toward iPod root directory.
CONNECTING EXTERNAL DEVICES
To connect an external video display to the iK350, make sure the video output is enabled on your iPod device. Connect a standard RCA composite video cable from the composite video output on the back of the iK350 to the RCA video input on your external video display. See Figure 3. This is a pass-through connection. If there are any problems with your external video display, refer to the iPod device manual or the instructions packaged with your external video display.
To connect an external audio device to the iK350, enable Aux-In mode with the rotary or remote control as described in the Input Source section on the previous page. Connect your line level device to the 1/8" stereo input on the back of the iK350. See Figure 3. If the sound is distorted, you may be overdriving the auxiliary input. Try turning down the external device until the sound is no longer distorted. Note: 1st - 3rd Generation iPods will require the use of the auxiliary input for audio playback.
To use an external audio device for output, connect the RCA outputs on the back of the iK350 to the input(s) of your third-party device. The audio output is at a fixed level and not adjustable with the iK350 volume control. Use your external audio device to attenuate the input/output level.
- No audio output from the iK350? Make sure the volume is turned up to an audible level on both the iK350 and the audio playback device connected to the iK350. Make sure the system is not muted. Check power connections. Make sure the iK350 is turned on and functioning properly. Try resetting the iK350 by unplugging the unit, waiting 10 seconds and plugging it back in to the wall. Check Auxiliary Mode If you are trying to playback audio from an auxiliary device, make sure that Aux-In mode is enabled and the device is connected to the 1/8" stereo input on the back of the iK350. If you are trying to playback audio from a docked iPod, make sure that Aux-In mode is disabled.
- Remote Control isn't working? Check for objects blocking the remote sensor on the bottom left corner of the right speaker grille. See Figure 2. Check the remote battery and replace if necessary. Open the battery compartment of the remote and replace the CR2025 3V Lithium battery. Make sure the iPod is functioning properly, if not, refer to item 3, below.
- iPod not responding? Make sure the iPod is not paused or in Hold mode. The high bass output of the iK350 can cause the iPod to freeze due to acoustic vibrations. Reboot the iPod by pressing and holding the play/pause button for approximately six seconds. Press any button to turn the iPod back on. If this doesn't work, reset the iPod by connecting the iPod to the iK350 dock connector. Put the iPod in Hold Mode and then slide the Hold switch back to the Off position. Finally, simultaneously press and hold the Center and Menu buttons for approximately six seconds. To reset an original iPod with a dock connector (with four buttons below the display), simultaneously press and hold the Play/Pause and Menu buttons to reset an original iPod.
DETECCION Y REPARACION DE AVERIAS
KICKER warrants this product to be free from defects in material and workmanship under normal use for a period of ONE (1) YEAR from date of original purchase with the original receipt from an Authorized KICKER Dealer. Should service be necessary under this warranty for any reason due to manufacturing defect or malfunction during the warranty period, KICKER will repair or replace (at its discretion) the defective merchandise with equivalent merchandise at no charge. Warranty replacements may have cosmetic scratches and blemishes. Discontinued products may be replaced with more current equivalent products.
This warranty is valid only for the original purchaser and is not extended to owners of the product subsequent to the original purchaser. Any applicable implied warranties are limited in duration to a period of the express warranty as provided herein beginning with the date of the original purchase at retail, and no warranties, whether express or implied, shall apply to this product thereafter. Some states do not allow limitations on implied warranties; therefore these exclusions may not apply to you. This warranty gives you specific legal rights; however you may have other rights that vary from state to state.
WHAT TO DO IF YOU NEED WARRANTY OR SERVICE
Defective merchandise should be returned to your local Authorized KICKER Dealer for warranty service. Assistance in locating an Authorized Dealer can be found at www.kicker.com or by contacting KICKER directly.
If it becomes necessary for you to return defective merchandise directly to Stillwater Designs (KICKER), call the KICKER Customer Service Department at (405) 624-8510 for a Return Merchandise Authorization (RMA) number. Package all defective items in the original container or in a package that will prevent shipping damage, and return to:
Stillwater Designs, 3100 North Husband, Stillwater, OK 74075
The RMA number must be clearly marked on the outside of the package. Include a copy of the original receipt with the purchase date clearly visible, and a "proof-of-purchase" statement listing your name and return shipping address, the Dealer's name and invoice number, and product purchased. Warranty expiration on items without proof-of-purchase will be determined from the type of sale and manufacturing date code. Freight must be prepaid; items sent freight-collect, or COD, will be refused.
WHAT IS NOT COVERED?
This warranty is valid only if the product is used for the purpose for which it was designed. It does not cover:
- Damage due to improper use.
- Damage due to improper installation of components or audio/video devices.
- Subsequent damage to other components or audio/video devices.
- Damage caused by exposure to moisture, excessive heat, chemical cleaners, and/or UV radiation.
- Damage through negligence, misuse, flood, fire, earthquake, accident, or abuse. Repeated returns for the same damage may be considered abuse.
- Items previously repaired or modified by any unauthorized repair facility or person.
- Return shipping on non-defective items
- Products with tampered or missing barcode labels.
- Products returned without a Return Merchandise Authorization (RMA) number.
- Freight Damage.
The cost of shipping product to KICKER.
Service performed by anyone other than KICKER.
HOW LONG WILL IT TAKE?
Kicker stiv to mair a goal of 48-hour service for all electronics returns. Delays may be incurred if lack of replacement inventory or parts is encountered.
Failure to follow these steps may void your warranty. Any questions can be directed to the Kicker Customer Service Department at (405) 624-8510.
GARANTÍA INTERNACIONAL VersionEspanol

- DOCKING YOUR iPod
- PERFORMANCE
- Model: iK350
- IMPORTANT SAFETY INSTRUCTIONS
- USING THE SYSTEM MENU ROTARY CONTROL
- USING THE REMOTE CONTROL
- CONNECTING EXTERNAL DEVICES
- DETECCION Y REPARACION DE AVERIAS
- WHAT TO DO IF YOU NEED WARRANTY OR SERVICE
- Stillwater Designs, 3100 North Husband, Stillwater, OK 74075
- WHAT IS NOT COVERED?
- HOW LONG WILL IT TAKE?
- GARANTÍA INTERNACIONAL VersionEspanol
Brand : KICKER
Model : iKick iK350
Category : Speaker