
F60PROXA - Oven BERTAZZONI - Free user manual and instructions
Find the device manual for free F60PROXA BERTAZZONI in PDF.

| Product Type | Built-in oven |
| Brand | Bertazzoni |
| Model | F60PROXA |
| Category | Oven |
| Cooking functions | Traditional, Traditional with fan, Grill, MaxiGrill, MaxiGrill with fan, Turbo, Bottom heat, Bottom heat with fan, Grill and bottom heat |
| Electronic programmer | Yes (timer, cooking time, end of cooking, time + end) |
| Interior lighting | Yes (stays on during cooking) |
| Accessories provided | Grid, baking tray, chrome supports with telescopic guides |
| Door seal | Yes |
| Grill element | Yes |
| Bottom heating element | Yes |
| Rear heating element with fan | Yes |
| Safety | Programmed automatic shutdown |
| Power supply | Electric (230 V / 50 Hz, estimated power 3000 W) |
| Dimensions (W x H x D) | 595 x 595 x 548 mm (estimate for standard 60 cm oven) |
| Weight | Approximately 30 kg |
Frequently Asked Questions - F60PROXA BERTAZZONI
User questions about F60PROXA BERTAZZONI
0 question about this device. Answer the ones you know or ask your own.
Ask a new question about this device
Download the instructions for your Oven in PDF format for free! Find your manual F60PROXA - BERTAZZONI and take your electronic device back in hand. On this page are published all the documents necessary for the use of your device. F60PROXA by BERTAZZONI.
USER MANUAL F60PROXA BERTAZZONI
Dear new owner of a Bertazzoni product,
Our company brings to homeowners around the world beautiful, high-performance kitchen appliances, which make their dreams come true.
We marry the finest Italian craftsmanship with technical precision using state-of-the-art manufacturing, which give our customers peace of mind.
Our brand elevates food - preparing it, sharing it, enjoying it - to a new dimension where taste, fun, and lifestyle - the values of our land - come together.
We have built this company with the unique passion and dedication of family entrepreneurship. Our fathers handed it to us. Our children will inherit it. It's in our minds, our hearts, our soul.
Since 1882 our name is on the products we build. We are proud – and at the same time humbled – by our heritage. This company is Bertazzoni. We are Bertazzoni. And we vow to continue building this great enterprise into the future.
DALLA SCRIVANIA DEL PRESIDENTE
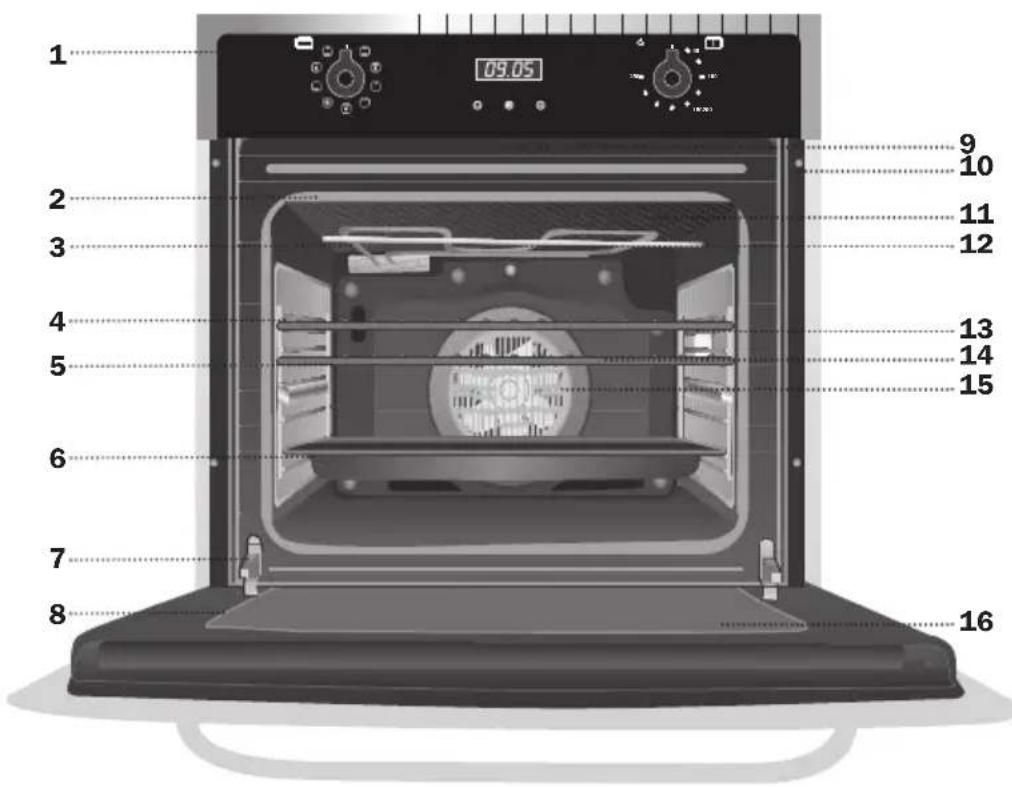
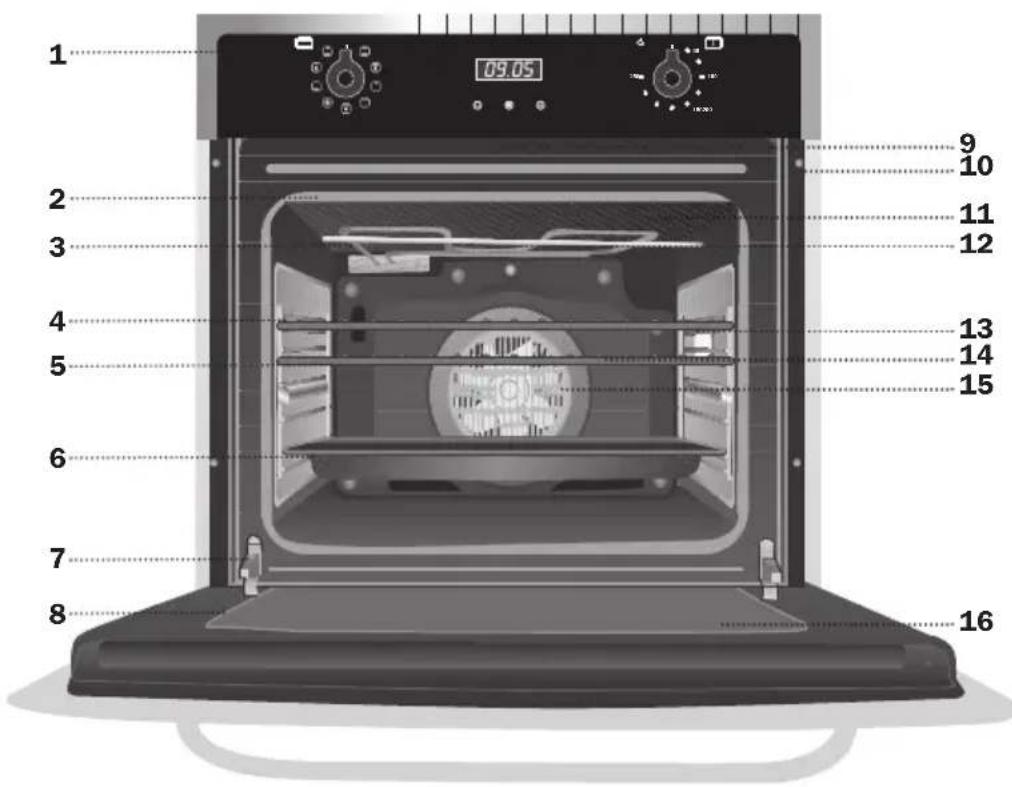
1 Function selector
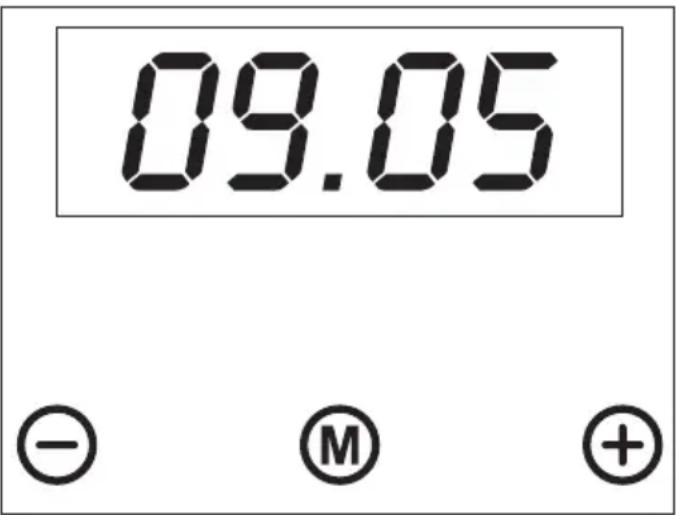
2 Electronic clock
3 Heating indicator light. Indicates that the heat is going to the food and it goes out when the set temperature is reached.
4 Temperature selector
Oven Functions
0 Oven Switch-Off

Conventional
This function is for use when baking cakes where the heat should be even to give a spongy texture.

Conventional with Fan
Suitable for roasts and cakes. The fan spreads the heat evenly throughout the inside of the oven to reduce cooking time and temperature.

Grill
Toasting and browning. This function allows the surface to be cooked without affecting the inside of the food. Suitable for flat pieces such as steaks, ribs, fish and toasts.

MaxiGrill
For toasting larger surfaces than possible with the Grill function, in addition to greater toasting power for faster food browning.

MaxiGrill with Fan
For even roasting and simultaneous surface browning. Ideal for mixed grills. Perfect for bulky pieces such as poultry and game. The meat should be placed on the oven grid with the tray below to collect meat juices and fat.
Caution
The door must be closed during use with Grill, MaxiGrill or MaxiGrill with Fan.

Turbo
The fan spreads the heat coming from an element located at the back of the oven. As a result of the evenly distributed temperature, food can be cooked on two levels at the same time.
This function can also be used for defrosting food. Set temperature selector to 0

Lower Element
Heat only comes from beneath. Suitable for warming plates or letting dough rise.

Lower Element with Fan
This distributes the heat coming from the lower element. Ideal for pastries with jam or fruit fillings that only require heat from below. This function always requires pre-heating.

Grill and Lower Element
Ideal for roasts. This function can be used with any size joints of meat.
NB
The light remains on with any cooking function.
Setting the Electronic Clock
When you switch on the oven, you will notice that the word AUTO will flash on the display with 00:00. Press the + and - symbols until you hear a beep and see a dot flashing between the digits of the clock. Then set the clock time by pressing on the + or - symbols. You will hear a beep to confirm that the time has been set. The symbol will remain lit.
Should you wish to change the time, follow these instructions again.
Manual Operation
After setting the clock, the oven is ready for use. Select a cooking temperature and function by pressing and turning the oven controls.
To turn off the oven, set the controls to 0
Electronic Clock Functions
Timer Alarm: An audible signal is produced at the programmed time, even if the oven is not being used.
Cooking Time: This function allows you to programme cooking time length, after which the oven will turn off automatically.
Cooking Stop Time: This function allows you to programme the time for cooking to stop, after which the oven will turn off automatically.
Cooking Time and Cooking Stop Time: This function allows both cooking time length and the stop time to be programmed. The oven switches on automatically at the set time and operates for the cooking time it has been programmed for. It switches itself off automatically at the entered stop time.
Changing the Clock Alarm Tone
1 Press + and - at the same time. You will notice a dot light up between the + and - symbols on the clock display.
2 Press M and you will see "ton1" light up on the clock display.
3 The alarm tone can be changed by repeatedly pressing on the - symbol.
Programming the Timer Alarm
1 Press on M. The symbol will flash on the clock display.
2 Select the length of time after which you want the alarm to sound by pressing on + or -.
3 The alarm will be confirmed by two consecutive beeps and the display will show the current time. The symbol will remain lit.
4 At the programmed time, the alarm will sound and the symbol will begin to flash.
5 Press on any symbol to turn off the alarm. The 口 symbol will continue to flash.
6 Keep pressing M until the function is switched off.
You can see how much time is left at any time by pressing M until the symbol flashes. You can then change the selected time by pressing + or -. The beep you hear will confirm the new time has been set.
Programming Cooking Time
1 Press M until you hear a beep. Press M again and the word "dur" will appear on the clock display.
2 Select the cooking time by pressing + or-.
3 You will then hear a beep and the present time and the word "AUTO" will light up to show that the oven will switch off automatically.
4 Select a cooking function and temperature.
5 When the set cooking time is over, the oven will turn off and an alarm will sound.
6 Press any symbol to turn off the alarm. The oven will remain off and AUTO will continue to flash.
7 Keep pressing on M until you hear a beep to show the function is now off. Then set the controls to 0 to switch off the oven.
You can see how much time is left and change the remaining cooking time. Follow the previous instructions.
To cancel this function, just press + and - at the same time.
Programming the Cooking Stop Time
1 Press M until you hear a beep. Then press M until the word "End" appears on the clock display.
2 Select the cooking stop time by pressing + or -.
3 You will then hear a beep and the present time and the word "AUTO" will light up to show that the oven will switch off automatically.
4 Select a cooking function and temperature.
5 When it is the time for cooking to stop, the oven will switch off and an alarm will sound.
6 Press any symbol to turn of the alarm. The oven will remain off and AUTO will continue to flash.
7 Keep pressing on M until you hear a beep to show the function is now off. Then set the controls to 0 switch off the oven.
You can use this function even if you are cooking with the oven. If this is the case, follow all of the above instructions except No. 4.
You can see the stop cooking time at any time by following instruction No.1.
Programming Cooking Time and Cooking Stop Time
1 Press M until you hear a beep. If you press M again, the word "dur" will appear on the clock display.
2 Select the cooking time by pressing + or -
3 A beep will then sound and the present time and AUTO will show.
4 Press M until you hear a beep. Then press M until the word "End" appears on the clock display.
5 Select the stop cooking time by pressing + or -.
6 A beep will then sound and the present time and AUTO will show.
7 Select a cooking function and temperature.
8 The oven will remain off with AUTO on the clock display. The oven is now programmed.
9 When it is the time for cooking to start, the oven will switch on and cooking will continue for the selected time. The symbols AUTO and will light up on the clock display.
10 When the programmed time is reach, the oven will switch itself off and an alarm will sound.
11 Press any symbol to stop the alarm. The oven will remain off and AUTO will continue to flash.
12 Press M until you hear a beep in order to switch off the function. Then set the controls to 0 to switch off the oven.
You can see the state of the timer at any time by following instructions 1 and 4.
If you wish to modify the timer setting, you must cancel the function by pressing + and - at the same time. Re-programme the oven by following the instructions given.
Caution
In the event of power failure, your electronic clock timer settings will be erased and 00:00 will flash on the display. Reset the clock and programme again.
IodxOaHT Aa 3aKeKaHnry n H3rTOBaeHnny npoxhix. BeHTnAraTOp paBHomepHo pacnpdeAer TenAo, TaKm o6pa3oM, cokpaaaetc Bpemn IOHnxAeTc TEmpepatypa npiroTOBaeHnry.

TpMb
Гратей и поверхноcthoe 3апеканe. ПОЗВОЯет DOCTиь 3олOTиСТОЛ KОрОЧКИ И He NepeCyшТь BHyTpEHHIOУчыглпpoДуктА. ПпeдHAЗнauаETся ДАЯ ПLOOCKИХ ПОрцIHbIX КУСКOB, ТaКИX KaK, HAnpIMeR, 6иФшTeKc, peбрblшКИ, рbl6a ИИTOCTbl.

MaKcnrPnAb
No3BOJAEr NOBepxHocTHoe 3aNeKaHne Ha 6oAush, yem npn 0bIyHOn FyHKuN rPnA rnoBepxHOCTax. BoAsha MoUHocTb 3aneKaHn rno3BOJAEr 6bICTpee Do6HTBCr 30AnOTnCTOJ KOpouKn.

MaKcnrpnab C Typ6Hoh
I03BOAReT OAnOpOAdHoe 3aNeKaHne N, B To JKe BpeM, fOpMnPoBaHne 3oAoTHcToN KopoQKn Ha NOBepxHOCTN. IDeaIbHo IOXoADIT dAe 3aNeKaHna Ha peWetke. Oco6eHHo peKOMeHdyETcR npn 6pbapOTke 6oAusbIX n ObbEMhblx IpOdyKTOB, TaKnx KaK PTTuca, DnYb Hp. PeKOMeHdyETcR nomecTHTb PPOyKT Ha peWetky dXyOBOrO uKaΦa N NoCTaBNTb POnd Hee CPeUHaBHyO eMKoCTb AIA c6opacTeKaIOUeTO COKa N Knpa.
BHHMaHne!
Bo Bpemn Hcnoa30BaHnny FyHKnI rpnA, MaKcnrpnA nn MaKcnrpnA b C typ6nHO nBepua dYXOBOrO 1kaΦa DOxHa 6bITb 3aKpbTa!

Typ60
Typ6nHa pacnpoctpaHReT TeIIO, hCXODJee OTHarpeBaTeIbHOrO 3AEMeHTa, pacnoLOXeHHoroHa 3aHHei PaHei NdyxOBoro WkaFa. BlaRopaR OADHOPOADHOCTN TempepaTypbI, 3Ta 0yHKUIN P03BOAET FOToBnTB Ha DByX yPoBHx OADHOBPemHNO. FyHKUIN Typ6o TaKxepeKOMEHyETcIpa3MOpO3KN IpOdyKTOB, AIA3TOFO CLeEyET yCTaHOBnTB pyKy BBiopaTEMpepaTp B NoLoXeHne 0.

Poa
TeIIO NOCTyNaET C HIXHHei Yactn AYXOBOro
UkaFa. FUnKcNIA PnIrOAnHa DAn pa3OrpeBa 6IoA
HAN IOAbema Tecta DAn KOHAnTEpCKnx N
IPOAObIX NM I3AeAIn.

Poa c Typ6HNoi
PacnpedeAeT TeIIO NoCTyNAIOUeC HIXHei
actn DxOBOr O KKaΦa. IDeaIbHaN FyHKuN
AII npriTOBAAHIN NporOB N TopTOB C
fpyKTOBOHauHHKOJ, dA J KOToPbIX Heo6XoHMa
noDAa TepA CNH3y. Bcerda Tpe6yeTcR
PpeDBapNTeABHbI HArpeB DxyOBOr O KaΦa

PnAb N PoA
CneuHaBHO 3aKeKaHn. MoKet nNoB3OBaTbCra AIO6oN nopun npOdykTa, BHe 3aBNCIMOCTN OT pa3Mepa.
PnmeuHne
Amnoyka BHyTpN dYXOBKn OCTaETcB KAnOueHHo npn AIO60f yHKuIN pnproTOBaEHn.
YCTaHOBka TeKyuIero BpeMeHn Ha 3AeKTpOHbIX yacax
Пи подкючени Baшero dyxoboro shkaфа, Ha экpane чавов появпся могаюшee слобо AUTO n 3начене 00:00. Дотparнвайтесьdo CIMBOLOB +и - do tex nop, пoka He ycablinte 3BykoBoN cnHaN He yBnDHTe MIRaHouToTOky MeJxdu nФрamn chavob. 3aTeM DoTpoHbTEcsbdo CIMBOLA + nH - n YcTaHOBNTe TeKyuSce Bpemr. B 3akluohene Bby ycablinte 3BykoBoN cnHaN O3HauaIOuN yCTaHOBky yaca. CIMBOA VdET CBETNbCЯ HePpepbIBHO.
BbIMoKeTe H3MeHHTb NOKa3aHnYacOB B AIO6Oe BpEm,AA 3TOFO CAdyIte BBiWeepnBeDeHHbIM HHCTpyKcNm.
Puyhoe ynpabIeHne
Iocae yctaHOBKn TeKyuIero BpeMeHn BaSha dYXOBka rOtoba K hauay pa6oTbI. NObopaunBaJ pyuKN ynpaBLeHnA dYXOBblM uKaΦom, Bbl6epnte Tempeatpy n fUHKUIO npriTOBAEHnI.
AAn OTKaHoueHn AYXOBOrO 1kKaΦa yCTaHOBHTepyKn B IIOAOKeHne .0
N3MeHeHne TOHaIbHOCTN 3ByKOBOrO CHrHaAa TaMepa
1 DToPoHbTeCb OAnH pa3 40 CnMBOAOB + H -- IoRbntbcraMraHouaTouka MeKdy UnΦpaMn 3AeKTpoHHbIX YacOB.
2 DToPoHbTecb Do CnMbOa M n Ha 3KpaHe yacOB IOnBNTcYka3aHne "ton1".
3 Kopotko DoTpaHbAocb do cHMBoA -, BblMOXeTe H3MeHHTb 3ByK TaMepa.
PporpamMnpoBaHne TaMepa
1 OToPraHbAaTeCb AO CnMBOa M Do Tex Nop, NOKa CnMBOA Ha 3KpaHe YacOB He 3aMnraet.
2 Haxmna Ha cHMBoI + nn - BbI6epnte Otp3OK BpeMeHH uepe3 KOtOpBn TaMep DOxKeH ONOBecNTb Bac
3 Bby ycblhnte 1 3BykoBOH cnHa, NOBHTcTekyuee Bpemn CmboA 6yDet pOBHO CBetntbcra. BaW taMep 3anporpammmpoBaH.
4No nCTeueHne 3aHaHHoro BpeMeHN Bbl yCbIwHTe 3ByKOBoN CnHaA N CmBOA 3amrtaet.
5 AIOOCTaHOBKn 3ByKOBOrO CNHaAa AOtpoHbTecb AO Ano6oRo.CnMBOA 6yDet PPOAOXKaTb MmTaTb.
6 OKOHuaHn yHKuH n CaeAyeT AANTeBHO HaxaTb Ha CNMBOA M.
B AIO6oMOMeHT BbI MOXeTe yBnDeTb BpeMaOCTaBwEecr DO OKOHuaHnpa60Tb, DA3TOrO CAdyET ANTEbHO HAXIMaTb Ha CNMBoAM DoTex Nop NOKa CNMBOA He HaHcET MIRaTb. B 3OT MOMeHT Bbl MoXeTe H3MeHtB BpeMaDToParHBaRcB DO CNMBOAOB + HAN-.3aTEM,Bbl YCaBlWHTe 1 3ByKOBo CNHaA O3HaauOuHn BHeceHne H3MeHeHn.
IporpamMnpoBaHne BpeMeHH npriTOBaeHHA
1AHTeBHO HaxmMaTe Ha CnMBOA MDo Tex nop, Noka He ycBbIuTe CnHa. ChOba DToPOHyBwHcB Do CnMBOa M, Ha 3KpaHe yacOB NOBtbcraOBO "dur".
2BbIbepTe BpemA dANTeABHOCTn npHroTOBaeHH AOTpaHNBaRcB DO CmBOAOB +nn-
3 3aTeM Bbl yCbIuHte 1 cnHnA, NOBHTcR TeKyuuee Bpemn CmBOAn "AUTO" bUdET CBETNbCra Yka3bIBaHa To, UTo BaW dYxOBoi ShKaΦ OTKluOHTCra ABTomAtnueckn.
4 BbIbepe Te yHKnIO n TemepaTypy npHrTOBaeHH
5No nCTeueHHe BpeMeHN dAHTeABHOCTn npHrTOBaeHna DyXOBKa OTKauHTcN I npO3ByuNT CnHaA
6ДЯ OCTaHOBKn 3ByKOBOrO CnHrHaa HaxMnte Ha AHObON CnMBoA. AyXOBOn WKaΦ OTKIAUoyEn n CnMBoA "AUTO" 6yAdET Mngatb.
7 AnTeAbHo HaxmMaTe Ha CnMBOA M Do Tex nop Noka He ycBbIuHte CnHa, O3HaayoUnn OkOHuaHne FyHKun. 3aTeM yCTaHOBnte pyKn B NoLoXKeHne DxyOBKa BblKluOyeHa.
B AIO60I MOMENT Bbl MOXeTe yBnAeTb H3MeHnTb BpeMg OCTaBWeecr DO OKOHuaHnnpnroTOBaeHn. AAn 3ToRo CcEaYnte BblweepNBeDeHHbIM HHCTpyKcHm.
Ecan Bbi XeAaTe OTMeHnTb 3Ty yHKnHO CaeDyET OAnHOBpeMeHHo HaxaTb Ha CNMBObl + -
IporpaMMnpoBaHne BpeMeHH OKOHuaHn nprirotOBaHn
1 AnTeAbHo HaxMaIte Ha CnMBOA M do Tex Nop Noka He ycBIsHTe 3ByKOBoN CnHaA. 3aTeM HaxMaIte Ha CnMBOA M do Tex Nop Noka Ha 3KpaHe yacOB He IOnBNTcR CAOBO "End".
2 BbIbepe Te Bpem OKOHuaHn IOTOBKn AOtpaIBaBcB DO CmBOAOB + HN -.
3 3aTeM Bby ycbluHte 1 3ByKOBoi CnHaa, NOBNTcra TeKyuuee BpeMa n cIMBOA "AUTO" 6ydet CBETNbCra yKa3bIBaHa To, YTO dYXOBoi ShkaΦ OTKAHOHTcra ABTomaTHueCKn.
4 BbIbepeTe FyHKUIO N Tempeatypy npnroTOBaeHn.
5No DoCTHXeHHe 3aHaHHoro BpeMeHN OKOHuaHnA, DuxOBoN uKaΦ OTKHOHTcra ABTomatUneCKn I npO3ByuNT CnHaA.
6 AIOOCTaHOBKn CnHaHa AOCTaTOHODOTPOHyTbCnAOIHOBOcMBOA. AyXOBKa BbIKIoUeHa n CmBOA "AUTO" 6yDet Mngatb.
7 Aa 3aBepWeHn FyHKuH N AHTeA bHo HaxMaTe Ha CmBOA M Do Tex nop noka He ycblnte 3ByKOBoi CNHa. 3aTeM yCTaHOBNTe pyKn B NoLoXeHne 0, dYxOBKa OTKAIOHTcra.
Moxho nCnoB3OBaTb 3Ty yHKnUO KOrda AyxOBoI uKaΦ yXe HaxoNTcB B npouceCe npuroTOBaeHn. ABy 3ToI0 CAdyIte yKa3aHbIM HHCTpyKzma, npOnycTN b NykT 4.
B AIO60I MOMENT BbIMOKeTe yBnNTb BpeMa OKOHuaHnI pniroTOBaeHnI, dA3TOTO BblNOAHHTe I.1 HNCTpyKcHn.EcAn BblJxEaete N3MeHnTB ac OKOHuaHnI CLeDyET OTMeHnTB fYHKUHO OADHOpeMeHHbIM HaxKaTHeM Ha CNMBoJI + n -, a 3aTeM CHOBa 3anpoPpAMMnPoBaTb CLeEyIO BblIePiNbBeDEHHbIM NHCTpyKcHm.
IporpaMMnpoBaHne dANTeAhoCTN OOKOHuaHn npuroTOBaeHn
1 AnTeA bHo HaxmMa Te Ha CnMBO M Do Tex Nop Noka He ycBbIWe CnHa. 3aTeM CHOBa DToPoHbTecb Do CnMBoA M, Ha 3KpaHe YacOB IOnBNTcR CaOBO "duI".
2BbIbePteAANTeAhoCTbPiNFOBaeHnAOTpaINBaAcbAoCNMBoA+Hn-.
3 Bbl yCbblnte OAnH CnHaA, NOBHTcA TekyuueBepMa n CmBOA "AUTO".
4 AnTeIbHo HaxmMaIte Ha CnMBOA M Do Tex nop Noka He ycBilIte CnHaa. 3aTeM ChOba HaxmaiTe Ha CnMBOA M Noka Ha 3KpaHe yacOB He NoRbITcraOBo "End".
5 Bb6epnte BpeM OKOHuaHn npHroTOBaeHn DOtpaHBaacb Do CmBOa + HN -.
6 3aTeM Bbl yCbIuHte 1 cnHa, noBHTcA TeKyuuee BpeMa n CnMBOA "AUTO".
7 BbIbepeTe FyHKcHIO N TeMnepaTypy npnroTOBaeHHJ.
8 Duxoboi shkaΦ OTKIouHTc, Ha 3KpaHe yacob nOBHTc CmBOAUTO. BaW duxoboi shkaΦ 3a nporpaMMnpoBaH.
9No doCTnHexHe BpeMeHn HaaHa npHrTOBLeHn AxyOBoN uKaΦ HauHET pa60Ty aBTOMaTHueCKn H 6yDet rTOBHTb TeueHne BBipahHoro BpeMeHn. Ha 3KpaHe yacob 6yDet CBeTtbcra CmBOA AUTO n
10 No doCTnHexHe 3aHaHHoro BpeMeHN OKOHuaHrydXOBoI uKaΦ OTKIAOHTcra ABTomatueeCKN IN P03ByuT CnHaA.
11 AAnOCTaHOBKn CnHaAa DoCTaTOUHO AOtpoHyTbcrdo AnbOoi KhoIKN. AyxOBoi ⅢKaΦOTKlOueH, CmBOI “AUTO” MnaeT.
12 AHTeAbHO HaxHMaIte Ha CnMBOA M do Tex nop Noka He ycbluHTe CNrHa o6 OKOHuaHH FyHKUHN. DA r OTKAIOueHnry dYXOBKn yCTaHOBnTb pyKN B NOAOKeHne 0 .
B AIO6o MoeHT Bbl MoXeTe yBnAeTb Ka3aIporpaMMnPoBaHbI Yacbl, dIy 3TOrO CLeDyIte HNCTpyKcIqM 1 n 4.
EcnBbXeIaeteH3MeHnTb nporpaMMy, cAeYETOTMeHnTb FyHKUIO ODHOBpeMeHHbIM HaxaTneHa + n -, a 3aTeM 3aHOBO 3anporpaMMpOBaTbCaeDyBbIePnPBeDeHHbIM HNCTpyKUJAM.
BHHMaHHe!
B clyae otKluoyehnna 3AeKtpoHntaHnBa Bc HhOpMaunra 3anporpammmpoBaHHa B 3AeKtpoHHbIX yacax 6ydet ytepyHa. Ha yacax NOBtCmraIoOee 3NaueHne 00:00. CJeMyET BHOBb yCTaHOBVb TeKyUee BpeMn 3anporpammmpoBaTb Yacbl.
09.05


jollie pibius 1! aclll
M
-
jraal aol qjg 2
-
jao
aclll jbiuog adg ai juaai 3
AUTO
J
4
5
a
aagall oJyI yj 6
aclll aia o jilai aai j
jgl+ jgl 1glll 1
aal aaaabai g
. aclwJ plj
"ton1" 2
aclll aolw
Jssll bcll aill 2i jy Silsol 3
·s - jn + 1jn
4
1
acllll 1c jaoj jao j
aclll 2
jgl+ joll jol
aclll jbiuogdojai juaa 3
e Jy lao cio 0 jorll g ylll
A
j 4
.0j0
aagall oJyI y Jg 5
.
aagglgjy jraM jaoall 6
i1
M jzj
aalil 1
sai
i j gaaaiu sii -jolgl + jol
aclll jie ie 15
aigjis1y aclwbl
J
a15 1c jbiw g jao g aclll
.00: 00 AUTO
+
aclllp jj aalgaaa aai jn j
j- jolil 1c biwally aclll |buaia laa
15 15
e 1
j 1
.0x1 2j1 j1 1
s
1 1
a
0 1
aigjNl aelwllg
ooll cgljil jgul jllb:
.
olll 1d:
Jilali JooJI c n jill a
S = 10
S OBC = S AOB + S_ BOC

3
Jgss
aaiia 1
4
a11 1
a 2
| Produttore Ma | nManufacturer Fabrìcant Fabricante | BERTAZZONI | |
| Modello Model | Modèle Modelo | F60CONXA F60PROXA | |
| Classe di efficienza energetica, su una scala da A (più effidente) a G (meno effidente). | Energy efficiency type follows a scale between A (most efficient) and G (least efficient). | Classe d'efficience energetique, sur une échelle de A (le plus efficient) à G (le moins efficient). | Clase de eficiencia energetica, en una scala que abarca de A (más eficiente) a G (menos efficiente). |
| Funzione di riscaldamento. | Heating function | Fonction de chauffage. | Función de calentimiento. |
| Riscaldamento standard. | Conventional heating. | Chauffage traditionnel. | Calentamente convencional. |
| Convezione forzata. | Forced convection. | Convection forcée. | Convección forzada. |
| Consumo di energia. | Energy consumption. | Consummation d'énergie. | Consumo de energia. |
| Riscaldamento standard. | Conventional heating. | Chauffage traditionnel. | Calentamente convencional. |
| Convezione forzata. | Forced convection. | Convection forcée. | Convección forzada. |
| Volume netto (litri). | Net volume (litres). | Volume net (litres). | Volumen neto (litros). |
| Tipo: Piccolo Medio Grande | Size: Small Medium Large | Type: Petit Moyen Grand | Tipolo: Pequeño Medio Grande |
| Tempo di cottura con carico normale. | Cooking time with normal load. | Temps de cuisson à charge normale | Tiempo de cocción con carga normal. |
| Riscaldamento standard. | Conventional heating. | Chauffage traditionnel. | Calentamente convencional. |
| Convezione forzata. | Forced convection. | Convection forcée. | Convección forzada. |
| Superficie di cottura. | Cooking surface | Surface de cuisson. | Superficie de cocción. |
| Rumore (dB (A) re 1 pW). | Noise (dB (A) re 1 pW). | Niveau sonore (dB (A) re1 pW) | Ruido (dB (A) re 1 pW). |
Desideriamoanchei dare il nostro contributo all'ambiente;perquesto la carta cheutilizziamo e riciclata.
Our contribution to protecting the environment - we use recycled paper.
Notre participation à la protection de l'environnement : nous utilisons du papier recyclé.
Nuestra aportacion a la proteccion del medio-ambiente:utilizamos papel reciclado.
Cod.: 3172583-000
| Hersteller Fabrikant | ПОНЗВОДТЕЛБ | Tillverkare BERTAZZONII | ||
| Modell Model | Modèle Modell | F60CONXA F60PROXA | ||
| Energieeffizienzklasse auf einer Skala von A (geringer Verbrauch) bis G (hoher Verbrauch) | Klasse van energie-efficientre, op een schaal van A (meest efficientre) tot G (minst efficientre). | КлASS Альпергенихшко эф�ковиностп, по Шаlette OT A (наньалец эф�ковиньд) до G (нанмee- п��е зфаль- ны). | Energiklassäre en skala frän A (mestenergieffektiv) till G (minstenergieffektiv). | A |
| Behezung. | Verwarmings-function. | Функшиянаг徕а. | Uppvärmlnings-funktion. | ↓ |
| Konventionelle Behezung. | Conventionele verwarming. | Обч neuropalngrabes. | Kconventionell uppvärmlnng. | ↓ |
| Zwangs-konvection | Geforceerde convectie. | Форсированная конвекця. | Forcerad konvection. | ↓ |
| Energiever-brauch. | Energieverbruick | Расхад заек- trpoэнергий. | Energi- fürbrukning. | ↓ |
| Konventionelle Behezung. | Conventionele verwarming. | Ob們ч neuropalngrabes. | Kconventionell uppvärmlnng. | ↓ |
| Zwangs-konvection | Geforceerde convectie. | Форсированная конвекця. | Forcerad konvection. | ↓ |
| Nettovolume (Liter). | Nettovolume (liter). | Оьем нето(отгруlt). | Nettovolym (liter). | 59 |
| Typ: Klein Mittel Groß | Type: Klein Middelgroot Groot | Тул: Маленький Среadingи Большой | Тур: Liten Medium Stor | ← |
| Garzeit bei Standard-beladung. | Baktijd bij normale belasting. | Вревая рогOtOBлевая, при Нормаль- ноч Загузke. | Tillagningsid med normal mängd lvsmedel. | 42 min. |
| Konventionelle Behezung. | Conventionele verwarming. | Ob們ч neuropalngrabes. | Kconventionell uppvärmlnng. | 42 min. |
| Zwangs-konvection | Geforceerde convectie. | Форсированная конвекця. | Forcerad konvection. | ↓ |
| Backfläche. | Bakoppervlak. | Поверхноctь Готовки. | Tillagningsyta. | 1300 cm² |
| Geräusch (dB (A) re 1 pW). | Geluid (db (A) re 1 pW). | Шум (dB (A) re 1 pW). | Buller (dB (A) re 1 pW). | ↓ |
- DALLA SCRIVANIA DEL PRESIDENTE
- Oven Functions
- Oven Switch-Off
- Conventional
- Conventional with Fan
- Grill
- MaxiGrill
- MaxiGrill with Fan
- Caution
- Turbo
- Lower Element
- Lower Element with Fan
- Grill and Lower Element
- NB
- Setting the Electronic Clock
- Manual Operation
- Electronic Clock Functions
- Changing the Clock Alarm Tone
- Programming the Timer Alarm
- Programming Cooking Time
- Programming the Cooking Stop Time
- Programming Cooking Time and Cooking Stop Time
- TpMb
- MaKcnrPnAb
- MaKcnrpnab C Typ6Hoh
- BHHMaHne!
- Typ60
- Poa
- Poa c Typ6HNoi
- PnAb N PoA
- PnmeuHne
- YCTaHOBka TeKyuIero BpeMeHn Ha 3AeKTpOHbIX yacax
- Puyhoe ynpabIeHne
- N3MeHeHne TOHaIbHOCTN 3ByKOBOrO CHrHaAa TaMepa
- PporpamMnpoBaHne TaMepa
- IporpamMnpoBaHne BpeMeHH npriTOBaeHHA
- IporpaMMnpoBaHne BpeMeHH OKOHuaHn nprirotOBaHn
- IporpaMMnpoBaHne dANTeAhoCTN OOKOHuaHn npuroTOBaeHn
- BHHMaHHe!
Brand : BERTAZZONI
Model : F60PROXA
Category : Oven