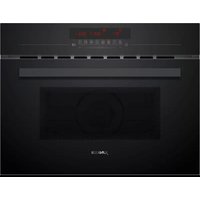
JB23PP50 - Oven Junker - Free user manual and instructions
Find the device manual for free JB23PP50 Junker in PDF.


| Features | Details |
|---|---|
| Product type | Electric oven |
| Capacity | 23 liters |
| Power | 800 W |
| Cooking functions | Grill, convection, traditional cooking |
| Temperature control | Adjustable thermostat up to 230°C |
| Dimensions | External dimensions: 45 x 35 x 25 cm |
| Weight | 5 kg |
| Cavity material | Stainless steel |
| Included accessories | Grill rack, baking tray |
| Energy consumption | Energy class A |
| Maintenance | Easy cleaning thanks to smooth surface |
| Safety | Overheat protection, automatic shut-off |
| Warranty | 2 years |
| Additional information | Ideal for small kitchens and quick meals |
Frequently Asked Questions - JB23PP50 Junker
User questions about JB23PP50 Junker
0 question about this device. Answer the ones you know or ask your own.
Ask a new question about this device
Download the instructions for your Oven in PDF format for free! Find your manual JB23PP50 - Junker and take your electronic device back in hand. On this page are published all the documents necessary for the use of your device. JB23PP50 by Junker.
USER MANUAL JB23PP50 Junker
Built-in oven JB23PP50
Integreerbare oven JB23PP50
Safety advice and information 21
Before installation 21
Safety advice and information. 21
Items that may damage the appliance 22
Your new oven 23
Control panel 23
Function control knob 23
Sensors and display panel 23
Sensors to change the set values. 24
Oven interior 24
Accessories 24
Before using the oven for the first time 24
Setting the time 24
Heating the oven. 24
Cleaning the accessories. 24
Programming the oven 25
Type of heating and temperature 25
Rapid heating 25
Setting the time functions 25
Timer 25
Cooking time 26
End time 26
Time 27
Changing the basic settings 27
Automatic shut off 27
Self-cleaning 28
Suggestions and warnings.. 28
Before using the self-clean function. 28
Setting 28
After using the self-clean function 28
Care and cleaning 29
Cleaning products 29
Light. 29
Unhooking and hanging the oven door 29
Fitting and removing the glass panels 30
Troubleshooting 31
Troubleshooting table 31
Changing the oven bulb. 32
Protective glass panels 32
After-sales service 32
E number and FD number 32
Energy-saving and environmental protection tips. 32
Saving energy. 32
Environmentally-friendly disposal of waste 32
Tested for you in our cooking studio 33
Cakes and pastries 33
Suggestions and practical advice for baking. 34
Meat, poultry, fish 34
Tips for roasting and grilling 35
Cooking a meal. 36
Ready-made products 36
Special dishes 37
Defrosting 37
Drying. 37
Jam making 38
Acrylamide in food 38
Test dishes 39
Baking. 39
Grilling 39
Safety advice and information
Read the instructions in this manual carefully. Keep the operation and installation instructions. The corresponding manual must be passed on to any subsequent owner.
This instruction manual is for use with both stand-alone ovens and oven-hob combinations. Read the instruction manual supplied with the hobs of oven-hob combinations to find out how their hob controls work.
Before installation
Transport damage
Check the appliance after removing it from its packaging. If the appliance has been damaged in transit, do not connect it to the mains; contact the technical support service and note the damage in writing, otherwise you may lose your rights to compensation.
Electrical connection
Only an authorised technician may connect the appliance. The warranty is void if any damage is caused by incorrect connection.
Before using the appliance for the first time, ensure that your domestic electrical system is earthed and meets all the current safety regulations. An authorised technician should install and connect your appliance. Use of this appliance without an earth
connection or incorrectly installed can cause serious injuries (personal injuries or electrocution), although this is very rare. The manufacturer accepts no responsibility for any malfunction or damage which is caused by improper electrical installations.
Safety advice and information
This appliance has been designed exclusively for domestic use. Only use the appliance for preparing food.
Children and young adults should not use the appliance without supervision
because they may suffer either physical or mentally injuries, or
may not have the knowledge and experience to use it correctly
Never allow children to play with the appliance.
Oven door.
The oven door must remain closed when the oven is switched on. For safety reasons, we recommend keeping the oven door closed, even when the oven is not being used.
Do not lean on, sit on or play with the oven door, even when it is closed.
Hot oven interior
Risk of burns.!.
- Never touch the oven's inner surfaces or heater elements when they are hot. Always carefully open the oven door. The oven may let out steam. Keep children away from the oven.
- Do not pour water into a hot oven. This can produce extremely hot water vapour.
- Do not use the oven to prepare dishes with large quantities of strong alcoholic liquor. Alcohol vapour can ignite inside the oven. Only use strong alcoholic liquors in small doses and take care opening the oven door.
Risk of fire!!
- Never put flammable objects into the oven. Never open the door if smoke is coming from the appliance. Turn it off. Remove the plug from the mains or disconnect the fuse/circuit breaker in the fuse box.
- Ensure that the greaseproof paper is securely fixed to the accessories when pre-heating the appliance. An air current occurs when the appliance door is opened. The greaseproof paper could touch the heating elements and burn. Always secure the greaseproof paper with a pan or baking tin. Only cover the required surface with greaseproof paper. The greaseproof paper must fit the accessory perfectly.
Danger of short-circuits!
Never put the electric cables of electric appliances around the door of the oven. The cable insulation could be damaged.
Hot accessories and pans/dishes
Risk of burns.!.
Never remove accessories or hot dishes from the oven without using grippers.
Inappropriate repairs
Risk of electrical discharge and the resulting shock!
Incorrect repairs can be dangerous. Repairs can only be carried out by qualified personnel from the Technical Assistance Service. If the appliance is faulty, unplug from the mains or remove the fuse/turn off the trip switch of the fuse box. Notify the Technical Assistance Service.
Self-cleaning
Risk of fire!!
The remains of food and grease as well as roasting juices can catch fire during self-cleaning. Before self-cleaning, remove grease and dirt from inside the oven.
- Do not place flammable objects, such as dishcloths, on the door handle. The outside of the appliance heats up considerably during self-cleaning. Keep children away.
Significant health risks!
Trays and baking tins with a non-stick surface must not be cleaned using the self-cleaning function. The intense heat removes the non-stick surface and creates toxic gases.
Items that may damage the appliance
Caution!
- Accessories, pans, film, greaseproof paper or aluminium foil on the oven floor: Do not place any accessory on the oven floor. Do not cover the oven floor with any type of film or paper. Do not place any cookware on the oven floor if the temperature is set at more than 50^ . It will get too hot. Oven and cooking times will be inaccurate and the enamel will be damaged.
Water in a hot oven Do not pour hot water into a hot oven. Steam will be produced. The resulting changes in temperature may damage the enamel and/or accessories.
Liquid foods: Do not keep liquid foods for too long inside the oven with the door closed. This would damage the enamel.
Fruit juices: Do not overfill the tray when baking pies containing juicy fruits. Fruit juice spilling from the tray will cause stains that will be impossible to remove. Use the deep enamel tray whenever possible.
Leaving the door open when the oven is cooling down The oven must only be left to cool with the door closed. Even if the oven door is left only slightly open, the fronts of nearby kitchen units may be damaged over time.
Oven seal: the fibreglass seal around the oven's interior forms the seal with the glass door. As far as possible, it is recommended that you do not clean it because it is very sensitive. Rubbing it might damage it. If the seal is worn, a new one can be acquired from the Technical Assistance Service.
The oven door as a support surface: Do not rest or sit on the oven door when it is open. Do not place any cookware or accessory on the oven door. - Transporting the appliance: Do not use the door handle to move or secure the appliance. The handle cannot take the weight of the appliance and may break. The glass panel of the oven door might move, causing misalignment between the front panel and the glass panel.
Heavy accessories: Do not pull out oven accessories too much when they are fully loaded before removing items from them. Loaded accessories will tilt when pulled out. This creates considerable pressure on the sides of the oven and could damage the enamel. Support the weight of accessories when they are pulled out by lifting slightly with one hand. Warning! Always use grippers when pulling out hot accessories.
Grilling: When grilling, do not place the universal deep tray or the flat oven tray at a height of more than 3. Due to the extreme heat, it could be deformed and cause damage to the enamel when it is removed. Use level 4 and 5 only for direct grilling.
Your new oven
We will now describe your new oven. This chapter explains the functions of the control panel and its individual elements. Information is also provided about the oven's accessories and internal components.
Control panel
Below is a general overview of the control panel. The display panel cannot show all the symbols at the same time. Elements may vary according to the model.
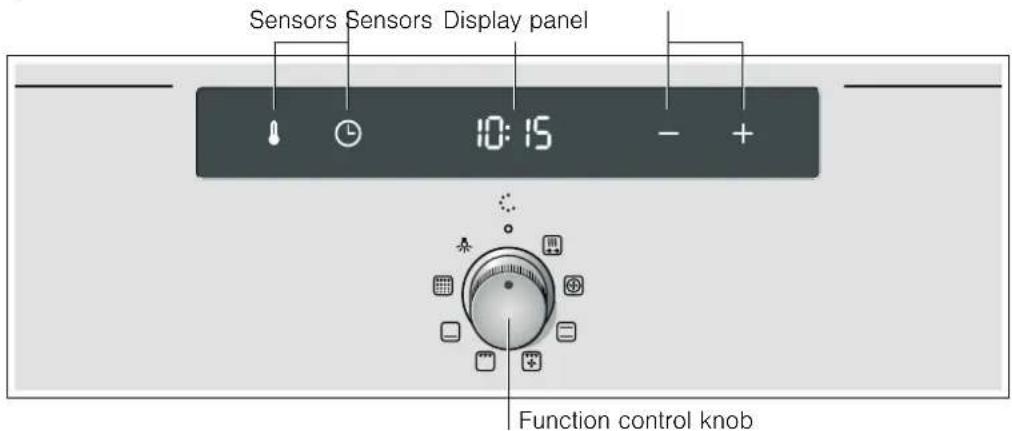
Knobs
The control knob is retractable on some ovens. The control knob is retracted or returned by pressing it when at the zero setting.
Sensors
Do not press the sensors forcefully. Only press the relevant symbol.
Function control knob
The function control knob is used to select the type of heating.
Setting Use
| ○ Zero setting The oven is off. |
| Rapid heating The oven reaches the pro-grammed temperature very quickly. |
| Hot air* For cakes and pastries. These can be baked on two levels. A fan located on the rear wall of the oven disperses the heat evenly. |
| Top and bottom heat-ing* For cakes, gratin dishes, and lean meat roasts, e.g. veal or game, on one level. The heat is provided by the bottom and top heating elements. |
| Grill with hot air For roasting joints of meat, poultry and fish. The grill heating element and the fan switch on and off alternately. The fan circulates the heat generated by the grill around the food. |
| Large surface grill For grilling steaks, sausages, fish and toasting bread. The entire surface below the grill heating element is heated. |
- Type of heating used to determine the appliance energy efficiency rating according to EN60350.
Setting Use
| Bottom heating Confits, baking and cooking au gratin. The heat comes from the bottom heating element. |
| Self-cleaning Using the self-cleaning function to clean the inside of the oven. The oven heats to clean itself. |
Light For turning on the oven light.
* Type of heating used to determine the appliance energy efficiency rating according to EN60350.
When a heating type is selected, the -- symbol is displayed on the display panel.
Sensors and display panel
The sensors are used to set different functions. The set values are shown on the display panel.
Sensor Sensor function
| Temperature Select the temperature and grill power or cleaning level. | |
| Time functions | Select the timer □, the cooking time ▲, the end time ▷ and the actual time ▽. |
| Minus | Reduces programmed values. |
| Plus | Increases programmed values. |
The symbol for the time function activated lights up on the display panel.
Sensors to change the set values
With the + or - sensors all fixed and recommended settings can be changed.
- = Increase programmed values.
- = Reduce programmed values.
Ranges
| 30-270 | Temperature range | The temperature inside the oven in °C. |
| 1-3 Grill | power The different levels for the large surface grill ☑. | |
1 sec. - 23:59 h. Cooking time.
1 sec. - 23:59 h. Time set on the timer.
When the oven is heating, the symbol lights up on the display panel. This light goes off when heating is paused. The symbol does not light up for grill power and cleaning levels.
Oven interior
The oven includes a fan and light.
Light
The oven light remains on while the oven is on. The light switches off at set temperatures of up to 60^ and during the clean function. This ensures optimum precision control.
However, the light can be turned on without the oven being on by setting the function control knob to.
Fan
The fan can be turned on and off as necessary. The hot air escapes through the top of the door. Warning! Do not cover the vent. The oven could overheat.
The fan remains on for a certain length of time after the oven has been switched off so that it can cool down more quickly.
Accessories
Racks may be positioned in the oven at 5 different heights. Up to 2/3 of a rack may be pulled out without it tipping over. This makes it easy to remove food.
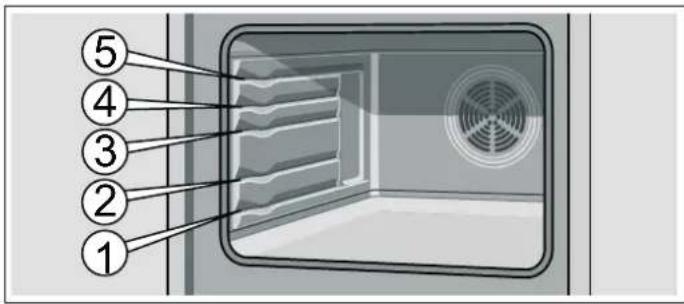
Racks may deform as they heat up. Once they have cooled, the deformation disappears and their operation is unaffected.
Your oven is supplied with only some of the following accessories.
Accessories may be purchased from the Technical Assistance Service or from specialist retailers. Please refer to the sales catalogue for available accessories.
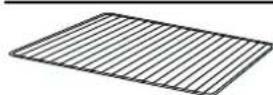
Shelf
For pans, baking tins, roasts, grilled items and frozen meals.
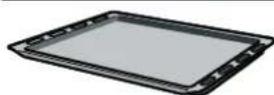
Flat enamel oven tray
For cakes, pastries and biscuits.
Place the tray in the oven with its raised lip facing the door.
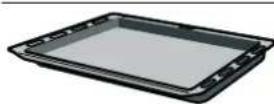
Universal deep enamel tray
For runny cakes, pastries, frozen meals and large joints for roasting. This can also be used as a tray to collect the fat when roasting directly on the shelf.
Place the tray in the oven with its raised lip facing the door.
Before using the oven for the first time
In this section, you can find out what you must do before using your oven to prepare food for the first time. First read the section on Safety information.
Setting the time
Once the oven has been connected, the and 0:00 symbols light up on the display panel. Set the clock to the right time.
- Press the sensor.
The display panel displays the time 12:00
- Set the time with the + or - sensors.
- Confirm the time with the sensor.
The programmed time is displayed after a few seconds.
Heating the oven
To remove the "new" smell, heat the oven empty with the door closed. The most effective option is to heat the oven for one hour with the top and bottom heating elements set at 240^ . Check that no packaging has been left inside the oven.
- Select top and bottom heating using the function control knob.
- Press the + sensor until 240^ is displayed on the display panel.
Turn the oven off after one hour. To do this, turn the function control knob to zero.
Cleaning the accessories
Before using the accessories for the first time, clean them thoroughly using a cloth, hot water and a little soap.
Programming the oven
There are different ways to programme the oven. Programming the type of heating, temperature or grill power. The oven can be programmed with the cooking time (duration) and the end time for each dish. For more information, see the chapter Setting the time functions.
Note: We recommend preheating the oven before inserting the food in order to avoid condensation on the oven glass.
Type of heating and temperature
Example in the picture: top and bottom heat at 190^
- Select the type of heating using the function control knob.
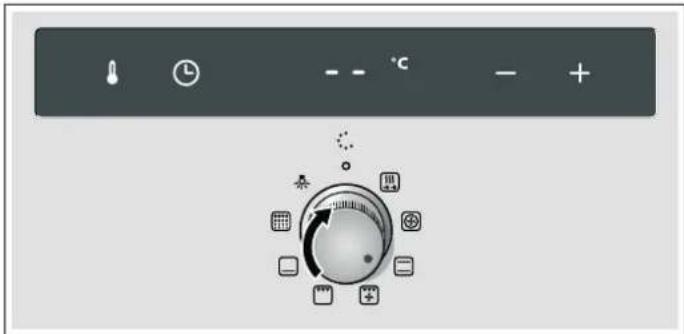
- Set the temperature or required grill power using the + or - sensors.
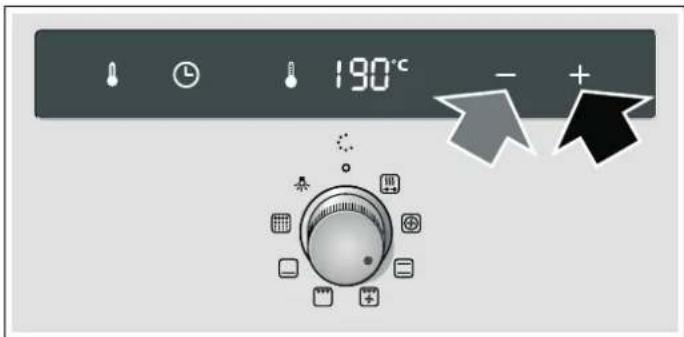
The oven will begin to heat up.
Switching the oven off
Set the function control knob to the zero setting.
Changing the settings
The type of heating and the temperature or grill power may be changed at any time.
Rapid heating
With the rapid heating setting, the oven reaches the programmed temperature very quickly.
Rapid heating must be used for temperatures of more than 100^ .
To ensure uniform cooking, the food must not be put into the oven until rapid heating has been completed.
- Select rapid heating using the function control knob.
- Select the required temperature using the + and - sensors. The symbol lights up on the display panel. The oven will begin to heat up.
End of rapid heating
A signal will sound, the 8 symbol will go out. Place the food in the oven and select the required function and temperature.
Cancelling rapid heating
Set the function control knob to the zero setting. The oven switches off.
Note: With the rapid heating function you cannot programme the cooking time duration.
Setting the time functions
This oven has various time functions. The sensor activates the menu and moves through the different functions. The time symbols remain lit up while settings are programmed. A time function that has already been programmed can be modified with the + or sensors.
Timer
The timer works independently of the oven. The timer has its own signal. You can therefore distinguish whether the time set for the timer or the automatic oven shut-off have finished (cooking time).
- Press the sensor.
The symbol lights up on the display panel.
- Programme the timer using the + or - sensors.
Sensor suggested value + = 10 minutes.
Sensor suggested value = 5 minutes.
The programmed time is shown after a few seconds. The time set for the timer starts to count down. The symbol lights up on the display panel and the time elapsed is displayed.
The time set for the timer has elapsed
A signal will sound. The display panel will show 00:00. Switch off the timer using the sensor.
Changing the time set on the timer.
Change the time set for the timer using the + or - sensors. The altered time is shown after a few seconds.
Cancelling the timer
When the oven switches off, the timer continues working. Resetting the timer to 00:00 with the - sensor. The timer switches off.
Viewing the time settings
If several time functions are programmed, the corresponding symbols light up on the display panel.
To view the timer, the cooking time ,the end time or the time 已 press the sensor repeatedly until the required symbol lights up. The corresponding value will be shown for a few seconds on the display panel.
Cooking time
The oven allows you to set the cooking time for each type of food. The oven switches off automatically when the cooking time has elapsed. This avoids interrupting other tasks to switch the oven off or exceeding the cooking time by mistake.
Example in the picture: Cooking time: 45 minutes.
- Select the type of heating using the function control knob.
- Press the sensor twice.
The display panel will show 00:00 and the cooking time symbol
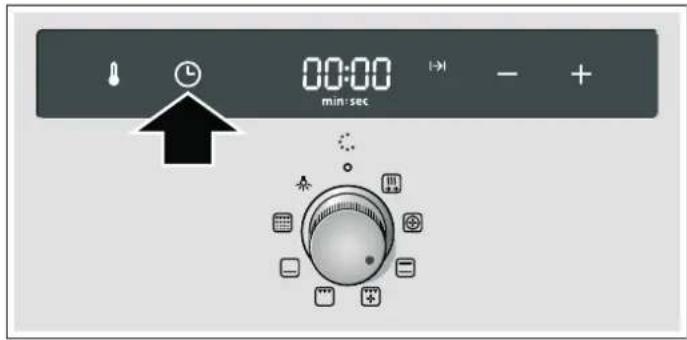
- Programme the cooking time using the ^+ or sensors. Sensor suggested value + = 30 minutes. Sensor suggested value - = 10 minutes.
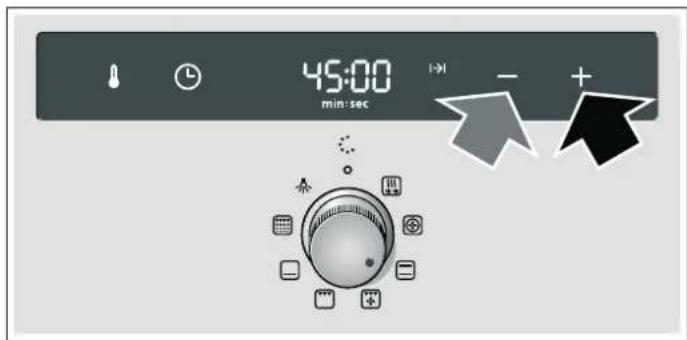
- Press the sensor.
Set the temperature or required grill power using the + or - sensors.
The oven will switch on after a few seconds. The programmed temperature will be shown on the display panel and the symbol will light up.
The cooking time has finished.
A signal will sound. The oven will stop heating. The display panel will show 00:00. Press the sensor twice. A new cooking time can be set with the sensors +or -. Or pressing the sensor and turning the control knob to zero. The oven is off.
Changing the cooking time
Press the sensor twice. Change the cooking time using the + or - sensors.
Cancelling the cooking time
Press the sensor twice. Reset the cooking time to 00:00 with the sensor - . The time has been cancelled.
Viewing the time settings
If several time functions are programmed, the corresponding symbols light up on the display panel.
To view the timer, the cooking time ,the end time 1 or the time , press the sensor repeatedly until the required symbol lights up. The corresponding value will be shown for a few seconds on the display panel.
End time
The oven allows you to set the time when you want the food ready. In this case the oven switches on automatically and switches off at the set time. For example, the food may be placed in the oven in the morning and the oven set so that it is ready at midday.
Ensure that the food will not go off if it is in the oven for too long.
Example in the picture: It is now 10:30 AM, the cooking time is 45 minutes and the oven should switch off at 12:30 PM.
1.Set the function control knob.
2. Press the sensor twice.
3. Programme the cooking time using the + or - sensors.
4. Press the sensor.
The time when the dish will be ready and the end time symbol will be shown on the display panel.
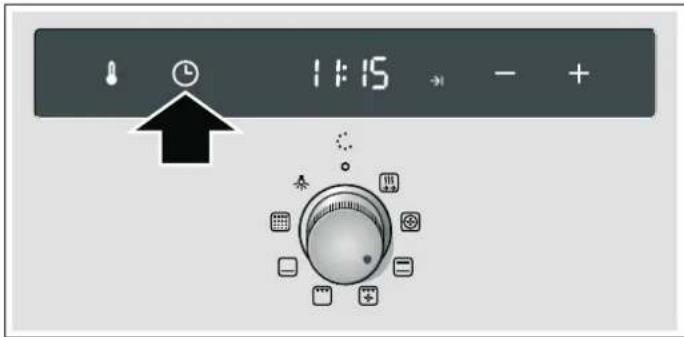
- Delay the end time using the + or - sensors.
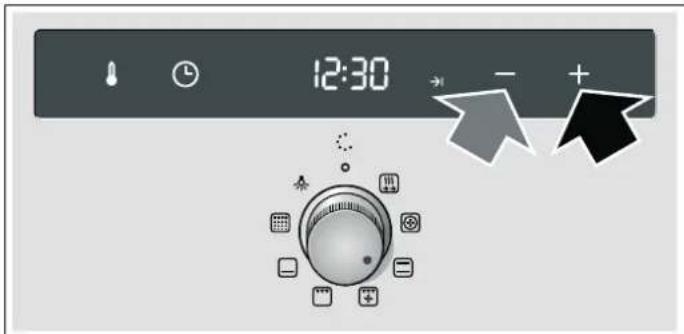
- Press the sensor.
Set the temperature or required grill power using the + or - sensors.
The programmed temperature and the symbol will be shown on the display panel, and the oven will be set to standby. When the oven turns on, the programmed temperature and the symbol will be shown. The symbol turns off.
The cooking time has finished
A signal will sound. The oven will stop heating. The display panel will show 00:00. Press the l sensor twice. A new cooking time can be set with the sensors ^+ or -. Or pressing the l sensor and turning the control knob to zero. The oven is off.
Changing the end time
Press the sensor three times. Change the end time using the ^+ or sensors. The altered time is shown after a few seconds. Do not change the end time if the cooking time has already started to count down. The final result may not be the same.
Cancelling the end time
Press the sensor three times and reset the end time to the current time with the - sensor. The oven switches on.
Viewing the time settings
If several time functions are programmed, the corresponding symbols light up on the display panel.
To view the timer, the cooking time 1 , the end time 1 or the time , press the sensor repeatedly until the required symbol lights up. The corresponding value will be shown for a few seconds on the display panel.
Time
Once the oven has been connected or after a power cut, the and 0 symbols light up on the display panel. Set the clock to the right time.
- Press the sensor.
The time is displayed 12:00.
-
Set the time with the + or - sensors.
-
Confirm the time with the sensor.
The programmed time is displayed after a few seconds.
Changing the time
No other time function must be programmed, the oven must be switched off.
- Press the sensor twice.
The display panel displays - Set the time with the + or - sensors.
- Confirm the time with the sensor.
The programmed time is displayed after a few seconds.
Hiding the time
The time can be hidden. See the Modifying basic settings chapter.
Changing the basic settings
This oven has different basic settings. The settings can be adapted to the user's own needs.
Basic setting Option 0 Option 1 Option 2 Option 3
| c1 | Duration of signal after the cooking | - approx. 10 sec approx. 2 min* approx. 5 min | ||
| time or the time set on the timer has elapsed | ||||
| c2 | Time indicator no yes* -- | |||
| c3 | Time until a setting is applied | - | approx. 2 sec | approx. 4 sec* |
| c6 | Select default settings for all values. | no* | yes | -- |
- Default setting
The oven must be switched off.
- Press the sensor for approximately 4 seconds.
The display panel will show the current basic setting for the duration of the signal, e.g., c / Option. - Change the basic setting using the + or - sensors.
- Confirm with the sensor
The display panel shows the following basic setting. The sensor allows you to run through all the settings and the+ or sensors allow you to modify them.
- Finally, press the sensor for approximately 4 seconds.
All basic settings have been applied.
The basic settings can be changed again at any time.
Automatic shut off
If the settings of the appliance are not changed for several hours it is automatically shut off. The oven will stop heating. This depends on the temperature or grill power selected.
Automatic shut off is activated
A signal will sound. The display shows F8 . The oven will stop heating.
Turn the function control knob to the zero setting. The oven switches off.
Cancelling the automatic shut off function
To avoid triggering the automatic shut off, a cooking time must be set. The oven will heat until this time is up.
Self-cleaning
During the self-cleaning function, the oven heats to about 500^ . In this way, baking and cooking remains are burned and only ash remains have to be cleaned from the oven.
There are three cleaning levels available.
Level Cleaning level Duration
| i | mild approx. 1 hour, 15 minutes |
| 2 | medium approx. 1 hour, 30 minutes |
| 3 | intense approx. 2 hours |
The more intense and old the dirt, the higher the self cleaning level used. The inside of the oven only has to be cleaned once every two or three months. Complete cleaning requires approximately 2.5 - 4.7 kilowatt-hours.
Suggestions and warnings
For safety reasons, the oven door locks automatically. The oven door can be opened once again when the inside of the oven has cooled a little and the lock symbol switches off. Do not attempt to move the latch by hand.
Do not attempt to open the oven door during self-cleaning. Otherwise, cleaning will be interrupted.
The oven light does not switch on during self-cleaning.
Risk of fire!!
The outside of the oven heats up considerably. Keep the front of the oven clear. Do not place flammable objects, such as dishcloths, on the door handle. Keep children away.
Before using the self-clean function
The oven must be empty. Remove all pans and unsuitable accessories from inside the oven.
Clean the oven door and the side surfaces inside the oven around the area with seals.
Risk of fire!!
The remains of food and grease as well as roasting juices can catch fire. Use a damp cloth to clean the inside of the oven and the accessories that will be cleaned inside the oven.
Cleaning of the accessories
For optimum cleaning of the oven interior, it is recommended that the self-clean function is not used with the trays.
However, the universal deep enamel tray or the flat enamel oven tray can only be cleaned using the self-clean function on level 2.
The shelf should not be cleaned using the self-clean function.
Use water to clean food remains, oil and roasting juices from the accessories.
Significant health risks!
Do not place non-stick baking tins or trays in the oven during self-cleaning. The intense heat removes the non-stick surface and creates toxic gases.
Setting
Once the cleaning level has been selected, set the oven.
- Select the self-cleaning function with the function control knob
- Set the required cleaning level using the + or - sensors.
The display panel will show the cleaning level and the symbol. Self-cleaning starts within a few seconds.
The oven door locks shortly after the function has started. The display panel displays 1 . Only when the 1 symbol turns off can the oven door be opened again.
Self-cleaning has ended.
The display panel will show 00:00. The oven will stop heating. Turn the function control knob to the zero setting. The oven switches off. The oven door can be opened again when the symbol on the display panel turns off.
Changing the cleaning level
The cleaning level cannot be changed once it has started.
Stopping the self-cleaning
Turn the function control knob to the zero setting. The oven switches off. The oven door can be opened again when the symbol on the display panel turns off.
Delaying the end time
The oven allows you to programme the self-cleaning end time. Self-cleaning can therefore be programmed at night for example, leaving the oven free for use during the day.
Programme as described in section 1 and 2. Before starting the self-cleaning, press the sensor three times and delay the end time with the + or sensors.
The oven is set to standby. The display panel will show the cleaning level and the symbol. When self-cleaning starts, the cleaning level and the symbol are shown. The symbol switches off.
Viewing the time settings
To view the duration of the cleaning level or the end time of the self-cleaning press the sensor repeatedly until the required symbol lights up. The corresponding value will be shown for a few seconds on the display panel.
After using the self-clean function
Once the inside of the oven has cooled, clean the ash remains using a damp cloth.
Care and cleaning
If cleaned and properly cared for, your oven will keep its bright appearance and operating performance for many years to come. Advice on how to care for and clean your oven is provided below.
Notes
Different colours may be seen in your front panel due to the various materials used in its manufacture, such as glass, plastic and metal.
Dark patches in the door's glass panel may seem to be dirt but they are in fact reflections from the oven light.
Enamel burns at very high temperatures. This may cause slight discolouration. This is normal and does not affect the oven's operation. The edges of thin baking trays may not be completely enamelled. They may therefore feel slightly rough, although their corrosive protection will be unaffected.
Cleaning products
Follow the indications provided in the table to avoid damaging the various oven surfaces by using unsuitable cleaning products. Do not use
■ abrasive or acidic cleaning products
■ strong products containing alcohol
scourers or hard sponges
high-pressure or steam cleaners.
Wash new dishcloths thoroughly before use.
Zone Cleaning products
| Front panel Hot water and a little soap:Clean with a dishcloth and dry with a soft cloth. Do not use a glass cleaning product or a glass scraper. | |
| Stainless steel Hot water and a little soap:Clean with a dishcloth and dry with a soft cloth. Immediately remove any water marks, grease, cornflower or egg white stains since corrosion could occur underneath these marks or stains.Special products for the care of stainless steel which are suitable for hot surfaces may be obtained from Technical Assistance Service centres and specialist retail outlets. Use a very fine soft cloth to apply the cleaning product. | |
| Glass panel Glass cleaning products:Clean with a soft cloth. Do not use a glass scraper. | |
| Display Glass cleaning products:Clean with a soft cloth. Do not use alcohol, vinegar or other abrasive or acidic cleaning products. | |
| Glass panels on oven door | Glass cleaning products:Clean with a soft cloth. Do not use a glass scraper. |
Door covering Only use products specially for cleaning stainless steel (these can be obtained from the Technical Assistance Service or from specialist shops). Follow the manufacturer's instructions.
Zone Cleaning products
| Inside the oven Hot water with a little soap or water and vinegar: Clean with a dishcloth. If very dirty, use a stainless steel scourer or special oven cleaning products. These must only be used when the oven interior is cold. Whenever possible, use the self-cleaning function. See the chapter on the Self-cleaning function. | |
| Glass cover for the oven light | Hot water and a little soap: Clean with a dishcloth. |
| Accessories Hot water and a little soap: Soak and clean using a dishcloth or brush. | |
Light
The oven light can be turned on manually to facilitate cleaning.
Connecting the oven bulb
Turn the function control knob to the position. The light will come on.
Turning the oven light off
Turn the function control knob to the opposition.
Unhooking and hanging the oven door
The front panel can be unhooked to help remove the oven door and clean the glass panels.
The oven door hinges are fitted with a locking lever. The door cannot be unhooked if the locking lever is closed (figure A). Once the locking lever has been opened to unhook the door (figure B), the hinges will be locked in position. This prevents the door from suddenly closing.
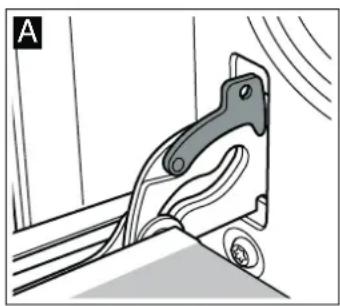
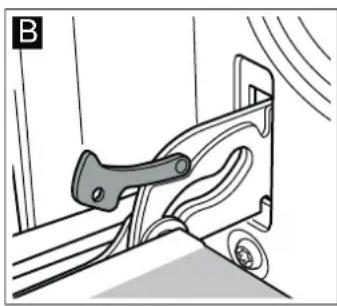
Risk of injuries!.
The hinges may close suddenly if they are not locked in position by the lever. Note that the locking levers are always closed, apart from when unhooking the door, when the levers must be open.
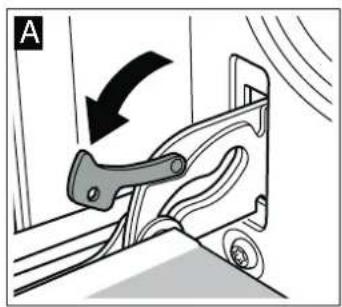
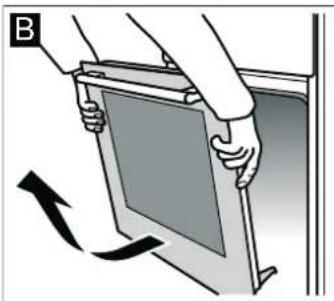
Unhooking the door
- Fully open the oven door.
2.Remove both locking levers located on the right and left hand sides (figure A). - Fully close the oven door as far as possible (figure B). Grip the left and right hand sides of the door with both hands. Close the door slightly more and remove it.
Hanging the door
Rehang the door by following the same steps but in reverse order.
- When refitting the door, check that both hinges are positioned exactly inside their respective openings (picture A).
2.The bottom groove of the hinges must fit snugly on both sides.
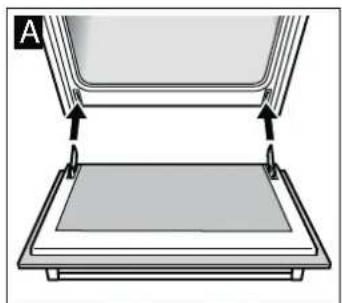
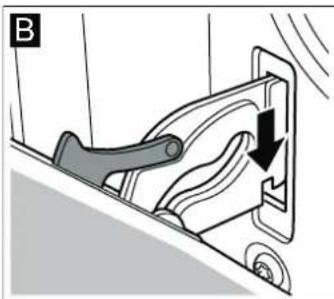
The door may be left crooked if the hinges are not mounted properly.
3. Reclose the attachment levers (picture C). Close the oven door.
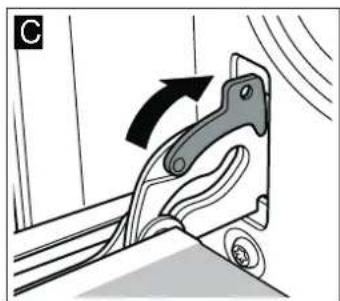
Risk of injuries!.
Do not touch the hinges; the door might accidentally fall or a hinge might suddenly close. Notify the Technical Assistance Service.
Fitting and removing the glass panels
The glass panels of the oven door can be removed to make cleaning easier.
Removing
- Unhook the oven door and position it on a cloth with its handle pointing downwards (figure A).
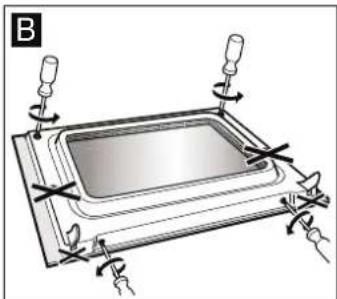
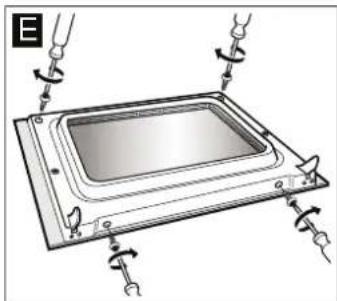
- First, unscrew the two lower bolts then the two upper bolts (figure B).
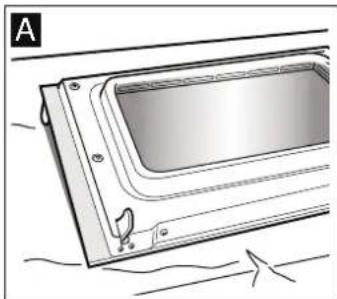
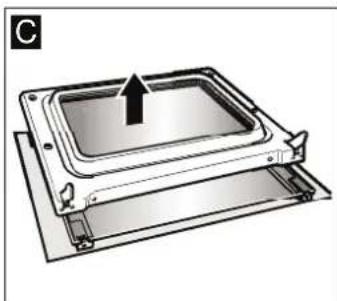
- Completely remove the door base (figure C).
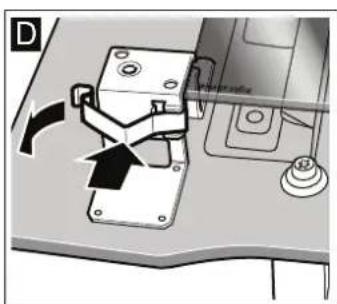
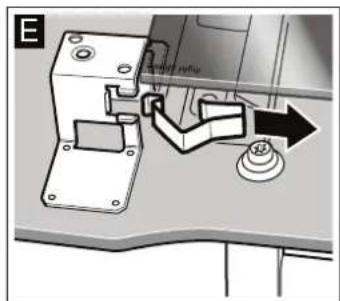
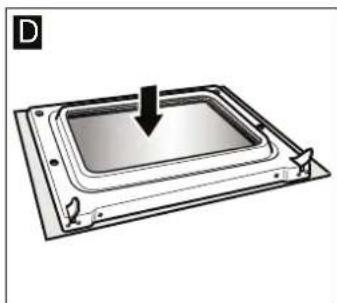
- Remove the two clips from the top of the glass (figure D). To do this, slightly press down on the clip with your thumb and pull on the tab with your index finger (figure E).
5.Lift the inside glass, push it slightly upwards then remove it from below (figure F).
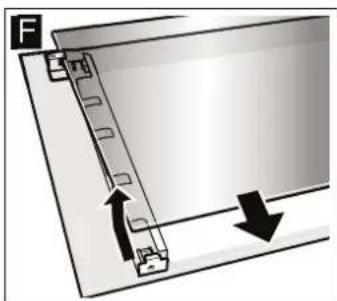
Clean the glass panels using a glass cleaning product and a soft cloth.
Do not use abrasive or corrosive cleaning products, glass scrapers or hard metal scourers as these could damage the glass.
Installing
When installing the glass, check that the phrase "right above" on the bottom left-hand side is upside down.
- Insert the interior glass, tilting it upwards and then inserting it downwards (figure A).
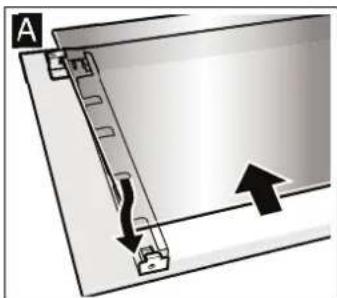
- Refit the clamps on the bottom left and right hand side (figure B). To do this, hook the clamps in the upper part of the support and press into place (figure C).
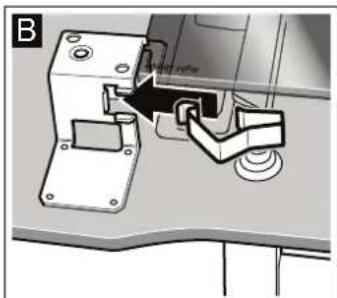
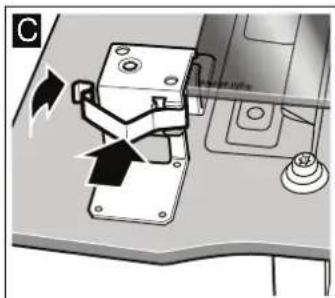
- Refit the entire door base (figure D).
- First, screw the two lower bolts into place then the two upper bolts (figure E).
- Hanging the oven door.
Once the glass panels have been correctly fitted, the oven is ready to use.
Troubleshooting
Quite often, when there is a malfunction, it is usually a small irregularity which is easy to rectify. Before contacting the Technical Assistance Service, try to determine the cause of the fault using the following table.
Troubleshooting table
| Fault Possible cause Solution/advice | ||
| The oven does not work. | The fuse has blown. | Check the condition of the fuse/circuit breaker in the fuse box. |
| Power cut Check that the light in the kitchen and other house- hold appliances are work- ing. | ||
| The ① symbol lights in the dis- play with some zeros. | Power cut Set the time once again. | |
| The oven does not work. | There is dust in the contacts. | Turn the control knob se- eral times in both direc- tions. |
| The oven door does not open. The ②symbol lights up on the display panel. | The oven door has been locked by the self-cleaning function ③. | Wait until the oven has cooled and the ④symbol turns off. |
| The display shows ⑤. | The appliance has been auto- matically turned off. | Turn the function control knob to the zero setting. |
Error messages
When the indicator displays an error message with E , press the sensor. The message will disappear. The set time function will be deleted. If the error message does not disappear, call the Technical Assistance Service.
The following error messages can be solved by the user.
| Error message Possible cause Solution/advice | ||
| E011 | A sensor has been pressed for too long or has got stuck. | Press all the sensors one by one. Check if a sensor is stuck, covered or dirty |
| E105 | The door lock has been activated with the door open. | Press the Ⓞ sensor. You can now begin program- ming again. |
| E115 | The temperature inside the oven is too high. | The door oven is locked and heating has stopped. Wait until the oven has cooled. Press the Ⓞ sensor and reset the time. |
Risk of electrical discharge and the resulting shock!
Incorrect repairs can be dangerous. Repairs can only be carried out by qualified personnel from the Technical Assistance Service.
Changing the oven bulb
If the oven light bulb is damaged it must be replaced. Special 25 W, E14, 220 V-240 V heat-resistant light bulbs (to 300^ temperature) can be obtained from the Technical Support Service or in specialist shops. Only use this type of bulb.
Risk of electrical discharge and the resulting shock!
Disconnect the appliance from the mains. Ensure that this is turned off.
- Place a dishcloth into the cold oven to avoid damage.
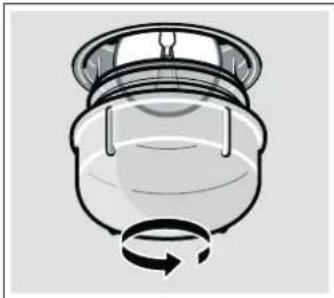
2.Remove the glass protection by unscrewing it to the left.
- Replace the bulb with a similar bulb.
4.Screw the protection glass back into place. - Remove the dishcloth and switch the oven back on at the mains.
Protective glass panels
Damaged protective glass panels must be replaced. Protective glass panels can be obtained from the Technical Assistance Service. Please quote your appliance's product number and production number.
After-sales service
Our after-sales service is there for you if your appliance needs to be repaired. We will always find the right solution in order to avoid unnecessary visits from a service technician.
E number and FD number
When calling us, please give the product number (E no.) and the production number (FD no.) so that we can provide you with the correct advice. The rating plate containing these numbers can be found on the right-hand side of the oven door. You can make a note of the numbers of your appliance and the telephone number of the after-sales service in the space below to save time should it be required.
E no.
FD no.
After-sales service
Please note that there will be a fee for a visit by a service technician in the event of a malfunction, even during the warranty period.
After-sales contact details for all countries can be found in the attached after-sales service directory.
Energy-saving and environmental protection tips
In this chapter we offer you some advice about how to save energy when baking or roasting and how to properly dispose of the appliance.
Saving energy
Preheat the oven only if this is required by a recipe or is indicated in the tables.
Use dark, lacquered or black enamel baking tins. These are more efficient at absorbing heat.
- Keep the oven door closed during cooking, baking and roasting cycles.
- When baking several cakes, these should be preferably baked one after the other. The oven will still be hot, thereby reducing the cooking time for the second cake. Two rectangular baking tins can be placed side-by-side.
For long cooking times, the oven may be turned off 10 minutes prior to the specified time, allowing the item to continue to cook but taking advantage of the oven's residual heat.
Environmentally-friendly disposal of waste
Dispose of packaging with the environment in mind.

This appliance is identified according to the Waste Electrical and Electronic Equipment Directive WEEE 2002/96/EC. This directive defines the framework for the recycling and reuse of appliances used in EU territory.
Tested for you in our cooking studio
Here you will find a selection of dishes and the ideal settings for them. We will show you which type of heating and which temperature are best suited for your dish. You can find information about suitable accessories and the height at which they should be inserted. There are also tips about cookware and preparation methods.
Notes
The values in the table always apply to dishes placed into the cooking compartment when it is cold and empty.
Only preheat the appliance if the table specifies that you should do so. Do not line the accessories with greaseproof paper until after they have been preheated.
The times specified in the tables are guidelines only. They will depend on the quality and composition of the food.
Use the accessories supplied. Additional accessories may be obtained as special accessories from specialist retailers or from the after-sales service.
Before using the oven, remove any unnecessary accessories and ovenware from the cooking compartment.
Always use oven gloves when taking hot accessories or ovenware out of the cooking compartment.
Cakes and pastries
Baking on one level
The best method for baking a cake is to place this on one level with top and bottom heating.
When baking using the hot air function, the following levels are recommended for the accessories:
Cakes in moulds: level 2
Cakes on the tray: level 3
Baking at different levels
Using the hot air mode.
Baking on two levels:
Universal tray
Oven tray
Trays put in the oven at the same time are not necessarily ready at the same time.
In these tables you will find numerous tips for your dishes.
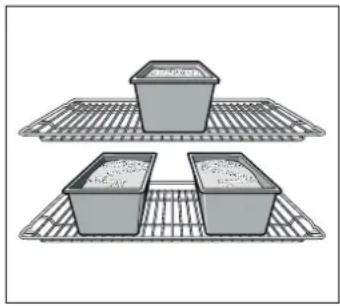
If 3 rectangular moulds are used at the same time, place on the wire shelf as shown in the diagram.
Baking tins
It is best to use dark-coloured metal baking tins.
Baking times are increased when light-coloured baking tins made of thin metal or glass dishes are used, and cakes do not brown so evenly.
If you wish to use silicone baking tins, use the information and recipes provided by the manufacturer as a guide. Silicone baking tins are often smaller than normal tins. The amount of mixture and recipe instructions may differ.
Tables
The table shows the optimum heating methods for each type of cake or dessert. The temperature and cooking time will depend on the amount and the consistency of the dough. For this reason the cooking tables always provide approximate cooking times. Always begin by trying the lowest value. The items will be more evenly browned at a lower temperature. If necessary, this can be increased next time.
If the oven is preheated, cooking times are reduced by 5 to 10 minutes.
Additional information is provided in the Tips for baking section as an appendix to the tables.
To bake a cake only on one level, place the mould on the enamel tray.
When baking several cakes at the same time, the moulds can be placed together on the wire shelf.
| Cakes in moulds: Cookware Level Type of heating Temperature | in °C | Cooking time, min-utes | ||
| Tart Corrugated tart baking tin,ø 3 1 cm. | 1 | ☐ | 240-260 30-40 | |
| 2 corrugated tart baking tinsø 3 1 cm. | 3+1 | ® | 180-200 40-50 | |
| Quiche Corrugated tart baking tin,ø 3 1 cm. | 1 | ☐ | 220-230 40-50 | |
| Cake Corrugated cake baking tinø 2 8 cm. | 1 | ☐ | 190-200 40-50 | |
| Food | Accessories | Level | Type of heating | Temperature in °C | Cooking time, min-utes |
| Pizza | Universal tray | 2 | □ | 200-220 | 25-35 |
| Universal tray + oven tray | 3+1 | ® | 180-190 | 35-40 | |
| Flambéed tart (preheat) | Universal tray | 2 | □ | 270 | 15-20 |
| Yeast plait | Universal tray | 2 | □ | 170-190 | 25-35 |
| Brioche Oven tray with 12 brioche moulds Ø 8 cm | 2 | 200-220 20-25 | |||
| Ensaimadas / eclairs Universal tray 2 | 200-220 30-45 | ||||
| Puff pastry Universal tray 3 | 180-200 20-30 | ||||
| Universal tray + oven tray 3+1 | 180-190 40-50 | ||||
| Meringue (preheat for 10 minutes) Universal tray 3 | 80-90 180-210 | ||||
| Butter cookies (preheat) Universal tray 3 | 150-160 20-30 | ||||
| Universal tray 2 | 140-160 20-30 | ||||
| Universal tray + oven tray 3+1 | 140-150 25-30 | ||||
| Macaroons Universal tray 2 | 110-130 30-40 | ||||
| Universal tray + oven tray 3+1 | 100-120 35-45 | ||||
| Börek | Universal tray 2 | 180-200 40-50 | |||
Suggestions and practical advice for baking
| If you want to use your own recipe. You can use a similar product to the one listed in the cooking table. | |
| How to check whether your sponge cake is ready. | Ten minutes before the end of the cooking time indicated in the recipe, test the thickest part of the cake with a thin wooden skewer. The cake is ready when the skewer comes out clean, with no traces of cake mix. |
| The cake is too flat. | Next time, try using less liquid or reduce the oven temperature by 10 degrees. Ensure you mix the batter according to the times given in the recipe. |
| The cake has a peaked centre, but the edges have shrunken. | Do not grease the tin. Once the cake is ready, use a knife to carefully remove it from the tin. |
| If the cake is too brown on top. | Position the cake deeper in the oven, reduce the oven temperature and bake it for longer. |
| The cake is too dry. | Use a skewer to make small holes in the finished cake. Pour a few drops of fruit juice or alcohol over the cake. Next time, increase the oven temperature by 10 degrees and reduce the cooking time. |
| The bread or cake (fruit cake, for example) looks fine on the outside but still has soft (soggy) areas inside. | Next time, use less liquid and leave the product for a little longer in the oven, at a lower temperature. The bases of cakes with juicy toppings should be baked first on their own. Then sprinkle chopped almonds or breadcrumbs on the base before adding the topping. Follow the recipe and observe the cooking times. |
| Biscuits are not evenly browned. | Select a lower temperature; the biscuits will be browned more uniformly. Bake more delicate pastries with top and bottom heating ☑ on one level. Overhanging greaseproof paper may also affect air circulation. Always trim it to fit the baking tray. |
| Products have been baked on different levels. Biscuits on the upper tray are darker than those on the lower tray. | Always use the hot air function ☑ when baking products on different levels. Although several baking trays may be placed in the oven at the same time, this does not mean that they will necessarily all be ready at the same time. |
| Baking moist cakes produces condensation. | Condensation may form when baking. Some of this moisture may evaporate via the door handle, and drops of condensation may form on the control panel or on the front of nearby kitchen units. The oven is physically designed with this in mind. |
Meat, poultry, fish
Cookware
Any heatproof cookware can be used. For large roasts, the enamel tray can also be used.
It is best to use glass containers. Check that the lid of the cookware will fit and close properly.
If using enamel containers, add more liquid.
When using stainless steel pans, the meat does not brown well and may even be left rare. If so, lengthen the cooking time.
Data shown in tables:
Uncovered cookware = open
Covered cookware - closed
Always place cookware in the centre of the wire shelf.
Hot glass cookware should be placed on a dry dishcloth. The glass could shatter if rested on a wet or cold surface.
Roasting
Add in a little liquid if the meat is lean. Cover the base of the ovenware with approx. 12 cm of liquid.
Add liquid generously for pot roasts. Cover the base of the ovenware with approx. 1 - 2cm of liquid.
The amount of liquid depends on the type of meat and the material the ovenware is made of. If preparing meat in an enamelled roasting dish, it will need a little more liquid than if cooked in glass ovenware.
Roasting dishes made from stainless steel are not ideal. The meat cooks more slowly and browns less fully. Use a higher temperature and/or a longer cooking time.
Grilling
Always use the grill with the oven closed.
For grilling, preheat the oven for about 3 minutes before the food is placed inside the oven.
Place the pieces directly on the wire shelf. If only one piece is prepared, it is best if placed in the centre of the wire shelf.
Place the enamel tray at level 1. The tray will help keep the oven clean by catching any meat juices.
Do not place the baking tray or universal tray at level 4 or 5. Due to the extreme heat, it could be deformed and cause damage to the oven interior when it is removed.
In so far as it is possible, use pieces of the same thickness. This will help them brown evenly and remain juicy. Salt the fillets after grilling.
Turn the pieces after 13 the time has elapsed.
The grill resistance switches on and off automatically. This is normal. The frequency depends on the chosen power level.
Meat
Turn pieces of meat halfway through the cooking time.
When the roast is ready, turn off the oven and allow it to rest for an additional 10 minutes. This allows better distribution of the meat juices.
After cooking, wrap sirloin in aluminium foil and leave it to rest for 10 minutes in the oven.
For roast pork with a rind, score the rind in a crossways pattern, then lay the roast in the dish with the rind at the bottom.
| Food Weight Accessories and cookware | Level Type of heating Temperature at °C, grill power | Cooking time, minutes | ||
| Meat | ||||
| Rare roast beef 1.0 kg open 1 | ♀ | 240-250 40-50 | ||
| Roastbeef, medium rare 1.0 kg open 1 | ♀ | 250-260 50-60 | ||
| Leg of lamb, boneless, rolled, medium rare | 1.5 kg open 1 | ♀ | 160-170 100-110 | |
| Kebab | 1.0 kg open 1 | ♀ | 190-210 100-120 | |
| Pork roll | 2.0 kg open 1 | ♀ | 170-190 170-180 | |
| Poultry | ||||
| Chicken | 1.5 kg open 1 | ♀ | 190-210 65-85 | |
| Duck | 2.0 kg open 1 | ♀ | 190-210 100-110 | |
| Fish | ||||
| Fish, whole, grilled | 300 g | Wire shelf + universal tray | 2+1 | 2 20-25 |
| Au gratin dishes. | ||||
| Dauphinoise potatoes | Springform tin on the wire shelf | 2 | 160-180 50-70 | |
| Toast | ||||
| Au gratin toast | 12 slices | Wire shelf + universal tray | 3+1 | 170-180 8-12 |
| Tips for roasting and grilling | ||||
| The table does not contain information for the weight of the joint. | Select the next lowest weight from the instructions and extend the time. | |||
| How to tell when the roast is ready. | Use a meat thermometer (available from specialist shops) or carry out a "spoon test". Press down on the roast with a spoon. If it feels firm, it is ready. If the spoon can be pressed in, it needs to be cooked for a little longer. | |||
| The roast is too dark and the crackling is partly burnt. | Check the shelf height and temperature. | |||
| The roast looks good but the juices are burnt. | Next time, use a smaller roasting dish or add more liquid. | |||
| The roast looks good but the juices are too clear and watery. | Next time, use a larger roasting dish and use less liquid. | |||
| Steam rises from the roast when basted. | This is normal and due to the laws of physics. The majority of the steam escapes through the steam outlet. It may settle and form condensation on the cooler switch panel or on the fronts of adjacent units. | |||
Cooking a meal
With Hot Air a complete meal can be prepared in the oven.
The heat of the oven is used to the maximum. Smells or flavours are not transferred with hot air.
Place the pan on a wire shelf.
| Meal Cookware Level Temperature | in °C | Cooking time, minutes | Notes |
| Meal 1 | |||
| Boneless leg of lamb, rolled, 1.3 kg, medium rare and roast potatoes | Open pan 1 180 80 After 30 minutes cooking time, 3 | the potatoes can be placed around the leg of lamb and the tart can be placed in the oven | |
| Tart Corrugated tart bak- ing tin, Ø 31 cm. | |||
| Meal 2 | |||
| Boneless leg of lamb, rolled, 1.3 kg, medium rare* | Open pan 1 180 80 After 30 minutes cooking time, 3 | the dauphinoise potatoes can be placed inside the oven. If the top- ping is overcooked, cover the pan for the last 10 minutes. | |
| Dauphinoise potatoes Open pan 3 | |||
- Suggestion: 20 minutes before cooking time ends, tomatoes can be placed around the leg of lamb.
Ready-made products
Read the manufacturer's instructions on the packaging.
When covering accessories with baking paper, ensure that the paper is suitable for high temperatures. Cut the paper to the size of dish to be prepared.
The result depends directly on the type of food. There may be irregularities and colour differences in raw products.
| Food Accessories | Level | Type of | heating | Temperature at °C, grill power | Cooking time, minutes | |
| Pizza, deep frozen | ||||||
| Thin base pizza | Universal tray 2 | ☐ | 210-230 | 15-30 | ||
| Universal tray + wire shelf 3+1 | ® | 190-210 | 20-30 | |||
| Thick base pizza | Universal tray 2 | ☐ | 180-200 | 20-30 | ||
| Universal tray + wire shelf 3+1 | ® | 180-190 | 30-35 | |||
| Pizza-baguette | Universal tray 3 | ☐ | 190-200 | 20-25 | ||
| Minipizza | Universal tray 3 | ☐ | 190-210 | 10-20 | ||
| Frozen pizza | ||||||
| Pizza (preheating) | Universal tray 1 | ☐ | 190-210 | 10-20 | ||
| Potato-based products, deep frozen | ||||||
| Chips | Universal tray 3 | ☐ | 190-210 | 20-30 | ||
| Universal tray + oven tray 3+1 | ® | 180-200 | 30-40 | |||
| Croquettes | Universal tray 3 | ☐ | 200-220 | 25-30 | ||
| Potato cakes, stuffed potatoes | Universal tray 3 | ☐ | 210-230 | 15-25 | ||
| Bakery products, deep frozen | ||||||
| Bread rolls and baguettes | Universal tray 3 | ☐ | 180-200 | 10-20 | ||
| Pretzels (bread dough) | Universal tray 3 | ☐ | 210-230 | 15-25 | ||
| Bakery products, prebaked | ||||||
| Bread rolls and baguettes | Universal tray 2 | ☐ | 190-210 | 10-20 | ||
| Universal tray + wire shelf 3+1 | ® | 160-180 | 20-30 | |||
| Food Accessories Level Type of | heating | Temperature at °C, grill power | Cooking time, minutes |
| Fried foods, deep frozen | |||
| Fishfingers Universal tray 2 | ☐ | 220-240 10-20 | |
| Chicken fingers, nuggets Universal tray 3 | ☐ | 200-220 15-25 | |
| Strudel, deep frozen | |||
| Strudel Universal tray 3 | ☐ | 200-220 35-40 | |
| Special dishesAt low temperatures, a good creamy yoghurt and a spongy yeast dough can be obtained. | 3. Pour the mixture into jars or bowls and cover them with transparent film. | ||
| Making yoghurt | 4. Preheat the oven as instructed. | ||
| 5. Now, place the bowls or jars on the bottom of the oven and prepare as follows. | |||
| 1. Boil 1 litre of milk (3.5% fat) and allow it to cool to about 40 °C. | Leaving yeast dough to rise | ||
| 2. Mix 150 g of yoghurt (at fridge temperature). | 1. Prepare the yeast dough as usual. Pour the dough into a heat-resistant ceramic baking dish and cover it. | ||
| 2. Preheat the oven as instructed. | |||
| 3. Turn off the appliance and allow the dough to rise inside the oven. | |||
Preparation
| Food | Cookware | Level | Type of heating | Temperature | Time |
| Yoghurt Place the bowls or jars | at the bottom of the oven | Preheat to 50 °C | 5 min. | ||
| 50 °C | 8 h | ||||
| Allow the yeast dough to rise | Place a heat-resistant baking dish | at the bottom of the oven | Preheat to 50 °C | 5-10 min. | |
| Turn off the appliance and place the dough inside the oven | 20-30 min. |
Defrosting
Defrosting time depends on the type and quantity of food. Read the manufacturer's instructions on the packaging. Remove frozen food from the container and place in appropriate cookware on the wire shelf.
Place the bird on a dish with the breast facing down.
Note: The oven light does not come on until reaching a temperature of 60^ . This helps achieve precise optimal control.
| Food | Accessories | Level | Type of heating | Temperature |
| Delicate frozen productsE.g. cream cakes, buttercream tarts, chocolate or sugar-coated cakes, fruit pies, etc. | Wire shelf | 1 | ® | 30 °C |
| Other frozen productsChicken, sausages and meat, bread, rolls, pies and other pastries | Wire shelf | 1 | ® | 50 °C |
Drying
Use only fruit and vegetables that are in perfect condition and wash them thoroughly first.
Drain well and dry thoroughly.
Place the universal tray at level 3 and the wire shelf at level 1. Cover the enamel tray and wire shelf with special baking parchment or greaseproof paper.
| Food | Level | Type of heating | Temperature in °C | Cooking time, hours |
| 600 g of sliced apples | 1+3 | ® | 80 | approximately 5 h |
| 800 g of pears cut into chunks | 1+3 | ® | 80 | approximately 8 h |
| 1.5 kg of plums | 1+3 | ® | 80 | approximately 8-10 h |
| 200 g of washed, fresh herbs | 1+3 | ® | 80 | approximately 1½ h |
Note: If the fruit or vegetables contain a lot of juice or water, they will have to be turned over several times. Once dried, remove them from the paper immediately.
Jam making
For cooking, the jars and the elastic bands must be clean and in perfect condition. Whenever possible, use jars of equal sizes. The values in the tables are given for round 1-Litre jars.
Caution!
Do not use larger or taller jars. Their lids could explode.
Only use fruit and vegetables that are in good condition. Clean them well.
The times given in tables are only given as an indication. These can vary according to the outside temperature, number of jars, quantity and temperature of the jar content. Before turning off the appliance, ensure the jars have begun to bubble.
Preparation
-
Tip the fruit or vegetable into the jars but do not fill them to the brim.
2.Clean the edges of the jars; these must be clean. -
Place a cover and wet elastic band on each jar.
4.Close the jars with clamps.
Do not place more than six jars in the oven at the same time.
Setting
- Place the universal tray on level 2. Place the jars on the tray so that they do not touch each other.
- Pour 12 litre of water (approx. 80^ ) on the universal tray.
3.Close the oven door. - Position the control knob to bottom heat position
5.Set the temperature between 170 and 180^
Jam making
After approximately 40 - 50 minutes, bubbles begin to form rapidly. Switch the oven off
Take the jars out of the oven after approximately 25 - 35 minutes (the residual heat is used in this time). If these are allowed to cool in the oven for more time, this could promote the formation of germs making the jam acidic.
| Fruit in 1 L jars from when bubbles start to appear | Residual heat |
| Apples, gooseberries, strawberries To switch off approx. 25 minutes | |
| Cherries, apricots, peaches, gooseberries To switch off approx. 30 minutes | |
| Apple, pear or cherry puree To switch off approx. 35 minutes |
Cooking vegetables
When small bubbles begin to form in the jars, adjust the temperature to approximately 120 - 140 °C. About 35 - 70 minutes, depending on the type of vegetables. After this time, turn off the oven to use the residual heat.
| Cold cooking vegetables in 1 L jars | When bubbles start to appear 120-140 °C | Residual heat |
| Peppers - approx. 35 minutes | ||
| Beetroot approx. 35 minutes approx. 30 minutes | ||
| Brussels sprouts | approx. 45 minutes approx. 30 minutes | |
| Beans, kohlrabi, red cabbage | approx. 60 minutes approx. 30 minutes | |
| Peas | approx. 70 minutes approx. 30 minutes |
Remove the jars from the oven
Remove the jars from inside the oven when cooking is finished.
Caution!
Do not place hot jars on a cold or wet surface. They could explode.
Acrylamide in food
Acrylamide is produced especially in cereal and potato products prepared at high temperatures, e. g., chips, toast, rolls, bread and bakery products (biscuits, spicy biscuits, Christmas biscuits).
| Tips for preparing food with a low content in acrylamide | |
| General | ■ Keep cooking time to a minimum. |
| ■ Brown food without toasting it too much. | |
| ■ Large, thick food products contain little acrylamide. | |
| Baking | With top and bottom heat max. 200 °C |
| With hot air max. 180 °C. | |
| Pastries and biscuits | With top and bottom heat max. 190 °C. |
| With hot air max. 170 °C. | |
| Egg or egg yolk reduces acrylamide formation. | |
| Oven chips | Spread in a single layer uniformly on the tray. Bake at least 400 g. per tray so that the potatoes do not dry up |
Test dishes
These tables have been produced for test institutes to facilitate the inspection and testing of the various appliances.
In accordance with EN 50304/EN 60350 (2009) and IEC 60350.
Baking
Baking on 2 levels:
Always place the universal deep tray on the upper level and the flat tray on the lower level.
Butter cookies:
Trays put in the oven at the same time are not necessarily ready at the same time.
Apple pie on level 1:
Place dark springform tins with some space between them.
Apple pie on 2 levels:
Place dark springform tins on top of one another.
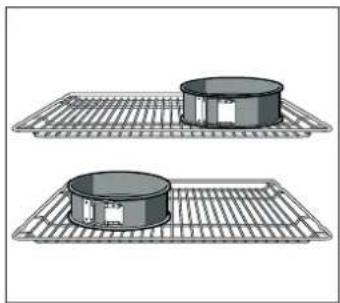
Corrugated cake springform tins:
Bake using top and bottom heating on level 1. Use the universal tray instead of the wire shelf and place the springform tins on it.
| Food Accessories and moulds Level Type of heating Temperature in | °C | Time in min-utes | ||
| Butter cookies (preheating*) Universal tray 3 | ☐ | 150-160 20-30 | ||
| Universal tray 2 | ® | 140-160 20-30 | ||
| Universal tray + oven tray 3+1 | ® | 140-160 20-30 | ||
| Small cakes (pre-heating*) Universal tray 3 | ☐ | 150-170 20-30 | ||
| Universal tray + oven tray 3+1 | ® | 140-160 25-35 | ||
| Small cakes Universal tray 3 | ® | 150-160 20-25 | ||
| Sponge cake (preheating*) | Detachable baking tin on the 2 wire shelf | ☐ | 170-180 30-40 | |
| Sponge cake | Detachable baking tin on the 2 wire shelf | ® | 160-170 30-40 | |
| Pastry case | Universal tray 3 | ☐ | 160-180 30-40 | |
| Universal tray 3 | ® | 140-160 35-45 | ||
| Universal tray + oven tray 3+1 | ® | 160-170 30-40 | ||
| Apple pie | Wire shelf + 2 springform tins Ø 20 cm. | ☐ | 190-210 70-90 | |
| 2 wire shelves + 3+1 | ® | 170-190 60-80 | ||
| 2 springform tins Ø 20 cm. | ||||
- Do not use rapid heating to preheat the oven.
Shelves and baking trays may be obtained as optional accessories from specialist retail outlets.
Grilling
If food is placed directly on the wire shelf, place the enamel tray at level 1. The tray will help keep the oven clean by catching any meat juices.
| Food | Accessories | Level | Type of heating Grill power | Time in min-utes |
| Brown toast (preheat for 10 min.) | Wire shelf | 5 | 3 | 1/2-2 |
| 12beefburgers* (no pre-heating) | Grill + enamel tray | 5+1 | 3 | 25-30 |
- Turn after 13 of the time.