CA421252 - Frying Pan CONSTRUCTA - Free user manual and instructions
Find the device manual for free CA421252 CONSTRUCTA in PDF.


| Product type | Induction hob |
| Brand | Constructa |
| Model | CA421252 |
| Number of zones | 4 |
| Control type | Touch |
| Surface material | Ceramic glass |
| Power supply | 230 V, 13/16/20 A (adjustable) |
| Main functions | Induction, Powerboost, Timer, Child safety, Automatic switch-off, Residual heat indicator |
| Adjustable connection current | 13 A, 16 A, 20 A |
| Installation depth | 500 mm |
| Protection class | I |
| Child safety | Yes, manual and automatic |
| Powerboost function | Yes, on all zones |
| Timer | Independent and programmable per zone |
| Automatic time limitation | Yes, depending on power level |
| Residual heat indicator | Yes, per zone (h/H) |
| Cleaning | With glass scraper and specific products |
| Intermediate support accessory | Ref. 686002 (optional) |
| Normal noises | Humming, whistling, crackling, fan |
| After-sales service | Contact details in the manual |
Frequently Asked Questions - CA421252 CONSTRUCTA
User questions about CA421252 CONSTRUCTA
0 question about this device. Answer the ones you know or ask your own.
Ask a new question about this device
Download the instructions for your Frying Pan in PDF format for free! Find your manual CA421252 - CONSTRUCTA and take your electronic device back in hand. On this page are published all the documents necessary for the use of your device. CA421252 by CONSTRUCTA.
USER MANUAL CA421252 CONSTRUCTA
Butter, Honig, Gelatine 1-2
Preparation of assembly kitchen units, figures 1/2/3/4.... 38
Installing the appliance, figures 5/7 39
Changing the intensity of the 13 / 16 / 20 Amp connection current, figure 8. 39
Uninstalling the appliance. 39
INSTRUCTION MANUAL 40
Safety precautions. 40
Elements that may damage the appliance 41
Protecting the environment 42
Environmentally-friendly disposal 42
Energy-saving advice 42
Induction cooking 42
Advantages of induction cooking. 42
Suitable pans. 42
Getting to know your appliance 43
The control panel. 43
The hotplates. 43
Residual heat indicator. 44
Programming the hob 44
Turning the hob on and off 44
Set the hotplate. 44
Cooking guidelines table 44
Childproof lock 46
Activating and deactivating the childproof lock. 46
Childproof lock. 46
Powerboost function 46
To activate 46
To deactivate 46
Time program function. 46
Turning off a hotplate automatically. 46
The timer 47
Automatic time limitation 47
Basic settings 47
Accessing the basic settings 48
Care and cleaning. 48
Hob. 48
Hob frame 49
Fixing malfunctions 49
Normal noise while the appliance is working 49
After-sales service. 50
INSTALLATION INSTRUCTIONS
Assembly
4a4b
5
6
7


Important notes
Safety: Safety in use is only guaranteed if the technical installation of the hob has been carried out correctly and in accordance with the assembly instructions. The installation technician shall be liable for any damage caused as a result of unsuitable installation.
Electric connection: Only by an authorised specialist technician. The guidelines set out by the local electricity provider must be observed.
Type of connection: The appliance falls under protection class I and can only be used in combination with a grounding conductor connection.
The manufacturer accepts no responsibility for any malfunction or damage caused by incorrect electrical installations.
Installation: The appliance must be connected to a fixed installation and the means of disconnecting it from the fixed installation must be installed according to the installation instructions.
Built-in assembly under worktop: The induction hobs may only be installed over a drawer, ovens with forced ventilation from the same brand and dishwashers from the same brand. Refrigerators, unventilated ovens and washing machines may not be installed beneath the hob.
Power cable: Do not tie the power cable or pass it along sharp edges. If there is an oven installed below, pass the cable along the rear corners of the oven to the connection box. It must be positioned so that it does not touch any of the hot parts of the hob or the oven.
Hob: flat, horizontal, stable. Follow the hob manufacturer's instructions.
Warranty: an unsuitable installation, connection or assembly will invalidate the product warranty.
Note: Any change to the appliance's interior, including changing the power cable, must only be performed by specially trained members of the Technical Assistance Service.
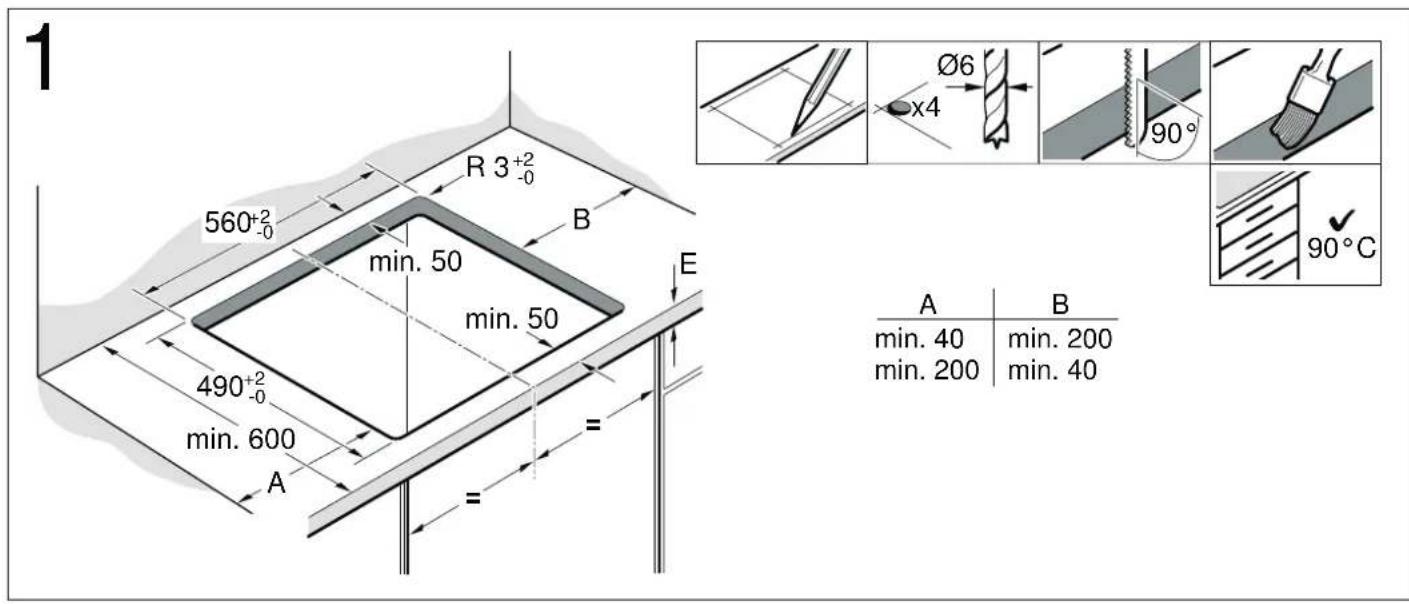
Preparation of assembly kitchen units, figures 1/2/3/4
Built-in kitchen units: Minimum temperature resistance of 90^ .
Gap: Remove any shavings after performing cutting work.
Cut surfaces: Seal with heat resistant material.
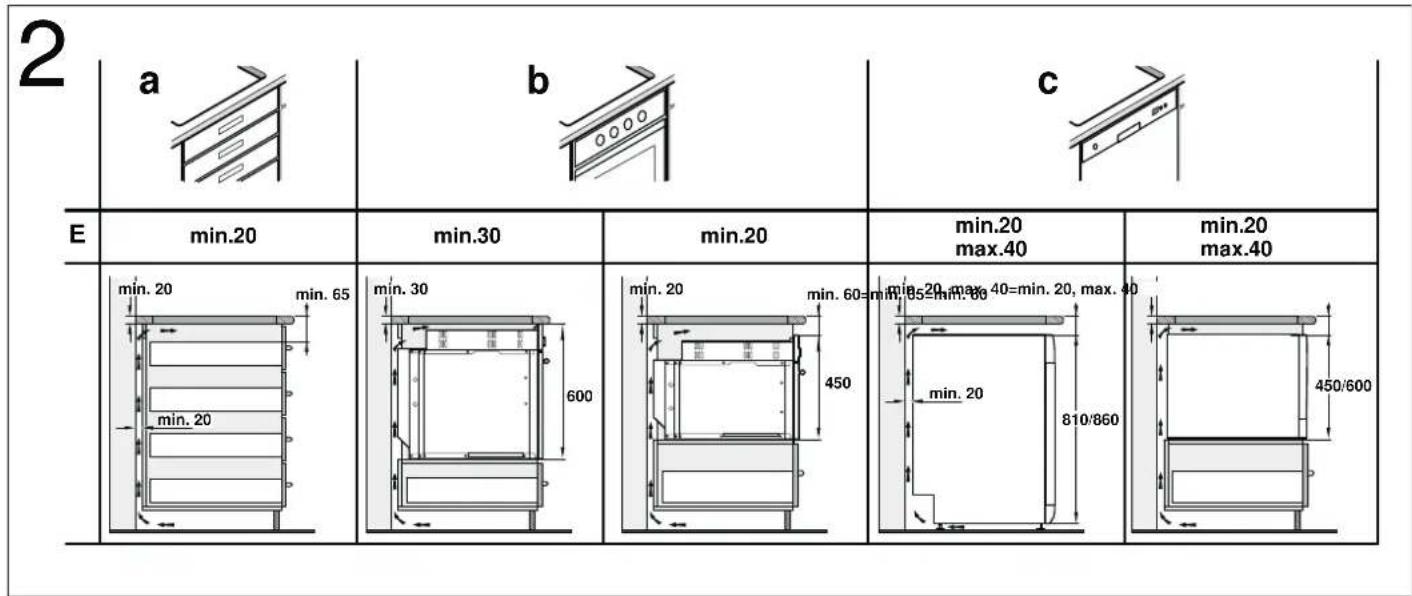
Assembly over drawer, figure 2a
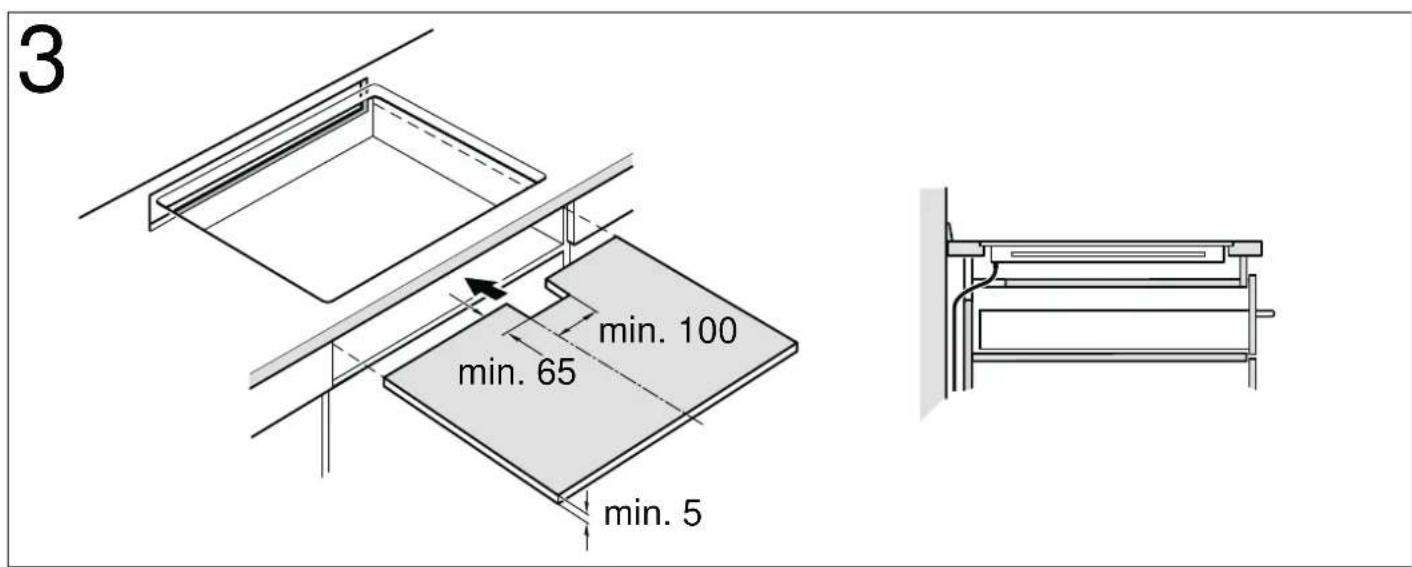
Metal objects stored inside the drawer could become very hot due to the air recirculating from the hob ventilation system. If this occurs, an intermediate support is recommended.
Intermediate support: A wooden panel can be used (figure 3) or you may order a suitable accessory from our Technical Assistance Service. The reference code for this accessory is 686002.
Worktop: Must have a minimum thickness of 20mm
The distance between the top of the working surface and the top of the drawer must be 65~mm
Assembly over oven, figure 2b
Worktop: Must have a minimum thickness of:
20 mm if installed over a compact oven.
30mm if installed over a full-size oven.
If the hob is installed over a compact oven, there must be a distance of 60mm between the top of the oven and the top of the working surface.
Assembly over dishwasher, figure 2c
An intermediate accessory must be installed. The accessory may be ordered from our Technical Assistance Service. The reference code for this accessory is 686002.
Worktop: Must have a minimum thickness of 20mm and maximum thickness of 40mm .
The space between the top of the working surface and the top of the dishwasher must be:
60 mm if installed over a compact dishwasher.
65 mm if installed over a full-size dishwasher.
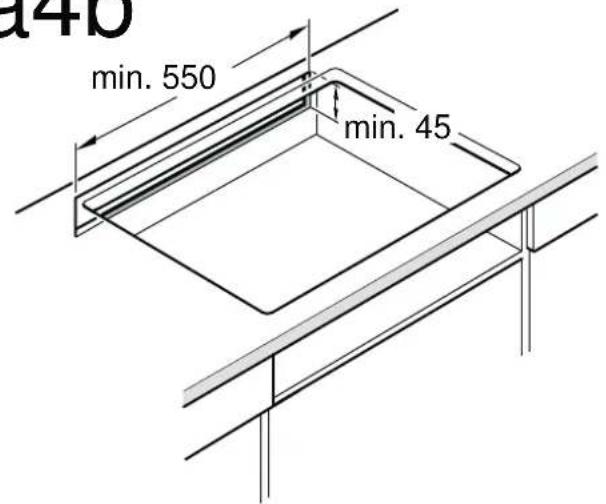
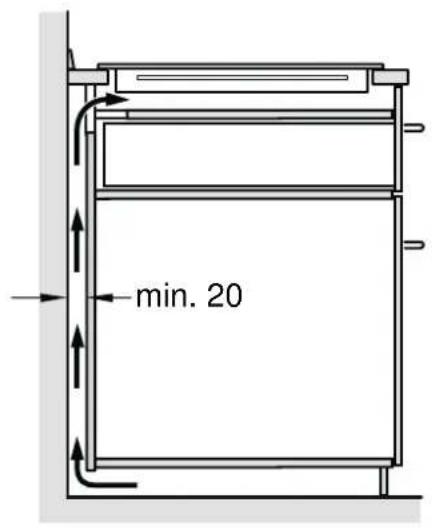
Ventilation, figure 4
Ventilating the hob requires:
An opening on the upper part of the kitchen unit's rear wall (figure 4a).
A separation between the rear part of the kitchen unit and kitchen wall (figure 4b).
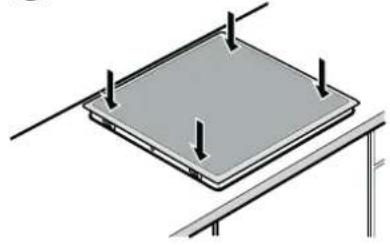
Installing the appliance, figures 5/7
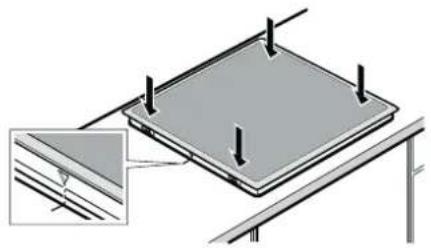
Fit the hob into place, (figure 5).
Connect the appliance to the mains to check its operation.
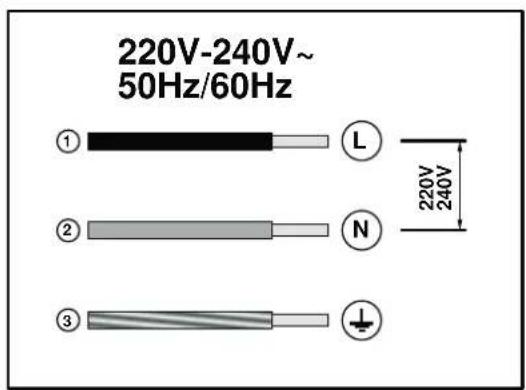
Voltage, see specifications plate.
Connect based on the connection drawing only (figure 7).
- Brown
- Blue
- Yellow and green
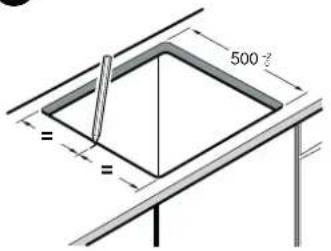
Position the hob in the gap available on the worktop with a depth of 500mm (figure 6)
- Mark the centre of the gap in the worktop.
- Fit the hob into place.
- Align the marks of the hob frame with those of the worktop.
- Insert the hob.
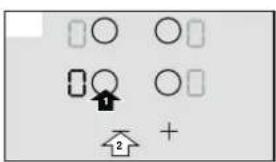
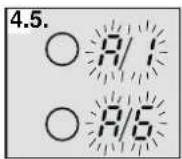
Changing the intensity of the 13 / 16 / 20 Amp connection current, figure 8
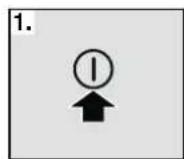
Before using the hob for the first time, the intensity of the hob connection must be tested.
Follow the steps below to change the current of the hob:
- Turn on the hob with the main switch. Do not place any pans on the hotplates
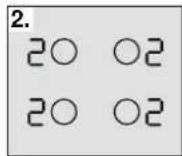
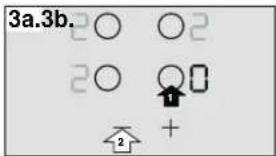
- Within the following 60 seconds, adjust all hotplates to the desired power level according to the required connection current (see table).
Power level Connection current in amperes
| 1 20 A |
| 2 16 A |
| 3 13 A |
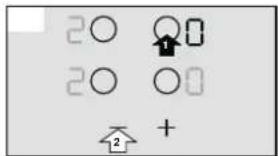
- Turn off all the hotplates in sequence, starting from the lower right and continuing counter-clockwise.
- The selected connection current is indicated in the display of the right-hand lateral hotplates.
- Turn off the hob with the main switch.
The selected connection current will have been properly saved.
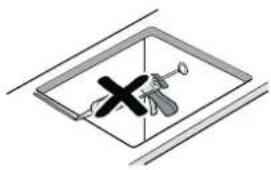
Uninstalling the appliance
Disconnect the appliance from the mains.
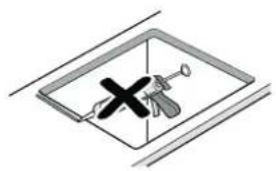
Push the hob upwards from below to remove it.
Caution!
Damage to the appliance! Do not try to remove the appliance by prying it out from above.
INSTRUCTION MANUAL
Additional information on products, accessories, replacement parts and services can be found at www.constructa.de and in the online shop www.constructa-eshop.com

Safety precautions
Please read this manual carefully. Please keep the instruction and installation manual as well as the appliance certificate in a safe place for later use or for subsequent owners.
Check the appliance after removing it from the packaging. If it has suffered any damage in transport, do not connect the appliance, contact the Technical Assistance Service and provide written notification of the damage caused, otherwise you will lose your right to any type of compensation.
This appliance must be installed according to the installation instructions included.
This appliance is intended for domestic use only. The appliance must only be used for the preparation of food and drink. The appliance must be supervised during operation. Only use this appliance indoors.
Do not use lids or unsuitable child safety grilles. These can cause accidents, due to overheating, catching fire or materials shattering, for example.
This appliance is not intended for operation with an external clock timer or a remote control.
This appliance may be used by children over the age of 8 years old and by persons with reduced physical, sensory or mental capabilities or by persons with a lack of experience or knowledge if they are supervised or are instructed by a person responsible for their safety how to use the appliance safely and have understood the associated hazards.
Children must not play with the appliance. Children must not clean the appliance or carry out general maintenance unless they are at least 8 years old and are being supervised.
Keep children below the age of 8 years old at a safe distance from the appliance and power cable.
Risk of fire!
- Hot oil and fat can ignite very quickly. Never leave hot fat or oil unattended. Never use water to put out burning oil or fat. Switch off the hotplate. Extinguish flames carefully using a lid, fire blanket or something similar.
The hotplates become very hot. Never place combustible items on the hob. Never place objects on the hob.
The appliance gets hot. Do not keep combustible objects or aerosol cans in drawers directly underneath the hob. - The hob switches off automatically and can no longer be operated. It may switch on unintentionally at a later point. Switch off the circuit breaker in the fuse box. Contact the after-sales service.
Risk of burns!
- The hotplates and surrounding area (particularly the hob surround, if fitted) become very hot. Never touch the hot surfaces. Keep children at a safe distance.
- The hotplate heats up but the display does not work. Switch off the circuit breaker in the fuse box. Contact the after-sales service.
- Metal objects on the hob quickly become very hot. Never place metal objects (such as knives, forks, spoons and lids) on the hob.
- After each use, always turn off the hob at the main switch. Do not wait until the hob turns off automatically after the pan is removed.
Risk of electric shock!
- Incorrect repairs are dangerous. Repairs may only be carried out and damaged power cables replaced by one of our trained after-sales technicians. If the appliance is defective, unplug the appliance from the mains or switch off the circuit breaker in the fuse box. Contact the after-sales service.
Penetrating moisture may cause an electric shock. Do not use any high-pressure cleaners or steam cleaners.
- A defective appliance may cause electric shock. Never switch on a defective appliance. Unplug the appliance from the mains or switch off the circuit breaker in the fuse box. Contact the after-sales service.
- Cracks or fractures in the glass ceramic may cause electric shocks. Switch off the circuit breaker in the fuse box. Contact the after-sales service.
Electromagnetic hazards!
This appliance complies with safety and electromagnetic compatibility standards. However, people with pacemakers must refrain from approaching the appliance when in use. Although the risk is small, it is impossible to ensure that all of these devices available on the market comply with current electromagnetic compatibility standards and that interference which may prevent the device from working correctly will not occur. It is also possible that people with other types of devices, such as hearing aids, could experience some discomfort.
Malfunction risk!
The hob is equipped with a fan in the lower section. If there is a drawer under the hob it should not be used to store small objects or paper, since they could damage the fan or interfere with the cooling if they are sucked into it.
There should be a minimum of 2 cm between the contents of the drawer and fan intake.
Risk of injury!
- When cooking in a bain marie, the hob and cooking container could shatter due to overheating. The cooking container in the bain marie must not directly touch the bottom of the water-filled pot. Only use heat-resistant cookware.
- Saucepans may suddenly jump due to liquid between the pan base and the hotplate. Always keep the hotplate and saucepan bases dry.
Elements that may damage the appliance
Caution!
Rough pan bases may scratch the hob.
- Avoid leaving empty pots and pans on the hotplate. Doing so may cause damage.
- Do not place hot pans on the control panel, the indicator area, or the hob frame. Doing so may cause damage.
Hard or pointed objects dropped on the hob may damage it.
Aluminium foil and plastic containers will melt if placed on the hotplate while it is hot. The use of laminated sheeting is not recommended on the hob.
Overview
The following table presents the most common damage caused:
Damage Cause Measure
| Stains Food spillage Immediately remove spilt food using a glass scraper. | |
| Unsuitable cleaning products Only use cleaning products specifically designed for glass-ceramic hobs. | |
| Scratches Salt, sugar and sand Do not use the hob as a tray or working surface. | |
| Pans with rough bottoms may scratch Check pans. the glass ceramic | |
| Fading Unsuitable cleaning products Only use cleaning products specifically produced for glass-ceramic hobs. | |
| Contact with pans Lift pots and pans before moving them around. | |
| Chips Sugar, substances with a high sugar Immediately remove spilt food using a glass scraper. content |
Protecting the environment
Unpack the appliance and dispose of its packaging in such a way that no damage is caused to the environment.
Environmentally-friendly disposal
Dispose of packaging in an environmentally-friendly manner.

This appliance is labelled in accordance with European Directive 2012/19/EU concerning used electrical and electronic appliances (waste electrical and electronic equipment - WEEE). The guideline determines the framework for the return and recycling of used appliances as applicable throughout the EU.
Energy-saving advice
Always use the correct lid for each pan. Cooking without a lid uses a lot more energy. Use a glass lid to provide visibility and avoid having to lift the lid.
Use pans with flat bases. Bases that are not flat use a lot more energy.
The diameter of the pan base must match the size of the hotplate. If the diameter is too small compared to the hotplate, energy can be wasted. Please note: pan manufacturers usually provide the diameter for the top of the pan, which is usually larger than the diameter of the pan base.
Use a small pan for small amounts of food. A large pan which is not full uses a lot of energy.
Use little water when cooking. This saves energy and preserves all the vitamins and minerals in vegetables.
Always cover as much of the hotplate as possible with the pan.
- Select the lowest power level to maintain cooking. If the power level is too high, energy is wasted.
Induction cooking
Advantages of induction cooking
Induction cooking represents a radical change from the traditional method of heating; the heat is generated directly in the pan. It therefore offers a number of advantages:
Time savings for cooking and frying; since the pan is heated directly.
Energy is saved.
Care and cleaning are simpler. Foods that have spilt do not burn as quickly.
Heat and safety control; the hob supplies or cuts off power as soon as the control knob is turned on. The induction hotplate stops supplying heat if the pan is removed without having previously switched it off.
Suitable pans
Ferromagnetic cookware
Only ferromagnetic cookware is suitable for induction cooking, these may be made from:
enamelled steel
cast iron
special cutlery for stainless steel induction pan.
To determine whether a pan is suitable, check to see if a magnet will stick to it.
Other cookware for induction
There are other types of cookware especially made for induction cooking whose base is not entirely ferromagnetic.
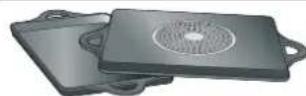
When using large cookware on a smaller ferromagnetic area, only the ferromagnetic zone heats up, so heat might not be uniformly distributed.
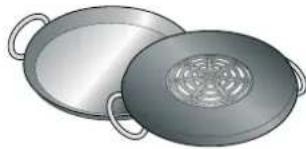
Pans with aluminium areas inserted in the base reduce the ferromagnetic area, so less heat may be supplied and the pan may be difficult to detect or not be detected at all.
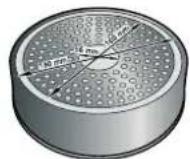
For good cooking results, the diameter of the cookware's ferromagnetic area should match the size of the hotplate. If cookware is not detected on a hotplate, try it on the next smaller hotplate down.
Unsuitable pans
Never use diffuser hobs or pans made from:
common thin steel
glass
earthenware
copper
aluminium
Characteristics of the pan base
The characteristics of the pan base may affect the uniformity of the cooking results. Pans made from materials which help diffuse heat, such as stainless steel sandwich pans, distribute heat uniformly, saving time and energy.
Absence of pan or unsuitable size
If no pan is placed on the selected hotplate, or if it is made of unsuitable material or is not the correct size, the power level displayed on the hotplate indicator will flash. Place a suitable pan on the hotplate to stop the flashing. If this takes more than 90 seconds, the hotplate will switch off automatically.
Empty pans or those with a thin base
Do not heat empty pans, nor use pans with a thin base. The hob is equipped with an internal safety system. However, an empty pan may heat up so quickly that the "automatic switch
off function may not have time to react and the pan may reach very high temperatures. The base of the pan could melt and damage the glass on the hob. In this case, do not touch the pan and switch the hotplate off. If it fails to work after it has cooled down, please contact the Technical Assistance Service.
Pan detection
Each hotplate has a minimum limit for detecting pans, which varies depending on the material of the pan being used. You should therefore use the hotplate that is most suitable for the diameter of your pan.
Getting to know your appliance
The instruction manual is the same for various different hobs. An overview of the models with their dimensions is given on page 2.
The control panel
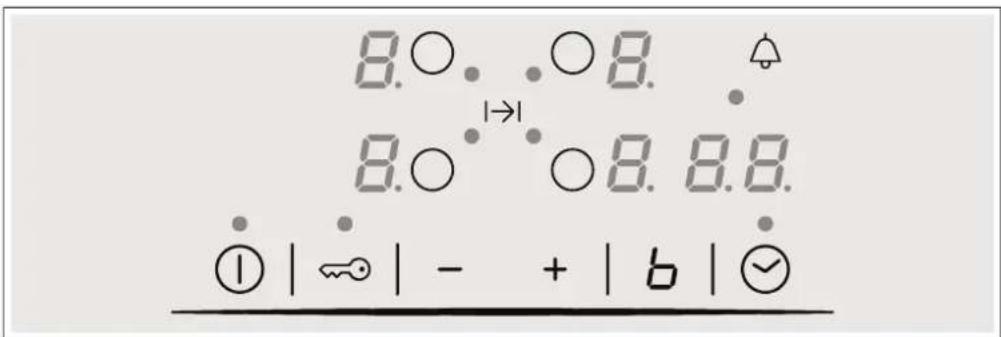
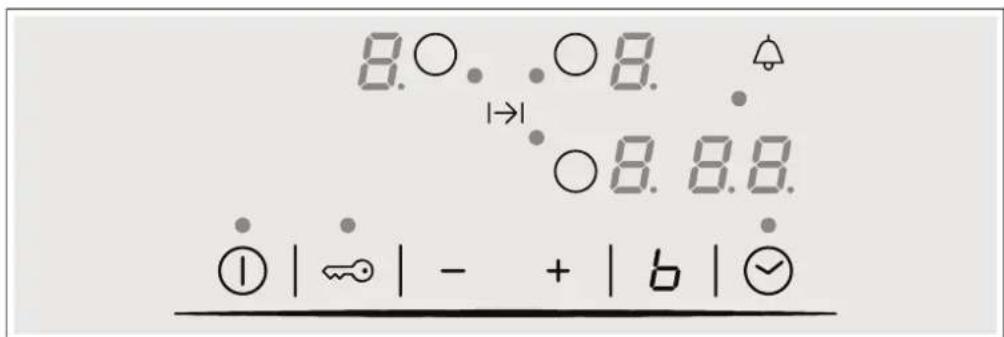
Control panels
① Main switch
Selecting the hotplate
-/+ Selecting settings
Powerboost function
Time program function
Childproof lock
Indicators
Functionality
Power levels
6 Powerboost function
H/h Residual heat
Time program function
Control panels
Pressing a symbol activates its corresponding function.
Note: Always keep the control surfaces dry. Moisture can affect proper working.
The hotplates
Hotplate Turning on and off
Single hotplate Always use cookware of a suitable size.
Use only cookware suitable for induction cooking; see the section on suitable cookware.
Residual heat indicator
The hob has a residual heat indicator for each hotplate to show those which are still hot. Avoid touching them when this indicator is lit.
Although the hob is switched off, the indicator h or H will remain on for as long as the hotplate is hot.
If the pan is removed before the hotplate is turned off, the indicator or and the selected power level will appear alternately.
Programming the hob
This section will show you how to program the hotplates. The table contains power levels and cooking times for several dishes.
Turning the hob on and off
The hob is turned on and off using the main switch.
To turn on: Press the ① symbol. A beep sounds. The indicator located next to the main switch and the ⑦ indicators of the hotplates light up. The hob is ready for use.
To turn off: press the ① symbol until the indicators go out. All hotplates are turned off. The residual heat indicator will remain lit until the hotplates have cooled down sufficiently.
Notes
The hob switches off automatically when all the hotplates are switched off for more than 20 seconds.
The settings are memorised for 4 seconds after the hob has been turned off. If the hotplate is switched back on within this time then the previous settings will be applied.
Set the hotplate
Select the required power level with the + and - symbols.
Power level 1 = minimum power.
Power level 9 = maximum power.
Each power level has an intermediate setting. This is marked with a dot.
Selecting the hotplate and the power level
The hob must be switched on.
-
Select the hotplate with the symbol.
-
Within the next 10 seconds press the + or - symbol. The basic setting appears:
-
symbol = power level 9
symbol = power level 4
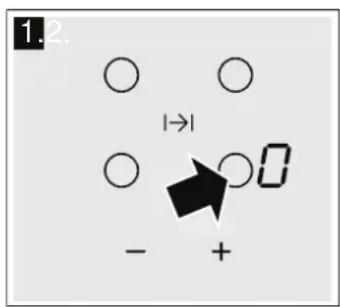
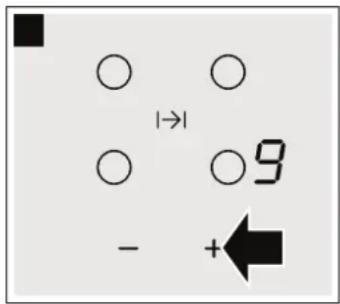
The power level has been set.
Changing the power level
Select the hotplate and press the + or - symbol until the required power level comes on.
To switch off the hotplate
Select the hotplate and then press the + or - symbol until symbol appears.
The hotplate turns off and the residual heat indicator appears.
Notes
If no pan has been placed on the hotplate, the selected power level flashes. After a certain time has elapsed, the hotplate switches off.
If a pan has been placed on the hotplate before switching on the hob, it will be detected within 20 seconds of pressing the main switch and the hotplate will be selected automatically. Once detected, select the power level within the next 20 seconds or the hotplate will switch off.
If more than one pan is placed on the hob, only one will be detected when switching it on.
Cooking guidelines table
The table below contains some examples.
Use power level 9 to begin cooking.
When heating purees, creams and thick sauces, stir frequently.
| Power level | |
| Melting | |
| Chocolate, chocolate coating 1-1. | |
| Butter, honey, gelatin 1-2 | |
| Heating and keeping warm | |
| Stew (e.g., lentils) 1-2 | |
| Milk** 1.-2. | |
| Sausages heated in water** 3-4 | |
| * Uncovered cooking | |
| ** Uncovered | |
| *** Turn frequently |
Power level
Defrosting and heating
Frozen spinach 3-4
Frozen goulash 3-4
Slow cooking, simmering
Potato dumplings* 4.-5.
Fish* 4-5
White sauces (e.g., bechamel) 1-2
Whipped sauces (e.g., Bearnaise, Hollandaise) 3-4
Boiling, steaming, sauteing
Rice (with a double amount of water) 2-3
Rice pudding 1.-2.
Potatoes 4-5
Pasta* 6-7
Soups 3.4.
Vegetables 2.-3.
Greens, frozen foods 3-4.
Cooked in a pressure cooker 4.-5.
Stewing
Meat roll 4-5
Stew 4-5
Goulash 3.-4.
Bake / Fry with a little oil**
Steaks,chops (plain orbreaded) 6-7
Beefsteak (3 cm thick) 7-8
Chicken breast (2 cm thick)*** 5-6
Hamburgers, meatballs (3 cm thick)*** 4.-5.
Plain fish and fish fillet 5-6
Breaded fish and fish fillet 6-7
Prawns and shrimps 7-8
Frozen meals (e.g., stir-fries) 6-7
Pancakes 6-7
Omelette 3.-4.
Frying\* (150-200 g per serving with 1-2 l. of oil)
Frozen foods (e.g., French fries, chicken nuggets) 8-9
Frozen croquettes 7-8
Meat (e.g., chicken pieces) 6-7
Fish, vegetables or mushrooms, breaded or battered, e.g., baby mushrooms 6-7
Confectionery products (e.g., fritters, fruit in batter) 4-5
- Uncovered cooking
Uncovered
* Turn frequently
Childproof lock
The hob can be protected against being accidentally turned on, to ensure that children do not switch on the hotplates.
Activating and deactivating the childproof lock
The hob should be turned off.
To activate: press the symbol for approximately 4 seconds. The indicator next to the symbol lights up for 10 seconds. The hob is locked.
To deactivate: press the symbol for approximately 4 seconds. The lock is now deactivated.
Childproof lock
With this function, the childproof lock automatically activates when a hob is switched off.
Activating and deactivating
All of the relevant information on the automatic childproof lock connection can be found in the Basic settings chapter.
Powerboost function
The Powerboost function can be used to heat large amounts of water more quickly than the power level 3.
All the hotplates have this function.
To activate
The hob must be switched on, but no hotplate should be working.
- Select a hotplate.
- Press the b symbol.
The indicator lights up
The function has been turned on.
Note: If any hotplate is switched on when the Powerboost function is working, b and 9 will flash on the hotplate display; the power level 9 will then be set. The Powerboost function will be deactivated.
To deactivate
- Select a hotplate.
- Press the symbol.
The indicator will no longer appear and the hotplate will return to the power level 9.
The function will be deactivated.
Note: In certain circumstances, the Powerboost function may turn off automatically in order to protect the electronic components inside the hob.
Time program function
This function may be used in two different ways:
to automatically switch off a hotplate
as a timer
Turning off a hotplate automatically
The hotplate turns off automatically once the selected time has elapsed.
Program the cooking time.
The hob must be switched on:
- Select the desired hotplate and power level.
-
Press the symbol. The indicator on the hotplate lights up. 00 is displayed on the time program function display.
-
Press the + or - symbol. The basic setting appears:
-
symbol: 30 minutes.
symbol: 10 minutes.
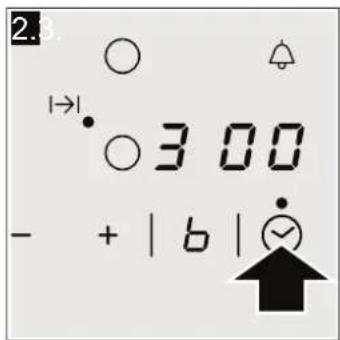
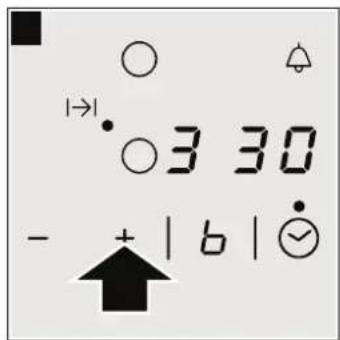
- Press the + or - symbol until the required cooking time appears.
After a few seconds, the cooking time begins to elapse.
Note: The same cooking time can be automatically programmed for the all the hotplates. The programmed time passes independently for each of the hotplates.
The Basic settings chapter provides information on automatically programming the cooking time.
Changing or cancelling the time
Selecting the hotplate. Press the symbol and change the cooking time with the ^+ or - symbols, or set to 00.
Once the time has elapsed
The hotplate switches off. A beep sounds and in the time program function display 品 appears for 10 seconds. The indicator on the hotplate lights up. Pressing the symbol turns off the indicators and stops the beeping.
Notes
If cooking times have been programmed for various hotplates, the time programming function always displays the time for the selected hotplate.
Any cooking time can be programmed for up to 99 minutes.
The timer
The timer can be set for periods of up to 99 minutes. It is independent of the other settings. This function does not automatically switch off a hotplate.
How to program
- The timer can be selected in two different ways:
If you have selected the hotplate: press the symbol twice.
If you have not selected the hotplate: press the symbol.
The indicator next to the symbol lights up. 00 is displayed on the time program function display.
-
Press the + or - symbol. The basic setting appears.
-
symbol: 10 minutes.
-
symbol: 5 minutes.
-
Set the desired time using the ^+ or - symbols.
After a few seconds, the time will start to elapse.
Changing or cancelling the time
Press the symbol various times until the indicator next to the symbol lights up. Change the time or set to 00 with the + or - symbols.
Once the time has elapsed
A warning signal sounds. is displayed on the time program function display. After 10 seconds the indicators turn off.
Pressing the symbol turns off the indicators and stops the beeping.
Automatic time limitation
If the hotplate remains in use for a long time and no changes are made in the settings, the automatic time limitation function is triggered.
The hotplate stops heating. The F , B symbol and the residual heat indicator h/H flash alternately in the display.
The indicator goes out when any symbol is pressed. The hotplate can now be reset.
When the automatic time function is used, it is governed by the selected power level (from 1 to 10 hours).
Basic settings
The device has several basic settings. These settings may be adapted to the user's individual needs.
Indicator Function
c'Childproof lock
Deactivated.*
I Activated.
c2 Audible signals
Confirmation and error signals deactivated.
Only error signal activated.
2 Only confirmation signal activated.
All signals activated.*
5 Automatic programming of cooking time.
Switched off.*
Automatic shut-off time.
*Factory settings
**The maximum power of the hob depends on the configuration of the installation's connection current. To not exceed this maximum value, the hob includes a series of components that automatically control the power, distributing it between the hotplates in use as required.
Indicator Function
c5 Duration of the time program function warning signal 10 seconds*. 230 seconds. 31 minute.
Power-Management function
= Deactivated.* I = 1,000W . minimum power. 工 = 1,500W 2-2,000 W.
etc.
or _· maximum power of hob.**
c Hotplate time selection
Unlimited: the last hotplate programmed remains selected.* Limited: The hotplate will only remain selected for 10 seconds.
C Return to basic settings
Personal settings. Return to factory settings.
*Factory settings
**The maximum power of the hob depends on the configuration of the installation's connection current. To not exceed this maximum value, the hob includes a series of components that automatically control the power, distributing it between the hotplates in use as required.
Accessing the basic settings
The hob should be turned off.
- Switch on the hob.
- Within the next 10 seconds, press the symbol for 4 seconds.
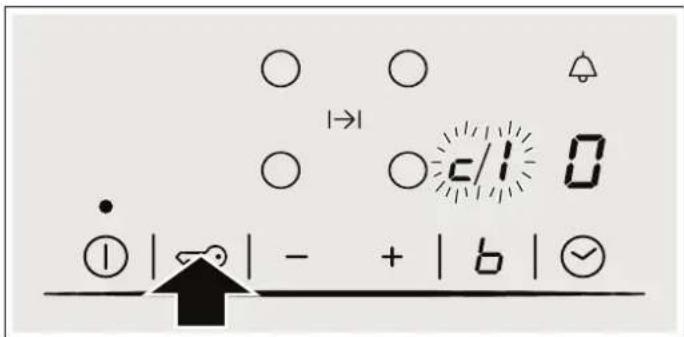
In the display ±bc and l alternately light up and lights up as a default setting.
- Press the symbol several times until the required function indicator appears.
- Next select the desired setting using the + and - symbols.
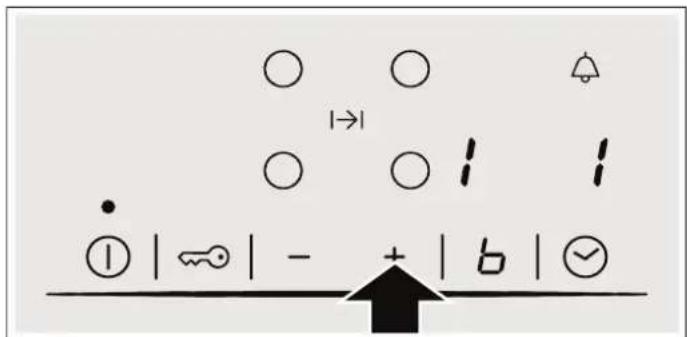
5. Press the symbol again for more than 4 seconds.
The settings will have been correctly saved.
Quit
To leave the basic settings, turn off the hob at the main switch.
Care and cleaning
The advice and warnings contained in this section aim to guide you in cleaning and maintaining the hob, so that it is kept in the best possible condition
Hob
Cleaning
Clean the hob after each use. This prevents food remains left on the surface from burning. Wait until the hob is cool enough before attempting to clean it.
Only use cleaning products specifically designed for hobs.
Follow the instructions provided on the packaging.
Do not use:
Undiluted washing-up liquid
Dishwasher detergent
Abrasive products
Corrosive products such as oven sprays or stain removers
Sponges that may scratch
High-pressure or steam cleaners
The best way to remove stubborn stains is to use a glass scraper. Follow the manufacturer's instructions.
Suitable glass scrapers can be obtained through the Technical Assistance Service or from our online shop.
Hob frame
In order to avoid damage to the hob frame, follow the indications below:
Use only slightly soapy hot water
- Do not use sharp or abrasive products
Do not use a glass scraper
Fixing malfunctions
Malfunctions are usually due to small details. Before calling the Technical Assistance Service you should bear in mind the following advice and warnings.
Indicator Malfunction Solution
| none The electric power supply has been cut off. Use other electrical appliances to check whether there has been a power cut. | ||
| The appliance has not been correctly con- nected following the connection diagram. | Check that the appliance has been connected correctly according to the connection diagram. | |
| Electronic system malfunction. If none of the above checks resolve the malfunction, contact the Technical Assistance Service. | ||
| The indicators blink | The control panel is damp or an object is resting on it. | Dry the control panel area or remove the object. |
| Er + number / d + number / Ω + number | Electronic system malfunction. Unplug the hob from the mains. Wait about 30 seconds before plugging it in again.* | |
| F0 / F9 | There is an internal operating error. | Unplug the hob from the mains. Wait about 30 seconds before plugging it in again.* |
| F2 / F5 | The electronic system has overheated and the corresponding hotplate has been switched off. | Wait until the electronic system has cooled down sufficiently. Then press any symbol on the hob.* |
| F4 The electronic system has overheated and all hotplates have been switched off. | ||
| U1 Supply voltage | outside normal operating limits. | Contact your power company. |
| U2 / U3 | The hotplate has overheated and has switched off in order to protect its cooking surface. | Wait until the electronic system has cooled down sufficiently before switching it back on. |
- If the warning persists call the Technical Assistance Service.
Do not rest hot pans on the control panel.
Normal noise while the appliance is working
Induction heating technology is based on the creation of electromagnetic fields that generate heat directly at the base of the pan. Depending on how the pan has been manufactured, certain noises or vibrations may be produced such as those described below:
A deep humming sound as in a transformer
This noise is produced when cooking on a high power level. It is caused by the amount of energy transferred from the hob to the pan. The noise disappears or becomes faint when the power level is lowered.
A low whistling sound
This noise is produced when the pan is empty. The noise disappears when water or food is added to the pan.
A crackling sound
This noise occurs in pans which are made from different materials superimposed on one another. It is caused by the vibrations that occur in the adjoining surfaces of the different superimposed materials. The noise comes from the pan. The amount of food and cooking method can vary noise intensity.
A high-pitched whistling sound
This noise is produced mainly in pans made from different materials superimposed on one another, and it occurs when such pans are heated at maximum power on two hotplates at the same time. The whistling disappears or becomes fainter as soon as the power level is lowered.
Noise from the fan
For proper use of the electronic system, the temperature of the hob must be controlled. To do this, the hob has a fan which turns on when a high temperature is detected. The fan may also work by inertia after the hob has been switched off, if the temperature detected is still too high.
Rhythmic sounds similar to the hands of a clock
This noise is only produced when 3 or more hotplates are working and disappears or is reduced when one of the hotplates is switched off.
The noises described are normal, they are part of induction heating technology and not a sign of malfunction.
After-sales service
Our after-sales service is there for you if your appliance should need to be repaired. We are committed to find the best solution also in order to avoid an unnecessary call-out.
E number and FD number:
Please quote the E number (product number) and the FD number (production number) of your appliance when contacting the after-sales service. The rating plate bearing these numbers can be found on the appliance certificate.
Please note that a visit from an after-sales service engineer is not free of charge, even during the warranty period.
Please find the contact data of all countries in the enclosed customer service list..
Trust the expertise of the manufacturer, and rest assured that the repair will be carried out by trained service technicians using original spare parts for your domestic appliance.
fr Table des matieres
NOTICE DE MONTAGE 52
Montage 52
Remarques importantes. 54

- INSTRUCTION MANUAL 40
- INSTALLATION INSTRUCTIONS
- Assembly
- Important notes
- Preparation of assembly kitchen units, figures 1/2/3/4
- Assembly over drawer, figure 2a
- Assembly over oven, figure 2b
- Assembly over dishwasher, figure 2c
- Ventilation, figure 4
- Installing the appliance, figures 5/7
- Position the hob in the gap available on the worktop with a depth of 500mm (figure 6)
- Changing the intensity of the 13 / 16 / 20 Amp connection current, figure 8
- Uninstalling the appliance
- Caution!
- INSTRUCTION MANUAL
- Safety precautions
- Risk of fire!
- Risk of burns!
- Risk of electric shock!
- Electromagnetic hazards!
- Malfunction risk!
- Risk of injury!
- Elements that may damage the appliance
- Overview
- Protecting the environment
- Environmentally-friendly disposal
- Energy-saving advice
- Induction cooking
- Advantages of induction cooking
- Suitable pans
- Ferromagnetic cookware
- Other cookware for induction
- Unsuitable pans
- Characteristics of the pan base
- Absence of pan or unsuitable size
- Empty pans or those with a thin base
- Pan detection
- Getting to know your appliance
- The control panel
- Control panels
- Indicators
- The hotplates
- Hotplate Turning on and off
- Residual heat indicator
- Programming the hob
- Turning the hob on and off
- Notes
- Set the hotplate
- Selecting the hotplate and the power level
- Changing the power level
- To switch off the hotplate
- Cooking guidelines table
- Power level
- Defrosting and heating
- Slow cooking, simmering
- Boiling, steaming, sauteing
- Stewing
- Bake / Fry with a little oil**
- Frying\* (150-200 g per serving with 1-2 l. of oil)
- Childproof lock
- Activating and deactivating the childproof lock
- Activating and deactivating
- Powerboost function
- To activate
- To deactivate
- Time program function
- Turning off a hotplate automatically
- Program the cooking time.
- Changing or cancelling the time
- Once the time has elapsed
- The timer
- How to program
- Automatic time limitation
- Basic settings
- Indicator Function
- Power-Management function
- c Hotplate time selection
- C Return to basic settings
- Accessing the basic settings
- Quit
- Care and cleaning
- Hob
- Cleaning
- Hob frame
- Fixing malfunctions
- Normal noise while the appliance is working
- A deep humming sound as in a transformer
- A low whistling sound
- A crackling sound
- A high-pitched whistling sound
- Noise from the fan
- Rhythmic sounds similar to the hands of a clock
- After-sales service
- E number and FD number:
- fr Table des matieres
- NOTICE DE MONTAGE 52
Brand : CONSTRUCTA
Model : CA421252
Category : Frying Pan