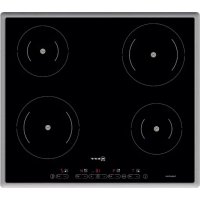
T43E20N1 - Cooker NEFF - Free user manual and instructions
Find the device manual for free T43E20N1 NEFF in PDF.


User questions about T43E20N1 NEFF
0 question about this device. Answer the ones you know or ask your own.
Ask a new question about this device
Download the instructions for your Cooker in PDF format for free! Find your manual T43E20N1 - NEFF and take your electronic device back in hand. On this page are published all the documents necessary for the use of your device. T43E20N1 by NEFF.
USER MANUAL T43E20N1 NEFF
natural_image
Technical diagram of a mechanical assembly with a magnified inset showing a component detail (no text or symbols)
natural_image
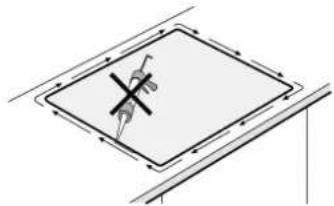
Diagram of a cross symbol on a tilted rectangular frame with directional arrows (no text or labels)5
text_image
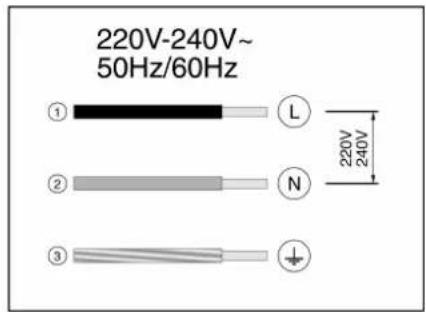
220V-240V~ 50Hz/60Hz ① ② ③ L N 220V 240V6
text_image
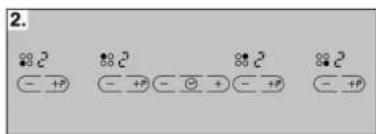
2. ●○ C³ ●○ C² ●● C² ●● C² - +P - +P - ⊙ + - +P - +P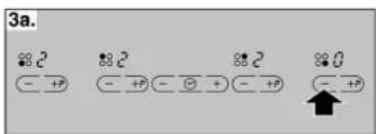
text_image
3a. ●● c² ●● c² ●● c² ●● U - +P - +P - + P - + P - +P ↑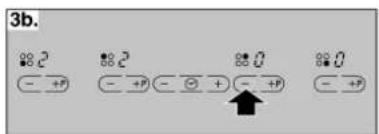
text_image
3b. #2 #2 #0 #0 - +P - +P - + - +P - +P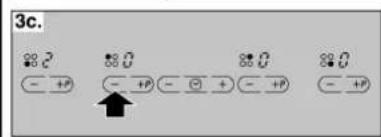
text_image
3c. #2 - +P #0 - +P - □ + - - +P #0 - +P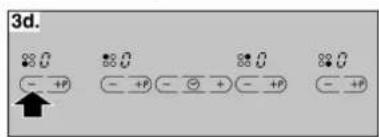
text_image
3d. 30 - +P 30 - +P - + P - +P 30 - +P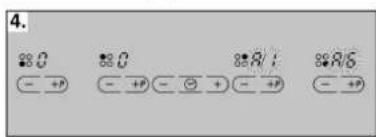
text_image
4. ##0 - +P ##0 - +P - + P ##A/1 - +P ##A/5 - +P
es
InstallationInstructions
Importantnotes
- Safetyinuseisonlyguaranteedifthetechnicalinstallationof thehobhasbeencarriedoutcorrectlyandinaccordancewith theinstallationinstructions. Theinstallationtechnicianshallbe liableforanydamagecausedasaresultofincorrectinstallation.
- Onlyanauthorised technicianisable to connect the appliance. The guidelines set out by the locale electricity provider must be observed.
- This is a class lappliance and should only be used with an earthed connection.
- Using this appliance without an earth connection or after it has been incorrectly installed may, in very rare cases, causes serious harm.
Themanufactureracceptsnoresponsibilityforanymalfunction ordamagewhichiscausedbyincorrectelectricalinstallation.
- If the appliance is not fitted with an accessible plug, disconnecting means must be incorporated in the fixed installation, in accordance with the installation regulations.
- The inlet hose must be positioned so that it does not touch any of the hot part so the hoboroven.
- Anychangetotheappliance'sinterior,includingchangingthe powercable,mustbeperformedbytheTechnicalAssistance Service.
- Inductionhobsmayonlybeinstalledoverdrawers,ovensof thesamebrandwithforced-airventilation,ordishwashersofthe samebrand. Refrigerators,unventilatedovens,andwashing machinesmaynotbeinstalledbeneaththehob.
Assemblyoverdrawer(figure2a)
- If the hobis installed above adrawer, metal objects stored inside could become every hot dueto the air recirculating from the hobventilationsystem. If this occurs, an intermediates supports recommended.
Awoodenpanelcanbeusedasanintermediatesupport(figure 3),oryoumayorderasuitableaccessoryfromourTechnical AssistanceService.
Thereferencecodeforthisaccessoryis686002.
- Theworkingsurfaceuponwhichthehobisinstalledmustbe atleast20mmthick.
- Thespacebetweenthetopoftheworkingsurfaceandthetopofthedrawermustbe65mm.
Assemblyoveroven(figure2b)
- Theworkingsurfaceuponwhichthehobisinstalledmustbe atleast:
-20mmthickifinstalledoveracompactoven.
-30mmthickifinstalledoverafull-sizeoven.
- If the hobis installed over a compact oven, ther must be 60 mm of space between the top of the oven and the top of the workings surface.
Assemblyoverdishwasher(figure2c)
- If the hobis installed over a dish washer, an intermediate accessory must be installed. The accessory may be ordered from our Technical Assistance Service.
Thereferencecodeforthisaccessoryis686002. - Theworkingsurfaceuponwhichthehobisinstalledmustbea minimumof20mmandamaximumof40mmthick.
- Thespacebetweenthetopoftheworkingsurfaceandthetopofthedishwashermustbe:
-60mmifinstalledoveracompactdishwasher.
-65mmifinstalledoverafull-sizedishwasher.
Installingandconnectingthehob -Figure1/2/3/4/5
• Seetheratingplateforthevoltage.
- Connectaccordingtotheconnectiondiagramonly.
Connectiondrawing–Figure5
- Brown
2.Blue - Yellowandgreen
Changingtheconnectioncurrent 10/13/16/20Amps–Figure6
Before using the hob for the first time, it must be tested for the correct current.
Followthestepsbelowtochangethecurrentofthehob:
1-Turnonthehobwiththemainswitch. Donotplaceanypansonthehotplates
2-Within the following 60 seconds, adjust all hot plate to the desired power level according to the required connection current (see table).
| PowerlevelConnectioncurrentinamperes | |
| 120A | |
| 216A | |
| 313A | |
| 4 10A | |
3-Turnoffallthehotplatesinsequence, starting from the lower right and continuing counter-clockwise.
4–Theselected connection current is indicated in the display of theright-hand, lateral hotplates.
5-Turnoffthehobwiththemainswitch.
Theselected connection current will have been properly saved.
Removingthehob
- Disconnect the cooker from the powersupply.
- Pushoutthehobfrombelow.
pt
- Pourlatension,voirlaplaquesignalétique.
text_image
1.2 0 - +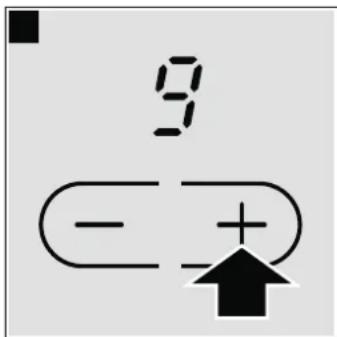
text_image
9 - +text_image
C/I - +P 0 - ✓ +text_image
Diagram showing electrical symbols including a key, +P, and ground connection with arrows and labelsSafety warnings and advice 24
Safety instructions.... 24
Elements that may damage the appliance 25
Protecting the environment....26
Environmentally-friendly disposal of waste products 26
Energy-saving advice 26
Induction cooking 26
Advantages of induction cooking 26
Suitable pans.... 26
Familiarise yourself with the appliance....27
The control panels.... 27
The hotplates.... 27
Residual heat indicator.... 27
Programming the hob 28
Switching the hob on and off 28
Set the hotplate 28
Cooking guidelines table.... 28
Childproof lock 29
Activating and deactivating the childproof lock.... 29
Activating and deactivating the childproof lock.... 29
Powerboost function....29
To activate 29
To deactivate 29
Time programming function 30
Turning off a hotplate automatically.... 30
Automatic timer.... 30
The timer 30
Cleaning protection.... 30
Automatic time limitation 31
Basic settings.... 31
To access the basic settings.... 31
Care and cleaning 32
Hob.... 32
Hob frame 32
Fixing malfunctions 32
Normal noise while the appliance is working 33
After-sales service 33
Additional information on products, accessories, replacement parts and services can be found at www.neff-
international.com and in the online shop www.neff- eshop.com
⚠ Safety warnings and advice
Please read these instructions carefully. We advise you not to use the appliance until you have read them.
Keep the operation and installation instructions. If the appliance is passed on to another user, please ensure that the documentation is also passed on with it.
Check the appliance after removing it from the packaging. If it has suffered any damage in transport, do not connect the appliance, contact the Technical Assistance Service and provide written notification of the damage caused, otherwise you will lose your right to any type of compensation.
Safety instructions
This device has been designed exclusively for home use. Only use the hob for food preparation. The appliance must not be left unsupervised while in use.
Safe operation
To use this appliance safely, adults and children who, as a result of
■ physical, sensory or mental disability,
■ or lack of experience or knowledge,
are not capable of using this appliance, should not do so without the supervision of a responsible adult.
Children must be supervised to ensure that they do not play with the appliance.
Oil and fat too hot
Risk of fire!!
Oil or fat that is too hot quickly catches fire. Do not leave overheated oil or fat unwatched. If the oil or fat catches fire, never use water to put it out. Extinguish the flames with a lid or a plate. Switch off the hotplate.
Cooking food using the bain-marie method
The bain-marie method allows you to cook food in a saucepan submerged in a larger pan containing water. The water cooks the food with a gentle and constant heat, rather than directly from the heat of the hotplate. When cooking food in bain-marie, you must prevent tins, glass containers or other material from resting directly on the base of the pan containing the water, to prevent the glass on the hob and the pan from breaking due to hotplate reheating.
Hot hob
Risk of burns!!
Do not touch hot hotplates. Keep children away from the hob.
Risk of fire!!
■ Never place flammable objects on the hob
- Do not keep flammable items or aerosols in the drawers beneath the hob.
Wet hotplates and pan bases
Risk of injury!!
Liquid between the bottom of the pan and the hob can produce steam pressure. Which may cause the pan to jump. Always ensure that the hotplate and the base of the pan are kept dry.
Cracks in the hob
Risk of electric shock!!
Disconnect the appliance from the mains if the hob is broken or cracked.
Contact the Technical Assistance Service.
The hotplate heats up, but the display does not work
Risk of burns!!
Turn off the hotplate if the indicator does not work. Contact the Technical Assistance Service.
The hob switches off
Risk of fire!!
If the hob switches off automatically and cannot be used, it can subsequently switch on by itself. To avoid this the hob must be disconnected from the mains. Please contact the Technical Assistance Service.
Do not place metal objects on the induction hotplate
Risk of burns!!
Do not leave knives, forks, spoons, lids or other metal objects that can heat up very quickly on the hob.
Fan care
Malfunction risk!
The bottom of the hob is equipped with a fan. If there is a drawer under the hob it should not be used to store small objects or paper, since they could damage the fan or interfere with the cooling if they are sucked into it.
Caution!
There should be a minimum distance of 2 cm between the drawer and the fan entrance.
Incorrect repairs
Risk of electric shock!!
Poor repairs are dangerous. Switch off the appliance if it is faulty. Contact the Technical Assistance Service. Repairs and the replacement of faulty connection cables may only be performed by qualified personnel from the Technical Assistance Service.
Caution!
This appliance complies with safety and electromagnetic compatibility standards. However, people with pacemakers must refrain from approaching the appliance when in use. It is impossible to ensure that all of these devices available on the market comply with current electromagnetic compatibility standards, and that interference which may prevent the device from working correctly will not occur. It is also possible that people with other types of devices, such as a hearing aids, could experience some discomfort.
Switching off the hob
After each use, always turn off the hob at the main switch. Do not wait until the hob turns off automatically after the pan is removed.
Elements that may damage the appliance
Caution!
■ Rough pan bases may scratch the hob.
- Avoid leaving empty pots and pans on the hotplate. Doing so may cause damage.
- Do not place hot pans on the control panel, the indicator area, or the hob frame. Doing so may cause damage.
- Hard or pointed objects dropped on the hob may damage it.
- Aluminium foil and plastic containers will melt if placed on the hotplate while it is hot. The use of laminated sheeting is not recommended on the hob.
Overview
The following table presents the most common damage caused:
Damage Cause Measure
| Stains Food spillage Immediately remove spilt food using a glass scraper. | |
| Unsuitable cleaning products Only use cleaning products specifically designed for glass-ceramic hobs. | |
| Scratches Salt, sugar and sand Do not use the hob as a tray or working surface. | |
| Pans with rough bottoms may scratch Check pans.the glass ceramic | |
| Fading Unsuitable cleaning products Only use cleaning products specifically produced for glass-ceramic hobs. | |
| Contact with pans Lift pots and pans before moving them around. | |
| Chips Sugar, substances with a high sugar content | Immediately remove spilt food using a glass scraper. |
Protecting the environment
Unpack the appliance and dispose of its packaging in such a way that no damage is caused to the environment.
Environmentally-friendly disposal of waste products

This appliance conforms to the Waste Electrical and Electronic Equipment Directive WEEE 2002/96/EC. This directive defines the framework for recycling used appliances within European territory
Energy-saving advice
■ Always place the correct lid on the pan. Cooking with an uncovered pan will result in a four-fold increase in energy use.
■ Use pans equipped with a solid, flat bottom. Curved pan bases increase energy consumption.
The diameter of the pan base must coincide with the diameter of the hotplate. This generally means the pan base diameter is greater than that of the hotplate. If the diameter of the pan is not the same as the diameter of the hotplate, it is preferable to use a pan with a bottom that is larger in diameter than the hotplate, otherwise half the energy will be wasted. Please note: Whether the cookware manufacturer has indicated the diameter of the top of the pan.
- Choose pans of a size suited to the amount of food you are going to cook. A large pan that is only half full will use a great amount of energy.
■ Use a small amount of water when cooking. This saves energy, and vegetables retain their vitamins and minerals.
■ Select a lower power level.
Induction cooking
Advantages of induction cooking
Induction cooking represents a radical change from the traditional method of heating; the heat is generated directly in the pan. It therefore offers a number of advantages:
■ Time savings for cooking and frying; since the pan is heated directly.
■ Energy is saved.
■ Care and cleaning are simpler. Foods that have spilt do not burn as quickly.
■ Heat and safety control; the hob supplies or cuts off power immediately when the control knob is turned on. The induction hotplate stops supplying heat if the pan is removed without having previously switched it off.
Suitable pans
Ferromagnetic pans
Only ferromagnetic pans are suitable for induction cooking, these may be made from:
■ enamelled steel
■ cast iron
■ special cutlery for stainless steel induction pan
To determine whether a pan is suitable, check to see if a magnet will stick to it.
Special induction pans
There is another type of pan specially made for induction, the base of which is not entirely ferromagnetic. Check the diameter, since this could affect detection of the pan, as well as the cooking results.
Unsuitable pans
Never use pans made from:
■ common thin steel
glass
■ earthenware
copper
aluminium
Characteristics of the pan base
The characteristics of the pan base may affect the uniformity of the cooking results. Pans made from materials which help diffuse heat, such as stainless steel sandwich pans, distribute heat uniformly, saving time and energy.
Absence of pan or unsuitable size
If no pan is placed on the selected hotplate, or if it is made of unsuitable material or is not the correct size, the power level displayed on the hotplate indicator will flash. Place a suitable pan on the hotplate to stop the flashing. If this takes more than 90 seconds, the hotplate will switch off automatically.
Empty pans or those with a thin base
Do not heat empty pans, nor use pans with a thin base. The hob is equipped with an internal safety system. However, an empty pan may heat up so quickly that the "automatic switch off" function may not have time to react and the pan may reach very high temperatures. The base of the pan could melt and damage the glass on the hob. In this case, do not touch the pan and switch the hotplate off. If it fails to work after it has cooled down, please contact the Technical Assistance Service.
Pan detection
Each hotplate has a minimum limit for detecting pans, which varies depending on the material of the pan being used. You should therefore use the hotplate that is most suitable for the diameter of your pan.
Double or triple hotplate
These hotplates can detect pans of different sizes. Depending on the material and properties of the pan, the hotplate will adapt automatically, switching on part or all of the hotplate and supplying sufficient power to obtain good cooking results.
Familiarise yourself with the appliance
These instructions for use are applicable to other hobs. On page 13 an overview of the models is provided, along with information on measurements.
The control panels
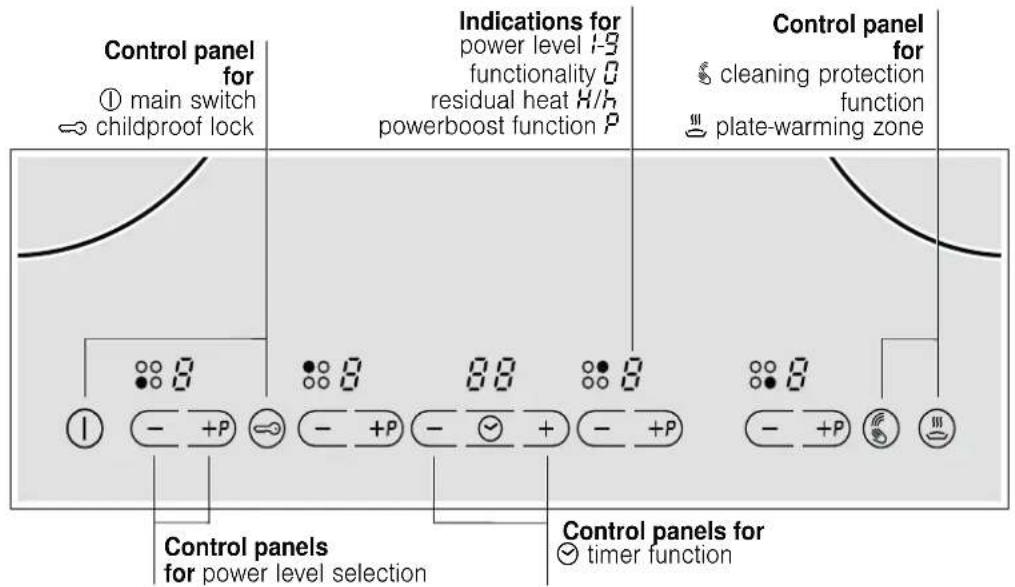
text_image
Control panel for ① main switch ⇔ childproof lock Indications for power level 1-3 functionality 0 residual heat H/h powerboost function P Control panel for cleaning protection function plate-warming zone Control panels for power level selection Control panels for timer function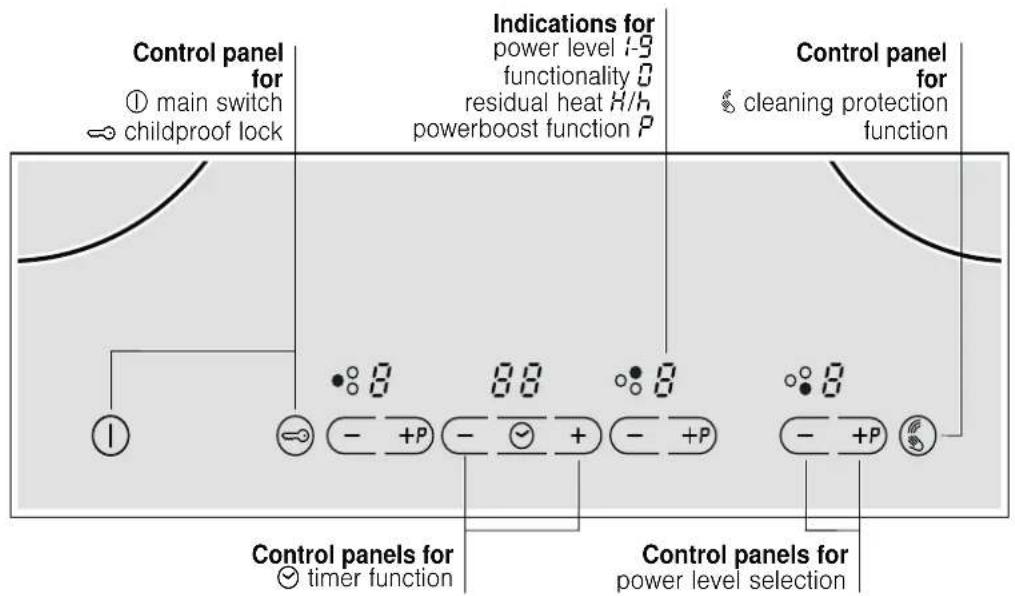
text_image
Control panel for ① main switch ⇔ childproof lock Indications for power level 1-9 functionality 0 residual heat H/h powerboost function P Control panel for § cleaning protection function Control panels for ○ timer function Control panels for power level selectionThe hotplates
| Hotplate Turning on and off | |
| ○ Single hotplate Use a correctly sized pan. | |
| ∞ Grill zone The hotplate turns on automatically when a pan the same size as its outer edges is placed on it. | |
| Resistive plate-warming zone* | Press the √ symbol.** |
| * Turning on the hotplate: The corresponding indicator lights up.** The residual heat warning light comes on.Only use pans suitable for induction cooking, see the "Appropriate cookware" section. | |
Residual heat indicator
The hob has a residual heat indicator for each hotplate to show those which are still hot. Avoid touching a hotplate that displays this.
Even when switched off, the h/R light will remain on as long as the hotplate remains hot.
If the pan is removed before the hotplate is turned off the h/h indicators and the selected power level will appear alternately.
Programming the hob
This section will show you how to program the hotplates. The table contains power levels and cooking times for several dishes.
Switching the hob on and off
The hob is turned on and off with the main switch.
To switch on: press the ① symbol. The indicator above the main switch lights up. The hob is ready for use.
To switch off: press the ① symbol until the indicator above the main switch disappears. All hotplates are off. The residual heat indicator stays on until the hotplates have cooled down completely.
Note: The hob switches off automatically when all the hotplates are switched off for more than 20 seconds.
Set the hotplate
Select the required power level with the + and - symbols.
Power level 1 = minimum power.
Power level 9 = maximum power.
Each power level has an intermediate setting. This is marked with a dot.
Selecting the power level:
The hob must be switched on.
-
Press the + or - symbol of the required hotplate. The □ symbol lights up on the display.
-
In the next 10 seconds, press the + or - symbol. The basic setting will appear.
-
symbol = power level 9.
- symbol = power level 4.
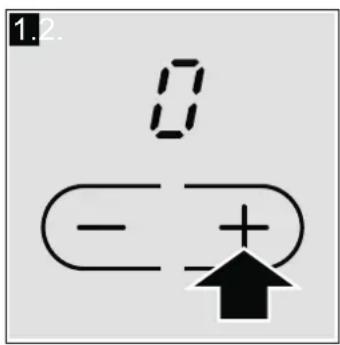
text_image
1.2. 0 - +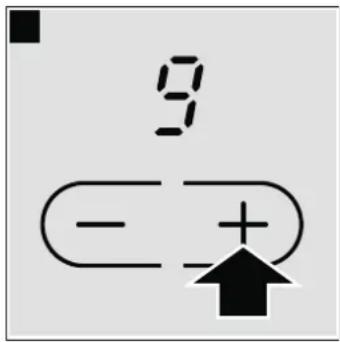
text_image
9 - +- To change the power level, press the + or - symbol until the required power level appears.
Turning off the hotplate
Press the + or - symbol until appears. The hotplate turns off and the residual heat indicator appears.
Note: If no pan has been placed on the induction hotplate, the selected power level flashes. After a certain time, the hotplate switches off.
Cooking guidelines table
The table below contains some examples.
| Power level | |
| Melt | |
| Chocolate, chocolate coating, butter, honey | 1-1. |
| Gelatine | 1-1. |
| Heating and warming | |
| Stew (e.g., lentils) | 1-2 |
| Milk** | 1.-2. |
| Sausages heated in water** | 3-4 |
| Defrosting and heating | |
| Frozen spinach | 2.-3. |
| Frozen goulash | 2.-3. |
| Slow cooking, simmering | |
| Potato dumplings | 4.-5.* |
| Fish | 4-5* |
| White sauces (e.g., bechamel) | 1-2 |
| Whipped sauces (e.g., Bearnaise, Hollandaise) | 3-4 |
| Boiling, steaming, roasting | |
| Rice (with a double amount of water) | 2-3 |
| Rice pudding | 1.-2. |
| Potatoes | 4-5 |
| Pasta | 6-7* |
| Soups | 3.-4. |
| Vegetables | 2.-3. |
| Greens, frozen foods | 3.-4. |
| Cooked in a pressure cooker | 4.-5. |
* Uncovered cooking
** Uncovered
| Power level | |
| Roasting | |
| Meat roll | 4-5 |
| Roast | 4-5 |
| Goulash | 3.-4. |
| Broil** | |
| Steaks, chops (plain or breaded) | 6-7 |
| Beefsteak (3 cm thick) | 7-8 |
| Chicken breast (2 cm thick) | 5-6 |
| Fish and fish fillet without breading | 5-6 |
| Fish and fish fillet with breading | 6-7 |
| Prawns and shrimps | 7-8 |
| Frozen meals (e.g., stir-fries) | 6-7 |
| Pancakes | 6-7 |
| Omelette | 3.-4. |
| Frying** (150-200g per serving with 1-2 l. of oil) | |
| Frozen foods (e.g., French fries, chicken nuggets) | 8-9 |
| Frozen croquettes | 7-8 |
| Meatballs | 7-8 |
| Meat (e.g., chicken pieces) | 6-7 |
| Fish, vegetables, breaded or battered, e.g., mushrooms | 6-7 |
| Confectionary products (e.g., fritters, fruit in batter) | 4-5 |
* Uncovered cooking
** Uncovered
Childproof lock
The hob can be protected against being accidentally turned on, to ensure that children do not switch on the hotplates.
Activating and deactivating the childproof lock.
The hob must be turned off.
To activate: press and hold the symbol for approx. 4 seconds. The indicator lights up for 10 seconds. The hob is locked.
To deactivate: press and hold the symbol for approx. 4 seconds. The lock is now deactivated.
Activating and deactivating the childproof lock
With this function, the childproof lock automatically activates when a hob is switched off.
Activating and deactivating
See the "Basic Settings" section.
Powerboost function
The Powerboost function can be used to heat food more quickly than using the power level ^9 .
All the hotplates have this function.
To activate
The hob must be switched on, but no hotplate should be working.
- Select the required hotplate.
- Select the power level 9.
- Then press the + symbol.
P lights up in the display. The Powerboost function has been activated.
Note: If any hotplate is switched when the Powerboost function is working, P and 9 will flash on the hotplate display; the power level 9 will then be set. The Powerboost function will be deactivated.
To deactivate
Select the hotplate and press the - symbol. The P indicator will disappear and the hotplate will return to the power level 3. The Powerboost function has been deactivated.
Note: In certain circumstances, the Powerboost function may turn off automatically in order to protect the electronic components inside the hob.
Time programming function
This function may be used in two different ways:
■ to automatically switch off a hotplate.
■ as a timer.
Turning off a hotplate automatically
Enter the cooking time for the required hotplate. The hotplate turns off automatically once the time has elapsed.
How to program
- Select the required power level.
- Press the Ⓧ symbol. The I→I indicator of the hotplate lights up. ∞ is displayed in the time program function display. To select another hotplate, press the Ⓧ symbol several times until the I→lindicator for the desired hotplate lights up.
- Press the + or - symbol on the time program function. The basic setting appears:
+symbol: 30 minutes.
- symbol: 10 minutes.
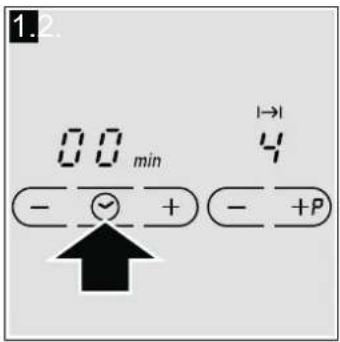
text_image
1.2. 0.0 min - + - +P 1→1 4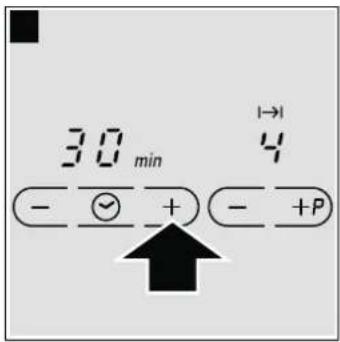
text_image
30 min - √ + - +P 1→1 4- Press the + or - symbol until the required cooking time appears.
After a few seconds, the cooking time begins to count down.
Once the time has elapsed
The hotplate switches off. The beep sounds, and in the time program function display 00 appears for 10 seconds. The I→I indicator lights up on the hotplate display. Pressing the ⬢ symbol turns off the indicators and stops the beeping.
Changing or cancelling the time
Press the ⬤ symbol several times until the required I→I indicator lights up. Change the cooking time using the + or - symbols, or set to 00.
Notes
If a cooking time has been programmed for several hotplates, it can be set to display all the time values. To do this, press the ⬤ symbol several times until the I→I indicator for the required hotplate lights up.
■ Any cooking time can be programmed for up to 99 minutes.
Automatic timer
With this function you may select a cooking time for all hotplates. Once a hotplate is switched on, the selected time will begin to count down. The hotplate will automatically switch off when the cooking time has elapsed.
Instructions on activating the timer are found in the chapter entitled "Basic settings".
Note: The cooking time can be changed or cancelled for any hotplate:
Press the ⬢ symbol several times until the required |→| indicator lights up. Change the cooking time using the + or - symbols, or set to ☐.
The timer
The timer can be set for periods of up to 99 minutes. It is independent of the other settings. This function does not automatically switch off a hotplate.
How to program
- Press the ⬤ symbol several times until the △ indicator lights up. 80 is displayed in the time program function display.
- Press the + or - symbol on the time program function. The basic setting will appear.
+symbol: 10 minutes.
- symbol: 5 minutes.
- Set the time required using the + or - symbols.
After a few seconds, the timer will start to count down.
Once the time has elapsed
A warning beep sounds. In the time program function display ☐ is shown, and the ⚠ indicator comes on. After 10 seconds the indicators turn off.
Pressing the ⬤ symbol turns off the indicators and stops the beep.
Changing or cancelling the time
Press the ⏻ symbol several times until the ⚠ indicator lights up. Change the time with the + or - symbols, or set to 00.
Cleaning protection
Cleaning the control panel while the hob is on may change the settings.
In order to avoid this, the hob has a cleaning protection function. Press the Ⓧ symbol. An audible signal sounds. The control panel is locked for 35 seconds. The surface of the control panel can now be cleaned without risk of changing the settings.
Note: The lock does not affect the main switch. The hob may be switched off when desired.
Automatic time limitation
If the hotplate remains in use for a long time and no changes are made in the settings, the automatic time limitation function is triggered.
The hotplate stops heating. On the hotplate display, and 8 flash alternately.
The indicator goes out when any symbol is pressed. The hotplate can now be reset.
When the automatic time function is used, it is governed by the selected power level (from 1 to 10 hours).
Basic settings
The device has several basic settings. These settings may be adapted to the user's individual needs.
| Indicator Function | |
| c1 | Childproof lock |
| Off.* | |
| Activated. | |
| c2 | Sound signals |
| Confirmation beep and error signal disconnected. | |
| Only error signal connected. | |
| Confirmation beep and error signal connected.* | |
| c5 | Automatic timer. |
| Switched off.* | |
| -99 Automatic shut-off time | |
| c6 | Duration of the time program function warning signal |
| 10 seconds. | |
| 30 seconds. | |
| 3 1 minute. | |
| c7 | Power-Management function |
| Deactivated.* | |
| = 1,000 W. minimum power. | |
| = 1,500 W. | |
| = 2,000 W. | |
| etc. | |
| or 9. = maximum power of hob.** | |
| c8 | Return to basic settings |
| Personal settings.* | |
| Return to factory settings. | |
*Factory settings
**The maximum power of the hob depends on the configuration of the installation's connection current. To not exceed this maximum value, the hob includes a series of components that automatically control the power, distributing it between the hotplates in use as required.
To access the basic settings
The hob must be turned off.
- Switch on the hob.
- Within the next 10 seconds, press the ≡ symbol and hold for 4 seconds.
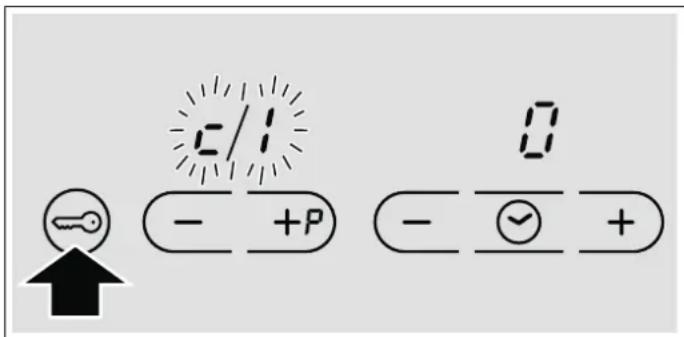
text_image
C/I - +P - √ + ↑c i is displayed on the left of the screen and 0 on the right.
- Press the symbol several times until the indicator for the required function appears.
- Then select the required setting using the + and - symbols.
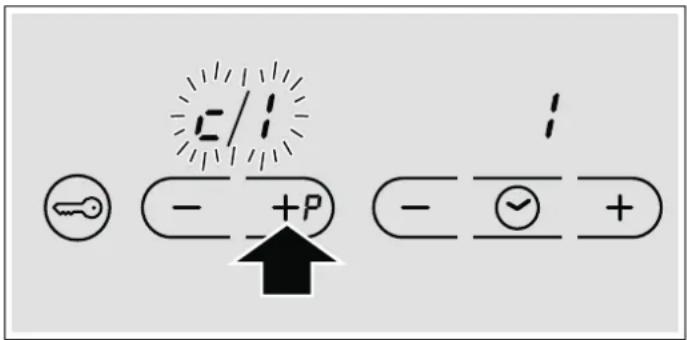
text_image
C/I - +P ↑ - ✓ + 1- Press the symbol again and hold for more than 4 seconds.
The settings will have been correctly saved.
Quit
To leave the basic settings, turn off the hob at the main switch.
Care and cleaning
The advice and warnings contained in this section aim to guide you in cleaning and maintaining the hob, so that it is kept in the best possible condition
Hob
Cleaning
Clean the hob after each use. This prevents food remains left on the surface from burning. Wait until the hob is cold enough before attempting to clean it.
Only use cleaning products specifically designed for glass-ceramic hobs. Follow the instructions provided on the packaging.
Do not use:
■ Abrasive products
■ heavy-duty cleaners, like oven sprays and stain removers
■ Pads that may scratch
■ High-pressure or steam cleaners
Glass scraper
Remove dried-on food remains using a glass scraper.
- Release the scraper safety catch
- Use the blade to clean the hob surface
Do not attempt to clean the hob surface with the base of the scraper. This could result in scratching.
Risk of injury!!
The blade is extremely sharp. Risk of cuts. Protect the blade when not in use. Replace the blade immediately when any imperfections are found.
Care of the appliance
Apply an additive to protect and preserve the hob. Follow the advice and warnings provided with the product.
Hob frame
In order to avoid damage to the hob frame, follow the indications below:
■ Use only slightly soapy hot water
■ Do not use sharp or abrasive products
■ Do not use a glass scraper
Fixing malfunctions
Malfunctions are commonly due to small details. Before calling the Technical Assistance Service, you should consider the following advice and warnings.
Indicator Malfunction Solution
| none The electric power supply has been interrupted. | Use other electrical appliances to check whether there has been a power cut. |
| The appliance has not been correctly connected according to the connection diagram. | Check that the appliance has been connected correctly according to the connection diagram. |
| Electronic system malfunction. If the above | checks do not resolve the malfunction, contact the Technical Assistance Service. |
| E flashes | The control panel is damp or an object is resting on it. |
| Er + number /d + number /E + number / | Electronic system malfunction. Turn the hob off from the mains. Wait 30 seconds or so and switch it back on.* |
* If the indication persists, call the Technical Assistance Service.
Do not rest hot pans on the control panel.
Indicator Malfunction Solution
| F0/F9 | There is an internal error in the operation. | Turn the hob off from the mains. Wait 30 seconds or so and switch it back on.* |
| F2 | The electronic system has overheated and the corresponding hotplate has been switched off. | Wait for the electronic system to cool down. Then push any symbol on the hob.* |
| F4 | The electronic system has overheated and all the hotplates have been switched off. | |
| F8 | The hotplate has been working non-stop too long at a high power level. | The automatic time stop has been activated. Press any symbol on the control panel. The indicator goes out. The hob may now be switched back on. |
| U1 | Incorrect supply voltage, outside normal operating limits. | Please contact the local electricity board. |
| U2/U3 | The hotplate has overheated and has switched off in order to protect its cooking surface. | Wait until the electronic system has cooled down sufficiently before switching the hotplate back on. |
* If the indication persists, call the Technical Assistance Service.
Do not rest hot pans on the control panel.
Normal noise while the appliance is working
Induction heating technology is based on the creation of electromagnetic fields that generate heat directly at the base of the pan. Depending on how the pan has been manufactured, certain noises or vibrations may be produced such as those described below:
A deep humming sound as in a transformer
This noise is produced when cooking on a high power level. It is caused by the amount of energy transferred from the hob to the pan. The noise disappears or becomes faint when the power level is lowered.
A low whistling sound
This noise is produced when the pan is empty. It disappears when water or food is added to the pan.
A crackling sound
This noise occurs in pans which are made from different materials superimposed on one another. It is caused by the vibrations that occur in the adjoining surfaces of the different superimposed materials. The noise comes from the pan. The amount of food and cooking method can vary.
A high-pitched whistling sound
This noise is produced mainly in pans made from different materials superimposed on one another, and it occurs when such pans are heated at maximum power on two hotplates at the same time. The whistling disappears or becomes fainter as soon as the power level is lowered.
Noise from the fan
For proper use of the electronic system, the temperature of the hob must be controlled. For this purpose, the hob has a fan that starts working when detecting excess temperatures at different power levels. The fan may also work due to inertia after the hob has been switched off, if the temperature detected is still too high.
Rhythmic sounds similar to a clock's hands
This noise is only produced when 3 or more hotplates are working and disappears or is reduced when one of the hotplates is switched off.
The noises described are normal, they are part of induction heating technology and not a sign of malfunction.
After-sales service
Our after-sales service is there for you if your appliance should need to be repaired. We are committed to find the best solution also in order to avoid an unnecessary call-out.
E number and FD number:
Please quote the E number (product number) and the FD number (production number) of your appliance when contacting the after-sales service. The rating plate bearing these numbers can be found on the appliance certificate.
Please note that a visit from an after-sales service engineer is not free of charge, even during the warranty period.
Please find the contact data of all countries in the enclosed customer service list.
To book an engineer visit and product advice
GB 0844 8928989
Calls from a BT landline will be charged at up to 3 pence per minute. A call set-up fee of up to 6 pence may apply.
IE 01450 2655
Trust the expertise of the manufacturer, and rest assured that the repair will be carried out by trained service technicians using original spare parts for your domestic appliance.
pt Indice
text_image
C/I - +P 0 - √ + ↑text_image
Diagram showing electrical symbols including a key, +P, and checkmark with arrows indicating direction or polaritytext_image
C/I - +P 0 - ✓ + ↑text_image
2/1 - +P ↑ - ✓ + 1text_image
C/I - +P 0 - ✓ +text_image
Diagram showing electrical symbols including a key, +P, and ground connection with arrows and labelsRecipienti adeguati.... 78
Familiarizzare con l'apparecchio ....79
Pannelli comandi 79
www.neff-international.com e l'eShop www.neff-eshop.com