GG 55511 - Fridge LIEBHERR - Free user manual and instructions
Find the device manual for free GG 55511 LIEBHERR in PDF.



User questions about GG 55511 LIEBHERR
0 question about this device. Answer the ones you know or ask your own.
Ask a new question about this device
Download the instructions for your Fridge in PDF format for free! Find your manual GG 55511 - LIEBHERR and take your electronic device back in hand. On this page are published all the documents necessary for the use of your device. GG 55511 by LIEBHERR.
USER MANUAL GG 55511 LIEBHERR
Operating instructions Page 6
Freezer
Read the operating instructions before switching on for the first time
natural_image
Front view of a simple rectangular door with a handle and wheels, no text or symbols visible.7082 363-00
GG 55 511
LIEBHERR
Entsorgungshinweis
natural_image
Simple line drawing of a diagonal beam supported by vertical supports (no text or symbols)text_image
Diagram showing a mechanical or electrical component with labeled parts and directional arrows indicating motion or force.natural_image
Diagram of a door frame with two arrows indicating upward motion (no text or symbols)natural_image
Diagram of a structural beam with upward and downward arrows indicating forces or motion (no text or symbols)The appliance contains some reusable materials and should be disposed of properly - not simply with unsorted household refuse. Appliances which are no longer needed must be disposed of in a professional and appropriate way, in accordance with the current local regulations and laws.

When disposing of the appliance, ensure that the refrigeration circuit is not damaged to prevent uncontrolled escape of the refrigerant it contains (data on type plate) and oil.
- Disable the appliance.
- Pull out the plug.
- Cut through the connecting cable.

WARNING
Danger of suffocation due to packing material and plastic film! Do not allow children to play with packing material. Take the packaging material to an official collecting point.
Range of appliance use
The appliance is suitable solely for cooling food in a domestic environment or similar. This includes use in, for example
- in staff kitchenettes, bed and breakfast establishments,
- by guests in country homes, hotels, motels and other forms of accommodation,
- in catering and similar services in the wholesale trade.
The appliance is not suitable for storing and cooling medicines, blood plasma, laboratory preparations or similar substances and products covered by the 2007/47/EC Medical Devices Directive. Misuse of the appliance can result in the stored products suffering harm or perishing. Furthermore, the appliance is not suitable for operation in potentially explosive atmospheres.
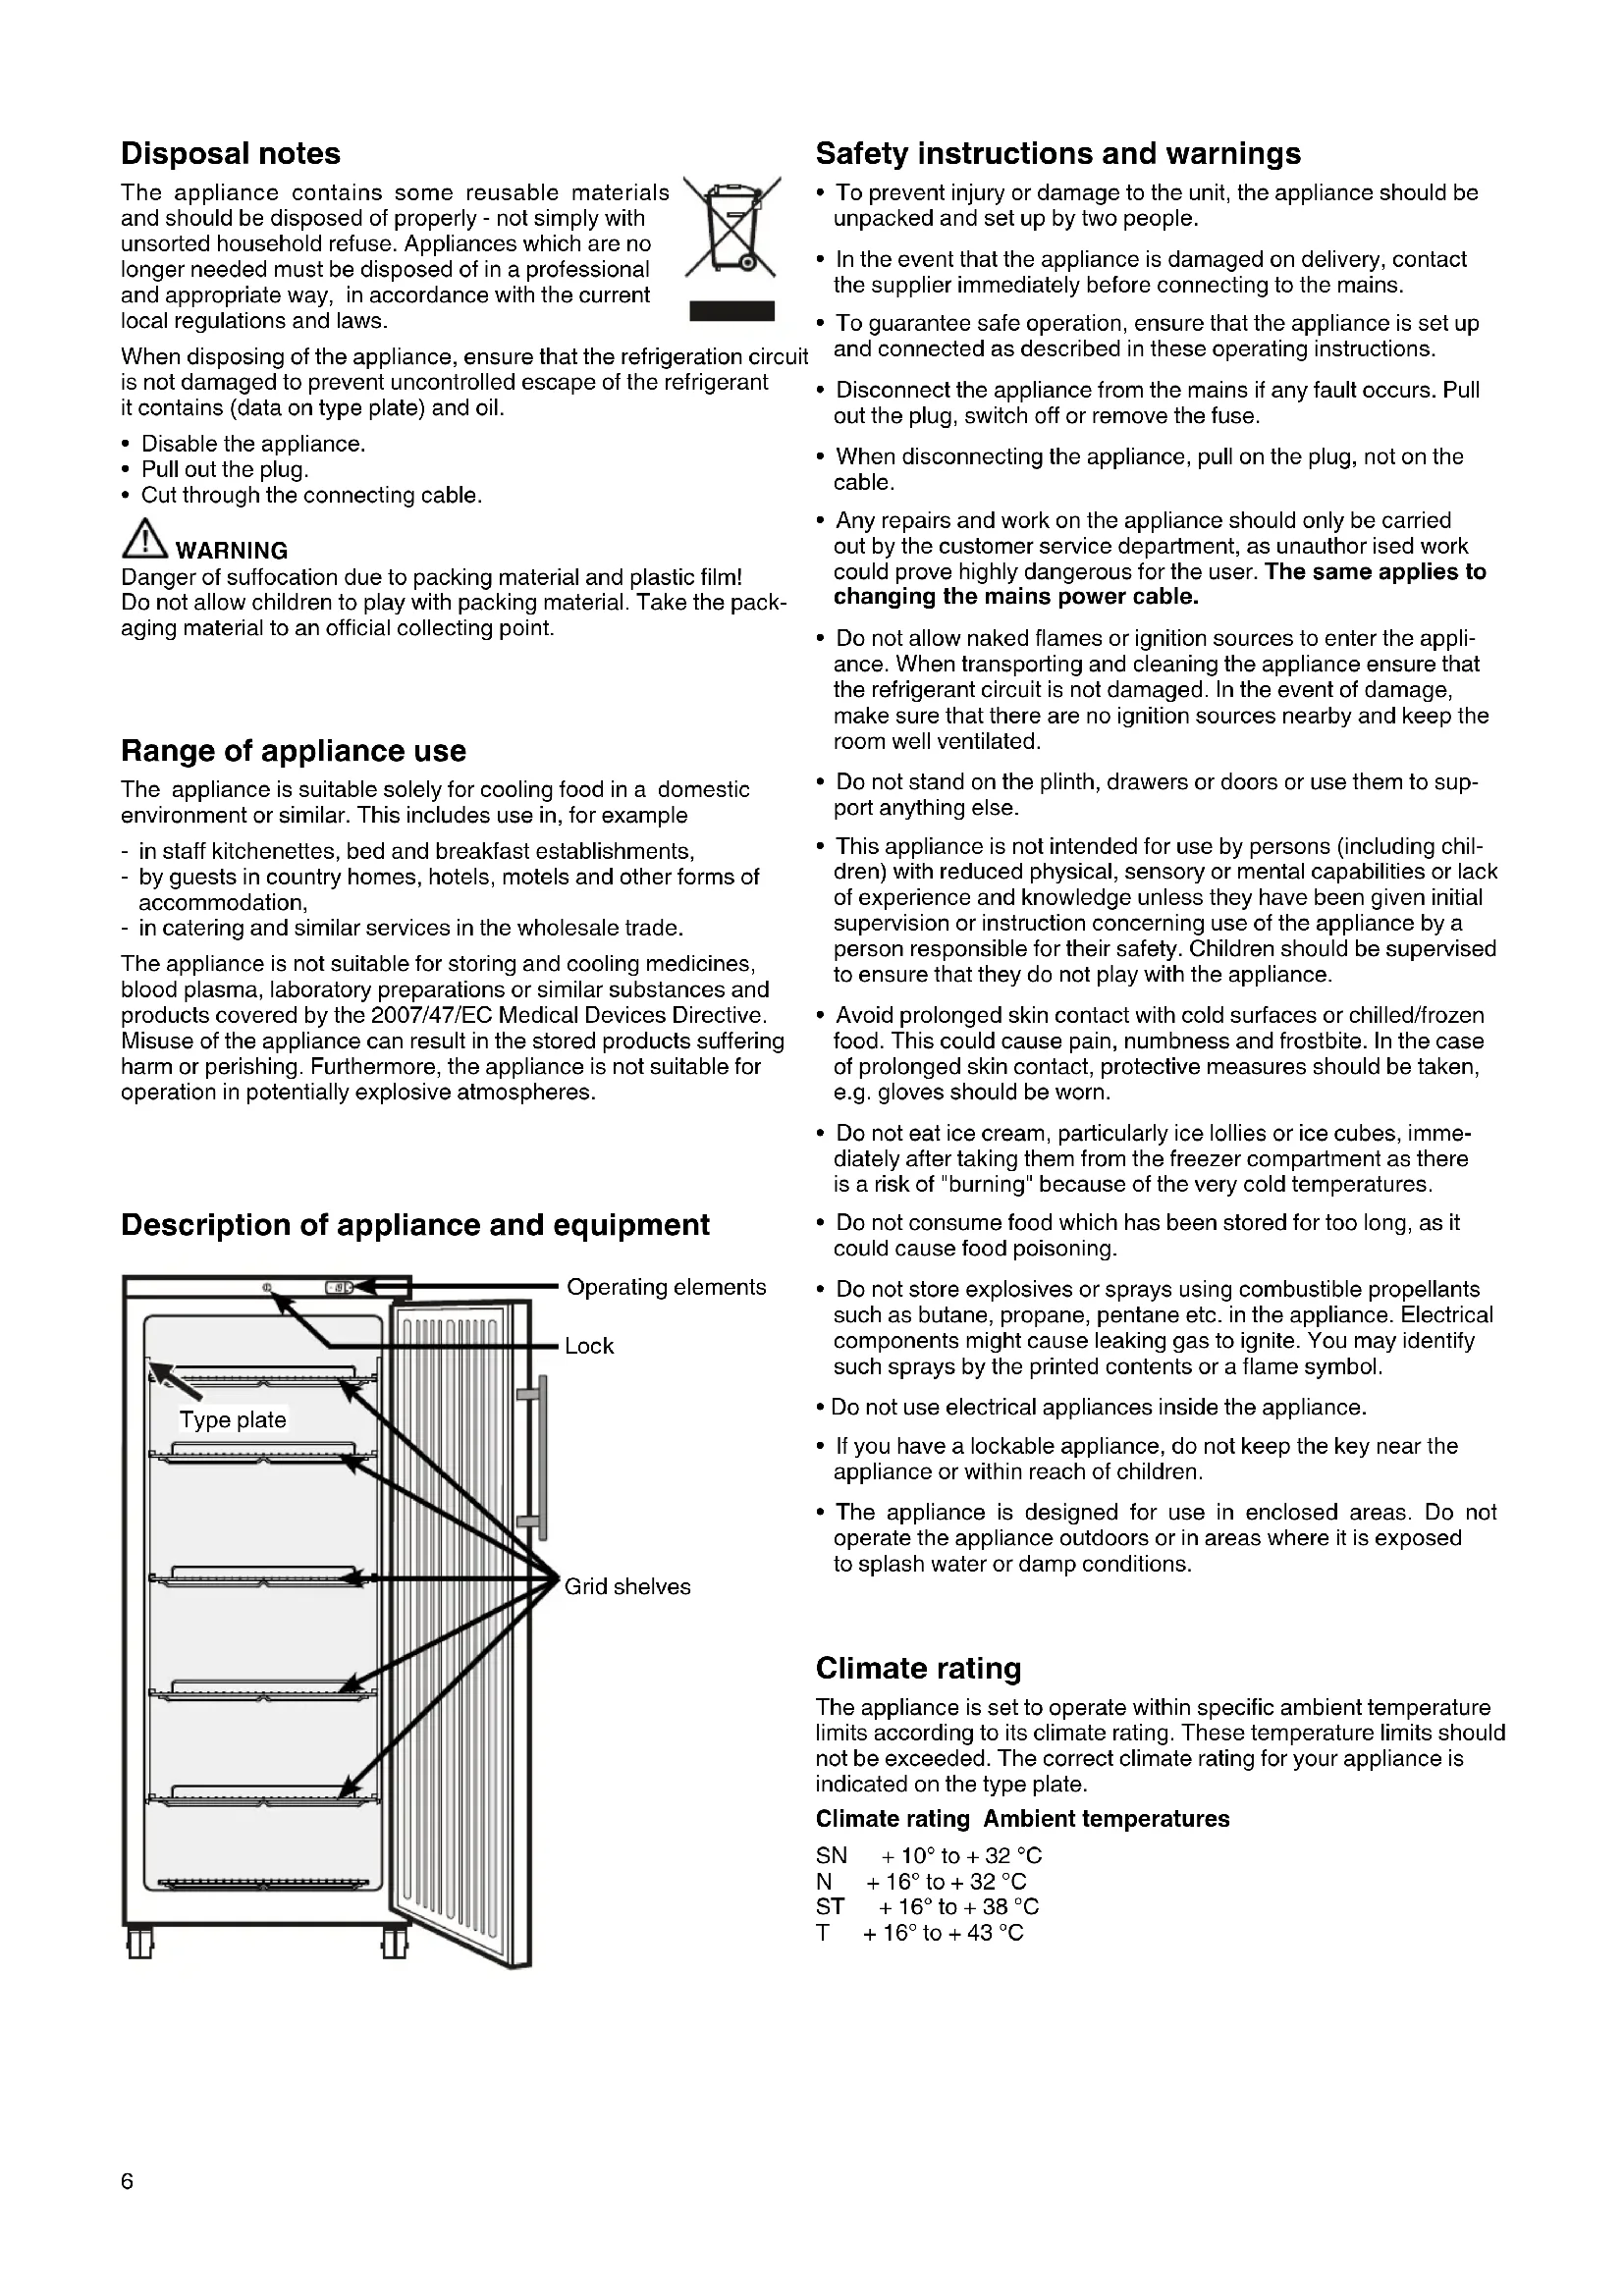
Description of appliance and equipment

text_image
Operating elements Lock Type plate Grid shelvesSafety instructions and warnings
- To prevent injury or damage to the unit, the appliance should be unpacked and set up by two people.
- In the event that the appliance is damaged on delivery, contact the supplier immediately before connecting to the mains.
- To guarantee safe operation, ensure that the appliance is set up and connected as described in these operating instructions.
- Disconnect the appliance from the mains if any fault occurs. Pull out the plug, switch off or remove the fuse.
- When disconnecting the appliance, pull on the plug, not on the cable.
- Any repairs and work on the appliance should only be carried out by the customer service department, as unauthor ised work could prove highly dangerous for the user. The same applies to changing the mains power cable.
- Do not allow naked flames or ignition sources to enter the appliance. When transporting and cleaning the appliance ensure that the refrigerant circuit is not damaged. In the event of damage, make sure that there are no ignition sources nearby and keep the room well ventilated.
- Do not stand on the plinth, drawers or doors or use them to support anything else.
- This appliance is not intended for use by persons (including children) with reduced physical, sensory or mental capabilities or lack of experience and knowledge unless they have been given initial supervision or instruction concerning use of the appliance by a person responsible for their safety. Children should be supervised to ensure that they do not play with the appliance.
- Avoid prolonged skin contact with cold surfaces or chilled/frozen food. This could cause pain, numbness and frostbite. In the case of prolonged skin contact, protective measures should be taken, e.g. gloves should be worn.
- Do not eat ice cream, particularly ice lollies or ice cubes, immediately after taking them from the freezer compartment as there is a risk of "burning" because of the very cold temperatures.
- Do not consume food which has been stored for too long, as it could cause food poisoning.
- Do not store explosives or sprays using combustible propellants such as butane, propane, pentane etc. in the appliance. Electrical components might cause leaking gas to ignite. You may identify such sprays by the printed contents or a flame symbol.
- Do not use electrical appliances inside the appliance.
- If you have a lockable appliance, do not keep the key near the appliance or within reach of children.
- The appliance is designed for use in enclosed areas. Do not operate the appliance outdoors or in areas where it is exposed to splash water or damp conditions.
Climate rating
The appliance is set to operate within specific ambient temperature limits according to its climate rating. These temperature limits should not be exceeded. The correct climate rating for your appliance is indicated on the type plate.
Climate rating Ambient temperatures
$$ \begin{array}{l} \mathrm{SN} + 1 0 ^ {\circ} \text { to } + 3 2 ^ {\circ} \mathrm{C} \ N + 1 6 ^ {\circ} \text { to } + 3 2 ^ {\circ} \text { C } \ \mathrm{ST} + 1 6 ^ {\circ} \text { to } + 3 8 ^ {\circ} \mathrm{C} \ T + 1 6 ^ {\circ} \text { to } + 4 3 ^ {\circ} \mathrm{C} \ \end{array} $$
Setting up
- Avoid positioning the appliance in direct sunlight or near cookers, radiators and similar sources of heat.
- The floor on which the appliance stands should be horizontal and level. Compensate for uneven floors with the adjustable feet. The appliance can be placed with its back flush to the wall.
- The ventilation grilles should not be obstructed. Always ensure that there is good ventilation and that the outward flowing air is able to escape.
- Do not place heat-emitting appliances, e.g. microwave oven, toaster, etc., on top of the freezer.
Dimensions

text_image
820 mm 736 mm 1515 mm 1972 mm 884 mmConnecting to the mains
Power supply (a.c.) and voltage at the operating point must comply with the details on the type plate. The socket must be fused with a 10 A fuse or higher, it must be away from the rear of the appliance and must be easily accessible.
Connect the appliance with a properly earthed fused plug and socket only.
- Do not connect the appliance to the supply with other equipment using an extension cable. This can cause the extension socket to overheat.

Storage
The appliance is suitable for storing ice cream and ready-frozen foods. The grid shelves can be moved to accommodate different height packages. Instead of the shelves, standard gastronomic trays can also be inserted in the support rails.
Depending on the height of the goods to be stored, you can adjust the position of the support rails in intervals of 27.5 mm.

natural_image
Simple line drawing of a diagonal beam supported by vertical supports, with no text or symbols present.First slide bars into the rear clip-in upright at the desired height and then hang in position at the front.
Operating and control elements

text_image
18 set
ON / OFF button

+ Temperature buttons

Set button (Enter)

Compressor is running

LED flashing - refrigeration unit switches on after a delay. The compressor will start automatically after the pressure in the refrigerant circuit has equalised.

Alarm function
Switching the appliance on and off
Connect the appliance to the mains - the appliance is switched on.
To switch the appliance off: Keep the ON/OFF button pressed for approx. 3 seconds - the display reads OFF.
To switch the appliance on: Keep the ON/OFF button pressed for approx. 5 seconds - the display reads ON.
Setting the temperature
- Press button 1 second. The temperature display flashes.
• To increase the temperature (warmer): press button - To reduce the temperature (colder): press button
- Press button set again.

The desired temperature setting is saved.
The temperature can be set at between -14^ and -26^ .
Alarm messages
LED lashes, which reads HI
The interior is too warm.
This can be caused by:
- the freezer door being left open for a long time, allowing warm ambient air to enter;
- a long power failure;
- a fault in the appliance.
In each case, make sure food has not defrosted or perished.
If EO, EE or EL appears in the display, the appliance has a fault. Consult the customer service department indicating the fault number displayed.
Safety lock
The lock is equipped with a safety mechanism.
Locking the appliance:
- Insert the key as shown by arrow 1.
- Turn the key 180^ .
To unlock the appliance, the same procedure must be repeated in the same order.

text_image
2 1Defrosting
After the appliance has been in operation for some time, a layer of frost or ice will form on the inside walls. This increases energy consumption.
- Switch the appliance off to defrost. Pull out the mains plug.
- Wrap the frozen food in paper or blankets and store in a cool place
- To speed up the defrosting process put a saucepan of hot water on the compartment floor.
- Leave the door of the appliance open while defrosting. After defrosting mop up the remaining water and clean the appliance.
Do not use any mechanical devices or other artificial aids for defrostic other than those recommended by the manufacturer.
Cleaning
Before cleaning always switch off the appliance. Pull out the mains plug or remove/unscrew the fuse.
Clean the inside, equipment parts and outer walls with lukewarm water and a little detergent. Do not use abrasive or acid cleaners or chemical solvents.
Do not use steam cleaners because of the risk of injury and damage.
- Ensure that no cleaning water penetrates into the electrical components.
• Dry all parts well with a cloth. - Do not damage or remove the type plate on the inside of the appliance. It is very important for servicing purposes.
Malfunctions
You may be able to rectify the following faults by checking the possible causes yourself:
- Appliance does not function: the control lamps are not lit.
– Is the appliance switched on?
– Is the plug correctly fitted in the mains socket?
– Is the socket fuse intact?
• The temperature is not low enough:
– Is the temperature setting correct (see "Setting the temperature")? - Does the separately installed thermometer show the correct reading?
- Is the ventilation system working properly?
- Is the appliance set up too close to a heat source?
If none of the above causes apply and you cannot rectify the fault yourself, contact the nearest customer service department stating the type of appliance ①, service number ② and appliance number ③ as indicated on the type plate.

text_image
Index Service-Nr.No. Service Name: China Name: China Ap-Top: Alt-Type AP-Type: Alt-Type Sub-Total: Gross Capacity Volume-Unit Cap/Weighted Unit Gefewer-Higher / Freeing Capacity Power of GWh Cap/ Capacitors Signal-Air. Number: Gain (K) / (G) / (K) / (SD) Net Quantity (K) / (K) / (C) / (M) / (W) Water Quality (L) / (L) / (C) / (A) / (B) / (C) Volume/Order (L) / (L) / (D) / (E) / (F) / (G) R 600m: 1 kg w x ac l v 1x2 Serial-Air.Shutting your appliance down
Your appliance is to be shut down for any length of time, switch it off and disconnect the plug or remove the fuse. Clean the appliance and leave the door open in order to prevent unpleasant smells.
The appliance complies with the relevant safety regulations and EC directives 2004/108/EC and 2006/95/EC.
All types and models are subject to continuous improvement and the manufacturer therefore reserves the right to make modifications to the shape, equipment and technology.
Changing over door hinges
- Remove screw from lower hinge bracket.

text_image
Diagram showing a mechanical or electrical component with labeled parts and directional arrows, including a numbered label '1' pointing to a component.- Transfer lower hinge bracket and cover plate to the opposite side.

text_image
6- Lift door, tilt to the right and remove.

text_image
d ↑2- Locate door on upper pin.

natural_image
Diagram of a structural component with arrows indicating upward motion, no text or symbols present- Turn lower hinge pin through 180° and remove.

text_image
180° 180° 3 4- Tilt door inwards from the left.

text_image
8 9- Insert pin on the opposite side and turn through 180°.

text_image
5- Secure hinge pin with screw.

text_image
10-
Transfer pin to the opposite side.
-
Transfer handle and plugs to the opposite side of the door.
natural_image
Simple line drawing of a diagonal beam supported by vertical supports (no text or symbols)Bedienings- en controleelementen

text_image
18 18 mufe setAan/Uit-toets
muts set-toets (Enter)
Compressor werkt