CDMIX1 - Cd player/recorder NUMARK - Free user manual and instructions
Find the device manual for free CDMIX1 NUMARK in PDF.
User questions about CDMIX1 NUMARK
0 question about this device. Answer the ones you know or ask your own.
Ask a new question about this device
Download the instructions for your Cd player/recorder in PDF format for free! Find your manual CDMIX1 - NUMARK and take your electronic device back in hand. On this page are published all the documents necessary for the use of your device. CDMIX1 by NUMARK.
USER MANUAL CDMIX1 NUMARK
Professional CD Mixing Console
QUICKSTART GUIDE
ENGLISH (3-7)
GUÍA DE INICIO RÁPIDO
ESPAÑOL (8 - 12)
GUIDE D'UTILISATION RAPIDE
FRANÇAIS (13 - 17)
GUIDA RAPIDA
ITALIANO (18 - 22)
KURZANLEITUNG
DEUTSCH (23–27)
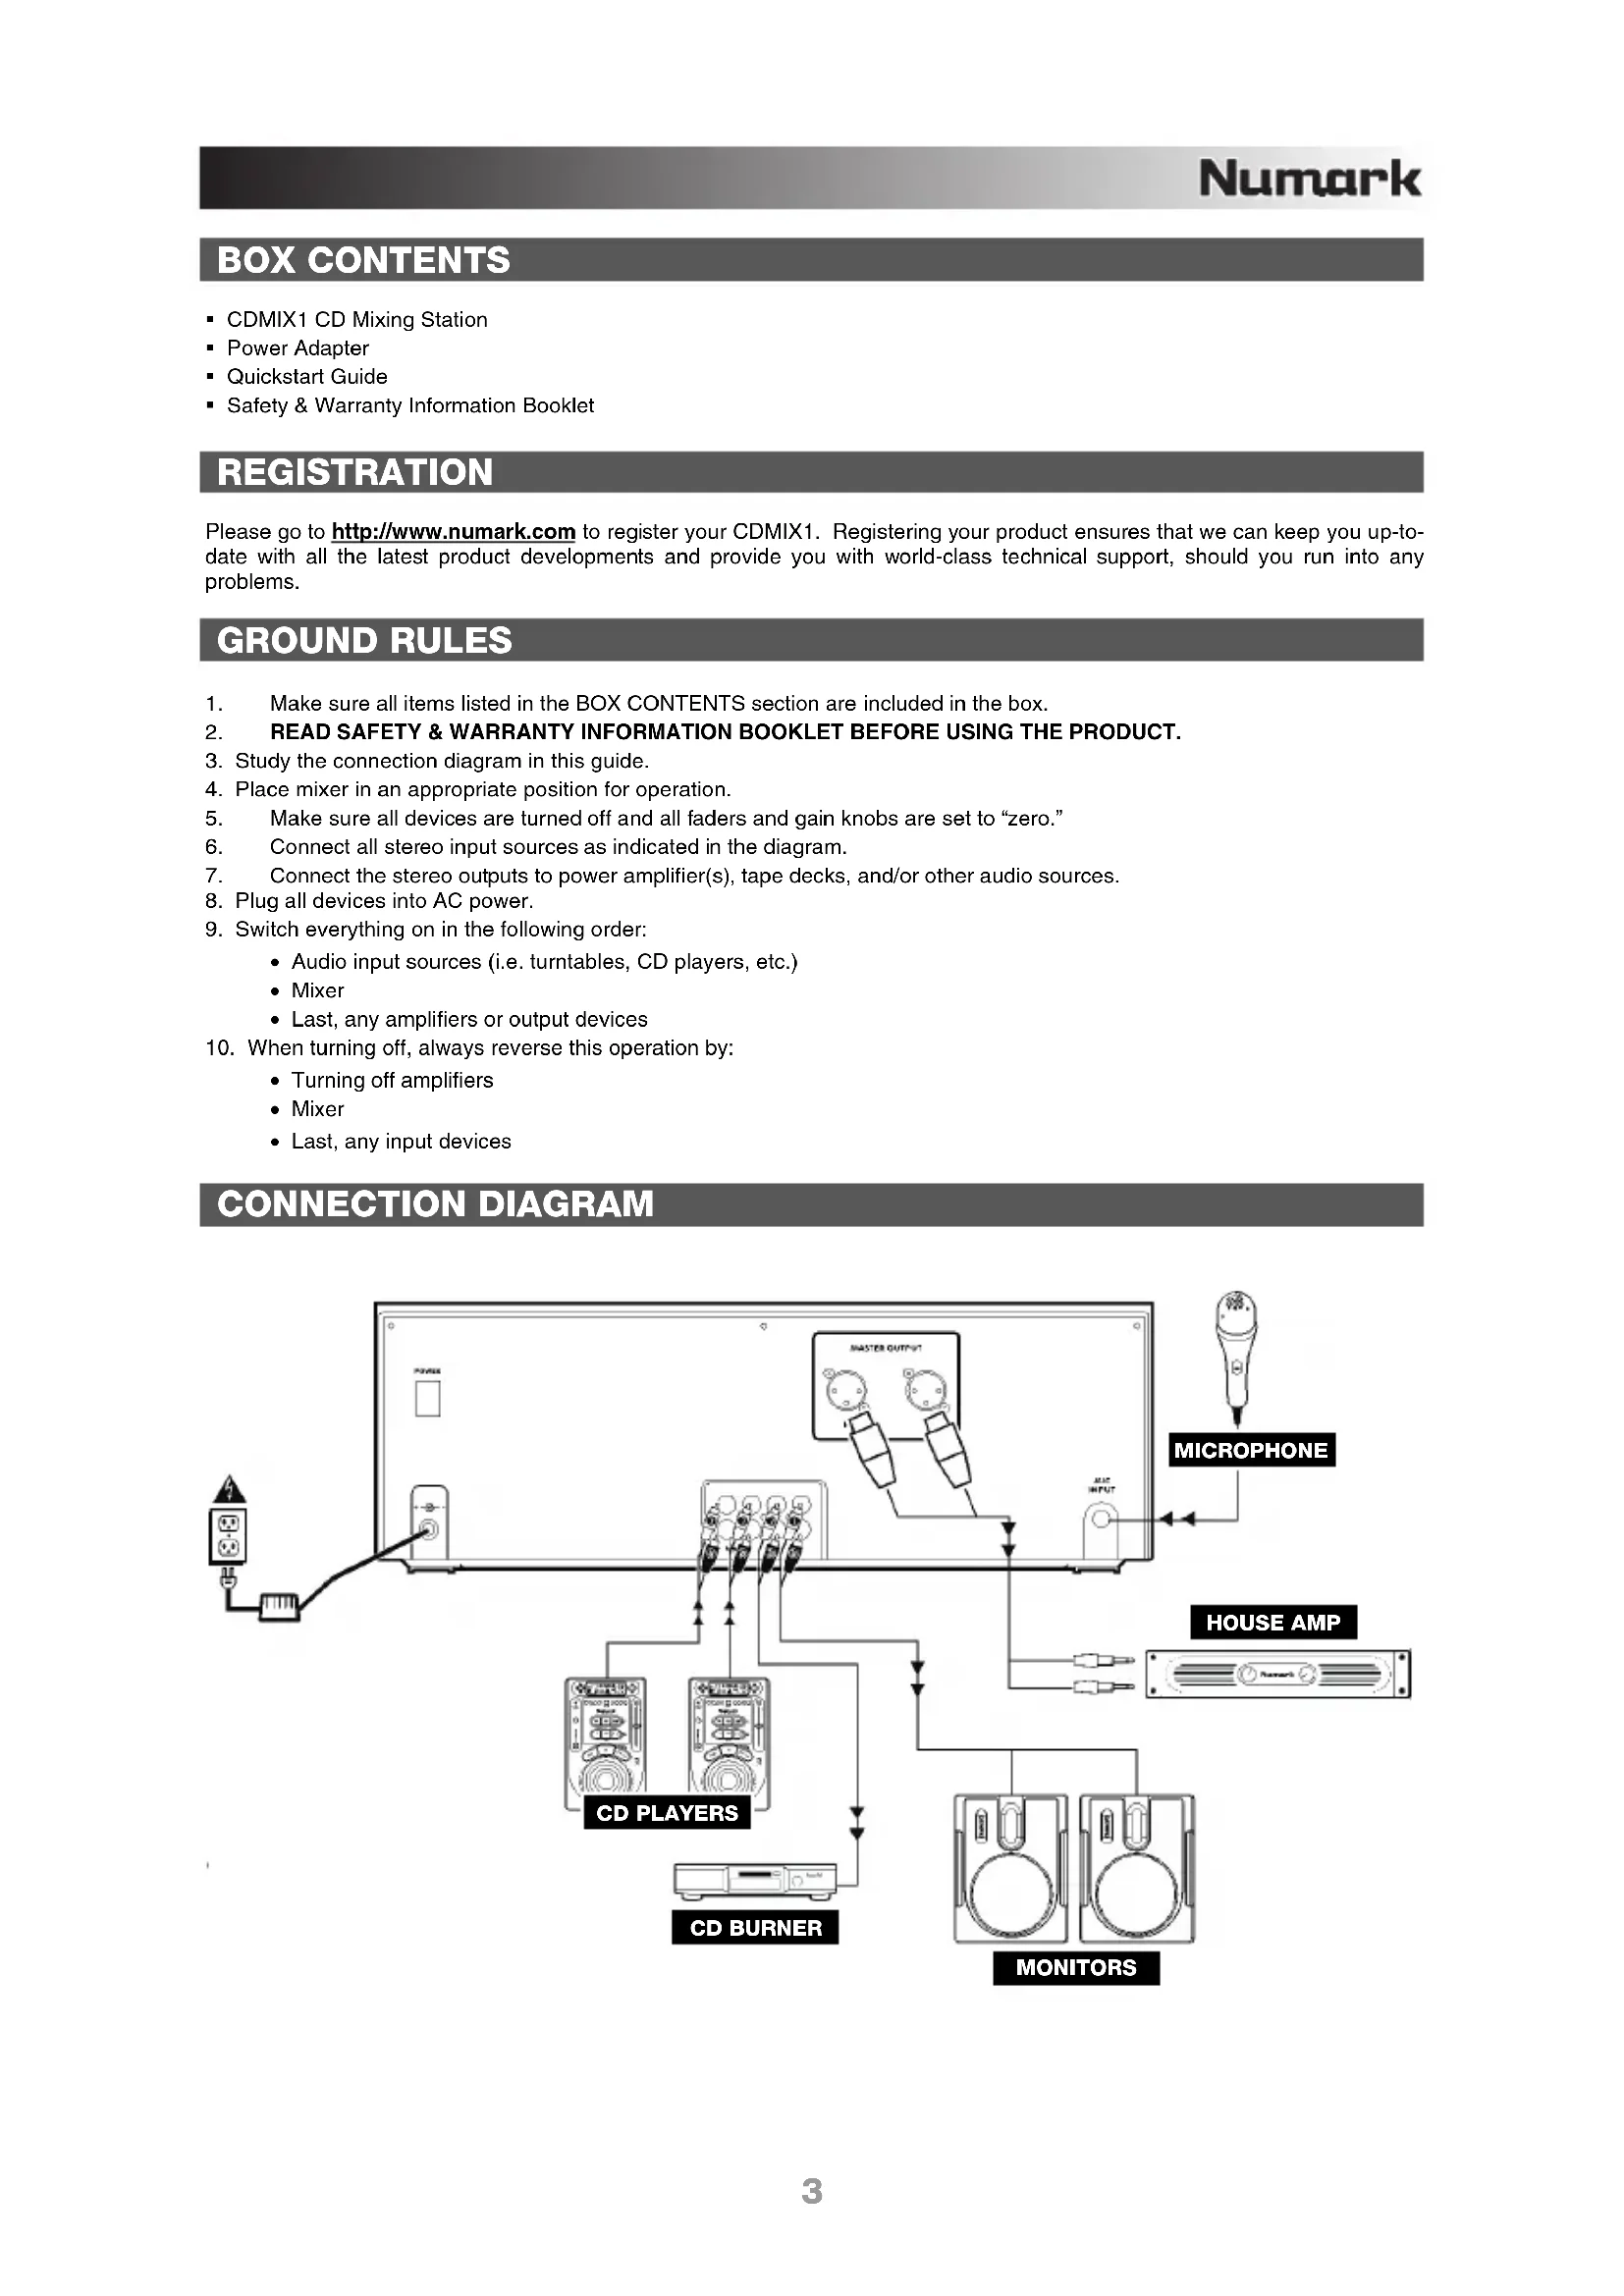
BOX CONTENTS
- CDMIX1 CD Mixing Station
■ Power Adapter
■ Quickstart Guide
■ Safety & Warranty Information Booklet
REGISTRATION
Please go to http://www.numark.com to register your CDMIX1. Registering your product ensures that we can keep you up-to-date with all the latest product developments and provide you with world-class technical support, should you run into any problems.
GROUND RULES
- Make sure all items listed in the BOX CONTENTS section are included in the box.
- READ SAFETY & WARRANTY INFORMATION BOOKLET BEFORE USING THE PRODUCT.
- Study the connection diagram in this guide.
- Place mixer in an appropriate position for operation.
- Make sure all devices are turned off and all faders and gain knobs are set to "zero."
- Connect all stereo input sources as indicated in the diagram.
- Connect the stereo outputs to power amplifier(s), tape decks, and/or other audio sources.
- Plug all devices into AC power.
- Switch everything on in the following order:
• Audio input sources (i.e. turntables, CD players, etc.)
- Mixer
- Last, any amplifiers or output devices
-
When turning off, always reverse this operation by:
-
Turning off amplifiers
- Mixer
- Last, any input devices
CONNECTION DIAGRAM
flowchart
graph TD
    A["Power"] --> B["Switch"]
    B --> C["CD PLAYERS"]
    C --> D["CD BURNER"]
    D --> E["MONITORS"]
    E --> F["MONITOR"]
    F --> G["HOUSE AMP"]
    G --> H["MICROPHONE"]
    H --> I["Master OUTPUT"]
    I --> J["Radio Head"]
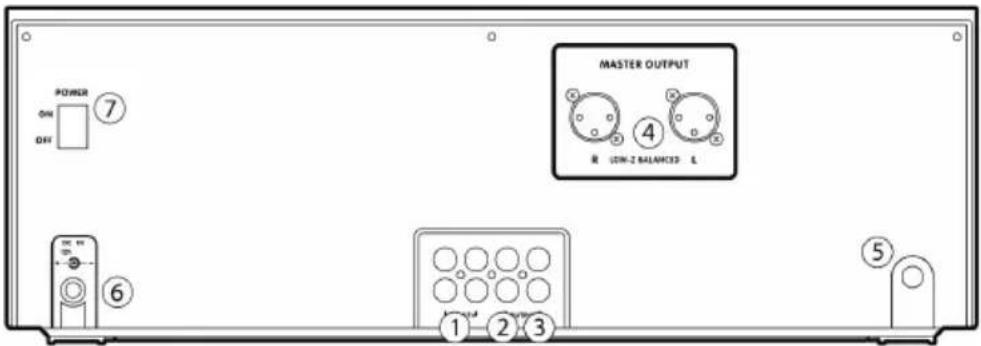
REAR PANEL FEATURES
text_image
POWER ON OFF MASTER OUTPUT 4 ON-2 BALANCED 5 1 2 3- LINE INPUTS (RCA) – Connect line-level devices, such as CD players, samplers or audio interfaces, to these inputs.
- RECORD OUTPUT (RCA) – Use standard RCA cables to connect this output to a recording device, such as a CD recorder or tape deck. The level of this output is based upon pre-master levels.
- MASTER OUTPUT (RCA) – Use standard RCA cables to connect this output to a speaker or amplifier system. The level of this output is controlled by the MASTER FADER on the top panel.
- MASTER OUTPUT (BALANCED) – Use XLR cables to connect this Master output to a speaker or amplifier system. The level of this output is controlled by the MASTER FADER on the top panel.
- MIC INPUT – Connect a 1/4" microphone to this input.
- POWER IN - Use the included power adapter to connect the mixer to a power outlet. While the power is switched off, plug the power adapter into the mixer first, then plug the power adapter into a power outlet.
- POWER SWITCH – Turns the mixer on and off. Turn on the mixer after all input devices have been connected and before you turn on amplifiers. Turn off amplifiers before you turn off the mixer.
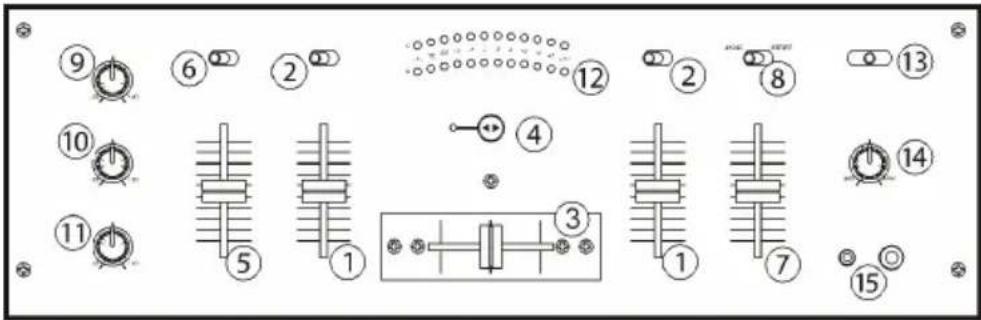
MIXER FEATURES
text_image
Technical diagram with numbered components and circular annotations, likely representing a mechanical or electrical component layout.- CHANNEL FADER – Adjusts the audio level on the corresponding channel.
- INPUT SELECTOR – Selects the input source to be routed to the corresponding channel. Input jacks are located on the rear panel.
- CROSSFADER – Blends audio playing between Channels 1 and 2. Sliding this to the left plays Channel 1 and sliding to the right plays Channel 2.
Note: The crossfader is user-replaceable if it should ever wear out. Simply remove the facepanel, then remove the screws holding it in position. Replace the fader with a quality authorized replacement from your local Numark retailer only. - FADER START – Enables or disables "fader start." When fader start is enabled, moving the crossfader toward a side will cause that channel to start playing.
- MIC GAIN – Adjusts the audio level of the microphone signal.
- MIC ON/OFF – Turns the microphone input on or off.
- MASTER FADER – This control adjusts the output volume of the Program mix.
- STEREO / MONO – Adjusts the Program mix for stereo or mono operation.
- CHANNEL TREBLE – Adjusts the high (treble) frequencies of the audio of the Program mix.
- CHANNEL MID – Adjusts the mid-range frequencies of the audio of the Program mix.
- CHANNEL BASS – Adjusts the low (bass) frequencies of the audio of the Program mix.
- STEREO LEVEL INDICATOR – Monitors the audio level of the Program mix.
- CUE MODE SELECTOR – Selects the audio that is sent to the headphones. Switch it to "1+2" to hear Channels 1 and 2 in the Cue channel.
- CUE GAIN – Adjusts the audio level of the Cue channel.
- HEADPHONES – Connect your 1/4" or 1/8" headphones to this output for cueing and mix monitoring.
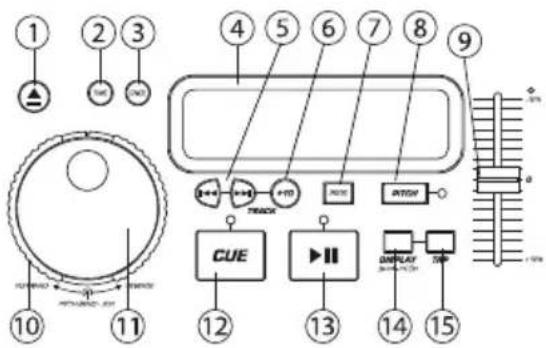
CD PLAYER FEATURES
- OPEN/CLOSE (Disc Tray Open/Close) – Press to load or eject the disc. Each press will open or close the disc tray on the transport.
NOTE: Tray will not open unless the disc has been paused. Tray will automatically close after 30 seconds.
-
TIME (Time Button) - Switches the time display between elapsed playing time and remaining time on the track and remaining time on the entire CD.
-
CONT/SING – Will cause just a single track to play or all tracks in order by pressing once or twice.
-
LCD DISPLAY - Indicates all the functions, as they are occurring, with the CD. These functions are explained in the next section.
-
TRACK (Track Buttons) – Used to select the track to be played.
-
Track 10 Button – This button is for quickly advancing to higher tracks on a CD.
-
PROGRAM - Depress this button and the unit will stop and the program indicator will light. Select each track to be programmed and press the PROGRAM button between selections. You can program up to 20 tracks. Press PLAY to start the program. To exit and erase program, either hold the program button down for more than 2 seconds while the unit is stopped, open the disc tray, or turn off the power.
-
PITCH (Pitch Button) – Activates the Pitch Slider.
-
PITCH SLIDER – The pitch can be changed up to +/-12% by pressing the PITCH button so the PITCH LED is lit, then moving the sliding fader. The pitch will not be changed if the PITCH LED is off.
-
SEARCH WHEEL (OUTER RING) - 3 forward and 3 reverse speed positions for searching through songs. The more you turn the wheel in either direction the faster you search through the music.
-
PITCH BEND/JOG WHEEL (INNER RING) – The jog wheel serves 2 functions depending on the current mode.
a) The jog wheel will control a slow frame search when the CD is not playing. To set a new frame cue point, spin the wheel then press play when you have determined the proper position. Press CUE to return to the "CUE POINT".
b) When both CD players are playing a CD, the pitch bend function allows the positioning of the bass beats to be matched after the pitch of each disc is matched. Either player can "catch up" or "fall back" to match the other player. The jog wheel will temporarily bend the pitch of the music if the song is already playing by rotating the wheel clockwise to speed up or counterclockwise to slow down. By changing the pitch of one disc with respect to the pitch of the other disc, the beats can be matched.
-
CUE - Pressing the CUE button during play provides a return to the position at which play was started. If PAUSE is used before CUE, that will become the cue point. Alternately pressing the PLAY button and the CUE button allows the CD to be played from the same position any number of times. The CUE LED will light up from the time the CUE button is pressed until the CD has been reset to the position at which play was started. Steady lighting of this LED indicates the ready condition.
-
START/PAUSE (Play/Pause Button) - Each press of the Play/Pause Button causes the operation to change from play to pause or from pause to play.
-
BPM/PITCH BUTTON - Switches the mode of the display between showing the BPM and the percentage change in pitch.
-
TAP BUTTON - Tap this button with the beat of the music to determine the current Beats Per Minute (BPM).
text_image
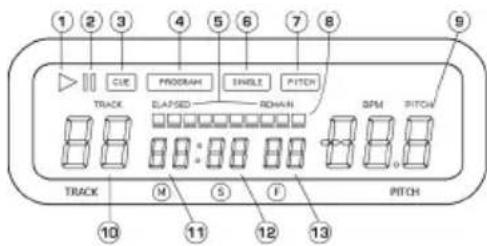
Diagram of a smart home control panel with labeled components and indicatorsLCD FEATURES
-
PLAY: Active while the unit is actually playing a CD.
-
PAUSE: Active when the unit is paused.
-
CUE: Flashing when the unit is setting a cue point. Lit continuously when the unit is paused at a cue point.
-
PROGRAM: Used for pre-programming the track order to automatically be played by the unit. This is a great function if you need to leave the CD player alone.
-
TIME MODE: (Elapsed) is for showing time as it is taking place. (Remain) shows how much time is left on a particular track. This function is controlled by the TIME BUTTON.
-
SINGLE: Shows when the unit is set to play just one track at a time. When this is not lit, the CD will play continuously through all tracks. This function is controlled by the SING/CONT BUTTON.
-
PITCH: Is lit when the PITCH BUTTON is active.
-
TIME BAR: Shows either time remaining or elapsed depending on the setting of the TIME BUTTON.
-
PITCH/BPM: Shows the percentage change in pitch or current BPM.
-
TRACK: Shows the current track that the unit is playing.
-
MINUTES: Shows the minutes elapsed or remaining depending on mode setting.
-
SECONDS: Shows the seconds elapsed or remaining depending on mode setting.
-
FRAMES: The CD Player breaks down a second into 75 frames for accurate cueing. This shows the frames elapsed or remaining depending on mode setting.
text_image
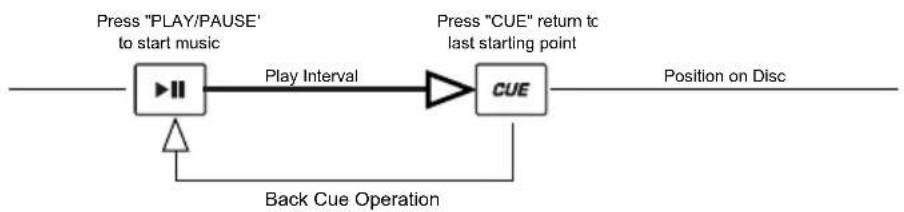
1 2 3 4 5 6 7 8 9 CLE PROGM SINGLE PITCH TRACK ELAPSED ROMAN SPM PITCH TRACK M S F PITCH 10 11 12 13PLAY, PAUSE & CUE OPERATIONS
PLAY & CUE
Pressing the "PLAY/PAUSE" button starts the disc. Pressing the "CUE" button will reset the disc to the last place where the disc was started. This is called the cue point. By alternately pressing the "PLAY/PAUSE" button and the "CUE" button, the disc may be returned and played from the cue point any number of times. This function is called back cue.
flowchart
graph LR
    A["Press "PLAY/PAUSE" to start music"] --> B["Play Interval"]
    B --> C["CUE"]
    C --> D["Position on Disc"]
    E["Back Cue Operation"] --> A
    F["Press "CUE" return tc last starting point"] --> C
PLAY, PAUSE & CUE
When play has been paused and then started again, the return position for the back cue will be updated to this new position.

flowchart
graph LR
    A["▶II"] --> B["Play Interval Play Intervals"]
    B --> C["▶II"]
    C --> D["▶II"]
    D --> E["CUE"]
    E --> F["Position on Disc"]
    G["Press 'PLAY/PAUSE' to start music"] --> A
    H["Press 'PLAY/PAUSE' to pause music"] --> B
    I["Press 'PLAY/PAUSE' to start music"] --> D
    J["Press 'CUE' return to last starting point"] --> E
    K["Back Cue Operation"] --> D
EDITING CUE POINT
When the inner dial is turned while a cue point is set, a new cue point can be located. The CD player will repeatedly play small parts of the CD as you move it to the desired position. By pressing "PLAY/PAUSE" then "CUE" you can confirm that the new cue point is desirable.
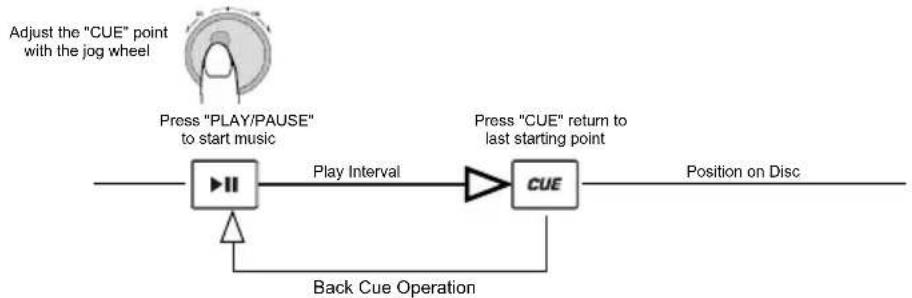
flowchart
graph LR
    A["Adjust the "CUE" point with the jog wheel"] --> B["Press "PLAY/PAUSE" to start music"]
    B --> C["Play Interval"]
    C --> D["Press "CUE" return to last starting point"]
    D --> E["CUE"]
    E --> F["Position on Disc"]
    G["Back Cue Operation"] --> H["Play Interval"]
    H --> I["Press "CUE" point with the jog wheel"]
MATCHING BPMs
Match the tempo by monitoring the music of both PLAYER 1 and PLAYER 2 by ear and adjusting the pitch. When the tempo of the music of the selected CD player is slow compared to the tempo of the other player, move the slider to the (+) side and match the tempo. When faster, move the pitch slider to the (-) side. The following illustration shows the case of matching the pitch of PLAYER 2 to the pitch of the music being played on PLAYER 1.
- Press PLAY/PAUSE to start PLAYER 1. PLAYER 1 is playing.
- Press PLAY/PAUSE to start PLAYER 2. Both CD players are playing discs.
- Listen to PLAYER 2 in your headphones. If the beat of channel 2 (in the headphones) is faster than channel 1, slow down the beat of channel 2 using the pitch control.
- If the beat of channel 2 (in the headphones) slower than the beat of channel 1, speed up the beat using the pitch control.
USING THE BPM DISPLAY FEATURE
Press the BPM button to select the BPM feature on the display on the side of the CD player that you wish to set. Tap the Counter button to the beat of the music.

natural_image
Two abstract diagrams showing downward and upward arrows with internal vertical bars, no text or symbols present.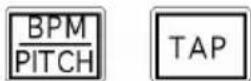
You will see the BPM number appear in the display. The more times you tap the more accurate your number will be. When you adjust the pitch slider the display number will change by an equal percentage.
BEAT MATCHING USING PITCH BEND
If you find the BPM's (Beats Per Minute or Tempos) are the same, however, the drum beats are not matched you will need to temporarily change the pitch. The illustration below shows how to match the beat of PLAYER 2 to the beat of the music being played on PLAYER 1. (This procedure can be done on either PLAYER).
After matching the BPM's adjust the pitch temporarily as follows:
When PLAYER 2 is ahead, rotate the jog wheel counter clockwise. When PLAYER 2 is behind, rotate the jog wheel clockwise.


The pitch changes automatically while the jog wheel is rotated. The faster you rotate the wheel the more you change. Releasing the wheel results in a return to the original pitch (so the BPM's are once again the same).
EXAMPLE OF MIXING USING BOTH PLAYERS OF YOUR CD PLAYER
While playing a disc on PLAYER 1, load a disc into PLAYER 2 and select your next track, match its pitch to the track playing on PLAYER1 and when you are ready use the crossfader on your mixer to fade from PLAYER 1 to PLAYER 2.
| Load a disc in PLAYER 1 and select the track and press PLAY. | PLAYER 1 Load a disc and press the OP EN/CLOSE button. Load a disc and press the OP EN/CLOSE button. | PLAYER1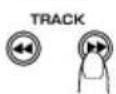 Select the track to be played. Select the track to be played. | PLAYER 1 Press the PLAY button Press the PLAY button |
| Load a disc in PLAYER 2 and select the track then play. | PLAYER 2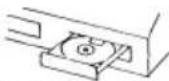 Load a disc and press the OP EN/CLOSE button. Load a disc and press the OP EN/CLOSE button. | PLAYER2 Select the track to be played. Select the track to be played. | PLAYER 2 Press the PLAY button Press the PLAY button |
| Set and edit a start cue point on PLAYER 2 | PLAYER 2 Press the Pause button of PLAYER 2. Press the Pause button of PLAYER 2. | PLAYER2 Rapidly search for a cue point using the outer wheel Rapidly search for a cue point using the outer wheel | PLAYER 2 Slowly set the right cue point using the inner wheel Slowly set the right cue point using the inner wheel |
| Check your new cue point | PLAYER 2 Listen with the monitor and press the play button. Listen with the monitor and press the play button. | PLAYER 2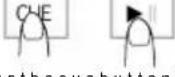 Press the cue button then press of the set cue point. Press the cue button then press of the set cue point. | PLAYER 2 Reset the player to me Cue point by pressing Cue Reset the player to me Cue point by pressing Cue |
| Do a MIX! | PLAYER 2 With a matching downbeat from Player 1 press the play button. With a matching downbeat from Player 1 press the play button. | PLAYER2 If you are beat mixing, turn on your Pitch a djus t and follow the directions for beat matching. If you are beat mixing, turn on your Pitch a djus t and follow the directions for beat matching. | MIXER When you are happy with your mix move the cross s fa de r a ccordingly. When you are happy with your mix move the cross s fa de r a ccordingly. |
CONTENIDO DE LA CAJA
text_image
Diagram of a mechanical or electrical component layout with numbered parts and clock indicatorsnatural_image
Two abstract diagrams showing downward and upward arrows with internal vertical bars (no text or symbols)text_image
Diagram of a mechanical or electrical component layout with numbered parts and circular symbols indicating components.text_image
Diagram of a smart home control panel with labeled components and indicator lights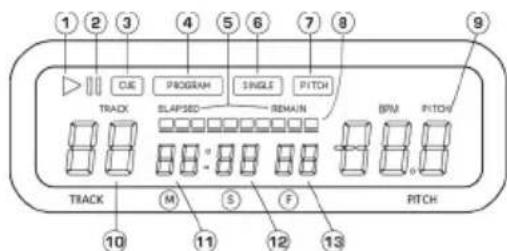
text_image
1 2 3 4 5 6 7 8 9 CIE PROGRAM SINGLE PITCH TRACK SLAPSED REMAIN BPM PITCH TRACK M S F RITCH 10 11 12 13FONCTIONS DE LECTURE/PAUSE ET DE PRÉ-ÉCOUTE
LECTURE ET PRÉ-ÉCOUTE
natural_image
Two abstract diagrams showing downward and upward arrows with internal vertical bars, no text or symbols present.UTILISATION DE LA FONCTION D'AFFICHAGE DU BPM
text_image
Technical diagram with numbered components and labeled parts, including alarm clock, timer, and electrical circuit elements.text_image
Diagram of a smart air conditioner system with numbered components and labeled buttons like CUE, LED, and meters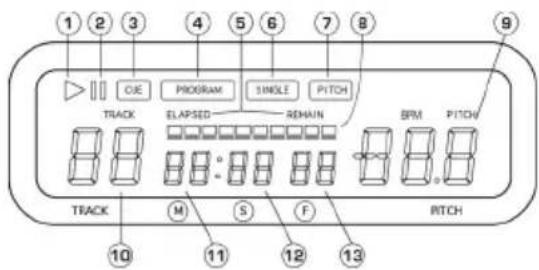
text_image
1 2 3 4 5 6 7 8 ▶ CJE PROGRAM SINGLE PITCH TRACK ELAPSED REMAIN BPM PITCH TRACK M S F RITCH 10 11 12 13OPERAZIONI PLAY / PAUSE E CUE
PLAY E CUE
natural_image
Two abstract diagrams showing downward and upward arrows with internal vertical bars, no text or symbols present.USO DEL DISPLAY BPM
text_image
Diagram of a mechanical or electrical component with numbered parts and circular symbols indicating components like clocks, springs, and indicators.text_image
Diagram of a smart air conditioner system with numbered components and labeled indicators