
Bar 8 - Coffee machine DELONGHI - Free user manual and instructions
Find the device manual for free Bar 8 DELONGHI in PDF.

| Product type | Steam boiler coffee maker |
| Brand | DeLonghi |
| Model | Bar 8 |
| Power supply | 120 V, 60 Hz (alternating current) |
| Main functions | Coffee preparation (light, medium, strong) and cappuccino |
| Water capacity | Graduated carafe: lines for 2 and 4 coffees, 2 cappuccinos |
| Milk capacity | Removable milk tank with max level |
| Recommended coffee type | Medium grind (MOKA type) |
| Cleaning | Regular cleaning of parts; descaling every 6 months with vinegar |
| Safety | Polarized plug, short cord, pressure safety boiler cap |
| Replacement parts | Carafe, filter holder cup, filter, milk tank, frother |
| Warranty | 1 year, free factory repair (Canada and United States) |
Frequently Asked Questions - Bar 8 DELONGHI
User questions about Bar 8 DELONGHI
0 question about this device. Answer the ones you know or ask your own.
Ask a new question about this device
Download the instructions for your Coffee machine in PDF format for free! Find your manual Bar 8 - DELONGHI and take your electronic device back in hand. On this page are published all the documents necessary for the use of your device. Bar 8 by DELONGHI.
USER MANUAL Bar 8 DELONGHI
COFFEE MACHINE MACHINE A CAFE CAFETERA ELECTRICALAQUINAS DE CAFÉ

Owner's instructions
Mode d'emploi
READ AND SAVE THESE INSTRUCTIONS
LISEZ ET GARDEZ CES INSTRUCTIONS
REPASE Y GUARDE ESTAS INSTRUCCIONES
GUARDE ESTAS INSTRUÇÉS


IMPORTANT SAFEGUARDS
When using electrical appliances, basic safety precautions should always be followed, including the following:
- Read all instructions.
- Do not touch hot surfaces. Use handles and knobs.
- To protect against fire, electrical shock and personal injury, do not immerse cord, plug or appliance in water or other liquid.
- Close supervision is necessary when any appliance is used by or near children.
- Unplug from the outlet when not in use and before cleaning. Allow to cool before fitting or taking off parts, and before cleaning the appliance.
- Do not operate with a damaged cord or plug, or after the appliance malfunctions, or has been damaged in any manner. Return the appliance to the nearest authorized service facility for examination, repair or adjustment.
- The use of accessory attachments or spare parts not recommended by the appliance manufacturer may result in fire, electrical shock or personal injury.
- Do not use outdoors.
- Do not let the cord hang over the edge of the table or counter, or touch hot surfaces.
- Do not place on or near a hot gas or electrical burner, or in a heated oven.
- To disconnect the appliance, turn any control to "off", then remove plug from wall outlet.
- Do not use the appliance for other than the intended use.
- This appliance is for household use only.
SAVE THESE INSTRUCTIONS
SHORT CORD INSTRUCTIONS
A short power cord is provided to reduce risks resulting from becoming entangled in or tripping over a longer cord.
- Longer, detachable power supply cords or extension cords are available and may be used if care is exercised in their use.
- If an extension cord is used, the marked electrical rating should be at least as great as the electrical rating of the appliance. The longer cord should be arranged so that it will not drape over the counter-top or table top where it can be pulled on by children or tripped over.
- Your product is equipped with a polarized alternating current line plug (a plug having one blade wider than the other). This plug will fit into the power outlet only one way. This is a safety feature. If you are unable to insert the plug fully into the outlet, try reversing the plug. If the plug should still fail to fit, contact your electrician to replace your obsolete outlet. Do not defeat the safety purpose of the polarized plug.
ONLY FOR UNITED STATES
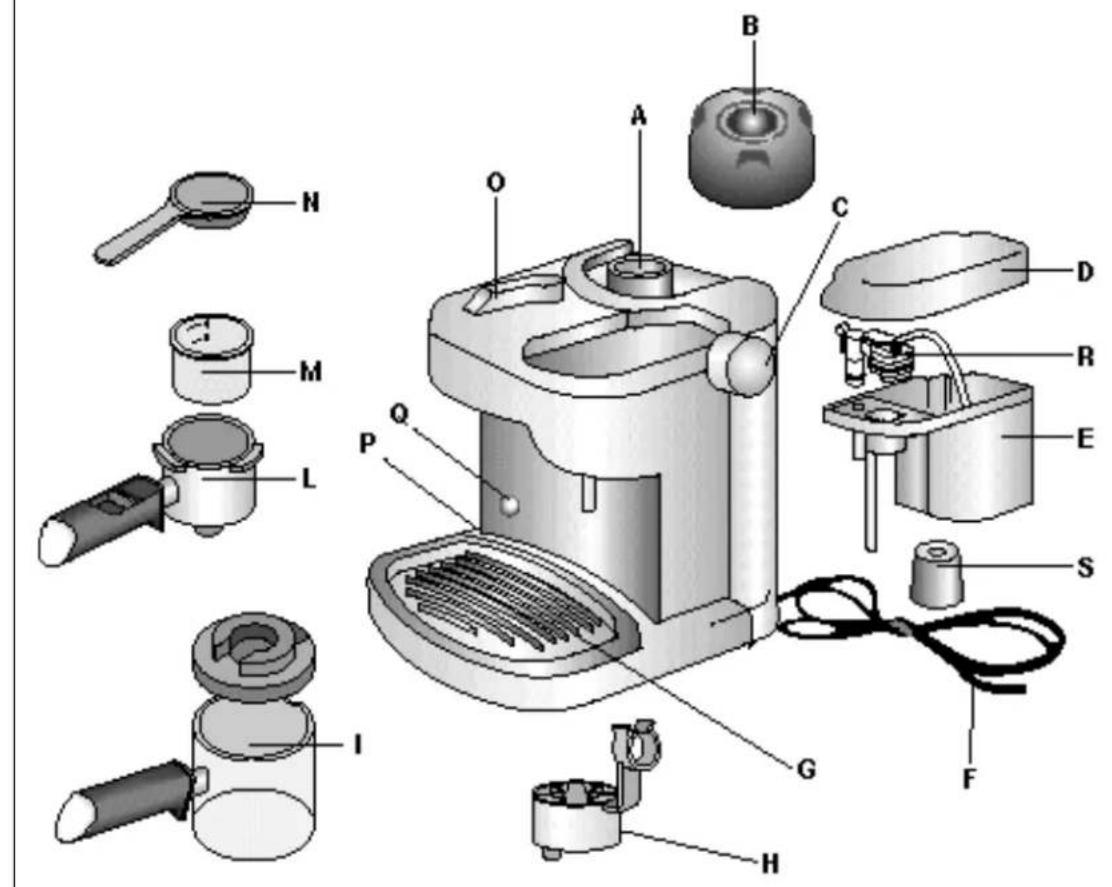
APPLIANCE DESCRIPTION
(See drawing on page 3)
The following terminology and letters of reference will be used continuously in the following pages:
A. Boiler
B. Cap
C. Steam knob
D. Milk tank lid
E. Milk tank
F. Supply cable
G. Drip tank
H. Cup adaptor
I. Carafe with lid
L. Filter holder
M. Filter
N. Measuring spoon
O. Selector for STRONG, MEDIUM or LIGHT coffee and CAPPUCCINO
P. Switch light
Q. "OK steam ready" pilot light
R. Emulsifier
S. Antisplash hood.
PREPARING THE COFFEE
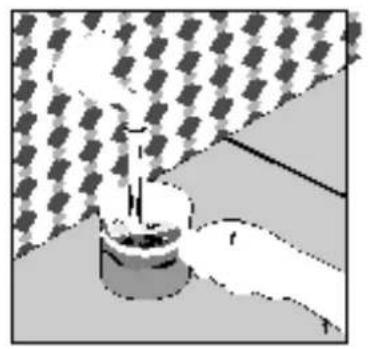
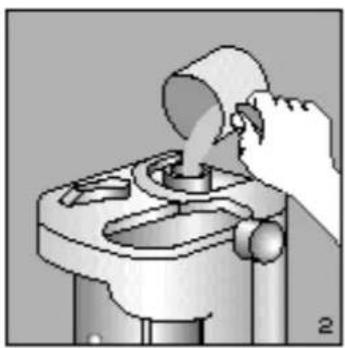
- Unscrew the boiler cap (B), turning it in an anticlockwise direction.
- Using the carafe (I) supplied (fig. 1), pour the water in the boiler (fig. 2) respecting the quantities shown in the table at the end of the text. Do not exceed the quantities shown or the appliance will cease to work properly. The filling of the boiler must be carried out with the switch light (P) off.
- Close the boiler cap carefully by turning it in a clockwise direction.
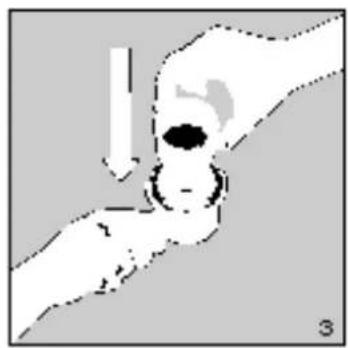
- Insert the filter in the filter holder (fig. 3).
- Using the measuring spoon (N), pour the coffee into the filter, respecting the amounts shown in the table at the end of the text, and spread it evenly (fig. 4). Use medium-ground coffee because coffee which is too finely-ground can cause the filter to become blocked (MOKA coffee is suitable).
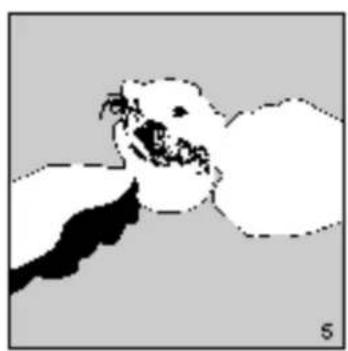
- Remove any excess coffee from the edge of the filter (fig. 5).
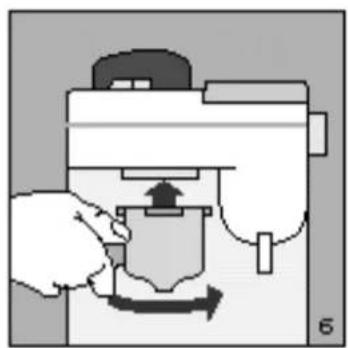
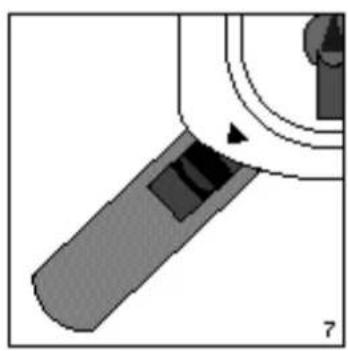
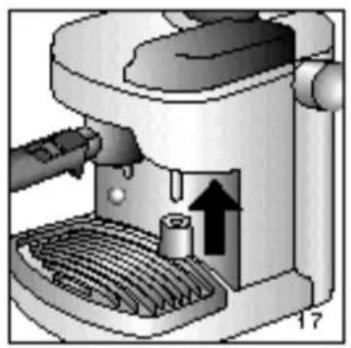
- To attach the filter holder to the machine, bring the filter holder under the boiler shower (fig. 6), aligning its handle with the arrow marked on the lid of the machine (fig. 7). Next, push the filter holder up and at the same time turn it completely to the
right. It is of no importance if the handle of the filter holder is not centred in relation to the machine; it is, however, important for the filter holder to be situated firmly in its housing.
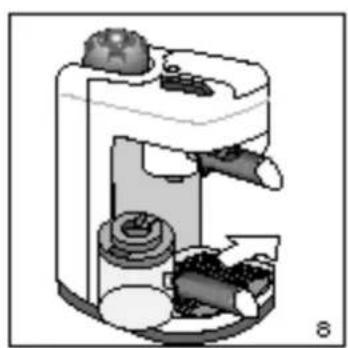
- The carafe with lid must be positioned under the filter holder in such a way that the spout of the filter holder is inside the opening contained on the lid (fig. 8).
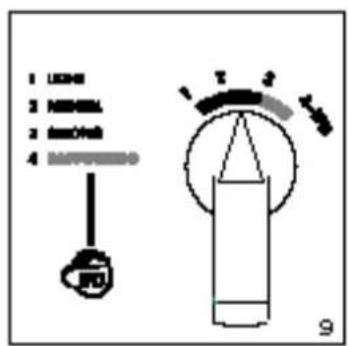
- Set the selector (O) to the type of coffee required: "1 LIGHT" for a weak coffee, "2 MEDIUM" for a normal coffee, "3 STRONG" for a strong coffee (fig. 9).
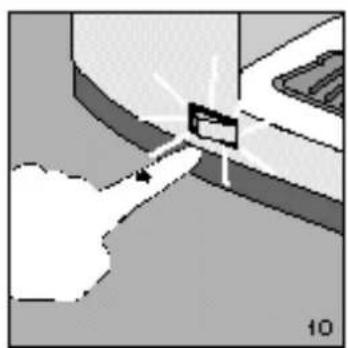
- Check that the steam knob (C) is turned off firmly and press the switch light. The pilot light will come on (fig. 10).
- It takes approx. 3 minutes for the coffee to start to come out. After it has been emitted, turn off the switch light.
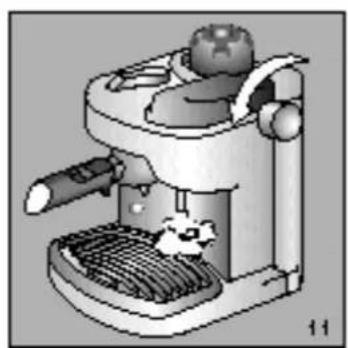
WARNING: In order to avoid puffs of steam, you must always eliminate the residual steam inside the boiler by turning the steam knob to let out all the steam before removing the filter holder (fig. 11).
NOTE: For safety reasons, it is not possible to open the boiler cap when the boiler is hot as the cap turns without unscrewing. If it has to be removed for any reason, it is always necessary to let off steam from the boiler using the steam knob as described immediately above.
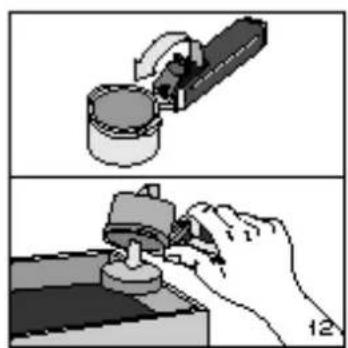
- In order to eliminate the coffee grounds from the filter holder, turn it upside down and beat it repeatedly so that the grounds come out (fig. 12). Alternatively, rinse the filter holder and the filter itself under running water.
WARNING: To eliminate the "new" smell the first time the appliance is used, complete the coffee cycle a few times without using the coffee powder.
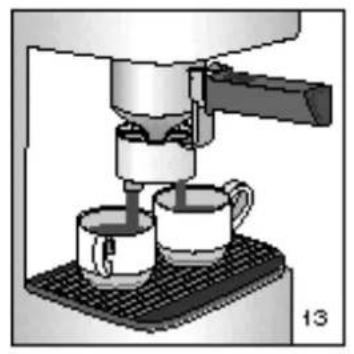
ADAPTOR ASSEMBLY
The adaptor (H) must be used every time the coffee is required to be made directly in the cup. For it to be assembled, it only needs to be inserted in the lower part of the filter holder (fig. 13).
PREPARING CUPPUCCINOS
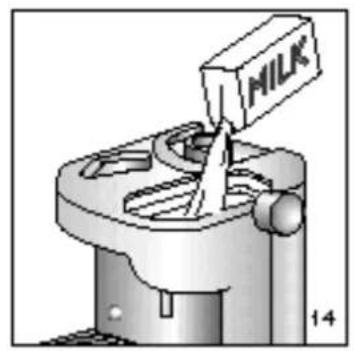
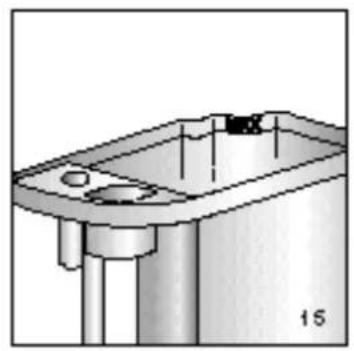
- Pour the amount of milk shown in the table at the end of the text into the carafe before pouring it into the milk tank (E). Never exceed the MAX level marked on the tank (fig. 15), otherwise the machine could continue to drip milk from the tank pipe
even after it has completed the frothing stage. Fresh milk must be used which has not been boiled and above all which is not warm.
- Prepare the coffee as described in the paragraph headed "PREPARING THE COFFEE" from point 1 to point 10, using, however, only the amount of water needed to obtain 2 cups of cappuccino as prescribed in the table at the end of the text. Note that the amount of water needed to make 2 cups of cappuccino is greater than that required for 2 cups of normal coffee as it also necessary to produce the steam to emulsify the milk. The coffee selector (O) must be set to the position "2 MEDIUM".
- Allow the coffee to trickle into the carafe until it reaches the level 2 marked.
WARNING: It is the level of the darker coffee which lies a little below the lighter-coloured cream rather than the level of the cream itself which has to match with line 2. This operation must be carried out with great care: if the level of the coffee should exceed line 2, there will no longer be enough steam left at the end to froth the milk.
Pour the coffee equally into two cups.
- Set the coffee selector to "4 CAPPUCCINO":
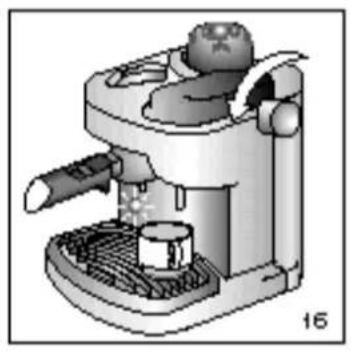
- Position the cups containing the coffee one at a time under the milk tank pipe and wait for the "OK steam ready" pilot light to come on (Q, fig. 16). The antisplash hood (S) should be inserted on the milk tank pipe (fig. 17) to avoid the milk from splashing if small cups are used.
- Turn the steam knob in an anti-clockwise direction; the frothy milk will begin to come out of the pipe. In order to achieve good frothing and to avoid milk from splashing the steam knob needs to be turned fully round at least once. Continue the process until half the milk tank has been emptied before shutting off the steam by turning the knob in a clockwise direction.
- Also fill the 2nd cup by repeating the previous process until the whole milk tank has been emptied. WARNING: Always wait for the "OK steam ready" pilot light (fig. 16) to come on before filling the second cup.
- Immediately after preparing the cups of cappuccino, pour a little water into the milk tank and place the carafe under the milk tank pipe. Turn the steam knob and let all the steam out.
WARNING: Even if it may seem pointless, it is essential for this process to be carried out every
time in order to empty the boiler completely of any residual water or steam which would otherwise prevent the appliance from working properly when it was next used. This operation also serves to clean all the holes in the emulsifier and to empty the internal circuits of any residual milk.
CLEANING AND MAINTENANCE
Before carrying out any cleaning or maintenance work, disconnect the appliance from the electrical power supply by pulling out the plug.
Cleaning the Milk Frother
Remember to clean the milk frother after each use as follows:
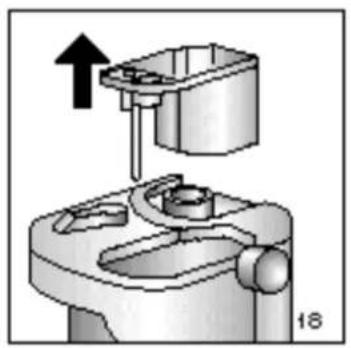
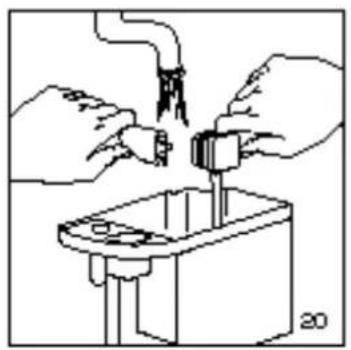
- Remove the milk tank by pushing the "PRESS" lever while at the same time pulling it upwards, and wash the tank with warm water (fig. 18).
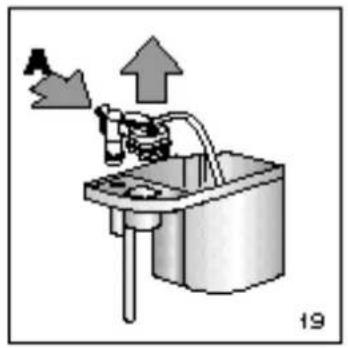
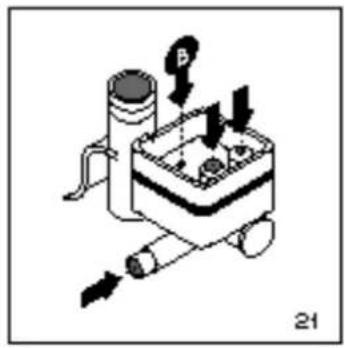
- Remove the emulsifier (R) by pressing on the lever (A) while at the same time pulling it upwards (fig. 19). Remove the rubber mixer (fig. 20), especially wash and clean with warm water the holes shown in fig. 21 (clean them using a needle). Check that the hole marked with the arrow B is not blocked (fig. 21). Once they have been cleaned, all the pieces must be reassembled correctly. Pay attention that the rubber mixer is firmly pushed down and the red emulsifier is pushed till you hear clic. If the appliance is not cleaned this way every time it is used the milk may fail to froth properly or may fail to be sucked up, or it may drip from the milk tank pipe.
Other Cleaning
- The carafe, filter holder and filter should be cleaned regularly, too.
- Neither solvents nor abrasive detergents must be used for the cleaning of the machine's plastic components. A damp cloth is sufficient.
- The machine must NEVER be immersed in water.
DESCALING
If the water in your area is hard, the minerals and the limestone which it contains will accumulate with the passing of time. The limestone deposits may prevent the appliance from working properly.
Approx. every 6 months (depending on the hardness of the water) your coffee machine should therefore be descaled with vinegar.
Proceed as follows:
- Fill the carafe with vinegar and pour the vinegar into the boiler;
- Close the tank cap properly;
-
Attach the filter holder;
-
Position the carafe under the filter holder;
- Turn the machine on and set the coffee selector to the "1 LIGHT" position;
- After a few minutes, the hot vinegar will flow through the filter holder into the carafe;
- Place a glass or a cup under the milk pipe. Turn the steam knob in an anti-clockwise direction for a few moments.
- When the process has been completed, turn off the appliance and let it cool down. Remove the carafe and detach the filter holder. Rinse them with hot water.
- Repeat this process at least twice with cold water in order to remove any traces of vinegar.
SERVICE AND REPAIR
If the appliance should break down or fail to work properly, contact your nearest authorised technical service centre. Repairs carried out by unauthorised staff will invalidate the guarantee.
| To make | Amount of water in the carafe | Amount of coffee in the filter | Amount of milk in the carafe |
| 2 coffees | The level of water must correspond to the line marked 2 on the carafe | → | |
| 2 cappuccinos | The level of water must correspond to the line marked IFD on the carafe | → | The level of the milk must correspond to the lower limit of the metal band |
| 4 coffees | The level of water must correspond to the line marked 4 on the carafe | → |
MESURES DE SECURITE IMPORTANTES

All DE' LONGHI electrical appliances are guaranteed to be free from defects in material and workmanship. Our obligation under this warranty is limited to the replacement or repair, free of charge, at our factory or authorized Service Centers, of any defective part or parts thereof other than parts damaged in transit, which shall be returned to us, transportation pre-paid, within one year from the date of delivery to the purchaser/ user. This warranty shall apply only if the appliance is used in accordance with the factory directions which accompany it, and on an alternating current (AC) circuit. This warranty is in lieu of all other express or implied warranties and representations and any other obligation or responsibility of the manufacturer. No other person or company is authorized to assume for us any liability in connection with the sale or use of our products.
This warranty does not cover appliances that have been repaired or modified outside our factory, nor to appliances which have been subject to misuse, negligence or accidents.
If repairs become necessary or spare parts are needed, please write to:
De' Longhi CANADA
1040 Ronsa Court
MISSISSAUGA, ONTARIO
L4W 3Y4 CANADA

PRECAUCIONES IMPORTANTES
LIMPEZA E MANUTENCAO
- COFFEE MACHINE MACHINE A CAFE CAFETERA ELECTRICALAQUINAS DE CAFÉ
- IMPORTANT SAFEGUARDS
- SAVE THESE INSTRUCTIONS
- SHORT CORD INSTRUCTIONS
- ONLY FOR UNITED STATES
- APPLIANCE DESCRIPTION
- PREPARING THE COFFEE
- ADAPTOR ASSEMBLY
- PREPARING CUPPUCCINOS
- CLEANING AND MAINTENANCE
- Cleaning the Milk Frother
- Other Cleaning
- DESCALING
- SERVICE AND REPAIR
- MESURES DE SECURITE IMPORTANTES
- De' Longhi CANADA
- PRECAUCIONES IMPORTANTES
- LIMPEZA E MANUTENCAO
Brand : DELONGHI
Model : Bar 8
Category : Coffee machine