
TTE40D1304K - Television TOKAI - Free user manual and instructions
Find the device manual for free TTE40D1304K TOKAI in PDF.

| Product type | LED Television |
| Brand | Tokai |
| Model | TTE40D1304K |
| Screen size | 40 inches (diagonal) |
| Resolution | 1920 x 1080 pixels (Full HD) |
| Aspect ratio | 16:9 |
| Contrast | 5000:1 |
| Display colors | 16.7 million |
| Screen lifespan | 30,000 hours |
| Power supply | AC 100-240 V, 50/60 Hz |
| Power consumption | Less than 80 W |
| Dimensions (W x D x H) | 934 x 246 x 615 mm |
| Weight | Approximately 9 kg |
| Connectivity | 3 x HDMI, 1 x VGA, 1 x SCART, 1 x USB, 1 x YPbPr, 1 x AV composite, 1 x coaxial output, 1 x headphone jack, 1 x RF input (antenna), 1 x CI (Common Interface) |
| USB playback formats | Video: AVI, MPEG 1/2, WMV, TS; Audio: WMA, AAC, AC3, MP3; Photo: JPEG, BMP, PNG, GIF; Text: TXT |
| Included accessories | Remote control, instruction manual, stand (with screws) |
| Special features | USB recording (PVR), Timeshift (delayed playback), teletext, electronic program guide (EPG), parental control, timer (Sleep Timer) |
| Safety | Double insulation (Class II), no grounding required; detailed safety instructions in the manual |
| Maintenance | Unplug before cleaning; use a soft dry or slightly damp cloth; do not use chemical products |
| Repairability | No user-serviceable parts; refer all servicing to qualified personnel |
Frequently Asked Questions - TTE40D1304K TOKAI
User questions about TTE40D1304K TOKAI
0 question about this device. Answer the ones you know or ask your own.
Ask a new question about this device
Download the instructions for your Television in PDF format for free! Find your manual TTE40D1304K - TOKAI and take your electronic device back in hand. On this page are published all the documents necessary for the use of your device. TTE40D1304K by TOKAI.
USER MANUAL TTE40D1304K TOKAI
① MANUEL D'UTILISATION
51 USER MANUAL

natural_image
Modern flat-screen TV displaying a stylized eye with green feathered eyelashes and white feather patterns (no text or symbols visible)Lire attentivement la notice avant d' utiliser l'appareil Before operating this product, please read user manual completely
AVERTISSEMENTS
natural_image
Technical line drawing of a computer monitor rear panel with no visible text or symbols①
natural_image
Diagram of a computer monitor front view showing internal components and an upward arrow pointing to a base plate (no text or symbols present)②
natural_image
Diagram of a mechanical or electrical component with multiple hanging lights and a central grid structure (no text or symbols)③
Vue avant
AFFICHAGE DES INFORMATIONS
Configuration 1

Configuration 3

bar
Auto Installation | Channel | Frequency (KHz) | | :--- | :--- | | ATV channels found: | 18 | | DTV channels found: | 21 | | Radio channels found: | 2 | Process | 25% | CH:21 474000 KHz Move Skip Exit ExitConfiguration 5
1.1 MODE IMAGE
2.1 Modes son
Fonction Renommer
3.51 Chaîne
4.31 Date
natural_image
Symbol of a trash bin crossed with a diagonal line, no text or numbers presentThis symbol is intended to alert the user to the presence of uninsulated "dangerous voltage" within the product's enclosure that may be of sufficient magnitude to constitute a risk of electric shock of persons.
To avoid the risk of electric shock, do not disassemble this equipment by anyone except a qualified service personnel.

The exclamation point within an equilateral triangle is intended to alert the user to the presence of important operating and maintenance (servicing) instructions in the literature accompanying the appliance.

This equipment is a Class II or double insulated electrical appliance. It has been designed in such a way that it does not require a safety connection to electrical earth.
SAFETY INSTRUCTIONS

WARNING – TO REDUCE THE RISK OF FIRE, ELECTRIC SHOCK, OR SERIOUS PERSONAL INJURY:
● This product shall not be exposed to dripping or splashing and that no objects filled with liquids, such as vases, shall be placed on the apparatus.
- Situate this product away from heat sources such as radiators, heat registers, stoves, or other appliances (including amplifiers) that produce heat.
- Clean the product only as recommended by the manufacturer (see "Maintenance" section for details). Unplug the power plug from the wall outlet before cleaning,
● Unplug the power plug from the wall outlet when left unused for an extended period.
● Prevent objects/liquids from falling or spilled on the product.
- Operate the product only with the supplied power cord. Route power cords so they are not likely to be walked on or pinched by items placed upon or against them, paying particular attention to plugs, convenience receptacles, and the point where they exit from the product.
- Where the MAINS plug or an appliance coupler is used as the disconnect device, the disconnect device shall remain readily operable.
- Do not operate this product under the following conditions.
- When the power-supply cord or plug is damaged.
- If liquid has been spilled into or objects have fallen into the product.
- If the product has been exposed to rain or water.
- If the product does not operate when used according to the operating instructions.
- If the product has been dropped or damaged in any way.
- Do not attempt to service the product; take it to the electronics repair shop of your choice for any servicing or repair.
- Do not overload wall outlets, extension cords, or integral convenience receptacles.
- Connect this product to the power outlet which has protective earth connection.

CAUTION- TO REDUCE THE RISK OR PERSONAL INJURY OR PRODUCT/PROPERTY DAMAGE:
● This product is intended solely for non-commercial, non-industrial, personal use as a television. Do not use this product for any other purpose.
- Do not subject the product to violent shocks, extreme temperatures, or lengthy periods of direct sunlight.
- Keep the product away from magnetic objects, motors, and transformers.
- Do not use outdoors in inclement weather.
- Do not use the TV while driving; this is dangerous and is illegal in some areas.
CAUTION ON HEADPHONE USE:

At full volume, prolonged listening to the portable audio device may damage the user's hearing.
BATTERY HANDLING AND USAGE:
- Keep batteries away from children and pets. Only adults should handle batteries.
● Never throw batteries into a fire or expose them to fire or other heat sources.
● Follow the battery safety and usage instructions.
TABLE OF CONTENTS
GETTING STARTED
WARNING / IMPORTANT INSTRUCTIONS.... 51-53
ACCESSORIES 55
STAND INSTALLATION....56
GENERAL PARTS....57-58
REMOTE CONTROL....59-61
REMOTE CONTROL PREPARATION 62-63
BASIC CONNECTIONS 63-68
OPERATIONS
BASIC OPERATIONS 69-77
MAIN MENU....78
FIRST TIME INSTALLATION 78-79
DTV MODE 80-92
ATV AND OTHER MODES 93
PC MODE 93
TELETEXT 94
FOR REFERENCE
MAINTENANCE 95
WALL MOUNTING 95
SPECIFICATIONS....96
TROUBLESHOOTING 97
DISPOSAL OF OLD ELECTRICAL APPLIANCES 98
IMPORTER 99
ACCESSORIES
| User Manual Remote Control | |
 |  |
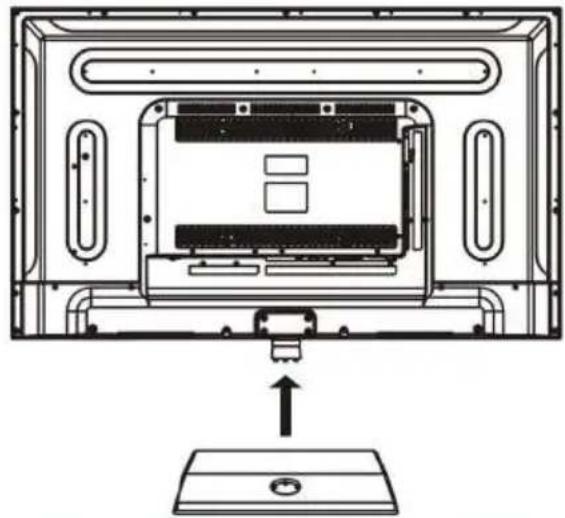
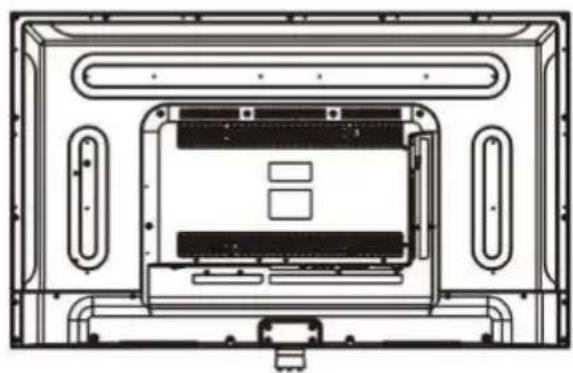
STAND INSTALLATION
Your TV is packaged with the Stand and the Cabinet separated. Before enjoying this TV, please carry out the Stand Installation according to the instructions below.
Step 1
Place the TV faced down on a soft cloth or cushion to prevent the panel from being damaged.
Step 2
Align the Stand with TV bottom and then force the end of stand until the TV is fully seated on the stand.
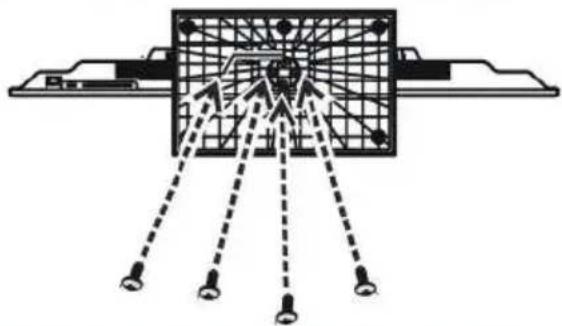
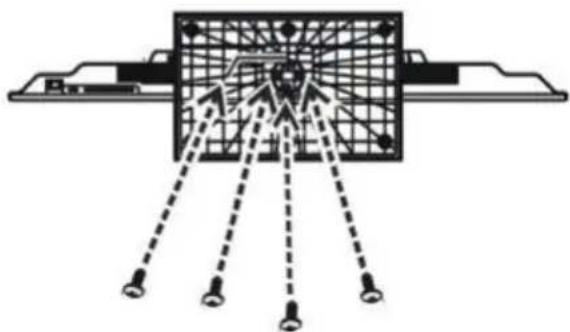
Step 3
Tighten the included screws with a screw driver.
NOTES:
- Unplug the power plug first when installing or removing the TV Stand.
- To avoid any damage to this TV, contact one or more partner for assistance when installing or removing the TV stand.

natural_image
Technical line drawing of a computer monitor rear panel with ventilation slots and drive bays (no text or symbols)①
natural_image
Technical line drawing of a computer monitor rear panel with no visible text or symbols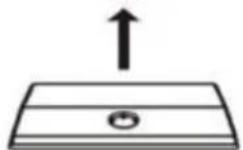
②
natural_image
Diagram of a mechanical or electrical component with multiple light sources and a central grid structure (no text or symbols)③
GENERAL PARTS
MAIN UNIT
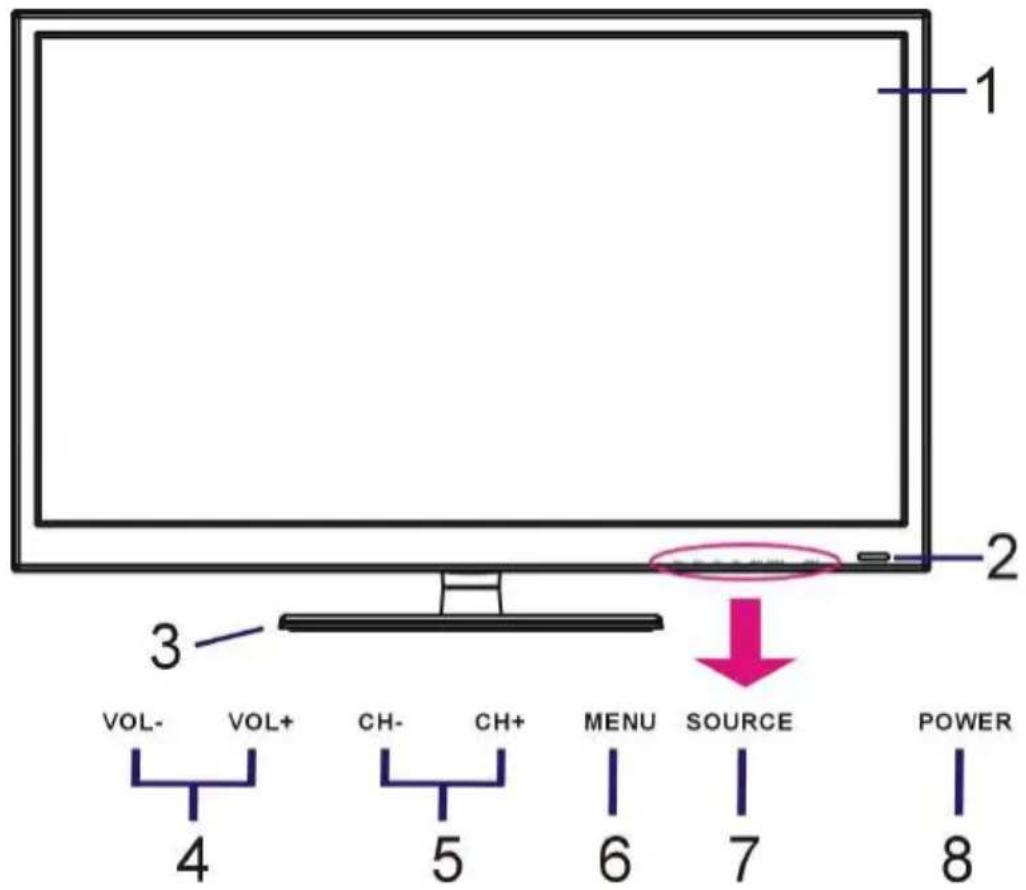
Front View
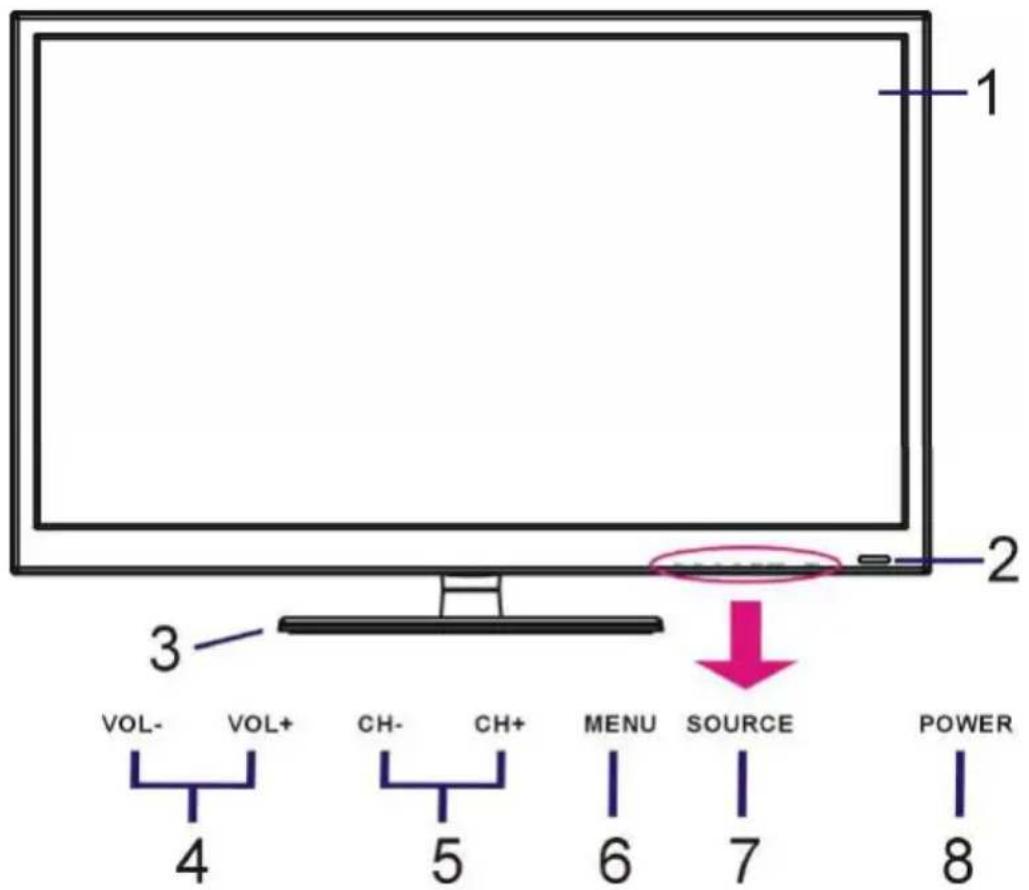
- LED display screen
- Remote control sensor / Power indicator- In standby mode the indicator light is red; when switching on the unit the indicator light is blue color.
- Stand holder
- VOL +/- button- To increase/decrease the volume level or move left/right.
- CH +/- button- To select next/previous channel or move up/down.
- MENU button- To enter menu setting page.
- SOURCE button- To select the input source.
- POWER button- To turn the TV ON/OFF.
Back View (Connections)
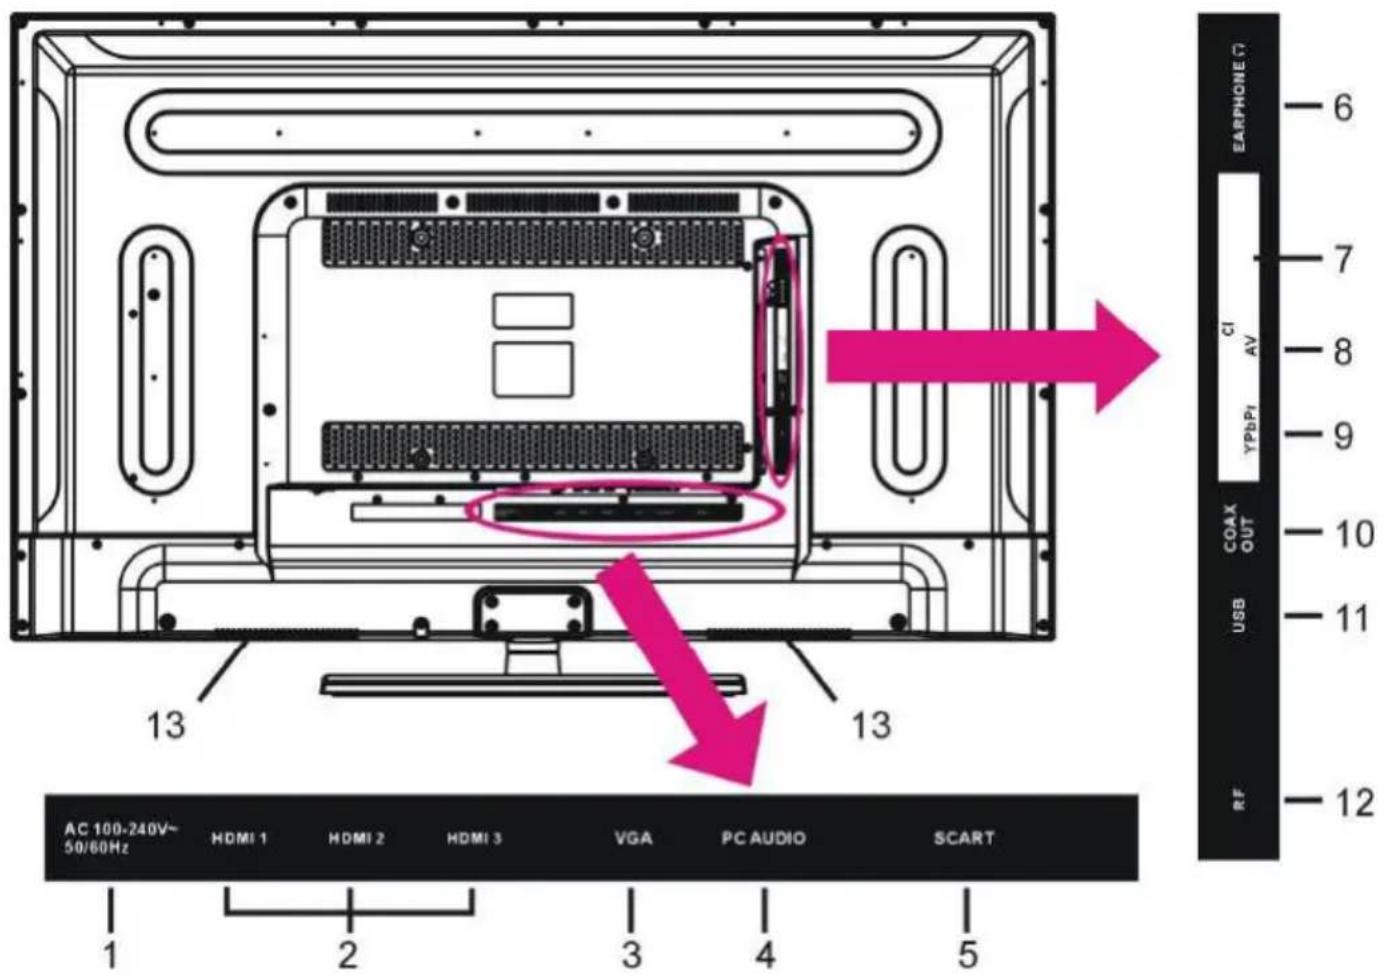
- AC Power cord
- HDMI1/HDMI2/HDMI3 input terminal
- VGA input terminal
- PC AUDIO input terminal
- SCART input terminal
- EARPHONE output terminal
- CI input terminal
- Mini AV input terminal
- Mini YPbPr input terminal
- COAXIAL output terminal
- USB input terminal
- RF input terminal- To connect the external antenna.
- Built-in speakers
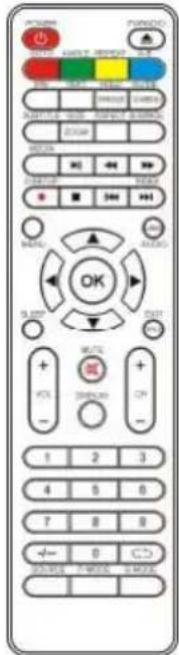
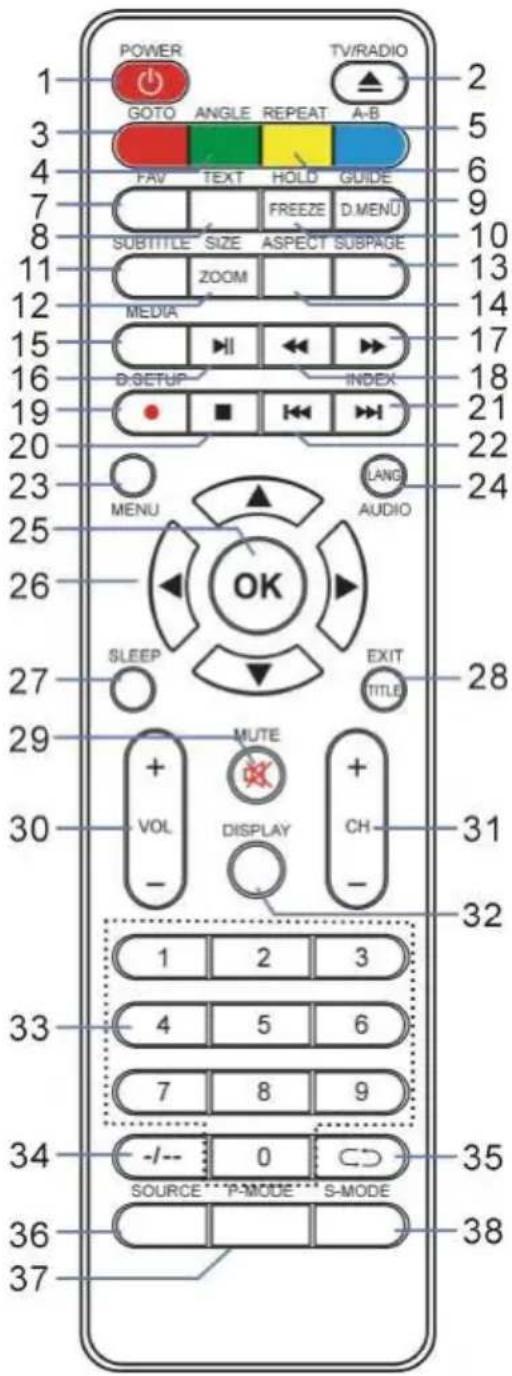
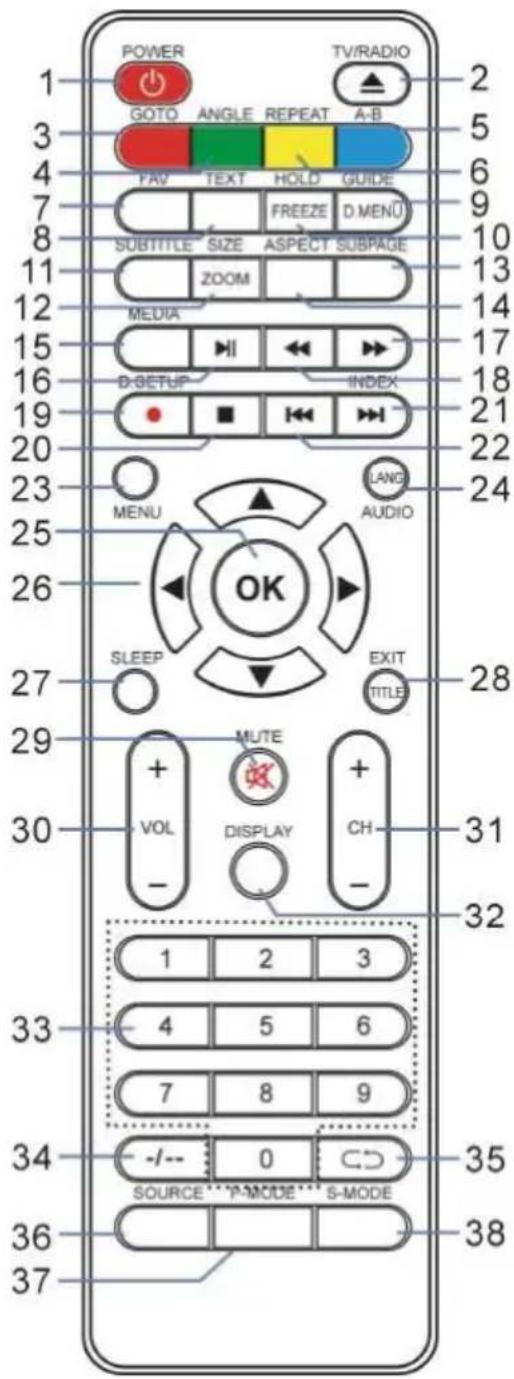
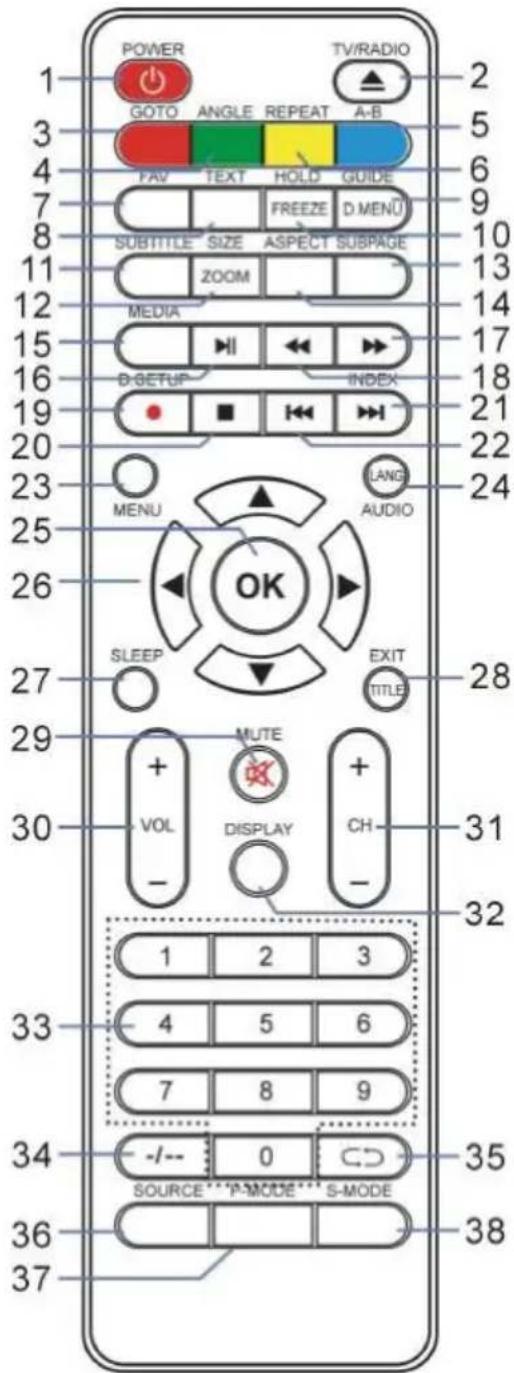
REMOTE CONTROL
The buttons on the remote control and similarly marked ones on the main unit perform similar functions.
1 POWER
Set the unit in standby mode; press it again to switch it on.
2 TV/RADIO (DTV)
Switch the unit between TV and Radio..
▲(DVD)
3 RED button (TV)
GOTO (DVD)
4 GREEN button (TV)
ANGLE (DVD)
5 BLUE button (TV)
A-B (DVD)
6 YELLOW button (TV)
REPEAT (DVD)
7 FAV
Display the favorite channels list.
8 TEXT\*
Display the available Teletext.
9 GUIDE (DTV)
Display electronic program guide.
D.MENU (DVD)
10 HOLD\*
Hold the Teletext.
FREEZE
Hold the picture.
11 SUBTITLE
Enable/disable subtitles.
12 SIZE (TV)\*
Switch Teletext size.
ZOOM (DVD)
REMOTE CONTROL
13 SUBPAGE\*
Enter Teletext sub-page.
14 ASPECT
Press it repeatedly to select desired screen size.
15 MEDIA
Enter Media (USB) mode directly.
16
Start/pause playing.
17
Move fast forward.
18
Move fast backward.
19 • (DTV)
Start RECORDING when watching available digital programs.
D.SETUP (DVD)
20
Stop playing.
21
Play the next file.
INDEX* (DTV)
Display the record list or Teletext index.
22
Play the previous file.
23 MENU
Call out the main menu or return to previous menu.
24 AUDIO (TV)
Switch the available sound-track.
LANG (DVD)
25 OK
Confirm selection.
26 ▲/▼/◄/►
Navigation buttons
27 SLEEP
Set desired sleep time.
28 EXIT (TV)
Exit the menu page.
TITLE (DVD)
29 MUTE
Mute the sound.
30 VOL +/-
Increase/decrease the volume level.
31 CH +/-
Play the next/previous program.
32 DISPLAY
Display the available program information.
33 Number buttons (0-9)
Input the number information, such as channel number and so on.
34 -/--
Switch the digit when watching TV programs.
35
Return to previous channel.
36 SOURCE
Select desired input source.
37 P-MODE
Switch the picture mode.
38 S-MODE
Switch the sound mode.
NOTE: The functions of those buttons, which marked with "DVD", are available only when your TV has fitted a DVD player. (Not available for your model TTE-40D1304).
The * marked on some keys means that these buttons are used for teletext.
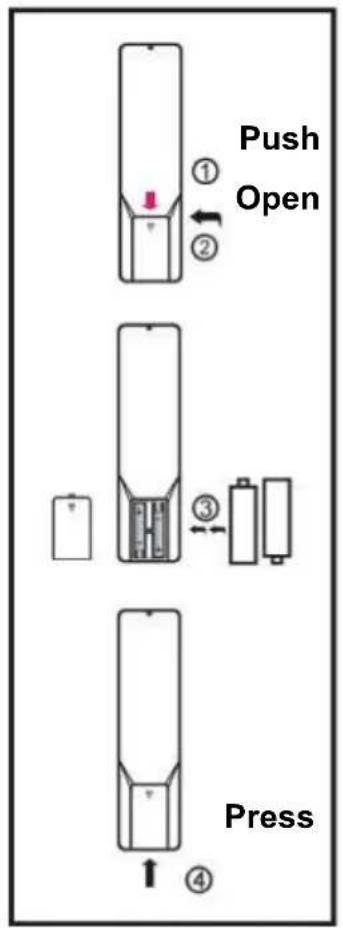
REMOTE CONTROL PREPARATION
BATTERY INSTALLATION
Install the batteries as the following pictures. Be sure + and – terminals are positioned as indicated in the battery compartment (Fig1).
SERVICE LIFE OF BATTERIES
- The batteries normally last for one year although this depends on how often the remote control is used.
- If the remote control fails to work even when it is operated near the player, replace the batteries.
- Use two size AAA dry batteries.
NOTE:
- Do not drop, step on or otherwise impact the remote control. This may damage the parts or lead to malfunction.
- If the remote control is not going to be used for a long time, remove the batteries.
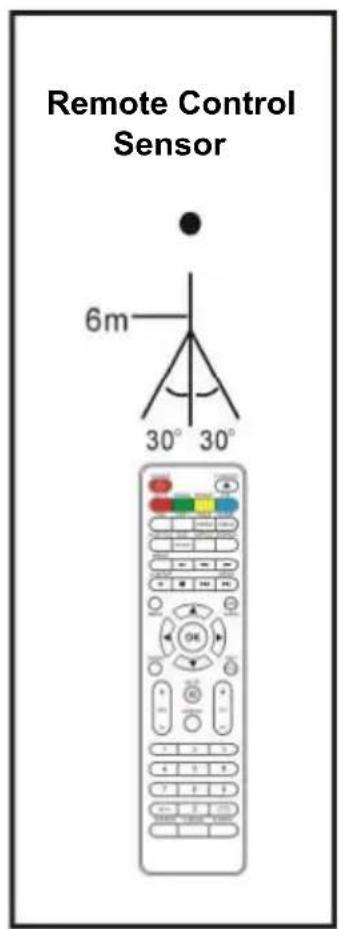
Point the remote control from no more than about 6m from the remote control sensor and within about 60^ of the front of the player (Fig2).
NOTES:
- The operating distance may vary according to the brightness of the room.
- Do not point bright light at remote control sensor.
- Do not place objects between the remote control and the remote control sensor.
- Do not use this remote control while simultaneously operating the remote control of any other equipments.
Fig1
flowchart
graph TD
    A["Press"] --> B["Open"]
    B --> C["Push"]
    C --> D["Lock"]
    style A fill:#f9f,stroke:#333
    style B fill:#ccf,stroke:#333
    style C fill:#cfc,stroke:#333
    style D fill:#fcc,stroke:#333
Fig
Precaution on battery use
Improper use of batteries can result in leakage of chemicals and/or explosion. Be sure to follow the instructions below :
Place batteries with their terminals corresponding to the (+) and (-) indications.
Different types of batteries have different characteristics. Do not mix batteries of different types.
Do not mix old and new batteries. Mixing old and new batteries can shorten the life of new batteries and/or cause old batteries to leak chemicals.
Remove batteries as soon as they are non-operable. Chemicals that leak from batteries can cause a rash.
If chemical leakage is found, wipe with a cloth.
The batteries (battery pack of batteries installed) shall not be exposed to excessive heat such as sunshine, fire or the like.
IMPORTANT NOTE ON BATTERIES :
Please help to protect the environment. It is recommended to dispose of old batteries in collection centers specially designed for that.
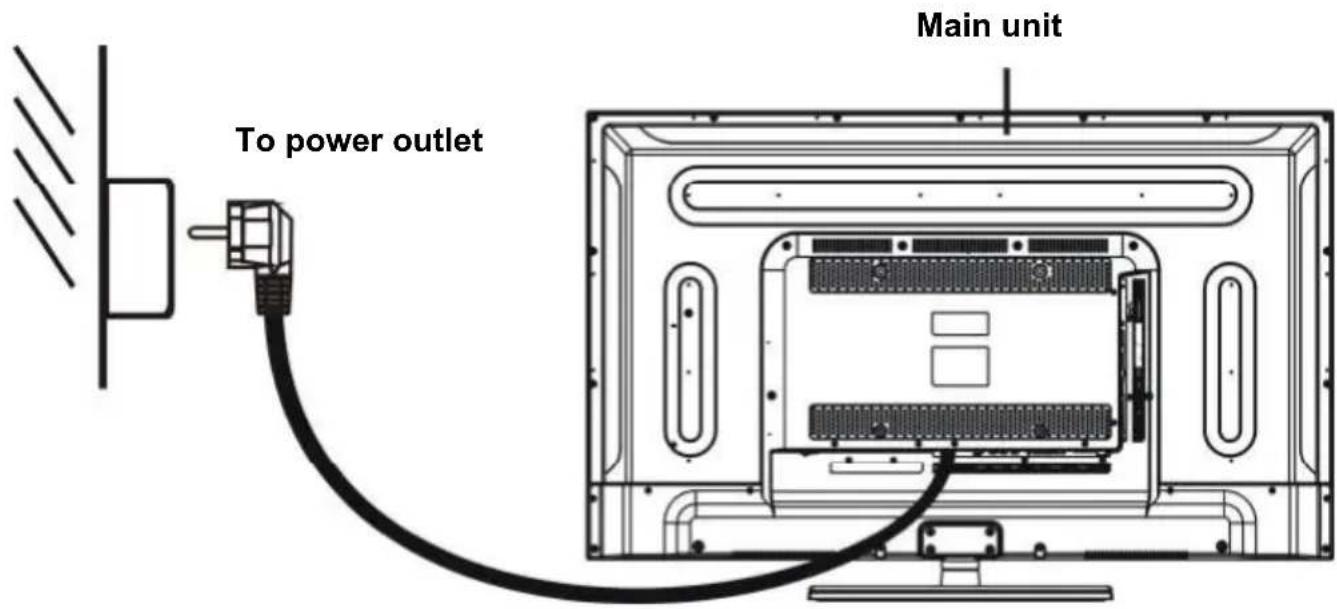
BASIC CONNECTIONS
● Ensure all the cables are disconnected from the main unit before connecting to AC power source.
- Read through the instructions before connecting other equipments.
CONNECTING TO AC POWER SOURCE
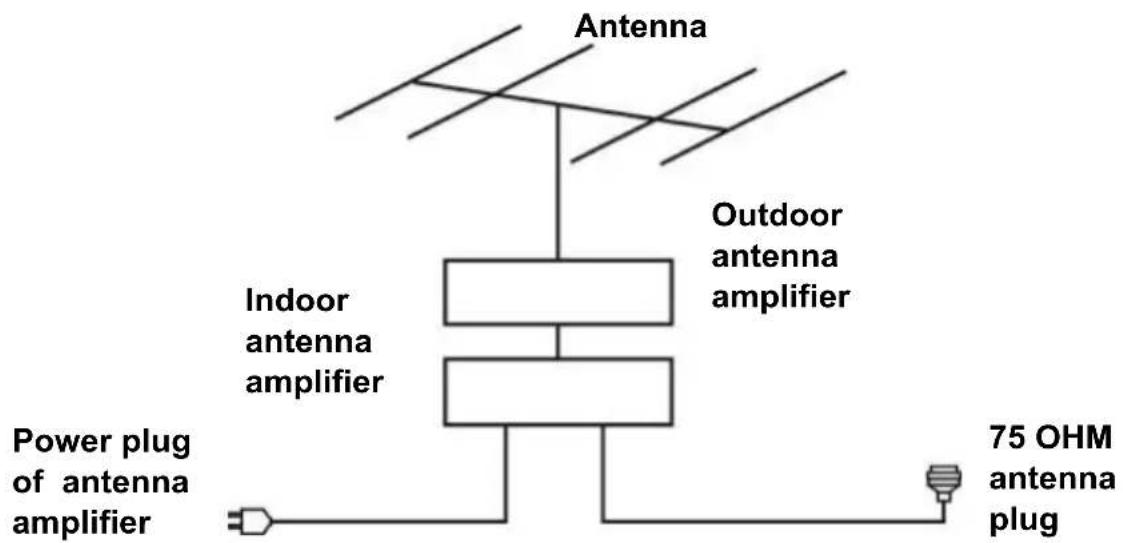
CONNECT EXTERNAL ANTENNA TO UNIT
Install external antenna into antenna jack for best picture.
Connect the TV signal cable (the antenna cable, for example) to the RF Input Jack (9) on the back of the unit.
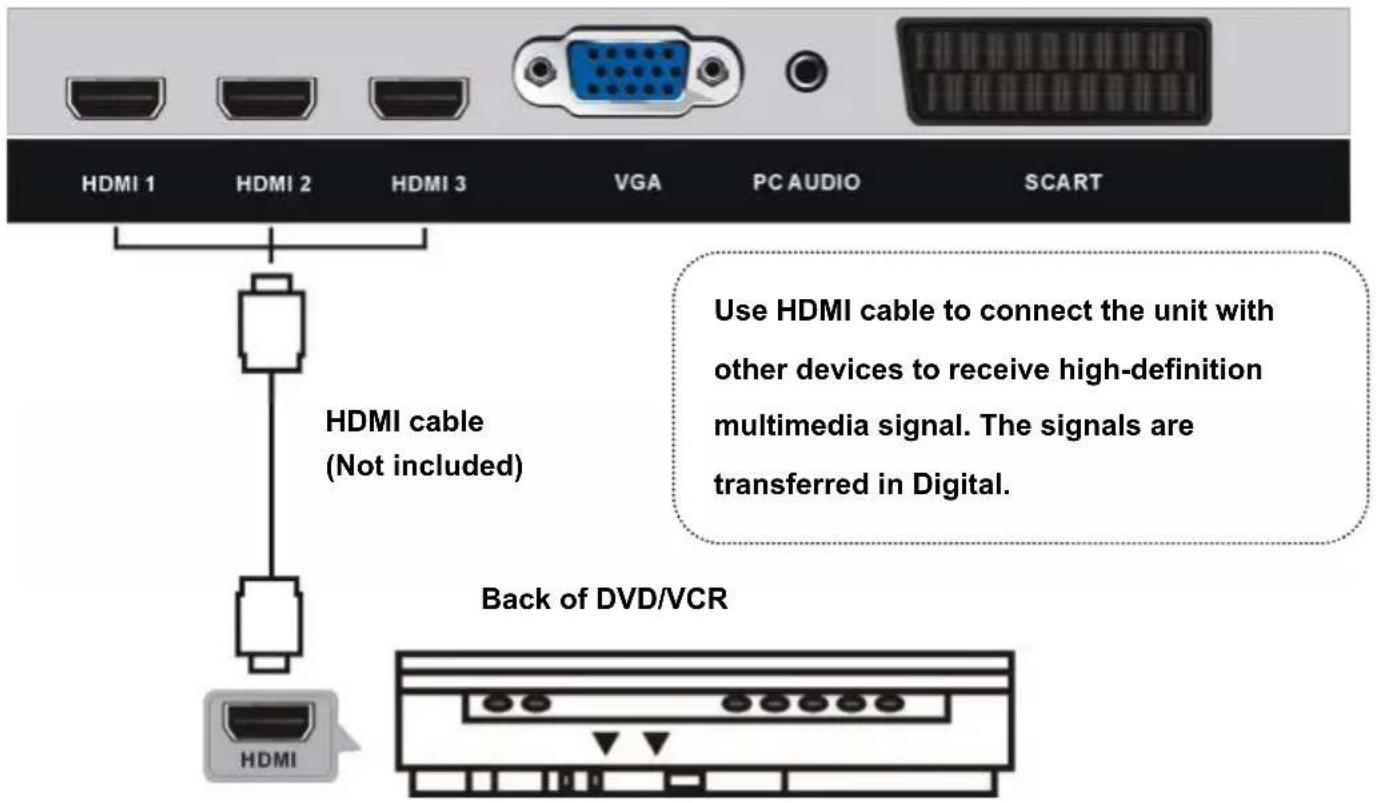
HDMI CONNECTION
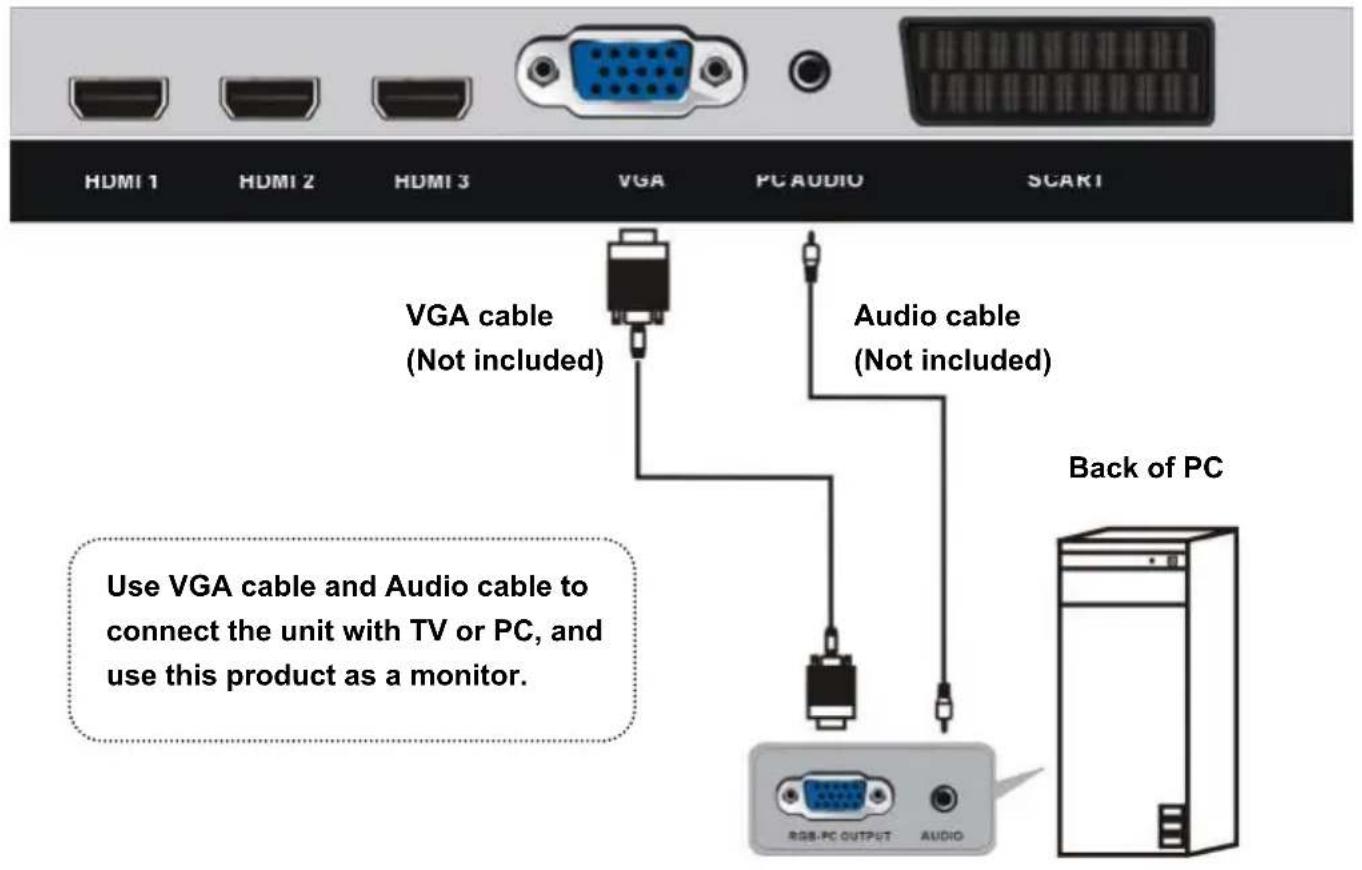
PC/VGA CONNECTION
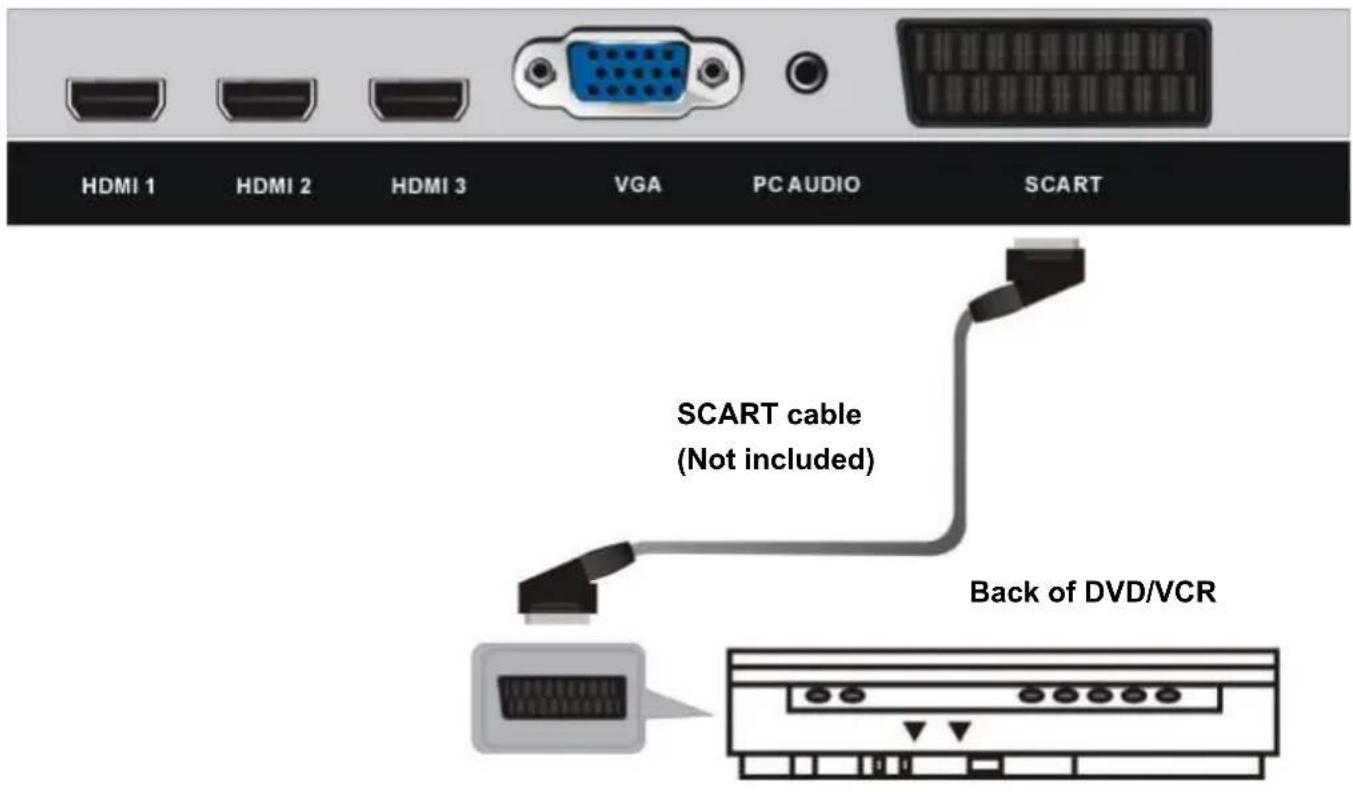
SCART CONNECTION
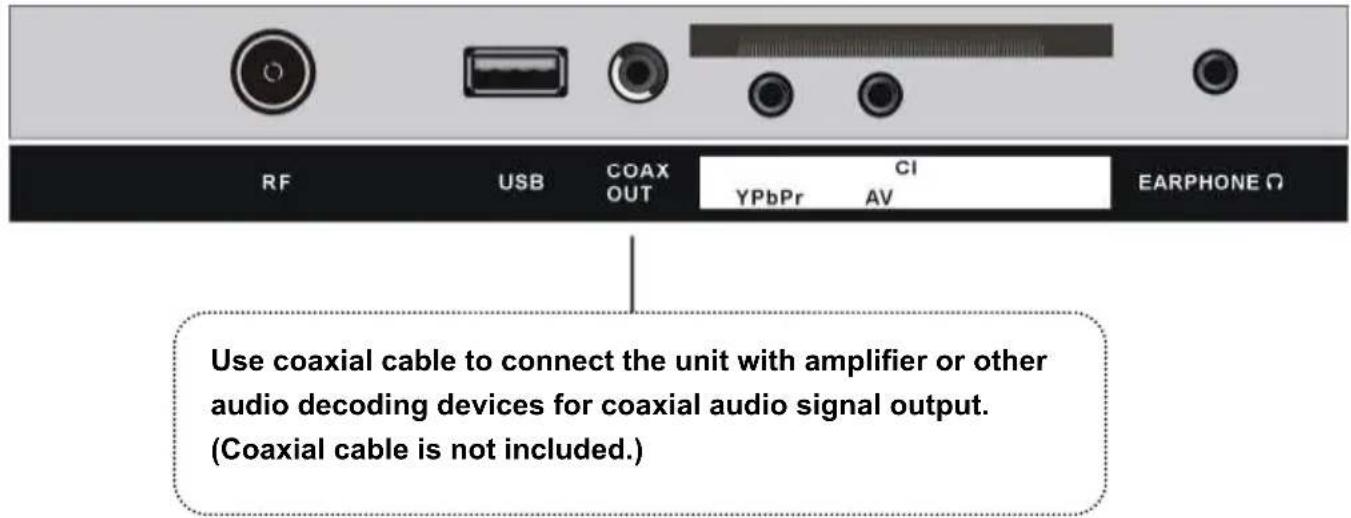
COAXIAL CONNECTION
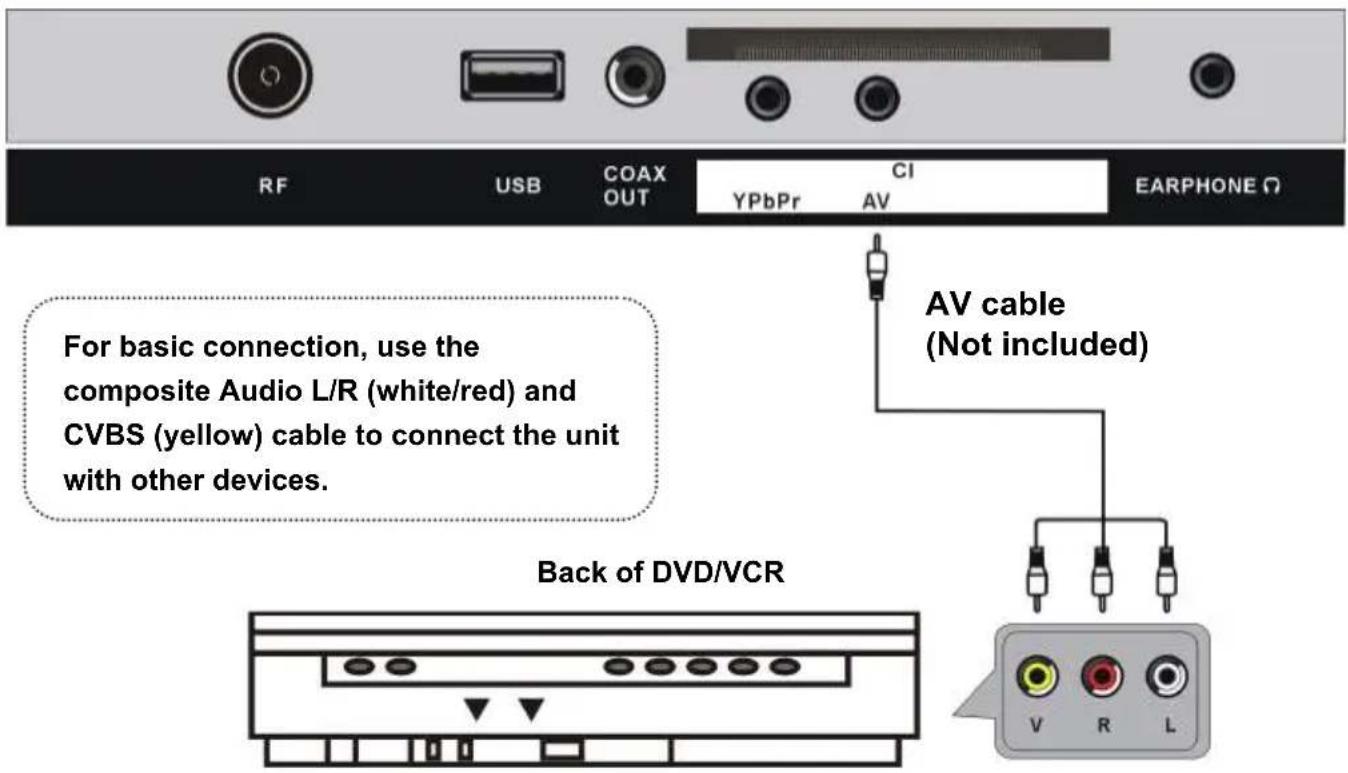
AV (COMPOSITE VIDEO) CONNECTION
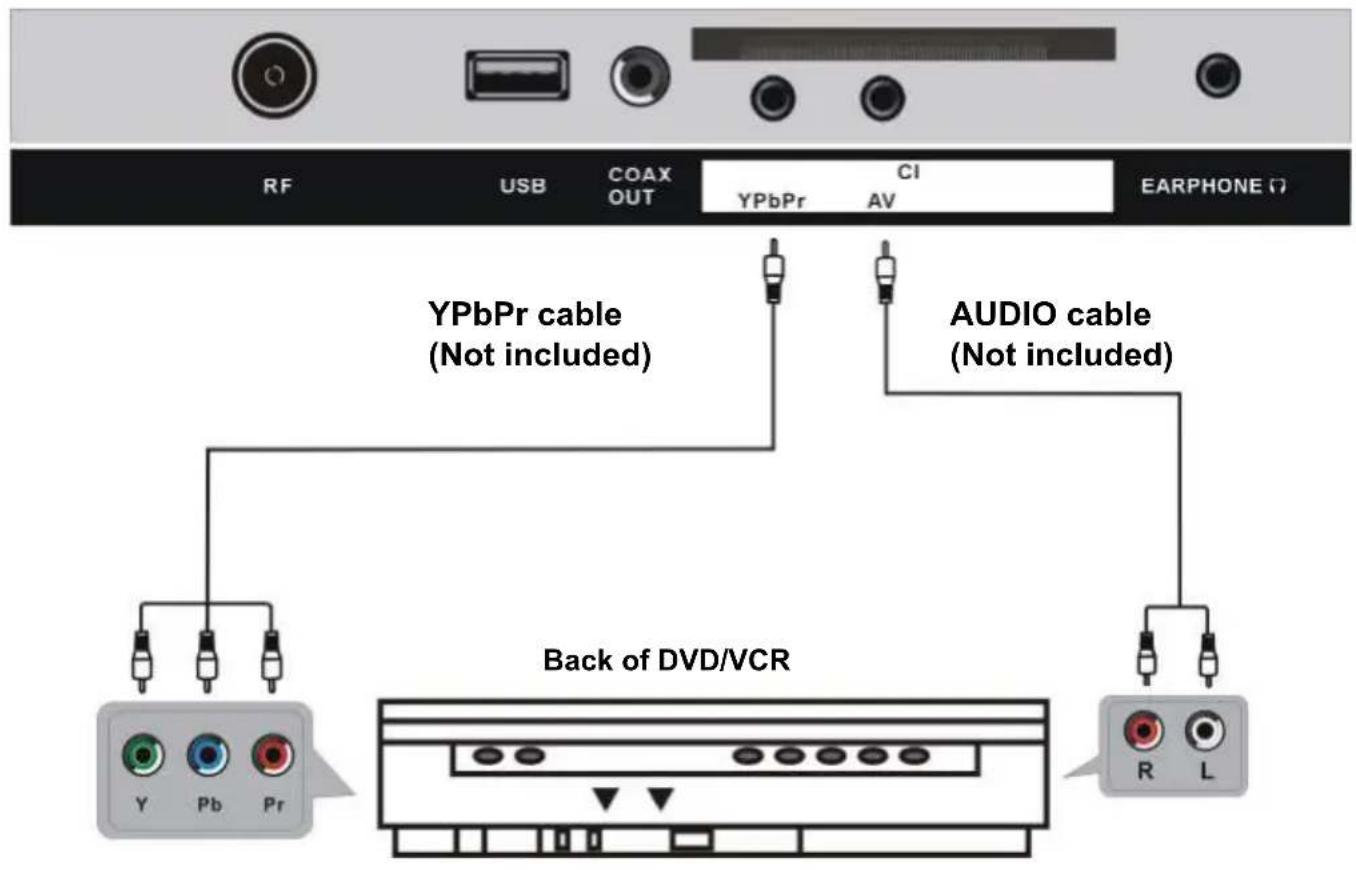
YPBPR CONNECTION
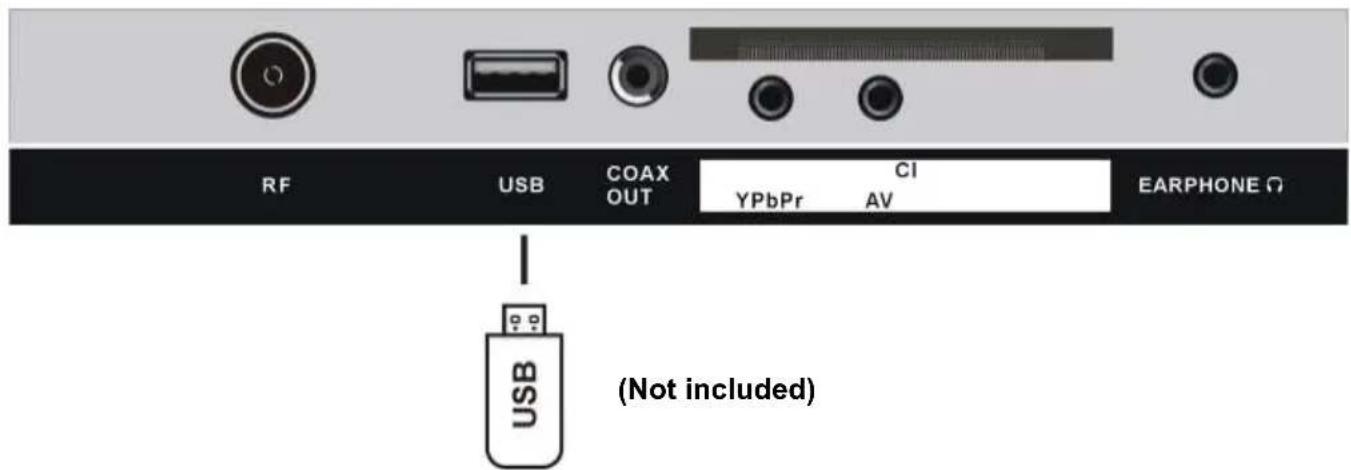
USB CONNECTION (TV)
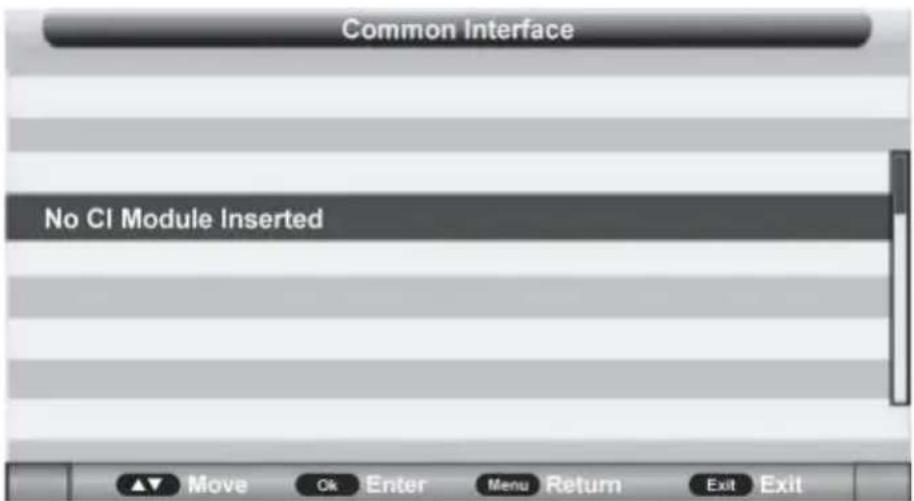
INSERT A CI CARD
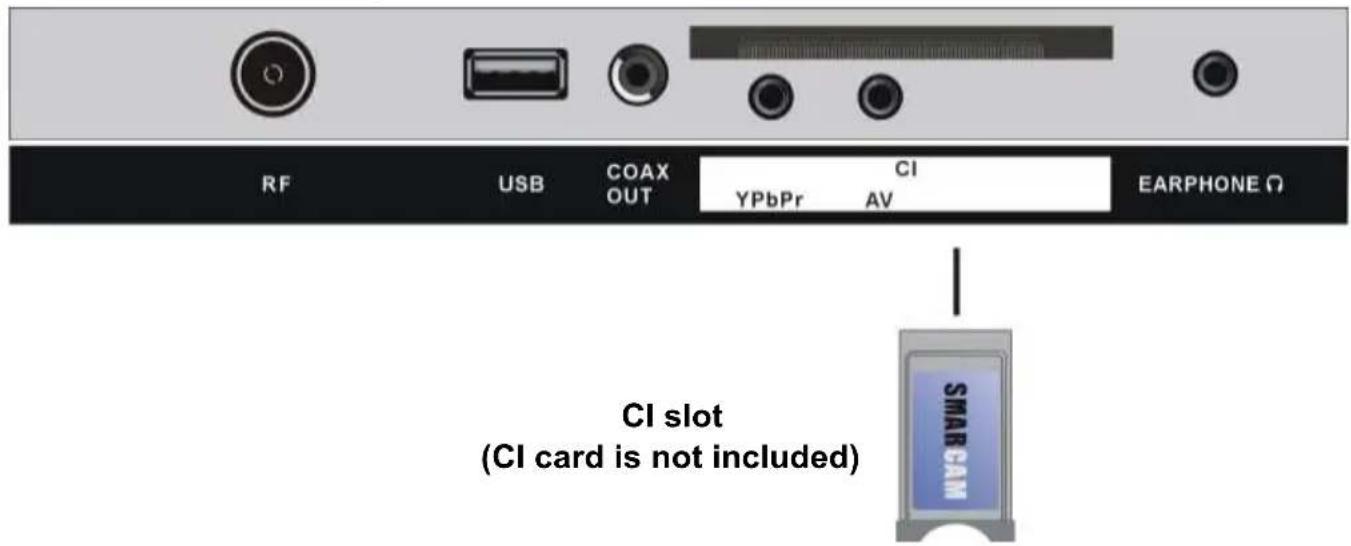
Pay per view services requires a smartcard to be inserted into the TV. If you subscribe to a pay per view service the provider will issue with a CAM card "Smartcard". The CAM can then be inserted into the COMMON INTERFACE port.
EARPHONE CONNECTION
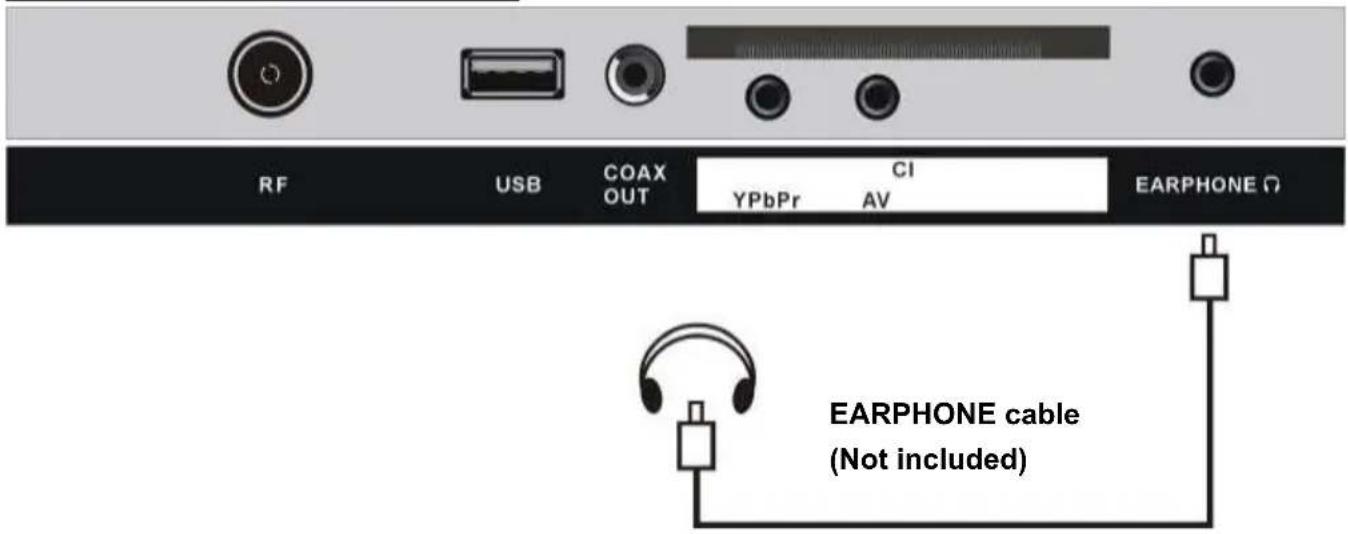
Use the HEADPHONES output of your TV set to listen the audio of the unit through your own stereo headphones. When you connect headphones to the unit, the main speakers will be silenced.
Notes : the headphone is not supplied with the TV set.
When connecting a headphone, please first reduce the volume to the minimum level and then progressively increase it to a comfortable volume level.
Hearing experts advise against exposure to continuous extended play at loud volume levels while using headphone (earphone), possible hearing loss may result.
MAKE SURE ALL THE EQUIPMENTS AND POWER CORD ARE
CONNECTED PROPERLY AND THE UNIT IS SET IN CORRECT MODE BEFORE KINDS OF OPERATIONS.
BASIC OPERATIONS
- Press POWER button on the unit or remote control to power ON the unit (indicator will glow blue); press it again to power OFF (standby mode) the unit (indicator will glow red).
- Press SOURCE button on the unit or remote control to switch the unit to DTV or ATV mode.
SELECT DESIRED PROGRAM
- Press CH+ button to play next channel.
- Press CH- button to play previous channel.
- Press number buttons on remote control directly to select desired program.
NOTE: Press -/-- button repeatedly to switch the digit.
VOLUME CONTROL
- Press VOL+ or VOL- to adjust the level of current volume.
Available range: 0-100.
MUTE CONTROL
- Press MUTE button to mute the sound, press it again to turn on the sound.
SOURCE SETTING
- Press SOURCE button on the unit or remote control to display the sources list.
- Press UP or DOWN navigation button to select desired input source, and then press OK button to confirm selection.
Available options: DTV, ATV, AV, SCART, YPBPR, HDMI 1/2/3, PC, Media.
PICTURE MODE
- Press P-MODE button on remote control repeatedly to select desired PICTURE mode directly.
Available options: Standard, Mild, User, Dynamic.
SOUND MODE
- Press S-MODE button on remote control repeatedly to select SOUND mode directly.
Available options: Standard, Movie, Music, Speech, User.
SLEEP TIME SETTING
- Press SLEEP button on remote control repeatedly to select SLEEP TIME directly.
Available options: Off, 10 Mins, 20 Mins, 30 Mins, 60 Mins, 90 Mins, 120 Mins, 180 Mins, 240 Mins
VIDEO SIZE SETTING
- Press ASPECT button on remote control repeatedly to select VIDEO SIZE directly. Available options: Auto, 4:3, 16:9, Zoom1, Zoom2.
NOTE: If there's no signal, pressing ASPECT button will not work. And the available video size may be different for different input source.
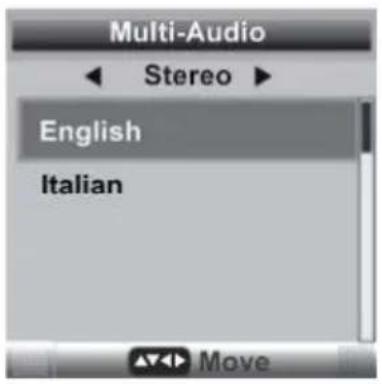
MULTI-AUDIO SETTING
- Press AUDIO button on remote control to enter Multi-Audio menu page.
- Press LEFT/RIGHT navigation button to select the available soundtrack.
- Press UP/DOWN navigation button to select the available audio language.
NOTE: To enable this function, make sure that the channel you are viewing supports multi-audio languages.
INFORMATION DISPLAY
- Press DISPLAY button on remote control to display information of current program.
TV GUIDE (FOR DTV MODE ONLY)
- Press GUIDE button on remote control to enter below menu page.
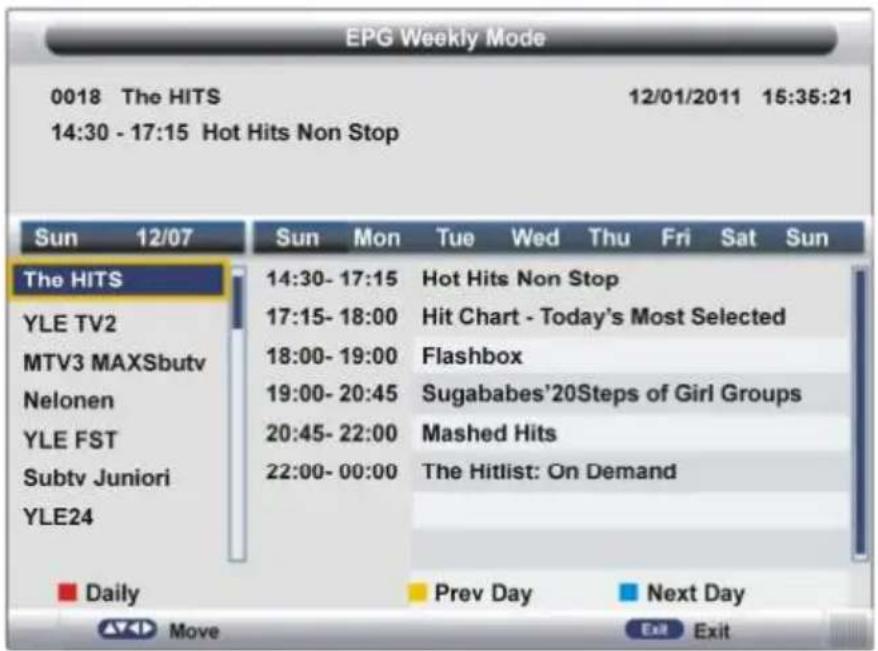
- Press UP/DOWN navigation button to select preferred channel.
- Press LEFT/RIGHT navigation button to switch between left column and right column.
- Press RED button to switch between weekly mode and daily mode.
- Press YELLOW button to display the TV guide of previous day.
- Press BLUE button to display the TV guide of next day.
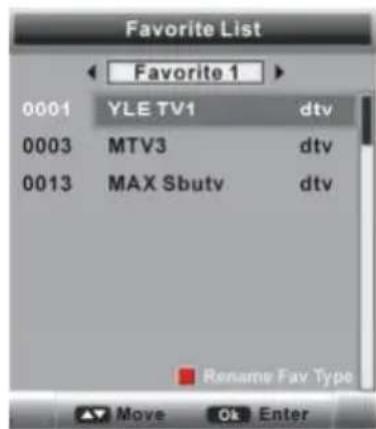
FAVORITE LIST
When viewing an available channel, press FAV button on remote control to enter Favorite List menu page.
- Press UP or DOWN navigation button to select preferred channel.
- Press LEFT/RIGHT navigation button to select preferred favorite group.
- Press OK button to confirm selection.
NOTES:
- To add/remove a channel from Favorite List, please see Part 3.2 "Favorite Management".
- Press RED button on remote control to display the keyboard. Then you can rename a desired favorite type using navigation buttons.
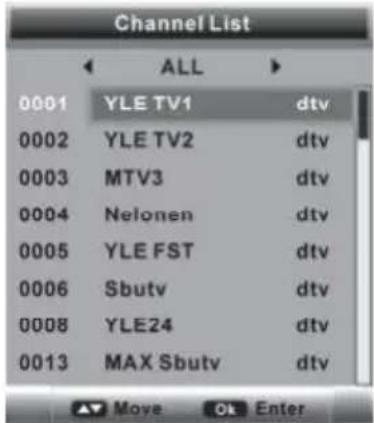
QUICK SELECT
When viewing an available channel, press OK button on remote control to enter Channel List menu page.
- Press UP or DOWN navigation button to select preferred channel.
- Press OK button to confirm selection.
TELETEXT
- Press TEXT button on remote control to display the available teletext information and press it again to stop playing the teletext.
TV/RADIO (FOR DTV MODE ONLY)
- Press TV/RADIO button on remote control to switch the unit between TV and radio mode.
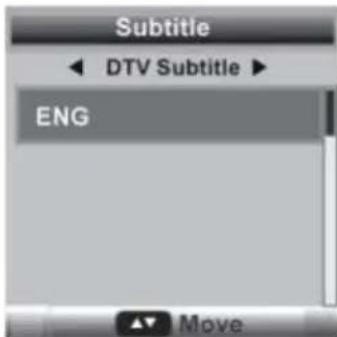
SUBTITLE
- Press SUBTITLE button on remote control to enter Subtitle menu page.
- Press LEFT/RIGHT navigation button to select preferred option.
- Press UP/DOWN navigation button to select available subtitle.
- Press OK button to confirm selection.
NOTE: To enable this function, make sure that the channel you are viewing supports multi-subtitle.
RECORDER (FOR DTV MODE ONLY)
- Insert your USB memory device into USB slot first.
When watching a digital program:
- Press ● button on remote control to start recording directly and press it again to call out below menu.

- Use LEFT/RIGHT navigation button to move the cursor; use number buttons to input your desired value and press OK button to confirm your setting.
- Press ■ button on remote control to call out a dialog box, and select OK to stop recording; select Cancel to dismiss the dialog box.
To watch recorded programs:
- Press INDEX button on remote control to call out the Record List menu.
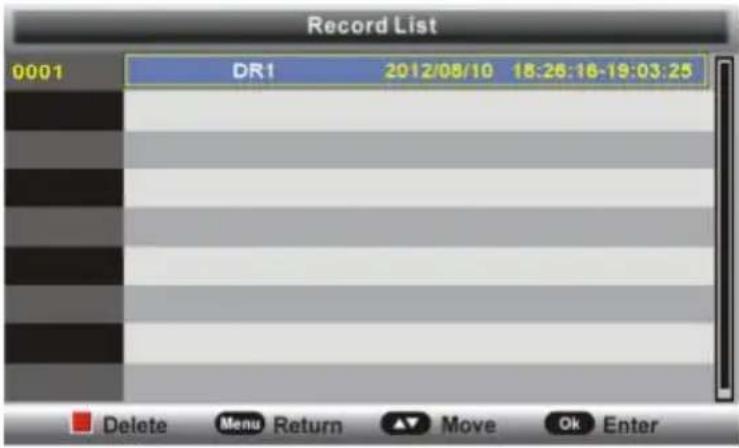
- Press UP/DOWN navigation button to select recorded files and press OK button to start playback.
TIME SHIFT (FOR DTV MODE ONLY)
- Insert your USB memory device into USB slot first.
When watching a digital program:
-If you don't want to miss any programs when left, press ▶ button on remote control to call out a dialog box, and select OK to enter TIME SHIFT mode; select Cancel to dismiss the dialog box. Press ▶ button again to enable TIME SHIFT function.
- Press ▶ button again when you're back to watch the program in TIME SHIFT mode.
- To stop TIME SHIFT, press ■ on remote control to stop TIME SHIFT playing and press it again to call out a dialog box. Select OK to exit TIME SHIFT mode and select Cancel to dismiss the dialog box.
MEDIA PLAYBACK
- Press SOURCE button on the unit or remote control to set the unit in MEDIA mode.
- Insert a USB memory device into USB slot before following operations.
- Press UP/DOWN/LEFT/RIGHT navigation button to move the cursor.
- Press EXIT button to return to previous menu page.
NOTE: Press MEDIA button on remote control to enter MEDIA mode directly.
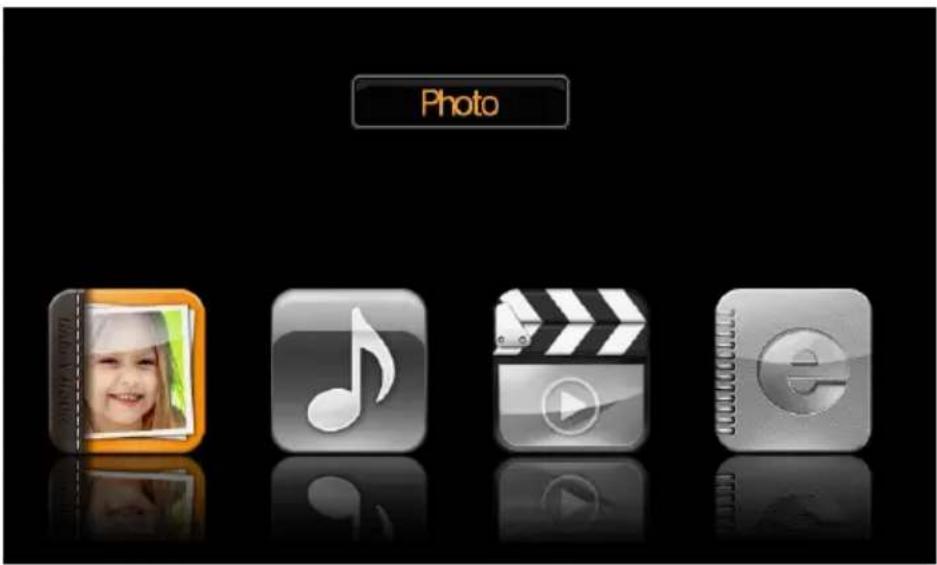
1. Photo
- Press LEFT/RIGHT navigation button to select Photo in the main menu and press OK button to enter it.

NOTE: When selecting Photo files, press EXIT button to move the cursor to TITLE and then press RIGHT navigation button to view files in thumbnail mode.
- Use navigation buttons to select preferred file.
- Press RED button to enter a dialog box, and select Yes to delete highlighted file; select No to cancel this operation.
- Press GREEN button to add/remove all the files from play list.
- Press OK button to add/remove highlighted file from play list.
- Press ▶ button to start playing.
During photo normal playing:
- Press OK button on remote control to display the tool bar; press EXIT button to hide it.
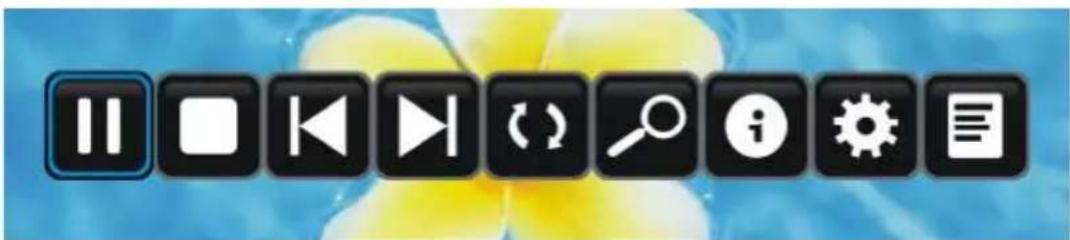
- Press LEFT/RIGHT navigation button to select preferred option in the tool bar and press OK button to confirm selection/enter submenu.
- Press ▶ button on remote control to play or pause playing.
- Press ■ button on remote control to stop playing.
- Press ◀ button on remote control to play previous file.
- Press ➤ button on remote control to play next file.
2. Music
- Press LEFT/RIGHT navigation button to select Music in the main menu and press OK button to enter it.
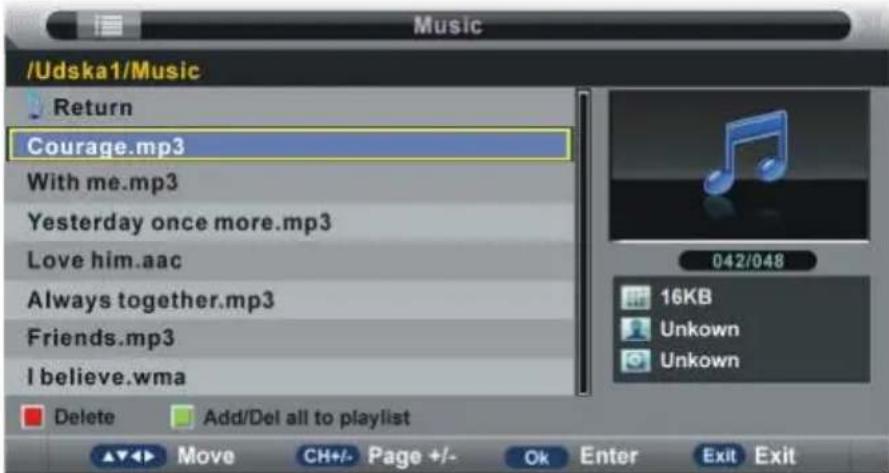
- Use navigation buttons to select preferred file.
- Press RED button to enter a dialog box, and select Yes to delete highlighted file; select No to cancel this operation.
- Press GREEN button to add/remove all the files from play list.
- Press OK button to add/remove highlighted file from play list.
- Press ▶ button to start playing.
During music normal playing:
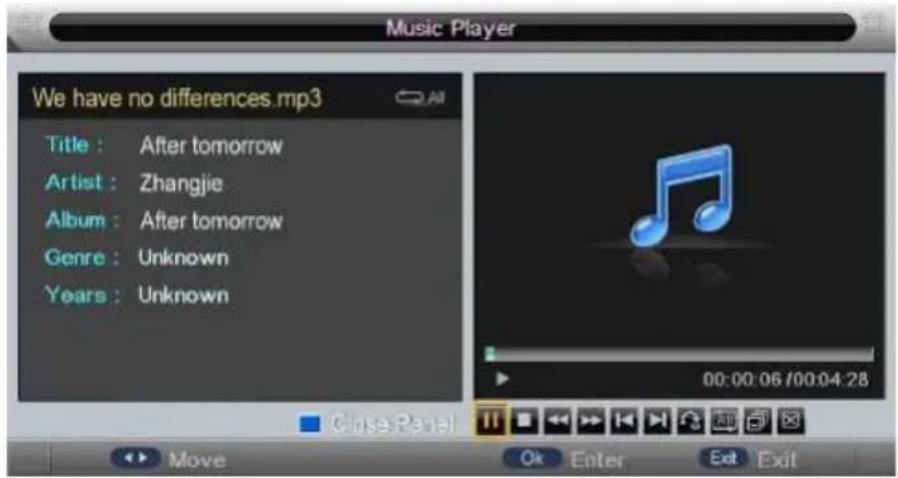
- Press LEFT/RIGHT navigation button to select preferred option in the tool bar and press OK button to confirm selection/enter submenu.
- Press BLUE button on remote control to close the on-screen display; press any button on remote control to display it again.
- Press ▶ button on remote control to play or pause playing.
- Press ■ button on remote control to stop playing.
- Press ← button on remote control to move fast backward.
- Press ▶ button on remote control to move fast forward.
- Press ◀button on remote control to play previous file.
- Press ➕ button on remote control to play next file.
3. Movie
- Press LEFT/RIGHT navigation button to select Movie in the main menu and press OK button to enter it.
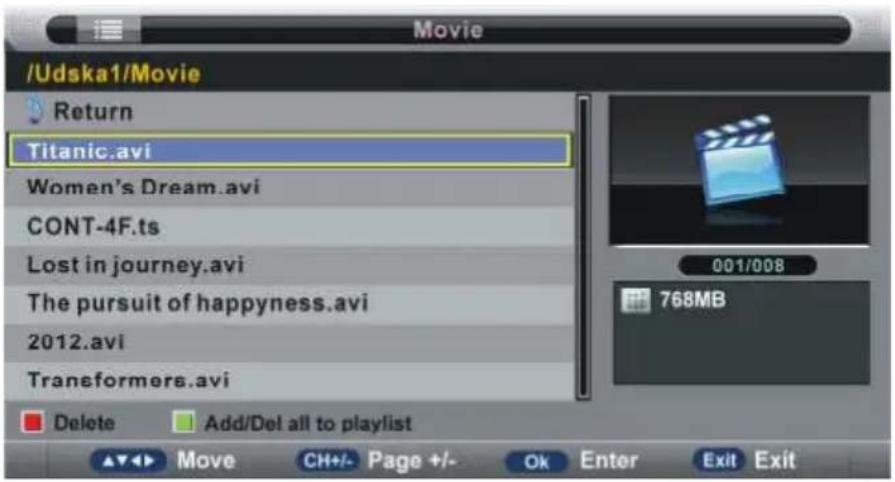
- Use navigation buttons to select preferred file.
- Press RED button to enter a dialog box, and select Yes to delete highlighted file; select No to cancel this operation.
- Press GREEN button to add/remove all the files from play list.
- Press OK button to add/remove highlighted file from play list.
- Press ▶ button to start playing.
During movie normal playing:
- Press OK button on remote control to display the tool bar; press EXIT button to hide it.
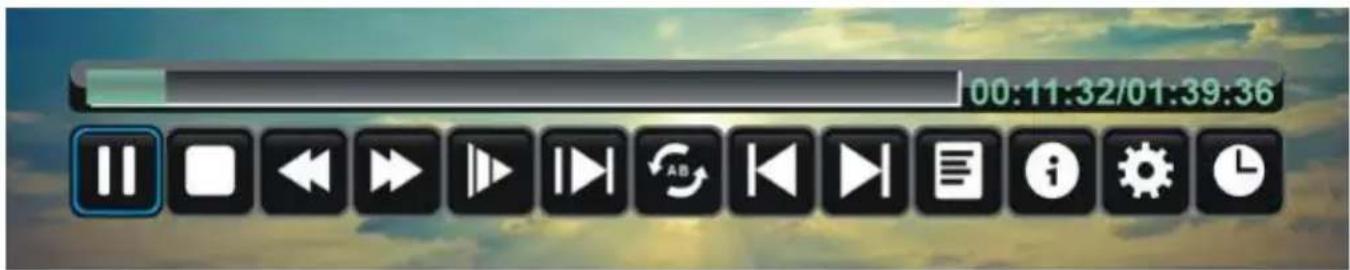
- Press LEFT/RIGHT navigation button to select preferred option in the tool bar and press OK button to confirm selection/enter submenu.
- Press ▶ button on remote control to play or pause playing.
- Press ■ button on remote control to stop playing.
- Press ← button on remote control to move fast backward.
- Press ➤ button on remote control to move fast forward.
- Press ◀button on remote control to play previous file.
- Press ➤ button on remote control to play next file.
4. e-Book
- Press LEFT/RIGHT navigation button to select e-Book in the main menu and press OK button to enter it.
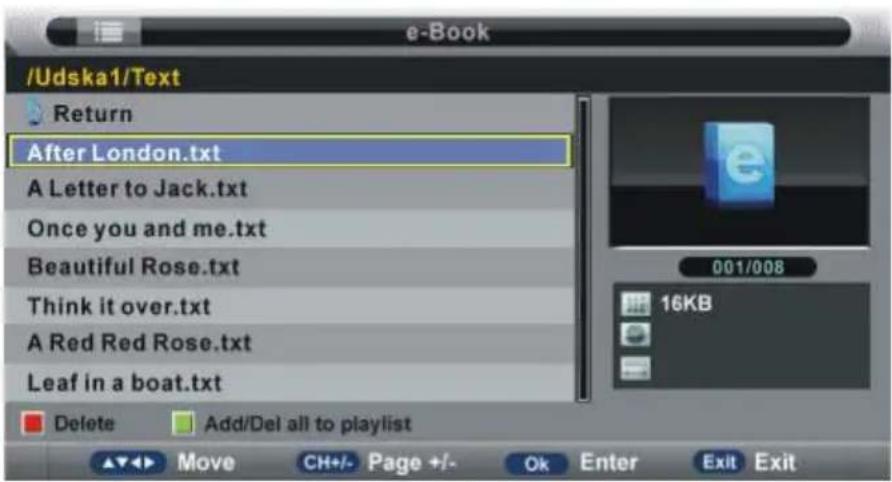
- Use navigation buttons to select preferred file.
- Press RED button to enter a dialog box, and select Yes to delete highlighted file; select No to cancel this operation.
- Press GREEN button to add/remove all the files from play list.
- Press OK button to add/remove highlighted file from play list.
- Press ▶ button to start playing.
During e-book normal playing:

- Press RED button on remote control to add/remove current page from Bookmark List.
- Press GREEN button on remote control to enter GOTO mode. Input valid number and press OK button to enter desired page directly.
- Press YELLOW button on remote control to display the Bookmark list.
- Press BLUE button on remote control to display the play list.
- Press ← button on remote control to play previous page.
- Press ▶ button on remote control to play next page.
NOTE: To play your multimedia files, make sure you have selected correct icon in the main menu of MEDIA PLAYBACK. That is to say, you can only play Photo files in PHOTO item, Music files in MUSIC item and so on.
MAIN MENU
● The unit contains different setting menus. Once the initial programming is entered, it will be remained in the memory until change, and the unit can always be operated under the same conditions.
● The settings will be remained in the memory until the settings are changed, even after setting the player to standby mode.
Common procedure for initial settings
- Press MENU button on the remote control to display the main menu.
- Press UP or DOWN navigation button to select submenus.
- Press OK or RIGHT navigation button to enter submenu page.
- Press UP or DOWN navigation button to select preferred option.
- Press LEFT or RIGHT navigation button to adjust the value.
- Press OK button to confirm selection.
- Press MENU button to return to previous menu page.
- Press EXIT button to exit menu page.
First Time Installation
- Connect to power source and turn on this TV, the first time below installation menu page will display on the screen:

Setup 1
- Press UP/DOWN navigation button to select desired picture Mode.
- Press OK button to call out a dialog box. Select OK to confirm selection and turn to next page; select Cancel to dismiss the dialog box.
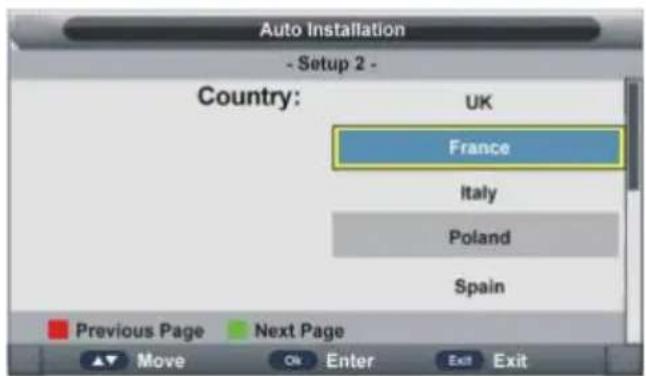
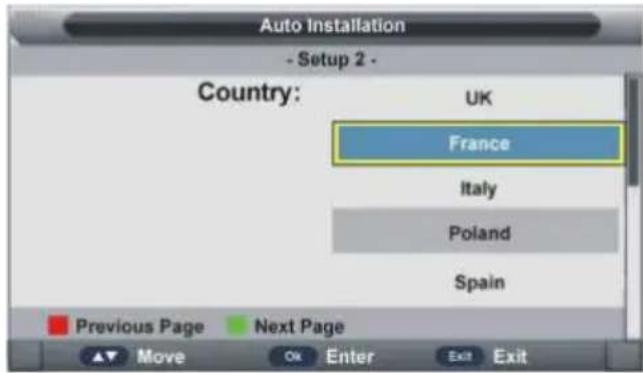
Setup 2
- Press UP/DOWN navigation button to select the country that you are living in.
- Press OK button to confirm selection and turn to next page.
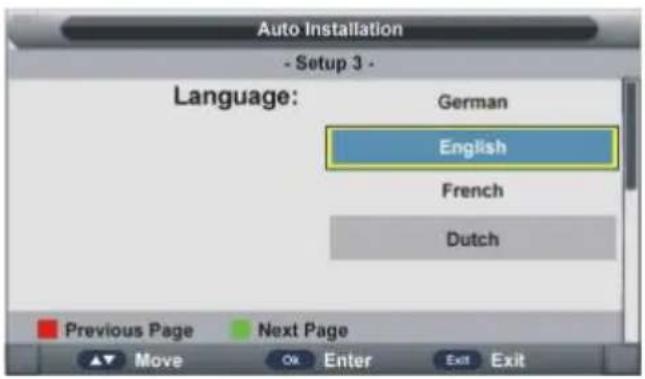
Setup 3
- Press UP/DOWN navigation button to select desired menu language.
- Press OK button to confirm selection and turn to next page.
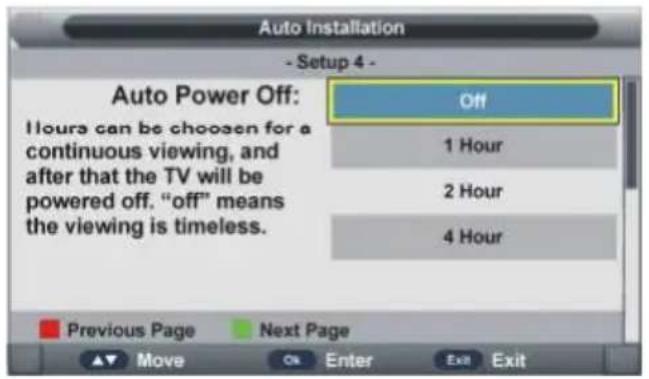
Setup 4
- Press UP/DOWN navigation button to select desired auto power off time.
- Press OK button to confirm selection and turn to next page.

bar
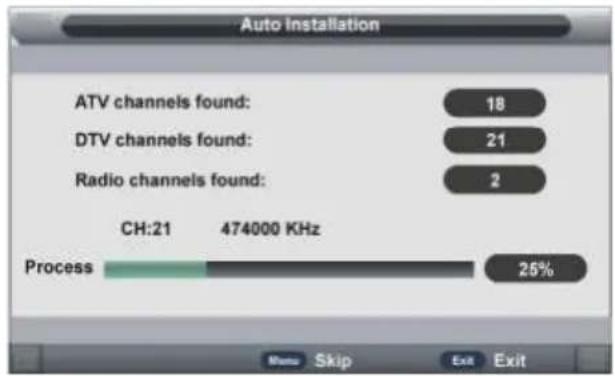
Auto Installation | Channel | Frequency (KHz) | | :--- | :--- | | ATV channels found: | 18 | | DTV channels found: | 21 | | Radio channels found: | 2 | Process | 25% | CH:21 474000 KHz Move Skip Exit ExitSetup 5
- Press UP/DOWN navigation button to select desired searching type.
- Press OK button to confirm selection and then this unit will search programs automatically.
NOTE:
- To skip ATV or DTV tuning, press MENU button on remote control to call out a dialog box, and select OK to skip it; select Cancel to dismiss the dialog box.
- To exit tuning, press EXIT button on remote control to call out a dialog box, and select OK to exit tuning; select Cancel to dismiss the dialog box.
DTV MODE
- Press SOURCE button on the unit or remote control to select DTV input source.
1. PICTURE
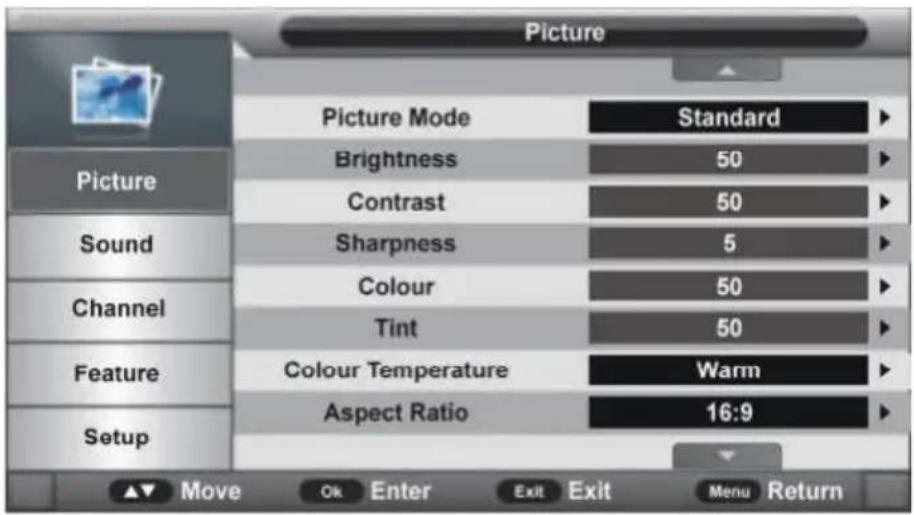
1.1 Picture Mode
Available options: Standard, Mild, User, Dynamic.
1.2 Brightness
The brightness value of picture can be adjusted from 0-100.
1.3 Contrast
The contrast value of picture can be adjusted from 0-100.
1.4 Sharpness
The sharpness value of picture can be adjusted from 0-10.
1.5 Colour
The colour saturation value of picture can be adjusted from 0-100.
NOTE: The value of Brightness, Contrast, Sharpness, and Colour is adjustable only in User picture mode.
1.6 Tint
This item is used to adjust the tone of color in NTSC system from 0-100.
1.7 Colour Temperature
This item is used to adjust the optimum colour temperature for suitable viewing.
Available options: Standard, Cold, Warm.
1.8 Aspect Ratio
- Press OK or RIGHT navigation button to enter submenu and press UP/DOWN navigation button to select preferred option.
Available options: Auto, 4:3, 16:9, Zoom1, Zoom2.
NOTE: If there's no signal, pressing ASPECT button on remote control will not work. And the available video size may be different in different input source.
1.9 Noise Reduction
This item is used to eliminate the image noise to gain better image effect.
Available options: Off, Low, Middle, High.
2. SOUND
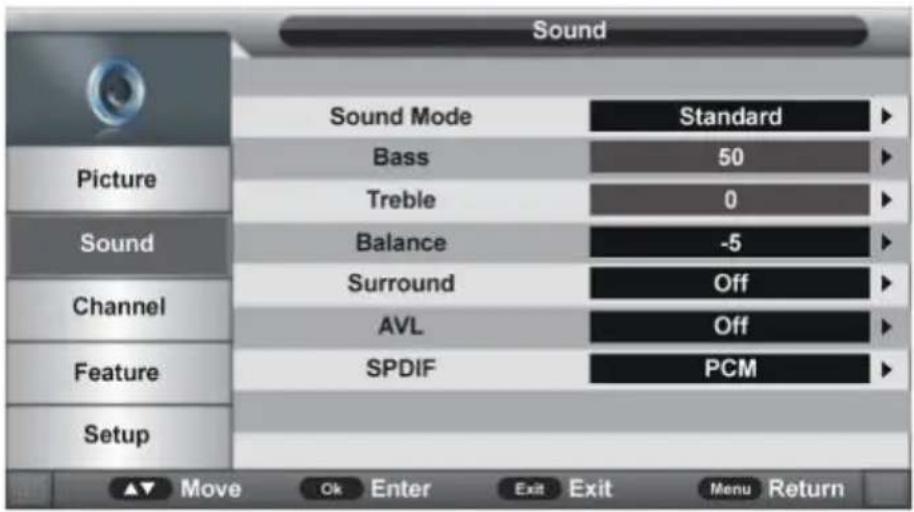
2.1 Sound Mode
Available options: Standard, Movie, Music, Speech, User.
2.2 Bass
This item is used to adjust the level of lower-pitched sounds from 0-100.
2.3 Treble
This item is used to adjust the level of higher-pitched sounds from 0-100.
NOTE: The value of Bass and Treble is adjustable only in User sound mode.
2.4 Balance
This item is used to adjust the audio output between left and right speaker from -50 to 50.
2.5 Surround
This item is used to turn on/off Surround function.
2.6 AVL (Auto Volume Level)
This item is used to turn on/off AVL function.
2.7 SPDIF
This item is used to select desired SPDIF audio output type.
Available options: Off, PCM, Auto.
3. CHANNEL
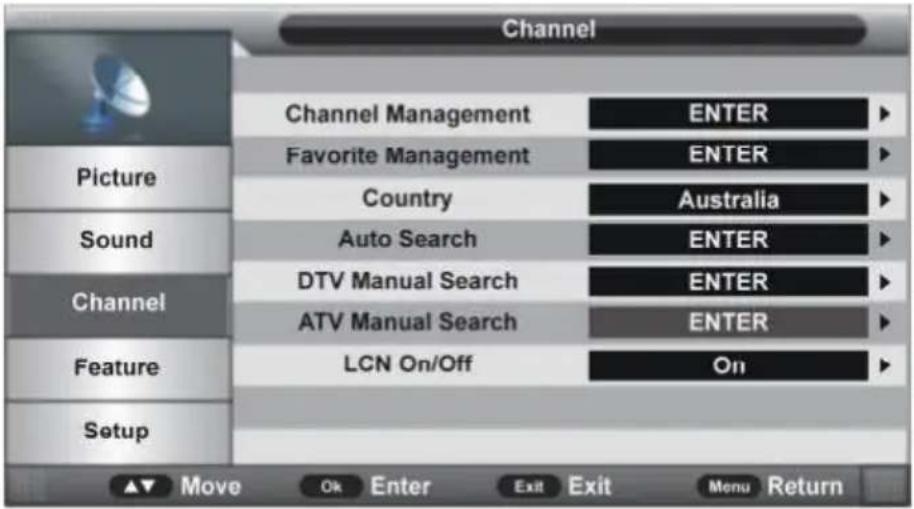
3.1 Channel Management
- Press UP/DOWN navigation button to select this item and press OK or RIGHT navigation button to enter submenu.
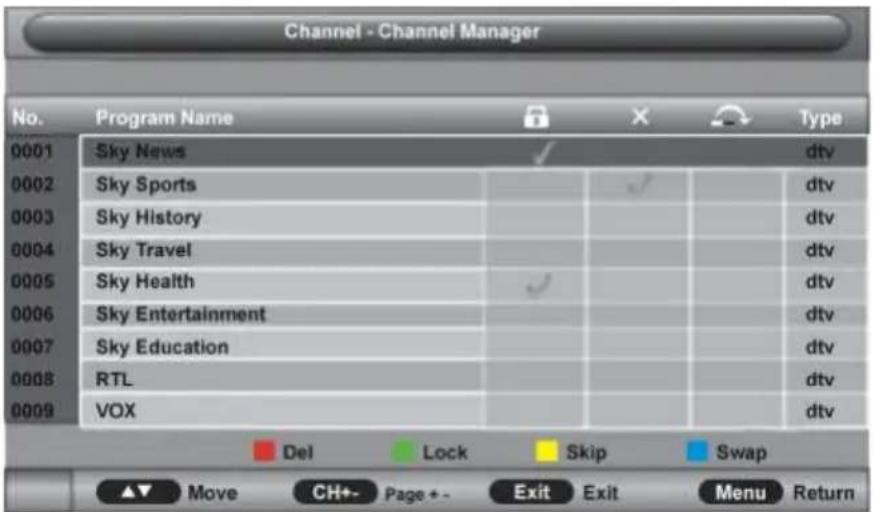
- Press UP/DOWN navigation to select preferred program.
a) Press RED button on remote control and use number buttons to input the password. Then press RED button to add/remove a delete mark on highlighted program. After that, press OK button to enter a dialogue box. Select OK to delete it; select Cancel to cancel this operation.
b) Press GREEN button on remote control and use number buttons to input the password. Then press GREEN button to lock/unlock a program.
c) Press YELLOW button on remote control to add/remove skip mark.
d) Press BLUE button on remote control to enter MOVE mode. Then use UP/DOWN navigation button to select preferred position and press OK button to move it.
e) Press UP/DOWN navigation to select preferred program. Then press OK button to enter Rename menu page.
NOTE: RENAME function is available only for analog programs.
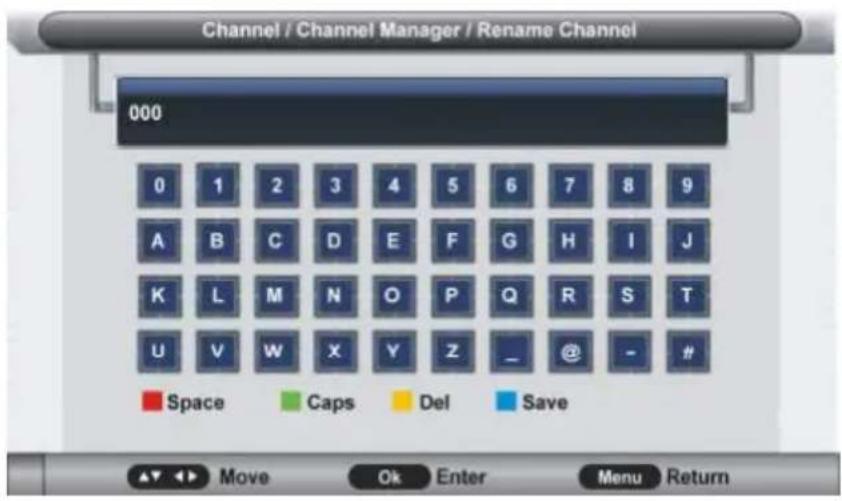
Rename operations:
- Press UP/DOWN/LEFT/RIGHT navigation button to select preferred option and press OK button to input it.
- Press RED button on remote control to add a space.
- Press GREEN button on remote control to switch between capital letters and lower case letters.
- Press YELLOW button on remote control to delete an input.
- Press BLUE button on remote control to save settings.
3.2 Favorite Management
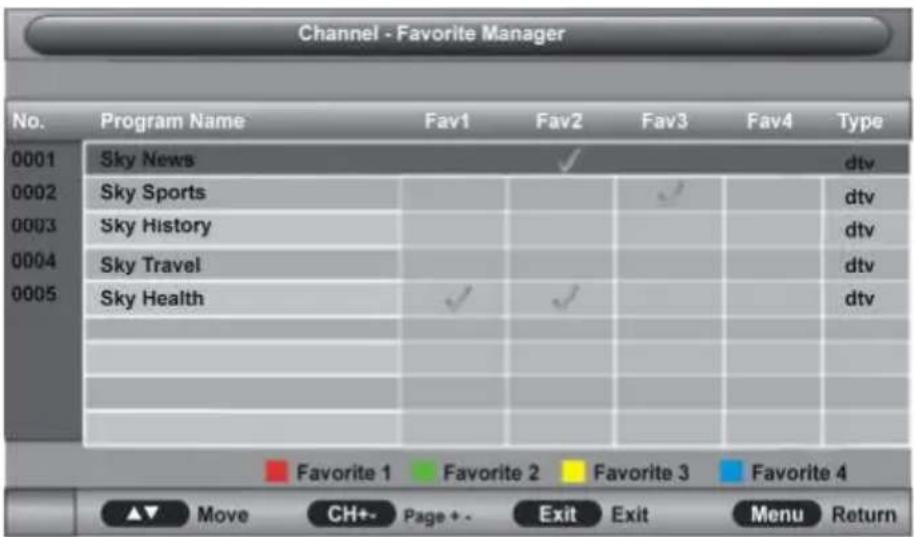
- Press UP/DOWN navigation to select preferred program.
a) Press RED button on remote control to add highlighted channel to Favorite 1 list.
b) Press GREEN button on remote control to add highlighted channel to Favorite 2 list.
c) Press YELLOW button on remote control to add highlighted channel to Favorite 3 list.
d) Press BLUE button on remote control to add highlighted channel to Favorite 4 list.
3.3 Country
This item is used to select the country that you are living in.
3.4 Auto Search
- Press UP/DOWN navigation button to select this item and press OK or RIGHT navigation button to enter submenu.
- Then press UP/DOWN navigation button to select All, DTV or ATV and press OK or RIGHT navigation button to enter a dialog box. Select OK to start auto searching; select Cancel to cancel this operation.
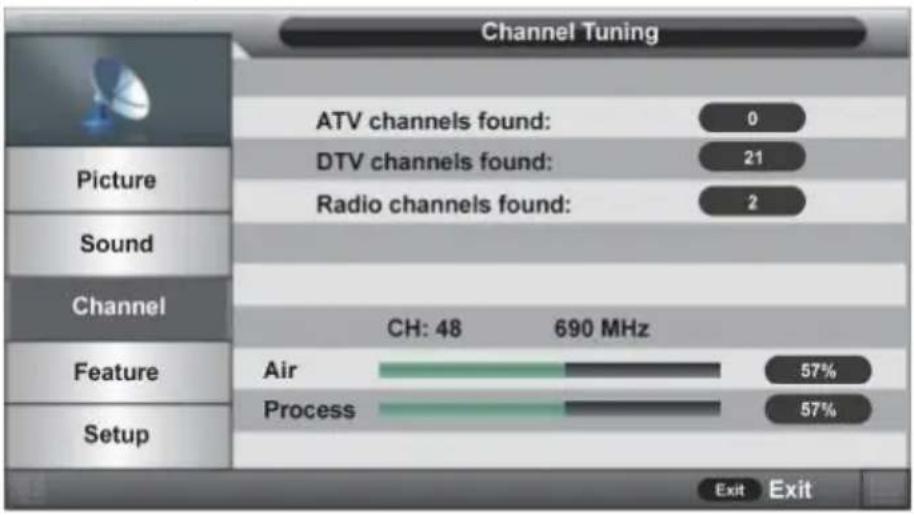
To exit auto tuning, press MENU or EXIT button and select OK.
3.5 DTV Manual Search
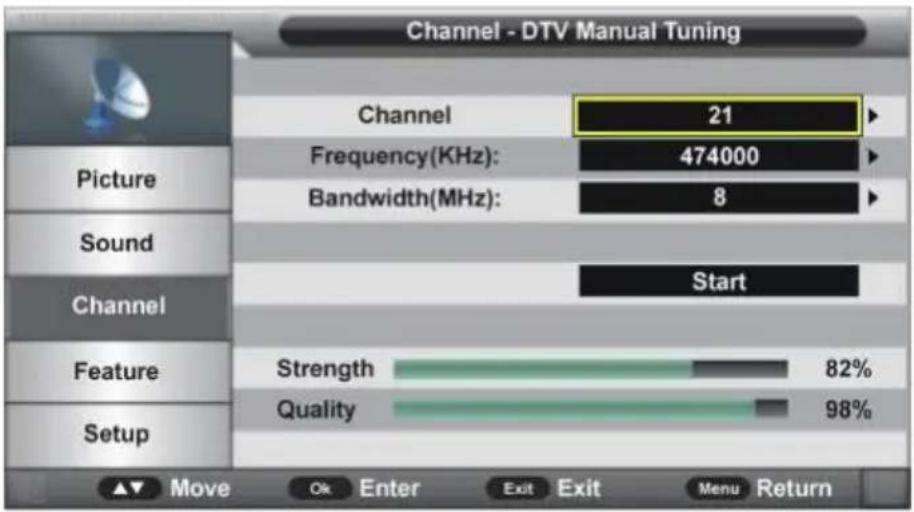
3.51 Channel
- Press OK or RIGHT navigation button to enter submenu and press UP/DOWN navigation button to select preferred program.
3.52 Frequency (KHz)
- Press OK or RIGHT navigation button to enter submenu.
- Press LEFT/RIGHT navigation button to move the cursor; press number buttons on remote control to input desired value.
3.53 Bandwidth (MHz)
- Press OK or RIGHT navigation button to enter submenu and press UP/DOWN navigation button to select preferred bandwidth.
Once the settings of part 3.51 to part 3.53 are finished, select Start in the menu and press OK button to start searching.
3.6 ATV Manual Search (for ATV input source only)
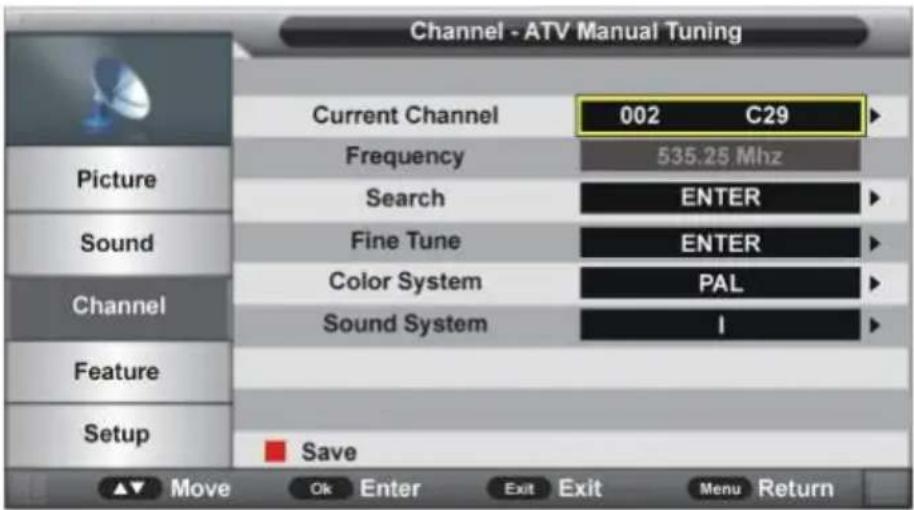
3.61 Current Channel
- Press OK or RIGHT navigation button to enter submenu and press UP/DOWN navigation button to select preferred program.
3.62 Frequency
This item is not user adjustable.
3.63 Search
This item is used to start searching.
3.64 Fine Tune
- Press OK or RIGHT navigation button to enter submenu and press LEFT/RIGHT navigation button to fine tune it.
3.65 Color System
- Press OK or RIGHT navigation button to enter submenu and press UP/DOWN navigation button to select preferred color system.
Available options: Auto, PAL, SECAM.
3.66 Sound System
- Press OK or RIGHT navigation button to enter submenu and press UP/DOWN navigation button to select preferred sound system.
Available options: BG, DK, I, L, L'.
NOTE: The Sound System options may vary due to different Color System settings.
3.7 LCN On/Off
This item is used to turn on/off LCN (Logic Channel Number).
4. FEATURE
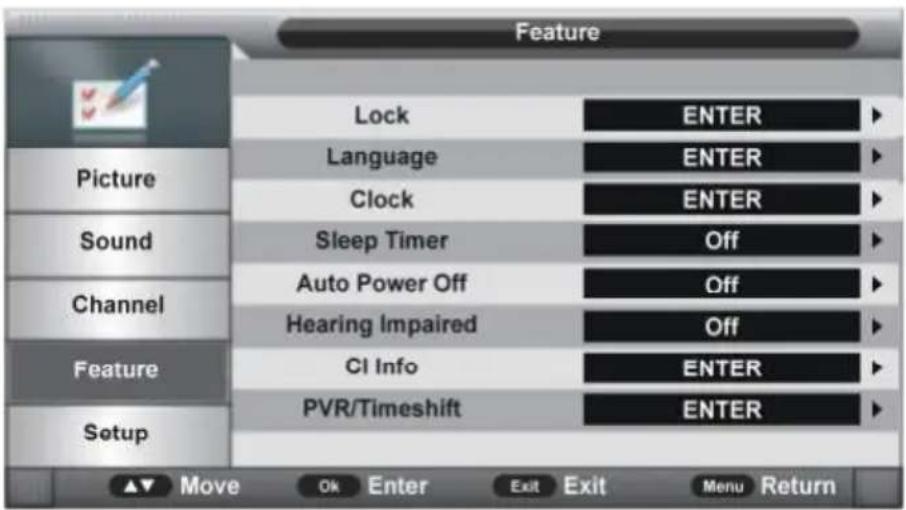
4.1 Lock
- Press OK or RIGHT navigation button to enter submenu.
- Input the factory default password "0000" using number buttons on remote control.
NOTE: You can use the universal password "8899" if forget your password.
- Press UP/DOWN navigation button to select preferred item.
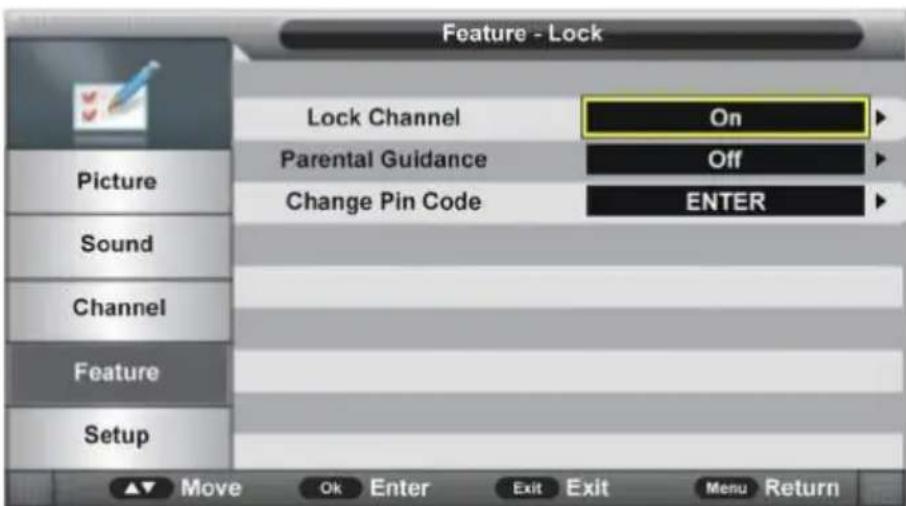
4.11 Lock Channel
This item is used to turn on/off Lock Channel function.
4.12 Parental Guidance
- Press OK or RIGHT navigation button to enter submenu and press UP/DOWN navigation button to select preferred option.
Available options: Off, 4 to 18.
4.13 Change Pin Code
- Press OK or RIGHT navigation button to enter submenu.
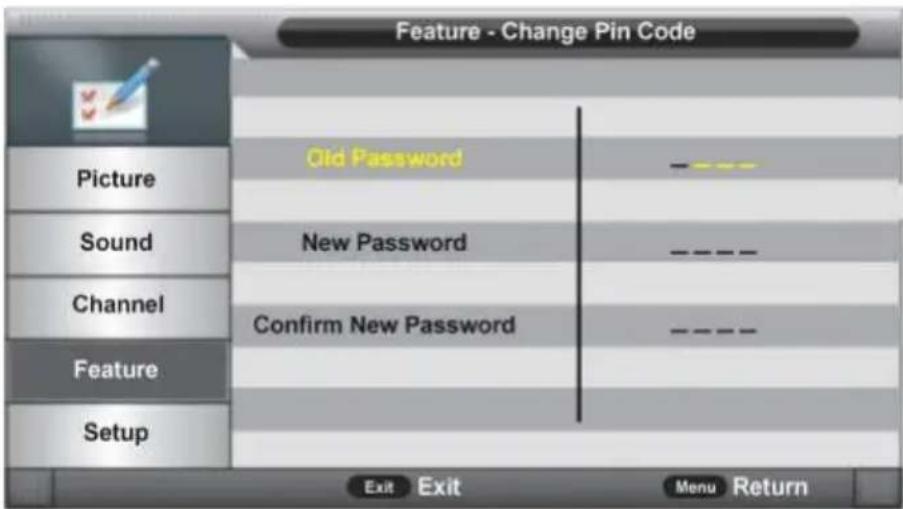
- Input the Old Password, New Password, and Confirm New Password in turn. After that, this unit will save the new password automatically.
4.2 Language
- Press OK or RIGHT navigation button to enter submenu. Then select preferred OSD menu language, subtitle language, audio language, and DTV/ATV TELETEXT language using navigation buttons.
4.3 Clock
- Press OK or RIGHT navigation button to enter submenu.
- Press UP/DOWN navigation button to select preferred item.
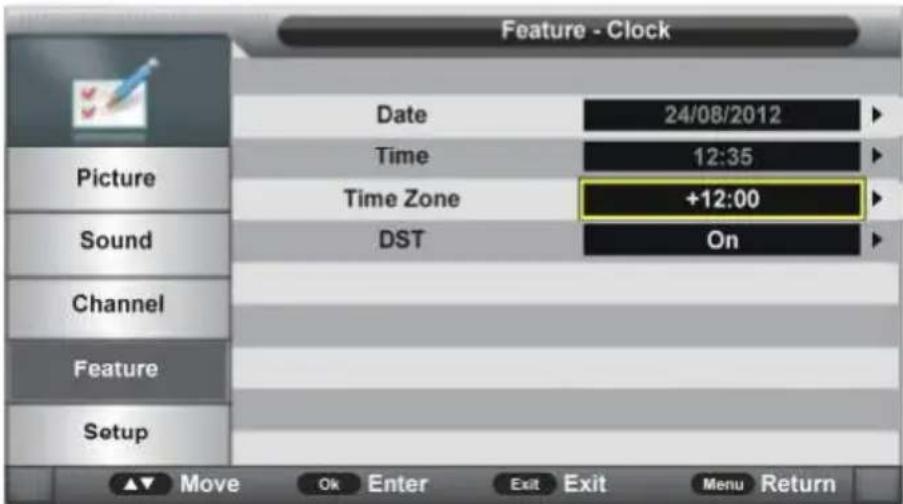
4.31 Date
When auto searching is done, this unit will get the date from the signal and save it automatically.
4.32 Time
When auto searching is done, this unit will get the time from the signal and save it automatically.
4.33 Time Zone
- Press OK or RIGHT navigation button to enter submenu and press UP/DOWN navigation button to select preferred option.
4.34 DST (Daylight Saving Time)
This item is used to turn on/off DST function.
4.4 Sleep Timer
This item is used to set the automatic sleep time in standby mode.
Available options: Off, 10 Mins, 20 Mins, 30 Mins, 60 Mins, 90 Mins, 120 Mins, 180 Mins, 240 Mins
4.5 Auto Power Off
This item is used to set the Auto Power Off time.
Available options: Off, 1 Hour, 2 Hours, 4 Hours.
4.6 Hearing Impaired
This item is used to turn on/off Hearing Impaired function. For Hearing Impaired users, this function can assist them to know a certain scene or action through the caption, instead of hearing it.
NOTE: Hearing Impaired function works only when you are viewing programs that contain related caption information.
4.7 CI Info
This item is used to display the CI information.
4.8 PVR/Timeshift
- Press OK or RIGHT navigation button to enter submenu.
- Press UP/DOWN navigation button to select preferred item.

4.81 Partition Select
- Press OK or RIGHT navigation button to enter submenu.
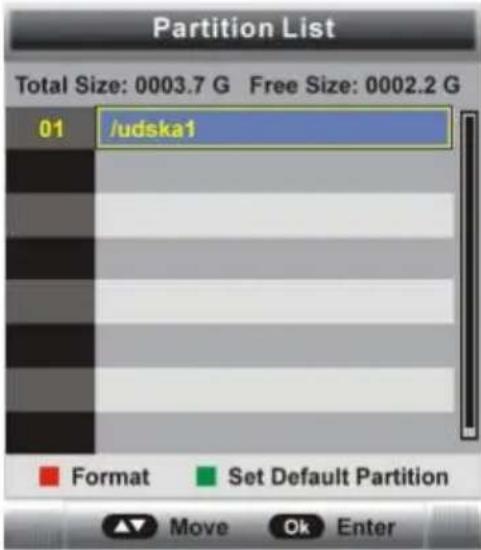
- Press RED button to enter a dialog box and then select OK to format your USB memory device.
- Press GREEN button to set default partition.
4.82 Auto Timeshift
This item is used to turn on/off Auto Timeshift function.
4.83 Timeshift Buffer
This item is used to select desired time shift buffer duration. Available options: Auto, 30Mins, 1hr, 2hr.
4.84 Timer
- Press OK or RIGHT navigation button to enter submenu.
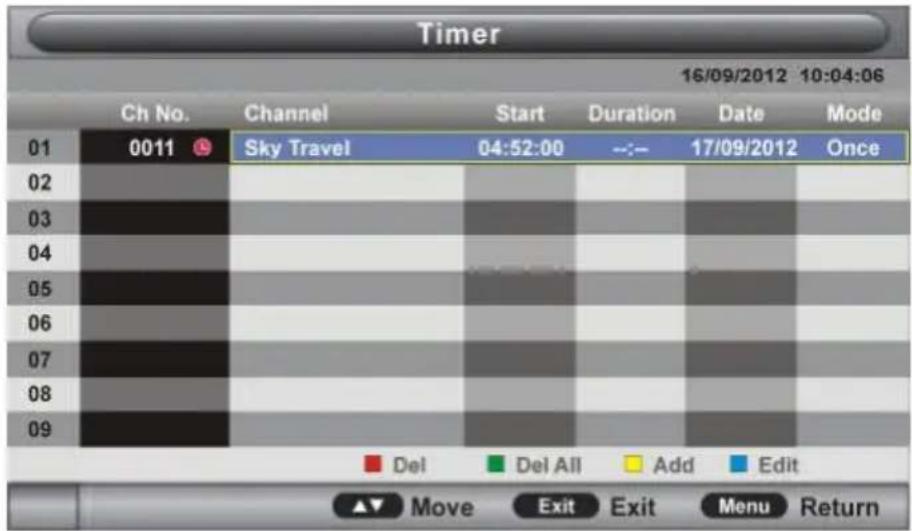
- Press RED button on remote control to delete highlighted option.
- Press GREEN button on remote control to delete all.
- Press BLUE button on remote control to enter Edit page.
- Press YELLOW button on remote control to enter Add page.
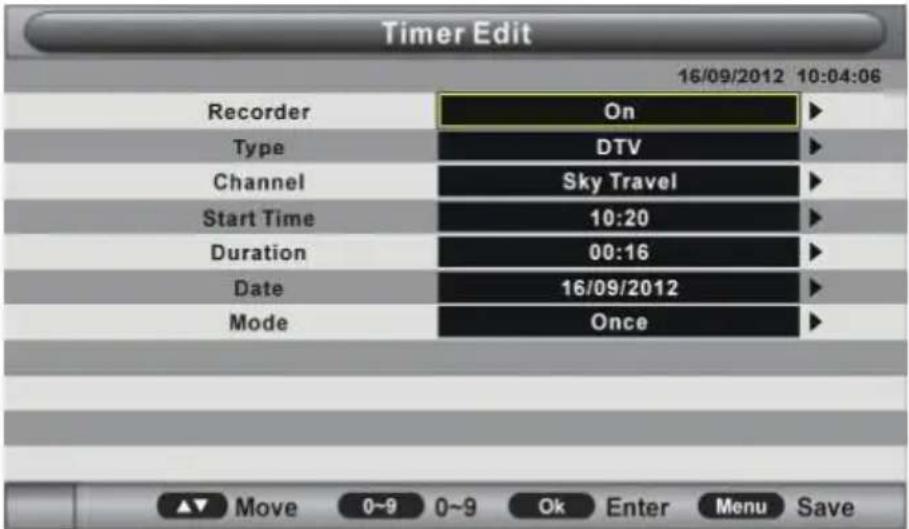
Recorder: Turn on/off Recorder.
Type: Select your recording type: DTV, Radio.
Channel: Select a channel you want to record.
Start Time: Set the recording start time.
Duration: Set the recording duration.
Date: Set the date of recording.
Mode: Set the recording mode.
NOTE: To change the numerical display of above items, press OK button to enter it and then use LEFT/RIGHT navigation button to move the cursor; use number buttons to input your desired value and press OK button to confirm your setting.
4.85 Record List
- Press OK or RIGHT navigation button to enter submenu.
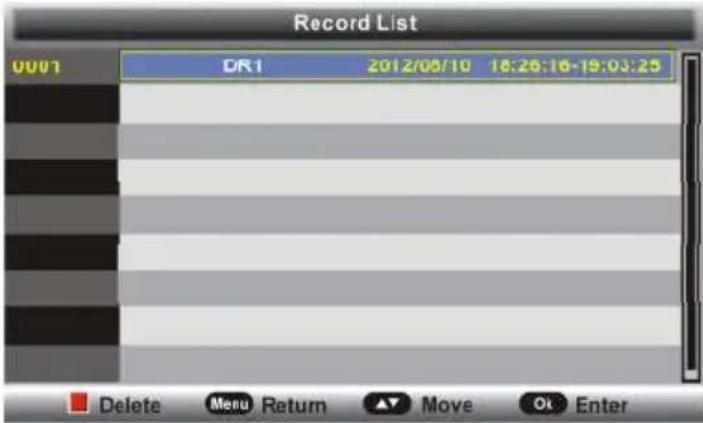
- Press UP/DOWN navigation button to select recorded files and press OK button to start playback.
4.86 Recorder Start
This item is used to start recording when watching an available digital program.
NOTE: Before recording, insert your USB memory device into USB slot first.
5. SETUP
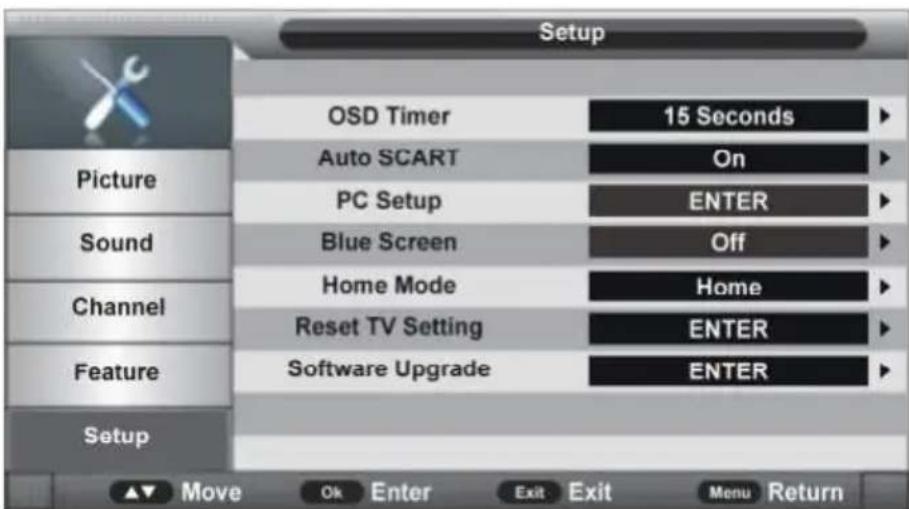
5.1 OSD Timer
- Press OK or RIGHT navigation button to enter submenu and press UP/DOWN navigation button to select preferred option.
Available options: 5/10/15/20/25/30 Seconds and Never.
5.2 Auto SCART
This item is used to turn on/off Auto SCART function. If Auto SCART is on, you can view the programs by SCART automatically when SCART cable is connected.
5.3 PC Setup (for PC input source only)
This item is adjustable only with PC input signal.
5.4 Blue Screen
This item is used to turn on/off blue background function. The screen background will turn blue at very weak or no signal condition, if Blue Screen is ON.
NOTE: This item is not adjustable in DTV mode.
5.5 Home Mode
This item is used to select desired picture mode.
Available options: Home, Dynamic, Standard, Mild.
5.6 Reset TV Setting
This item is used to reset to factory default settings.
5.7 Software Upgrade
This item is used to upgrade the TV software through USB memory device.
ATV AND OTHER MODES
- Press SOURCE button on the unit or remote control to select desired input source.
- For these modes, please refer to the menu operations of DTV mode, except for PC MODE as below.
PC MODE
- Connect a personal computer to this unit.
- Power on your computer and this unit.
- Press SOURCE button on the unit or remote control to select PC input source.
- Press MENU button to display the main menu. Select Setup using UP/DOWN navigation button. Then press OK or RIGHT navigation button to enter submenu.
- Select PC Setup and enter it.
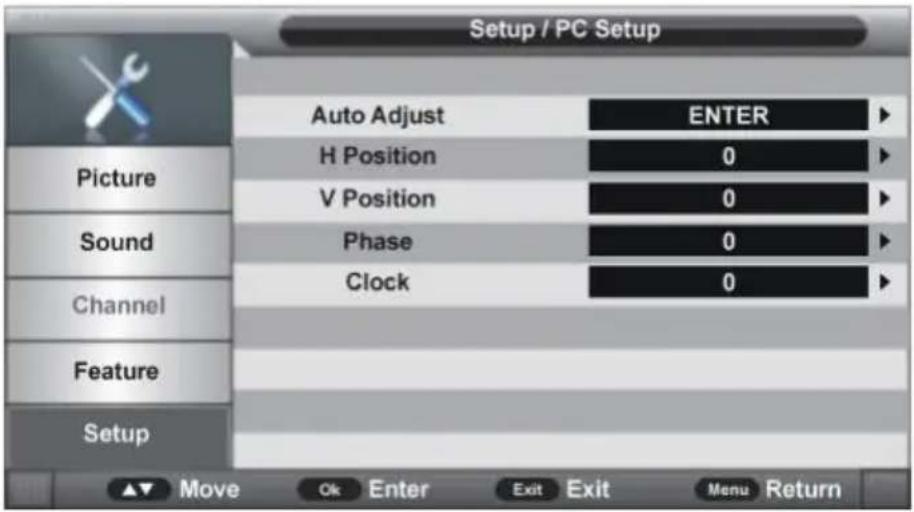
- Press UP/DOWN navigation button to select preferred item.
- Press OK or RIGHT navigation button to enter submenu. Press LEFT/RIGHT navigation button to adjust the value.
1. Auto Adjust
This item is used to adjust the PC screen automatically.
2. H Position
This item is used to adjust the value of horizontal position (available range: -16 to 16).
3. V Position
This item is used to adjust the value of vertical position (available range: -16 to 16).
4. Phase
This item is used to adjust the picture apply to the TV (available range: 0 to 100).
5. Clock
This item is used to adjust the signals transfer speed (available range: 50 to +50).
NOTE: For other menus, please refer to the menu operations of DTV mode.
TELETEXT
HOW TO USE THE TELETEXT
To bring up Teletext on the screen:
- Select an analogue TV channel with a teletext signal.
- Press the TEXT button to go on the teletext pages.
- Press the TEXT button twice to go back to TV mode.
Choosing a teletext page
Enter the page number you want by using the numeric buttons. Page numbers are always 3 numbers. If you press a wrong number, you must complete the three digit number and then re-enter the correct page number.
Hold
You can press HOLD button to freeze the pages and press it again to unfreeze the page.
INDEX
Press the INDEX button to go to the main index page of your teletext.
Making the text bigger
You can double the size of the text on the teletext pages to make it easier to read.
- Press the SIZE button to make the text on the top half of the page bigger.
- Press the SIZE button again to make the text on the bottom half of the page bigger.
- Press the SIZE button again if you want the text reduced to normal size.
Reveal mode
The REVEAL button means you can show hidden teletext informations (such as answers to puzzles and riddles). To do this, press the REVEAL button on your remote control.
Subpages
Some teletext pages may contain several subpages. To read the subpage, do the following. You can go to a subpage by pressing the SUBPAGE button. You can then select the page number you want using the numeric buttons on your remote control.
For example, if you want the third subpage, you would enter 003.
Press the SUBPAGE button again to exit the subpage menu.
Press TEXT twice to exit TELETEXT.
Colour buttons
Press these buttons to go straight to the teletext highlighted in the same color.
MAINTENANCE
- Be sure to press POWER button to set the player to the standby mode and disconnect the power plug before maintaining the player.
● Wipe the player with a dry, soft cloth. - If the surface is extremely dirty, wipe clean with a cloth which has been dipped in a weak soap-water solution and wrung out thoroughly, and then wipe again with a dry cloth.
● Never use alcohol, benzene, thinner, cleaning fluid or other chemicals. And do not use compressed air to remove dust.
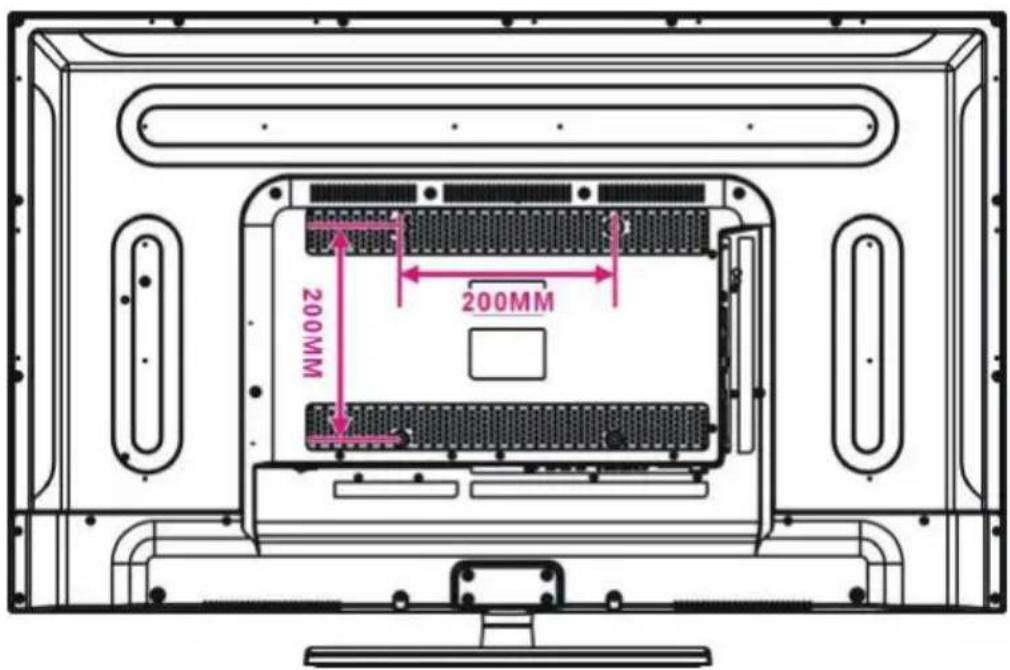
WALL MOUNTING
- Contact a professional for assistance when wall mounting your TV. We are not responsible for any damage to the product or injury to yourself, if you mount the TV on your own.
- Do not wall mount the TV while TV is turned on. It may cause personal injury due to electric shock.
● Use standard M6*10mm screws (4 pieces) to mount this TV.
Back of your TV
SPECIFICATIONS
| Display Device | 40 inch LED TV |
| Resolution 1920×1080 | |
| Display Colors 16.7 M | |
| Contrast Ratio 5000:1 | |
| Aspect Ratio 16:9 | |
| Life Time | 30,000 Hrs |
| USB Multimedia Playback Format | Movie: AVI, MPEG 1/2, WMV, TS |
| Music: WMA, AAC, AC3, MP3 | |
| Photo: JPEG, BMP, PNG, GIF | |
| Text: TXT | |
| Power Source AC 100~240V, 50/60Hz | |
| Power Consumption <80W | |
| Operation Temperature | -5 °C to 45°C |
| Measurement 934(W)×246(D)×615(H) mm | |
| Weight Approx. 9 kg | |
Specifications are subject to change without notice.
GENERAL TROUBLESHOOTING
Check the following points before assuming malfunctions of this unit:
| Symptom[COMMON] Remedy | |
| No power. Insert the power plug securely into the power outlet. | |
| No picture. Ensure that the equipment is connected properly. | |
| No sound.Distorted sound. | Ensure that the equipment is connected properly.Ensure that the input setting for the TV and stereo system are correct.Adjust the master volume to a suitable volume by pressing VOL+/VOL- button. |
| No operations can be performed with the remote control unit. | Check the batteries are installed with the correct polarities.The batteries are exhausted: replace them with new ones.Point remote control at the remote control sensor and operate it again.Operate the remote control unit at a distance of no more than 6m from the remote control sensor.Remove the obstacles between the remote control and remote control sensor. |
| No key operation (by the main unit and/or the remote control unit) is effective. | Disconnect the power plug and then reconnect it. (The player may not be operating properly due to lightning, static electricity or some other factors.) |
| Symptom[TV] Remedy | |
| No or poor picture. | Adjust antenna or use an external antenna.Relocate the unit near a window (if inside a building).Move units away from this product that causes interference.Do Auto Tuning again.Try another channel. |
| No sound or poor sound. | Check the audio settings.Press MUTE button on remote control to cancel mute function.Unplug the headphone. |
| Noise or other interface. | Electronic equipment near the unit is causing interface. Relocate the unit or move the equipment. |
End of Life Disposal

natural_image
Symbol of a trash bin crossed with no text or labels, accompanied by a black rectangular block below (no readable text or symbols)Warning ! This logo set on the product means that the recycling of this apparatus comes within the framework of the Directive 2002/96/CE of January 27, 2003 concerning the Waste of Electrical and Electronic Equipment (WEEE). This symbol means that used electrical and electronic products should not be mixed with general household waste. There is a separate collection system for these products.
If you want to dispose of this equipment, please do not use the ordinary dust bin!
- The presence of dangerous substances in the electrical and electronic equipments can have potential consequences on the environment and human health in the cycle of reprocessing this product.
- Therefore, at the end of its lifetime, this product shall not be disposed with other non-recycled waste. Used electrical and electronic equipment must be treated separately and in accordance with legislation that requires proper treatment, recovery and recycling of used electrical and electronic equipment.
- Local authorities and resellers have set special procedures for the purpose of collecting and recycling this product (please contact your local authority for further details). You have the obligation to use the selective waste collection systems put in place by your local authority.
- If your used electrical or electronic equipment has batteries or accumulators, please dispose of these separately beforehand according to local requirements.
- By disposing.of this product correctly you will help ensure that the waste undergoes the necessary treatment, recovery and recycling and thus prevent potential negative effects on the environment and human health which could otherwise arise due to inappropriate waste handling.
IMPORTER
This product was imported by the Company : LEMA S.A.S.
For any questions concerning the conformity of the product, thank you to send your request to :
LEMA S.A.S.
28, Boulevard Zéphirin Camélinat 92230 GENNEVILLIERS FRANCE
CE
This unit complies with European Council Directive 2006 / 95 CE (Electromagnetic Compatibility & Low Voltage Directives)
natural_image
Modern flat-screen TV displaying a stylized eye with green feathered eyelashes (no text or symbols visible)
okai
TTE-40D1304


- AVERTISSEMENTS
- Vue avant
- AFFICHAGE DES INFORMATIONS
- Configuration 1
- Configuration 3
- Configuration 5
- MODE IMAGE
- Modes son
- Fonction Renommer
- Chaîne
- Date
- SAFETY INSTRUCTIONS
- WARNING – TO REDUCE THE RISK OF FIRE, ELECTRIC SHOCK, OR SERIOUS PERSONAL INJURY:
- CAUTION- TO REDUCE THE RISK OR PERSONAL INJURY OR PRODUCT/PROPERTY DAMAGE:
- CAUTION ON HEADPHONE USE:
- BATTERY HANDLING AND USAGE:
- TABLE OF CONTENTS
- GETTING STARTED
- OPERATIONS
- FOR REFERENCE
- ACCESSORIES
- STAND INSTALLATION
- Step 1
- Step 2
- Step 3
- NOTES:
- GENERAL PARTS
- MAIN UNIT
- Front View
- REMOTE CONTROL
- POWER
- TV/RADIO (DTV)
- RED button (TV)
- GREEN button (TV)
- BLUE button (TV)
- YELLOW button (TV)
- FAV
- TEXT\*
- GUIDE (DTV)
- HOLD\*
- SUBTITLE
- SIZE (TV)\*
- SUBPAGE\*
- ASPECT
- MEDIA
- REMOTE CONTROL PREPARATION
- BATTERY INSTALLATION
- SERVICE LIFE OF BATTERIES
- NOTE:
- Precaution on battery use
- IMPORTANT NOTE ON BATTERIES :
- BASIC CONNECTIONS
- CONNECTING TO AC POWER SOURCE
- CONNECT EXTERNAL ANTENNA TO UNIT
- Notes : the headphone is not supplied with the TV set.
- MAKE SURE ALL THE EQUIPMENTS AND POWER CORD ARE
- CONNECTED PROPERLY AND THE UNIT IS SET IN CORRECT MODE BEFORE KINDS OF OPERATIONS.
- BASIC OPERATIONS
- SELECT DESIRED PROGRAM
- VOLUME CONTROL
- MUTE CONTROL
- SOURCE SETTING
- PICTURE MODE
- SOUND MODE
- SLEEP TIME SETTING
- VIDEO SIZE SETTING
- MULTI-AUDIO SETTING
- INFORMATION DISPLAY
- TV GUIDE (FOR DTV MODE ONLY)
- FAVORITE LIST
- QUICK SELECT
- TELETEXT
- TV/RADIO (FOR DTV MODE ONLY)
- SUBTITLE
- RECORDER (FOR DTV MODE ONLY)
- When watching a digital program:
- To watch recorded programs:
- TIME SHIFT (FOR DTV MODE ONLY)
- MEDIA PLAYBACK
- Photo
- During photo normal playing:
- Music
- During music normal playing:
- Movie
- During movie normal playing:
- e-Book
- During e-book normal playing:
- MAIN MENU
- Common procedure for initial settings
- First Time Installation
- Setup 1
- Setup 2
- Setup 3
- Setup 4
- Setup 5
- DTV MODE
- PICTURE
- Picture Mode
- Brightness
- Contrast
- Sharpness
- Colour
- Tint
- Colour Temperature
- Aspect Ratio
- Noise Reduction
- SOUND
- Sound Mode
- Bass
- Treble
- Balance
- Surround
- AVL (Auto Volume Level)
- SPDIF
- CHANNEL
- Channel Management
- Rename operations:
- Favorite Management
- Country
- Auto Search
- DTV Manual Search
- Channel
- Frequency (KHz)
- Bandwidth (MHz)
- Once the settings of part 3.51 to part 3.53 are finished, select Start in the menu and press OK button to start searching.
- ATV Manual Search (for ATV input source only)
- Current Channel
- Frequency
- Search
- Fine Tune
- Color System
- Sound System
- LCN On/Off
- FEATURE
- Lock
- Lock Channel
- Parental Guidance
- Change Pin Code
- Language
- Clock
- Time
- Time Zone
- DST (Daylight Saving Time)
- Sleep Timer
- Auto Power Off
- Hearing Impaired
- CI Info
- PVR/Timeshift
- Partition Select
- Auto Timeshift
- Timeshift Buffer
- Timer
- Record List
- Recorder Start
- SETUP
- OSD Timer
- Auto SCART
- PC Setup (for PC input source only)
- Blue Screen
- Home Mode
- Reset TV Setting
- Software Upgrade
- ATV AND OTHER MODES
- PC MODE
- Auto Adjust
- H Position
- V Position
- Phase
- Clock
- HOW TO USE THE TELETEXT
- To bring up Teletext on the screen:
- Choosing a teletext page
- Hold
- INDEX
- Making the text bigger
- Reveal mode
- Subpages
- Colour buttons
- MAINTENANCE
- WALL MOUNTING
- SPECIFICATIONS
- GENERAL TROUBLESHOOTING
- End of Life Disposal
- If you want to dispose of this equipment, please do not use the ordinary dust bin!
- IMPORTER
- okai
Brand : TOKAI
Model : TTE40D1304K
Category : Television