14 SERIES - TV JENSEN - Free user manual and instructions
Find the device manual for free 14 SERIES JENSEN in PDF.


| Product type | LED Television |
| Brand | Jensen |
| Model | 14 SERIES |
| Screen size | 18.5 inches (other sizes available) |
| Maximum resolution | 1366 x 768 pixels |
| Brightness | 200 cd/m² |
| Contrast ratio | 1000:1 |
| Viewing angle horizontal/vertical | 170° / 160° |
| Input connectors | 1 x HDMI, 1 x USB, 1 x VGA, 1 x YPbPr, 1 x RF (antenna), 1 x AV composite |
| Output connectors | 1 x Audio (L/R), 1 x SPDIF |
| Power supply | AC 120V, 50/60Hz |
| Power consumption | 25 W |
| Dimensions (W x H x D) | 458 x 344 x 156 mm |
| Weight | 3.5 kg |
| Main features | Remote control, OSD menu, parental lock, sound and image control, timer, closed captioning, channel list, USB mode (photo/music) |
| Care and cleaning | Clean with a soft dry cloth. For stains, use a cloth slightly moistened with a mild soap solution. Do not use solvents. |
| Safety | Do not expose to rain or moisture. Unplug during storms or when not in use for a long time. Keep away from heat sources. |
| Spare parts and repairability | Contact an authorized service center for repairs. Use only manufacturer-specified parts. |
| General information | Instruction manual available in PDF. Multilingual manual (French, English, Spanish). |
Frequently Asked Questions - 14 SERIES JENSEN
User questions about 14 SERIES JENSEN
0 question about this device. Answer the ones you know or ask your own.
Ask a new question about this device
Download the instructions for your TV in PDF format for free! Find your manual 14 SERIES - JENSEN and take your electronic device back in hand. On this page are published all the documents necessary for the use of your device. 14 SERIES by JENSEN.
USER MANUAL 14 SERIES JENSEN
- Please observe all safety precautions when using this product.
- Please read this manual carefully.
• Part identification (Right View) / Accessories 6.
- Part identification (Back View) 7
- Mounting on a Desktop / Installation Precautions.8
- Installing an Antenna 9
- Remote control....10 - 11
- Precautions / How to use the remote control 12.
Connection
• VCR Connections / Digital Amplifier Connections / Watching Video Tape 1.3
- Satellite/Cable TV Set-Top Box Connections / Watching Cable TV.14
• DVD Connections / USB Connections / Playing the DVD 15.
• PC Connections / External Audio Amplifier / How to use as a PC monitor.... 16
Basic Use
- Selecting input source / Initial Setup Wizard....17
Application
- Menu Operation 18.
- Customizing the PICTURE Settings 19
- Customizing the AUDIO Settings 20
- Customizing the TIMER Settings 21
- Customizing the SETUP Settings 22 - 23
- Customizing the LOCK Settings 24 - 26
- Customizing the CHANNEL Settings 27 - 28
- USB Settings. 29
Maintenance and Service
- Trouble shooting 30
- Specifications 3.1.
WARNING
To reduce the risk of fire or electric shock, do not expose this product of rain or moisture.
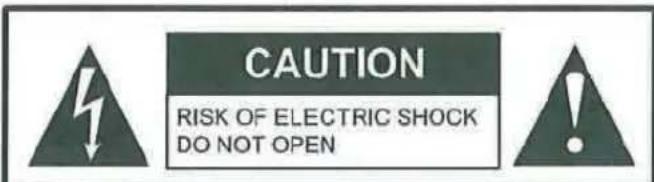
CAUTION-To reduce the risk of electric shock, do not perform any servicing other than that contained in the operating instructions unless you are qualified to do so.
This symbol is intended to alert the user to the presence of uninsulated “dangerous voltage” within the product's enclosure that may be of sufficient magnitude to constitute a risk of electric shock to persons.

This symbol is intended to alert the user to the presence of important operating and maintenance (servicing) instructions in the literature accompanying the appliance.
This product utilizes tin-lead solder, and fluorescent lamp containing a small amount of mercury. Disposal of these materials may be regulated due to environmental considerations. For disposal or recycling information, please contact your local authorities or the Electronic Industries Alliance: www.eia.org.
FCC STATEMENT
This product has been tested and found to comply with the limits for a Class B digital device, pursuant to part 15 of the FCC Rules. These limits are designed to provide reasonable protection against harmful interference when the equipment is operated in a commercial environment. This product generates, uses, and can radiate radio frequency energy and, if not installed and used in accordance with the instruction manual, may cause harmful interference to radio communications. Operation of this equipment in a residential area is likely to cause harmful interference in which case the user will be required to correct the interference at his own expense.
FCC CAUTION:
Pursuant to 47CFR, Part 15.21 of the FCC rules, any changes or modifications to this monitor not expressly approved by the manufacturer could cause harmful interference and would void the user's authority to operate this device.
WARNING
This is a CLASS B product. In a domestic environment, this product may cause radio interference, in which cause the user may be required to take adequate measures to counter interference
IMPORTANT SAFETY INSTRUCTIONS
1) Read these instructions.
2) Keep these instructions.
3) Heed all warnings.
4) Follow all instructions.
5) Do not use this product near water.
Apparatus should not be exposed to dripping or splashing and no objects filled with liquids, such as vases, should be placed on the product.
6) Clean only with a dry cloth.
7) Do not block any ventilation openings. Install in accordance with the manufacturer's instructions.
8) Do not install near any heat sources such as radiators, heat registers, stoves, or other apparatus(including amplifiers) that produce heat.
9) Do not defeat the safety purpose of the polarized or grounding-type plug. A polarized plug has two blades with one wider than the other. A grounding type plug has two blades and a third grounding prong. The wide blade or the third prong are provided for your safety. If the provided plug does not fit into your outlet, consult an electrician for replacement of the obsolete outlet.
10) Protect the power cord from being walked on or pinched, particularly at plugs, convenience receptacles, and the point where they exit from the apparatus.
11) Only use attachments / accessories specified by the manufacturer.
12) Use only with the cart, stand, tripod, bracket, or table specified by the manufacturer or sold with the apparatus.
when a cart is used, use caution when moving the cart / apparatus combination to avoid injury from tip-over.

13) Unplug this apparatus during lightning storms or when unused for long periods of time.
14) Refer all servicing to qualified service personnel. Servicing is required when the product has been damaged in any way, such as power-supply cord or plug is damaged, liquid has been spilled or objects have fallen into the product, the product has been exposed to rain or moisture, does not operate normally, or has been dropped.
15) Where the mains plug or an appliance coupler is used as the disconnect device, the disconnect device shall remain readily operable.
Before using your TV, please read these instructions completely, and keep this manual for future reference, Carefully observe and comply with all warnings, cautions and instructions placed on the unit or described in the operating instructions or service manual.
WARNING
To guard against injury, the following basic safety precautions should be observed in the installation, use and servicing of the unit.
Power Sources
This unit should be operated only from the type of power source indicated on the information label. If you are not sure of the type of electrical power supplied to your home, consult your dealer or local power company.
Grounding or Polarization
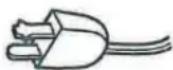
This unit is equipped with a polarized AC power cord plug (a plug having one blade wider than the other), or a DC power connection, for use in a vehicle. Follow the instructions below:
For the unit with a polarized AC power cord plug
This plug will fit into the power outlet only one way. This is a safety feature. If you are unable to insert the plug fully into the outlet, try reversing the plug. If the plug still fails to fit, contact your electrician to have a suitable outlet installed. Do not defeat the safety purpose of the polarized plug by forcing it in.
For the unit with a DC power connector
For installation in a vehicle, connect the red wire to the 12V accessory line and the black wire to ground terminal.
Wall outlet
Do not use a poor fitting outlet.
Insert the plug fully into the outlet. If it is loose, if may cause arcing and result in fire. Contact your electrician to have the outlet changed.
Wiring
For your safety, unplug the power cord when wiring cables.
Electric shock
Do not tough the AC power cord or the unit with a wet hand. If you plug / unplug the AC power cord from the unit with a wet hand, it may cause electric shock.
Never attempt to move the unit unless the AC power cord is disconnected.
Cleaning
- Clean the power plug regularly.
- If the plug is covered with dust and it picks up moisture, its insulation may deteriorate and result in fire. Unplug the power plug and clean it regularly.
- Unplug the power cord when cleaning this unit. If not, it may result in electric shock.
- Clean the cabinet of the TV with a dry safe cloth. To remove dust from the screen, wipe it gently with a safe cloth.
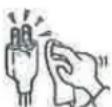
- Stubborn stains may be removed with a cloth slightly dampened with a solution of mild soap and warm water. Never use strong solvents such as thinner or benzine for cleaning.
- If using a chemically pre-treated cloth, please follow the instructions provided on the package.
Overloading
Do not overload wall outlets, extension cords or convenience receptacles beyond their capacity, since this can result in fire or electric shock.
Power
Always turn the unit off when it is not being used.
When the unit is left unattended and unused for long periods of time, unplug it from the wall outlet as a precaution against the possibility of an internal malfunction that could create a fire hazard.
Sound
If a snapping or popping sound from the TV is continuous or frequent while the TV is operating, unplug the TV and consult your dealer or service technician. It is normal for TV's to make occasional snapping or popping sounds, particularly when being turned on or off.
Power Cord
If you damage the power cord, it may result in fire or electric shock.
- Do not pinch, bend, or twist the cord excessively. The core lines may be bared and cut and cause short-circuit, resulting in fire or electric shock.
- Do not convert or damage the power cord.
- Do not put anything heavy on the power cord. Do not pull the power cord.
- Keep the power cord away from heat sources.
- Be sure to grasp the plug when disconnecting the power cord. If the power cord is damaged, stop using it and replace with a new one.
Ventilation
The slots and openings in the TV are provided for necessary ventilation. To ensure reliable operation of the unit, and to protect it from overheating, these slots and openings must never be blocked or covered. Unless proper Ventilation is provided, the unit may gather dust and get dirty. For proper ventilation, observe the following:
- Do not install the unit turned backward or sideways.
- Do not install the unit turned over or upside down. Never cover the slots and openings with a cloth or other materials.
- Never block the slots and openings by placing the unit on a bed, sofa, rug or other similar surface.
- Never place the unit in a confined space, such as a bookcase or built-in cabinet, unless proper ventilation is provided.
- Leave some space around the unit. Otherwise, adequate air-circulation may be blocked, causing overheating, and may cause fire or damage the unit.
Heat sources
Do not install near any heat sources such as radiators, heat registers, stoves, or other apparatus (including amplifiers) that produce heat.
Do not use this product near water
Do not use near a bathtub, washbowl, kitchen sink, or laundry tub, in a wet basement, or near a swimming pool. Do not use immediately after moving from a low temperature to high temperature environment, as this cause condensation, which may result in fire, electric shock, or other hazards. This product should not be exposed to dripping or splashing and no objects filled with liquids, such as vases, should be placed on the product.
Entering of objects and liquids
Never insert an object into the product through vents or openings. High voltage flows in the product, and inserting an object can cause electric shock and / or short internal parts. For the same reason, do not spill water or liquid on the product.
Lightning
Unplug this apparatus during lightning storms or when unused for long periods of time.
For added protection during a lightning storm, or when left unattended and unused for long periods of time, unplug the product from the wall outlet and disconnect the antenna. This will prevent damage to the equipment due to lightning and power-line surges.
Servicing
Refer all servicing to qualified service personnel. Servicing is required when the product has been damaged in any way, such as power-supply cord or plug is damaged, liquid has been spilled or objects have fallen into the apparatus, the apparatus has been exposed to rain or moisture, does not operate normally, or has been dropped.
Replacement parts
In case the product needs replacement parts, make sure the service person uses replacement parts specified by the manufacturer, or those with the same characteristics and performance as the original parts. Use of unauthorized parts can result in fire, electric shock and / or other danger.
Attachments
Only use attachments / accessories specified by the manufacturer. Do not use attachments not recommended by the manufacturer. Use of improper attachments can result in accidents.
Damage requiring service
If any of the following conditions occurs, unliug the power cord from the AC outlet and request a qualified service person to perform repairs.
a. The power cord or plug is damaged.
b. Liquid is spilled on the product or when objects have fallen into the product.
c. The product has been exposed to rain or water.
d. The product does not operate properly as described in the operating instructions.
Do not touch the controls other than those described in the operating instructions. Improper adjustment of controls not described in the instructions can cause damage, which often requires extensive adjustment work by qualified technician.
e. The product has been dropped or the cabinet has been damaged in any way.
f. The product displays an abnormal condition or exhibits a distinct change in performance. Any noticeable abnormality in the product indicates that the product needs servicing.
Safety checks
Upon completion of service or repair work, request the service technician to perform safety checks to ensure that the product is in proper operating condition.
Wall or ceiling mounting
When mounting the product on a wall or ceiling, be sure to install be product according to the method recommended by the manufacturer. This is safety feature.
Panel protection
This panel used in this product is made of glass. Therefore, it can break when the product is dropped or impacted upon by other objects. Be careful not to be injured by broken glass pieces if the panel breaks.
Pixel defect
Occasionally, a few non-active pixels may appear on the screen as a fixed point of blue, green or red. Please note that this does not affect the performance of your product.
Antennas
Outdoor Antenna Grounding
If an outdoor antenna is installed, follow the precautions below. An outdoor antenna system should not be located in the vicinity of overhead power lines or other electric light or power circuits, or where it can come in contact with such power lines or circuits.
WHEN INSTALLING AN OUTDOOR ANTENNA SYSTEM, EXTREME CARE SHOULD BE TAKEN TO KEEP FROM CONTACTING POWER LINES OR CIRCUITS AS CONTACT WITH THEM IS ALMOST INVARIABLY FATAL.
Be sure the antenna system is grounded to provide some protection against voltage surges and built-up static charges. Section 810 of the National Electrical Code (NEC) in USA and Section 54 of the Canadian Electrical Code in Canada provides information with respect to proper grounding of the mast and supporting structure, grounding of the lead-in wire to an antenna discharge unit, size of grounding conductors, location of antenna discharge unit, connection to grounding electrodes, and requirements for the grounding electrode.
Antenna Grounding According to the National Electrical Code, ANSI/NFPA 70
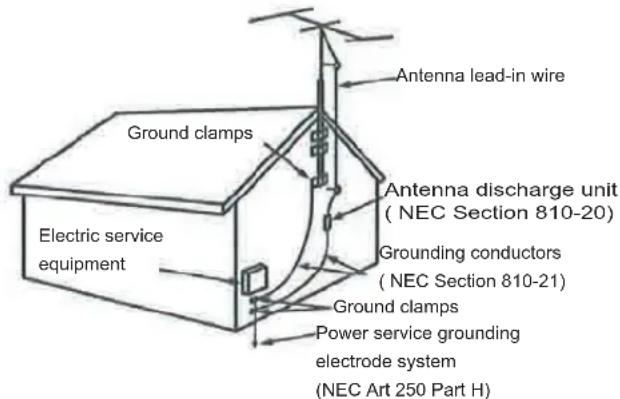
NEC: National Electrical Code
Part Identification
Right View
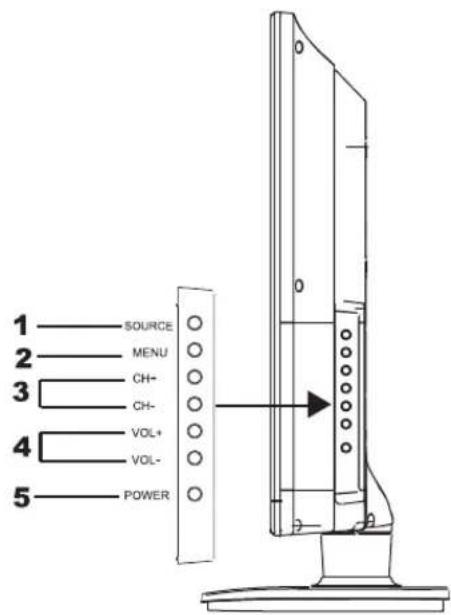
1 SOURCE Button
② MENU Button-OSD Menu Display Button
③ CH+/CH-Button
④ VOL+ / VOL- Button
⑤ POWER Button
Accessories
● The configuration of the components may look different from the following illustration.
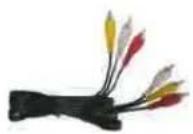
AV Cable

Battery 1.5V(AA×2)
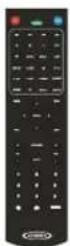
Rrmote Control
Part Identification
Back View
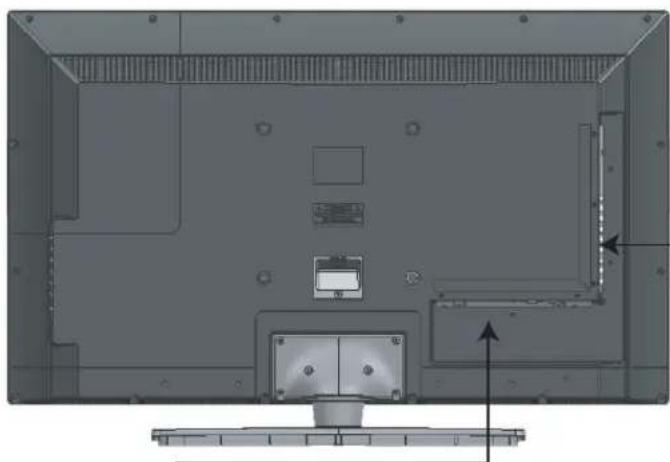
natural_image
Top-down technical drawing of a computer monitor showing internal components and mounting base (no text or symbols)JE3214 & JE3914
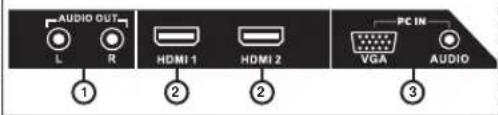

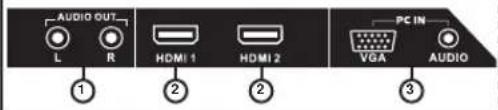
JE1914
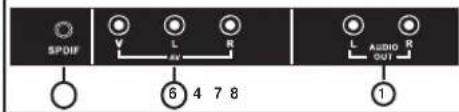

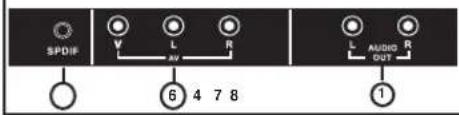
- AUDIO (L/R) OUT
- HDMI 1 / HDMI 2 / HDMI 3 INPUT
- PC IN (VGA and AUDIO) INPUT
- USB Port
- Y Pb Pr INPUT
- AV IN (VIDEO and AUDIO)
- SPDIF OUTPUT
- RF IN
- HEADPHONE OUTPUT
Mounting on a Desktop
natural_image
Soccer ball on a green field under a blue-tinted stadium with a cloudy sky (no text or symbols visible)- Your LED TV can be mounted on a desktop with the base installed.
● This is not a floor-standing unit.
Installation Precautions
Wall Mounting
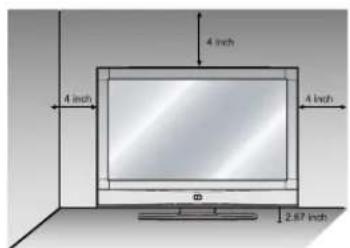
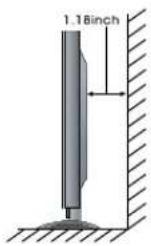
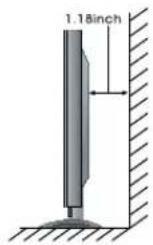
- Please ensure enough space for safe use. (Please refer to diagrams A and B.)
● Installation of the LED TV in an improperly ventilated location can cause damage to the LED TV due to increased temperature.

*Contact your dealer to purchase the "Adhystable-angle wall mount" required for wall-mounted installation.
Using the Stand
- Do not install on an unstable location with a support area smaller than the LED TV.
- Please refer to the desktop stand user's manual for details of installation.
B
(Using the Stand)
Installing an Antenna
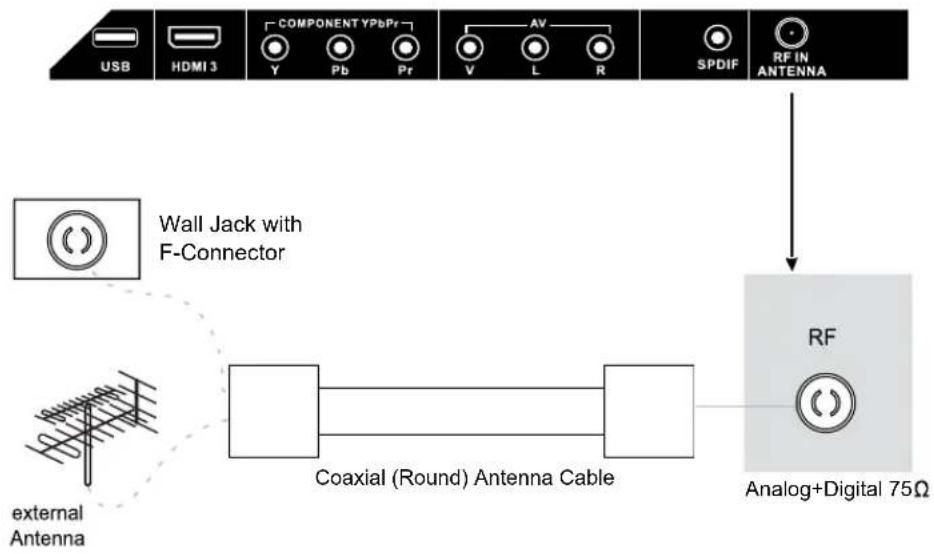
For connecting to ATS or NTSC broadcast
- Use a coaxial cable to connect the wall jack or external antenna to the RF-IN on the LED TV.
flowchart
graph TD
    A["External Antenna"] --> B["Coaxial (Round) Antenna Cable"]
    B --> C["RF Analog+Digital 75Ω"]
    D["Wall Jack with F-Connector"] --> E["RF"]
    style A fill:#f9f,stroke:#333
    style B fill:#ccf,stroke:#333
    style C fill:#cfc,stroke:#333
    style D fill:#fcc,stroke:#333
    style E fill:#ffc,stroke:#333
Press the SOURCE button on the remote control to select TV, then press RIGHT button to confirm.
Then you can receive the ATSC/NTSC signal.
See page 17 for initial setup.
Remote Control
● Funnions of remote control buttons
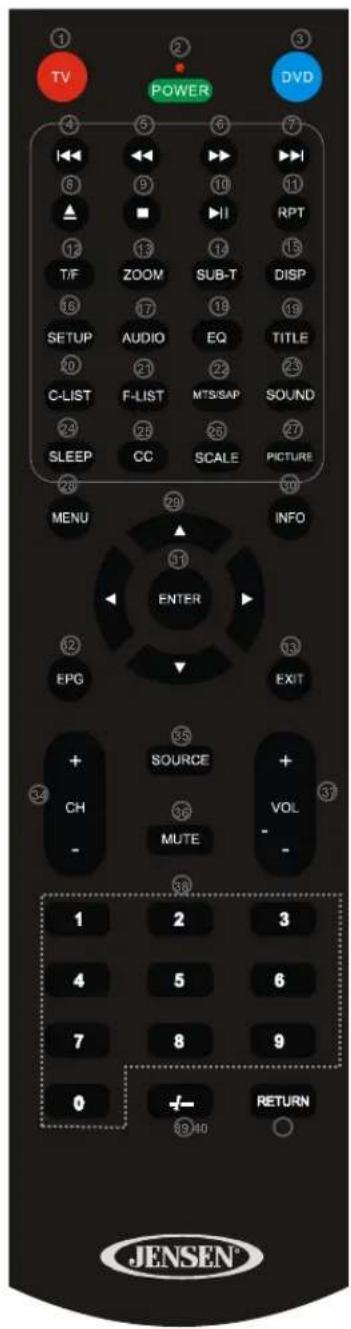
| 1 | TV Activate TV Mode |
| 2 | POWER On / off for TV and DVD |
| 3 | DVD Activate DVD Mode |
| 4 | PREVIOUS |
| 5 | FAST REVERSE |
| 6 | FAST FORWARD |
| 7 | NEXT |
| 8 | EJECT(DVD) |
| 9 | STOP |
| 10 | LAY/PAUSEP |
| 11 | RPT Repeat Selection |
| 12 | T/F (DVD) |
| 13 | ZOOM (DVD) |
| 14 | SUB-T (DVD) |
| 15 | DISP (DVD) Display Time or Chapter information |
| 16 | SET UP (DVD) |
| 17 | AUDIO (DVD) |
| 18 | EQ (DVD) |
| 19 | TITLE (DVD) |
| 20 | C-LIST Press C-LIST button to display the channel list |
| 21 | F-LIST Press this button to display the favourite list |
| 22 | MTS/SAP Press MTS/SAP to select Stereo, SAP or Mono |
| 23 | SOUND Press SOUND to cycle select sound types:Standard / Music / Movie / Personal |
| 24 | SLEEP Cycles through the LED TV sleep time:off / 5 /10 / 15 / 30 / 45 / 60 / 90 / 120 / 180 / 240 minutes |
| 25 | CC Closed Captions |
| 26 | SCALE Cycles scale modes:Wide, Zoom, Cinema, Normal. |
| 27 | PICTURE Press PICTURE to cycle select picture types: Standard / Dynamic / Soft / Personal |
| 28 | MENU Displays the OSD menu on the screen |
| 29 | NAVIGATION Move up, down, left or right |
| 30 | INFORMATION Press INFO to display informationabout the current channel. |
| 31 | ENTER Press ENTER to confirm your opeartion |
| 32 | EPG Displays the program guide |
| 33 | EXIT Exits the current menu. |
| 34 | CH+/CH- Increase or Decrease channel |
| 35 | SOURCE Displays AV Inputs |
| 36 | MUTE Press once mutes audio, press again to restore audio |
| 37 | VOL+/VOL- Increase or Decrease volume |
| 38 | NUMERIC KEYS |
| 39 | + - Digital channel selection |
| 40 | RETURN Return to previously viewed channel |
Remote Control
| BUTTON | TV-FUNCTION | DVD-FUNCTION | BUTTON | TV-FUNCTION | DVD-FUNCTION | BUTTON | TV-FUNCTION | DVD-FUNCTION |
| POWE R | POWER POWER | EPG | EPG | ■ | STOP | STOP | ||
| (T27T) | CH+CH- | T/F | T-F | ▶ | PLAY-PAUSE | PLAY-PAUSE | ||
| (2673) | VOL+VOL- | VOL+VOL- | ▲ | EJECT | ◀ | PREVIOUS | PREVIOUS | |
| R N(T730) | RETURN | -/- | -/- | ◀ | FAST-REVERSE | FAST-REVERSE | ||
| (X384) | MUTE | MUTE | 1 | 1 | 1 | ▶ | FAST-FORWARD | FAST-FORWARD |
| (G51-1) | MENU | MENU | 2 | 2 | 2 | ▶ | NEXT | NEXT |
| (AATD) | INFO | 3 | 3 | 3 | RPT | RPT | RPT | |
| (K4602) | UP UP | 4 | 4 | 4 | ZOOM | ZOOM | ||
| (AC8X) | DOWN DOWN | 5 | 5 | 5 | SUB-T | SUB-T | ||
| (G03-1) | LEFT LEFT | 6 | 6 | 6 | DISP | DISP | ||
| (22A7) | RIGHT RIGHT | 7 | 7 | 7 | SETUP | SETUP | ||
| (E W02-4) | ENTER OK | 8 | 8 | 8 | AUDIO | AUDIO | ||
| (S 5283) | SOURCE SOURCE | 9 | 9 | 9 | EQ | EQ | ||
| (D80-1) | EXIT | 0 | 0 | 0 | TITLE | TITLE | ||
| (S 6186) | MTS-SAP | SCALE | SCALE | CC | CC | |||
| (F 4X00) | F-LIST | C-LIST | C-LIST | SLEEP | SLEEP | |||
| (PICITURE) | PICTURE | SOUND | SOUND | |||||

NOTE: DVD functions are intended for JENSEN DVD players only. See your JENSEN DVD manual for more information.
Precautions
Avoiding Remote Control Problems
- Check the polarity (+,-) of the batteries in the remote control.
- Check that the batteries are good.
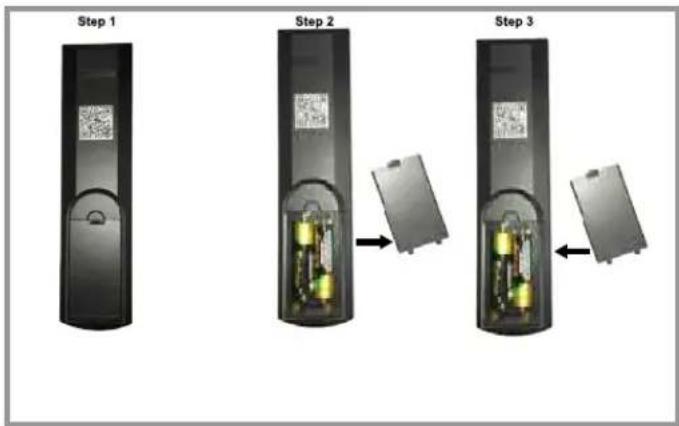
Inserting Batteries in the Remote Control
- Open the cover completely.
- Insert the two supplied batteries (AA, 1.5V). Ensure that the polarities (+ and -) of the batteries are aligned correctly.
- Replace the cover.
flowchart
graph TD
    A["Step 1"] --> B["Step 2"]
    B --> C["Step 3"]
    style A fill:#000,stroke:#fff,color:#fff
    style B fill:#000,stroke:#fff,color:#fff
    style C fill:#000,stroke:#fff,color:#fff

CAUTION: Risk of explosion if battery is replaced by incorrect type. Dispose of used batteries according to national code (Recycling program).
How to use the remote control
The remote control should be operated within 30 feet (7m) and 30^ to the left and the right of the IR receiver at the front of the LED TV.
• Used batteries should be disposed of properly.
VCR Connections
● Connecting to the Composite terminal
* Terminals vary by manufacturer

Connect the LED TV's Composite In terminal to VCR's Composite OUT terminal using the included Composite cable. (Make sure the color of the terminals and the colors of the cable are the same.)
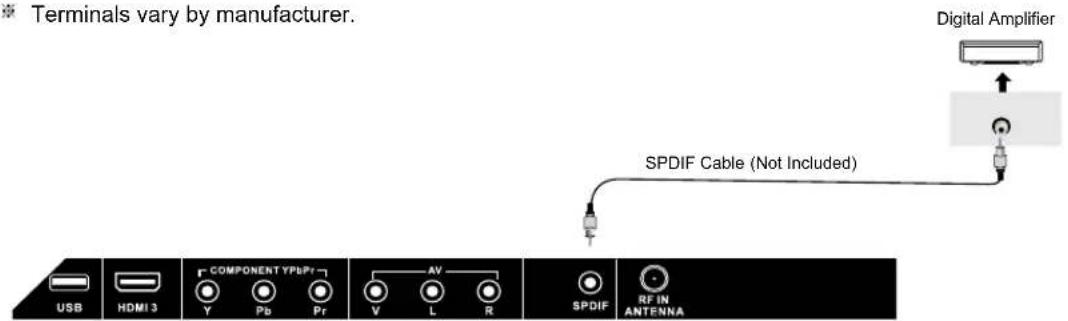
Digital Amplifier Connections
● Connecting to a Digital Amplifier
* Terminals vary by manufacturer.
Watching Video Tape
- Turn on the LED TV and press
SOURCE - Use to move to "AV".
- Press ENTER to confirm the source selection, will automatically enter the selection mode.
- Turn on the VCR, insert the tape and press the play button.
Satellite / Cable TV Set-Top Box Connections
● Connecting to the Composite terminal
In order to watch Cable TV, Subscribe to your local Cable TV company and install a separate receiver (Set-Top Box)
* Terminals vary by manufacturer
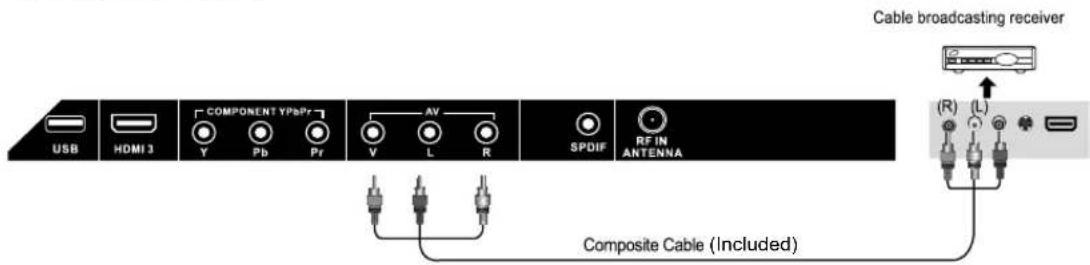
Connect the LED TV's Composite In terminal to the cable broadcasting receiver Composite Out terminal using the Composite cable. (Make sure the color of the terminals and the color of cables are the same)
- Connecting to the HDMI terminal
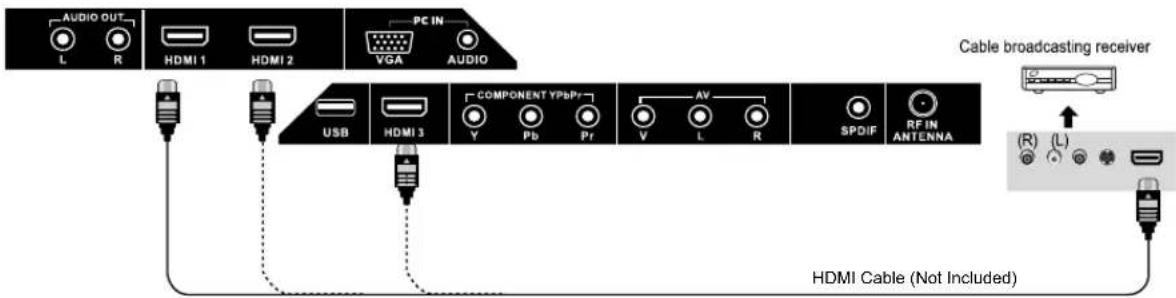
Watching Cable TV
- Turn on the LED TV and press

on the remote control.
- Use to move to "AV". If HDMI has been connected, select HDMI.
- Press ENTER to confirm the source selection.
- Turn on the cable broadcasting receiver and select the channel you wish to view.
DVD Connections
- Connecting to the component terminal
* Terminals vary by manufacturer
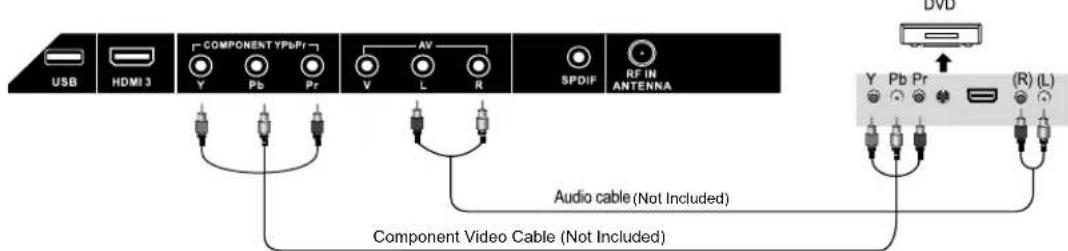
- Connect LED TV's YPbPr terminal to DVD's Video Out terminal.
- Connect LED TV's Audio terminals in YPbPr to DVD's Audio Out terminal.
- It must match the component connection cable Y, Pb, Pr colors between the LED TV and DVD Player.
- Connecting to the HDMI terminal
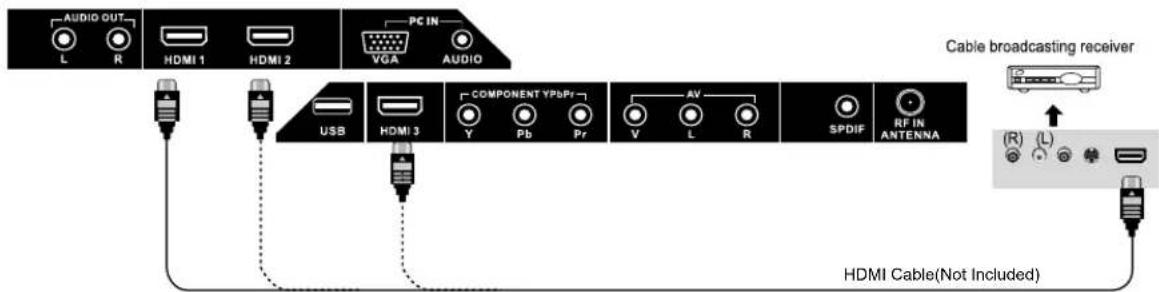
USB Connections
* Connection to USB.

Note: This USB connection can be used for software upgrade and using the USB media(Audio + photos) player.
Playing DVDS
- Turn on the LED TV and press the source button.
- Press Source to cycle and select "YPbPr". If HDMI has been connected, select "HDMI".
- Stop operation a few seconds, will automatically enter the selection mode.
- Turn on the DVD player, insert the DVD disc and press the Play button.
PC Connections
* Terminals vary by manufacturer.
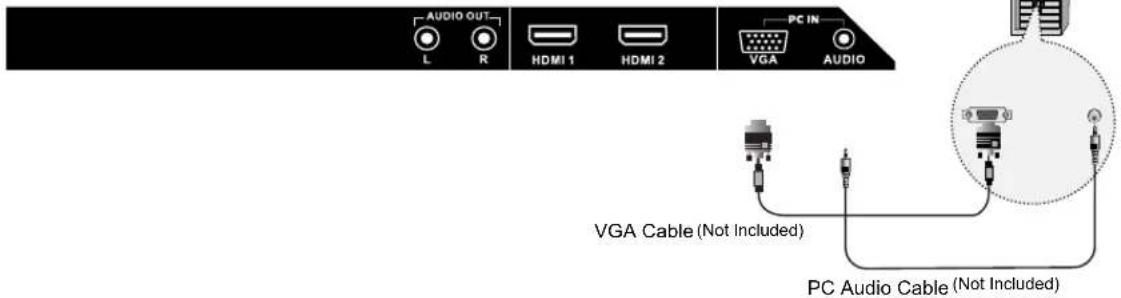
- Connect the LED TV's PC Input terminal to the PC's VGA terminal using a VGA cable.
- Connect the LED TV's PC Audio terminal to the PC's Audio terminal using a 3.5mm (Headphone) audio cable. (Only for PC's with an Audio termian!)
External Audio Amplifier
- Connecting to an amplifier or home theater system.
* Terminals vary by manufacturer.
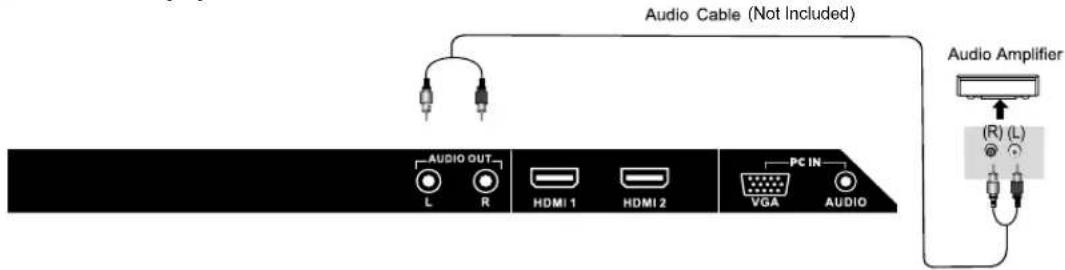
- Connect the LED TV's AUDIO (L/R) output terminal to Audio Amplifier using an audio patch cable. Note: The speakers of LED TV still have output audio signal at this time.
- You can use the Volume +/- buttons to adjust the audio output level.
How to use as a PC monitor
- Turn on the LED TV and press
on the remote control.
- Use

to move to "VGA".
- Press

to confirm the source selection.
Selecting Input Source
- You can select between the TV signal and the input signal of other equipment connected to the TV.
- Use this function to switch to the input source you wish to view.
Press

button on the remote control.
Use

to move to the desired input source.
Press

to select.
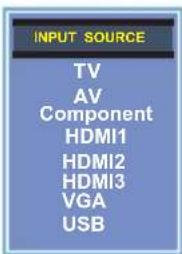
Note: After you have selected the desired input sorce and pause for a few moments, then LED TV will automatically enter the selected mode.
Initial Setup Wizard
After connecting your TV antenna or Coaxial cable, turn the television ON. The quick setup wizard will display on-screen. Select your preferred language followed by antenna options and performing Auto Scan to receive local broadcast channels that will be stored in the TV tuner memory.
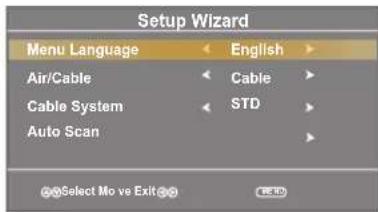
The wizard will direct you to the TV menu to select antenna options and run the Channel Auto Scan. Channels found will be stored in the TV tuner memory.
How to Navigate:
Press the ▲▼ arrow button to highlight Menu Language and then press ◀▶ button to select OSD Language.
Press the ◀▶ arrow button to highlight CABLE / AIR based on your antenna connection.
- Press the ▼ arrow button to select Auto Scan and press ▶ arrow (when Cable is selected, 'AUTO' is recommended). Otherwise, press the ◀ ▶ arrow button to select Cable System: STD > IRC > HRC > Auto.
Menu Operation
- Press the POWER button to turn the LED TV on.
- Press the MENU button on the remote control, the on-screen menu will appear.
- Use the LEFT and RIGHT buttons to select your main menu option.
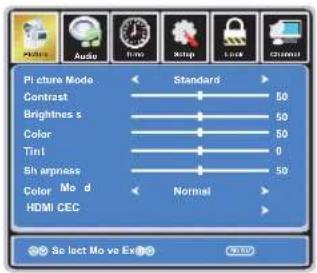
Allows you to make adjustments to your picture settings.
AUDIO MENU:PICTURE MENU:
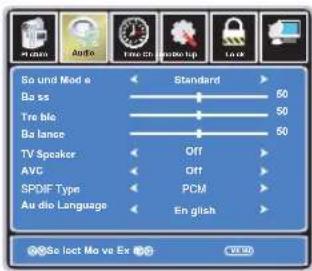
Allows you to customize the sound options and effects.
TIME MENU:
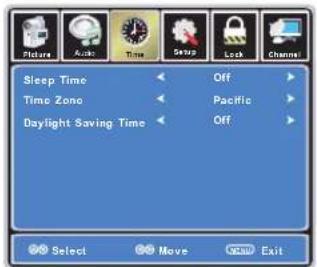
Allows you to set up a variety of time options.
SETUP MENU:
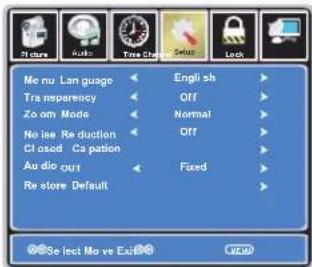
Allows you to set up a variety of setup options.
LOCK MENU:
Allows you to set up a variety of lock options.
CHANNEL MENU:
Allows you to search channels and set up a variety of channel options.
- Use the UP / DOWN buttons to select an option of the sub-menu, and press the RIGHT button. While in adjustment mode, use the LEFT / RIGHT buttons to change the value of the item.
- Press the MENU button to exit submenu to return to the main menu. Press the MENU button again or EXIT button to exit the main menu.
Note: Some options are not available for all inputs.
Customizing the PICTURE Settings
Select TV source for example. (Press SOURCE button to select TV mode)
- Press the POWER button to turn the LED TV on
- Press the MENU button on the remote control to display the Main menu, and use the LEFT and RIGHT buttons to select the PICTURE.
- Use the UP and DOWN buttons to highlight an individual PICTURE options, use the LEFT and RIGHT buttons to change the setting, and press the MENU or EXIT button to exit.
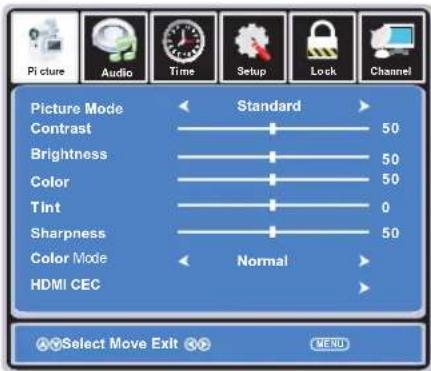
The PICTURE menu includes the following options :
| Picture Mode | Cycles through picture display modes: Standard, Dynamic, Soft, Personal. |
| Contrast | Controls the difference between the brightest and darkest regions of the picture. |
| Brightness | Controls the overall brightness of the picture |
| Color | Controls the color. |
| Tint | Controls the tint. |
| Sharpness | Increase this setting to see crisp edges in the picture; decrease it for soft edges . |
| Color Mode | Cycles through color modes: Normal, Cool, Warm. |
HDMI CEC
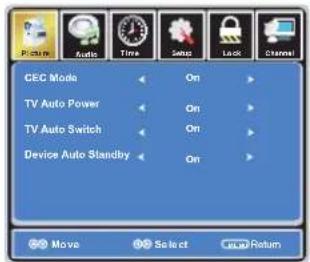
If you turn off the CEC Mode then the following items (TV Auto Power, TV Auto Switch, Device Auto Standby) will not be used.
| TV Auto Power | On - TV will turn on when compatible CEC device is activated on HDMI connection. |
| TV Auto Switch | On - TV will switch to HDMI inputs when compatible CEC device is activated on HDMI connection. |
| Device Auto Standby | On - When the TV is turned off, any connected, compatible CEC device will also turn off. |
Customizing the Audio Settings
Select TV source for example. (Press SOURCE button to select TV mode)
- Press the POWER button to turn the LED TV on.
- Press the MENU button on the remote control to display the Main menu, and use the LEFT and RIGHT buttons to select the AUDIO.
- Use the UP and DOWN buttons to highlight an individual Audio options, use the LEFT and RIGHT buttons to change the setting, and press the MENU or EXIT button to exit.
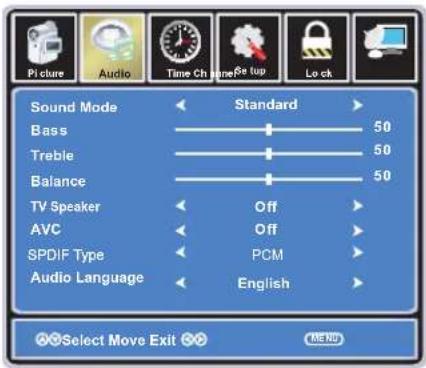
The SOUND menu includes the following options :
| Sound Mode | Cycles through sound modes: Standard, Music, Movie and Personal. |
| Bass | Controls the relative intensity of lower pitched sounds. |
| Treble | Controls the relative intensity of higher pitched sounds |
| Balance | To adjust the balance of the left and right sound track, or turn off the volume of the left and right sound track. |
| TV Speaker | Allows you to select between ON and OFF. |
| AVC | On or off (Automatic Volume Control) to keep volume level steady. |
| SPDIF Type | Allows you to select between PCM and RAW (Digital connection to Home Theater system) |
| Audio Language | Allows you to select preferred audio languages: English, French and Spanish. |
Customizing the TIMER Settings
Select TV source for example. (Press SOURCE button to select TV mode)
- Press the POWER button to turn the LED TV on.
- Press the MENU button on the remote control to display the Main menu, and use the LEFT and RIGHT buttons to select the TIMER.
- Use the UP and DOWN buttons to highlight an individual TIMER option, use the LEFT and RIGHT buttons to change the setting, and press the MENU or EXIT button to exit.
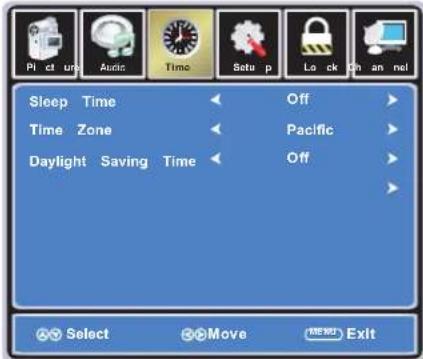
The TIMER menu includes the following options :
| Sleep Time | Allows you to set up the sleep timer : 5 Min, 10 Min, 15 Min, 30 Min, 45 Min, 60 Min, 90 Min, 120 Min, 180 Min, 240 Min and off. |
| Time Zone | Allows you to select correct time zone: Pacific, Alaska, Hawaii, Eastern, Central and Mountain. |
| Daylight Saving Time | Allows you to turn on or off daylight saving time. |
Customizing the SETUP Settings
Select TV source for example. (Press SOURCE button to select TV mode)
- Press the POWER button to turn the LED TV on.
- Press the MENU button on the remote control to display the Main menu, and use the LEFT or RIGHT button to select SETUP.
- Use the UP and DOWN buttons to highlight an individual SETUP option, use the LEFT and RIGHT buttons to change the setting, and press the MENU or EXIT button to exit.
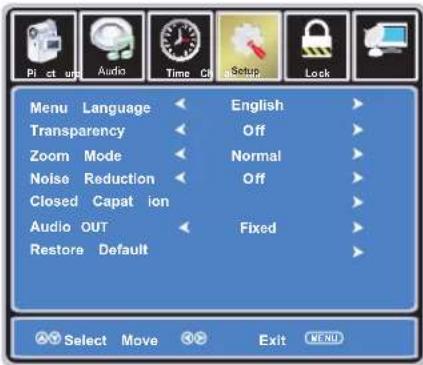
The SETUP menu includes the following options:
| Menu Language | Allows you to select menu languages: English, Français and Español. |
| Transparency | Allows you turn on or off the transparency function of on screen menu. |
| Zoom Mode | Allows you to select the zoom modes: Normal, Cinema, Wide, Zoom . |
| Noise Reduction | Allows you to select the noise reduction modes: Strong, Off, Weak, Middle. |
Customizing the SETUP Settings
Closed Caption
Use Down button to highlight "Closed Caption", then press RIGHT button or ENTER to enter into the following menu.
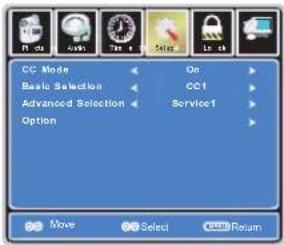
CC Mode
Allows you to select the CC Modes: On, Off and CC on Mute.
Basic Selection
Allows you to select the basic selections: CC1, CC2, CC3, CC4, Text1, Text2, Text3 and Text4.
Advanced Selection
Allows you to select the advanced services: Service1, Service2, Service3, Service4, Service 5 and Service 6.
Option
Use Down button to highlight the "Option" item, then press RIGHT button to enter into the following menu.
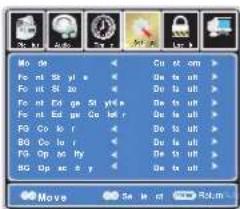
Use UP and DOWN buttons to highlight the desired item, and use LEFT and RIGHT buttons to select.
Audio Out
Allows you to select between Variable and Fixed.
Restore Default
Restores all settings in SETUP menu to factory settings.
Customizing the LOCK Settings
Select TV source for example. (Press SOURCE button to select TV mode)
- Press the POWER button to turn the LED TV on
-
Press the MENU button on the remote control to display the Main menu, and use the LEFT and RIGHT buttons to select the LOCK
-
Use the DOWN button to highlight "Enter Password", use the numeric keys to input a 4-digit password. After that, the screen will display the next menu. After setting, press menu or exit button to exit. NOTE: The factory password is 0000.
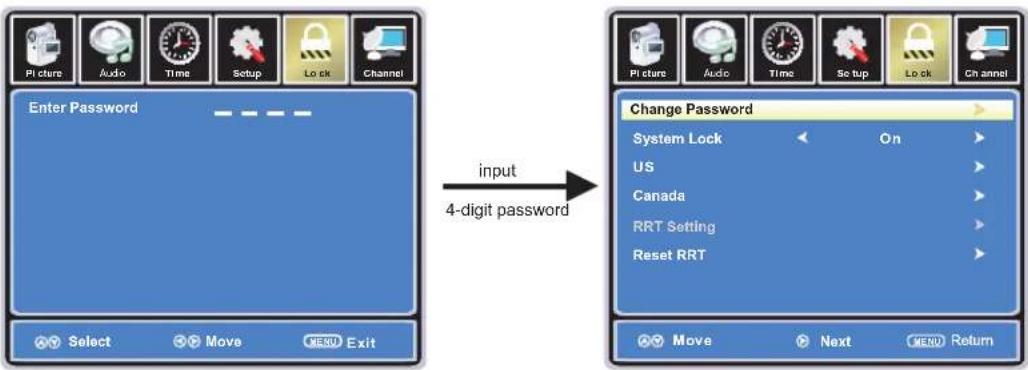
flowchart
graph LR
    A["Enter Password"] -->|input 4-digit password| B["Change Password"]
    B --> C["System Lock On Us Canada RRT Setting Reset RRT"]
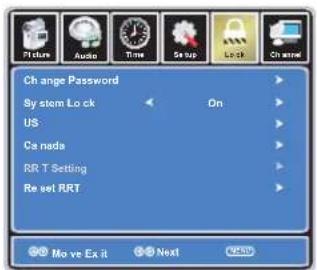
The LOCK menu includes the following options :
Change Password
Use DOWN button to select "Change Password", then press RIGHT or ENTER button to enter into the following menu.
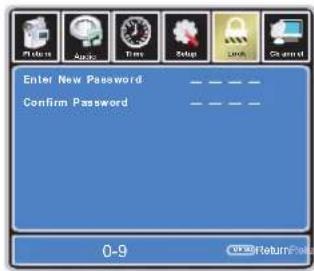
Input the new 4-digit password and confirm it.
System Lock
Allows you to turn On or Off the system lock. If you turn off the system lock, then the following items (US, Canada, RRT Setting and Reset RRT) will not be used.
Customizing the LOCK Settings
US
Use Down button to highlight "US", then press RIGHT or ENTER button to enter into the following menu.
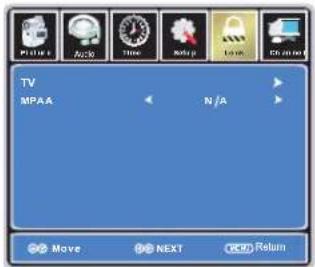
TV
Use Down button to highlight "TV", then press RIGHT or ENTER button to enter into the following menu.
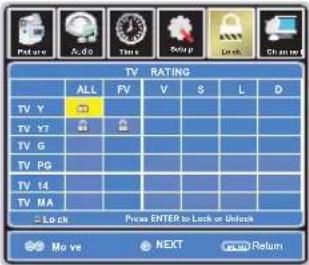
Use UP and DOWN buttons to select the desired rating and press ENTER button to block or unblock rating.
MPAA
The Movie rating (System) is used for original movies rated by the Motion Picture Association of America (MPAA) as broadcasted on cable TV and not edited for television. Use UP or DOWN button to select N/A, G, PG, PG-13, R, NC-17 or X.
| RATING | DESCRIPTION |
| G General Audiences. Movie is appropriate for all ages. | |
| PG Parental Guidance Suggested. May contain material not suited for younger viewers. | |
| PG-13 Contains content that may not be appropriate for viewers under the age of 13. | |
| R Restricted. Contains adult content, no one under 17 admitted without parent. | |
| NC-17 No one 17 and under admitted. | |
| X Adults only. | |
Customizing the LOCK Settings
Canada
Use the Down button to highlight "Canada", then press the RIGHTor ENTER button to enter into the following menu.
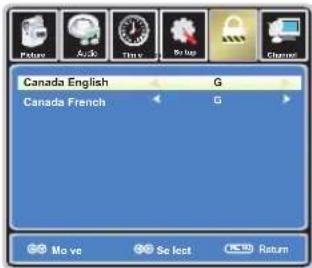
Canada English
Use LEFT and RIGHT buttons to select among: E, C, C8+, G, PG, 14+ and 18+
Canada French
Use LEFT and RIGHT buttons to select among: E, G, 8ans+, 13ans+, 16ans+ and 18ans+
RRT Setting
Reset RRT
Allows you to reset the RRT setting.
Customizing the CHANNEL Settings
Select TV source for example. (Press SOURCE button to select TV mode)
- Press the POWER button to turn the LED TV on.
- Press the MENU button on the remote control to display the Main menu, and use the LEFT and RIGHT buttons to select the CHANNEL.
- Use the UP and DOWN buttons to highlight an individual CHANNEL option, use the LEFT and RIGHT buttons to change the setting, and press the MENU or EXIT button to exit.
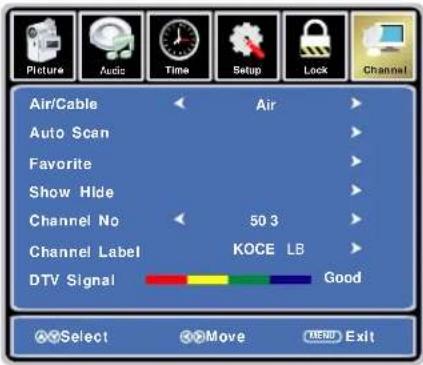
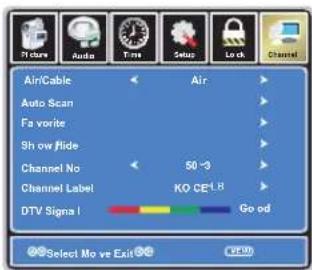
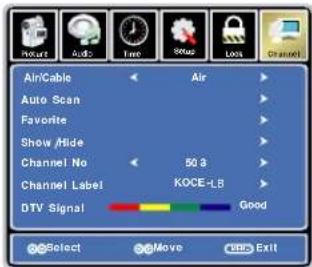
The CHANNEL menu includes the following options :
| Air/Cable | Allows you to select between Air and Cable. |
| Auto Scan | Use Down button to highlight “Auto Scan”, then press RIGHT or ENTER button to enter into the following menu. |
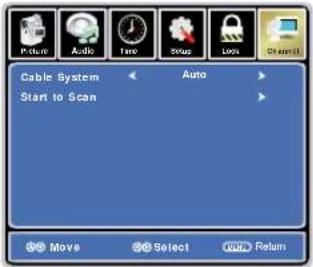 If you select “Air” as input signal in Antenna, you can press RIGHT or ENTER button to search the channels automatically. If you select “Air” as input signal in Antenna, you can press RIGHT or ENTER button to search the channels automatically. | |
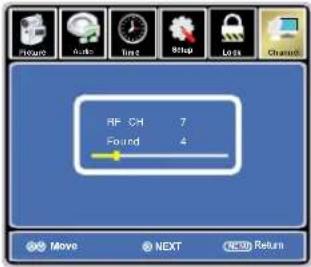 The receivable channels will be stored automatically.When searching channels, press MENU to stop. The receivable channels will be stored automatically.When searching channels, press MENU to stop. |
Customizing the CHANNEL Settings
| If you select “Cable” as input signal in Antenna then you can select Cable Systems: Auto, STD, IRC and HRC.Use DOWN button to highlight “Start to Scan”, then press the RIGHT or ENTER button to search the channels automatically.The receivable channels will be stored automatically.When searching channels, press MENU to stop. | |
| Favorite | Allows you to add these channels as the favorite channels.Use UP or DOWN button to highlight “Favorite”, then press the RIGHT or ENTER button to enter into the following menu.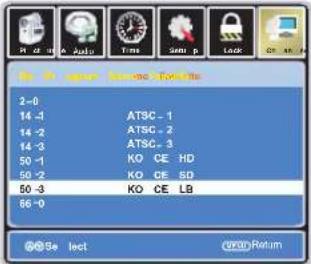 Use UP and DOWN button to highlight the desired channel, then press the ENTER button to add or remove the highlighted channel as favorite. Use UP and DOWN button to highlight the desired channel, then press the ENTER button to add or remove the highlighted channel as favorite. |
| Show / Hide | Allows you to show or hide the channels.Use the UP or DOWN button to highlight “Show / Hide”, then press the RIGHT or ENTER button to enter into the following menu.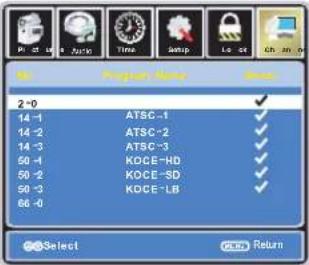 Use the UP and DOWN button to highlight the desired channel, then press ENTER button to show or hide the highlighted channel. Use the UP and DOWN button to highlight the desired channel, then press ENTER button to show or hide the highlighted channel. |
| Channel No. | Displays the number of the current channel. |
| Channel Label | Displays the label of the current channel. |
| DTV Signal | Displays the quality of the current DTV signal. |
USB Settings
This TV is a widescreen TV with USB port. Through the USB port the TV can access USB flash drives and display pictures or play MP3 files. To use this feature connect a USB flash drive to the USB port of the TV and press the SOURCE button to select USB to start browsing for music and pictures.
In the USB Mode, select Photo
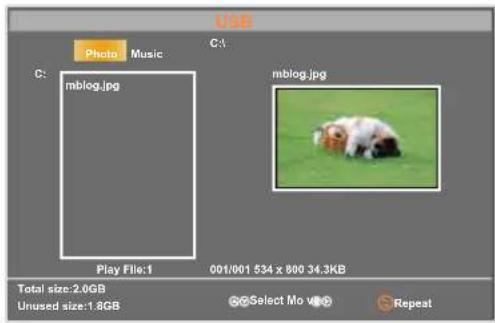
In the Photo Mode:
You can use the ◀ or ▶ button to select Photo.
You can use the ▲ or ▼ button to select the file you want and press ENTERto view the file.
You can use the ■ button to return main menu.
You can use the ◀◀ or ▶▶ button to select the file you want.
In the USB Mode, select Music
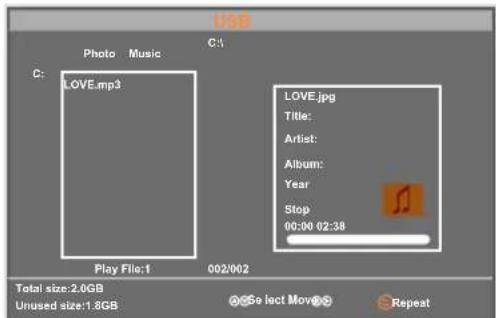
In the Music Mode:
You can use the ◀ or ▶ button to select Music.
You can use the ▲ or ▼ button to select the file you want and press ENTERto play the file.
You can use the ■ button to Stop.
You can use the |◀◀ ▶▶| ▶▶ ◀◀ ▶▶ RPT button to select the file you want.
Trouble shooting
- In case a problem occurs with your LED TV, please take the following steps first.
- If you still have the problem, turn the power off and contact your dealer or an authorized service center.
| Problem Action | |
| The screen does not appear. | Is the power plug connected? Insert the power plug.Press the power button of the remote control. |
| The screen appears tooslowly after the power is turned on. | This problem occurs for a brief time in the process ofimage elimination processing in order to hide temporary screen noisethat occurs when the power is turned on. But if the screen does notcome after 1 minute contact your dealer or an authorized servicecenter. |
| Screen is too bright or too dark. Ad | just the brightness or contrast. |
| Screen is too large or too small. Ad | just the Scale or Zoom Settings. |
| Stripes appear on the screenand it shakes. | Stop using wireless telephones, hair dryers or electric drills. |
| The screen does not move. Pr | ess the PAUSE button. Check if the Pause button is pressed onexternal equipment. |
| Screen appears, Voice is not heard | 1. Press the "MUTE" button.2. Increase the sound level by pressing the volume adjustment button3. Check if sound terminal of external input is connected properly.4. Check if audio cables are connected properly.5. Select and check the other input.If the sound still does not work and the other channels are thesame after you have done as the above, contact your dealer oran authorized service center. |
| Remote control does not work | 1. Check if main power is On.2. Check that the batteries of the remote controller were loadedproperly.3. Check to see if any obstacle exists between the LED TV andthe remote control , then remove it, if any.4. If the batteries are low, replace them with two newbatteries. |
Specifications
| LED Panel | Panel Size | 31.5" TFT LED 39" TFT LED | |
| Brightness | 200 | ||
| Contrast Ratio | 4000:1 | ||
| Viewing Angle | 178^/178^ | ||
| Max. Resolution | 1366 x 768 1920 x 1080 | ||
| INPUT | VIDEO | 1 | |
| AUDIO (L/R) | 1 | ||
| PC/AUDIO(L/R) | 1 | ||
| HDMI | 3 | ||
| RF | 1 | ||
| YPbPr | 1 | ||
| OUTPUT | AUDIO (L/R) | 1 | |
| SPDIF | 1 | ||
| Power Source | AC 100-240, 50/60Hz | ||
| Power Consumption | 50 W 70 W | ||
| Dimension | 733W x 503H x 80D mm | 889W x 582H x 89D mm | |
| Weight | 6.3 Kg 9 Kg | ||
- The cabinet design and electronics specifications may be modified without prior notice for performance improvement.
• Weight and dimensions are approximate
Specifications
| LED Panel | Panel Size | 18.5" TFT LED |
| Brightness | 200 | |
| Contrast Ratio | 1000:1 | |
| Viewing Angle | 170^/160^ | |
| Max. Resolution | 1366 x 768 | |
| INPUT | VIDEO | 1 |
| AUDIO (L/R) | 1 | |
| PC/AUDIO(L/R) | 1 | |
| HDMI | 1 | |
| RF | 1 | |
| YPbPr | 1 | |
| OUTPUT | AUDIO (L/R) | 1 |
| SPDIF | 1 | |
| Power Source | AC 120V | |
| Power Consumption | 25 W | |
| Dimension | 458W x 344H x 156D mm | |
| Weight | 3.5 Kg | |
- The cabinet design and electronics specifications may be modified without prior notice for performance improvement.
• Weight and dimensions are approximate
CAUTION-To reduce the risk of electric shock, do not perform any servicing other than that contained in the operating instructions unless you are qualified to do so.
natural_image
Illustration of a computer monitor with radiating lines, no text or symbols presentnatural_image
Silhouette of a person lifting a stack of boxes inside a circular frame (no text or symbols)natural_image
Top-down architectural rendering of a modern office or kitchen space with visible furniture and doorways (no text or symbols)
JE3214 & JE3914

JE1914

natural_image
Soccer field with a golden ball on the grass under a blue sky with clouds, no visible text or symbols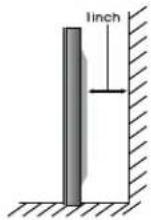
Menu audio:
Menu de blocage:
Mode CC
Le téléviseur

- Connection
- Basic Use
- Application
- Maintenance and Service
- WARNING
- FCC STATEMENT
- FCC CAUTION:
- IMPORTANT SAFETY INSTRUCTIONS
- Power Sources
- Grounding or Polarization
- For the unit with a polarized AC power cord plug
- For the unit with a DC power connector
- Wall outlet
- Wiring
- Electric shock
- Cleaning
- Overloading
- Power
- Sound
- Power Cord
- Ventilation
- Heat sources
- Do not use this product near water
- Entering of objects and liquids
- Lightning
- Servicing
- Replacement parts
- Attachments
- Damage requiring service
- Safety checks
- Wall or ceiling mounting
- Panel protection
- Pixel defect
- Antennas
- Outdoor Antenna Grounding
- WHEN INSTALLING AN OUTDOOR ANTENNA SYSTEM, EXTREME CARE SHOULD BE TAKEN TO KEEP FROM CONTACTING POWER LINES OR CIRCUITS AS CONTACT WITH THEM IS ALMOST INVARIABLY FATAL.
- Part Identification
- Right View
- Accessories
- Back View
- Mounting on a Desktop
- Installation Precautions
- Wall Mounting
- Using the Stand
- Installing an Antenna
- Remote Control
- ● Funnions of remote control buttons
- Precautions
- Avoiding Remote Control Problems
- Inserting Batteries in the Remote Control
- How to use the remote control
- VCR Connections
- Digital Amplifier Connections
- Watching Video Tape
- Satellite / Cable TV Set-Top Box Connections
- Watching Cable TV
- DVD Connections
- USB Connections
- Playing DVDS
- PC Connections
- External Audio Amplifier
- How to use as a PC monitor
- Selecting Input Source
- Initial Setup Wizard
- How to Navigate:
- Menu Operation
- Customizing the PICTURE Settings
- Customizing the Audio Settings
- Customizing the TIMER Settings
- Customizing the SETUP Settings
- Customizing the LOCK Settings
- Customizing the CHANNEL Settings
- USB Settings
- Trouble shooting
- Specifications
- Menu audio:
- Menu de blocage:
Brand : JENSEN
Model : 14 SERIES
Category : TV