
JE1507DC - Television JENSEN - Free user manual and instructions
Find the device manual for free JE1507DC JENSEN in PDF.


| Product Type | LCD Television |
| Brand | JENSEN |
| Model | JE1507DC |
| Screen Size | 15 inches (15" TFT LCD) |
| TV System | ATSC / NTSC |
| Reception | VHF 2-13, UHF 14-69, CATV 1-125, Digital Terrestrial 2-69, Digital Cable 1-135 |
| Audio | BTSC, output 2 W × 2 |
| AC Power | 120 V AC, 60 Hz |
| DC Power | 10 - 16 V DC (for vehicle) |
| Power Consumption | 30 W |
| Dimensions (W × H × D) | 15.3 × 13.7 × 3.1 inches |
| Weight | 8.6 lb (approx 3.9 kg) |
| Input Connectors | Composite video/audio (×1), S-Video (×1), Component YPbPr (×1), D-Sub (×1), RF Antenna (×1) |
| Output Connectors | Composite video/audio (×1) |
| Update Port | 1 (for maintenance) |
| Main Functions | Parental control, closed captions (CCD), screen zoom, favorite channel lists, programmable sleep timer, auto channel search |
| Care and Cleaning | Soft dry cloth; mild soap and water solution for stubborn stains; never use solvents or alcohol |
| Safety | Polarized plug; do not expose to water or moisture; do not block ventilation openings; unplug during thunderstorms |
| Spare Parts and Repairability | Use only manufacturer-specified parts; call a qualified repair technician |
Frequently Asked Questions - JE1507DC JENSEN
User questions about JE1507DC JENSEN
0 question about this device. Answer the ones you know or ask your own.
Ask a new question about this device
Download the instructions for your Television in PDF format for free! Find your manual JE1507DC - JENSEN and take your electronic device back in hand. On this page are published all the documents necessary for the use of your device. JE1507DC by JENSEN.
USER MANUAL JE1507DC JENSEN
LCD Color Television
with ATSC Tuner
Owners Manual
Before connecting, operating or adjusting this product, please read the manual completely. Please keep this manual for future reference.
The illustrations and on-screen displays in this operation manual are for explanation purposes and may vary slightly from the actual operations.
Menu items that are not available are grayed out.
FOR ASSISTANCE, VISIT US AT WWW.ASAELECTRONICS.COM.
WARNING
To reduce the risk of fire or electric shock, do not expose this product to rain or moisture.
CAUTION
RISK OF ELECTRIC SHOCK DO NOT OPEN

CAUTION-To reduce the risk of electric shock, do not perform any servicing other than that contained in the operating instructions unless you are qualified to do so.
This symbol is intended to alert the user to the presence of uninsulated "dangerous voltage" within the product's enclosure that may be of sufficient magnitude to constitute a risk of electric shock to persons.

This symbol is intended to alert the user to the presence of important operating and maintenance (servicing) instructions in the literature accompanying the appliance.
This product utilizes tin-lead solder, and fluorescent lamp containing a small amount of mercury. Disposal of these materials may be regulated due to environmental considerations. For disposal or recycling information, please contact your local authorities or the Electronic Industries Alliance: www.eia.org
FCC STATEMENT
This product has been tested and found to comply with the limits for a Class B digital device, pursuant to part 15 of the FCC Rules. These limits are designed to provide reasonable protection against harmful interference when the equipment is operated in a commercial environment.
This product generates, uses, and can radiate radio frequency energy and, if not installed and used in accordance with the instruction manual, may cause harmful interference to radio communications. Operation of this equipment in a residential area is likely to cause harmful interference in which case the user will be required to correct the interference at his own expense.
FCC CAUTION:
Pursuant to 47CFR, Part 15.21 of the FCC rules, any changes or modifications to this monitor not expressly approved by the manufacturer could cause harmful interference and would void the user's authority to operate this device.
WARNING:
This is a CLASS B product. In a domestic environment, this product may cause radio interference, in which case the user may be required to take adequate measures to counter interference.
IMPORTANT SAFETY INSTRUCTIONS
1) Read these instructions.
2) Keep these instructions.
3) Heed all warnings.
4) Follow all instructions.
5) Do not use this product near water.
Apparatus should not be exposed to dripping or splashing and no objects filled with liquids, such as vases, should be placed on the product.
6) Clean only with a dry cloth.
7) Do not block any ventilation openings. Install in accordance with the manufacturer's instructions.
8) Do not install near any heat sources such as radiators, heat registers, stoves, or other apparatus (including amplifiers) that produce heat.
9) Do not defeat the safety purpose of the polarized or grounding-type plug. A polarized plug has two blades with one wider than the other. A grounding type plug has two blades and a third grounding prong. The wide blade or the third prong are provided for your safety. If the provided plug does not fit into your outlet, consult an electrician for replacement of the obsolete outlet.
10) Protect the power cord from being walked on or pinched, particularly at plugs, convenience receptacles, and the point where they exit from the apparatus.
11) Only use attachments/accessories specified by the manufacturer.
12) Use only with the cart, stand, tripod, bracket, or table specified by the manufacturer or sold with the apparatus.
When a cart is used, use caution when moving the cart/apparatus combination to avoid injury from tip-over.

13) Unplug this apparatus during lightning storms or when unused for long periods of time.
14) Refer all servicing to qualified service personnel. Servicing is required when the product has been damaged in any way, such as power-supply cord or plug is damaged, liquid has been spilled or objects have fallen into the product, the product has been exposed to rain or moisture, does not operate normally, or has been dropped.
15) Where the mains plug or an appliance coupler is used as the disconnect device, the disconnect device shall remain readily operable.
Before using your TV, please read these instructions completely, and keep this manual for future reference. Carefully observe and comply with all warnings, cautions and instructions placed on the unit or described in the operating instructions or service manual.
WARNING
To guard against injury, the following basic safety precautions should be observed in the installation, use and servicing of the unit.
Power Sources
This unit should be operated only from the type of power source indicated on the information label. If you are not sure of the type of electrical power supplied to your home, consult your dealer or local power company.
Grounding or Polarization
This unit is equipped with a polarized AC power cord plug (a plug having one blade wider than the other), or a DC power connection, for use in a vehicle. Follow the instructions below:
For the unit with a polarized AC power cord plug
This plug will fit into the power outlet only one way. This is a safety feature. If you are unable to insert the plug fully into the outlet, try reversing the plug. If the plug still fails to fit, contact your electrician to have a suitable outlet installed. Do not defeat the safety purpose of the polarized plug by forcing it in.
For the unit with a DC power connector
For installation in a vehicle, connect the red wire to the 12V accessory line and the black wire to a ground terminal.
Wall outlet
Do not use a poor fitting outlet.
Insert the plug fully into the outlet. If it is loose, it may cause arcing and result in fire. Contact your electrician to have the outlet changed.
Wiring
For your safety, unplug the power cord when wiring cables.
Electric shock
Do not touch the AC power cord or the unit with a wet hand. If you plug/unplug the AC power cord from the unit with a wet hand, it may cause electric shock.
Never attempt to move the unit unless the AC power cord is disconnected.
Cleaning
- Clean the power plug regularly.
- If the plug is covered with dust and it picks up moisture, its insulation may deteriorate and result in fire. Unplug the power plug and clean it regularly.
- Unplug the power cord when cleaning this unit. If not, it may result in electric shock.
- Clean the cabinet of the TV with a dry soft cloth. To remove dust from the screen, wipe it gently with a soft cloth.
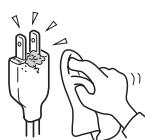
- Stubborn stains may be removed with a cloth slightly dampened with a solution of mild soap and warm water. Never use strong solvents such as thinner or benzine for cleaning.
- If using a chemically pre-treated cloth, please follow the instructions provided on the package.
Overloading
Do not overload wall outlets, extension cords or convenience receptacles beyond their capacity, since this can result in fire or electric shock.
Power
Always turn the unit off when it is not being used.
When the unit is left unattended and unused for long periods of time, unplug it from the wall outlet as a precaution against the possibility of an internal malfunction that could create a fire hazard.
Sound
If a snapping or popping sound from the TV is continuous or frequent while the TV is operating, unplug the TV and consult your dealer or service technician. It is normal for TV's to make occasional snapping or popping sounds, particularly when being turned on or off.
Power Cord
If you damage the power cord, it may result in fire or electric shock.
- Do not pinch, bend, or twist the cord excessively. The core lines may be bared and cut and cause short-circuit, resulting in fire or electric shock.
- Do not convert or damage the power cord.
- Do not put anything heavy on the power cord. Do not pull the power cord.
- Keep the power cord away from heat sources.
- Be sure to grasp the plug when disconnecting the power cord. If the power cord is damaged, stop using it and replace with a new one.
Ventilation
The slots and openings in the TV are provided for necessary ventilation. To ensure reliable operation of the unit, and to protect it from overheating, these slots and openings must never be blocked or covered. Unless proper ventilation is provided, the unit may gather dust and get dirty. For proper ventilation, observe the following:
- Do not install the unit turned backward or sideways.
- Do not install the unit turned over or upside down.
- Never cover the slots and openings with a cloth or other materials.
- Never block the slots and openings by placing the unit on a bed, sofa, rug or other similar surface.
- Never place the unit in a confined space, such as a bookcase or built-in cabinet, unless proper ventilation is provided.
- Leave some space around the unit. Otherwise, adequate air-circulation may be blocked, causing overheating, and may cause fire or damage the unit.
Heat sources
Do not install near any heat sources such as radiators, heat registers, stoves, or other apparatus (including amplifiers) that produce heat.
Do not use this product near water
Do not use near a bathtub, washbowl, kitchen sink, or laundry tub, in a wet basement, or near a swimming pool.
Do not use immediately after moving from a low temperature to high temperature environment, as this causes condensation, which may result in fire, electric shock, or other hazards.
This product should not be exposed to dripping or splashing and no objects filled with liquids, such as vases, should be placed on the product.
Entering of objects and liquids
Never insert an object into the product through vents or openings. High voltage flows in the product, and inserting an object can cause electric shock and/or short internal parts. For the same reason, do not spill water or liquid on the product.
Lightning
Unplug this apparatus during lightning storms or when unused for long periods of time.
For added protection during a lightning storm, or when left unattended and unused for long periods of time, unplug the product from the wall outlet and disconnect the antenna. This will prevent damage to the equipment due to lightning and power-line surges.
Servicing
Refer all servicing to qualified service personnel. Servicing is required when the product has been damaged in any way, such as power-supply cord or plug is damaged, liquid has been spilled or objects have fallen into the apparatus, the apparatus has been exposed to rain or moisture, does not operate normally, or has been dropped.
Replacement parts
In case the product needs replacement parts, make sure the service person uses replacement parts specified by the manufacturer, or those with the same characteristics and performance as the original parts. Use of unauthorized parts can result in fire, electric shock and/or other danger.
Attachments
Only use attachments/accessories specified by the manufacturer. Do not use attachments not recommended by the manufacturer. Use of improper attachments can result in accidents.
Damage requiring service
If any of the following conditions occurs, unplug the power cord from the AC outlet and request a qualified service person to perform repairs.
a. The power cord or plug is damaged.
b. Liquid is spilled on the product or when objects have fallen into the product.
c. The product has been exposed to rain or water.
d. The product does not operate properly as described in the operating instructions.
Do not touch the controls other than those described in the operating instructions. Improper adjustment of controls not described in the instructions can cause damage, which often requires extensive adjustment work by a qualified technician.
e. The product has been dropped or the cabinet has been damaged in any way.
f. The product displays an abnormal condition or exhibits a distinct change in performance. Any noticeable abnormality in the product indicates that the product needs servicing.
Safety checks
Upon completion of service or repair work, request the service technician to perform safety checks to ensure that the product is in proper operating condition.
Wall or ceiling mounting
When mounting the product on a wall or ceiling, be sure to install the product according to the method recommended by the manufacturer. This is a safety feature.
Panel protection
The panel used in this product is made of glass. Therefore, it can break when the product is dropped or impacted upon by other objects. Be careful not to be injured by broken glass pieces if the panel breaks.
Pixel defect
Occasionally, a few non-active pixels may appear on the screen as a fixed point of blue, green or red. Please note that this does not affect the performance of your product.
Antennas
Outdoor Antenna Grounding
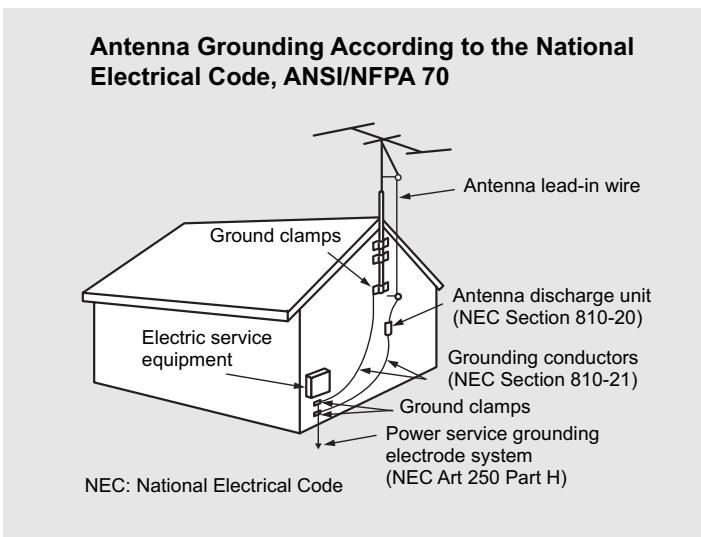
If an outdoor antenna is installed, follow the precautions below. An outdoor antenna system should not be located in the vicinity of overhead power lines or other electric light or power circuits, or where it can come in contact with such power lines or circuits.
WHEN INSTALLING AN OUTDOOR ANTENNA SYSTEM, EXTREME CARE SHOULD BE TAKEN TO KEEP FROM CONTACTING POWER LINES OR CIRCUITS AS CONTACT WITH THEM IS ALMOST INVARIABLY FATAL.
Be sure the antenna system is grounded to provide some protection against voltage surges and built-up static charges. Section 810 of the National Electrical Code (NEC) in USA and Section 54 of the Canadian Electrical Code in Canada provides information with respect to proper grounding of the mast and supporting structure, grounding of the lead-in wire to an antenna discharge unit, size of grounding conductors, location of antenna discharge unit, connection to grounding electrodes, and requirements for the grounding electrode.
Important Information 1
Important Safeguards 2
Table of Contents 4
Introduction 6
Remove the TV from the Box. 6
Installing the TV 6
Carrying or Moving the TV 6
TV Controls and Connectors 7
Control Panel 7
TV Connectors 8
Making Connections 9
Basic Connections 9
Overview 9
Connecting Antenna System 9
Connecting Cable System 9
Connecting Cable Box 1
Connecting Digital Cable Box 1
Connecting Satellite Receiver 1
Connecting Digital Satellite Receiver 1
Using External Equipment 1
Connecting a VCR 1
Connecting a VCR for Recording. 1
Connecting a DVD Player with Component Video Connectors 1
Connecting a DVD Player with S-Video and Audio Connectors 1
Connecting a PC 1
Connecting a Camcorder or "PlayStation" 1
Connecting a Second TV or Monitor 1
Operation- Remote Control 1
Insert Batteries into the Remote Control 1
Using the Remote Control. 1
Button Descriptions 1
Basic Operation 2
Connecting to your Power Supply 2
JE1507 2
JE1507DC. 2
Turning On/Off 2
Viewing Channels 2
Selecting an Antenna Input Source 2
Auto Programming 2
Menu Navigation 2
Analog And HDTV Channels 2
Selecting Channels 2
Adjusting Volume 2
Input Select 2
Using the ZOOM button 2
Advanced Functions 27
Picture Control 27
Accessing the Picture Menu 27
Adjusting Picture Settings 27
Audio Control 28
Accessing the Audio Menu 28
Selecting Audio Options 28
Time Adjust 29
Accessing the Time Menu 29
Selecting Time Options 29
Setting Channels 30
Accessing the Channel Menu 30
Selecting Channel Options 30
Setting Channel List 30
Editing Channel Label 31
Setting System 32
Accessing the Option Menu 32
Setting Caption Vision 32
Using the CCD button 32
Parental Lock Control 33
Accessing the Lock Menu 33
Selecting Lock Options 33
Viewing Locked or Blocked Programs 34
Other Information 35
Troubleshooting 35
Care and Maintenance 37
Specifications 38
| Remove the TV from the Box | STOP! To safely remove the television from the box, use 2 people to provide stability. 1. Remove cardboard holders from the box. 2. Remove the cardboard. However, keep the wrapping on the television to protect it while moving. 3. Lift onto the installation location, as illustrated. |
| Installing the TV | Select a steady platform with good ventilation to place the TV. • Keep enough space above and behind the Display. • The TV should be installed near an easily accessible power outlet. • To prevent internal heat buildup, do not block the ventilation openings. • Do not install the TV in a hot or humid place, or in a place subject to excessive dust or mechanical vibration. • Be sure to take measures to prevent the TV from toppling over and causing injury. • To obtain the best picture, do not expose the screen to direct illumination or direct sunlight. It is recommended to use spot lighting directed down from the ceiling or to cover the windows that face the screen with opaque drapery. It is desirable to install the TV in a room where the floor and walls are not of a reflective material. |
| Cautions: • Do not install the TV in protruding locations. • Do not install this unit in restaurants where oily vapors occur. Dust absorbing oil may enter into the unit and damage the unit. • Do not install this unit outdoors. If the unit is exposed to rain, it may result in fire or electric shock. • If you install the unit on a non-level surface, the unit may fall or drop and cause injury or damage. • If you place the unit on an unstable surface, the unit may fall and cause injury or damage. • Do not hang anything on the unit. If you do so, the unit may fall from the stand or wall-mount bracket, causing damage or serious injury. | |
| Carrying or Moving the TV | • When you move the TV, carry it by two or more people. • When you move the TV, hold the upper and bottom frames of the TV, not the speaker. • As the glass surface of the TV has a special coating, be careful to avoid touching the glass surface as much as possible. • When transporting, do not subject the unit to shocks or vibration, or excessive force. |
TV Controls and Connectors
Control Panel
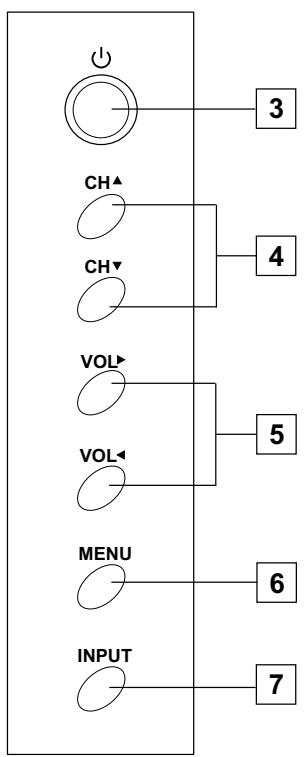
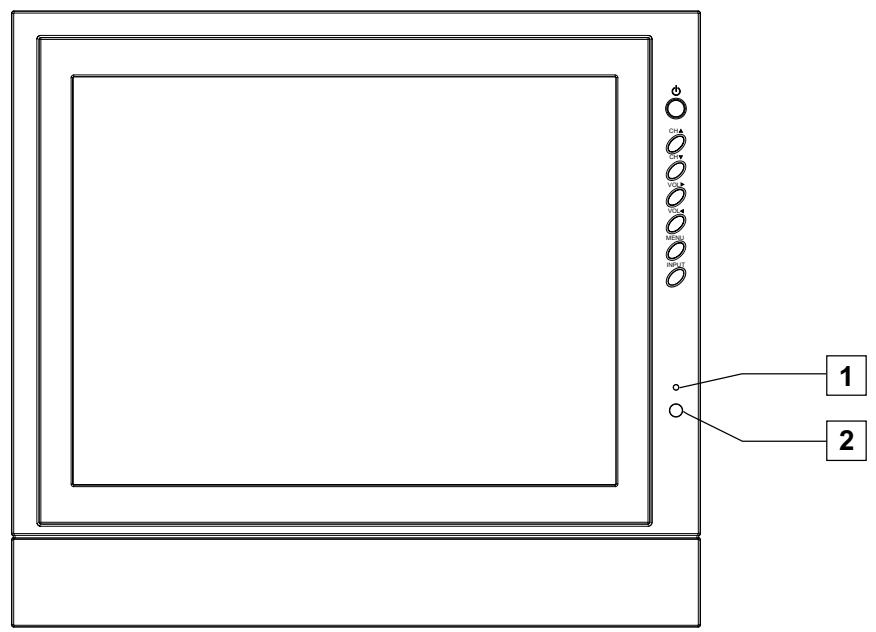
| Item | Description |
| 1 Power Indicator | |
| 2 Remote Sensor | Receives IR signals from the remote control. |
| 3 POWER ↓ | Turn the unit on or off. |
| 4 CH▲/CH▼ | Press to scan through channels. In menu operations, these buttons serve as down/up buttons. |
| 5 VOL▼/VOL↓ | Press to adjust the volume. In menu operations, these buttons serve as left/right buttons. |
| 6 MENU* | To access the Menu main page. |
| 7 INPUT | To display the input source list. Press VOL▶ to select (Enter). |
- In normal viewing, press the MENU button to access the Menu main page.
TV Connectors
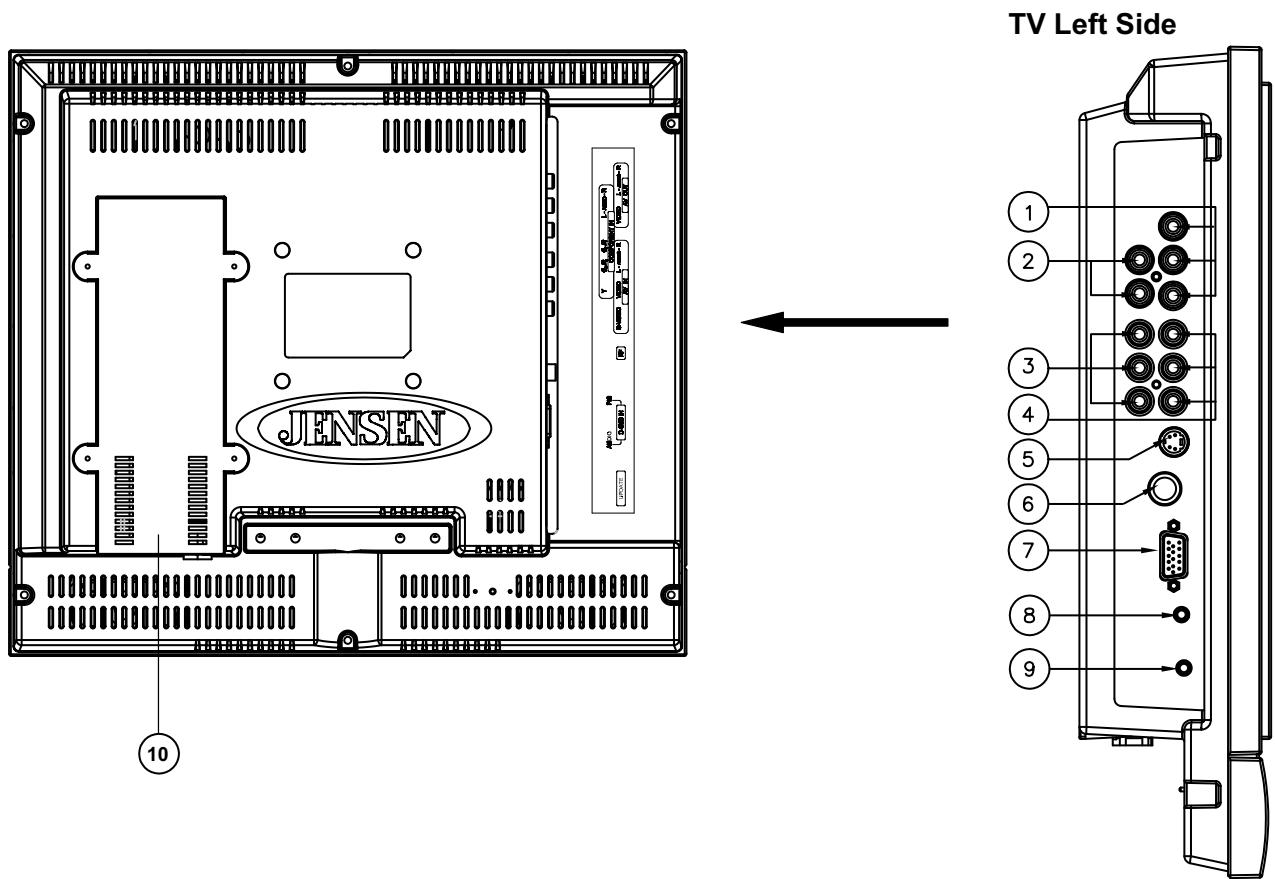
| Item | Description |
| 1 Video OUT | Connects to your VCR video (Yellow) input to record programs or to connect a second TV. HD video is not available from this connection. |
| Audio OUT | Connects to your VCR audio (Red/White) inputs to record programs, connects to a second TV, or connects to an auxiliary audio system. Audio is available for all sources and the volume can be controlled by the VOL+/- and Mute buttons. |
| 2 Component Audio | Connects to your DVD or digital set-top box's audio (Red/White) output. |
| 3 Component Video | Connects to your DVD or digital set-top box's component video (YPbPr) output. |
| 4 Composite Audio IN | Connect to the composite audio output jacks on your VCR or other video device. |
| Composite Video IN | Connect to the composite video output jack on your VCR or other video device. |
| 5 S-VIDEO input | Connects to the S-VIDEO output jack of your VCR or other video equipment that has S-VIDEO. S-VIDEO provides better picture quality than the composite video connection. |
| 6 RF IN | RF input that connects to your cable system or outdoor antenna. |
| 7 D-Sub IN | Connects to a PC or other Analog RGB devices such as Video Conferencing or Set-top Boxes. |
| 8 Audio IN for D-Sub interface | Use this audio input when you are using D-Sub connection. |
| 9 Update | Software upgrade port for service only. |
| 10 Power Converter | Converts 120VAC or 12V DC power, depending on the model. |
Basic Connections
Overview
To display clear, crisp pictures, you must connect your TV correctly and choose the correct display format. It is strongly recommended to connect the cable and antenna input using a 75-ohm coaxial cable to receive an optimum picture quality signal. A 300-ohm twin lead cable can be easily affected by radio noise and the like, resulting in signal deterioration. If you use a 300-ohm twin lead cable, keep it as far away as possible from the TV.
The way in which you connect your TV will vary, depending on how your home receives a signal (antenna and satellite; cable and cable box).
Do not use an indoor antenna, which is especially susceptible to radio noise.

Disconnect all power sources before making any connections.
Connecting Antenna System
For best results, use this connection if you have an antenna system.
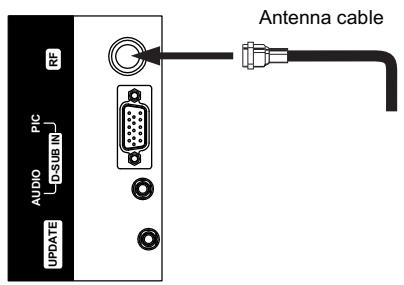
TV Left Side

Be sure to choose "Air" before you start Auto Program. See chapter "Basic Operation" for details.
Connecting Cable System
For best results, use this connection if you have a cable system.
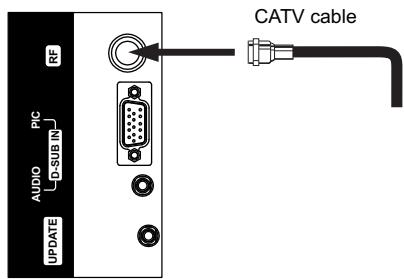
TV Left Side

Be sure to choose "Cable" before you start Auto Program. See chapter "Basic Operation" for details.
Basic Connections
Connecting Cable Box
For best results, use this connection if you have a cable system and your cable company scrambles some channels, such as premium channels or all channels (which requires you to use a cable box).
Connect the CATV cable to the cable box's input jack. Then use a coaxial cable to connect the cable box's output jack to the TV's RF input jack.
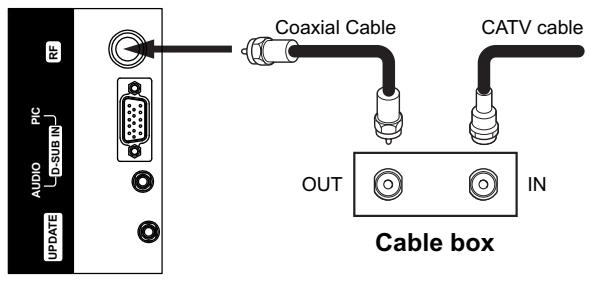
TV Left Side
Be sure to choose "Cable" before you start Auto Program. See chapter "Basic Operation" for details.
Connecting Digital Cable Box
Connect the RF coaxial cable from the CATV to the input of the digital cable box. Use a component video cable to connect the YPbPr jacks of your digital cable box to the TV's component jacks.
Component video connection is necessary to view digital broadcasts in 1080i, 720p, 480i and 480p. This TV displays most picture formats.
The component jacks do not provide audio, so audio cables must be connected to provide sound.
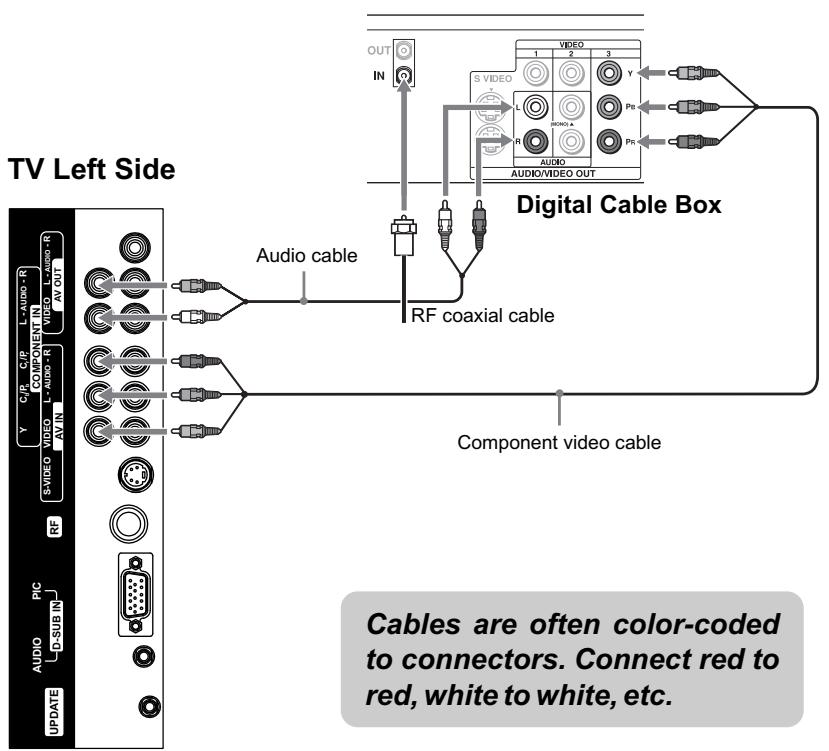
Basic Connections
Connecting Satellite Receiver
Connect the satellite antenna cable to the satellite receiver's SATELLITE IN jack. Use AV cables to connect the satellite receiver's AUDIO and VIDEO OUT jacks to the TV's AUDIO and VIDEO IN jacks.
Cables are often color-coded to connectors. Connect red to red, white to white, etc.
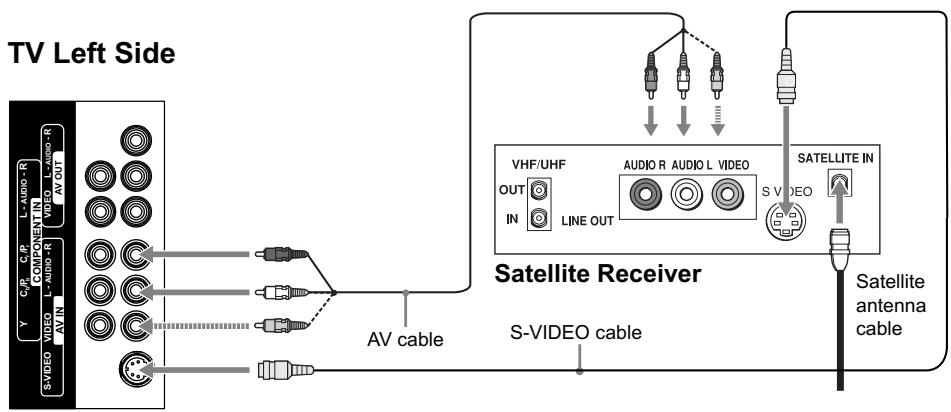
If your satellite receiver is not equipped with S-VIDEO, use a VIDEO cable (yellow) instead of the S-VIDEO cable.
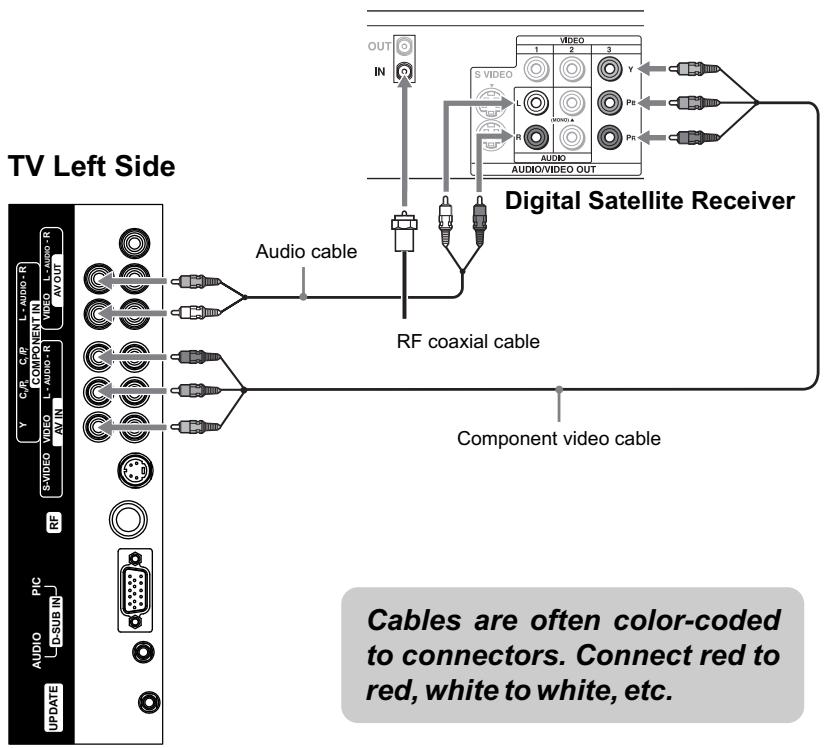
Connecting Digital Satellite Receiver
Connect the RF coaxial cable from the satellite dish to the input of the digital satellite receiver.
Use a component video cable to connect the YPbPr jacks of your digital satellite receiver to the TV's component jacks.
Component video connection is necessary to view digital broadcasts in 1080i, 720p, 480i and 480p. This TV displays most picture formats.
The component Jacks do not provide audio, so audio cables must be connected to provide sound.
Using External Equipment
You can connect many types of external equipment to your TV, including a DVD player, VCR, Digital TV tuner, PC, game console or camcorder. To view external source images, select the input source from INPUT on the remote control unit or on the Display.
Notes and Cautions:
- Disconnect all power sources before making any connections.
- Carefully check the terminals for position and type before making any connections.
- The packing contents of this TV may not include the cables or adaptors mentioned in this chapter.
- Refer to your external equipment operation manual carefully before making connections.
- Loose connectors can result in image or color problems. Make sure all connectors are securely inserted into their terminals.
Refer to your external equipment operation manual for the signal type. - The illustration of the external equipment may be different depending on your model.
Using External Equipment
Connecting a VCR
Connect the video output of the VCR to either the composite video input(yellow RCA) or S-Video input on the TV. Connect the line-level audio output of the VCR to the audio inputs(Red and White RCA) on the TV.

The S-video terminal share the same audio jacks with video.
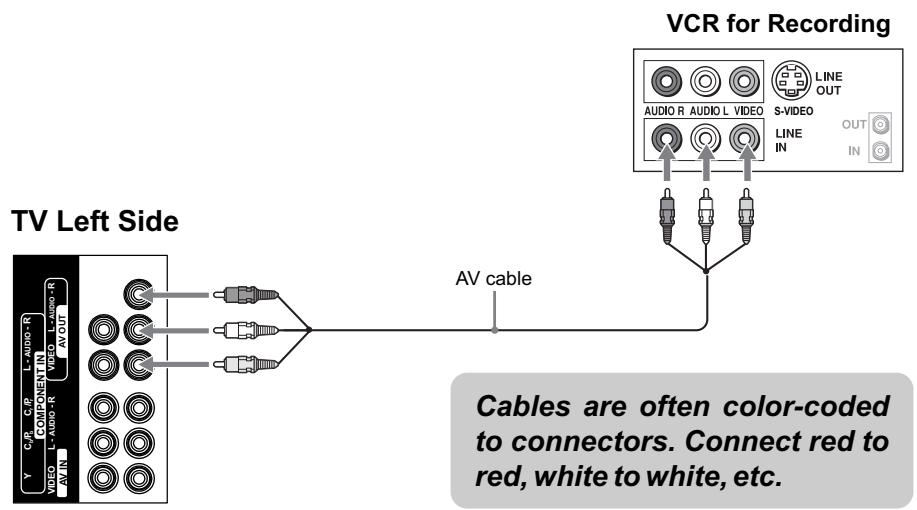
Connecting a VCR for Recording
Use AV cables to connect the VCR's AV input jacks to the TV's AV output jacks.
Using External Equipment
Connecting a DVD Player with Component Video Connectors
Use a component video cable to connect the DVD player's YPbPr jacks to the TV's YPbPr jacks. Use an audio cable to connect the DVD player's AUDIO OUT jacks to the TV's AUDIO IN jacks. Be sure to use the same row of inputs that you used for the video connection.
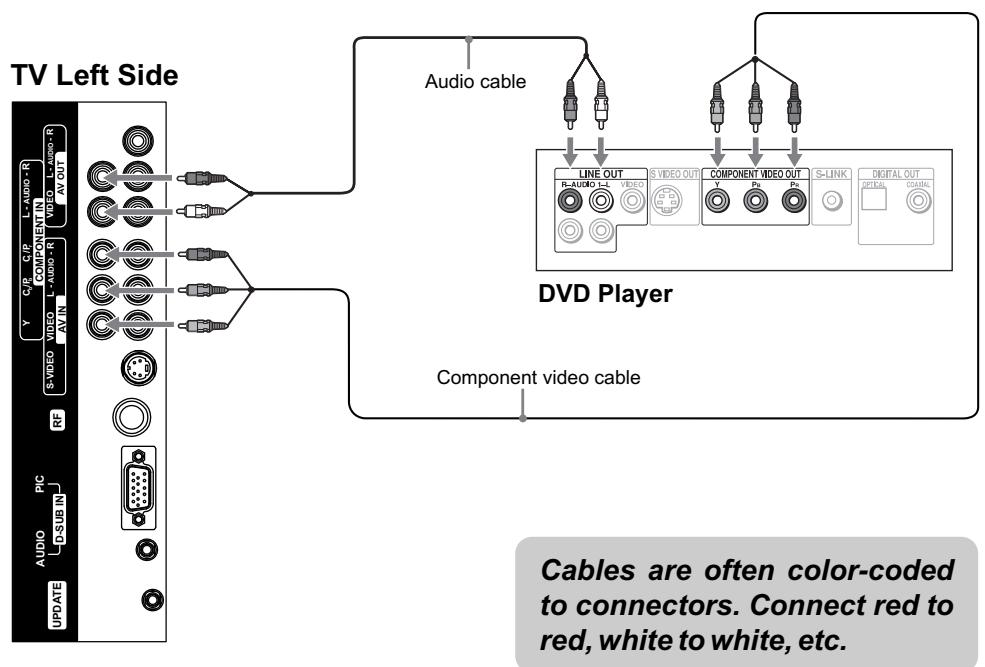
The YPbPrjacks on your DVD player are sometimes labeled YCbCr, or Y, B-Y and R-Y. If so, connect the cables to like colors.
Using External Equipment
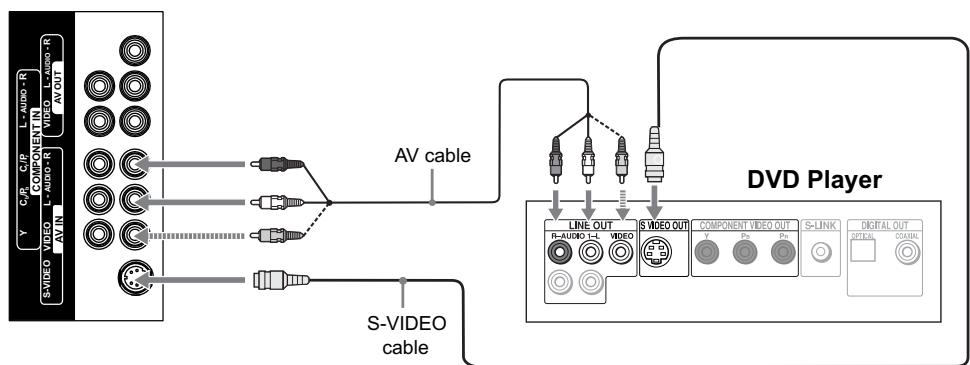
Connecting a DVD Player with S-Video and Audio Connectors
Use an AV cable to connect the DVD player's AUDIO OUT jacks to the TV's AUDIO IN jacks.
Use a S-VIDEO cable to connect the DVD player's S-VIDEO OUT jack to the TV's S-VIDEO IN jack.
TV Left Side
Cables are often color-coded to connectors. Connect red to red, white to white, etc.
If your DVD player is not equipped with S-VIDEO, use a VIDEO cable (yellow) instead of the S-VIDEO cable.
Using External Equipment
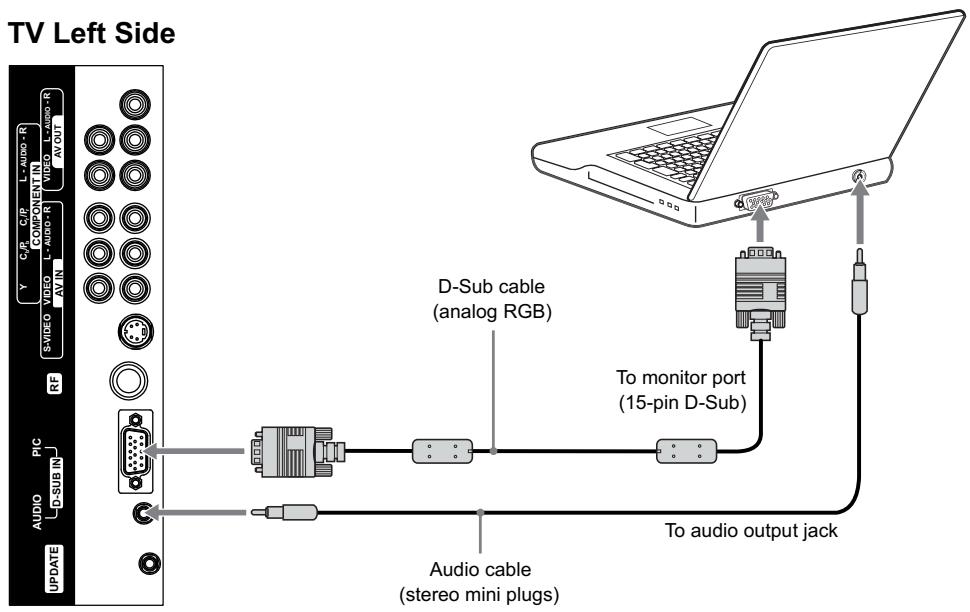
Connecting a PC
If you connect your PC to the TV, you can view your personal computer's display on the TV.
When your PC is connected to the TV with the D-Sub cable and audio cable, you can view and listen to the PC's video and audio output on the TV.
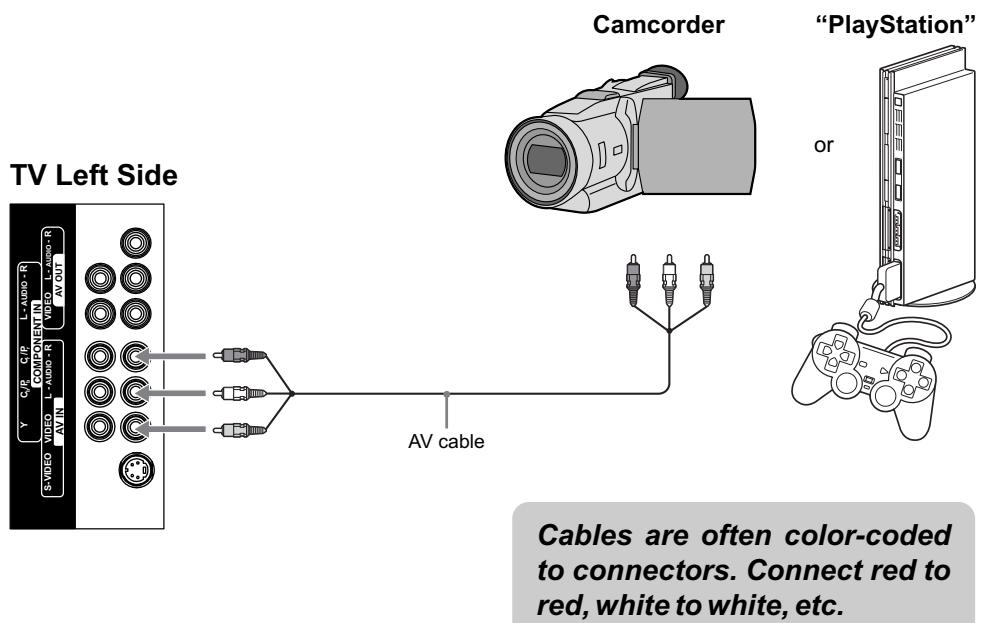
Connecting a Camcorder or "PlayStation"
Use an AV cable to connect the camcorder or "PlayStation" AV output jacks to the TV's AV input jacks.
Using External Equipment
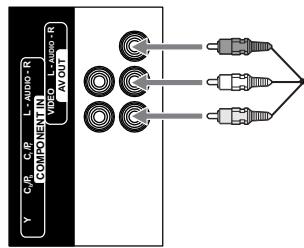
Connecting a Second TV or Monitor
The TV has a special signal output capability which allows you to hook up a second TV or monitor.
Connect the second TV or monitor to the TV's VCR output jacks.
See the Operating Manual of the second TV or monitor for further details regarding that device's input settings.
Cables are often color-coded to connectors. Connect red to red, white to white, etc.
Second TV or Monitor
TV Left Side
AV cable
Insert Batteries into the Remote Control
Insert two size AAA batteries by matching the and on the batteries to the diagram inside the battery compartment.
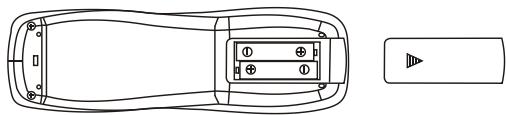
Precaution on battery use
Improper use of batteries can result in a leakage of chemicals and/or explosion. Be sure to follow the instructions below.
- Place batteries with their terminals corresponding to the (+) and (-) indications.
- Different types of batteries have different characteristics. Do not mix batteries of different types.
- Do not mix old and new batteries. Mixing old and new batteries can shorten the life of new batteries and/or cause old batteries to leak chemicals.
- Remove batteries as soon as they are non-operable. Chemicals that leak from batteries can cause a rash. If chemical leakage is found, wipe with a cloth.
- The batteries supplied with the product may have a shorter life expectancy due to storage conditions.
- If the remote control is not used for an extended period of time, remove the batteries from the remote control.
Using the Remote Control
Use the remote control by pointing it towards the remote sensor window of the set. Objects between the remote control and sensor window may prevent proper operation.
Cautions regarding use of remote control
- Do not expose the remote control to shock. In addition, do not expose the remote control to liquids, and do not place in an area with high humidity.
- Do not install or place the remote control under direct sunlight. The heat may cause deformation of the unit.
- The remote control may not work properly if the remote sensor window of the main unit is under direct sunlight or strong lighting. In such a case, change the angle of the lighting or TV set, or operate the remote control closer to the remote sensor window.
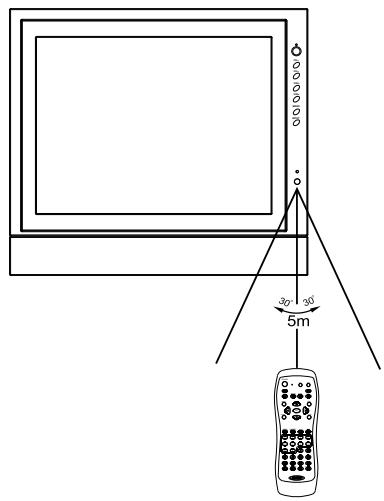
This above illustration is for reference only. The remote sensor may be in different locations on different models.
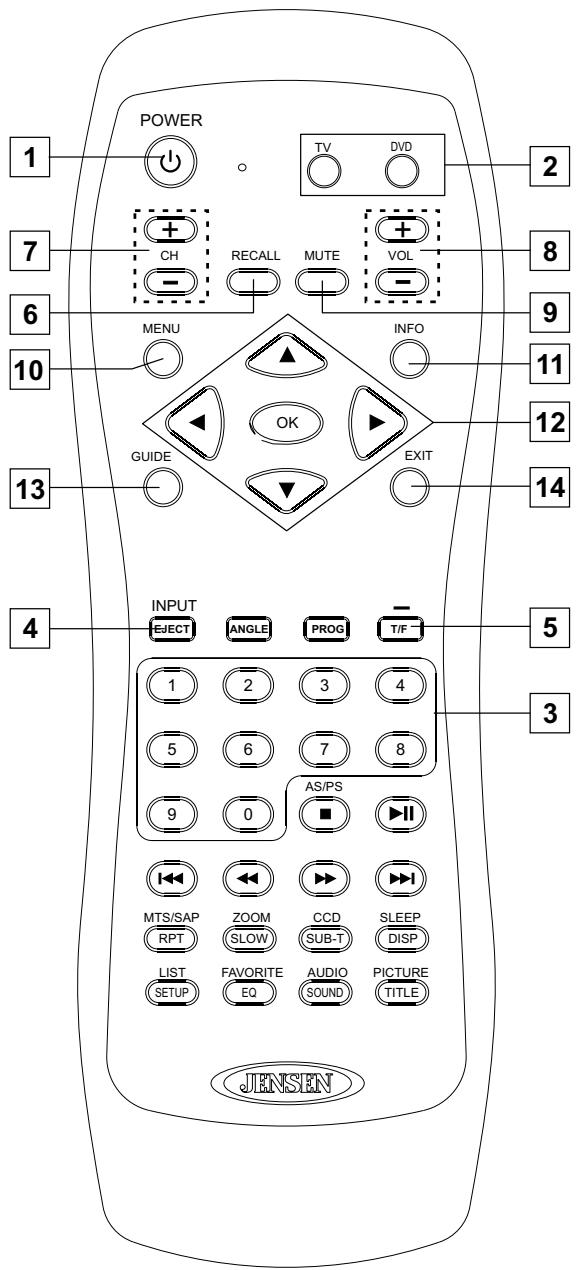
Button Descriptions
| Button | Description |
| 1 POWER | Turn the unit on or off. |
| 2 DVD, TV | To switch control between the TV and DVD player (if attached).If your remote control does not work correctly when you operate the unit, press the TV button. |
| 3 0-9 number buttons | Use these number buttons to select channel or input password. |
| 4 INPUT/EJECT* | To display the INPUT source list.Ejects DVD in DVD mode. |
| 5 Dash (-)/T/F | To enter a program number for multiple program channels such as 2-1,2-2, etc. |
| 6 RECALL | To switch between the currently tuned channel and the previously tuned channel. |
| 7 CH+, CH- | To select channels upward or downward. |
| 8 VOL+, VOL- | To adjust volume of speakers and audio out. |
| 9 MUTE | To mute the sound of speakers and audio out. |
| 10 MENU | To access the Menu main page. |
| 11 INFO | To access the program information. |
| 12 ▲, ▼ | To move upward or downward in menu operation; |
| To move left or right in menu operation;To adjust selected menu item in menu operation; | |
| OK To confirm or alter the settings of the selected menu item. | |
| 13 GUIDE | To access the program guide. |
| 14 EXIT | To exit menu. |
- NOTE: DVD mode is provided on this remote to control JENSEN DVD players and is used only if your entertainment system includes a JENSEN DVD player.
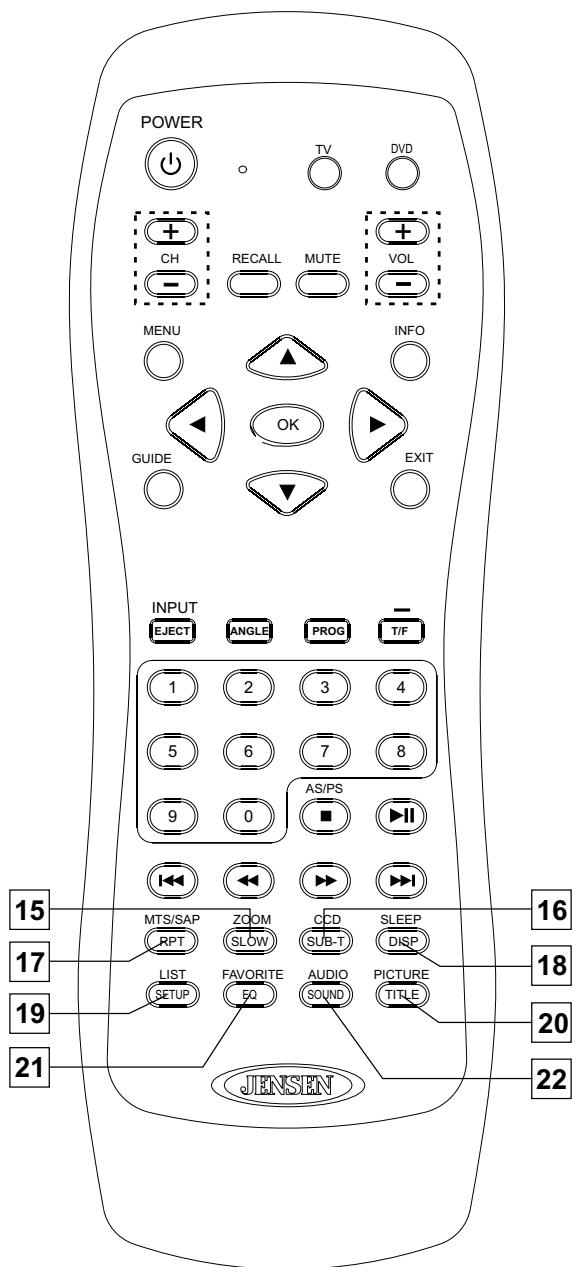
Button Descriptions
| Button | Description |
| 15 ZOOM | To select a screen aspect ratio. |
| 16 CCD | To select closed caption mode. |
| 17 MTS/SAP | To select a stereo, sap or mono for analog channels; also used to select audio track for digital channels. |
| 18 SLEEP | To set sleep timer. |
| 19 LIST | To access the master channel list. |
| 20 PICTURE | To select a preset picture mode. |
| 21 FAVORITE | To access the favorite channel list. |
| 22 AUDIO | To select a preset sound mode. |
NOTE: The buttons without descriptions are not active.
Connecting to your Power Supply
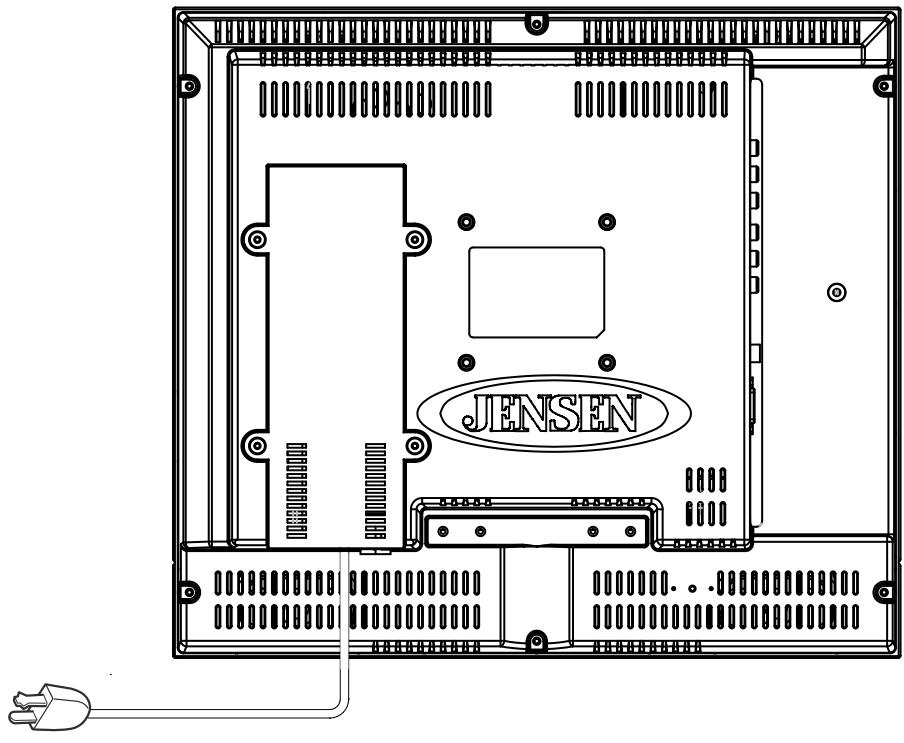
JE1507
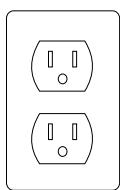
The JE1507 is equipped with a polarized AC power cord plug (a plug having one blade wider than the other). This plug will fit into the power outlet only one way. This is a safety feature. If you are unable to insert the plug fully into the outlet, try reversing the plug. If the plug still fails to fit, contact your electrician to have a suitable outlet installed. Do not defeat the safety purpose of the polarized plug by forcing it in.
JE1507DC
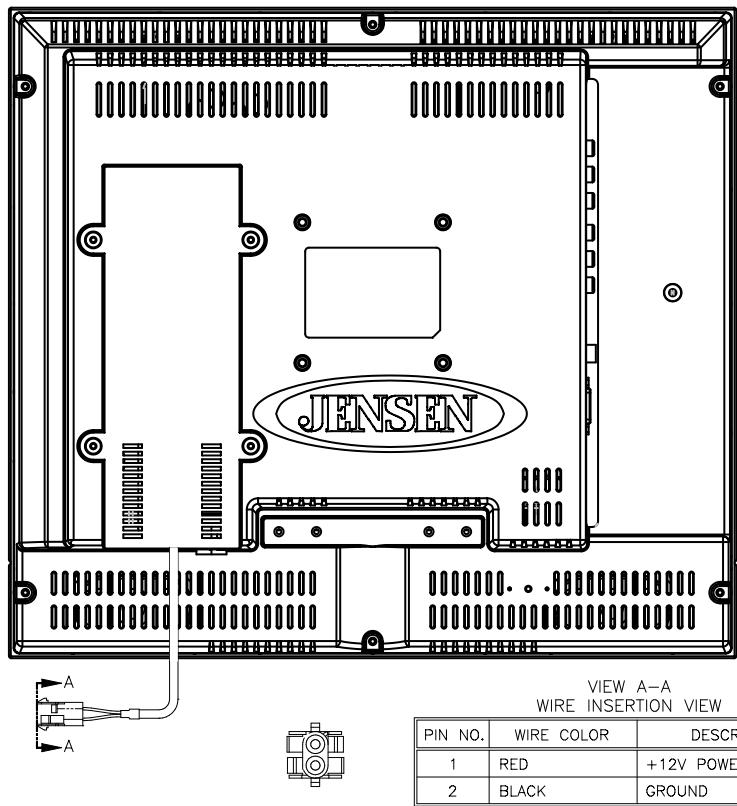
The JE1507DC is equipped with a 12V DC connector for use in a vehicle. Connect the red wire to a 12V DC accessory wire. This wire should not have 12 volts when the ignition is in the start position. Connect the black wire to the ground terminal or clean unpainted metal part of the chassis.
Turning On/Off
Turning On
First, connect the power correctly.
Press on the TV or POWER on the remote control.
Never attempt to move the TV unless the power cord has been disconnected.
Turning Off
Press on the TV or POWER on the remote control.
The TV enters standby mode and the image on the screen disappears.
The TV will still consume some power as long as the power cord is still inserted into the power outlet.
If you are not going to use this TV for a long period of time, be sure to remove the power cord from the power outlet.
Viewing Channels
Selecting an Antenna Input Source
Before you begin watching television, you must first select the antenna source and allow the television to perform auto programming.
- Press the MENU button on the remote control.
- Press the / to select the CHANNEL menu.
- Press to access and [Antenna] item will be highlighted.
- Press the / to select [Air] or [Cable] according to what kind of connection is made with your TV.
- Press to select [Auto Scan] and to confirm and continue.
If you choose [Air], please select [Start to Scan] item and press to confirm, then the TV starts Auto Program automatically.
If you choose [Cable], there are 3 kinds of Cable systems, including STD, IRC and HRC. Select [Auto] if unsure. (When you select [Auto], the unit automatically detects the proper cable source. If the unit fails to detect the type of cable system, please consult with your cable TV company to determine the proper system and enter this information.) Then please select [Start to Scan] item and press to confirm, the TV starts Auto Program automatically.
- During the process of the auto search, you can press MENU or EXIT to exit.
Auto Programming
Operate according to the steps 1-5 above, the unit automatically begins auto program. Auto Program may take a while to complete and a progress bar is displayed while available channels are being scanned. If you select [MENU] or [EXIT] to cancel the Auto Program before all receivable channels are scanned, you should run Auto Program at a later time to be sure all available channels are received. Auto Program will create a list of receivable channels for the current input. You will be required to run Auto Program for RF input to create a list of available channels.
Menu Navigation
- PRESS to display the Main menu.
Press to highlight the menu items. OK -
OK Press to enter the sub-menu field.
Press to select items in the sub-menu. 4. Press to adjust the selected items or enter the sub-menu. OK OK -
PRESS to return to the previous screen.
- Press to return to normal picture.
Analog And HDTV Channels
This television is capable of receiving the full range of cable-TV channels available today, from the most digital and HDTV channels, to the traditional analog channels.
As the transition toward full digital TV continues, some cable-TV systems in the USA will have a mixture of analog and digital channels in their lineups. So in most situations the ATSC PSIP channel number is composed of a major channel number and a minor channel number. The major channel number is same for both analog and digital channels (It is equal to the NTSC channel number for existing broadcasters). An analog channel usually has a minor channel number of zero, while a digital channel usually has a minor channel number of 1, 2 or larger.
Selecting Channels
You can select analog channels in several ways.
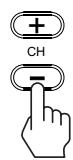
Method 1 - Using CH+/CH- on the remote control or CH▲/CH▼ on the TV
Press the CH + / CH- or CHA/CHV to cycle among all available channels. Only those channels marked with a tick symbol can be selected by the CH + / CH- or CHA/CHV button.
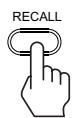
Method 2 - Using RECALL on the remote control
Press RECALL to switch to the previously tuned channel. Press RECALL again to switch back to the currently tuned channel.
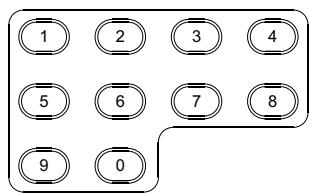
Method 3 - Using 0-9, dash(-) and OK on the remote control
- For analog TV channels
Press the 0-9 number buttons to input a channel number and confirm with OK to select up to 125 channels for VHF/UCHF/CATV.
For digital TV channel
Press the 0-9 number buttons and dash(-) to input a digital channel number, the TV goes to the selected channel directly.
(e.g., channel 8-3, just press 8, - and 3 one by one)
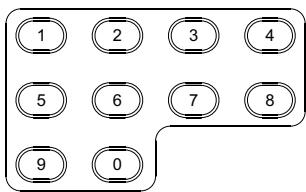
If you enter channel number with 0-9 only (without pressing OK), channel selection will be made if there is no operation for a few seconds.

Method 4 - Using master channel list
Press the LIST button to display the master channel list, you may select channel with the and OK buttons.
Method 5 - Using favorite channel list
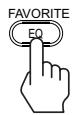
Press the FAVORITE button to display a desired favorite channel list, you may select channel with the and OK buttons.

Adjusting Volume
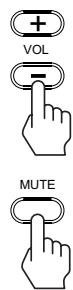
Using VOL+/VOL- on the remote control or VOL▶/VOL▲ on the TV
Press the VOL+/VOL- or VOL▶/VOL< to increase or decrease the volume.
Using MUTE on the remote control
Press MUTE to mute the sound. Press it again to cancel the mute.
Input Select
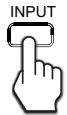
Press the INPUT button on the remote control and select the input source with the and OK/ buttons. The INPUT SOURCE options is shown below.
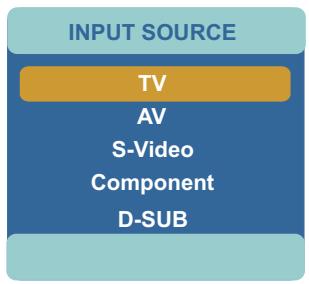
Select to view TV programs
- Select to view programs from AV inputs.
- Select to view programs from S-video inputs.
- Select to view programs from Component inputs.
- Select to view programs from D-Sub input.
Using the ZOOM button
Press ZOOM repeatedly to choose a proper screen aspect ratio. The following mode may available for your choice.
Normal
The zoom mode options may differ from different formats of the input signal.
Select to match the source's image.( 4:3 to 4:3, 16:9 to 16:9)
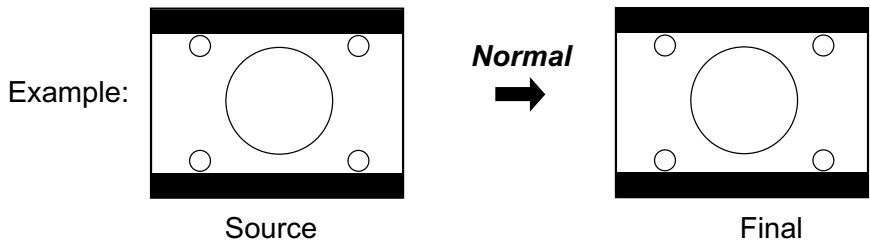
When you choose NORMAL to view a 16:9 program, two black bars appear on the top and bottom of the screen.
For additional protection to the screen, when you are viewing a 16:9 program, please DO NOT use the NORMAL feature for a long period of time.
Using the ZOOM button
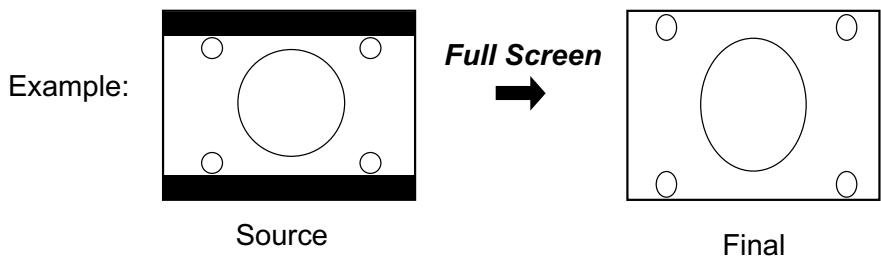
Full Screen
Select to enlarge the 16:9 picture vertically only, to fill the display area.
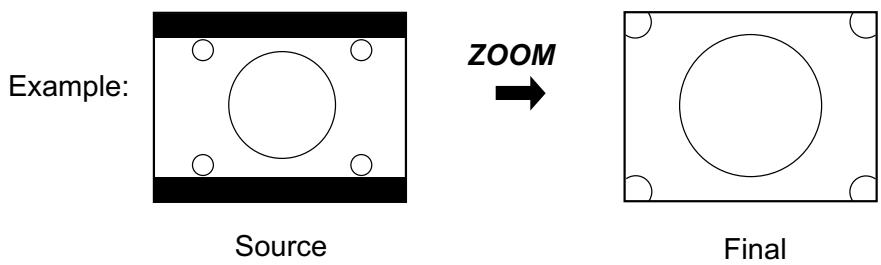
ZOOM
Select to enlarge the picture horizontally and vertically to an equal aspect ratio that fills the whole screen.
Depending on the signal tuned, you may see different MENU options on your screen. For example, Menus displayed below are based on TV mode.
Picture Control
Accessing the Picture Menu
- Press MENU

- Highlight the PICTURE icon.
Use or button.
- Press

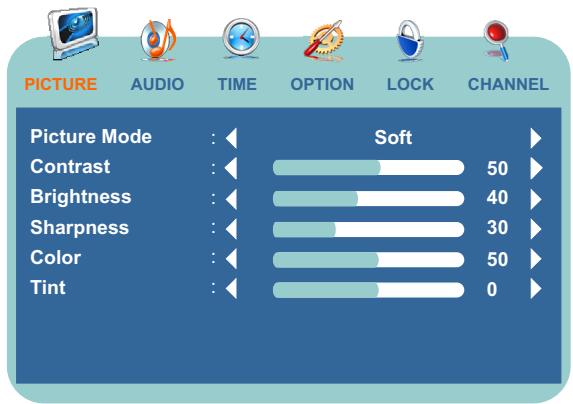
To highlight an option and to change settings, press . Press EXIT to exit.
Adjusting Picture Settings
Option
Description
Picture Mode
Select to choose a picture mode to best match the TV environment, which can vary due to room brightness, type of program watched or the type of image input from external equipment.
Standard Select for a normal picture.
Dynamic Select for enhanced picture contrast and sharpness.
Soft Select for a highly defined image in a normally bright room.
Personal Select to customize the picture as desired.

To quickly change the picture mode, press the PICTURE button repeatedly.
| Contrast | Select to adjust picture contrast. |
| Brightness | Select to adjust picture brightness. |
| Sharpness | Select to adjust clarity of outline detail. |
| Color | Select to adjust picture color. |
| Tint | Select to adjust natural flesh tones. Used for 480i format only. |
Audio Control
Accessing the Audio Menu
- Press MENU
- Highlight the AUDIO icon.
Use or button.
- Press

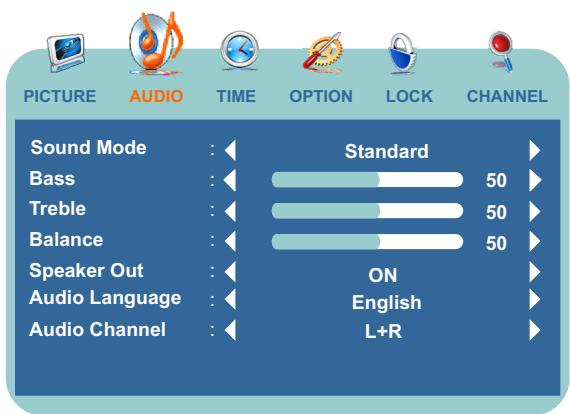
To highlight an option and to change settings, press . Press EXIT to exit.
Selecting Audio Options

To quickly change the sound mode, press the AUDIO button repeatedly.
| Option | Description |
| Sound Mode | Personal Select to customize the audio as desired. |
| Movie Select for a movie program. | |
| Music Select for a music program. | |
| Standard Select for a normal program. | |
| Bass, Treble & Balance | Select to access an audio adjustment window. |
| Bass Adjust to increase or decrease lower-pitched sounds. | |
| Treble Adjust to increase or decrease higher-pitched sounds. | |
| Balance Adjust to emphasize left or right speaker balance. | |
| Speaker Out | Select ON or OFF. There is sound output from the speaker when select [ON], while there is no sound output from the speaker when select [OFF]. |
| Audio Language | Select English, French or Spanish. Used for digital TV only. After setting, the unit will choose the default audio track when you switch to another channel. |
| Audio Channel | Toggle between L+R, L+L, and R+R. |
Time Adjust
Accessing the Time Menu
- Press MENU
- Highlight the TIME icon.
Use or button.
- Press
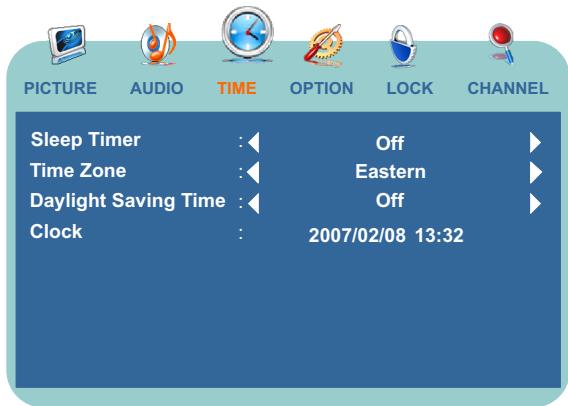
To highlight an option and to change settings, press . Press EXIT to exit.
Selecting Time Options
| Option | Description |
| Sleep Timer | Press ↓ / ▷ to set the television to automatically turn off after 15, 30, 60, 90, 120, 180 or 240 minutes. To cancel the timer, select Off. |
| Time Zone | Press ↓ / ▷ to select a proper time zone according to your area. If you want to return to previous screen, press [MENU] to return. |
| Daylight Saving Time | Press ↓ / ▷ to select [On] item if you want to observe daylight saving, or you may select [Off] to abandon daylight saving. |
| Clock | Displays the current day/time determined by the selected Time Zone. The time is set automatically from the digital TV source. |
Setting Channels
Accessing the Channel Menu
- Press MENU
- Highlight the CHANNEL icon.
Use or button.
- Press


To highlight an option and to change settings, press . Press EXIT to exit.
Selecting Channel Options
| Option | Description |
| Antenna | Choose "Air" for antenna usage or "Cable" for cable TV or satellite. |
| Auto Scan | You may need to run Auto Program manually if this is the first time using TV. |
| Favorite | Allows you to set up favorite channels. |
| Show/Hide | Select to display all available channels scanned by Auto Scan or hide the dislike channels. See "Setting Channel List" on this page. |
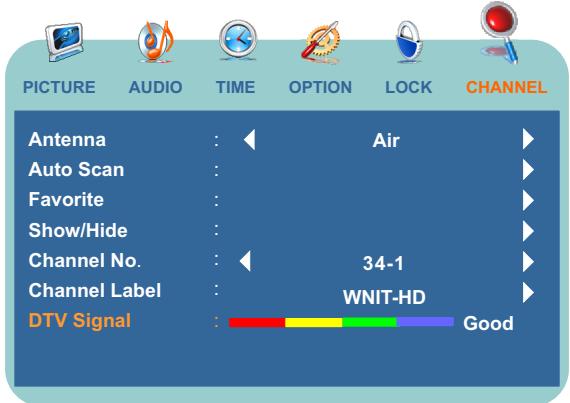
| Channel No. | Displays selected channel number. |
| Channel Label | Allows you to assign labels (such as station call letters) to a selected channel. See "Editing Channel Label" on the next page. |
| DTV Signal | This shows that the channel is a Digital (HD) station and gives the signal strength. |
Setting Channel List
In the [Show/Hide List] window, you may mark or unmark the desired channels. Only those channels marked with a check mark can be selected by the CH+ or CH- button. The unmarked channel(s) can only be selected using the 0-9 number buttons.
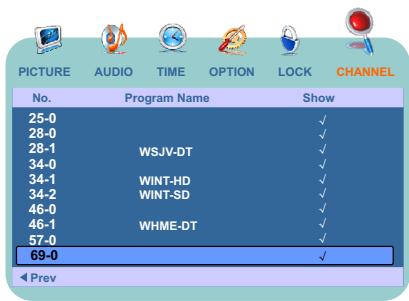
You can also access the master channel list by pressing the LIST button.
Setting Channels
Editing Channel Label
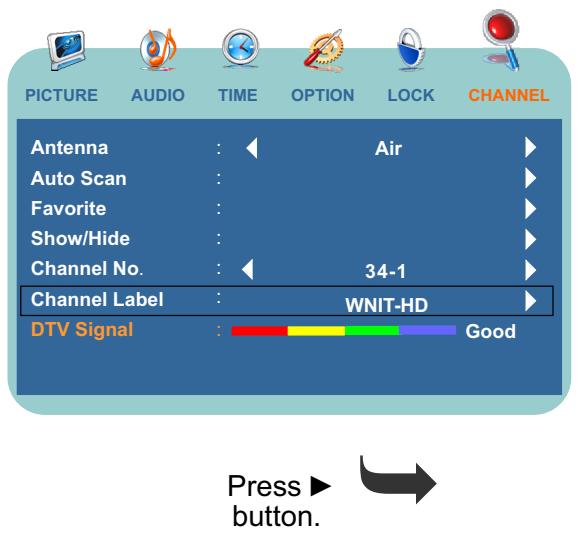
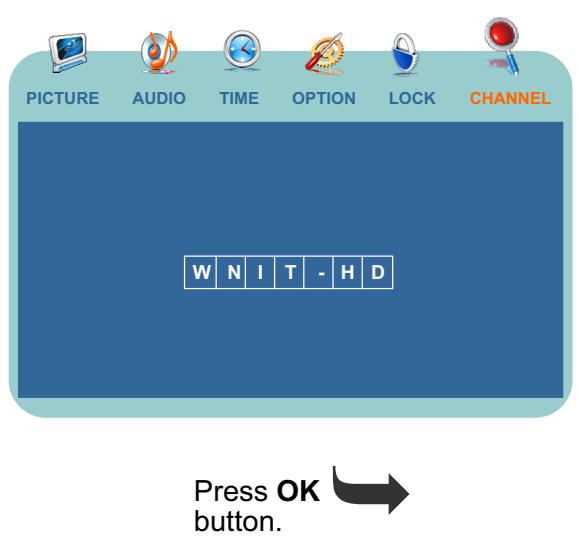
The unit allows you to assign a label to all available channels as desired using the Channel Label feature. Under the CHANNEL menu, select the Channel No. you want to rename. Use and buttons to input a name in the Channel Label field. Press OK when finished.
Setting System
Accessing the Option Menu

MENU
- Press MENU
- Highlight the OPTION icon.
Use or button.
- Press

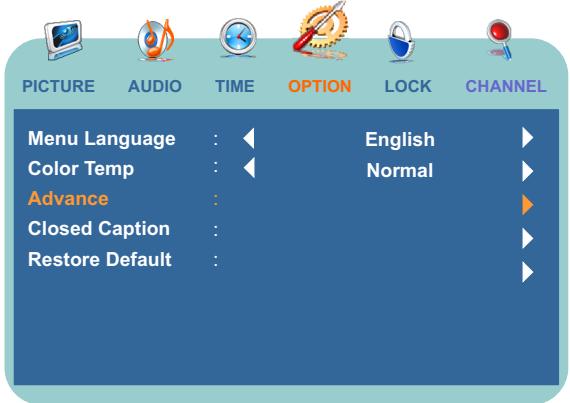
To highlight an option and to change settings, press . Press EXIT to exit.
Setting Caption Vision
| Option | Description |
| Menu Language | Allows you to select an on-screen menu language. Select from English, French and Spanish. |
| Color Temp | Choose from the following color temperatures: |
| Cool Select to give the white colors a blue tint. | |
| Normal Select to give the white colors a neutral tint. | |
| Warm Select to give the white colors a red tint. | |
| Closed Caption | Allows you to set closed captioning to Basic (EIA-608) or Advanced (EIA-708). Select from [Basic Selection] and [Advanced Selection]. |
| Restore Default | Select to reset display settings to the defaults. Please make sure that you want to reset all settings to the factory defaults before you perform this operation. The channels information will be lost. You must Auto Scan again. |
WARNING: Running the [Restore Default] item will clear all of your customized settings.
Using the CCD button
Press the CCD button repeatedly to select [Off], [On] or [CCD On Mute].
| Option | Description |
| On | Select to turn on the Closed Captions. |
| Off | Select to turn off the Closed Captions. |
| CCD On Mute | Select to turn on the Closed Captions when the TV is muted. |
Parental Lock Control
The rating control gives parents control over broadcasts which are accessed by their children. It allows parents to select programs judged suitable for child viewing while blocking others judged not suitable. It does so automatically once activated. See "Selecting Locks Options" on the next page.
Accessing the Lock Menu
- Press MENU............

- Enter a correct password.
Use 0-9 number buttons.
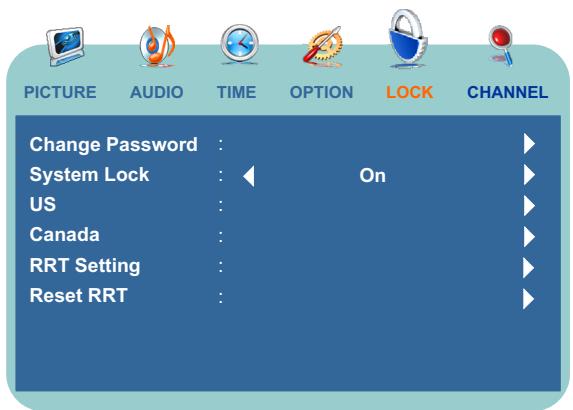
If it is the first time to access the [Lock] menu, the unit allows you to use a default number as "0000".
Once the correct password is entered, the [Lock] menu displays as above.
To highlight an option and to change settings, press . Press EXIT to exit.
Selecting Lock Options
| Option | Description |
| Change Password | Select to change password as desired. The old password is necessary if you want to change the password. |
| System Lock | ON Select to enable the parental lock control. |
| OFF Select to disable the parental lock control. | |
| US | Set US custom rating restrictions. |
| Canada | Set Canadian custom rating restrictions. |
| RRT Setting | If the broadcasting program uses RRT5 (Rating Region Table-Region 5) criteria rating in accordance with the FCC Rules, its rating can be down loaded to this TV and can be used for parental controls. |
| Reset RRT | Select to reset RRT5 Version information to the default. |
Parental Lock Control
Selecting Locks Options
To ensure maximum blocking capability, the age-based ratings should be used.
US Custom Rating Options
| Option | Description |
| TVBlock programs by their rating, content or both. | Age-Based Options |
| TV-Y All children. | |
| TV-Y7 Directed to children age 7 and older. | |
| TV-G General audience. | |
| TV-PG Parental guidance suggested. | |
| TV-14 Parents strongly cautioned. | |
| TV-MA Mature audience only. | |
| Content-Based Options | |
| ALL Select all content-based options for Age rating. | |
| FV Fantasy violence. | |
| V Violence. | |
| S Sexual situations. | |
| L Strong language. | |
| D Suggestive Dialog. | |
| MPAA | G All children and general audiences. |
| PG Parental guidance suggested. | |
| PG-13 Parental guidance for children under 13. | |
| R Restricted viewing, parental guidance is suggested for children under 17. | |
| NC-17 No one 17 and under admitted. | |
| X X is an older rating that is unified with NC-17 but may be encoded in the data of older movies. |
Canadian Custom Rating Options
| Option | Description | |
| Canada Eng (English) | C | All children. |
| C8+ | Children 8 years and older. | |
| G | General programming. | |
| PG | Parental guidance. | |
| 14+ | Viewers 14 and older. | |
| 18+ | Adult programming. | |
| Canada Fre (French) | G | General programming. |
| 8 ans+ | Not recommended for ages under 8. | |
| 13 ans+ | Not recommended for ages under 13. | |
| 16 ans+ | Not recommended for ages under 16. | |
| 18 ans+ | Adult programming. | |
The content ratings will increase depending on the level of the age-based rating. For example, a program with a TV-PG V (Violence) rating may contain moderate violence, while a TV-14 V (Violence) rating may contain more intense violence.
Viewing Locked or Restricted Programs
You can view a locked or blocked program by entering the secret number.
- Tuned to a locked or blocked program.
- Enter your secret number using the 0-9 buttons.
Parental Lock will be canceled temporarily until you turn your TV off.
Troubleshooting
If, after reading these operating instructions, you have additional questions related to the use of your television, please call the service center in your area. Before calling service, please check the below symptoms and follow suggested solutions.
Remote Control
| Problem | Possible Solutions |
| Remote control does not operate | ·The batteries could be weak. Replace the batteries. ·Check the orientation of the batteries. ·Make sure the power cord is plugged in. |
Video and Audio
| Problem | Possible Solutions |
| No picture (screen not lit), No sound | ·Make sure the power cord is plugged in. ·Press POWER on the TV or on the remote control. ·Select correct input source. ·Try another channel; it could be station trouble. |
| Dark, poor or no picture (Screen lit), good sound | ·Select a proper picture mode. ·Adjust the brightness in the video setting. ·Check the antenna/cable connections. ·Disconnect main power and reconnect. |
| No color/dark picture/color Is not correct | ·Adjust the color saturation in the video setting. |
| Only snow and noise appear On the screen | ·Check the antenna/cable connections. ·Try another channel; it could be station trouble. |
| Dotted lines or stripes | ·Adjust the antenna. ·Move the TV away from noise sources such as cars, neon signs, or hair dryers. |
| Double images | ·Using a highly directional outdoor antenna or a cable may solve the problem. |
| “Black box” on screen | ·You have selected a text option in the Setup setting and no text is available. Please try to turn off the Close Caption feature or select CC1 instead of Text1-4. |
| Good picture, no sound | ·The sound may be muted. Press MUTE again to cancel. ·Make sure the stereo mode is set to stereo or mono. |
| Audio noise | ·Communication problems may occur if infrared communication equipment (e.g., infrared cordless headphones) is used near the TV. Move the infrared communication equipment away from the TV until the noise is eliminated. |
Troubleshooting
General
| Problem | Possible Solutions |
| One or some channels can’t be displayed | These channels may be locked. Please unlock them (see Lock settings).These channels may be set to hidden in the master channel list. You may mark them with the check mark to cancel hidden or select them with 0-9 number buttons. |
| Lost password | On the password screen, enter the following master password: 1397. You may use the master password to set a new password as desired. Please remember your new password and keep it carefully. |
| Some items can’t be accessed | If a setting option appears in gray, this indicates that the settings option is unavailable in current input mode. |
| TV cabinet creaks | When the TV is in use, there is a natural rise in temperature, causing the cabinet to expand or contract and may be accompanied by a slight creaking noise. This is not a malfunction. |
| Control buttons do not operate | Disconnect the power cord and wait for a few seconds. Then re Plug the power cord and turn on the unit again. |
Notes:
If your problem is not solved, turn your unit off and then on again.
Cautions:
Never attempt to repair a defective TV yourself.
Care and Maintenance
About After-Image
The extended use of fixed image program material can cause a permanent after-image on the screen.
This background image is viewable on normal programs in the form of a stationary fixed image. This type of irreversible screen deterioration can be limited by observing the following steps:
A. Reduce the brightness/contrast setting to a minimum viewing level.
B. Do not display the fixed image for extended periods of time.
C. Turn the power off when not in actual use.
Important Information Regarding Use of Video Games, Computers, Captions or Other Fixed Image Displays.
- Do not allow a still picture to be displayed for an extended period, as this can cause a permanent after-image to remain on the screen.
Examples of still pictures include logos, video games, computer images, teletext and images displayed in 16:9 mode.
CAUTIONS:
- The permanent after-image on the screen resulting from fixed image use is not an operating defect and as such is not covered by the warranty.
- This product is not designed to display fixed images for extended periods of time.
Cleaning and Maintenance
To clean this unit, wipe with a soft, dry cloth.
If the surfaces are extremely dirty, use a soft cloth dipped in a soap and water solution or a weak detergent solution.
- Use eyeglass cleaner to remove stubborn dirt from the screen.
- Never use alcohol, paint thinner or benzine to clean this unit.
- Before using a chemically treated cloth, read the instructions that came with the cloth carefully.
Specifications
| Type: | LCD TV | |
| Panel: | 15" TFTLCD | |
| TV system: | American TV standard ATSC/NTSC System | |
| Receiving Channel: | ||
| VHF/UHF: | VHF 2-13ch, UHF 14-69ch | |
| CATV: | 1-125ch | |
| Digital Terrestrial Broadcast: | 2-69ch | |
| Digital cable: | 1-135ch | |
| Audio multiplex: | BTSC System | |
| Audio out: | 2W × 2 | |
| Power Requirement (AC Version): | AC 120 V, 60Hz | |
| Power Requirement (DC Version): | 10-16V DC | |
| Power Consumption: | 30 W | |
| Dimensions (W X H X D in inches): | 15.3"W × 13.7"H × 3.1"D | |
| Weight: | 8.6 lbs | |
| Terminals: | ||
| N | Composite Video/Audio(L/R): | 1 |
| S-Video: | 1 | |
| Component Video/Audio(L/R): | 1 | |
| D-Sub/Audio: | 1 | |
| Antenna: | 1 | |
| OUT | Composite Video/Audio(L/R): | 1 |
| Control | Update: | 1 |
- As part of policy of continuous improvement, the manufacturer reserves the right to make design and specification changes for product improvement without prior notice. The performance specification figures indicated are nominal values of production units. There may be some deviations from these values in individual units.
AVERTISSEMENT
Bass, Treble & Balance
- LCD Color Television
- Owners Manual
- WARNING
- CAUTION
- FCC STATEMENT
- FCC CAUTION:
- WARNING:
- IMPORTANT SAFETY INSTRUCTIONS
- Power Sources
- Grounding or Polarization
- For the unit with a polarized AC power cord plug
- For the unit with a DC power connector
- Wall outlet
- Wiring
- Electric shock
- Cleaning
- Overloading
- Power
- Sound
- Power Cord
- Ventilation
- Heat sources
- Do not use this product near water
- Entering of objects and liquids
- Lightning
- Servicing
- Replacement parts
- Attachments
- Damage requiring service
- Safety checks
- Wall or ceiling mounting
- Panel protection
- Pixel defect
- Antennas
- Outdoor Antenna Grounding
- WHEN INSTALLING AN OUTDOOR ANTENNA SYSTEM, EXTREME CARE SHOULD BE TAKEN TO KEEP FROM CONTACTING POWER LINES OR CIRCUITS AS CONTACT WITH THEM IS ALMOST INVARIABLY FATAL.
- TV Controls and Connectors
- Control Panel
- TV Connectors
- Basic Connections
- Overview
- Disconnect all power sources before making any connections.
- Connecting Antenna System
- Connecting Cable System
- Connecting Cable Box
- Connecting Digital Cable Box
- Connecting Satellite Receiver
- Connecting Digital Satellite Receiver
- Using External Equipment
- Notes and Cautions:
- Connecting a VCR
- Connecting a VCR for Recording
- Connecting a DVD Player with Component Video Connectors
- Connecting a PC
- Connecting a Camcorder or "PlayStation"
- Connecting a Second TV or Monitor
- Insert Batteries into the Remote Control
- Precaution on battery use
- Using the Remote Control
- Cautions regarding use of remote control
- Connecting to your Power Supply
- Turning On/Off
- Turning On
- Turning Off
- Viewing Channels
- Selecting an Antenna Input Source
- Auto Programming
- Menu Navigation
- Analog And HDTV Channels
- Selecting Channels
- Method 1 - Using CH+/CH- on the remote control or CH▲/CH▼ on the TV
- Method 2 - Using RECALL on the remote control
- Method 3 - Using 0-9, dash(-) and OK on the remote control
- - For analog TV channels
- For digital TV channel
- Method 4 - Using master channel list
- Method 5 - Using favorite channel list
- Adjusting Volume
- Input Select
- Using the ZOOM button
- Normal
- Full Screen
- ZOOM
- Picture Control
- Accessing the Picture Menu
- Adjusting Picture Settings
- Option
- Description
- Audio Control
- Accessing the Audio Menu
- Selecting Audio Options
- Time Adjust
- Accessing the Time Menu
- Selecting Time Options
- Setting Channels
- Accessing the Channel Menu
- Selecting Channel Options
- Setting Channel List
- Editing Channel Label
- Setting System
- Accessing the Option Menu
- Setting Caption Vision
- Using the CCD button
- Parental Lock Control
- Accessing the Lock Menu
- Selecting Lock Options
- Selecting Locks Options
- Viewing Locked or Restricted Programs
- Troubleshooting
- Remote Control
- Video and Audio
- Notes:
- Cautions:
- Care and Maintenance
- About After-Image
- Important Information Regarding Use of Video Games, Computers, Captions or Other Fixed Image Displays.
- Cleaning and Maintenance
- To clean this unit, wipe with a soft, dry cloth.
- AVERTISSEMENT
Brand : JENSEN
Model : JE1507DC
Category : Television