JTV2423DCS - TV JENSEN - Free user manual and instructions
Find the device manual for free JTV2423DCS JENSEN in PDF.

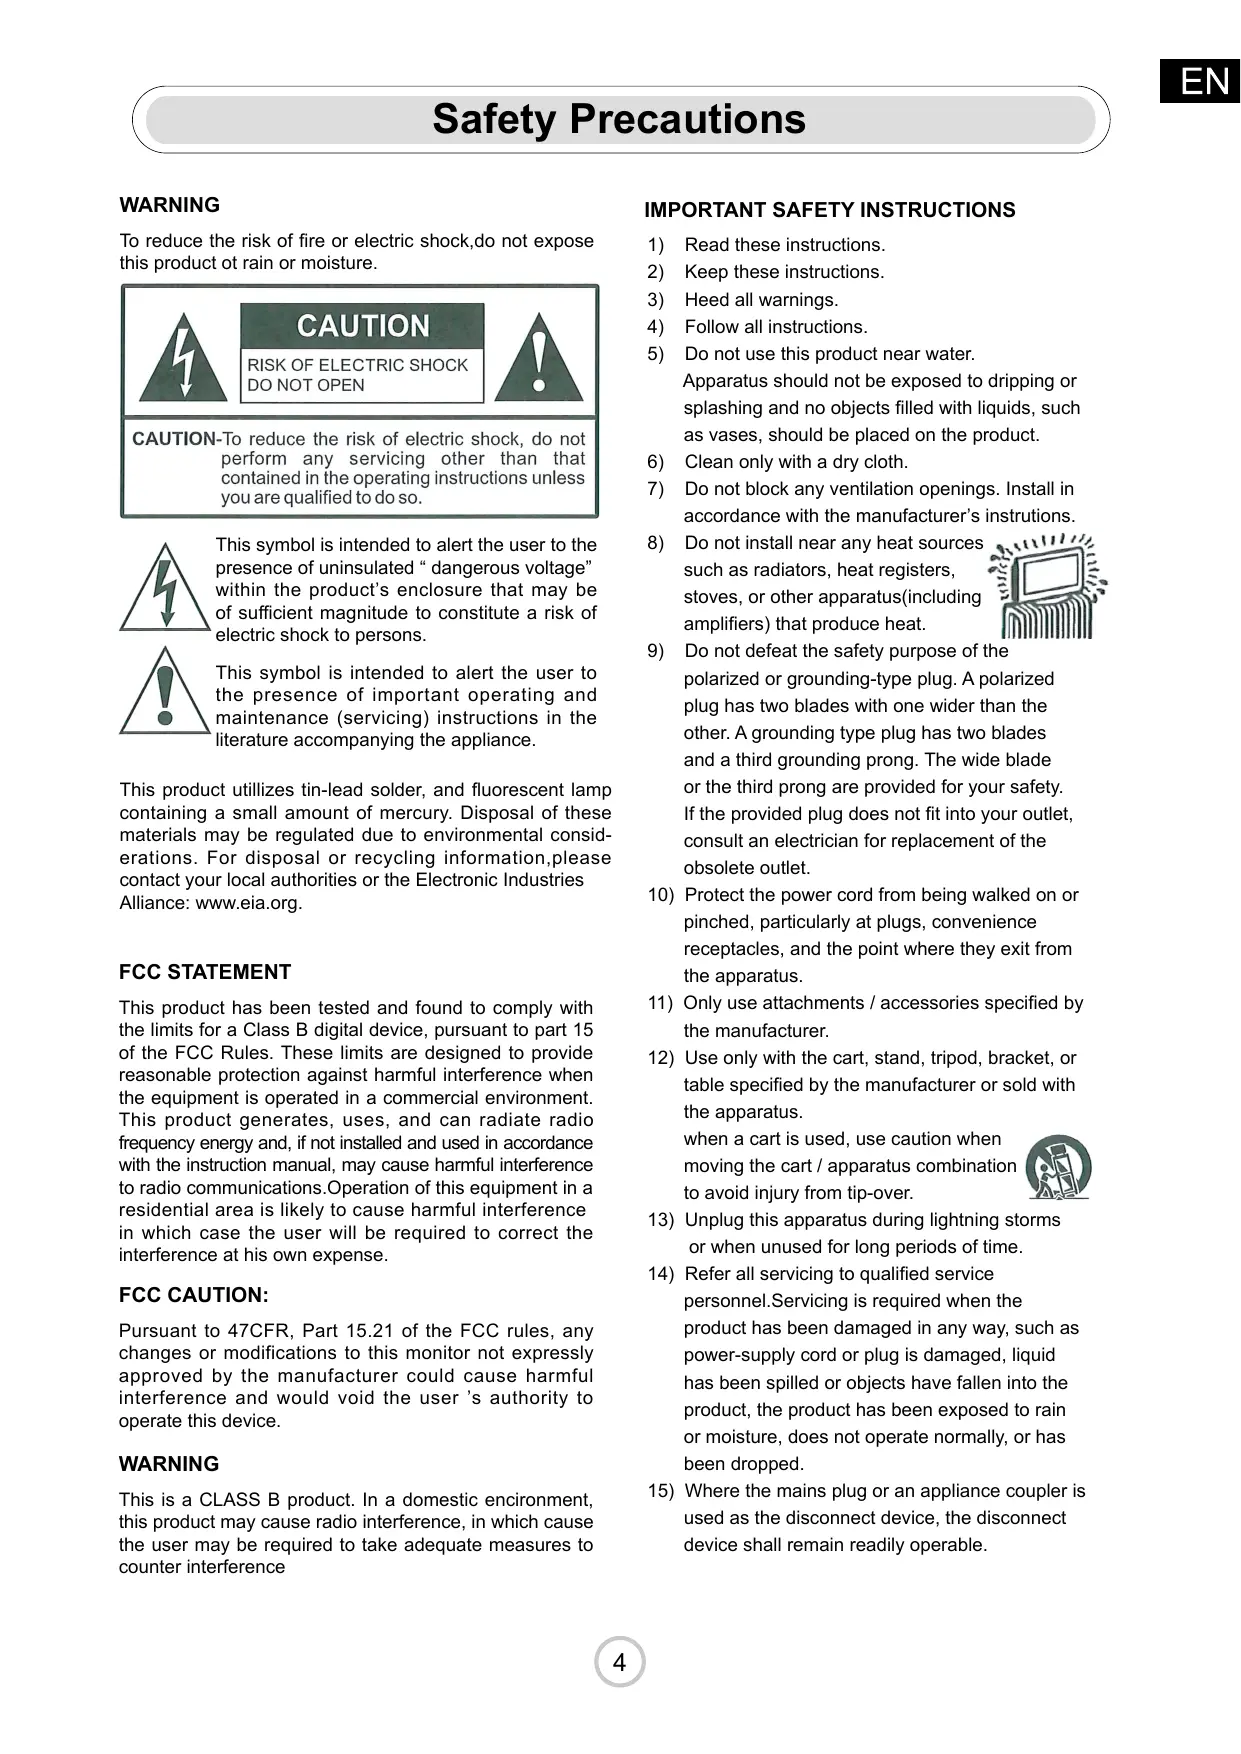

| Product type | 24-inch LED TV |
| Brand | JENSEN |
| Model | JTV2423DCS |
| Screen size | 24 inches (60 cm) |
| Resolution | 1366 x 768 pixels (HD) |
| Display technology | LED LCD |
| Dimensions (W x H x D) without stand | 55.6 x 33.5 x 7.5 cm |
| Dimensions with stand | 55.6 x 38.2 x 17 cm |
| Weight | 3.2 kg |
| Power supply | 100-240 V AC, 50/60 Hz |
| Power consumption (max) | 40 W |
| Standby consumption | <0.5 W |
| Video inputs | 1 x HDMI, 1 x VGA, 1 x composite |
| Audio inputs | 1 x 3.5 mm jack |
| USB ports | 1 x USB 2.0 (media playback) |
| TV tuner | DVB-T/C |
| Speakers | 2 x 3 W |
| Main features | Remote control, OSD menu, parental control, timer |
| Wall mount | VESA 100 x 100 mm |
| Care and cleaning | Wipe with a soft dry cloth; do not use solvents |
| Safety | Polarized plug, grounding, surge protection |
| Spare parts and repairability | Use only manufacturer-approved parts |
| General information | Operating temperature: 0°C to 40°C; humidity <80% |
Frequently Asked Questions - JTV2423DCS JENSEN
User questions about JTV2423DCS JENSEN
0 question about this device. Answer the ones you know or ask your own.
Ask a new question about this device
Download the instructions for your TV in PDF format for free! Find your manual JTV2423DCS - JENSEN and take your electronic device back in hand. On this page are published all the documents necessary for the use of your device. JTV2423DCS by JENSEN.
USER MANUAL JTV2423DCS JENSEN
Please observe all safety precautions when using this product.
Please read this manual carefu.

JENSEN and JENSEN logo are trademarks or registered trademarks of ASA Electronics.

HDMI, the HDMI logo, and the term High Definition Multimedia Interface are trademarks or registered trademarks of HDMI Licensing LLC.
FCC WARNING
This device complies with part 15 of the FCC Rules. Operation is subject to the following two conditions: (1) this device may not cause harmful interference, and (2) this device must accept any interference received, including interference that may cause undesired operation.
Any changes or modifications not expressly approved by the party responsible for compliance could void the user's authority to operate the equipment.
NOTE: This equipment has been tested and found to comply with the limits for a Class B digital device, pursuant to Part 15 of the FCC Rules. These limits are designed to provide reasonable protection against harmful interference in a residential installation. This equipment generates, uses and can radiate radio frequency energy and, if not installed and used in accordance with the instructions, may cause harmful interference to radio communications.
However, there is no guarantee that interference will not occur in a particular installation. If this equipment does cause harmful interference to radio or television reception, which can be determined by turning the equipment off and on, the user is encouraged to try to correct the interference by one or more of the following measures:
-- Reorient or relocate the receiving antenna.
-- Increase the separation between the equipment and receiver.
-- Connect the equipment into an outlet on a circuit different from that to which the receiver is connected.
-- Consult the dealer or an experienced radio/TV technician for help.
To maintain compliance with FCC's RF Exposure guidelines, This equipment should be installed and operated with minimum 20cm distance between the radiator and your body: Use only the supplied antenna.
Contents
Safety Precautions 4-9
TV Buttons And Terminal Interface 10
TV Buttons 10
Terminal Interface 10
Accessories 10
External device connection 10
TV Install 11
Mounting on a Desktop 11
Installation Precautions 11
Remote Control 12
Initial Settings 13-14
Select language 13
Connect to the Internet 13
Terms & Conditions, Privacy Policy 14
VIDAA APP Download SOP 15
Live TV 16-18
Channel Scan 16
Channel List. 16
Favorite 17
Connection 19-21
Wired LAN 19
Wireless 19
HDMI-CEC 20
HDMI Device 20
USB Device 21
Multi-screen 22
Screen Sharing 22
Content Sharing 22
Smart Functions 23-24
Media 23
Home 24
App Store 24
Search 24
Picture and Sound 25-26
Adjusting the Picture Quality 25
Adjusting the Sound Quality 26
System and Support 27-28
Setting Time 27
Using the timer 27
Notification 27
Upgrade 28
Troubleshooting 29-31
Self Diagnosis 29
Picture Problem 29
Sound Problem 29
Other Picture and Sound Problem 30
Internet Problem 30
My File Won't Play 31
Using the E-Manual 32
Launching the E-Manual 32
Using the Buttons in the E-Manual 32
Specifications 33
WARNING
To reduce the risk of fire or electric shock,do not expose this product ot rain or moisture.
CAUTION
RISK OF ELECTRIC SHOCK DO NOT OPEN

CAUTION-To reduce the risk of electric shock, do not perform any servicing other than that contained in the operating instructions unless you are qualified to do so.
This symbol is intended to alert the user to the presence of uninsulated "dangerous voltage" within the product's enclosure that may be of sufficient magnitude to constitute a risk of electric shock to persons.
This symbol is intended to alert the user to the presence of important operating and maintenance (servicing) instructions in the literature accompanying the appliance.
This product utilizes tin-lead solder, and fluorescent lamp containing a small amount of mercury. Disposal of these materials may be regulated due to environmental considerations. For disposal or recycling information, please contact your local authorities or the Electronic Industries Alliance: www.eia.org.
FCC STATEMENT
This product has been tested and found to comply with the limits for a Class B digital device, pursuant to part 15 of the FCC Rules. These limits are designed to provide reasonable protection against harmful interference when the equipment is operated in a commercial environment. This product generates, uses, and can radiate radio frequency energy and, if not installed and used in accordance with the instruction manual, may cause harmful interference to radio communications. Operation of this equipment in a residential area is likely to cause harmful interference in which case the user will be required to correct the interference at his own expense.
FCC CAUTION:
Pursuant to 47CFR, Part 15.21 of the FCC rules, any changes or modifications to this monitor not expressly approved by the manufacturer could cause harmful interference and would void the user's authority to operate this device.
WARNING
This is a CLASS B product. In a domestic environment, this product may cause radio interference, in which cause the user may be required to take adequate measures to counter interference
IMPORTANT SAFETY INSTRUCTIONS
1) Read these instructions.
2) Keep these instructions.
3) Heed all warnings.
4) Follow all instructions.
5) Do not use this product near water. Apparatus should not be exposed to dripping or splashing and no objects filled with liquids, such as vases, should be placed on the product.
6) Clean only with a dry cloth.
7) Do not block any ventilation openings. Install in accordance with the manufacturer's instructions.
8) Do not install near any heat sources such as radiators, heat registers, stoves, or other apparatus(including amplifiers) that produce heat.
9) Do not defeat the safety purpose of the polarized or grounding-type plug. A polarized plug has two blades with one wider than the other. A grounding type plug has two blades and a third grounding prong. The wide blade or the third prong are provided for your safety. If the provided plug does not fit into your outlet, consult an electrician for replacement of the obsolete outlet.
10) Protect the power cord from being walked on or pinched, particularly at plugs, convenience receptacles, and the point where they exit from the apparatus.
11) Only use attachments / accessories specified by the manufacturer.
12) Use only with the cart, stand, tripod, bracket, or table specified by the manufacturer or sold with the apparatus.
when a cart is used, use caution when moving the cart / apparatus combination to avoid injury from tip-over.

13) Unplug this apparatus during lightning storms or when unused for long periods of time.
14) Refer all servicing to qualified service personnel. Servicing is required when the product has been damaged in any way, such as power-supply cord or plug is damaged, liquid has been spilled or objects have fallen into the product, the product has been exposed to rain or moisture, does not operate normally, or has been dropped.
15) Where the mains plug or an appliance coupler is used as the disconnect device, the disconnect device shall remain readily operable.
Before using your TV, please read these instructions completely, and keep this manual for future reference. Carefully observe and comply with all warnings, cautions and instructions placed on the unit or described in the operating instructions or service manual.
WARNING
To guard against injury, the following basic safety precautions should be observed in the installation, use and servicing of the unit.
Power Sources
This unit should be operated only from the type of power source indicated on the information label. If you are not sure of the type of electrical power supplied to your home, consult your dealer or local power company.
Grounding or Polarization
This unit is equipped with a polarized AC power cord plug (a plug having one blade wider than the other), or a DC power connection, for use in a vehicle. Follow the instructions below:
For the unit with a polarized AC power cord plug
This plug will fit into the power outlet only one way. This is a safety feature. If you are unable to insert the plug fully into the outlet, try reversing the plug. If the plug still fails to fit, contact your electrician to have a suitable outlet installed. Do not defeat the safety purpose of the polarized plug by forcing it in.
For the unit with a DC power connector
For installation in a vehicle, connect the red wire to the 12V accessory line and the black wire to ground terminal.
Wall outlet
Do not use a poor fitting outlet.
Insert the plug fully into the outlet. If it is loose, if may cause arcing and result in fire. Contact your electrician to have the outlet changed.
Wiring
For your safety, unplug the power cord when wiring cables.
Electric shock
Do not tough the AC power cord or the unit with a wet hand. If you plug / unplug the AC power cord from the unit with a wet hand, it may cause electric shock. Never attempt to move the unit unless the AC power cord is disconnected.
Cleaning
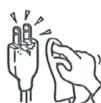
- Clean the power plug regularly.
- If the plug is covered with dust and it picks up moisture, its insulation may deteriorate and result in fire.
- Unplug the power plug and clean it regularly.
- Unplug the power cord when cleaning this unit. If not, it may result in electric shock.
-
Clean the cabinet of the TV with a dry soft cloth. To remove dust from the screen, wipe it with a soft cloth.
-
Stubborn stains may be removed with a cloth slightly dampened with a solution of mild soap and warm water. Never use strong solvents such as thinner or benzine for cleaning.
- If using a chemically pre-treated cloth, please follow the instructions provided on the package.
Overloading
Do not overload wall outlets, extension cords or convenience receptacles beyond their capacity, since this can result in fire or electric shock.
Power
Always turn the unit off when it is not being used.
When the unit is left unattended and unused for long periods of time, unplug it from the wall outlet as a precaution against the possibility of an internal malfunction that could create a fire hazard.
Sound
If a snapping or popping sound from the TV is continuous or frequent while the TV is operating, unplug the TV and consult your dealer or service technician. It is normal for TV's to make occasional snapping or popping sounds, particularly when being turned on or off.
Power Cord
If you damage the power cord, it may result in fire or electric shock.
- Do not pinch, bend, or twist the cord excessively. The core lines may be bared and cut and cause short-circuit, resulting in fire or electric shock.
- Do not convert or damage the power cord.
- Do not put anything heavy on the power cord.
- Do not pull the power cord.
- Keep the power cord away from heat sources.
- Be sure to grasp the plug when disconnecting the power cord.
- If the power cord is damaged, stop using it and replace with a new one.
Ventilation
The slots and openings in the TV are provided for necessary ventilation. To ensure reliable operation of the unit, and to protect it from overheating, these slots and openings must never be blocked or covered. Unless proper Ventilation is provided, the unit may gather dust and get dirty. For proper ventilation, observe the following:
- Do not install the unit turned backward or sideways.
- Do not install the unit turned over or upside down.
- Never cover the slots and openings with a cloth or other materials.
- Never block the slots and openings by placing the unit on a bed, sofa, rug or other similar surface.
- Never place the unit in a confined space, such as a bookcase or built-in cabinet, unless proper ventilation is provided.
- Leave some space around the unit. Otherwise, adequate air-circulation may be blocked, causing overheating, and may cause fire or damage the unit.
Heat sources
Do not install near any heat sources such as radiators, heat registers, stoves, or other apparatus (including amplifiers) that produce heat.
Do not use near a bathtub, washbowl, kitchen sink, or laundry tub, in a wet basement, or near a swimming pool.
Do not use immediately after moving from a low temperature to high temperature environment, as this cause condensation, which may result in fire, electric shock, or other hazards.
This product should not be exposed to dripping or splasing and no objects filled with liquids, such as vases, should be placed on the product.
Entering of objects and liquids
Never insert an object into the product through vents or openings. High voltage flows in the product, and inserting an object can cause electric shock and / or short internal parts. For the same reason, do not spill water or liquid on the product.
Lightning
Unplug this apparatus during lightning storms or when unused for long periods of time.
For added protection during a lightning storm, or when left unattended and unused for long periods of time, unplug the product from the wall outlet and disconnect the antenna. This will prevent damage to the equipment due to lightning and power-line surges.
Servicing
Refer all servicing to qualified service personnel. Servicing is required when the product has been damaged in any way, such as power-supply cord or plug is damaged, liquid has been spilled or objects have fallen into the apparatus, the apparatus has been exposed to rain or moisture, does not operate normally, or has been dropped.
Replacement parts
In case the product needs replacement parts, make sure the service person uses replacement parts specified by the manufacturer, or those with the same characteristics and performance as the original parts. Use of unauthorized parts can result in fire, electric shock and / or other danger.
Attachments
Only use attachments / accessories specified by the manufacturer. Do not use attachments not recommended by the manufacturer. Use of improper attachments can result in accidents.
Damage requiring service
If any of the following conditions occurs, unplug the power cord from the AC outlet and request a qualified service person to perform repairs.
a. The power cord or plug is damaged.
b. Liquid is spilled on the product or when objects have fallen into the product.
c. The product has been exposed to rain or water.
d. The product does not operate properly as described in the operating instructions.
Do not touch the controls other than those described in the operating instructions. Improper adjustment of controls not described in the instructions can cause damage, which often requires extensive adjustment work by qualified technician.
e. The product has been dropped or the cabinet has been damaged in any way.
f. The product displays an abnormal condition or exhibits a distinct change in performance. Any noticeable abnormality in the product indicates that the product needs servicing.
Safety checks
Upon completion of service or repair work, request the service technician to perform safety checks to ensure that the product is in proper operating condition.
Wall or ceiling mounting
When mounting the product on a wall or ceiling, be sure to install be product according to the method recommended by the manufacturer.
Panel protection
This panel used in this product is made of glass.
Therefore, it can break when the product is dropped or impacted upon by other objects. Be careful not to be injured by broken glass pieces if the panel breaks.
Pixel defect
Occasionally, a few non-active pixels may appear on the screen as a fixed point of blue, green or red. Please note that this does not affect the performance of your product.
Antennas
Outdoor Antenna Grounding
If an outdoor antenna is installed, follow the precautions below. An outdoor antenna system should not be located in the vicinity of overhead power lines or other electric light or power circuits, or where it can come in contact with such power lines or circuits.
WHEN INSTALLING AN OUTDOOR ANTENNA SYSTEM, EXTREME CARE SHOULD BE TAKEN TO KEEP FROM CONTACTING POWER LINES OR CIRCUITS AS CONTACT WITH THEM IS ALMOST INVARIABLY FATAL.
Be sure the antenna system is grounded to provide some protection against voltage surges and built-up static charges. Section 810 of the National Electrical Code ( NEC) in USA and Section 54 of the Canadian Electrical Code in Canada provides information with respect to proper grounding of the mast and supporting structure, grounding of the lead-in wire to an antenna discharge unit, size of grounding conductors, location of antenna discharge unit, connection to grounding electrodes, and requirements for the grounding electrode.
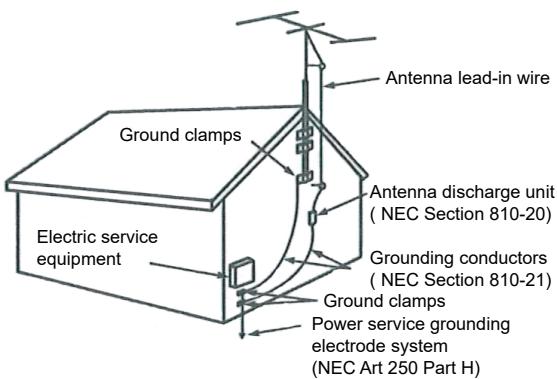
Antenna Grounding According to the National Electrical Code, ANSI/NFPA 70
NEC: National Electrical Code
POWER:Turn ON/OFF Power.
SOURCE MENU CH+ CH- VOL+ VOL- POWER
CH+/:-:Selecting Channel. SOURCE: External Signal Input Selection.
VOL+/-:Adjusting Volume.MENU:Display Main MENU And Confirm MENU Item Selection.
Terminal Interface
Note: The following are the various terminal interface, the actual position and arrangement, the number of different models may be different.
| AV IN | AV input External AV Signal Input | EARPHONE | EARPHONE output When earphones are plugged in, speakers are disabled |
| HDMI | HDMI input Digital signal input from HDMI video connector. | USB 5V=500mA | USB input Connect a USB device here to play its media files or to record programs via the PVR function. |
| ANT 75Ω | ANT 75 Connect the antennal/cadle tv input (75/VHF/UHF) | OPTICAL | OPTICAL output Connect the SPDIF receiver. |
| LAN | RJ 45 Connect the Internet. |
Accessories
Note:The configuration of the components may look different from the following illustration.

Battery 1.5V(AAA X2)
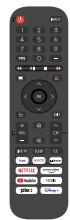
Remote Control
External device connection
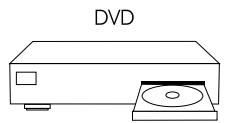


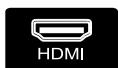
HDMI input connection

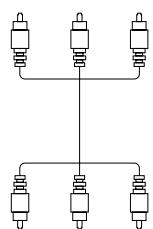
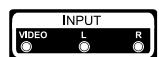
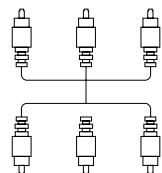
AV input connection
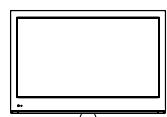
AV input connection
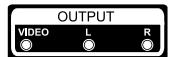
AV output connection
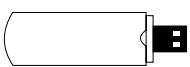
USB connection
TV connection
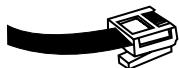
RJ45 connection


Mounting on a Desktop
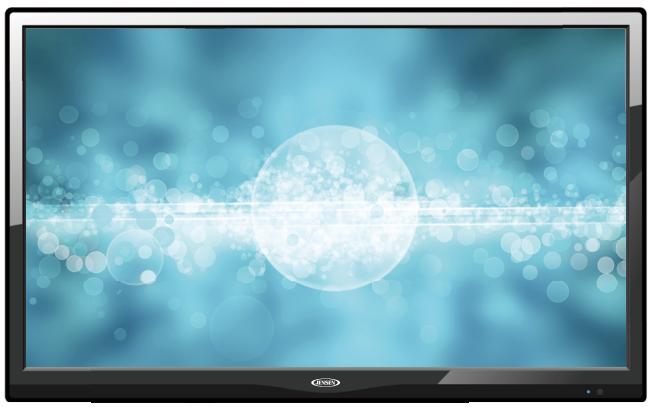
Your LED TV can be mounted on a desktop with the base installed. This is not a floor-standing unit.
Installation Precautions
Wall Mounting
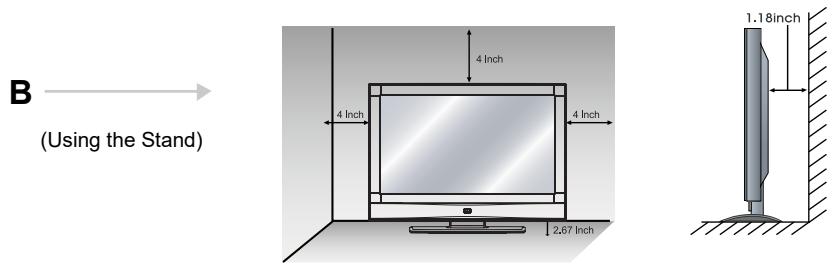
Please ensure enough space for safe use. (Please refer to diagrams A and B.) Installation of the LED TV in an improperly ventilated location can cause damage to the LED TV due to increased temperature.
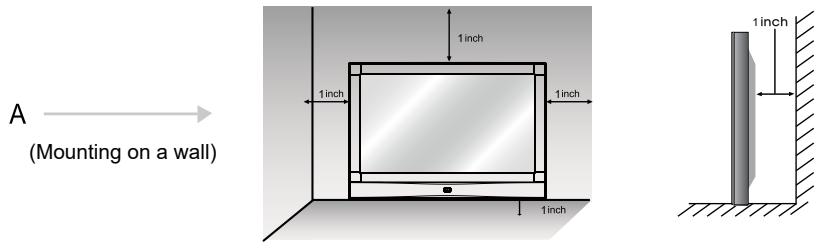
- Contact your dealer to purchase the Adjustable-angle wall mount required for wall-mounted installation.
Using the Stand
Please ensure enough space for safe use. (Please refer to diagrams A and B.) Do not install on an unstable location with a support area smaller than the LED TV. Please refer to the desktop stand user's manual for details of installation.
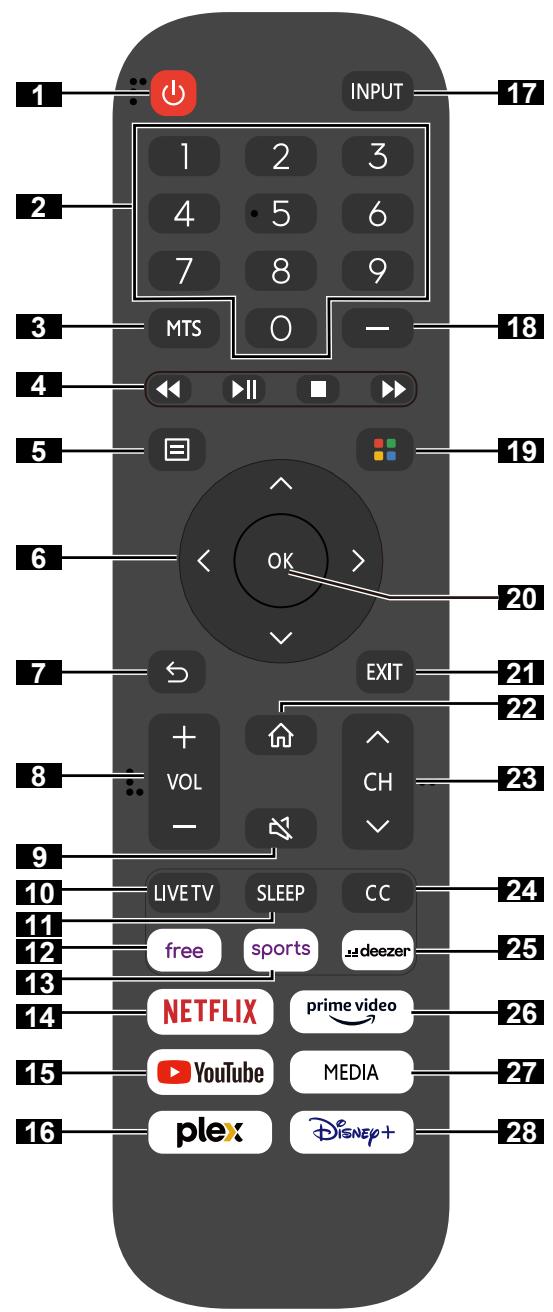
- Funtions of remote control buttons
1 Power on/off
2 Number Enter Channels/Input numbers
3MTS Set the audio language (MTS)
Battery Installation:
Remove the battery cover on the rear of the remote control. Put two AAA batteries inside the battery compartment with their + and - ends aligned as indicated. Do not mix old and new batteries or different types of batteries. Close the battery cover and press it down until it clicks into place.
Media content control function /■/■/II
5 Menu
6 / / < / > D-pad (up/down/left/right navigation buttons)
7 Return to the previous place in the menu or app
8 +VOL - Volume (up/down)
9 Mute and restore sound (quick press) Press 3 times successively to call out system info (for service purpose)
10 LIVE TV Enter Live TV source
11 SLEEP Adjust sleep timer setting
12 free Quick access to VIDAA Free
13 sports Quick access to VIDAA SPORTS
14 NETFLIX Quick access to VIDAA NETFLIX
15 YouTube Quick access to VIDAA YouTube
16 plex Quick access to VIDAA plex
17 INPUT Change TV input source
18 — Select a digital sub-channel
19 (Red/Green/ Special function buttons Yellow/Blue)
20 OK Confirmation button
21 EXIT Exit the menu or app
22 Display the Home screen
23 ^CH Channel (up/down)
24 CC Turn Closed Caption On/Off and turn Closed Caption on when mute
25 deezer Quick access to VIDAA deezer
26 prime video Quick access to VIDAA prime video
27 MEDIA Quick access to Media
28 Disney Quick access to VIDAA Disney
Using the Remote control:
Unless stated otherwise, the remote control can operate all the features of the TV.
Always point the remote control directly at the remote sensor in the front of the TV.
Initial Settings
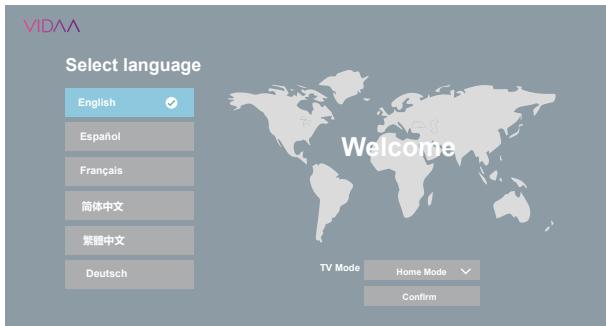
Press button to turn on the TV.
Select language
Press A / V button to select OSD Language. and press OK button to enter the next setting page.
default setting is English.
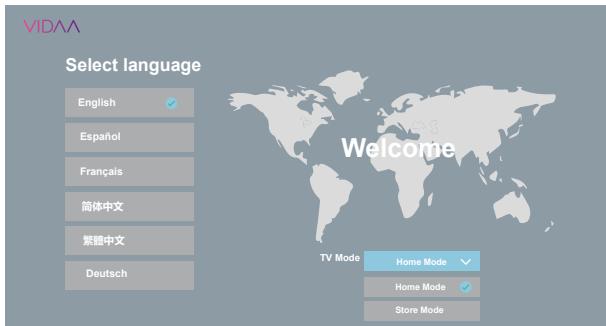
TV Mode
Press A / V button to select TV Mode
Home Mode
- Store Mode
Press Confirm to enter the next selection Note:
default setting is Home Mod.
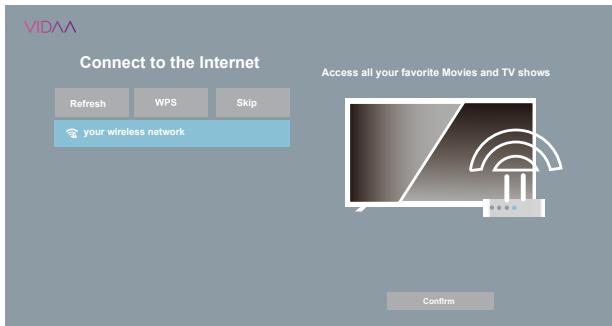
Connect to the Internet
Press / button to select your wireless network, input your password, Press Connect connect to an available wireless network.
Press Confirm to enter the next selection.
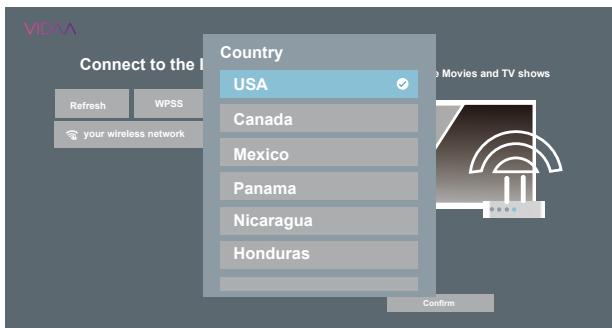
Country
Press ±b / ±b button to select Country
USA
Canada
Mexico
Panama
- Nicaragua
Honduras
EL Salvador
Guatemala
Dominican Republic
Trinidad
- Jamaica
- Curacao
- Barbados
St. Maarten
- Puelo Rico
Note:
default setting is USA.
Press the OK button to enter the submenu.
Initial Settings
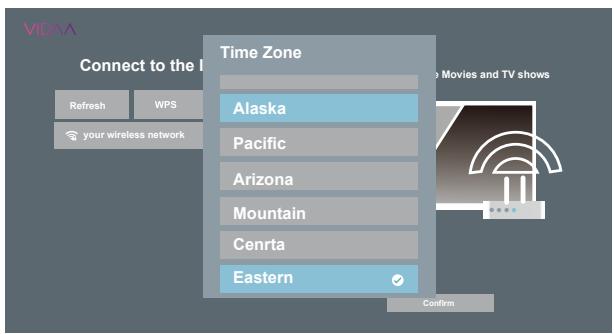
Time Zone
Press A / V button to select Time Zone
Hawaii
Alaska
Pacific
Arizona
Mountain
- Central
- Eastern
Note:
default setting is Eastern.
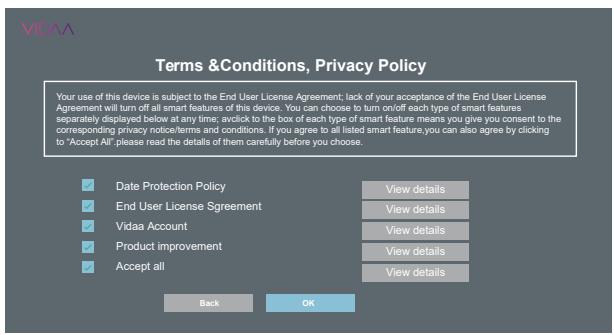
Terms & Conditions, Privacy Policy
Press / button read the Terms and Conditions, Privacy Policy carefully, agree by clicking to "Accept All".
Press OK button to enter the next selection.
Note:
You can view the details by clicking "View Details".
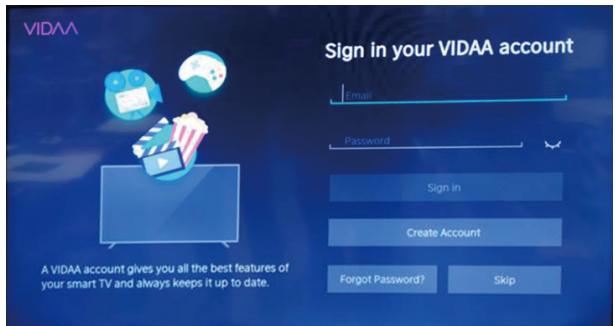
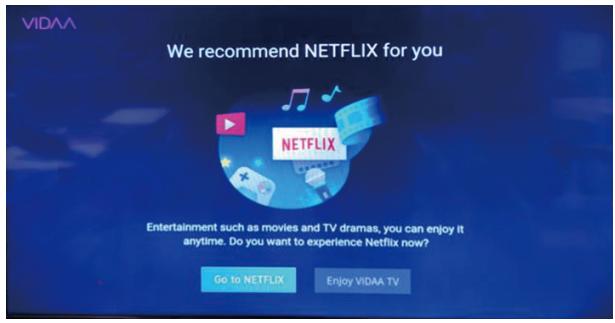
When connected to internet, you will be prompted to create or sign in to your VIDAA and Netflix account or skip forward to Home Screen.
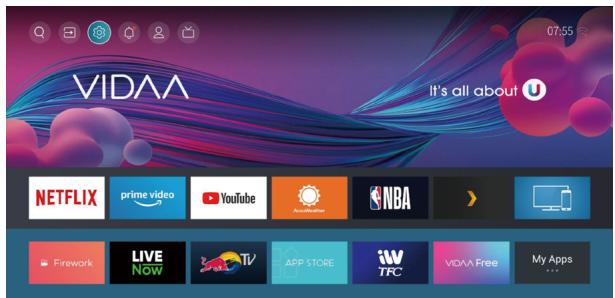
Using remote control to navigate on Home Screen.
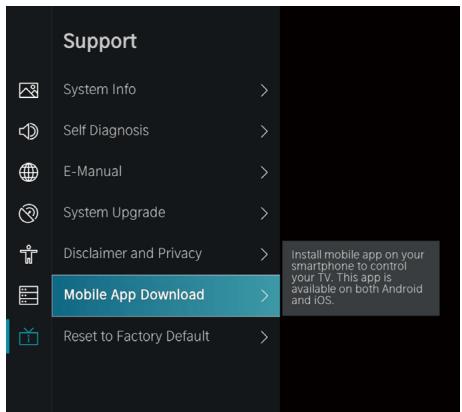
"Setting" > Support > Mobile App Download
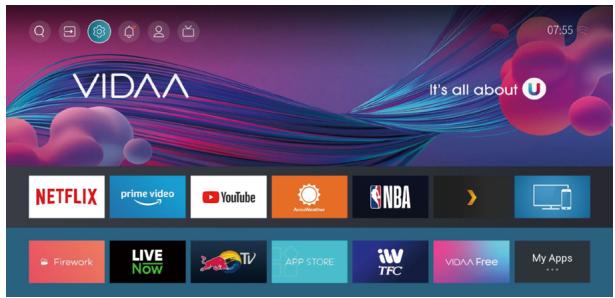
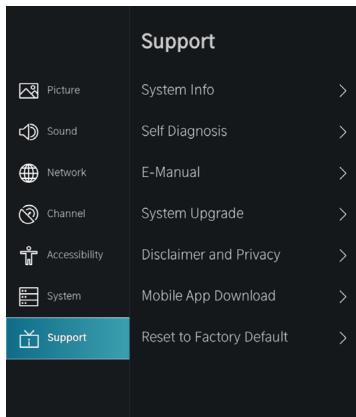
Select " Mobile App Download "
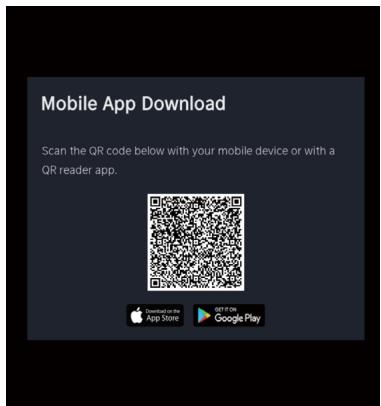
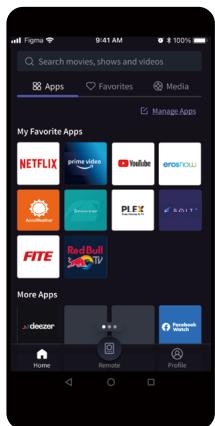
QR code will appear on screen. Please follow directions for VIDAA app download and enjoy controlling your smart TV through your mobile device.
Live TV
Press the "Live TV" button and follow directions for Over-the-air TV.
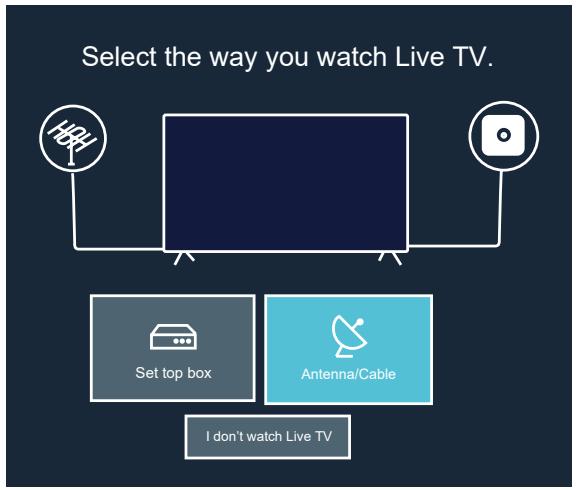
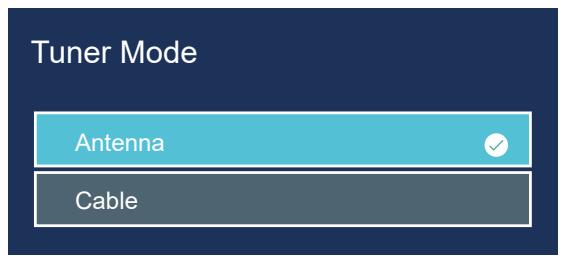
Or access by:
Settings > Channel > Auto Channel Scan
Channel Scan
Auto Channel Scan
Note:
- Before you select Auto Channel Scan, you can press > Settings > Channel > Tuner Mode to select Antenna or Cable.
Channel List
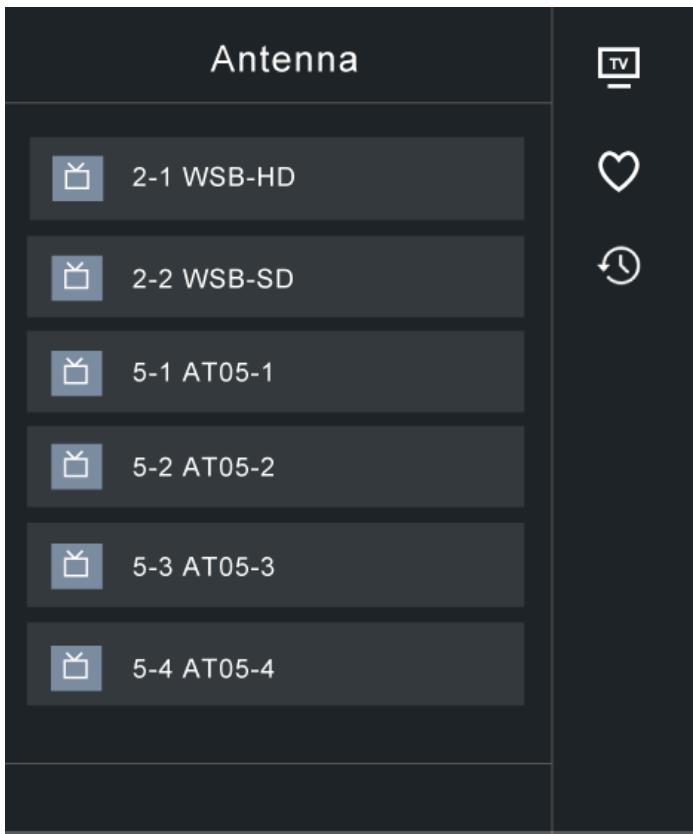
Display the channel list
In Live TV, press OK button on the remote control to display the channel list menu.
Live TV
Favorite
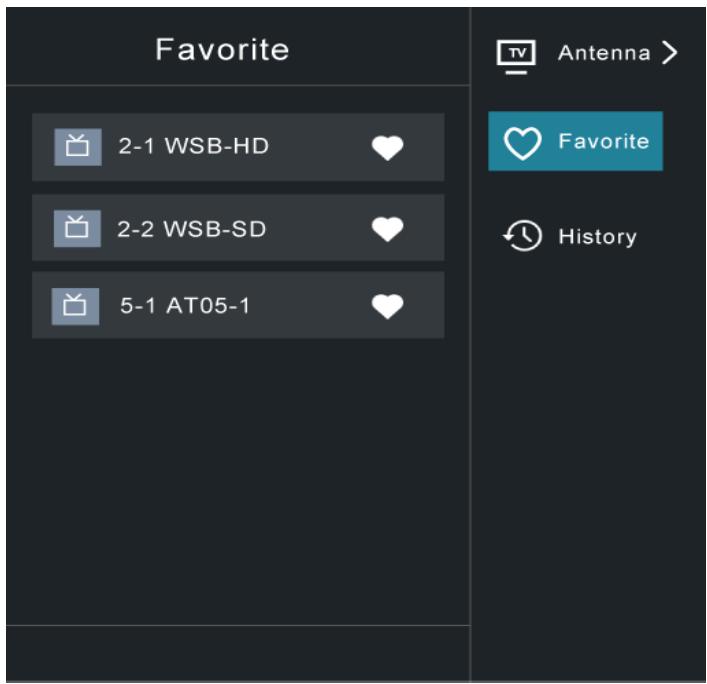
Adding channels to your 'Favorites' list
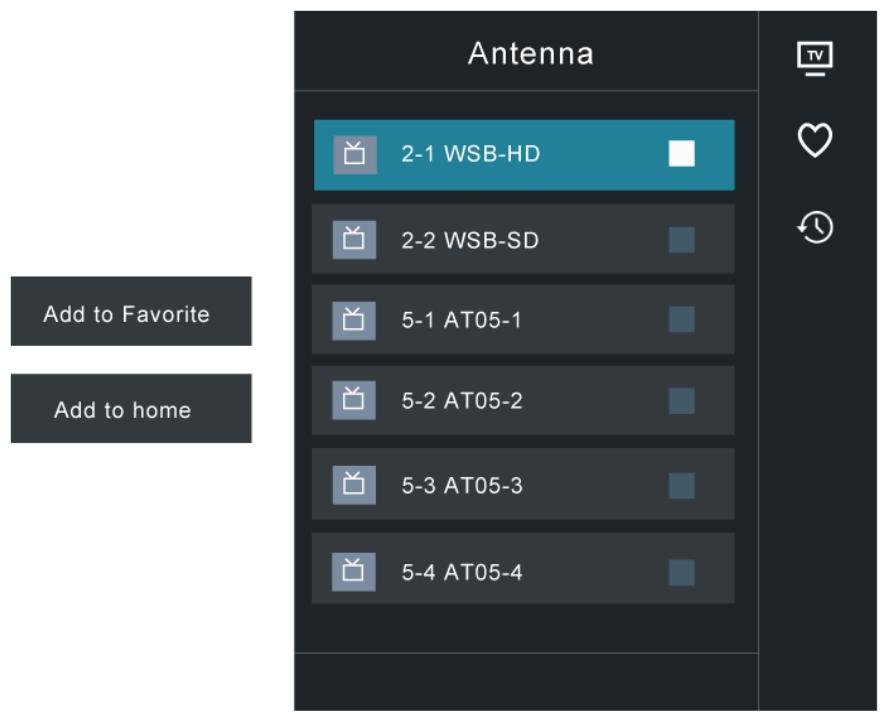
Press OK button to call out the channel list, the channel list appears on the right side of the screen.
Press > 0 to select your favorite channel.
Press and Choose Add to Favorite, a heart-shaped icon will appear next to your favorite channel.
Viewing your 'Favorites' list
Press to call out the channel list, the channel list appears on the right side of the screen.
Press > Favorite, your favorite channel with a heart-shaped icon will appear on the favorite list.
Live TV
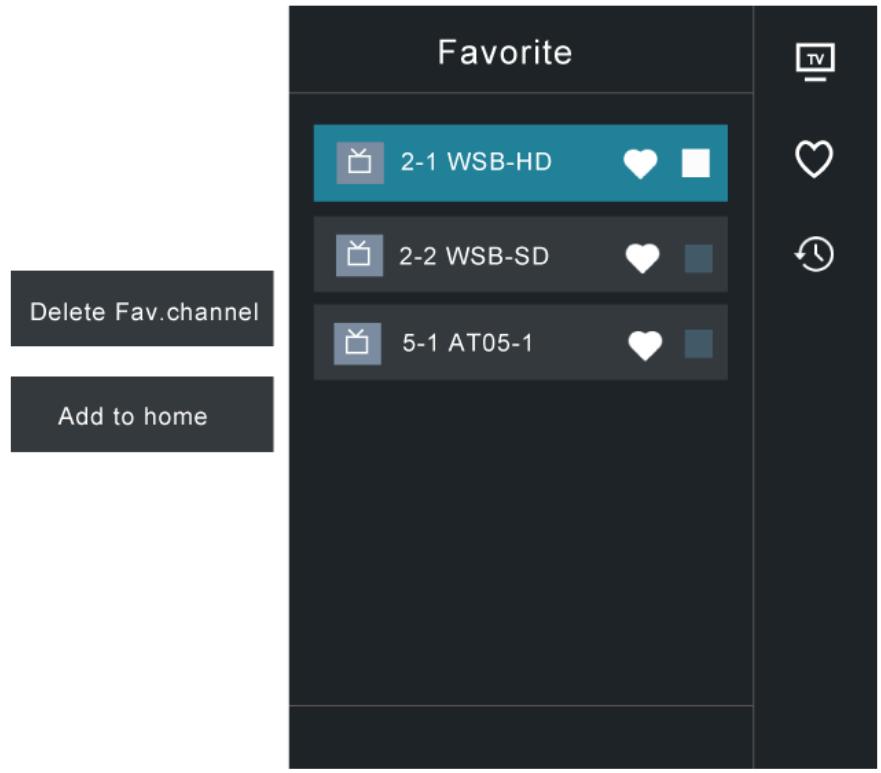
Deleting channels from your 'Favorite' list
Press to call out the channel list, the channel list appears on the right side of the screen.
Press > Favorite, on the favorite list screen, press to select the channel that you want to delete.
Press and choose Delete Fav/channel, the selected channel will disappear on favorite channel list.
Note:
- These steps should be operated under TV inputs.
- Before you edit the fav lists, complete channel scan first.
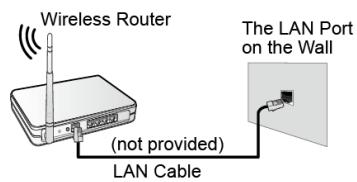
Wired LAN
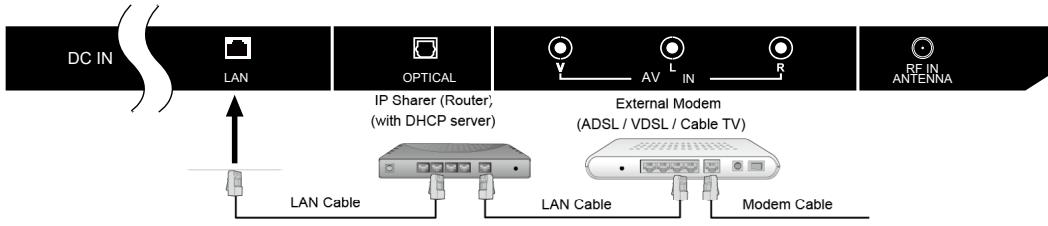
Connecting to the Internet
Settings > Network > Network Configuration
You set the TV network by selecting Configuration and press the OK button to enter the submenu.
Automatically obtain an IP address
- If you connect to the wired network, the TV will automatically obtain an IP address and connect to the network.
- If the connection fails, disconnected message will display for the Ethernet status. Retry or enter the IP settings, and select Manual to input the information again.
Manually enter the IP address
- Enter the IP settings to select Manual.
-
Enter the IP Address, Netmask, Gateway, DNS Server 1 and DNS Server 2 in the menu. Note:
-
This section is only for 4K models.
- You get access to the Internet through your TV.
- The default option of IP Settings Mode is DHCP.
Wireless
Connecting to the Internet
Wireless Adapter built-in the TV set
Note:
- You get access to the Internet through your TV.
- Connect to an available wireless network.
- Make sure that you have the wireless router's SSID and password before attempting to connect.
Connecting to a Wireless Network
Settings > Network > Network Configuration
You set the TV network by selecting Configuration and press OK the button to enter the submenu.
- Connection Type
Choose a wireless network connection to access the Internet.
efresh
Refresh wireless network.
Connection
- Advanced Settings
Configure the advanced wireless network settings for the TV.
- Add
You can add wireless network.
Note:
- If no wireless router is found, select Add and enter the network name in the SSID.
- If no wireless router is found, select Refresh.
HDMI-CEC
You can use your TV remote to control the external devices that are connected to the TV by HDMI cable. The external devices need to support HDMI & CEC Function (HDMI-CEC). Connecting an external device through HDMI-CEC Function
>Settings System HDMI-CEC
- Set HDMI-CEC to On.
- Connect an HDMI-CEC-compliant device to the TV.
- Turn on the connected external device. The device is automatically connected to the TV. After connection is finished, you can access the menu of the connected device on your TV screen using your TV remote and control the device.
Note:
- HDMI cables must be used to connect HDMI CEC-compatible devices to your TV.
- The HDMI CEC feature of the connected device must be turned on.
- If you connect an HDMI device that is not HDMI CEC-compatible, all the HDMI-CEC control features do not work.
- Depending on the connected HDMI device, the HDMI-CEC Control feature may not work.
- The HDMI CEC feature are supported One Touch Play, Routing Control, System Standby, Device OSD Name Transfer, Remote Control Pass Through, Give Device Power Status, System Audio Control.
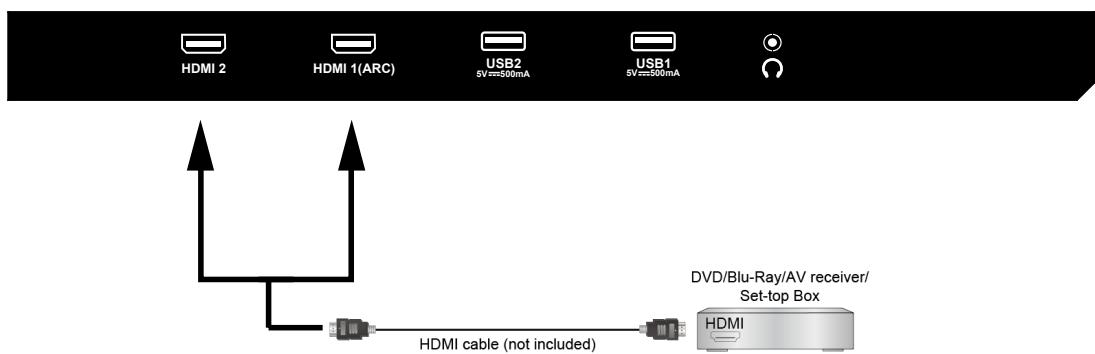
HDMI Device
Connect an HDMI cable from an external A/V equipment.
Some devices such as DVD player require HDMI signal to be set to output in the device's settings.
Please consult your device user manual for instructions.
Please note that the HDMI connector provides both video and audio signals, it's not necessary to connect an audio cable.
Connection
USB Device
Connect the USB devices such as hard drives, USB sticks and digital cameras for browsing photos, listening to music.
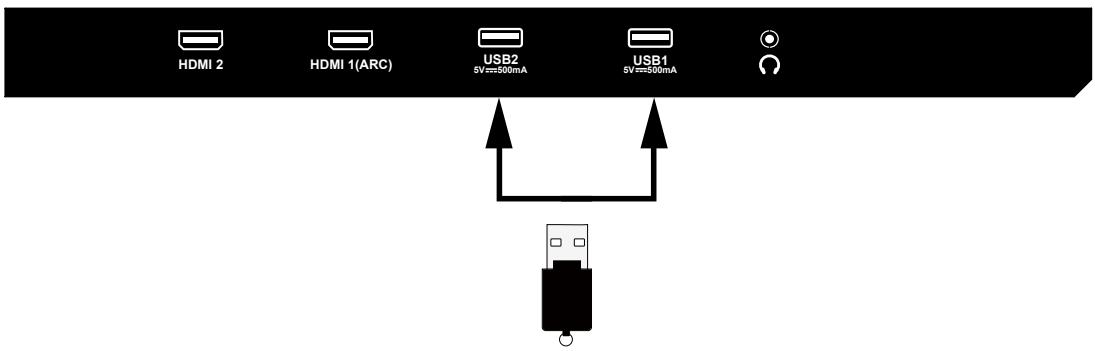
- Support the U disk 4G, 8G, 16G, 32G, 64G, 128G and other common market sizes, 8T hard drive is currently supported.
- Support format: NTFS, FAT32.
Screen Sharing
Mirror content from your device to the TV.
INPUT > Screen Sharing
- Turn on the casting function of your Android/Windows10 device.
- Find the TV name in the searching list of your device and select it. Wait for the connection progress to complete and the content on your device will be displayed on the TV.
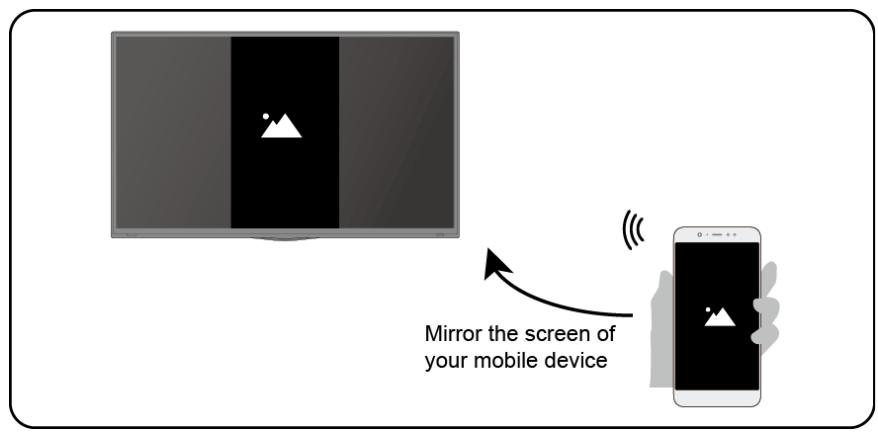
Note:
- Some Android devices may not support casting.
Content Sharing
Share media content, like videos, music or photos, from your Android/iOS/PC device to the TV
screen.
Before you use this function, turn on Content Sharing at > Settings > System > Application Manager > Content Sharing.
- Establishing Content Sharing connection between the TV and your device
- Turn on the content sharing function of your Android/iOS/PC device.
- Find the TV name in the searching list of your device and select it.
- Wait for the connection progress to complete, and select the content you want to share.
Viewing media content of your device
Press INPUT button on your remote, and select a media content on the screen.
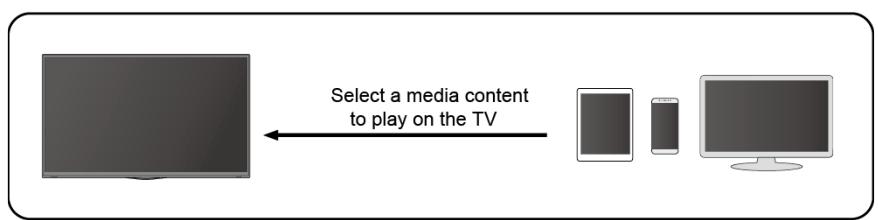
Note:
- Make sure your device and the TV are connected to the same network.
- Some devices may not support content sharing. If your device doesn't support content sharing, you can download an app that supports the function.
- If you want to mirror content from your device, go to INPUT > Screen Sharing.
Media
Playing Media contents
MyApps >Media
By default, there are Content Sharing displayed on the Media screen. If your mobile device is connected to the TV, its name also appears on the Media screen.
Note:
- For more information about Content Sharing, refer to its detailed introduction.
My Apps > Media > connected device
Select the content you want to play on the screen, like pictures, videos and music.
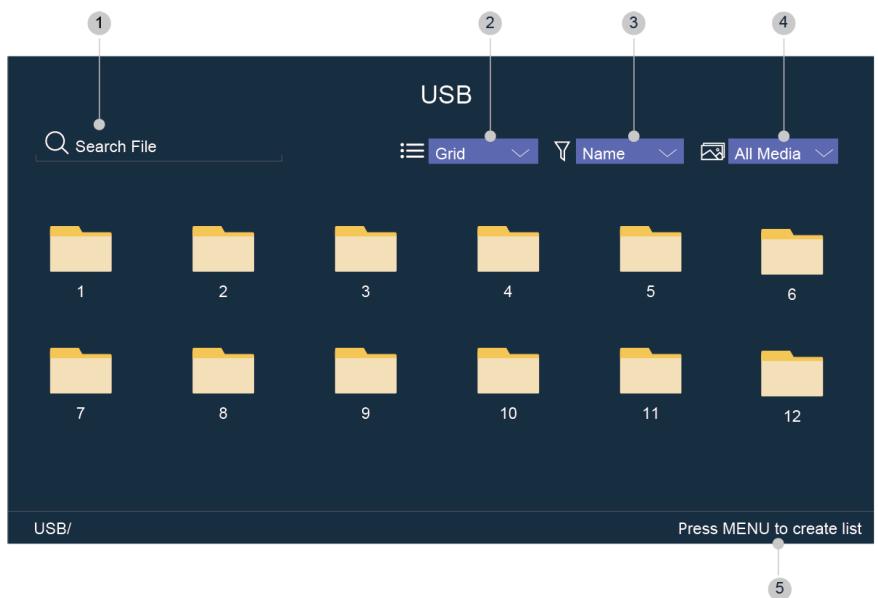
1 Input the content name you want to play.
2 Arrange the content list by Grid, List.
3 Arrange the content list by Name, Date Modified, Size.
4 Filter the content list by All Media, Photo, Video, Music.
5 Create a photo, music, or video playlist.
Playing background music during viewing pictures
You need to:
- Choose a picture to playback.
- Press A / V button to call out playbar.
- Select Background Music and choose your music to create a Music Playlist.
- Play the background music during viewing pictures.
Note:
- The TV may be support the following file formats:
| Medium | File Format |
| Video | .AVI, .WMV, .MP4, .MOV, .3GP, .MKV, .MPG, .MPEG, .VOB, .FLV, .OGM |
| Picture | .jpeg, .bmp, .PNG, .GIF |
| Music | .mp3, .aac, .wma, .wav |
- For more information about connection to PC/mobile device, refer to the detailed introduction of each part.
Home
Getting familiar with the Home screen
Run the TV more conveniently by selecting the corresponding sections.
Press button.
- You can always view the current time at the top of the Home screen.
- If your TV is connected to the Internet through a wireless connection, then the icon will be at the top right corner of the screen.
- Manage apps
- Select the item you want to move, press l button to manage.
Q Search
Search the app you want.
Inputs
Select the input you want.
Settings
Display the Settings menu.
Notifications
Allow pop-up notifications to appear for useful information and events that occur with your TV.
- Select Notifications on the Home screen, and select Settings then display Advertising, New Arrivals,Warnings And Legal Statements, System Message, from which you can choose the types of notifications you would like to receive.
VIDAA Account
Sign in your VIDAA account.
A VIDAA account gives you all the best feature of your smart TV and always keeps it up to date.
App Store
My Apps
-
Removing an app in My Apps
-
In My Apps select the app you want to remove, and then press l button to select Remove.
-
Select OK. The selected app is deleted.
-
Adding an app in APP STORE to the Home screen
-
In APP STORE select the app you want to add and then select Install.
-
The selected app has been added to the My Apps.
-
Sorting apps in My Apps
-
In My Apps select the app you want to sort, and then press button to select Sort.
-
Press A / V / C / button to move it.
-
Press OK to store position.
Note:
- To use this function, TV must be connected to the Internet.
- Adding apps is free, but it might cost you money when using some apps.
- The default apps in My Apps cannot be removed.
Search
命 > O
You can search for a title, app, person, genre and more by virtual keyboard.
Adjusting the Picture Quality
Adjust current picture mode to apply to all sources or just current source.
The menu is only for reference. The following modes may differ from the actual product.
Choosing a picture mode
Picture Mode or > Settings > Picture > Picture Mode
You can select the Picture Mode that provides the best viewing experience.
Vivid
Standard
- Energy Saving
- Theater
Game
- Sports
- Calibrated
Low Blue Light
Theater and Calibrated are designed to reduce the level of blue light to protect your eyes.
You can go to 目> Picture Mode or > Settings > Picture > Picture Mode, then select
Theater or Calibrated.
To reduce the eye strain and protect eyes when you watch TV for a period of time, you are suggested to:
- Take regular and frequent breaks to avoid watching TV for a long period of time. Long time of watching may cause you eye fatigue. It is not recommended to watch TV for more than one hour.
- Look away from the TV screen and look at distance objects during the breaks for at least 10 minutes for eye care.
- Relax yourself during a break by doing eye exercises or outdoor activities.
- The best recommended viewing distance is 3 times the vertical height of the TV screen.
Proper breaks and exercises are proved excellent help to relieve eye strain and fatigue.
Note:
- This feature may not be applicable in some models/countries/regions. Low blue light certification may vary by model.
- Low Blue Light can only be supported when the Color Temperature is set to Low.
Changing the picture size
Picture Size or > Settings > Picture > Picture Size
You can change the size of the picture displayed on the TV screen.
- Auto
Normal - Zoom
Wide - Direct
Dot-By-Dot - Panoramic
Cinema
Configuring advanced picture settings
Settings >Picture >Picture Mode Settings
Adjust display setting for each Picture Mode.
- Apply Picture Settings
-
Backlight
-
Contrast
- Brightness
Color - Tint
- Sharpness
- Overscan
Color Temperature
Motion Clearness - Noise Reduction
- Digital Noise Reduction
HDMI Dynamic Range
Active Contrast - Expert Settings
- Reset Picture Settings
Adjusting the Sound Quality
Adjust current sound mode to apply to all sources or just current source.
The menu is only for reference. The following modes may differ from the actual product. Choosing a sound mode
Settings > Sound > Sound Mode
You can select a favourite sound mode suitable for the content type or the listening environment.
Standard
- Theater
Music
- Speech
Sports
- Late Night
Configuring advanced sound settings
Settings > Sound > Sound Mode Settings
- Bass Boost
- Surround Sound
- Dialog Clarity
- TruVolume
- Auto Volume Control
Setting Time
Settings > System > Time Settings
Set the current time based on your location.
Time Zone
Select your time zone.
Time Format
Set the time to display in a 12 or 24-hour format.
- Date Format
Set the time to display in a mm-dd-yyyy, dd-mm-yyyy or yyyy-mm-dd format.
Daylight Savings
Select whether to apply Daylight Savings Time to the TV.
- Date and Time
Set the Date and Time. You can set the date and time to automatically sync with Internet/ broadcast or manual setup by yourself.
Using the timer
Settings > System > Timers
Adjust the timer settings to suit your preference.
- Sleep Timer
Set the sleep timer to automatically turn the TV Off within a specified time: Off, 10 Minutes, 20 Minutes, 30 Minutes, 40 Minutes, 50 Minutes, 60 Minutes, 90 Minutes and 120 Minutes.
- Power On Timer
Set the clock for the time you want the TV to turn on automatically. You can set the time only once
or set the time in specified date weekly.
Power Off Timer
Set the clock for the time you want the TV to turn off automatically. You can set the time only once
or set the time in specified date weekly.
- Menu Timeout
Set the amount of time that you would like for the menu to display: 10s, 20s, 30s, 60s, 90s, Off.
Notification
自 > Settings > System > Advanced Settings > Notifications Pop-ups
Allow pop-up notifications to appear for useful information and events that occur with your TV, including: Advertising, New Arrivals,Warnings And Legal Statements and System message.
You can enable/disable each of these notifications.
Notifications
You can view the list of event messages generated by the TV.
Note:
System and Support
- To delete all notifications, select Clear All.
Upgrade
Settings > Support > System Update
Set your TV to receive the latest firmware.
- Auto Firmware Upgrade
Set your TV to automatically receive the latest firmware. - Check Firmware Upgrade
Check if your TV needs Firmware upgrade.
Note:
- Please ensure your TV is connected to the Internet.
- System App Auto Upgrade
App auto upgrade will be done in the background. May need your confirmation on new Privacy Notices to complete upgrade in the progress.
- Upgrade from USB
Upgrade TV software from USB device.
Note:
- Please ensure the USB flash drive insert to USB2.0 port of the TV.
- The updating files must be available in root directory.
- The format of the USB must be FAT32 and the partition table type must be MBR.
Self Diagnosis
Diagnose issues with your TV.
Settings > Support > Self Diagnosis
Use the Picture Test to help diagnose picture issues and the Sound Test to diagnose sound issues. Use the Network Test to test network connection and use the Input Connection Test to show all related information with external connections.
Picture Problem
When the TV has trouble with the picture, these steps may help resolve the problem. Picture Test
Settings >Support >Self Diagnosis >Picture Test
Before you review the list of problems and solutions below, use Picture Test to determine if the problem is caused by the TV. Picture Test displays a high definition picture that you can examine for flaws or faults
| The Problem | Possible Solutions |
| No picture, or black and white picture. | ·Unplug TV from AC outlet and re-plug after 60 seconds. ·Check that the Color is set to 50 or higher. ·Try different TV channels. |
| The picture is distorted. | ·The compression of video content may cause picture distortions, especially in fast moving pictures from sports programmes and action movies. ·If the signal reception is weak or poor, screen distortion may be visible but it is not a malfunction. ·Mobile phones used close to the TV (within 1 m) may cause noise on analogue and digital channels. |
Note:
- If the test picture does not appear or there is noise or distortion, the TV may have a problem. Contact the service company in your country.
- If the test picture is displayed properly, there may be a problem with an external device. Please check the connections.
- If the problem persists, check the signal strength or refer to the external device's user manual.
Sound Problem
When the TV has difficulties with sound, these steps may help resolve the problem.
Sound Test
Settings > Support > Self Diagnosis > Sound Test
If the TV plays the Sound Test melody without distortion, there may be a problem with an external device or the broadcast signal's strength.
Troubleshooting
| The Problem | Possible Solutions |
| There is no sound or the sound is too low at maximum volume. | Check the volume control of the device (cable or satellite box, DVD, Blu-ray, etc.) connected to your TV. |
| Picture is normal, but no sound. | ·Check the volume settings. ·Check if 'Mute' mode is set to on. |
| The speakers are making an odd sound. | ·Make sure that the audio cable is connected to the correct audio output connector on the external device. ·For antenna or cable connections, check the signal information. ·A low signal level may cause sound distortions. |
Note:
- This product does not support decoding of DTS CD bitstreams. Playback of this format may produce undesirable noise.
Other Picture and Sound Problem
When the TV has difficulties with sound and picture, these steps may help resolve the problem.
Picture Test
Settings >Support >Self Diagnosis >Picture Test
Sound Test
Settings > Support > Self Diagnosis > Sound Test
If the Sound Test and Picture Test are normal, there may be a problem with an external device or the broadcast signal's strength.
| The Problem | Possible Solutions |
| No sound and picture. | ·Check if the power cord is plugged into a powered AC outlet. ·Press the button in the remote control to activate the unit from Standby. ·Check to see if the LED light is on or not. If it is, then the TV is receiving power. |
| I have connected an external source to my TV but I get no picture and/ or sound. | ·Check the correct connection on the external source and the input connection on the TV. ·Make sure you have made the correct selection for the input mode for the incoming signal. |
| Sound and picture distorted or appear wavy. | ·Some electrical appliances may affect TV set. If you turn off the appliance and the interference goes away, then move it further away from TV. ·Insert the power plug of the TV set into another power outlet. |
Internet Problem
When the TV has difficulties connecting to the Internet, these steps may help resolve the problem.
Network Test
Settings > Support > Self Diagnosis > Network
Test If the TV network is connected, the screen will display Connected successfully.
Troubleshooting
| The Problem | Possible Solutions |
| The TV cannot connect to your network or apps. | Make sure the TV has a network connection. • Run Network Test (© > Settings > Support > Self Diagnosis > Network Test). • Contact your Internet service provider. |
| The wireless network connection failed. | Make sure your wireless modem/rodger is on and connected to the Internet. |
| The wireless network signal is too weak. | Position your wireless router, modem router, or access point in a central location. Avoid putting it in a corner. |
My File Won't Play
When files aren't playing, this may help resolve the problem.
| The Problem | Possible Solutions |
| Some files can't be played. | This problem may occur with high-bitrate files. Most files can be played back, but you might experience problems with high-bitrate files. |
Launching the E-Manual
Settings > Support > E-Manual or My Apps > E-Manual
View the embedded E-Manual that contains information about your TV's key features.
- Words in blue (e.g., Picture Mode) indicate a menu item.
- The small black circle indicates the button on the remote control.
Disclaimer:
Instructions and images through this manual are only for reference and may differ from the actual product.
Using the Buttons in the E-Manual
Search Q
Search for the product feature information, and the E-Manual will provide all the titles and content that contains the search information.
- Link
Allows you to access the corresponding reference page.
Specifications
| LED Panel | Panel Size | 24" TFT LED |
| Brightness | 200 | |
| Contrast Ratio | 3000:1 | |
| Viewing Angle | 178°/178° | |
| Max. Resolution | 1366 x 768 | |
| INPUT | VIDEO | 1 |
| LAN | 1 | |
| HDMI | 2 | |
| RF | 1 | |
| USB | 2 | |
| OUTPUT | OPTICAL | 1 |
| EARPHONE | 1 | |
| Power Source | 12V DC | |
| Power Consumption | 36W | |
| Dimension | 22" x 13.6" x 2.1" inch | |
| Weight | 7.0lbs | |
- The cabinet design and electronics specifications may be modified without prior notice for performance improvement.
- Weight and dimensions are approximate

- FCC WARNING
- Contents
- WARNING
- CAUTION
- FCC STATEMENT
- FCC CAUTION:
- IMPORTANT SAFETY INSTRUCTIONS
- Power Sources
- Grounding or Polarization
- For the unit with a polarized AC power cord plug
- For the unit with a DC power connector
- Wall outlet
- Wiring
- Electric shock
- Cleaning
- Overloading
- Power
- Sound
- Power Cord
- Ventilation
- Heat sources
- Entering of objects and liquids
- Lightning
- Servicing
- Replacement parts
- Attachments
- Damage requiring service
- Safety checks
- Wall or ceiling mounting
- Panel protection
- Pixel defect
- Antennas
- Outdoor Antenna Grounding
- WHEN INSTALLING AN OUTDOOR ANTENNA SYSTEM, EXTREME CARE SHOULD BE TAKEN TO KEEP FROM CONTACTING POWER LINES OR CIRCUITS AS CONTACT WITH THEM IS ALMOST INVARIABLY FATAL.
- Terminal Interface
- Accessories
- External device connection
- Mounting on a Desktop
- Installation Precautions
- Wall Mounting
- Using the Stand
- Battery Installation:
- Using the Remote control:
- Initial Settings
- Select language
- Connect to the Internet
- Country
- Time Zone
- Terms & Conditions, Privacy Policy
- Live TV
- Channel Scan
- Channel List
- Favorite
- Note:
- Wired LAN
- Wireless
- Connection
- - Advanced Settings
- - Add
- HDMI-CEC
- >Settings System HDMI-CEC
- HDMI Device
- USB Device
- Screen Sharing
- INPUT > Screen Sharing
- Content Sharing
- Media
- Home
- App Store
- Search
- Adjusting the Picture Quality
- Adjusting the Sound Quality
- Setting Time
- Using the timer
- Notification
- Upgrade
- Self Diagnosis
- Picture Problem
- Sound Problem
- Troubleshooting
- Other Picture and Sound Problem
- Internet Problem
- My File Won't Play
- Launching the E-Manual
- Using the Buttons in the E-Manual
- Specifications
Brand : JENSEN
Model : JTV2423DCS
Category : TV