LDP2237S - Portable DVD Player TOKAI - Free user manual and instructions
Find the device manual for free LDP2237S TOKAI in PDF.



| Product type | Portable DVD player |
| Brand | Tokai |
| Model | LDP2237S |
| Screen size | 7 inches (TFT-LCD) |
| Dimensions (L×W×H) | 205 × 160 × 40 mm |
| Weight | 0.8 kg |
| Power supply | AC mains adapter (DC 12 V, 1 A) or built-in battery |
| Built-in battery | Li-Polymer 1300 mAh, rechargeable |
| Battery life | Approx. 1 h 30 min (with headphones) |
| Battery charging time | 2 to 2.5 h (device off); 4.5 to 6 h (device on) |
| Compatible disc formats | DVD, VCD, CD, MP3, CD-R, CD-RW, JPEG, DVD±R/W, MPEG4 (Region 2) |
| Main functions | DVD player, MP3/MPEG4 playback, JPEG display, USB port, AV output to TV |
| Audio/video outputs | Composite video (CVBS 1 Vp-p/75 Ω), stereo audio (2 channels), 3.5 mm headphone jack |
| USB port | Yes, for MP3 and JPEG playback (compatible with USB flash drives) |
| Remote control | Infrared, range 5 m (CR2025 battery included) |
| Supplied accessories | Mains adapter, remote control, carrying case, car cigarette lighter cable, manual |
| Laser class | Class 1 (safe under normal use) |
| Power consumption | ≤ 12 W |
| Cleaning | Unplug before cleaning; use a soft, slightly damp cloth (not wet) |
| Maintenance and repairability | No user-serviceable parts; refer to qualified personnel |
Frequently Asked Questions - LDP2237S TOKAI
User questions about LDP2237S TOKAI
0 question about this device. Answer the ones you know or ask your own.
Ask a new question about this device
Download the instructions for your Portable DVD Player in PDF format for free! Find your manual LDP2237S - TOKAI and take your electronic device back in hand. On this page are published all the documents necessary for the use of your device. LDP2237S by TOKAI.
USER MANUAL LDP2237S TOKAI
natural_image
Two foldable electronic devices displaying a grayscale image of eye content, one with 'Tokio' branding and the other with 'Toku' logo (no visible text or symbols on devices)Tokai
LDP-2237S
MANUEL D'UTILISATION
USER MANUAL
MANUAL DEL USUARIO
HANDLEIDING
MANUAL DE INSTRUÇÕES
Veuillez lire attentivement ce manuel d'utilisation afin d'assurer une utilisation appropriée de ce produit, conservez ce manuel pour toute utilisation utérieure. Please read this User Manual carefully to ensure proper use of this product and keep this manual for future reference.
Por favor los este manual del usuario con detenimiento para garantizar el uso correcto de esta producio y conserve el manual para futuras consultas.
Lwes deze gebruikssenwijzing zorguldig door zodal u zich verzakerd van jursi gebruik van dit gebruik en inverter deze handstijnd nog voor uitkurs.
gaandis van
raadpleging
Por favor, leia atentamente esta manual para garantir uma utilização correda deste produto e quarde este manual para referência futura.

Tokai
LDP-2237S
www.tokal.fr
FRANÇAIS - ENGLISH
ESPAÑOL - DUTCH - PORTUGUÊS

LDP-2237S
Sommaire
Interface COMPATIBLE USB
- Répétition A-B
Pression longue (2 sec.)
| Language | Aspect Ratio TV System Smart Picture |
| Video | |
| Rating | |
| Misc |
Le mode d'affichage
| Language | Parental ControlSet Password |
| Video | |
| Rating | |
| Misc |
Contrôle parental
| Language | Use Default Settings |
| Video | |
| Rating | |
| Misc |
11
Dépannage
SON PRESENT, MAIS AUCUNE IMAGE
Safety Precautions 16
Panel Illustration 18
Connecting to a TV set.... 19
Remote Control 20
MP3/MPEG4 playing 23
PICTURE CD PLAYBACK 24
SYSTEM SETUP 24
Troubleshooting.... 26
Specifications 27
Accessories 27
Safety Instructions
Safety is Important

To ensure your safety and the safety of others, please ensure you read the Safety Instructions before you operate this product.
Keep this information in a safe place for future reference. Please read all the safety information before using the product. Safety Considerations.
- Position the cables so that they cannot be walked on or pinched by items placed on or against them.
- Do not use the set top box in humid or damp conditions.
- Do not allow the set top box to get wet.
- Do not expose the set top box to dripping or splashing.
- Do not place water filled objects such as vases on top of the set top box.
- Do not place naked flame sources, such as candles, on the top of the set top box.
Cleaning
- ALWAYS unplug the set top box before you clean it.
- Do not use liquid or aerosol cleaners
- Clean the set top box with a soft, damp (not wet) cloth.
Ventilation
- The slots and openings on the set top box are for ventilation. Do not cover or block them as it may cause overheating.
- NEVER let children push anything into the holes or slots on the case.
Servicing
- There are no user serviceable parts in this set top box.
- When servicing, refer to qualified service personnel.
- Consult your dealer if you are ever in doubt about the installation, operation or safety of this unit.
Battery Disposal
- Please ensure batteries are disposed of safely.
- Never dispose of batteries in a fire or with other household waste.
- Check with your local authority for disposal regulations.

This symbol indicates that this product incorporates double insulation between hazardous mains voltage and user accessible parts. When servicing use only identical replacement parts.
WARNING: To reduce the risk of fire or electric shock, do not expose this apparatus to rain or cords.
- The apparatus shall not be exposed to dripping or Splashing and that no objects filled with liquids, such as Vases, shall be placed the apparatus.
- The mains plug is used as the disconnect device, the disconnect device shall remain readily operable.
- To be completely disconnect the power input, the mains plug of apparatus shall be disconnected from the mains.
- The mains plug of apparatus should not be obstructed or should be easily accessed during intended use.

Special notice
A few highlights or dark spots may occur on the LCD screen. It is a very common phenomenon of the activematrix display technology, and does not mean any defects or faults. Never try to repair this machine by yourself. In case of any faults. Please turn off the unit at once, and notify our Company or the corresponding dealer. The display is made up of many precision electronic components. Any disassembly or modification may lead to further damage.
Safety Instructions

This Digital Video Disk player employs a Laser System. To ensure proper use of this product, please read this owner manual carefully and retain for future reference. Should the unit require maintenance, contact an authorized service location see service procedure.
Use of controls, adjustment or the performance of procedures other than those specified may result in hazardous radiation exposure.
To prevent direct exposure to laser beam, do not try to open the enclosure.
Visible and invisible laser radiation when open and interlocks defeated.
DO NOT STARE INTO BEAM
LISTENING WITH HEADPHONE (EARPHONE) (Not Included)
Connect the plug of the stereo headphone (earphone) into the EARPHONE jack (marked phones) before use the unit.

CAUTION: Hearing experts advice against exposure to continuous extended play at loud volume levels while using headphone (earphone), possible hearing loss may result. If you experience a ringing in the ears, reduce volume or discontinue use. We want you listening for a life time.
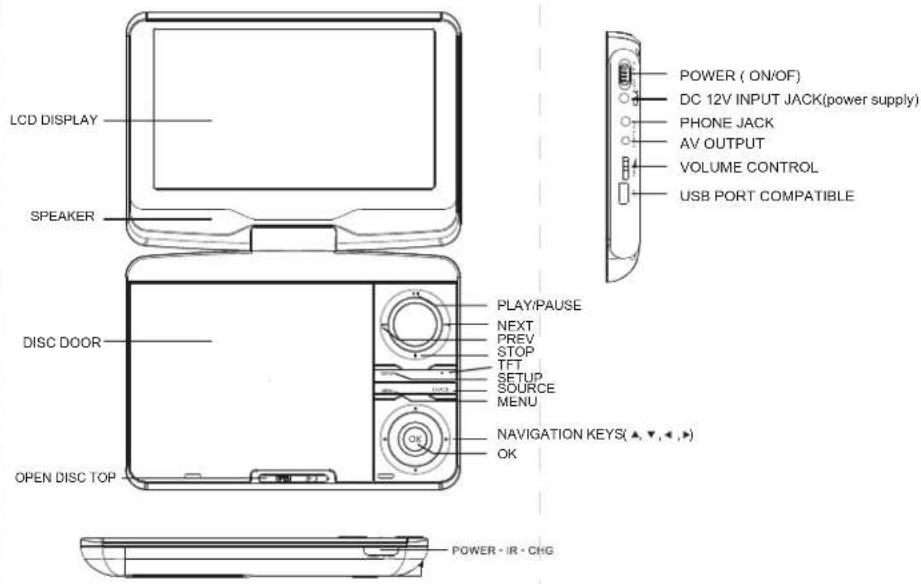
Panel Illustration
Introduction
Connecting to a TV Set
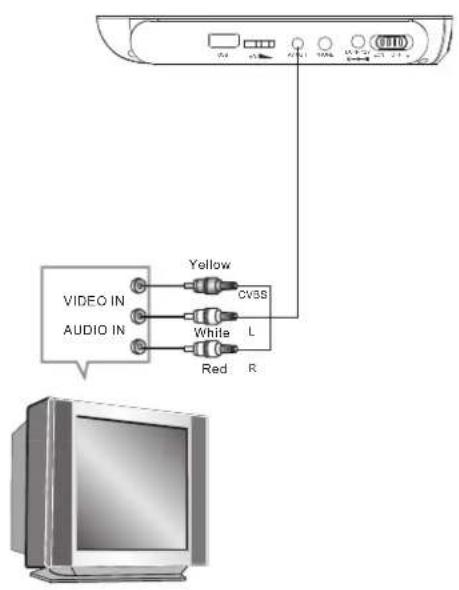
Connections
Phone Jack Function
Insert the earphone into the earphone jack, to listen the music or movie privately.
Battery charging
When the unit battery is powered out, connect the AC adapter onto the unit. the battery will charge automatically.
Volume adjust
Use VOLUME CONTROL in the side of the unit to adjust the volume.
Connect to the USB PORT COMPATIBLE
Press the SOURCE key on the remote control until you switched into USB COMPATIBLE work mode
USB COMPATIBLE interface
This unit have a USB COMPATIBLE IN jack to play the MP3 music or and JPEG files or other files.
Press the
Note: theUSB COMPATIBLE IN port is compatible with flash memories, it is not warranted the
NOTE:
When using USB COMPATIBLE function. Please do not insert in the wrong direction, or i will be corrupted.
Warning:
The USB drive must be connected directly to the unit. To prevent data loss by interference and transfer, do not use USB extension cords.
Remote Control
Introduction
Remote Control
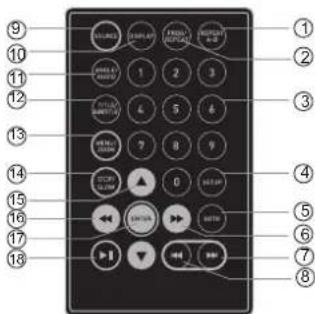
1. A-B Repeat
press 1x: set A ,prss 2x: set B
press3x: disable the function
2. Prog/Repeat
Short press: Repeat mode
Long press (2Sec.)
DVD program mode
3. 0-9 Number Keys
- Setup
Open the setup menu
- Goto
Goto a specific time index
-
Fast Forward
-
Next
Next chapter or file
-
Previous
-
Previous chapter or file
-
SOURCE
-
SOURCE Input mode selection
-
Display
-
Display
Display detailed informations
of the current file or disc.
11. Angle / Audio
Short press
Changes the audio mode (if different modes
are available)
Long press (2Sec.): Changes the angle mark
(if different modes are available)
- Title / Subtitle
Short press: Change subtitle mode
(if subtitles are available)
Long press (2Sec.): DVD Title menu
- MENU / ZOOM
Short press: Zoom in
Long press (2Sec.): Menu key for DVD Menu
- STOP / SLOW
Short press: Stop
Long press (2Sec.): Slow motion
-
Navigation keys (▲▼▲▲)
-
East Rewind
-
ENTER
To confirm and enter options or to play files.
- Play / Pause
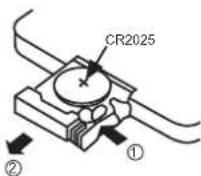
Preparation of the Remote Control
Place the remote control on an even surface and insert the supplied
button cell into the
remote control as follows.
-
Push the button towards left
-
Push the button towards it
-
Pull the battery leader out
-
Pull the battery loader out
-
Insert the battery into the receptacle
Make sure the polarity matches the marks
inside the component.
- Insert the receptacle into the remote control.
Cell data
Battery type: 1x CR2025, 3 V
Service life: approximately 1 year
(for normal use and roomtemperature)
Using Of Remote Control
Point the remote control towards the main unit when operating
The remote control works best at a distance less than 5 m and at an angle of up to 30° to the front of the unit. No obstacles may stand in the way between remote control and infrared sensor and do not place the remote control in direct sunlight. If the remote control unit fails to work even when it is operated near the player, replace the battery.
Notes on batteries
If the remote control is not used for a long period of time, please re
move the battery from the compartment.
Do not heat batteries or dispose of them in fires. Do not
dismantle, deform or modify batteries.
Remote Control
Introduction
Using Of Remote Control
Point the remote control towards the main unit when operating. The remote control works best at a distance less than 5 m and at an angle of up to 30° to the front of the unit. No obstacles may stand in the way between remote control and infrared sensor and do not place the remote control in direct sunlight. If the remote control unit fails to work even when it is operated near the player, replace the battery.
Notes on batteries
If the remote control is not used for a long period of time, please remove the battery from the compartment. Do not heat batteries or dispose of them in fires. Do not dismantle, deform or modify batteries.
About Built-in Rechargeable Battery
Precautions related to battery recharge
- Once the battery is fully discharged, immediately recharge it (regardless of whether you plan to use the battery or not) in order to maximize the battery life. When the power is low, the battery icon will be shown on the upper left corner of the TFT for warning.
- To charge the battery, please connect this player to AC mains via the AC adapter and the charge indicator will turn on in red, and the indicator will turn into green when the battery is fully charged. This will take about 2-2.5 hours if the player is in off mode or 4.5-6 hours if the player is in working mode.
Using and maintaining your rechargeable batteries
- Please make sure you always use only the AC adapter included with the player to recharge your batteries.
- Recharge efficiency will degrade when the environmental temperature drops below 50oF (100 or exceed 95oF (35°C).
- The lasting time of the fully charged battery when a headphone is connected to the player is approximately 1.5 hours
REMOTE CONTROL KEY FUNCTIONS
PLAY/PAUSE
Press this button once(during playback) to pause playback. Press this button a second time to resume playback.
STOP
Press this button once(during playback) to stop playback; to resume from the same position,
Press ▶/PLAY
Press this button a second time to end playing back the disc altogether. Continue at the start of the disc using ▶.
MENU
Press this button (during playback) to display the menu on the screen. In menu mode, select the desired option using the◀▶▲▼ buttons. Then press OK.
Button
Press this button to jump to the beginning of the previous track or chapter
← Button(Fast rewind)
Pressing this button repeatedly will increase the rewind speed successively to 2x,4x,8x,16x Continue playback at normal speed using▶
Button
To jump to the beginning of the next track or chapter.
Button(Fast forward)
Pressing this button once to display detailed information about the disc in the player.(Pressing this button repeatedly).
AUDIO button
During playback the available audio streams are enabled successively (DVDs can contain up to eight audio streams; e.G., for multiple languages.
Remote Control
Introduction
SUBTITLE button
During playback, allows you to select a language for subtitles or to turn subtitles on/off.DVDs can contain up to 32 subtitle tracks. By pressing this button repeatedly, you call up the following settings:
SUBTITLE 1/N: Subtitle 1 is displayed.
SUBTITLE 2/N: Subtitle 2 is displayed.
SUBTITLE */N:Subtitle * is displayed.
SUBTITLE OFF: No Subtitle.
N represents the total number of subtitle traks included. This function is only available for DVDs that contain multiple subtitle tracks.
REPEAT button
Pres the key to repeat a chapter or a title.
GOTO button
Enables you to select a position(time, track or title) at which to start playback. Use the.../. . Buttons to select the desired option. Use the 0-9 number keys to enter the time directly and then confirm using OK. Press the GOTO button again to resume normal playback.
ANGLE button
Pressing this button for approx 2 Sec. cycles through the camera perspectives available for the particular scene(see illustration). This function is only available for DVDs that contain recordings of multiple camera perspectives.
ZOOM button
For DVDs the image size is successively changed to the following values compared to the normal size:1x,2x,3x,off. This function is not available for Cds.
Get started
-
Press POWER switch to turn on the player.
-
Press OPEN button to open the disc tray.
-
Place a disc onto the disc tray.
-
Close the disc cover and the playback starts automatically.
5.When a menu screen appears on the display, move the navigation buttons or press the numeric buttons to select a preferred track number, then press OK/ENTER button to start playback Using the AC adapter
Always turn off the DVD player via the Power on/off switch prior to connecting or disconnecting the AC adapter. Be sure to use the supplied AC adapter.
Using a different type of adapter may cause malfunction or damage to the product. When the AC adapter is used for prolonged periods of time, it may heat up. This is normal and is not a cause for concern. When not using the adapter, unplug it from the wall outlet. Keep the AC adapter free from moisture, cold, and dust. Otherwise, a risk of fire or electric shock may be resulted in.
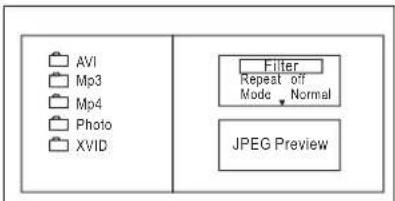
Insert the MP3/MPEG4 disc, use navigation keys to open the desired directory. Press ENTER to enter the subdirectory. Use the navigation keys to select the desired track and then ENTER to play the file. Press the PLAY/PAUSE key to pause the playback, press the stop key to stop the play. To return to the upper menu, press navigation key to choose the icon and press ENTER to confirm. Open the option menu using the navigation keys
Filter: Allows selecting the categories of files displayed in the browser list.
Repeat: To switch different repeat playing mode
Select single option to enable one file repeat, select folder option to enable all the files in the folder repeat.
Mode: Select different playing mode
Normal: Normal playback
Shuffle: Shuffle mode enabled. When playback reaches the end of the current chapter/track, playback jumps to a random chapter/track.
Music Intro: In this mode, the unit will play the first 10 seconds of the file and then skip to the next file.
Edit Mode: Use this option to enable programmed playback mode. Select the mode, press LEFTNavigation key to directory and press ENTER to choose the desired track and press Add to program to program the playback list.
Program view: Display directory/folder.
Brower view: Display playback list directory.
Add to program: Use this in combination with Edit Mode to create a play list. Clear program: When entered the BrowserView and incomplete stop state (press STOP button twice), use this option in combination with Edit Mode to delete tracks from the playback list.
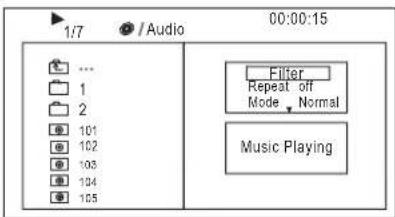
PICTURE CD PLAYBACK
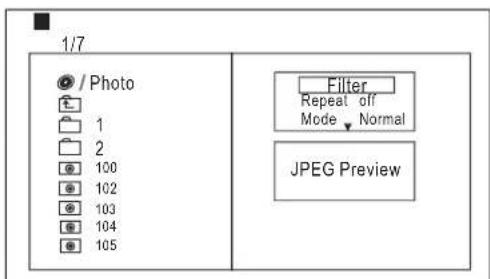
Press Navigation key to choose the root directory and then press ENTER button to enter into the sub directory. Press Navigation key to choose the desired picture and then press ENTER or PLAY to enjoy the picture. If you want to return to the upper menu, press Navigation key to choose 📄 the icon and press ENTER button.
Image rotation
In picture play state, press Navigation key to rotation the picture, press ANGLE button to change the picture scan mode.
SYSTEM SETUP
MENU OPERATION
Press the SETUP button on the remote control and the SETUPMENU will be displayed. Use the navigation buttons for upand down movement to select the desired item, then press the ENTER button to confirm. Press LEFT navigation button return to the main menu. To exit the setup, press the SETUP button. Press right navigationkey to enter the submenu.
LANGUAGE SETUP
Select Language in the setup menu.
| Language | LanguageSubtitleMPEG4 SubtitleAudioDVD Menu |
| Video | |
| Rating | |
| Misc |
OSD Language
Use this item to select the language of the setup menu and screen display.
Subtitle
Set the default subtitle.
Note: not every disc supports this function.
MPEG4 Subtitle
Set default MPEG4 subtitle encoding option.
Note: not every disc supports this function.
Audio
Set the defaultaudio language.
Note: not every disc supports this function.
SYSTEM SETUP
DVD Menu
Set the default DVD menu language.
Note: not every disc supports this function.
VIDEO SETUP
Select Video in the setup menu, and display the Video submenu:
| Language | Aspect RatioTV SystemSmart Picture |
| Video | |
| Rating | |
| Misc |
Aspect Ratio
Select the aspect ratio.: 16:9, 4:3 PS, 4:3LB
Notes.
The image display ratio is related to the recorded disc format. Some disc can not display images in the aspect ratio you choose. If you play a disc recorded in 4:3 format on a wide screen TV, black bars will appear on the left and right side of the screen. You must adjust the screen setting depending on the type of the television you have.
TV System
This product supports output of various systems (NTSC, PAL). When connecting to a TV set make sure that both units have the same PAL / NTSC settings.
Smart picture
Adjust display effect:
Standard: default effect.
Bright: internal setting for bright view effect. Soft: internal setting for soft view effect.
Dynamic: user adjusts brightness, contrast, color etc.
RATING SETUP
Select Rating in the setup menu, and display the Rating submenu:
Note: Not all DVD support ratings.
| Language | Parental ControlSet Password |
| Video | |
| Rating | |
| Misc |
Parental Control
Set the desired level
Note: not every disc supports this function.
Set Password
Use the 0-9 keys to input four digits(password), then press ENTER to confirm.
Note: If you forget your password, please use the universal password 6666 to unlock.
MISC SETUP
Select MISC in the setup menu, and display the submenu: ^ Use Default Settings
Reset data to factory default.
| Language | Use Default Settings |
| Video | |
| Rating | |
| Misc |
Troubleshooting
Others
If you have any questions, please consult the troubleshooting guide below.
NO PICTURE OR SOUND
- Ensure the power button is on.
- Ensure the power outlet is operational.
- Ensure the power cord is not damaged.
- Ensure the power plug is connected
PICTURE BUT NO SOUND
- Ensure the audio jacks are securely connected.
- Ensure the audio connector is not damaged.
- Ensure the volume is turned up in VOL/CH setup.
- Ensure you have set the player's AUDIOsettings correctly.
- Ensure you have ENTERed the correct AV input for your TV.
- Ensure the audio is not set to mute
SOUND BUT NO PICTURE
- Ensure the video jacks are securely connected.
- Ensure you have ENTERed the correct AV input for your TV.
- Ensure the video connector is not damaged.
- Ensure you have set the player's VIDEO settings correctly.
POOR PICTURE OR SOUND
- Ensure you have set the player's AUDIO settings correctly.
- Ensure the disc is not scratched or stained.
- Ensure the AV connector or the output terminal is not damaged.
"BAD DISC" DISPLAYED
- Ensure the disc is not warped, damaged or deformed.
- Ensure the disc is not badly stained or damaged.
- Ensure the disc format is compatible with the player.
- Please check whether you have tried to play a software CD.
If so, please restart the player.
REMOTE NOT WORKING
- Ensure the remote batteries are working.
- Point the remote control directly at the player's IR sensor.
- Remove any obstacles between the remote and the IR sensor.
UNIT NOT WORKING
- Turn off the power, and then turn it on again.
"NO DISC" DISPLAYED
- Ensure you have put the disc on the tray.
- Ensure the disc is not upside down.
- Ensure the disc is not distorted, stainedor scratched.
Specifications
Others
| Play mode | NTSC/PAL |
| Disc mode | DVD, VCD, CD, MP3, CD-R, CD-RW, JPEG, DVD+ -R/W, MPEG4. |
| Video characteristic | |
| Video S/N ratio | ≥65dB. |
| Resolution | ≥500 lines. |
| Audio characteristic | |
| Frequency response | fs 96KHz: 20Hz-20KHz:+/-1dBi |
| Audio S/N ratio | ≥90dB |
| Dynamic range | ≥80dB |
| Distortion | < 0.01% |
| D/A Converter | 96KHz/24bit |
| Output characteristic | |
| Display Device | Color TFT-LCD |
| Screen Size | 7 inches |
| Video output | 1Vp-p(75 w) |
| Audio output | 2CH |
| Power Voltage | DC IN 12V |
| Power consumption | ≤slant 12W |
| Size | 206x160x40mm |
| Weight | 0.8kg |
■ Accessories
AC adapter
Remote control
Bag & straps
Car adapter
User manual
Specifications are subject to change without notice.
End of Life Disposal

Warning! This logo set on the product means that the recycling of this apparatus comes within the framework of the Directive 2002/96/CE of January 27, 2003 concerning the Waste of Electrical and Electronic Equipment (WEEE).
This symbol means that used electrical and electronic products should not be mixed with general household waste. There is a separate collection system for these products.
If you want to dispose of this equipment, please do not use the ordinary dust bin!
The presence of dangerous substances in the electrical and electronic equipments can have potential consequences on the environment and human health in the cycle of reprocessing this product.
Therefore, at the end of its lifetime, this product shall not be disposed with other non-recycled waste. Used electrical and electronic equipment must be treated separately and in accordance with legislation that requires proper treatment, recovery and recycling of used electrical and electronic equipment.
Local authorities and resellers have set special procedures for the purpose of collecting and recycling this product (please contact your local authority for further details). You have the obligation to use the selective waste collection systems put in place by your local authority.
If your used electrical or electronic equipment has batteries or accumulators, please dispose of these separately beforehand according to local requirements.
- By disposing of this product correctly you will help ensure that the waste undergoes the necessary treatment, recovery and recycling and thus prevent potential negative effects on the environment and human health which could otherwise arise due to inappropriate waste handling.

This unit complies with European Council Directive 2006 / 95 CE (Electromagnetic Compatibility & Low Voltage Directives)

DVD Compatibility This Product can only play REGION Code 2 DVD

INDÍCE
| Language | Aspect RatioTV SystemSmart Picture |
| Video | |
| Rating | |
| Misc |
Tamaño de Visión
| Language | Parental ControlSet Password |
| Video | |
| Rating | |
| Misc |
| Language | Use Default Settings |
| Video | |
| Rating | |
| Misc |
USB KOMPATIBLE interface
| Language | Aspect RatioTV SystemSmart Picture |
| Video | |
| Rating | |
| Misc |
Beeldverhouding
| Language | Parental ControlSet Password |
| Video | |
| Rating | |
| Misc |
Ouderlijke controle
| Language | Use Default Settings |
| Video | |
| Rating | |
| Misc |
Problemen Oplossen
1 A-B repetir
| Language | Aspect RatioTV SystemSmart Picture |
| Video | |
| Rating | |
| Misc |
Aspecto Ratio
| Language | Parental ControlSet Password |
| Video | |
| Rating | |
| Misc |
Control Paterno
| Language | Use Default Settings |
| Video | |
| Rating | |
| Misc |
NENHUMA IMAGEM OU SOM

- Tokai
- LDP-2237S
- Sommaire
- Le mode d'affichage
- Contrôle parental
- Dépannage
- SON PRESENT, MAIS AUCUNE IMAGE
- Safety Instructions
- Safety is Important
- Cleaning
- Ventilation
- Servicing
- Battery Disposal
- Special notice
- LISTENING WITH HEADPHONE (EARPHONE) (Not Included)
- Connections
- Phone Jack Function
- Battery charging
- Volume adjust
- Connect to the USB PORT COMPATIBLE
- USB COMPATIBLE interface
- Remote Control
- Introduction
- A-B Repeat
- Prog/Repeat
- 0-9 Number Keys
- Angle / Audio
- Preparation of the Remote Control
- Cell data
- Using Of Remote Control
- Notes on batteries
- About Built-in Rechargeable Battery
- Precautions related to battery recharge
- Using and maintaining your rechargeable batteries
- REMOTE CONTROL KEY FUNCTIONS
- PLAY/PAUSE
- STOP
- Press ▶/PLAY
- MENU
- Button
- ← Button(Fast rewind)
- Button(Fast forward)
- AUDIO button
- SUBTITLE button
- REPEAT button
- GOTO button
- ANGLE button
- ZOOM button
- Mode: Select different playing mode
- PICTURE CD PLAYBACK
- Image rotation
- SYSTEM SETUP
- MENU OPERATION
- LANGUAGE SETUP
- OSD Language
- Subtitle
- MPEG4 Subtitle
- Audio
- DVD Menu
- VIDEO SETUP
- Aspect Ratio
- TV System
- Smart picture
- RATING SETUP
- Parental Control
- Set Password
- MISC SETUP
- Troubleshooting
- Others
- NO PICTURE OR SOUND
- PICTURE BUT NO SOUND
- SOUND BUT NO PICTURE
- POOR PICTURE OR SOUND
- "BAD DISC" DISPLAYED
- REMOTE NOT WORKING
- UNIT NOT WORKING
- "NO DISC" DISPLAYED
- ■ Accessories
- End of Life Disposal
- INDÍCE
- Tamaño de Visión
- Beeldverhouding
- Ouderlijke controle
- Problemen Oplossen
- A-B repetir
- Aspecto Ratio
- Control Paterno
- NENHUMA IMAGEM OU SOM
Brand : TOKAI
Model : LDP2237S
Category : Portable DVD Player