MES4031 - Portable DVD Player LENCO - Free user manual and instructions
Find the device manual for free MES4031 LENCO in PDF.


| Product Type | Portable DVD Player |
| Brand | Lenco |
| Model | MES4031 |
| Power Supply | AC 100-240 V, 50/60 Hz, DC 9-12 V |
| Power Consumption | Less than 15 W |
| Supported Formats | DVD, VCD, CD, MP3, JPEG |
| Removable Media | SD/MS/MMC, USB |
| Video Output | 1 Vp-p (75 Ω) |
| Audio Output | 1.0 Vrms (1 KHz, 0 dB), headphone, coaxial |
| Speakers | 1 W x 2 |
| Laser System | Semiconductor, 650 nm |
| Signal System | NTSC / PAL |
| Main Functions | Zoom, repeat, program, parental control, subtitles, viewing angle |
| OSD Languages | English, French, German, Spanish, Dutch, Polish, Hungarian |
| Included Accessories | Remote control, power adapter, car adapter, fixing straps |
| Maintenance | Clean with a dry cloth, avoid moisture and liquids |
| Safety | Parental lock with password, laser protection |
| Repairability | Refer to an authorized center, otherwise warranty void |
| Warranty | Compliant with European legislation, Lenco customer service |
Frequently Asked Questions - MES4031 LENCO
User questions about MES4031 LENCO
0 question about this device. Answer the ones you know or ask your own.
Ask a new question about this device
Download the instructions for your Portable DVD Player in PDF format for free! Find your manual MES4031 - LENCO and take your electronic device back in hand. On this page are published all the documents necessary for the use of your device. MES4031 by LENCO.
USER MANUAL MES4031 LENCO
natural_image
Two identical electronic devices connected by a cable, showing ports and wiring (no text or symbols)USER'S MANUAL
MES-4031
For information and support, WWW.lenco.com
Before connecting, operating or adjusting this product, please read this user's manual carefully and completely.
Important Safety Instructions
-
Warning: To reduce the risk of electric shock, do not remove the cover or back. There are no user-serviceable parts inside. Refer servicing to qualified personnel.
-
Warning: To prevent fire or electric shock hazard, do not expose the unit to rain or moisture.
-
Do not expose the Adaptor and portable DVD to water (dripping or splashing) and no objects filled with liquids, such as vases, should be placed on the unit.
-
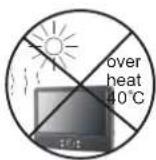
Keep the portable DVD away from direct sunlight and heat source such as radiators or stoves.
-
Do not block the ventilation openings. Slots and openings on the unit are provided for ventilation. The openings should never be blocked by placing your portable DVD on a cushion, sofa or other similar surface.
-
Do not place the portable DVD on unstable cart, stand, tripod, bracket or table. The unit may fall, resulting in possible damage or injury.
-
Never place heavy or sharp objects on the LCD panel or frame.
-
Only use the AC adapter included with portable DVD. Using any other adapter will void your warranty.
-
The plug of AC adaptor is used as the disconnect device, the disconnect device shall remain readily operable.
-
Unplug the power from the outlet when the unit is not in use.
11.WARNNING: Excessive sound pressure from earphones or headphones can cause hearing loss.
12.WARNING: Only use attachments/accessories specified provided by the manufacturer, the portable DVD is supplied by AC adapter, the AC adapter is used as disconnect device, the disconnect device shall remain readily operable.
This marking indicates that this product should not be disposed with other household wastes throughout the EU. To prevent possible harm to the environment or human health from uncontrolled waste disposal, recycle it responsibly to promote the sustainable reuse of material resources. To return your used device, please use the return and collection systems or contact the retailer where the product was purchased. They can take this product for environmental safe recycling.


To prevent possible hearing damage, do not listen at high volume levels for long periods.
Safety Precautions
WARNING
RISK OF ELECTRIC SHOCK DO NOT OPEN
-
Warning: This digital video disc player employs a laser system. Use of controls, adjustments, or the performance of procedures other than those specified herein may result in hazardous radiation Exposure.
-
Warning: To prevent direct exposure to laser beam, do not open the enclosure. Visible laser radiation when open.
-
Warning: Never stare directly into the laser beam.
-
Caution: Do not install this product in a confined space such as a book case or similar unit.
-
Warning: when the unit using by child, parents must make sure to let the child understand all contents in Instruction book.
-
Warning: more than 250mm USB extension cord is prohibited to use for USB port
Notes on Copyrights:
-
It is forbidden by law to copy, broadcast, show, broadcast via cable, play in public, or rent copyrighted material without permission.
-
This product features the copy protection function developed by Macrovision. Copy protection signals are recorded on some discs. When recording and playing the pictures of these discs picture noise will appear. This product incorporates copyright protection technology that is protected by method claims of certain U.S. Patents and other intellectual property rights owned by Macrovision Corporation and other rights owners. Use of this copyright protection technology must be authorized by Macrovision Corporation, and is intended for home and other limited viewing uses only unless otherwise authorized by macrovision Corporation. Reverse engineering or disassembly is prohibited.


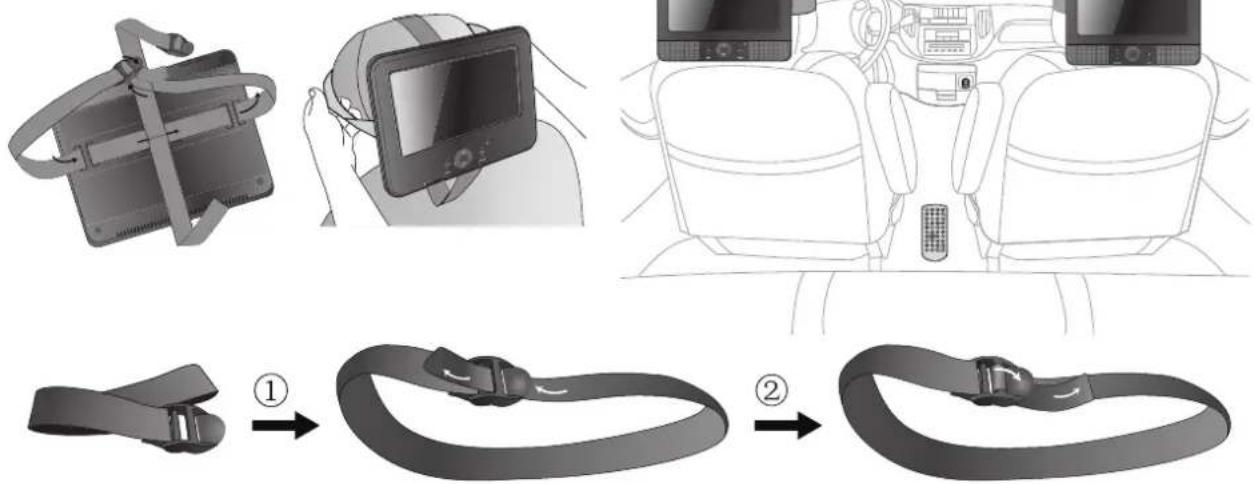
Mounting in the Vehicle
Use the supplied car mounting straps to install the main unit and monitor on the back of the vehicle's headrests. Tightly wrap the mounting strap around the headrest.
Dear Customer:
Thank you for purchasing this Portable DVD player.
When opening the box for the first time, please check whether all the accessories are present. Before connecting parts and power, please carefully read the user manual and always keep
theseinstructions close by your Portable DVD player.
Box content:
1 x main unit
1 x slave unit
1 x Remote control including battery
1x Car Adaptor
Straps
Note: if some parts are missing please contact your dealer as soon as possible.
Identification of Controls
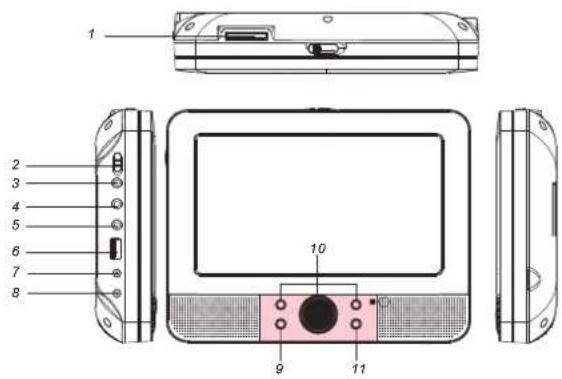
Main Unit
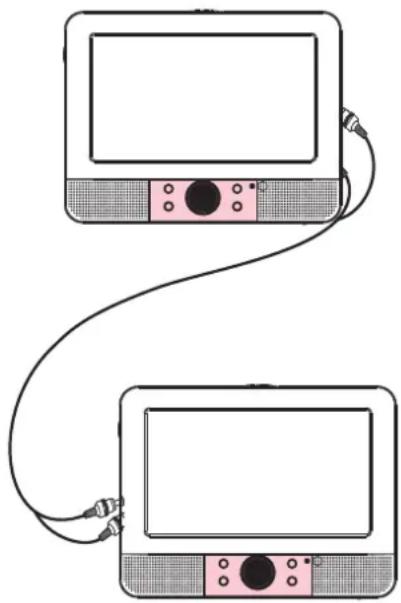
MASTER TFT SCREEN
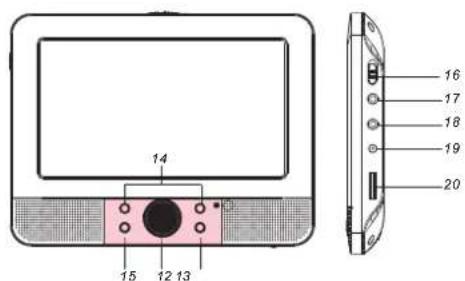
SLAVER TFT SCREEN
1.SD/MS/MMC
2. POWER ON/OFF
3. HEADPHONE OUT JACKS
4. VIDEO/AUDIO OUT
5. DIGITAL AUDIO OUT (COAXIAL)
6.USB
7. DC OUT
8. DC IN 9-12V
9. ENTER
10. UP/DOWN/LEFT/RIGHT
11. SOURCE
12. UP/DOWN
13. MODE
Slaver TFT menu setting.
14. LEFT/RIGHT
15.BACK LIGHT
Slaver TFT backlight switch.
16. POWER ON/OFF
17. AV IN
18. HEADPHONE OUT JACKS
19. DC IN
20. Volume Rotary
Identification of Controls
Remote control unit
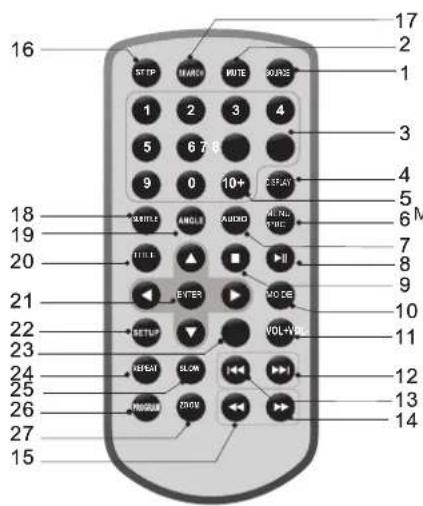
1. SOURCE
DVD/CARD/USB.
2. MUTE
Disable Audio output.
3.0-9 NUMBER BUTTON
Selects numbered items in a menu.
4.DISPLAY
To display the playtime and status information.
5.10+ BUTTON
In order to select a track 10 or greater, first press 10+, For example; select track 12, first press 10+, and then press number 2 button.
6. MENU/PBC
Return to DVD root menu(DVD).
PBC on/off switch (VCD).
7.AUDIO
DVD: Press AUDIO repeatedly during playback to hear a different audio language or audio track, if available.
MP3/CD/VCD:Press AUDIO repeatedly during playback to hear a different audio channel (Left, Right, Mix, Stereo).
8.PLAY/PAUSE
Press PLAY/PAUSE once to pause playback, pressing PLAY/PAUSE second time will resume the playback.
9.STOP
When this button is pressed once, the unit records the stopped point, from where playback will resume if PLAY( ) is pressed after wards. But if STOP button is pressed again instead of PLAY( ) button, there will be no resume function.
10.MODE
Set LCD parameter(adjust bightness, contrast, and saturation).
11.VOL+
12. Forward Skip
Go to next chapter/ track.
13. Reverse Skip
Go to previous chapter/ track to the beginning.
14. BUTTON
Press ▶ BUTTON allow skipping ahead at 5-level speed(X2->X4->X8->X16->X32->PLAY), press PLAY button return to normal playback.
Identification of Controls
Remote control unit
15. BUTTON
Press ◀ BUTTON allow skipping back at 5-level speed(X2->X4->X8->X16->X32 PLAY), press PLAY button return to normal playback.
16.STEP
Step the motion in DVD mode.
17.SEARCH
Goto time point, title or chapter you want in DVD Mode.
18.SUBTITLE
Press SUBTITLE repeatedly during playback to hear a different subtitle languages.
19.ANGLE
DVD:Press ANGLE will change the view angle, on DVDs that support this feature.
20. TITLE
Return to DVD title menu
21. ENTER
Confirms menu selection.
22.SETUP
Accesses or removes setup menu.
23.VOL-
Adjust volume
24.REPEAT
Press REPEAT during playback to select a desired repeat mode.
DVD: you can play select repeat chapter/title/off.
VCD: you can select repeat single/all/off.
CD/MP3: you can select repeat single/folder/off.
25.SLOW
Press Slow button repeatedly to enter slow playback, and cycle between different speeds. The speeds are 1/2, 1/4, 1/8, 1/16, and normal.
26.PROGRAM
DVD/VCD:The program function enables you to store your favourite tracks from the disc. Press PROGRAM button ,then PROGRAM MENU will appear on screen, now you can use the number key to direct input the titles,chapters or tracks number and select PLAY option. TO resume normal playback, press PROGRAM and select clear program option on the program menu,press PROGRAM again to exit program menu.
27.ZOOM
DVD/VCD: Use ZOOM to enlarge or shrink the video image.
-
Press ZOOM during playback or still playback to activate the Zoom function. The square frame appears briefly in the right bottom of the picture.
-
Each press of the ZOOM button changes the TV screen in the following sequence:
2X size → 3X size → 4X size → 1/2 size → 1/3 size → 1/4size→normal size
JPEG: Use ZOOM to enlarge or shrink the picture.
- Press 'ZOOM'.
2.Used "▶" to enlarge,or "◀" to shorten the picture. Use the button to move through the zoomed picture.
Setup Menu Setting
General Setup Page
Press SETUP button to get the setup menu. Use direction buttons
▲▼◀▶ to select the preferred item. After finishing settings, press
SETUP again to normal display.
The following menu items can be changed:
GENERAL: selects the GENERAL PAGE menu.
AUDIO: selects the AUDIO PAGE menu.
VIDEO: selects the VIDEO PAGE menu.
PREFERENCE : selects the PREFERENCE PAGE menu.
PASSWORD: selects the PASSWORD PAGE menu.
General Setup Page
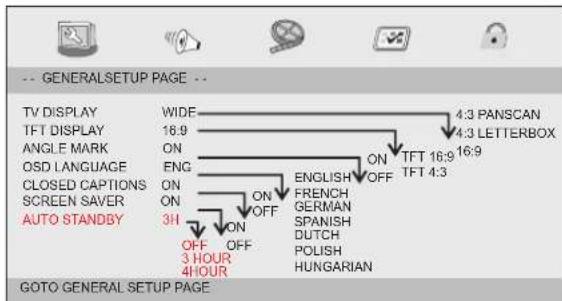
TV DISPLAY: selects the aspect ratio of the playback picture.
4:3 PANSCAN: if you have a normal TV and want both sides of the picture to be trimmed or formatted to fit your TV screen.
4:3 LETTERBOX: if you have a normal TV. In this case, a wide picture with black bands on the upper and lower portions of the TV screen will be displayed.
16:9:wide screen display.
TFT DISPLAY: Selects the TFT display to 16:9 or 4:3.
Angle Mark
Displays current angle setting information on the right hand corner of the TFT screen if available on the disc.
OSD Language
You can select your own preferred language settings.
Closed Captions
Closed captions are data that are hidden in the video signal of some discs. Before you select this function, please ensure that the disc contains closed captions information and your TV set also has this function.
Screen Saver
This function is used to turn the screen saver On or Off.
AUTO STANDBY
This function is used to standby.
Audio Setup Page
Audio Setup Page
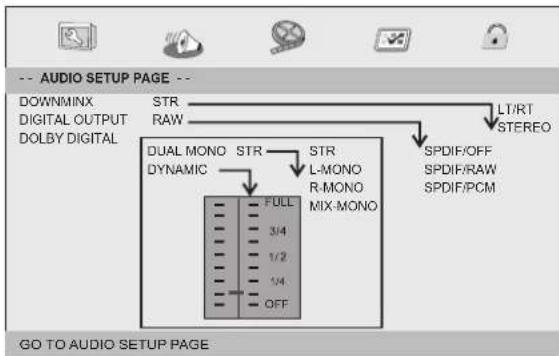
flowchart
graph TD
    A["STR RAW"] --> B["DUAL MONO STR DYNAMIC"]
    B --> C["FULL 3/4 1/2 5/4 OFF"]
    C --> D["L-MONO R-MONO MIX-MONO"]
    D --> E["SPDIF/OFF SPDIF/RAW SPDIF/PCM"]
    F["LT/RT STEREO"] --> E
Setup Menu Setting
Audio Setup Page
Downmix
This options allows you to set the stereo analog output of your DVD Player.
→ LT/RT : Select this option if your DVD Player is connected to a Dolby Pro Logic decoder.
→ Stereo : Select this option when output delivers sound from only the two front speakers.
Digital Output
The function is used to select the SPDIF Output:SPDIF Off,SPDIF /RAW,SPDIF/PCM.
→ SPDIF Off: Turns off the SPDIF output.
→ SPDIF/RAW: If you have connected your DIGITAL AUDIO OUT to a multi-channel decoder/receiver.
→ SPDIF/PCM: Only if your receiver is not capable of decoding multi-channel audio.
Dolby digital
The options included in Dolby Digital Setup are: and'Dual Mono 'Dynamic'.
Dual Mono
→ Stereo: Left mono sound will send output signals to Left speaker and Right mono sound will send output signals to Right speaker.
→ L-Mono: Left mono sound will send output signals to Left speaker and Right speaker.
→ R-Mono: Right mono sound will send output signals to Left speaker and Right speaker.
→ Mix-Mono: Left and Right mixed mono sound will send output signals to Left and Right speakers.
Dynamic
Dynamic range compression.
Video Setup Page
Video Setup Page
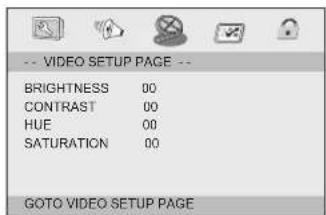
Brightness, Contrast, Hue, Saturation: setting the video quality.
Preference Page
Preference Page
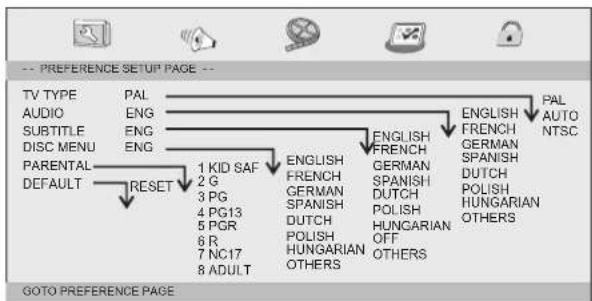
flowchart
graph TD
    A["TV TYPE"] --> B["PAL"]
    C["AUDIO"] --> D["ENG"]
    E["SUBTITLE"] --> F["ENG"]
    G["DISC MENU"] --> H["ENG"]
    I["PARENTAL"] --> J["RESET"]
    K["DEFAULT"] --> L["1 KID SAF"]
    L --> M["2 G"]
    L --> N["3 PG"]
    L --> O["4 PG13"]
    L --> P["5 PGR"]
    L --> Q["6 R"]
    L --> R["7 NC17"]
    L --> S["8 ADULT"]
    T["ENGLISH"] --> U["FRENCH"]
    U --> V["GERMAN"]
    V --> W["SPANISH"]
    W --> X["DUTCH"]
    X --> Y["POLISH"]
    Y --> Z["HUNGARIAN"]
    Z --> AA["OFF"]
    AA --> AB["OTHERS"]
    AC["ENGLISH"] --> AD["FRENCH"]
    AD --> AE["GERMAN"]
    AE --> AF["SPANISH"]
    AF --> AG["DUTCH"]
    AG --> AH["POLISH"]
    AH --> AI["HUNGARIAN"]
    AI --> AJ["OTHERS"]
    AK["PAL"] --> AL["AUTO"]
    AL --> AM["NTSC"]
TV Type
Selecting the colour system that corresponds to your TV when AV outputs. This DVD Player is compatible with both NTSC and PAL.
Setup Menu Setting
Preference Page
PAL - Select this if the connected TV is PAL system. It will change the video signal of a NTSC disc and output in PAL format.
NTSC-Select this if the connected TV is NTSC system. It will change the video signal of a PAL disc and output in NTSC format.
Auto: Chang the video signal output automatic according to the playing disk format.
Audio: Selects a language for audio (if available).
Subtitle: Selects a language for subtitle (if available).
Disc Menu: Selects a language for disc menu (if available).
Parental
Some DVDs may have a parental level assigned to the complete disc or to certain scenes on the disc. This feature lets you set a playback limitation level. The rating levels are from 1 to 8 and are country dependent. You can prohibit the playing of certain discs that are not suitable for your children or have certain discs played with alternative scenes.
Default: Back to the factory setting.
Password Setup Page
Password Setup Page
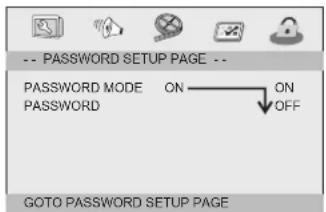
Password mode: Set password mode on/off. If set to off, change parental level will not check password.
Password Setup Page
Password: select the menu password change page.
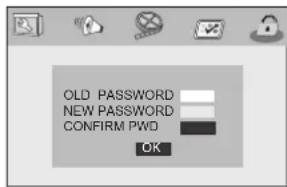
OLD PASSWORD: Enter the OLD password, (Factory setting is 1369), and the cursor will jump automatically to NEW PASSWORD
NEW PASSWORD: Enter the NEW password. Enter 4 digits from the remote control unit numeric buttons, and the cursor will automatically jump to CONFIRM PASSWORD.
CONFIRM PASSWORD: Confirm the NEW password by entering it again. If the confirmation is incorrect, the cursor will stay in this column. After entering, the correct new password again, the cursor will jump automatically to OK.
OK: When cursor is on this button, press ENTER key to confirm setting.
Note: If the password has been changed, the parental and disc lock code will also be changed.
The default password(1369)is always active even the password has been changed.
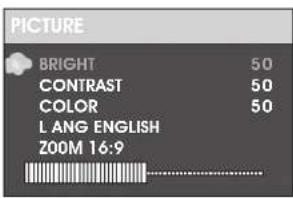
Slaver TFT Menu Setting Picture Page
Brightness
Adjust screen Bright Setting.
Contrast
Adjust screen Contrast Setting.
Color
Adjust screen Color Setting.
LANG
Adjust Menu OSD Language
ZOOM
Adjust screen ZOOM 16:9 or 4:3
Parameters and specifications Electronical parameters
| Item | Standard requirement | |
| Power requirements | : AC 100-240 V, 50/60 Hz | |
| Power consumption | :<15W | |
| Operating humidity | : 5 % to 90 % | |
| Output | VIDEO OUT | :1 Vp-p (75Ω) |
| AUDIO OUT | :1.0 Vrms (1 KHz, 0 dB) | |
| Audio | :Speaker:1WX2, output, Coaxial outputHeadphones | |
System
| Laser | :Semiconductor laser, wavelength 650 nm |
| Signal system | :NTSC / PAL |
| Frequency response | :20Hz to 20 kHz(1dB) |
| Signal-to-noise ratio | :More than 80 dB (ANALOG OUT connectors only) |
| Dynamic range | :More than 80 dB (DVD/CD) |
Note: Design and specifications are subject to change prior notice.
Service and support
For information: www.lenco.com
For support: http://lencosupport.zendesk.com
Lenco helpdesk:
Germany 0900-1520530 (Local charges)
The Netherlands 0900-23553626 (Local charges + 1ct p/min) Belgium 02-6200115 (Local charges)
France 03-81484280 (Local charges)
The helpdesk is accessible from Monday till Friday from 9 AM till 6 PM.
When contacting Lenco, you will always be asked for the model and serial number of your product. The serial number can be found on the back of the device. Please write down the serial number below:
Model:MES-4031
Serial number:
Lenco offers service and warranty in accordance to European law, which means that in case of repairs (both during and after the warranty period) you should contact your local dealer.
Important note: It is not possible to send products that need repairs to Lenco directly.
Important note: If this unit is opened or accessed by a non-official service center in any way, the warranty expires.
This device is not suitable for professional use. In case of professional use, all warranty obligations of the manufacturer will be voided.

This symbol indicates that the relevant electrical product or battery should not be disposed of as general household waste in Europe. To ensure the correct waste treatment of the product and battery, please dispose them in accordance to any applicable local laws of requirement for disposal of electrical equipment or batteries. In so doing, you will help to conserve natural resources and improve standards of environmental protection in treatment and disposal of electrical waste (Waste Electrical and Electronic Equipment Directive).

Products with the CE marking comply with the EMC Directive (2004/108/EC) and the Low Voltage Directive (2006/95/EC) issued by the Commission of the European Community.
The declaration of conformity may be consulted at http://www.lenco.eu/supportfiles/CE/vnj3e59859tjhgjharasrppppp.pdf
®All rights reserved
Lenco
natural_image
Two identical electronic devices connected by a cable, showing front and back views with no text or symbols.BENUTZERHANDBUCH
MES-4031
The declaration of conformity may be consulted at http://www.lenco.eu/supportfiles/CE/vnj3e59859tjhgjharasrppppp.pdf
natural_image
Two identical electronic devices connected by a cable, showing front and back views with no text or symbols.HANDLEIDING
MES-4031
-
DC UITGANG
-
DC INGANG 9-12V
-
ENTER
-
OMHOOG/OMLAAG/LINKS/RECHTS
-
SOURCE
-
OMHOOG/OMLAAG
-
MODE
Slave TFT-menuinstelling.
- LINKS/RECHTS
15.ACHTERGRONDVERLICHTING
The options included in Dolby Digital Setup are: and Dual Mono 'Dynamic'.
Dual Mono
natural_image
Two identical electronic devices connected by a cable, showing front and back views with no text or symbols.MANUEL DE L'UTILISATEUR
MES-4031
Note: Design and specifications are subject to change prior notice.
Service et support
natural_image
Two identical electronic devices connected by a cable, showing ports and wiring (no text or symbols)MANUAL DEL USUARIO
MES-4031
Estimado cliente:

- Important Safety Instructions
- Safety Precautions
- WARNING
- Notes on Copyrights:
- Mounting in the Vehicle
- Identification of Controls
- Main Unit
- Remote control unit
- SOURCE
- MUTE
- 3.0-9 NUMBER BUTTON
- 4.DISPLAY
- 5.10+ BUTTON
- MENU/PBC
- 7.AUDIO
- 8.PLAY/PAUSE
- 9.STOP
- 10.MODE
- 11.VOL+
- Forward Skip
- Reverse Skip
- BUTTON
- BUTTON
- 16.STEP
- 17.SEARCH
- 18.SUBTITLE
- 19.ANGLE
- TITLE
- ENTER
- 22.SETUP
- 23.VOL-
- 24.REPEAT
- 25.SLOW
- 26.PROGRAM
- 27.ZOOM
- Setup Menu Setting
- General Setup Page
- Angle Mark
- OSD Language
- Closed Captions
- Screen Saver
- AUTO STANDBY
- Audio Setup Page
- Downmix
- Digital Output
- Dolby digital
- Dual Mono
- Dynamic
- Video Setup Page
- Preference Page
- TV Type
- Parental
- Password Setup Page
- Slaver TFT Menu Setting Picture Page
- Parameters and specifications Electronical parameters
- Service and support
- Lenco helpdesk:
- HANDLEIDING
- Service et support
Brand : LENCO
Model : MES4031
Category : Portable DVD Player