MW8212HCSS - Microwave Oven Holland Electro - Free user manual and instructions
Find the device manual for free MW8212HCSS Holland Electro in PDF.

| Product Type | Microwave Oven |
| Brand | Holland Electro |
| Model | MW8212HCSS |
| Voltage | 230 V / 50 Hz |
| Input Power (Microwave) | 1300 W |
| Output Power (Microwave) | 800 W |
| Grill Power | 1000 W |
| Convection Power | 1200 W |
| Capacity | 21 Liters |
| Turntable Diameter | 270 mm |
| Dimensions (W x D x H) | 485 x 395 x 287 mm |
| Net Weight | 13.7 kg |
| Main Functions | Microwave, Grill, Convection, Combi, Defrost (weight/time), Auto Menu (A1-A9) |
| Maximum Convection Temperature | 200 °C |
| Compatible Materials | Heat-resistant glass, microwave-safe plastic, paper, porcelain |
| Safety | Grounding, auto shut-off, door lock, microwave protection |
| Maintenance | Clean with a damp cloth; do not remove the MICA plate |
| Control Type | Rotary knob and touch buttons |
Frequently Asked Questions - MW8212HCSS Holland Electro
User questions about MW8212HCSS Holland Electro
0 question about this device. Answer the ones you know or ask your own.
Ask a new question about this device
Download the instructions for your Microwave Oven in PDF format for free! Find your manual MW8212HCSS - Holland Electro and take your electronic device back in hand. On this page are published all the documents necessary for the use of your device. MW8212HCSS by Holland Electro.
USER MANUAL MW8212HCSS Holland Electro
Specifications 2
Important safety instructions 3
Radiation 3
Usage 3
Maintenance 3
Positioning 4
Materials that you can use in the microwave 5
Materials you have to avoid in the microwave 6
Before use 7
Names of components 7
Control panel 7
Installation 8
Turning tray 8
Placing 8
Setting the clock 8
Cooking 9
Cooking with microwave 9
Grilling 10
Defrosting on weight 10
Defrosting on time 11
Auto menu 11
Baking with Convection oven 11
Baking with Combination 12
Attention: 12
Solving problems 13
Faq 14
Specifications
| Model: MW8212HCSS | |
| Art. Nr. 10005323 | |
| Voltage: 230V/50Hz | |
| Input power (magnetron): 1300W | |
| Output power (magnetron): 800W | |
| Grill power: 1000W | |
| Convectie power: 1200W | |
| Oven capacity: 21 liter | |
| Diameter turntable: 270mm | |
| Proportions (LxBxH): 485mm x 395mm x 287mm | |
| Netto weight: 13,7 kg | |
Important safety instructions
Radiation
If the door or the door locks are damaged you may not use the oven until it is fixed by a qualified person. Don't try making this oven work with open door; this will bring detrimental energy outside. Don't place any objects between the front of the oven and the door, also make sure that no detergent gets in contact with the closing. It's dangerous for everybody not-qualified to remove the hood that protects against microwave energy. DON'T remove the cardboard MICA-sign on the inside.
Usage
Do not play with the safety locks.
Liquid forms and other food may not be heated inside closed buckets, if this happens they can explode. Make sure children only use the oven without supervision, if they had good instructions about how to use the oven. If the machine is used in combination mode; make sure children only use the machine under supervision of an elder. Concerning high temperatures. Only use plates and buckets that are appropriate for usage in the oven. If you sense something is smoking, you have to immediately turn out the oven or pull out the plug to prevent fire. Don't let your food overcook. Don't use the oven to keep things in. Also don't keep food in it. Remove metal handles from your plastic or paper buckets before putting these in the oven. Egg with scale and very hard cooked eggs may not be heated inside the microwave concerning chance of exploding eggs. Always check the temperature of the contents of baby bottles and other baby food buckets. Heating with the microwave can cause slowed eruptions; so make sure to be careful with the buckets.
Maintenance
You have to clean the oven on regular bases.
If you don't keep the oven clean this can have effect on the lifespan of the oven.
Cleaning:
Clean the inside of the oven with a wet towel after every use.
Clean the accessories in soapsuds
The door and closing have to be carefully cleaned with a wet towel when they're dirty.
Positioning
Only install the oven on a, according to the guidelines, appropriate place.
Only use the machine for goals that are pointed out in this instruction. So don't use chemicals and such in this machine. If the wiring is damaged it has to be replaced by the fabricant, the service centre or somebody else qualified. Don't place the machine outside the house. Don't use this oven in a wet environment.
The temperature can get very high when the oven is on, so don't cover it. Make sure no wiring is hanging over a table corner or other corner. If you use a connector; make sure the marked energy classifications of the wiring are at least equal to the classifications of the machine.
- The connector has to be an appropriate three-coreded cord.
- The connector must be placed in a way it won't fall of a ledge, to prevent children from pulling it down. This machine is provided with appropriate wiring and an appropriate plug. The plug must be placed in a good placed, appropriate power socket. Place the machine on a stable, level sub-soil.
Materials you can use in the microwave
Browned plate
Follow the instructions of the manufacturer with this. The bottom must be at least 5mm above the turning tray. If it isn't used properly there is a chance the tray breaks.
Diner plates
Only if they're save for use in the microwave. Follow the instructions of the manufacturer.
Don't use them when they're busted or broken.
Glass bowls
Always remove the lid, and only use these for heating food until it's only warm. Most glass bowls can't deal with extreme heat and can break.
Glass
Only use heat-durable glass. Make sure no metal is in this glass and don't use broken or busted glass.
Oven-cook-bags
Follow the instructions of the manufacturer. Don't close them with metal wiring. Make holes so that the steam can escape.
Paper plates and buckets
Only use these for short term cooking or heating. Never leave the oven when using it.
Baking paper
Use these for covering food when heating food again, or to absorb fat. Only use this under supervision and for a short period.
Parchment paper
Use this for covering food from splattering or with steaming.
Plastic
Only if it's save for use in the microwave. Follow the instructions of the manufacturer. There has to be said on the boxes that they're appropriate for use in the microwave. Some plastic will melt when it gets to hot.
Cooking bags must be foreseen with air holes
Plastic cover
Only if it's save for use in the microwave. Use these to preserve the fluid. Make sure the plastic doesn't touch the food.
Thermometers
Only if they're save for use in the microwave.
Wax paper
Only use as closing material to prevent splattering and preserve fluid.
Materials you have to prevent in the microwave
Tin foil
Can cause flashes and shocks in your microwave. Cover the food with something that is safe inside the microwave.
Food paperboard with metal handles
Can cause bumps in your microwave. Move the food to a material that is safe inside the microwave.
Metal or material that contains metal
Can cause sparks and shocks inside the oven when used as a microwave.
Paper bags
Can cause fire inside the oven.
Foam plastic
Foam plastic can melt or the liquid it contains can come out when exposed to high temperatures.
Wood
Wood will dehydrate with use in the microwave and then brake.
Before use
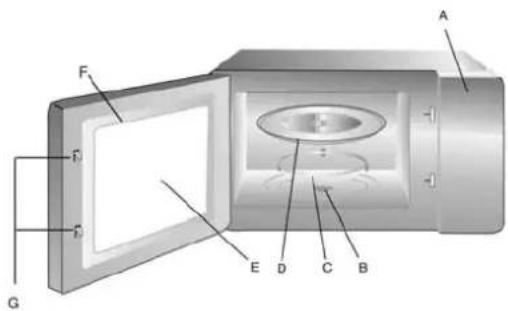
Names of components
Take your oven and all parts from the cardboard.
You receive the following accessories with your oven:
1x Glass plate
1x Turn ring for turning tray
1x Instructions
1x T-shaft/ operating ash
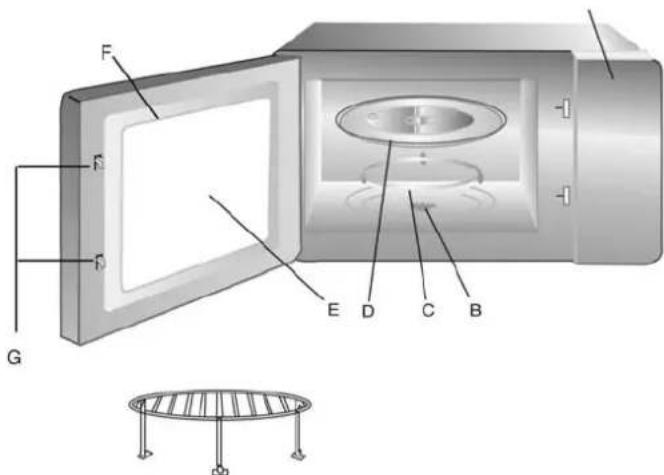
Control panel
Shaft for turning tray
Ring for turning tray
Turning tray
Window
Door assembly
Door lock with automatic junction
Installation
Turning tray
T-shaft - operating ash (bottom)
Glass plate
T-shaft/ operating ash turning tray Ring for turntable
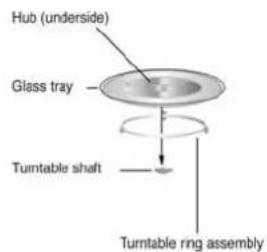
- Never place the glass plate upside down. The plate may not be limited in space.
- Both the glass plate as the ring for the turning tray must be used when cooking and can be used during ALL functions.
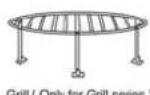
- The grill-rack may be used with the convection, grill and combination functions but not during microwave function.
- The food and the buckets where you are preparing the food in must be standing on the glass plate.
- If the glass plate or the ring of the turning tray break, you have to immediately contact the service centre.
- Don't use the oven when it's damaged.
- DON'T remove the light brown mica sign on the inside of the oven; the sign is there for the prevention of radiance.
- Remove the protecting plastic plaque that can be on the hood of the microwave.
- Look at the oven good to see any possible damage, like a broken door.
Placing
- Select a surface level that keeps enough space to open the door.
- Put the plug of your oven in a standard power socket.
Make sure the voltage and frequency are the same as the voltage and frequency on the label of the oven. - There must be a minimal space of 7,5cm between the oven and possible walls.
- Leave a space free of approximately 30cm above the oven. By blocking openings of the oven, the oven can be damaged.
- The surface where your machine stands can get very hot when the machine is on.
- Place the oven as far away as possible from radios or TV receivers.
- Don't remove the legs at the bottom of the oven. (for example to safe space)
- Never install your oven above a cooking plateau or something else that can get very hot. If you do this, your oven can get damaged.
Setting the clock
If the microwave receives power, the display will say '00:00' and you will hear a sound. You can set the clock from 00:00 till 23:59.
Step 1 If you're waiting; press STOP/CLEAR/CLOCK and '00'. At the same time '00:00' will light up.
Step 2 Turn to set the hours (0-23)
Step 3 Push START to confirm this.
Step 4 Turn to set the minutes (0-59)
Step 5 Push START to confirm this.
If your machine does have power but the time isn't set, the time doesn't run.
! When you push STOP/CLEAR/CLOCK while setting the clock; the establishment will stop.
Cooking
Attention: In this instruction there is only said how to control the microwave.
Order the microwave guide or look in the bookshop for special recipes for microwaves.
The microwave function is used for heating liquid and firm food quickly. Think of: thee, coffee, leftovers, potatoes vegetables etc. The food is heated from the inside by micro radiation that reflects in the microwave until it is absorbed by the food. You can use the microwave function with low capacity to heat something slowly, or you can heat with high capacity. Always pay attention on high capacity because the result is unpredictable! When you use the microwave function the food will not get a crispy crust. This will happen when you use the combination function.
You use the grill to grill meat, fish or vegetables. This means the lights above, heat the food with intense heat. Pay attention that the outside of the food is warmed harder then the inside.
You use the defrost function to defrost food. You can do this in two ways:
1: You set the weight
2: You choose the time
The convection function is used for baking bread or cake etc. Attention; the maximum temperature is 200^
The combination function is a combination of the convection and microwave function. Where you can set convection temperature, on different temperatures.
Auto menu is a function where you choose the food as appointed under the display on the microwave and then set the weight. The oven now automatically chooses the right program.
Cooking with the microwave
Select the wished cooking-menu and the right time. There are four different options for cooking
Step 1 Push MICROWAVE, there will be 'p100' on the screen. After this the indicator will light up. If you push STOP/CLEAR/CLOCK you will go back to the waiting status.
When you push MICROWAVE more often you will change the power capacity. The p with the number behind it stands for the percentage of the total power of the microwave.
Step 2 Turn to set the cooking-time. The maximum time is 95 minutes.
Step 3 By pushing STOP/CLEAR/CLOCK you will return to the previous menu.
Step 4 Push START to begin cooking. " will now light up. The indicator will blink. When you push STOP/CLEAR/CLOCK the machine will stop.
Step 5 By pushing STOP/CLEAR/CLOCK again (when no more then 5 minutes have passed) you can set the machine in waiting status again.
Step 6 By pushing START within 5 minutes the machine will begin and the time will count down.
Step 7 By pushing MICROWAVE you can see the amperage (during 3 seconds) after that the machine will return to countdown status automatically.
Step 8 When you are ready with cooking you will here a bleep 5 times. The machine will then return to the waiting status. If you push START during cooking; 30 seconds will be added with the cooking time.
Grilling
Step 1 By pressing GRILL multiple times you can set the power of the grill. 'G-1', 'G-2' 'G-3' and 'G-4' will pass by in this order. On this moment the will light up.
Step 2 Turn to set the cooking time. The maximum time is 95 minutes.
Step 3 Press START to start cooking. Indicator will blink. The time will count down.
Step 4 if you push STOP/CLEAR/CLOCK the machine will stop working. By pushing STOP/CLEAR/CLOCK again (when no more than 5 minutes have passed) you can set the machine in waiting status again.
Step 5 By pushing START within 5 minutes; the machine will continue cooking and the time will continue counting down. You will hear one bleep.
Step 6 When you push GRILL again, you will (during 3 seconds) see the grill-mode and the status.
Step 7 When cooking is stopped you will here a bleep 5 times. If you push START during cooking; 30 seconds will be added with the cooking time.
| G-1 100% grillpower |
| G-2 75% grillpower |
| G-3 50% grillpower |
| G-4 25% grillpower |
Defrosting on weight
Step 1 Push DEFROST for setting the wished defrosting schedule. ** will now light up. 'DEF1' will blink. If you keep pressing this button 'DEF1' and 'DEF2' will light up in turns.
Step 2 Push START to choose the defrost weight. 'DEF 1' will not blink but light up.
Step 3 Turn to choose the weight you want, from 100 to 1000. 'g' will now light up.
Step 4 Push start to start defrosting. ** will blink and G' will turn off.
Step 5 If you push STOP/CLEAR/CLOCK the machine will stop working. If you push STOP/CLEAR/CLOCK again within 5 minutes; the machine will return to waiting mode.
Step 6 By pushing START within 5 minutes, the machine will continue cooking and the time will count down further. You will hear 1 beep.
Step 7 When the defrosting stops you will hear a beep 5 times. By pressing START during the defrosting process; 30 seconds will be added to the time.
Step 8 When half the time of the defrosting process is over you will hear 2 beeps. This tells you when you have to turn the food. If you don't do this the machine will continue but the results can be less good.
Defrosting on time
Step 1 Push DEFROST twice to go to the function: defrosting on time. ** will light up. 'DEF2' will blink. If you keep pressing this button 'DEF1' and 'DEF2' will light up in turns.
Step 2 Push START to choose for defrosting on time. 'DEF2' will not blink but light up.
Step 3 Turn to select the cooking time.
Step 4 Push start to defrost. ** will blink and G' will turn off.
Step 5 If you push STOP/CLEAR/CLOCK the machine will stop working.
Step 6 If you push STOP/CLEAR/CLOCK again within 5 minutes; the machine will return to waiting mode.
Step7 By pushing START within 5 minutes, the machine will continue cooking and the time will count down further.
Step 8 The defrosting power is P30. During this process, every time you push start, 30 seconds will be added on the defrosting time.
Step 9 When the process ends you will hear a beep 5 times.
Auto menu
Step 1 When the machine is in waiting mode, turn to choose a menu directly. 'A1' till 'A9' will be displayed.
Step 2 Push START to confirm the menu.
Step 3 Turn to confirm the weight at the menu.
Step 4 Press START again to begin cooking.
Step 5 When the cooking is ready you will hear a beep 5 times and the machine will return to waiting mode.
Autocomnuschedule
| A1 REHEAT = warm up leftovers |
| A2 P OTATO = cooking potatoes |
| A3 V E G A T A B L E S = cooking vegetables |
| A4 P A S T A = cooking pasta |
| A5 M EAT = preparing meat |
| A6 F S H = preparing fish |
| A7 P Z Z A = preparing pizza |
| A8 B R E A D = preparing bread |
| A9 R O A S T C H I C K E N = grill chicken |
Baking with convectionoven
Step Push CONVECTION to establish the convection temperature.
Step 2 'C' will light up. The numbers '110' till '120' will appear in the circle.
Step 3 Establish the convection time by turning . The maximum time you can choose is 95 minutes.
Step 4 Push START to make the machine work. The led will blink and ':' will stop blinking.
Step 5 If you push STOP/CLEAR/CLOCK the machine will stop working.
Step 6 If you push STOP/CLEAR/CLOCK again within 5 minutes; the machine will return to waiting mode. By pushing START within 5 minutes, the machine will continue cooking and the time will count down further.
Step 7 By pushing CONVECTION you can watch the time and temperature.
Step 8 By pushing START during the process; 30 seconds will be added on the time.
Step 9 When the cooking is ready you will hear a beep 5 times and the machine will return to waiting mode.
Baking with combination
Convection & Microwave
Step 1 Push COMBINE to set the temperature. And 'C' will light up. The numbers '110' till '120' will appear in the circle. By pushing STOP/CLEAR/CLOCK the machine will return to waiting mode.
Step 2 You can set the time by turning . The maximum time is 95 minutes.
Step 3 Push START to begin the cooking process. LED will blink. "'' will stop blinking. The time will count down.
Step 4 If you push STOP/CLEAR/CLOCK the machine will stop working. If you push STOP/CLEAR/CLOCK again within 5 minutes; the machine will return to waiting mode. By pressing START within the 5 minutes the machine will continue working.
Step 5 If you push COMBINE the status and temperature will be displayed for several moments.
Step 6 By pushing START during the process; 30 seconds will be added on the clock.
Step 7 When the cooking is ready you will hear a beep 5 times and the machine will return to waiting mode.
Attention:
The maximum time for MICROWAVE, GRILL, DEFROST ON TIME, CONVECTION and COMBINE is 95 minutes.
- When the door of the machine is open, a light will be on, on the inside. When you leave the door open for more than 10 minutes, the light will turn off and the machine will go to waiting mode.
- When you open the door during the waiting or cooking process, the display will show the same thing. The START button won't work.
- When you close the door, the light will turn off automatically. You can change the settings and the START button will work again.
Faq
Question: When can I use the Grillrack?
Answer: When you're using the convection, grill and combine function, but not on the microwave function.
Question: What does the cardboard sign on the inside of the microwave do?
Answer: This sign makes sure the microwave radiation is divided properly and therefore it may NOT be removed.
Question: What's the difference between grill and convection?
Answer: When you use grill, the fan isn't on and the air isn't heated but only the food, so that you really grill the food. With convection mode, a quiet fan will heat the air so that the food is baked from all sides.
Question: I don't know how to prepare certain food in this microwave, how can I find out?
Answer: You can order a microwave guide with us with handy tips, or you can buy a microwave cooking book at a bookstore.
Question: Which function should I use for baking ovenbread and cakes?
Answer: You have to use the convection mode for this. But pay attention that this mode doesn't go higher then 200^ .
| Problem Possible cause Solution | ||
| The oven will not go on 1. The | plug isn't connected.2. The cutout fumarole or the circuit-breaker is on.3. There are problems with the power socket.. | Take out the plug and reconnect it after 10 secondsReplace or reset them( must be done by profes-sional personnel)Test the socket with other electronic machines. |
| The oven doesn't get hot 4. The | the door isn't closedproperly | Close the door properly. |
| The turning tray makes noise while the oven is on | 5. There is dirt on thebottom of the oven | Look at 'maintaining the microwave' to keep the machine clean. |
| The microwave influences the television signal. | It can happen that theconnection of your radio or television is not good when the microwave is on.This is similar to the jamming a small device like a mixer can make. | This is normal. |
| The light on the inside of the microwave isn't that bright anymore. | When there is not muchpower working on yourmachine, it can be that thelight is shining less bright. | This is normal. |
| Much steam is generated,this can come from between the door and hot air can come from the ventilation holes | When you're cooking; hotsteam can come out of theoven. Most of it will come through the ventilation holes,but it can also come frombetween the door. | Dit is normal. |
Technische Daten
| A1 REHEAT = warm up leftovers |
| A2 P OTATO = cooking potatoes |
| A3 V E G A T A B L E S = cooking vegetables |
| A4 P A S T A = cooking pasta |
| A5 M EAT = preparing meat |
| A6 F S H = preparing fish |
| A7 P Z Z A = preparing pizza |
| A8 B R E A D = preparing bread |
| A9 R O A S T C H I C K E N = grill chicken |
| Problem Possible cause Solution | ||
| The oven will not go on 1. The | plug isn't connected.2. The cutout fumarole or the circuit-breaker is on.3. There are problems with the power socket.. | Take out the plug and reconnect it after 10 secondsReplace or reset them( must be done by profes-sional personnel)Test the socket with other electronic machines. |
| The oven doesn't get hot 4. The | door isn't closedproperly | Close the door properly. |
| The turning tray makes noise while the oven is on | 5. There is dirt on thebottom of the oven | Look at 'maintaining the microwave' to keep the machine clean. |
| The microwave influences the television signal. | It can happen that theconnection of your radio or television is not good when the microwave is on.This is similar to the jamming a small device like a mixer can make. | This is normal. |
| The light on the inside of the microwave isn't that bright anymore. | When there is not muchpower working on yourmachine, it can be that thelight is shining less bright. | This is normal. |
| Much steam is generated,this can come from between the door and hot air can come from the ventilation holes | When you're cooking; hotsteam can come out of theoven. Most of it will come through the ventilation holes,but it can also come frombetween the door. | Dit is normal. |
Grill (Only for Grill series)