
Nizza - TV SEG - Free user manual and instructions
Find the device manual for free Nizza SEG in PDF.
| Product type | LED TV with built-in DVD player |
| Brand | SEG |
| Model | Nizza |
| Screen size | 21.5 inches (54.6 cm) |
| Resolution | 1920 x 1080 pixels (Full HD) |
| TV system | PAL B/G/D/K, I |
| Audio system | B/G/D/K, I |
| Audio power | 2 x 3 W |
| Power supply | 12 V === 4 A (power adapter included) |
| Power consumption | Less than 48 W (standby < 1 W) |
| Weight | 4.0 kg |
| Wall mount | VESA 100 x 100 mm (screws M4 x 8) |
| Video inputs | HDMI, SCART, VGA (PC), YPbPr, AV (composite), USB |
| Antenna input | 75 ohms (DVB-T/cable/satellite) |
| CI slot | CI+ (for conditional access modules) |
| DVD player | Built-in, compatible with PAL/NTSC (zone 2) |
| Remote control | Infrared, range 5 m, AAA batteries (2 x 1.5 V) |
| Main functions | DVB-T, digital cable, satellite (Astra 19.2E), EPG, parental control, hotel mode, USB multimedia (photo, music, video, text) |
| Care and cleaning | Soft, dry cloth; do not use solvents |
| Safety | Automatic shutdown if no signal (10 min) and after 4 hours of inactivity |
| General information | Manufacturer warranty 2 years (Switzerland); telephone support: 044 508 72 78 |
Frequently Asked Questions - Nizza SEG
User questions about Nizza SEG
0 question about this device. Answer the ones you know or ask your own.
Ask a new question about this device
Download the instructions for your TV in PDF format for free! Find your manual Nizza - SEG and take your electronic device back in hand. On this page are published all the documents necessary for the use of your device. Nizza by SEG.
USER MANUAL Nizza SEG
Operating Instructions
Mode d'emploi
Istruziose d'uso
Inhalt
natural_image
Diagram of a remote control unit showing battery, battery pack, and two battery cells with positive charges (no text or labels)text_image
COAX RF DVB_S2 CI_SLOT Headphone DVB-S-/DVB-S2-Signaltext_image
Screenshot of a remote control interface with labeled buttons and color-coded indicatorstext_image
There's a whole world of hotel possibilities out there that we but you never know suicad, with up to 50% off hand rolls and thousands of rooms, you'll find yourself assessed by all the electrictrips to create to cables to hotels to pay rooms to customers. And we'll never, over charge you a booking fee, whether you're going for business, pleasant, or just a desired night's sleep. Just look either or by phone, ensure the booking with a credit card and pay the total on deporters. Happy exploring!text_image
100mm 100mmservice@schmid-electronics.de
SAFETY INFORMATION ....3
Headphone Warning 4
Where to install....4
LED Screen 4
Unit and Accessories 5
Getting Started....5
Front view....5
Remote Control....6
Remote control instructions in TV mode....6
Remote control instructions in DTV/USB mode 7
Remote control instructions in TELETEXT mode 8
Installing Batteries in the Remote Control 9
Using the Remote Control....9
Aerial connection....9
Connecting the TV Antenna 9
Connecting external devices 9
HDMI Lead....9
SCART Lead 9
VGA Cable 9
CONNECTIONS 11
PC connection....11
VGA, HDMI PC Connection....11
Satellite connection....11
Connecting an audio system 12
Connecting a DVD player 13
HDMI Connection....13
SCART Connection....13
USB Connection....13
AV Connection 14
YPbPr Connection....14
Common Interface Slot....15
USING YOUR COMMON INTERFACE SLOT 15
Auto installation setup 15
Power On / Off the LED TV....15
TV SETTINGS Menu....16
Signal Source 16
Auto Scan 16
PROGRAMME EDIT 18
Signal Information....18
Cl Information 18
Power-Off-No-Signal-Down 18
Auto-Power-Down 18
Guide (EPG - Electronic Program Guide) 18
Favourite Lists....18
Dish Setup 18
Menu Settings 23
Picture menu....23
SOUND menu....24
EXTRAS menu....24
OPTIONS menu....24
LOCK menu....25
Multimedia Operation....27
Basic Operation....27
- Photo 28
- Music 28
- Movie 28
- Text 28
DVD Operation....29
General Setup 29
Audio Setup 29
Dolby Setup....30
Preference Setup 30
Disc Care 31
TROUBLE SHOOTING GUIDE....32
TECHNICAL SPECIFICATIONS ....32
TV Specifications 32
Wall Mounting 33
Waste Electrical Recycling 33
Correct disposal of Product....33
Introduction
Thank you for purchasing this LED TV which has been designed and manufactured to give you many years of trouble free service.
You may already be familiar with using a similar product but please take time to read these instructions which have been written to ensure you get the very best from your purchase.
HDMI
HDMI (High Definition Multimedia Interface) is the next generation of digital interface. Unlike conventional connections, it transmits uncompressed digital and audio signals using a single cable. This TV supports high-definition video input via the HDMI socket on the back of the TV.
Safety is important
To ensure your safety and the safety of others, please read the safety precautions BEFORE you operate this product.
Disclaimer
The illustrations of the LCD-TV, accessories and menus shown in this User's Manual may differ from the actual product.
SAFETY INFORMATION
IMPORTANT SAFETY INSTRUCTIONS - READ CAREFULLY BEFORE USE.
Take note of the following safety information which appears on the back of the TV.

CAUTION: TO PREVENT ELECTRICAL SHOCK, DO NOT REMOVE ANY COVER SCREWS, NO USER SERVICEABLE PARTS INSIDE, REFER SERVICING TO QUALIFIED SERVICE PERSONNEL.

This symbol indicates that there are important operating maintenance instructions in the literature accompanying this unit.
This symbol indicates that dangerous voltage constituting a risk of electric shock is present within this unit.
Keep these instructions
- Do not use this TV near water.
• Clean only with a slightly damp cloth. - Do not block any ventilation openings.
• Install in accordance with the supplied Quick Start Guide and this User Guide. - Protect the power chord from being walked on or pinched, particularly at plugs, and the point where it exits from the TV.
- Do not allow the power chord to overhang the edge of a table.
- Unplug this TV during lightening storms or when unused for long periods of time.

WARNING! TO REDUCE THE RISK OF FIRE OR ELECTRICAL SHOCK, DO NOT EXPOSE THIS TV TO RAIN OR MOISTURE. THE TV MUST NOT BE EXPOSED TO DRIPPING AND SPLASHING AND NO OBJECTS FILLED WITH LIQUIDS SHOULD BE PLACED ON THE TV.
NOTE: No naked flames such as candles should be placed on the TV.
NOTE: When displaying the same still picture for more than 2 hours without any interruption, the picture contours of the continuously displayed contents may remain visible on screen, i.e. a persistent image remains. The same applies, when displaying for more than 2 hours:
• the same background/wallpaper
• logos, video games, computer images, Teletext
- contents with a non-filling aspect ratio (e.g. 4:3 format)
These do not represent any malfunction and will not be covered by the manufacturer's warranty

This unit has been produced according to all current safety regulations. The following safety tips should safeguard users against careless use and the dangers connected with such use.
- Although this appliance has been carefully manufactured and rigorously checked prior leaving the factory, as with all electrical appliances it is possible for problems to develop. If you notice smoke, an excessive build up of heat or any other unexpected phenomena, you should disconnect the plug from the mains power socket immediately.
- Ensure that the unit is sufficiently ventilated! Never place next to or underneath curtains!
- The mains plug or appliance coupler is used as the disconnect device, the disconnect device shall remain readily operable.
- This set should only be connected to a mains power supply which matches that stated on the label on the rear of the TV - do not attempt to connect it to any other type of supply.
- The socket - outlet must be installed near the equipment and easily accessible.
- To prevent overload, don't share the same mains supply socket with too many other items of equipment.
- Apparatus with Class 1 construction shall be connected to a mains socket outlet with a protective earth connection.
- Keep away from rodents. Rodents enjoy biting into electric flexes.
- Always hold the plug when pulling out the plug from the mains supply socket. Do not pull on the flex, the flex can become overloaded and cause a short circuit.
- Set up the unit so that no one is able to trip over the flex.
- Do not place heavy items on the flex, which may damage it.
• Take note that the flex cannot be reached and pulled by young children, avoiding injury. - Do not set up the unit near to heat sources. The casing and the flex could be damaged by the impact of heat.
- The screen is made of plastic and can break if damage is done to it. Be careful when collecting sharp edged plastic splinters to avoid injury.
- Avoid placing the unit on any surfaces that may be subject to vibrations or shocks.
- To protect the unit during a thunderstorm unplug the AC power cable and disconnect the aerial. Caution: Do not touch the aerial (RF) connector.
- When you leave your home for long periods of time, unplug the AC power cable for safety reasons.
- The unit becomes warm when in operation. Do not place any covers or blankets on the unit in order to prevent overheating. The ventilation holes are not to be blocked. Do not set up near radiators. Do not place in direct sunshine. When placing on a shelf leave 5 cm (2") free space around the whole unit.
- Do not allow water or moisture to enter the TV. Do NOT use in wet or moist areas such as Bathrooms, steamy kitchens or near swimming pools.
- Do not use this unit when moisture condensation may occur
-
Any repairs must be carried out by qualified personnel only.
-
Do not open this unit. A non-expert attempting to repair the unit could be dangerous and potentially cause a fire hazard.
- Liquids spilt into the unit can cause serious damage. Switch the set OFF and disconnect the mains power supply, then consult a qualified service person before attempting to use the unit again.
- Do NOT remove the safety covers. There are no useable or serviceable parts inside. You may invalidate the warranty. Qualified personnel must only service this apparatus.
- Do NOT tap or shake the screen, you may damage the internal circuits. Take good care of the remote control, do not drop.
- Never place hot objects or open flame sources on or close to the TV.
• High temperatures can melt plastic and lead to fires. - To clean the TV use a soft dry cloth. Do NOT use solvents or petrol based fluids. For stubborn stains, you may use a damp cloth with dilute detergent.
Note 1: If you want to use your TV via a cigarette lighter adapter in your car, please use the supplied cable. Through the use of other cables, your device may be damaged.
Note 2: If your device works with an AC adapter, be sure to use only the power adapter that came with the product. Do not use damaged sockets. Make sure that the plug is completely inserted into the socket. A loose connector can cause fires due to arcing. Let faulty electrical parts be replaced by an electrician.
Note 3: Do not connect AC and DC voltage (12 V) simultaneously to the device. This will damage your device.
Headphone Warning

Loud music can damage your hearing irreversibly, therefore do not set the volume to a high level when listening through headphones, particularly for lengthy listening periods.
Where to install
Locate the television away from direct sunlight and strong lights, soft indirect lighting is recommended for comfortable viewing. Use curtains or blinds to prevent direct sunlight falling on the screen. Place the TV on a sturdy platform of which the surface should be flat and steady. This will prevent it from falling over. Make sure the television is located in a position where it cannot be pushed or hit by objects, as pressure will break or damage the screen, and so that small objects cannot be inserted into the ventilation slots or openings in the cabinet.
LED Screen
The LED display panels are manufactured using an extremely high level of precision technology, however sometimes some parts of the screen may be missing picture elements or have luminous spots. This is not a sign of malfunction.
Unit and Accessories
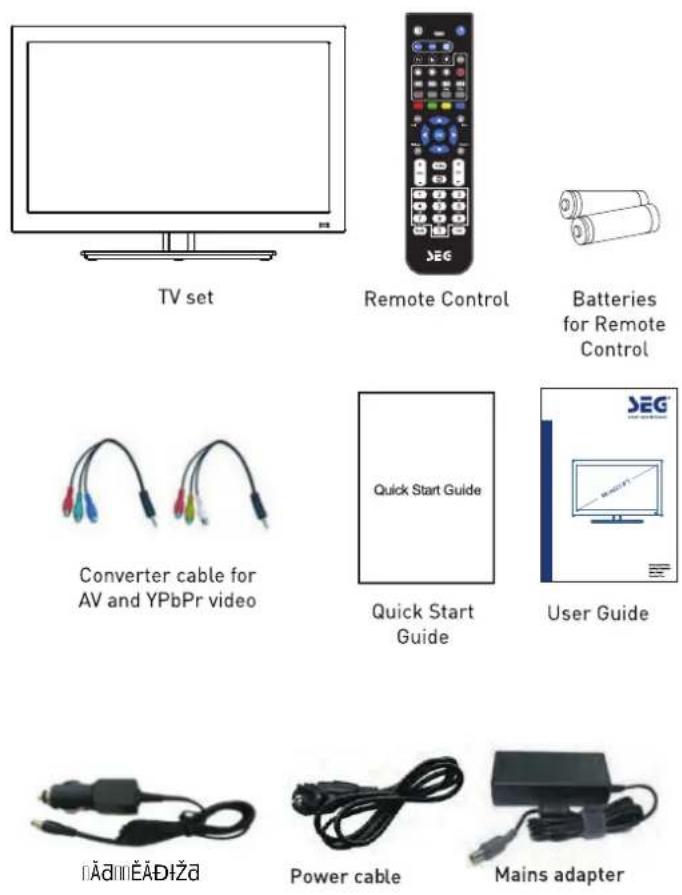
Packaging materials are no toys. Please keep away from children. Plastic bags can cause suffocation when pulled over the head.
Äd ÄD + Zd ÄY + dG Z E G E I Zd Äd ÄD Äd Äl ÄY Zd + ZA + s YD + z + 66E + qs
This Television is designed to work with any DTT Antenna, Analog or Digital cable or a fixed Satellite Dish aligned with Astra 19.2E and fitted with a universal LNB. Other Dishes and LNBs can be used but full set up is required. The Television is preset for the above fixed dish/LNB and when quickstart is used Astra 19.2E will be instantly tuned without need of a "search"
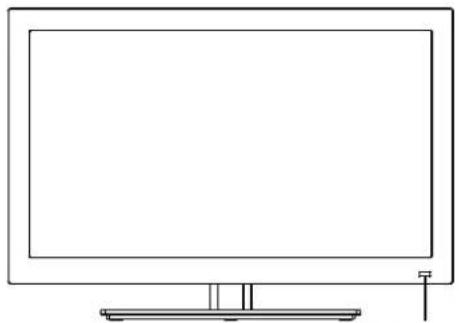
Getting Started
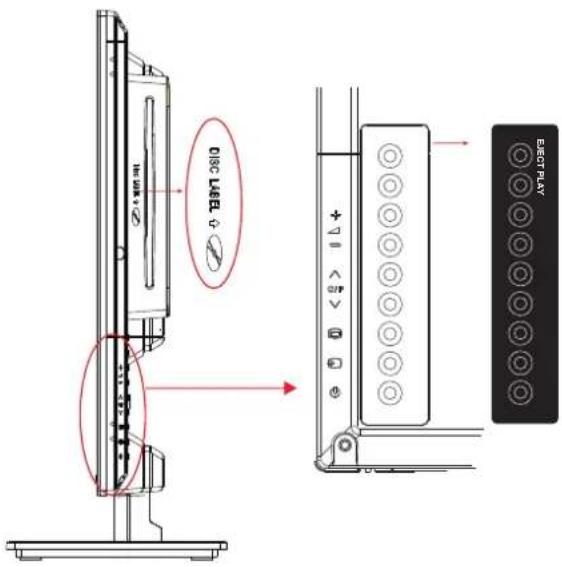
Front view
natural_image
Line drawing of a flat-screen monitor with a stand at the base (no text or symbols)LED Indicator
Remote Control Window (keep clear)

text_image
disc LUB + 10 ELECT RUB ELECT RUBNote about digital TV: Digital TV (DVB) is available only where digital terrestrial television (DVB-T) is broadcasted or where a compatible cable TV service (DVB-C) is provided. Please ask your dealer if you need further information about the local availability of these services. DVB-T is the standard for terrestrial digital TV and DVB-C designates the digital cable TV service. Despite this TV set conforms with all current DVB-T und DVB-C standards, we cannot guarantee compatibility with any future digital terrestrial DVB-T and DVB-C signals. Some cable TV providers charge additional fees and external hardware is required for their offer, and a subscription for the related services may be necessary. Some digital TV functions may be limited to specific regions and for DVB-C it is possible that the device will not perform as expected with certain providers. For more information, please do not hesitate to contact our Customer Service.
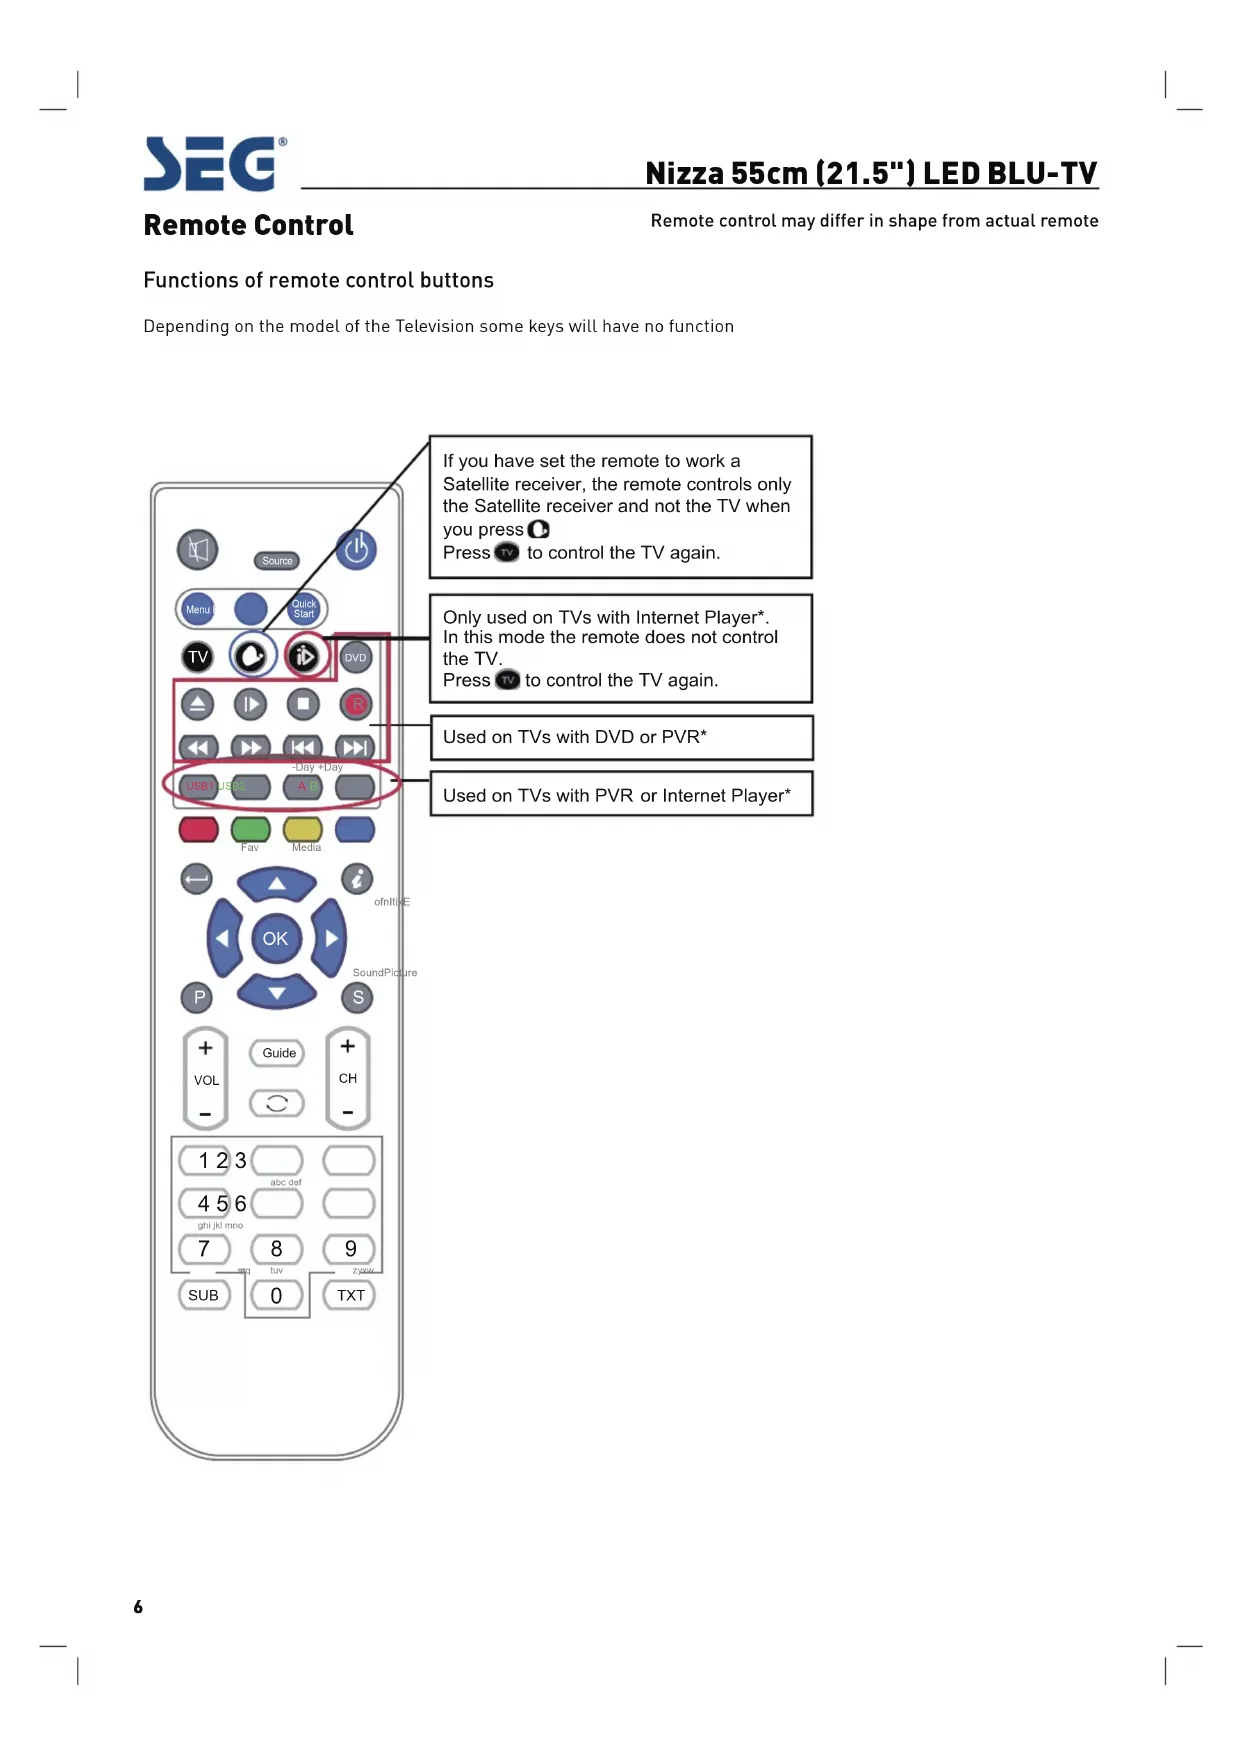
Remote Control
Remote control may differ in shape from actual remote
Functions of remote control buttons
Depending on the model of the Television some keys will have no function
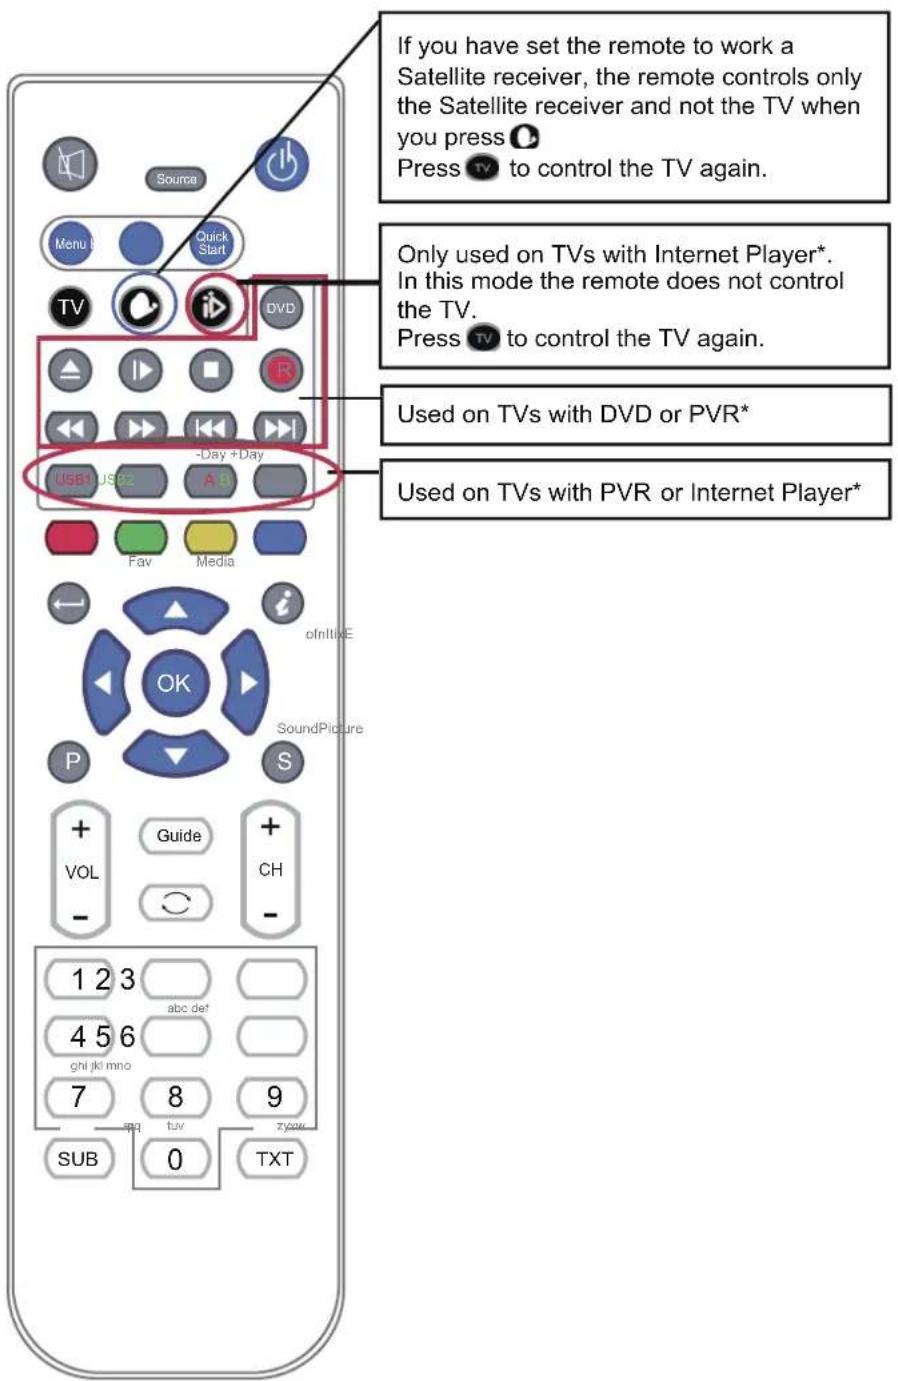
text_image
If you have set the remote to work a Satellite receiver, the remote controls only the Satellite receiver and not the TV when you press 🔒 Press tv to control the TV again. Only used on TVs with Internet Player*. In this mode the remote does not control the TV. Press tv to control the TV again. Used on TVs with DVD or PVR* Used on TVs with PVR or Internet Player*Remote control (continued)
Functions of remote control buttons
Depending on the model of the Television some keys will have no function
text_image
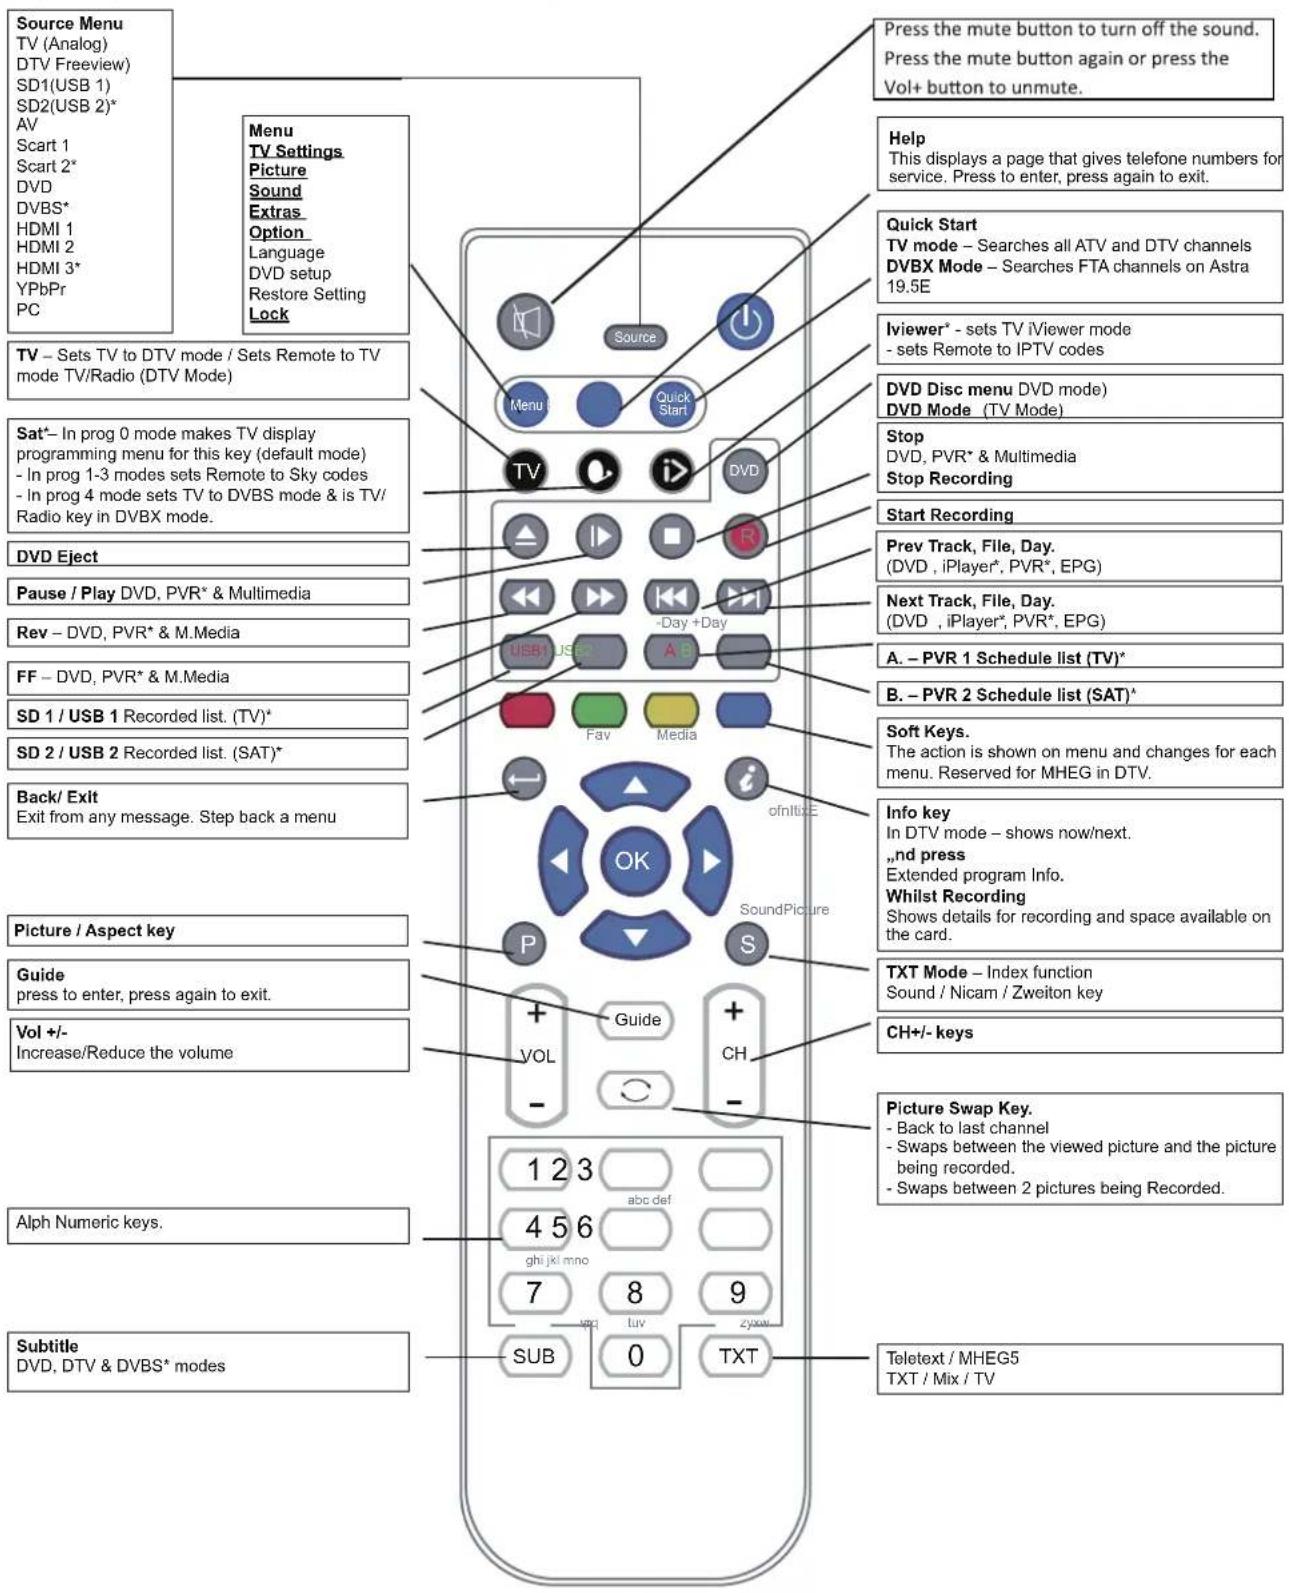
Source Menu TV (Analog) DTV Freeview) SD1(USB 1) SD2(USB 2)* AV Scart 1 Scart 2* DVD DVBS* HDMI 1 HDMI 2 HDMI 3* YPbPr PC Menu TV Settings Picture Sound Extras Option Language DVD setup Restore Setting Lock Press the mute button to turn off the sound. Press the mute button again or press the Vol+ button to unmute. Help This displays a page that gives telephone numbers for service. Press to enter, press again to exit. Quick Start TV mode - Searches all ATV and DTV channels DVBX Mode - Searches FTA channels on Astra 19.5E Iviewer* - sets TV Viewer mode - sets Remote to IPTV codes DVD Disc menu DVD mode) DVD Mode (TV Mode) Stop DVD, PVR* & Multimedia Stop Recording Start Recording Prev Track, File, Day. (DVD , iPlayer*, PVR*, EPG) Next Track, File, Day. (DVD , iPlayer*, PVR*, EPG) A. - PVR 1 Schedule list (TV)* B. - PVR 2 Schedule list (SAT)* Soft Keys. The action is shown on menu and changes for each menu. Reserved for MHEG in DTV. Info key In DTV mode - shows now/next. nd press Extended program Info. Whilst Recording Shows details for recording and space available on the card. TXT Mode - Index function Sound / Nicam / Zweiton key CH+/- keys Picture Swap Key. - Back to last channel - Swaps between the viewed picture and the picture being recorded. - Swaps between 2 pictures being Recorded. Alph Numeric keys. Subtitle DVD, DTV & DVBS* modes 1 2 3 abc def 4 5 6 ghi jkl mno 7 8 9 SUB 0 TXT Teletext / MHEG5 TXT / Mix / TVRemote control (continued)
text_image
Source Menu Quick Start TV DVD USB1 USB2 -Day+Day AB Fav Media ofInlueE OK SoundPicture P S + VOL - Guide + CH - 123 456 ghijklmno 7 8 9 gq tuv SUB 0 TXTDependant on the model of TV some keys will have no function
*Dependant on Model
This button puts the Remote in TV control mode
This button puts the Remote in a Multi Satellite control mode
* A number of modes are available. See below for details
This button puts the Remote into an Internet Player mode
* This is only used on some TVs and Digital Boxes
To Set the Multi-Satellite Mode button
The Sat button ⬆ is programmable in the remote and can be set as follows:
To set the button if you have no Satellite Receiver: Press ☐ and at the same time press 0.
If you have a Satellite Receiver with Recorder (Known as "Plus" type)
Press and at the same time press 1.
If you have a Satellite Receiver with High Definition (Known as "HD" type)
Press O and at the same time press 2.
If you have a normal Digital Satellite Receiver (Known as "Digital" type)
Press ① and at the same time press 3.
If you want to use this button to switch on the DVBS* Player*
Press ⬇ and at the same time press 4. *DVBS only fitted on certain models.
O + 0 NO SAT RECEIVER
O + 1 \~ SAT +
Q + 2 \~ SAT HD
+ 3 SAT DIGITAL
O + 4 \~ FTA DVBS
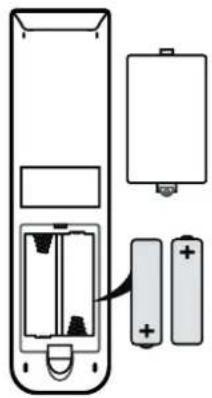
Installing Batteries in the Remote Control
- Remove the battery compartment cover at the rear of the remote control by pushing the retaining clip forward and pulling up.
- Install the supplied batteries, ensuring the polarity matches what is shown in the battery compartment.
- Replace the battery compartment cover.
natural_image
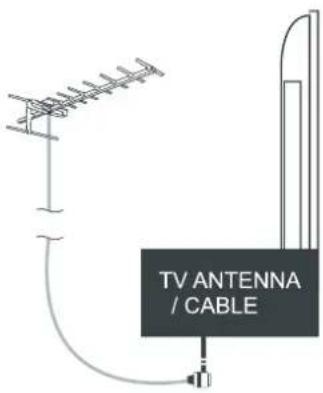
Diagram of a remote control unit showing battery, battery pack, and two charging cells (no text or labels)Aerial connection
WARNING! ENSURE THE TV AND ALL ANCILLARY EQUIPMENT IS UNPLUGGED FROM THE MAINS BEFORE MAKING ANY CONNECTIONS!
Connecting the TV Antenna
Connect the TV antenna to the aerial socket with a 75 ohm co-axial plug. For best results use a high gain TV aerial, preferably roof or loft mounted.
- To improve picture quality in a poor signal area, purchase and install a signal amplifier.
- If the antenna needs to be split for two TVs, use a 2-Way Signal Splitter (not supplied).
Using the Remote Control
To use the remote control point it at the TV and press the required buttons. You must be within 6 meters and at an angle of less than 30 degrees from the center of the TV.
NOTE: Sunshine or other strong light sources may interfere with the signal from the remote control. In this situation turn the TV away from the light source.

WARNING! DO NOT LEAVE BATTERIES IN THE REMOTE CONTROL FOR EXTENDED PERIODS AS THEY CAN LEAK OR CORRODE CAUSING DAMAGE TO THE REMOTE CONTROL. CHECK THEM PERIODICALLY AND REPLACE THEM AS REQUIRED.

WARNING! DO NOT MIX BATTERY TYPES. WHEN INSERTING BATTERIES, REPLACE ALL BATTERIES AT THE SAME TIME. DO NOT MIX OLD AND NEW BATTERIES.

WARNING! EXHAUSTED BATTERIES MUST BE TREATED WITH CARE AND DISPOSED OF ACCORDING TO ANY SAFETY OR RECYCLING REGULATIONS IN FORCE IN YOUR LOCAL AREA, NEVER DISPOSE OF BATTERIES INTO GENERAL WASTE, OR FIRE.

WARNING! NEVER EXPOSE BATTERIES TO EXCESSIVE HEAT SUCH AS SUNSHINE, FIRE OR THE LIKE.
text_image
TV ANTENNA / CABLEConnecting external devices
This instruction manual shows the simplest and most effective way of connecting your TV to ancillary equipment. Alternate methods are listed below.
HDMI Lead
You can connect this TV to a compatible device using a HDMI lead. This method will give the best picture.
Connect the cable from the HDMI equipment to the TV HDMI socket.
SCART Lead
You can connect this TV to a compatible device using a SCART lead. The connection uses component video signals, i.e. the red, green and blue (RGB) content of the video are sent on separate signals.
VGA Cable
You can use your TV as a monitor for your personal computer by using a VGA cable. Sound from your personal computer may also be played through the TV.

Connecting external devices (continued)
text_image
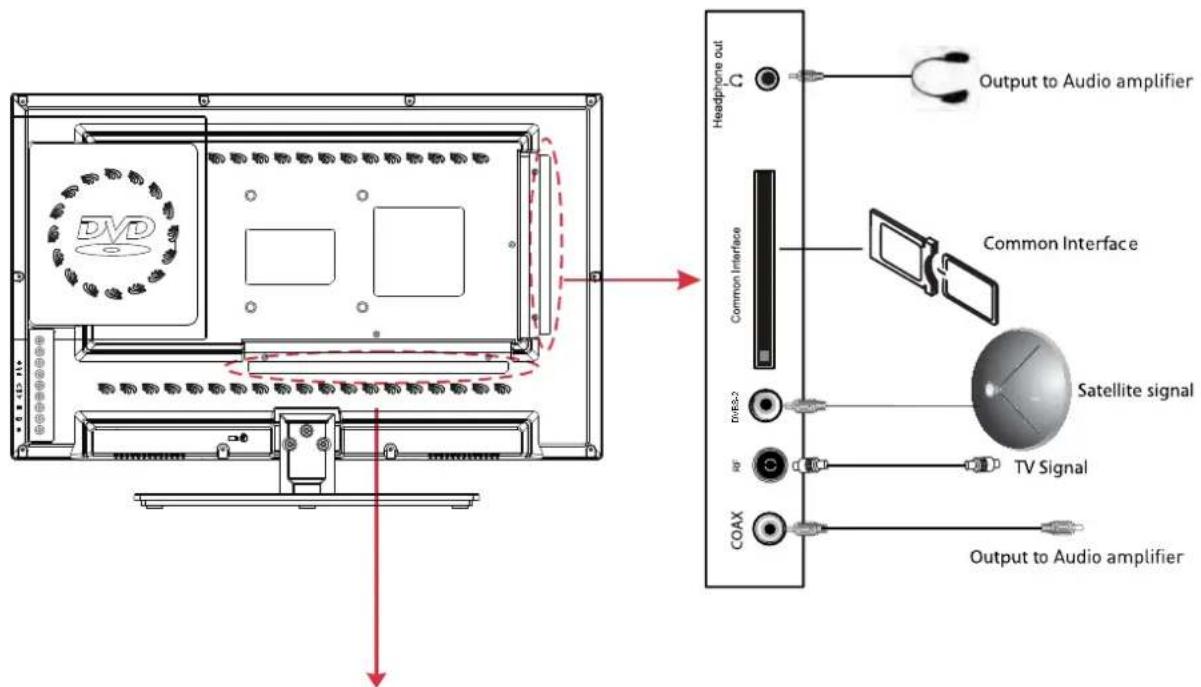
DVD Output to Audio amplifier Headphone out Common Interface Common Interface DVR63-2 Satellite signal TV Signal COAX Output to Audio amplifier
text_image
For Car Cable Only For AC Adaptor Only USB HDMI SCART PC-IN VGA VPhPs INV/INVM Car ) daptor USB device SCART PC Satellite Box or Blu-ray DVDConnecting external devices (continued)
CONNECTIONS
| Name Function Description | |
| &ždI ĀČAĐIŽaI ŽýLI&zdīDAdiAEADlZdīZYiLJ | ŽÝÝĞDÍHŽ ĐŽ‖Gá☐EZĐĐiLJ |
| HDMI | Connect to the HDMI output of your DVD or Satellite Box |
| SAT LNB Con- nection | Connect to Satellite signal |
| VGA (PC IN) | Connect to the PC VGA output to dis-play PC graphics |
| PC-IN PC Audio input | |
| Mini YpbPr | Connect to the YPbPr output on exter- nal devices |
| Mini AV | Connect to AV output on external devices |
| SCART | Connect to the SCART input / output of external devices |
| RF Connect to TV signal cable | |
| Head phone Connect Head phone | |
| CI / CI+ CI slot (Pay as you view card slot) | |
| Coax Output t | o audio amplifier |
| USB Media playback | |
Caution:
Beforeconnectingexternal devices:
- Makes sureto disconnect the appliances from the power supply in orderto avoid any potential damage from occurring.
• Make sureto establish the required connection. - Make sure that the connectors are properly and correctly attached beforeconnecting the appliance to the power supply.
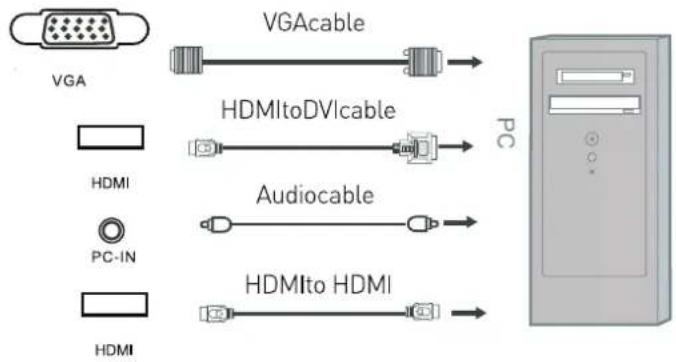
PC connection
As PCs are sometimes still supplied with a 'conventional' CRT monitor, you may need to adjust the display settings of your PCs graphicscard, otherwise the pictures may not appear correctly. Switch on your PC (still with your original monitor connected) now select the screen resolution, and select 60Hz refreshrate. Switch off your PC, then connect it to your TV while both appliances are still switched off.
VGA, HDMI PC Connection
Use a PC-VGA cable (not supplied) to connect the TV to your PC. You can also use an HDMI cable to connect to your PC (if your PC Graphic card supports HDMI). When the HDMI cable is used, the PC audio cable is no longer required. If you use the HDMI to DVI cable, you will need to use the PC audio cable. Connect all cables carefully and do not bend or break the connector pins.
When using the VGA cable
- Switch on the TV
- Switch on the PC
- Select PC/VGA as input source
When using the HDMI cable - Select HDMI as input source

flowchart
graph LR
    A[" VGA "] --> B[" VGAcable "]
    C[" HDMI "] --> D[" HDMItoDVlcable "]
    E[" PC-IN "] --> F[" Audiocable "]
    G[" HDMI "] --> H[" HDMIto HDMI "]
(All illustratedcables are not supplied)
Satellite connection
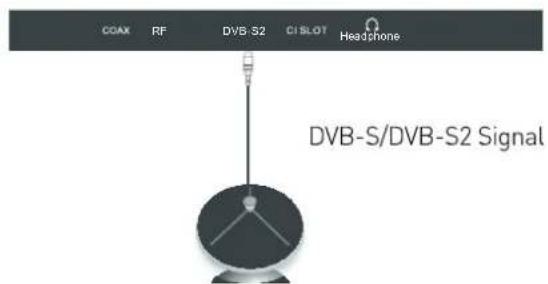
text_image
COAX RF DVB-S2 CI SLOT Headphone DVB-S/DVB-S2 SignalConnect the DVB-S/DVB-S2 signal to the SATELLITE LNB on the TV SET. Select the SATELLITE input source using the DVBS/DVBS2 button on the remotecontrol.
Note: If there is no DVBS(S2)reception, please check whether there is any problem (such as a short-circuit) on the F-type connector, on the LNB cable, the multi-switch etc. of your satellite antenna system. In this case, please disconnect the TV set from the antenna system. If necessary, consult a qualified technician to solve the problem.
Connecting Video camera and Video recorder
Video camera
- Connect the AV cable to the TV and to the video camera.
• Turn on both video camera and the TV. - Select AV/CVBS source
- You can now see the playback picture from the video camera. Note:
- To connect the video camera using other cables, refer to the video camera instruction manual.
Video recorder
- Connect the Scart cable to the TV and video recorder.
• Turn on both video recorder and the TV. - Select Scart source
- You can now see the playback picture from the video recorder.
Note:
To connect the video recorder using other cables, refer to the video recorder instruction manual.
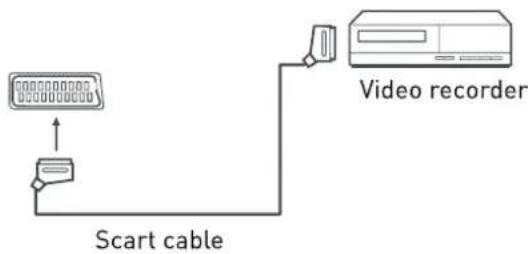
text_image
Scart cable Video recorder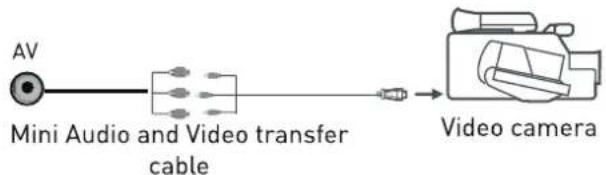
flowchart
graph LR
    A["AV"] --> B["Mini Audio and Video transfer cable"]
    B --> C["Video camera"]
(Mini AV cables are supplied)
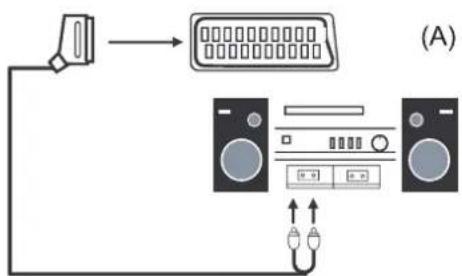
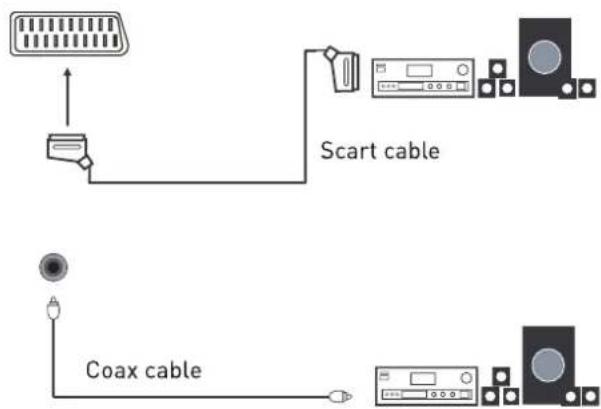
Connecting an audio system
You can supply the TV sound to the stereo system (A) with the Scart socket. Use a special Scart cable SCART to RCA. (Please consult your hi-fi instructions for details). If you have a surround sound amplifier/decoder (B) Use the Scart cable or the special Scart cable Scart to RCA.
flowchart
graph TD
    A["Input"] --> B["Laptop"]
    B --> C["Display Unit"]
    C --> D["Output"]
    style A fill:#f9f,stroke:#333
    style B fill:#ccf,stroke:#333
    style C fill:#cfc,stroke:#333
    style D fill:#fcc,stroke:#333
Scart to RCA cable
text_image
Scart cable Coax cable(All illustrated cables are not supplied)
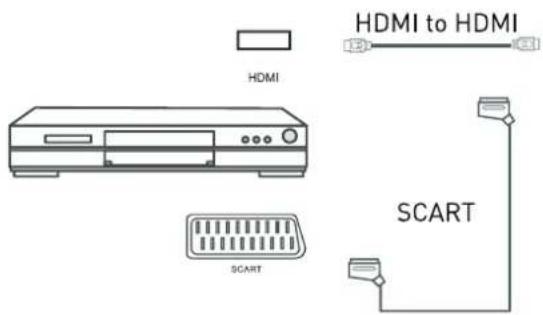
Connecting a DVD player
Connect a DVD player using either a SCART cable or the HDMI cable. (only if your external equipment supports HDMI).
text_image
HDMI HDMI to HDMI SCART SCART(All illustrated cables are not supplied)
When using the SCART cable
- Switch on the TV
- Switch on the DVD player
- Select SCART as input source
When using the HDMI cable
- Select HDMI as input source
HDMI Connection
TV Back
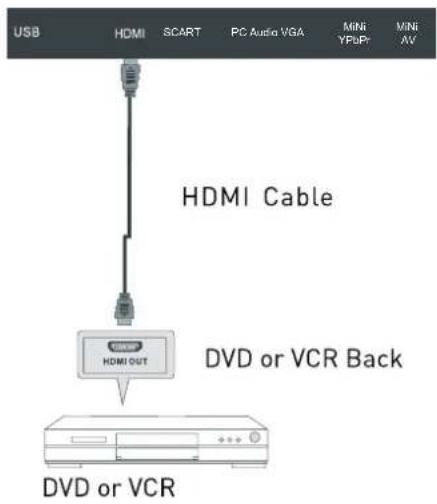
text_image
USB HDMI SCART PC Audio VGA Mini YPbPr Mini AV HDMI Cable HDMI OUT DVD or VCR Back DVD or VCRSCART Connection
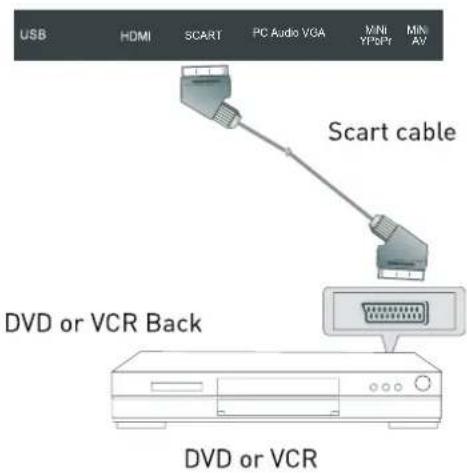
text_image
USB HDMI SCART PC Audio VGA MINI YF/DPt MINI AV Scart cable DVD or VCR Back DVD or VCRConnect the SCART connector to the external video item and the SCART connector on the TV. The SCART lead operates as an Input/Output connection. If the tv does not select the SCART input automatically, press the SOURCE button on the remote control and select the SCART signal source.
HDMI connection allows the user to transfer all audio/video/control signals through one cable only. These signals are transferred in digital.
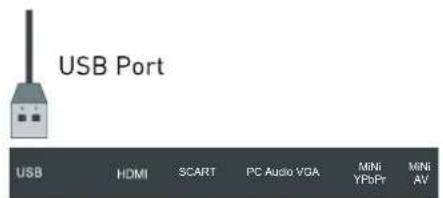
USB Connection
Put the USB flash drive in to the USB port, Select the USB channel source using the SOURCE button on the remote control. The maximum supported capacity of external storage devices (e.g. USB memory stick or USB hard disk) is 1TB. However, not all available storage media may be compatible.
text_image
USB Port USB HDMI SCART PC Audio VGA MINI YPbPr MINI AVTV Back

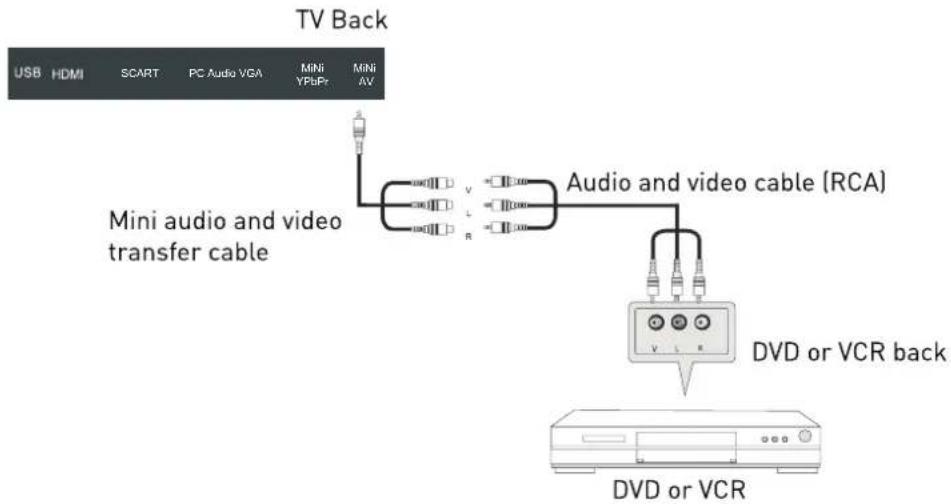
AV Connection
text_image
TV Back USB HDMI SCART PC Audio VGA MINI YPbPr MINI AV Mini audio and video transfer cable Audio and video cable (RCA) DVD or VCR back DVD or VCRConnect the VIDEO and AUDIO output jack of the DVD or VCR to the VIDEO jacks on the TV set using the supplied YPbPr converter cable and an RCA cable (not supplied). Match the jack colors: Video is yellow, Audio left is white, and Audio right is red. Press the SOURCE button on the remote control and select the AV input source.
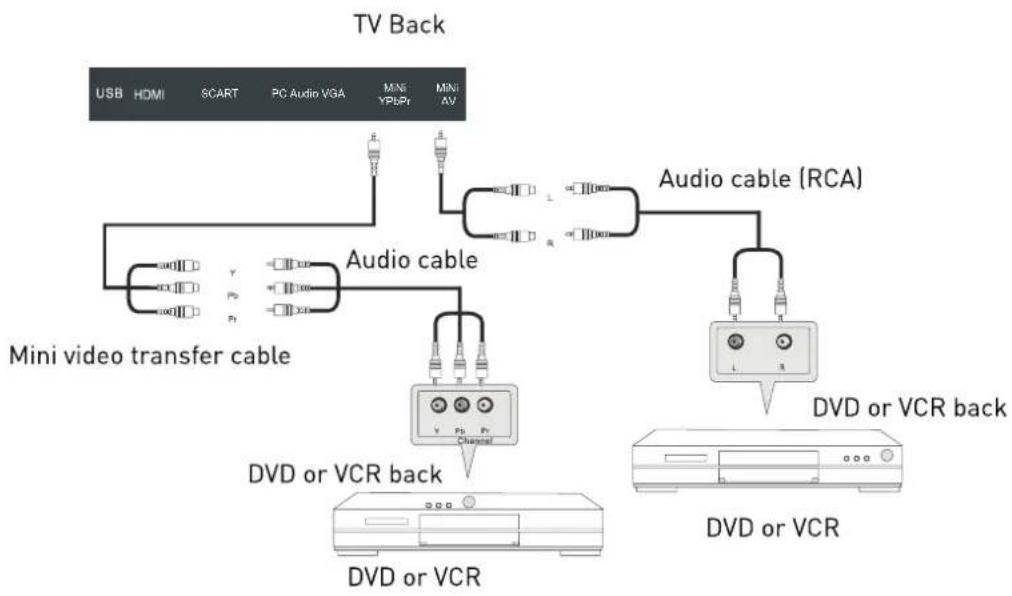
YPbPr Connection
flowchart
graph TD
    A["USB HDMI SCART PC Audio VGA MINI YPSPr MINI AV"] --> B["Audio cable"]
    B --> C["Mini video transfer cable"]
    C --> D["Audio cable (RCA)"]
    D --> E["DVD or VCR back"]
    E --> F["DVD or VCR"]
    G["Video/Video Switch"] --> H["Video/Video Switch"]
    I["Video/Video Switch"] --> J["Video/Video Switch"]
Connect the YPbPr output of the DVD or VCR to the YPbPr input on the TV set. Connect the Audio output of the DVD or VCR to the Audio input jacks on the TV set using two RCA cables together with the supplied converter cables. Match the jacks colors: Y is green, Pb is blue, Pr is red, Audio left is white, and Audio right is red. Press the SOURCE button on the remote control and select the YPbPr input source.
Common Interface Slot
USING YOUR COMMON INTERFACE SLOT
This TV set features a Cl+ slot and supports the following digital standards: DVB-T, DVB-S(S2) and DVB-C.
Common Interface
The Common Interface (Cl+) slot is designed to accept the Conditional Access Module (CAM) and Smart Card in order to view the pay TV programmes and additional services. Contact your Pay Per View TV service provider to get more information about the modules and subscriptions.
NOTE: Conditional Access Module and Smart Cards are sold separately.
WARNING! SWITCH OFF YOUR TV BEFORE ANY MODULE IS INSERTED INTO THE COMMON INTERFACE SLOT, THEN ADD THE SMART CARD TO THE CAM.

text_image
Cl+ Slot CAM Smart Card- Turn on the TV and ensure 'DTV' Source is selected.
- If the CAM is detected the TV will display the following message on the screen. "Common Interface Module inserted" wait for a few moments until the card is activated.
- Select the relevant digital Pay Per View channel.
- Detailed information on the Smart Card in use is displayed
- Press the Ok button to access the card menu. Refer to the Module Instruction Manual for setting details.
- When the module is removed, the following message will appear on the screen. "Common Interface module removed".
Auto installation setup
Power On / Off the LED TV
To turn on the LED TV
Press the power button on the LED TV or the POWER button on the remote control, the standby indicator will light green.
To turn off the LED TV
Press the power button on the LED TV or the POWER button on the remote control, the standby indicator will light red.
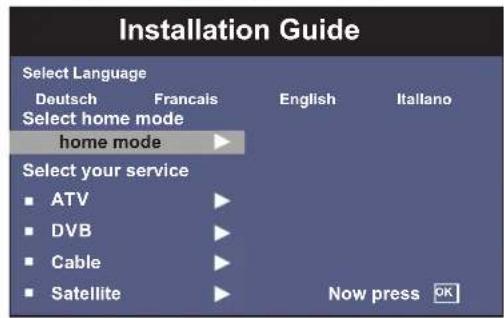
When you initially turn on the LED TV you will see the first time installation menu as below:
text_image
Installation Guide Select Language Deutsch Français English Itallano Select home mode home mode Select your service • ATV • DVB • Cable • Satellite Now press OKUse the left/Right keys to select your language use the up/down keys to select the type of service you want to install. You can only install one service at a time but you can return to this menu in order to install an additional service by pressing the Quick Start button.
ATV (Analogue Television) is used for Analogue Cable systems.
DVB (DTT - Digital Terrestrial Television, DVB-T) is used if you have an antenna receiving signals from a terrestrial transmitter.
Cable is used for Digital Cable systems (DVBC)
Satellite is preset for Astra 19.2E. You need a fixed dish with a universal LNB. To install any other satellites use the full satellite installation menu.
Press OK button and you will see the following menu.
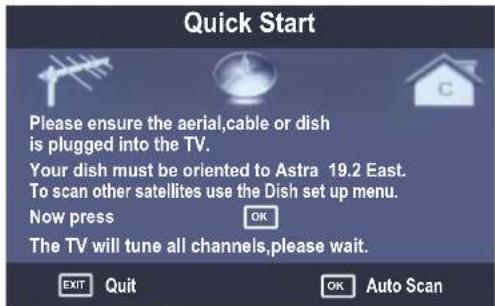
text_image
Quick Start Please ensure the aerial,cable or dish is plugged into the TV. Your dish must be oriented to Astra 19.2 East. To scan other satellites use the Dish set up menu. Now press OK The TV will tune all channels,please wait. EXIT Quit OK Auto ScanEnsure your aerial, cable or dish is plugged in to the TV and then press OK again.
The TV will start to install the service you have selected. This could take some time depending on your selected service.
You can tune an additional service at any time by pressing the Quick Start button.

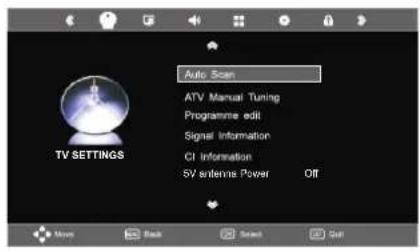
TV SETTINGS Menu
All options mentioned on the previous page can also be accessed through the Main Menu system in the TV Settings menu.
To access the correct service you need the TV to be in the correct mode, ATV, DVB, Cable or Satellite.
Select the desired signal source either from the handset or from the source menu.
Signal Source
Press the Source button on the remote control or the TV/AV button on your LED TV to select the signal source.
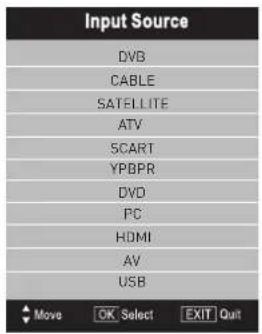
text_image
Input Source DVB CABLE SATELLITE ATV SCART YPBPR DVD PC HDMI AV USB Move OK Select EXIT Quit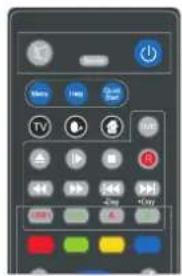
text_image
Digital TV control interface with buttons and display settingsPress the ▲▼ buttons to highlight the desired signal source. Press OK to select it.
After you have selected the desired operating mode, press the Menu button on the remote control to display the "TV Settings" menu.
When you are in the correct mode, press Menu button on the remote control and enter the TV Settings Menu
To select the TV mode directly from the remote control use the 3 mode keys
Press MENU button to display the main menu, use left/right buttons to select EINSTELLUNGEN menu, press OK or down button to enter the menu. Press MENU or up button to return to the main menu.
NOTE: TV SETTINGS can only be selected under the ATV/DVB/SATELLITE/CABLE modes, it is disabled whilst in all other modes.
ATV / CABLE SETTINGS
text_image
TV SETTINGS Auto Scan ATV Manual Tuning Programme edit Signal Information CI Information SV antennas Power OffDVB / DVB-T SETTINGS

text_image
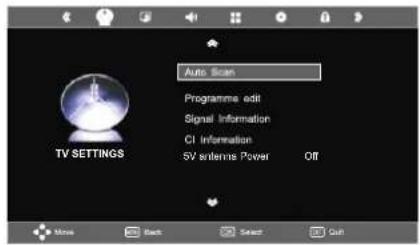
Auto Scan DTV Manual Tuning Programme edit Signal Information CI Information 5V entertainment Power Off TV SETTINGSSATELLITE / DISH SETTINGS
text_image
TV SETTINGS Auto Scan Programme edit Signal Information CI Information 5V antennas Power OffDIGITAL CABLE (DVBC) SETTINGS
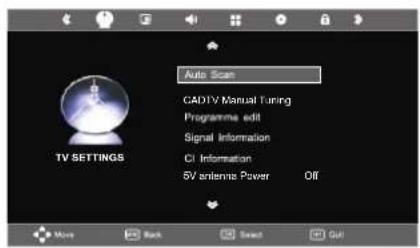
text_image
Auto Scan CAD/TV Manual Tuning Programme edit Signal Information CI Information 5V antenna Power Off TV SETTINGSAuto Scan
In the Auto Scan menu there are 3 options for you to select from: DVB Select type, Country and Tune Type.

text_image
Auto Scan DVB Select type County Tune Type AIR Germany ATV + DTV CABLE Scan Menu Scan type Frequency Network ID Symbol(ks/s) Full 770000 Auto Auto MOVE OK OK MENU EXITPress ◀/▶ to select DVB Select type, Country and Tune Type, press OK to start scanning.
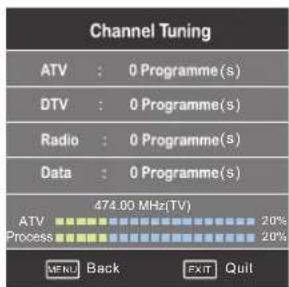
If you select ATV+DTV, the first 50% of the processing is for ATV tuning, while the second 50% represent DTV tuning. When ATV tuning, you can press MENU to Skip ATV tuning and start DTV tuning or press EXIT to exit tuning.
During the channel search a preview of the already-found channels is displayed.

text_image
Channel Tuning ATV : 0 Programme(s) DTV : 0 Programme(s) Radio : 0 Programme(s) Data : 0 Programme(s) 474.00 MHz(TV) ATV Process MENU Back EXIT QuitUnlike QUICKSTART the satellite search will search the whole satellite for channels and will not be instant.
Also the channels will appear in the order on the satellite and not the pre-set order.
text_image
Channel Tuning ATV : 0 Programme(s) DTV : 0 Programme(s) Radio : 0 Programme(s) Data : 0 Programme(s) 474.00 MHz(TV) ATV Process 20% 20% MFNL Back FXYT QuitAuto search replaces any previous searched channels with those of the new search. To add an extra satellite if you have a suitable Dish/LNB/Switch you must use the Dish Installation menu.
DTV (DVBT) Manual Tuning
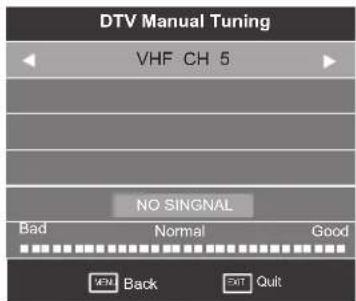
text_image
DTV Manual Tuning VHF CH 5 NO SINGNAL Bad Normal Good MENU Back EXIT QuitYou can manually tune DTV channels in the TV SETTINGS menu. Press the Left/Right arrow buttons to select the channel you wish to tune, then press OK button to scan for the channel.
CADTV (DVB-C) Manual Tuning
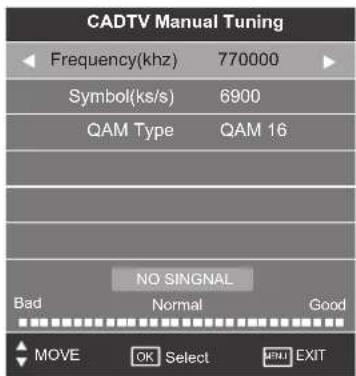
text_image
CADTV Manual Tuning Frequency(khz) 770000 Symbol(ks/s) 6900 QAM Type QAM 16 NO SINGNAL Bad Normal Good MOVE OK Select EXITYou can manually tune CADTV channels in the TV SET-TINGS menu.
Note: for more information about the channel parameters (frequency, symbol rate and QAM type), please check with your cable TV provider.
Frequency
Select Frequency using the ◀▶ buttons.
Symbol (ks/s)
Select the Symbol (ks/s) using the ◀▶ buttons.
QAM Type
Select the QAM Type using the ◀▶ buttons
ATV (analogue cable TV) Manual Tuning
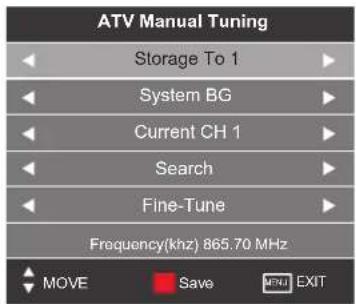
text_image
ATV Manual Tuning Storage To 1 System BG Current CH 1 Search Fine-Tune Frequency(khz) 865.70 MHz MOVE Save EXITYou can manually tune ATV channels in the TV SETTINGS menu.
Storage to
Press the ◀▶ buttons to change the numbered location of the found channel.
System
Select the system using the ◀▶ buttons.
Current CH
Displays the current channel number, press the buttons to choose the channel you wish to modify.
Search
Press the ◀▶ buttons to scan through the frequencies to find new channels.
Fine tune
In case of bad reception, you can press the ◀▶ buttons to make fine adjustments to the tuning. After manual tuning is complete, please press the RED button to save any found channels.

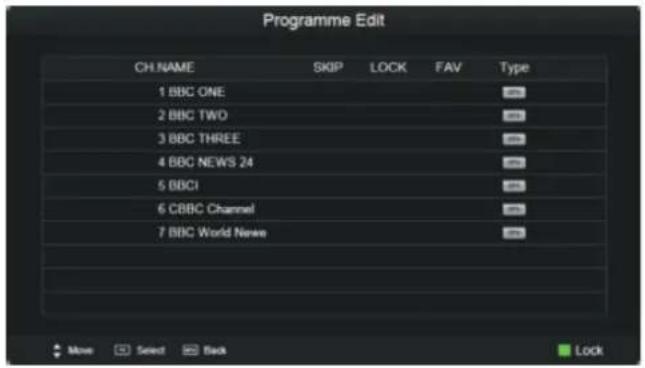
PROGRAMME EDIT
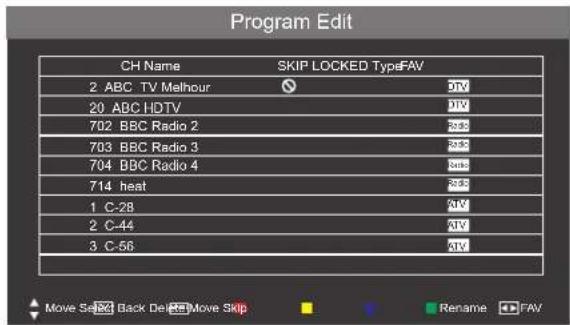
text_image
Program Edit CH Name SKIP LOCKED TypeFAV 2 ABC TV Malhour 0kV 20 ABC HDTV 0kV 702 BBC Radio 2 533 703 BBC Radio 3 533 704 BBC Radio 4 800 714 heat 533 1 C-28 0kV 2 C-44 0kV 3 C-56 0kVUse up/down keys to select program edit. Press OK or Right button to enter the menu. Use up/down buttons to navigate through the menu
Delete
Press the RED button to delete the highlighted channel, a red circle will appear next to the channel name.
Press the RED button again to confirm delete.
Press the MENU to return to the main menu.
Move
Press ▲▼ to select the channel, press yellow button to enter the move mode, then press ▲▼ to move the channel location, press yellow button again or press OK to confirm.
Press MENU to return to the main menu.
Skip
Press ▲▼ to select the channel you wish to skip.
Press the BLUE button, a logo will appear next to the channel name and the channel will be skipped when you scroll through the channels.
Press the BLUE button again on the highlighted channel to disable the skip function. Press MENU to return to the main menu.
Rename (Only available in ATV)
Modify current channel name.
Press the ◀▶ button to enter RENAME mode, then use the ▲▼◀▶ buttons to change name. Press the green button, the OK button or the menu button to confirm.
Signal Information
Only available in DTV mode, Signal Information includes: channel /network/modulation/quality /strength.
CI Information
When insert CI Module, display CI Information.
Note: The following reception types or reception combinations are possible: ATV, DVB-C, DVB-S(S2), DVB-T, ATV and DVB-C, ATV and DVB-S(S2), ATV and DVB-T. The simultaneous reception of DVB-C, DVB-S(S2) and DVB-T channels is not possible.
Power-Off-No-Signal-Down
If no valid input signal is detected, the TV set will toggle to standby mode automatically after approx. 10 minutes.
Auto-Power-Down
4 hours maximum after the last user interaction and/or the last channel switching, the TV set will automatically toggle from On to standby mode. Prior to this automatic toggling, a message will be displayed allowing you to extend the delay time for another 4 hours.
Guide (EPG - Electronic Program Guide)
Press the GUIDE button on the remote control to open the Electronic Program Guide. EPG contains a 7-day programme preview as long as the selected channel supports this function. If there is more information about a programme, press the M and m buttons to scroll through the pages. Please note that the maximum viewable number of characters is limited.
Favourite Lists
Select the desired channel and press the green (Fav) button to add it to the list of favourite channels. To remove a channel from the favourite list, select the desired channel and press the green (Fav) button. You can display your favourite list by pressing the green (Fav) button. You can create an own favourite list for each tuner module.
Dish Setup
- If you do not have a fixed dish aligned to Astra 19.2E fitted with universal LNB you will need to use this section.
- If you have a fixed Dish aligned to a different Satellite or with a different LNB you will need to use this section.
- If you have a motorised Dish with a DiSEqC rotator and wish to tune more than one satellite you will need this section.
- If you are on a DiSEqC switch system you will need this section.
The first 2 installations can be done by most people so long as you know what satellite your dish is aligned with and what type of LNB it is fitted with.
Installation of 3 & 4 require an experienced user or engineer.
To set a different Satellite or LNB
Select Satellite mode, press MENU key, navigate down to the Dish Setup option, press OK. You will see the Satellite Dish Setup menu.
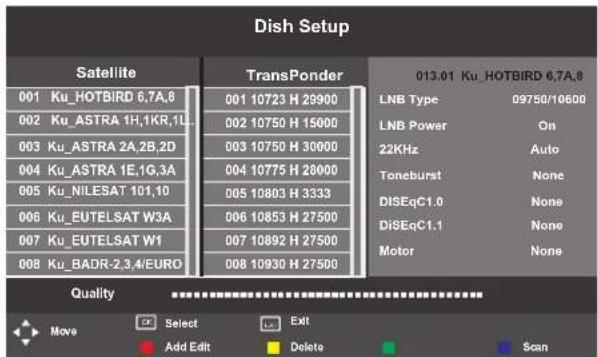
text_image
Dish Setup Satellite TransPonder 013.01 Ku_HOTBIRD 6,7A,8 001 Ku_HOTBIRD 6,7A,8 001 10723 H 29900 LNB Type 09750/10600 002 Ku_ASTRA 1H,1KR,1L 002 10750 H 15000 LNB Power On 003 Ku_ASTRA 2A,2B,2D 003 10750 H 30000 22KHz Auto 004 Ku_ASTRA 1E,1G,3A 004 10775 H 28000 Toneburst None 005 Ku_NILESAT 101,10 005 10803 H 3333 DISEqC1.0 None 006 Ku_EUTELSAT W3A 006 10853 H 27500 DISEqC1.1 None 007 Ku_EUTELSAT W1 007 10892 H 27500 Motor None 008 Ku_BADR-2,3,4/EURO 008 10930 H 27500 Quality Move Select Exit Add Edit Delete ScanTo set Multiple Satellites and LNBs (only possible on multi-LNB dish, switch systems)
Use ▲▼ buttons to select the satellite to which your dish is aligned. Press OK. An arrow will display against the chosen satellite.
Press ▶ button to navigate to LNB section of the menu. Select the LNB type and settings for your LNB.
Press the Exit button and the ◀ button to select the second satellite.
Use ▲▼ buttons to select the second satellite. Use ▲▼ keys to select the satellite to which your dish is aligned. Press OK. An arrow will display against the chosen satellite.
Press ▶ button to navigate to LNB section of the menu. Select the LNB type and settings for your second LNB and switch settings.
Press the Exit button and the ◀ button.
Press the blue Key twice to search the satellite channels.
A full description of the advanced Dish set up for multiple satellites using DiSEqC switches and DiSEqC positioner follows. This should only be attempted by experience users.
The Dish set up main menu page displays the main interface. The interface consists of Satellite List, Transponder list and Dish/LNB parameter list
Satellite List
The Satellite list displays the satellite names.
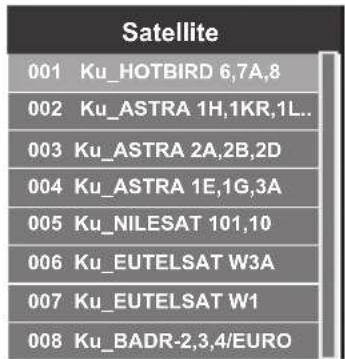
text_image
Satellite 001 Ku_HOTBIRD 6,7A,8 002 Ku_ASTRA 1H,1KR,1L.. 003 Ku_ASTRA 2A,2B,2D 004 Ku_ASTRA 1E,1G,3A 005 Ku_NILESAT 101,10 006 Ku_EUTELSAT W3A 007 Ku_EUTELSAT W1 008 Ku_BADR-2,3,4/EUROSatellite Edit
No. The current list number of the selected satellite Satellite name. The No. cannot be edited.
Satellite name: Press the green button to open the edit menu explained below.
| Edit | |
| NO. | 001 |
| Satellite Name | HOTBIRD 6,7A,8 ▷ |
| Longitude Direction | East |
| Longitude Angle | 013.0 |
| Band | Ku |
For editing via the on-screen keyboard, press the ▶ button.
In the input frame, use ▲▼◀▶ and OK button to select characters.
Input Frame (On-screen keyboard)
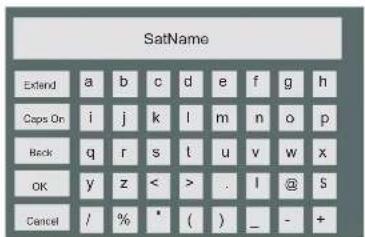
text_image
SatName Extend a b c d e f g h Caps On i j k l m n o p Back q r s t u v w x OK y z < > . l @ s Cancel / % * ( ) _ - +Extend: Extended characters
Caps On: Change character case. Press OK button to select.
Back: Delete letters, press OK to confirm.
OK: Sure to set the naming of the satellite, and return to Edit Menu
Cancel: Return directly back to edit menu.
Longitude Direction: Added to determine the location of the satellite. Use the ◀ arrow buttons to select West/East.
Longitude Angle: Input Longitude. By moving the cursor tu buttons to enter the satellite longitude.
Band: band selection. Press ◀▶ to select.

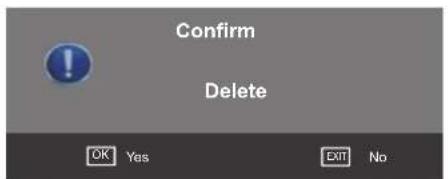
Delete Satellite menu
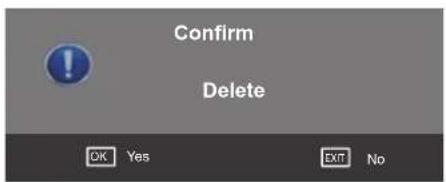
Press the YELLOW button, the confirmation menu will appear. Press OK to delete.
text_image
Confirm Delete OK Yes Exit NoAdd Satellite
Press the RED button to see the Add menu.
| Add | |
| NO. | 059 |
| Satellite Name | ASTRA 1H,1KR,1L.. ▷ |
| Longitude Direction | West |
| Longitude Angle | 019.2 |
NO: This is the list placing number. This number cannot be manually edited.
Adjust all settings and parameters according to the instructions of the previous section. Press OK to save or press EXIT o cancel.
A new position number will be assigned to the added satellite.
Transponder List
The list shows the transponders for the selected satellite.
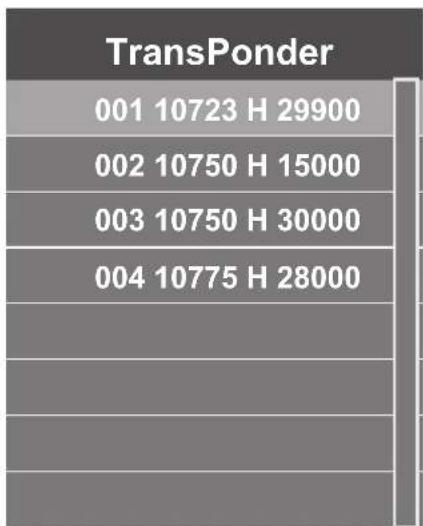
bar
TransPonder | Category | Value | |---|---| | 001 | 10723 H 29900 | | 002 | 10750 H 15000 | | 003 | 10750 H 30000 | | 004 | 10775 H 28000 |Edit Transponder menu
Press GREEN button to enter Transponder edit menu.
| Edit | |
| TransPonder | 001 |
| Frequency | 10723 |
| Symbol(ks/s) | 29900 |
| Polarity | H |
No. This is the list placing number. Nr. cannot be manually edited
Frequency: Set the downlink frequency.
Symbol (ks/s): Set the Symbol Rate.
Polarity: Set the polarity (horizontal or vertical).
Delete Transponder
Press the YELLOW button, the confirmation menu will appear. Press OK to delete.
text_image
Confirm Delete OK Yes Exit NoAdd Transponder
Press RED button to enter the add transponder menu.
| Add | |
| TransPonder | 001 |
| Frequency | 0000 |
| Symbol(ks/s) | 22000 |
| Polarity | H |
No. Can not be manually edited.
Frequency: Set the downlink frequency.
Symbol (ks/s): Set the Symbol Rate.
Polarity: Set the polarity (horizontal or vertical).
Dish Parameter description
Highlight the LNB Type, and use the ◀▶ buttons or Ok to enter submenu then you can set specific parameters.
| 013.01 Ku_HOTBIRD 6,7A,8 | |
| LNB Type | 09750/10600 |
| 9750/10600 | |
| 9750/10750 | |
| 05150 | |
| 05750 | |
| 09750 | |
| 10600 | |
| 10750 | |
| 013.01 Ku_HOTBIRD 6,7A,8 | |
| LNB Type | 09750/10600 |
| 11300 | |
| 11475 | |
| User Single | |
| User Dual | |
LNB Power: Polarization switching power supply, Press ◀▶ to select On/Off.
| 013.01 Ku_HOTBIRD 6,7A,8 | |
| LNB Type | 09750/10600 |
| LNB Power | On |
| 22KHz | Auto |
| Toneburst | None |
| DiSEqC1.0 | None |
| DiSEqC1.1 | None |
| Motor | None |
On: Allowed to receive Horizontal / Vertical Polarization program.
Off: out-off of supply.
22KHz: The level of the LO switch / DS switch ( Require the user to have installed 22KHzSatellite signal switch). Press ◀▶ to select Auto/On/Off.
| 013.01 Ku_HOTBIRD 6,7A,8 | |
| LNB Type | 09750/10600 |
| LNB Power | On |
| 22KHz | Auto |
| Toneburst | None |
| DiSEqC1.0 | None |
| DiSEqC1.1 | None |
| Motor | None |
Auto: Automatically issued 22 KHz pulse signal to control switching.
On/Off: Manual control switch.
Tone burst: Double Single Switch (Require users to install Tone burst switch), Press ◀▶ to select Burst A/Burst B/None.
Burst A/Burst B: Manually switch the satellite A/B.
DiSEqC1.0: 4 select 1 switch ( Require the user device support DiSEqC 1.0 protocol). Press ◀ to select LNB1/ LNB2/ LNB3/LNB4/None.
LNB1/LNB2/LNB3/LNB4: Corresponding to a satellite, After selecting the corresponding list will appear in the satellite list.

DiSEqC 1.1: 16 select 1 switch ( Require the user device support DiSEqC1 .0 protocol) Equipment needs support DiSEqC 1.1 protocol, Most control 16↑LNB. Press ◀ to select LNB1\~LBN16/None.
LNB 1-LNB 16: Corresponding to a satellite, After selecting the corresponding list will appear in the satellite list.
Motor: Control of multi-satellite polar (Require the user device support DiSEqC1.2 or DiSEqC1.3 protocol), Left and right buttons to select DiSEqC1.2/ DiSEqC1.3/None.
DiSEqC1.2: DiSEqC1.2 Protocol selection
DiSEqC1.3: DiSEqC1.3 Protocol selection
For Motor definite "DiSEqC1.2", Operating Instructions:
Press RED button to enter "Set Limit" menu.
Press OK button to enter Set Position menu.
Move Continue: Control of the east or the west continued to turn the polar axis to the desired position.
Move Step: Control of the east or west, at a fixed polar axis step rotation.
| Set Limit | ||
| Move Continue | ◀ | STOP ▷ |
| Move Step | STOP | |
| Set West Limit | ||
| Set East Limit | ||
| Goto Reference | ||
| Disable Limit | ||
Set West Limit: The current position is set to the maximum point of the west.
Set East Limit: The current position is set to the maximum point of the east.
Goto Reference: Back to the default values.
Disable Limit: Abolish the current limit set.
| Set Position | ||
| Move Auto | ◀ | STOP ▷ |
| Move Continue | STOP | |
| Move Step | STOP | |
| Store Position | ||
| Goto Position | ||
| Goto Reference | ||
Move Auto: East or west of Automatic Control continued to turn the polar axis to the desired position.
Move Continue: Manual control of the east or the west continued to turn the polar axis to the desired position.
Move Step: Control of the east or west, at a fixed polar axis step rotation.
Store Position: Save the current rotation angle of polar axis.
Goto Position: Control the polar angle automatically to the previously saved.
Goto Reference: Control the angle of polar axis automatically to the default. When Motor definite "DiSEqC1.3".
Press RED button to enter "Set Limit" and Motor Defined as "DiSEqC1.3" "Set Limit" menu same.
| 013.01 Ku_HOTBIRD 6,7A,8 | |
| LNB Type | 09750/10600 |
| LNB Power | On |
| 22KHz | Auto |
| Toneburst | None |
| DiSEqC1.0 | None |
| DiSEqC1.1 | None |
| Motor | DiSEqC1.3 |
Press GREEN button to enter Set Location menu.
| Set Location | ||
| Location | ◀ | Manual ▷ |
| Longitude Direction | East | |
| Longitude Angle | 000.0 | |
| Latitude Direction | North | |
| Latitude Angle | 000.0 | |
Location: Select the user area or similar areas, if the user is not in the system default settings when in these areas, can select Manual custom settings.
Longitude Direction: Select the user area in the east longitude or longitude.
Longitude Angle: Longitude angle. Select the user area in which the longitude, Enter the appropriate values to move the cursor.
Latitude Direction: Select the user area in the latitude or latitude.
Latitude Angle: Select the user latitude area, Enter the appropriate values to move the cursor.
Press OK button to enter Set Position menu.
| Set Position | ||
| Move Auto | ◀ | STOP ▷ |
| Move Continue | STOP | |
| Move Step | STOP | |
| Store Position | ||
| Goto Position | ||
| Goto Reference | ||
| Goto X | ||
Move Auto: East or west of Automatic Control continued to turn the polar axis to the desired position.
Move Continue: Manual control of the east or the west continued to turn the polar axis to the desired position.
Move Step: Control of the east or west, at a fixed polar axis step rotation.
Store Position: Save the current rotation angle of polar axis.
Goto Position: Control the polar angle automatically to the previously saved.
Goto Reference: Control the angle of polar axis automatically to the default.
GotoX: Area based on user input parameters, Automatically calculate the satellite over the area,
Control the polar axis rotation to the right place.
Scan Menu
When all the parameters after. Press BLUE button to Tuning the setup menu to enter.
| Channel Search | ||
| Scan Mode | ◀ | Default ▶ |
| Channel Type | ◀ | All ▶ |
| Service Type | ◀ | All ▶ |
| Polarization | ◀ | Auto ▶ |
Scan Mode: Scan from Default, Blind Scan and Network to select.
Default: Default search program.
Blind Scan: Searches all the programs for the LNB settings. (This is a long search but will find all channels including new Channels).
Network: Search the known channel frequencies for the selected LNB & Satellite settings at the time of manufacture. (This will be the quickest search).
Channel Type: FTA (Free to Air) or ALL (Free to Air and Pay Channels).
Service Type: DTV (DVB TV) or Radio (DVB Radio) or both DTV & Radio.
Polarization: The LNB polarization: H (horizontal), V (vertical) and AUTO depending on the LNB installation.
Menu Settings
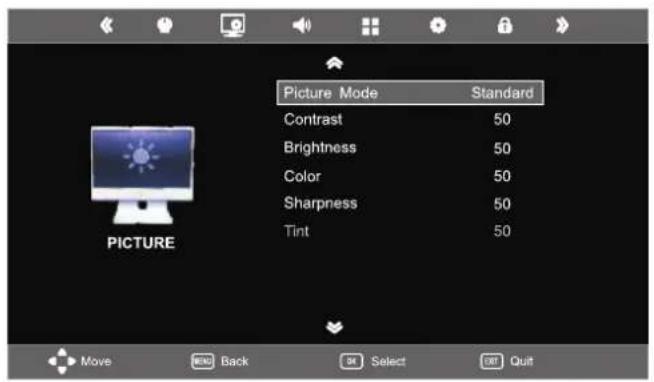
Picture menu
text_image
Picture Mode Standard Contrast 50 Brightness 50 Color 50 Sharpness 50 Tint 50 MOVE BACK Select Exit Quit
Picture Mode: Choose from Standard, Dynamic, User and Mild.
Note: Contrast, Brightness, Colour and sharpness are only available and can be adjusted in the User mode option in the Picture Mode Settings.
Contrast: Controls the difference between the brightest and darkest regions of the picture.
Brightness: Controls the overall brightness of the picture.
Colour: Control the colour.
Sharpness: Increase this setting to see crisp edges in the picture; decrease it for soft edges.
Tint: Controls the tint (NTSC mode only).
Colour Temperature: Choose from Medium, Cool, User and Warm.
Red: Controls the red colour of the picture.
Green: Controls the green colour of the picture.
Blue: Controls the blue colour of the picture.
Aspect Ratio: Choose from Auto, 4:3, 16:9, Zoom1, Zoom2, and Panorama.
Noise Reduction: Choose interference noise modes from Off, Low, Middle and High.
SOUND menu
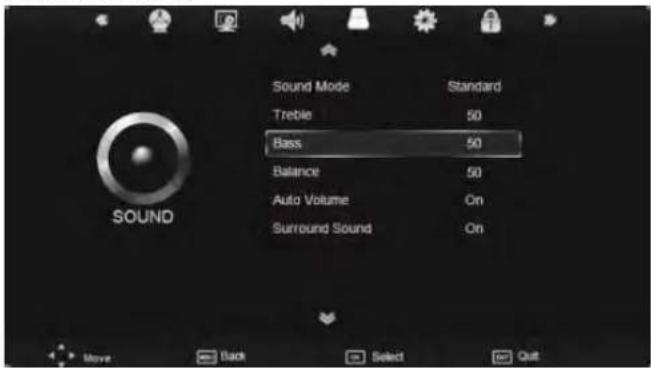
text_image
Sound Mode Treble Bass Balance Auto Volume Surround Sound Standard 50 50 50 On OnSound Mode: Allows you to select among: Standard, Music, Movie, Sports and User.
Treble (Can be adjusted when the sound mode is set to User): Controls the relative intensity of higher pitched sounds.
Bass (Can be adjusted when the sound mode is set to User): Controls the relative intensity of lower pitched sounds.
Balance: To adjust the balance of the left and right speakers audio output, or turn off the volume of the left or right speaker.
Auto Volume: This feature automatically adjusts the audio level when the TV is turned on. This function is activated by selecting "On".
Surround Sound: Turn on / off the surround sound function by selecting "On" or "Off".
EXTRAS menu
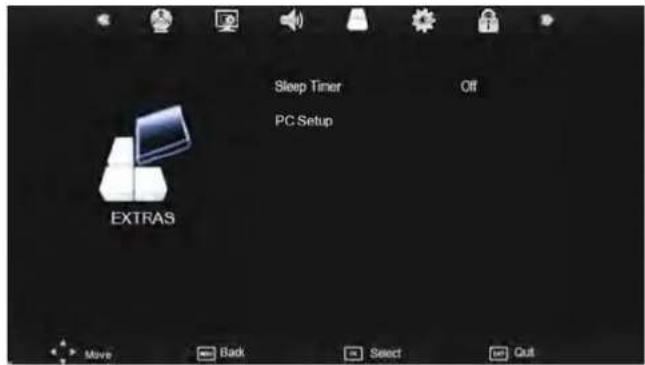
text_image
Sleep Timer Off PC Setup EXTRAS Move Back Select QuitüZÜDÄYZÄUJÖEGHİSĞDüZÜIÏZäödswZEĞ
Sleep Timer: Allows you to setup the sleep timer: 10min, 20min, 30min, 60min, 90min, 120min, 180min, 240min and off.
PC Setup (PC mode only): Press the OK button to enter the submenu to adjust the Horizontal / Vertical position or Size and Phase of the picture.
To select automatic installation use the up down buttons to highlight the option and press OK.
OPTIONS menu
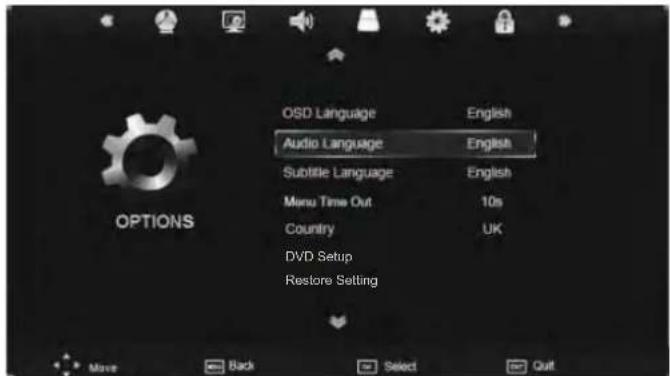
text_image
OSD Language Audio Language Subtitle Language Menu Time Out Country DVD Setup Restore Setting English English 10s UK Options Move Back Select QuitOSD Language: Allows you to select the on screen display menu language.
Audio Language (can only be selected in DTV mode): Select the audio language. The availability of this function depends on the tuned-in channel.
Subtitle Language (can only be selected in DTV mode): Select the subtitle language. The availability of this function depends on the tuned-in channel.
Menu Time Out: Allows you to setup the length of time that the on screen display is visible: 5s, 10s, 15s, 20s, 25s, 30s, 35s, 40s.
Country: This is defaulted to Germany, but can be changed by using the Auto tune function.
Restore Setting: Press the OK button to restore the factory default settings.
LOCK menu
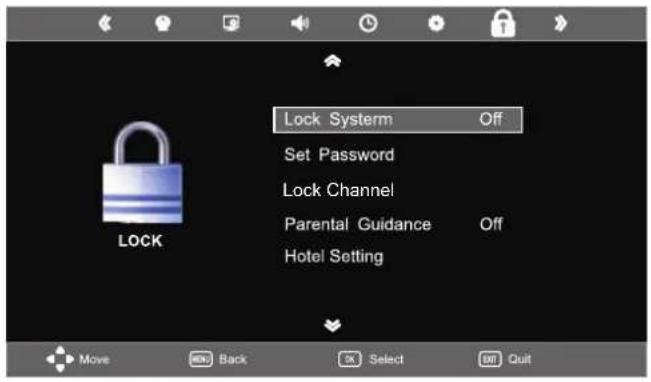
text_image
Lock System Off Set Password Lock Channel Parental Guidance Off Hotel Setting Move Back Select Exit QuitThe password must be entered to access the Lock Menu. The default password is 0000. Once inside the menu you can change the password to your own choice.
Set Password: If you had already changed the password, enter the current password.
Old Password: Enter the current password.
New Password: Enter the new password.
Confirm New Password: Enter the new password.
You can use the Channel Lock to lock selected channels. Press the ▲▼ buttons to select the desired channel and then press the GREEN button on the remote control to lock it. To unlock a previously locked channel, select the channel and press the GREEN button.
Note: In order to view locked channels, you have to enter your password.
Parental Guidance blocks programmes according to their parental level. This feature is available only for digital TV and the tuned-in channel must support it.
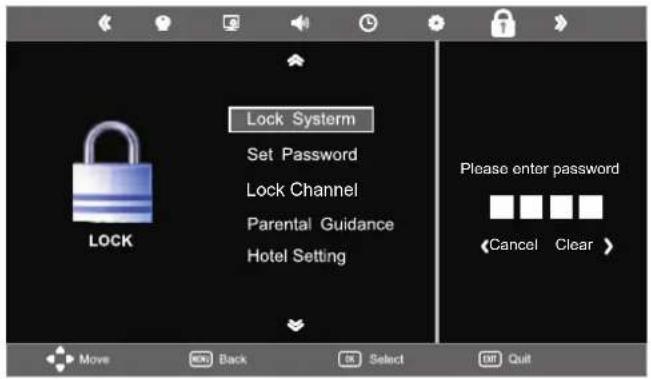
text_image
Lock System Set Password Lock Channel Parental Guidance Hotel Setting Please enter passwordLock System: Enables or disables the system lock. After selecting ON, the settings made under "Lock Channel", "Parental Guidance" and "Hotel Settings" will be enabled and applied.
text_image
Programme Edit CH NAME SKIP LOCK FAV Type 1 BBC ONE 2 BBC TWO 3 BBC THREE 4 BBC NEWS 24 5 BBCI 6 CBBC Channel 7 BBC World News More Select Back Lock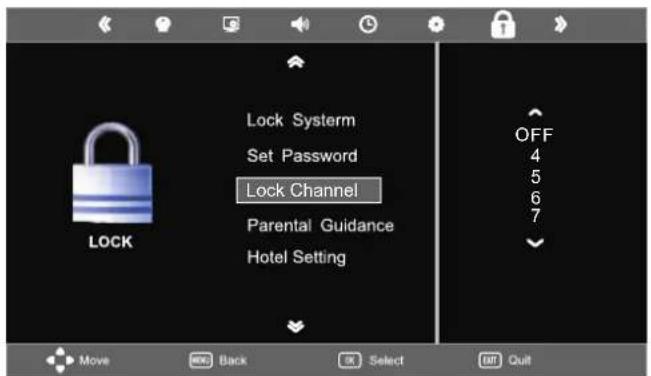
text_image
Lock System Set Password Lock Channel Parental Guidance Hotel Setting OFF 4 5 6 7 Move Back Select Exit QuitHotel Setting: Opens the "Hotel Setting" menu.

Hotel mode
| Hotel Setting | ||
| Hotel Lock | ||
| Lock Channel | ||
| Set Source | ||
| Picture Lock | ||
| Key Lock | ||
| Max Volume | ||
| Source Lock | ||
| Clear Lock | ||
| DataBase Export | ||
| DataBase Import | ||
| Quick Start Lock | ||
| Menu Lock | ||
| Move | Adjust | Exit Quit |
Restricts access to tuning menus, limitation of maximum volume setting. Locks picture and signal menus.
Hotel Lock: Press the ▲▼ buttons to select the "Hotel Lock" option and then press ▶ to choose between the options ON or OFF. After selecting ON, the following options except the "Clear Lock" option are available.
Lock Channel: Press the ▲▼ buttons to select the "Lock Channel" option and then press ▶ to choose between the options ON or OFF. After selecting ON, the TV settings options will not appear in main menu any more.
Set Source: Press the ▲▼ buttons to select the "Set Source" option and then press ▶ to choose a signal source or OFF. This function lets you set the signal source (DVB/Cable/Satellite/ATV/SCART/AV/YPBPR/PC/HDMI1/USB) to be used when powering on the unit. It will be used until you select a different signal source or disable this function (OFF).
Picture Lock: Press the ▲▼ buttons to select the "Picture Lock" option and then press ▶ to choose between the options ON or OFF. After selecting ON, the Picture menu options will not appear in main menu any more.
Key Lock: Press the ▲▼ buttons to select the "Key Lock" option and then press ▶ to choose between the options ON or OFF. After selecting ON, the front panel buttons TV/AV/ Menu/CH+/CH-/VOL+/VOL of the device will be locked.
Max. Volume: Press the ▲▼ buttons to select the "Max. Volume" option and then press ▶ to set the desired volume. Then the output volume will never exceed the set maximum value.
Source Lock: Press the ▲▼ buttons to select the "Source Lock" option and then press OK to enable the menu. Press the ▶ button to toggle between ON and OFF. All signal sources labelled ON will not be available any more in the signal source selection menu.
Clear Lock: Press the ▲▼ buttons to select the "Clear Lock" option and then press ▶ to enable it. All hotel settings will remain disabled until you enable the Hotel Lock again.
Database export and import: Allows Picture, Sound, Options, Lock and Hotel menus to be copied from one set to other sets, to make a group of sets all set up the same.
To export the settings to a file on a USB memory: Connect a USB memory stick to the USB1 port. Select "Database export". Press the ▶ button. When export is completed successfully "Export Success" is displayed.
To import the settings on another SEG Ešnjjä Insert the memory stick containing the file in USB1 of the new TV. Select "Database import". Press the ▶ button. When complete the TV will turn off. When turned on again it will have same settings as the first TV.
QuickStart Lock: Press the ▲▼ buttons to select the "QuickStart Lock" option and then press ▶ to choose between the options ON or OFF. After selecting ON, the QUICK START button on the remote control will be disabled.
Menu Lock: Press the ▲▼ buttons to select the "Menu Lock" option and then press ▶ to choose between the options ON or OFF. After selecting ON, all submenus except the "Lock" menu will not appear in main menu any more.
Multimedia Operation
Basic Operation
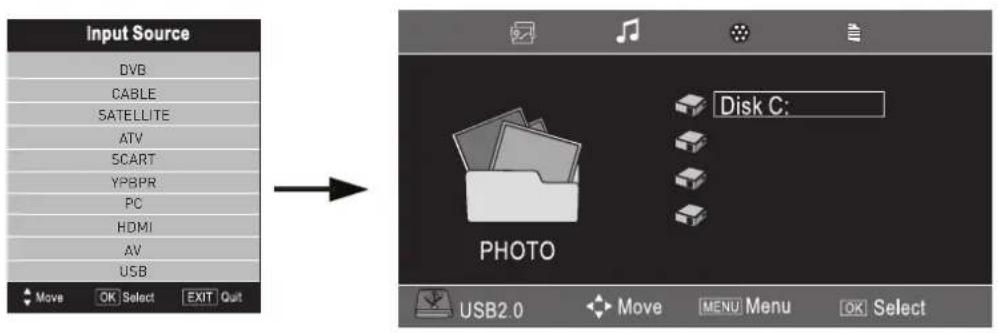
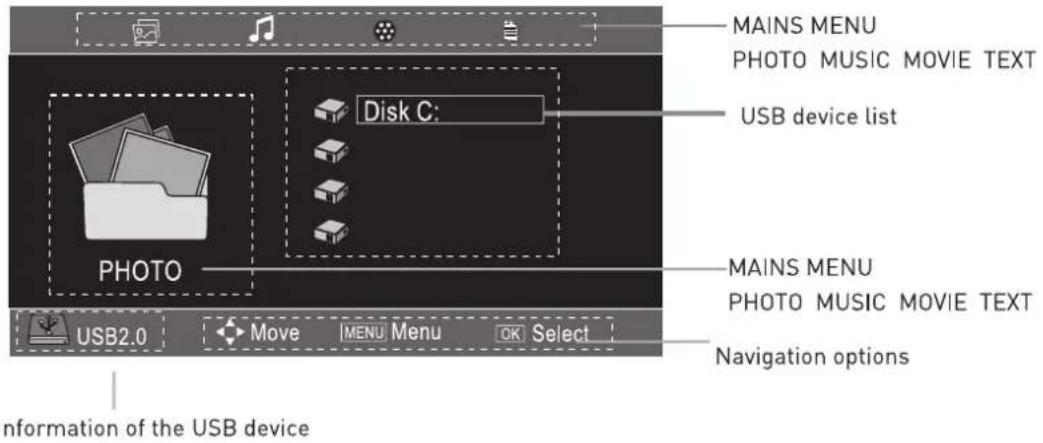
- Press the SOURCE button on the remote control to display the input source menu, select the USB source with the ▲▼ buttons and press the OK button to enter the Multimedia menu below.
text_image
Input Source DVB CABLE SATELLITE ATV SCART YPBPR PC HDMI AV USB Move OK Select EXIT Quit → Disk C: PHOTO USB2.0 Move MENU Menu OK Select
- Insert the USB device, the name of the device will be displayed on the screen.
text_image
MAINS MENU PHOTO MUSIC MOVIE TEXT USB device list DISK C: PHOTO MAINS MENU PHOTO MUSIC MOVIE TEXT USB2.0 Move |MENU Menu OK Select Navigation options information of the USB device3). Press ◀/▶ button to select the files on the USB device (PHOTO, MUSIC, MOVIE, TEXT) to view or play.
text_image
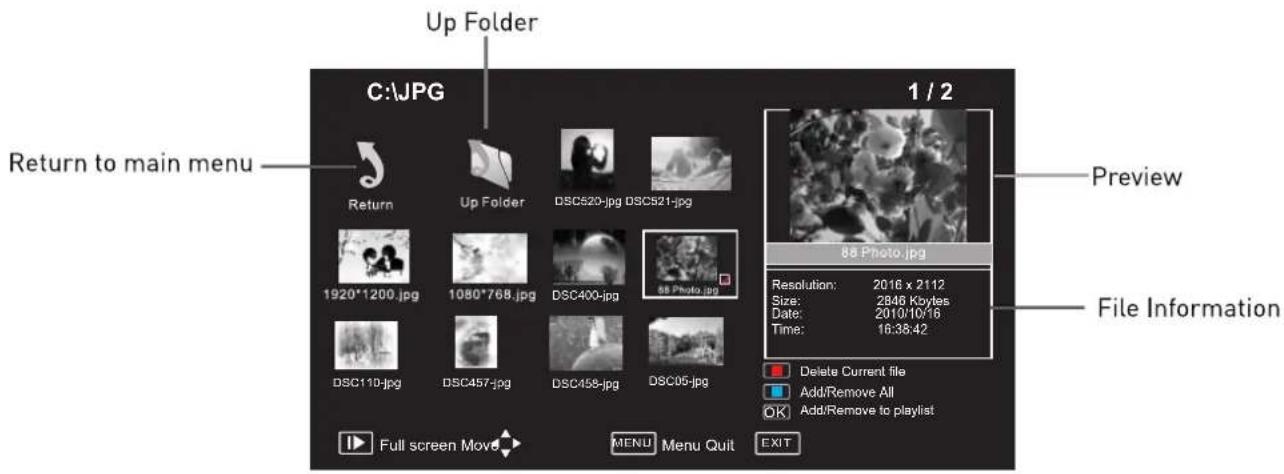
Up Folder C:\JPG 1 / 2 Preview Return to main menu Return Up Folder DSC520-jpg DSC521-jpg 1920*1200.jpg 1080*768.jpg DSC400-jpg 88 Photo.jpg DSC110-jpg DSC457-jpg DSC458-jpg DSC06-jpg 88 Photo.jpg Resolution: 2016 x 2112 Size: 2846 Kbytes Date: 2010/10/16 Time: 16:38:42 File Information Delete Current file Add/Remove All Add/Remove to playlist Full screen Move MENU Menu Quit EXITPress ▲/▼/◄/► buttons to select and the OK button to activate the file or open folder. Press ▶ button to play the files in full screen mode. When in full screen mode press the OK button to show the navigation option menu on the bottom of the screen or press ■ stop button to return to files.
1. Photo
Photo viewing
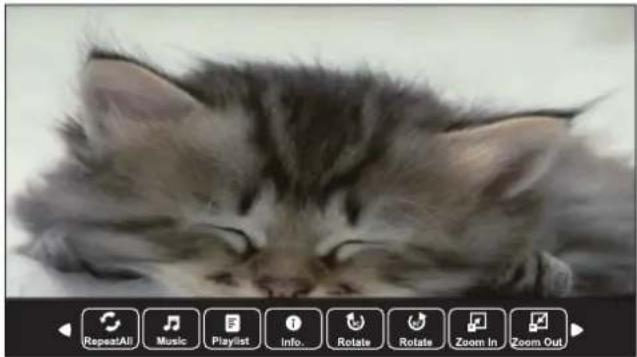
natural_image
Close-up of a fluffy kitten resting on a surface, with no visible text or symbols in the image itself.Press ◀/▶ buttons to select the option on the menu, and press the OK button to activate.
Repeat: Select the repeat mode from Repeat All, Repeat 1, Repeat None.
Music: Play/Pause the background music of your choice.
Playlist: Display the playlist on the screen and select the photo of your choice.
Info: Display the information of the file.
Rotate: Rotate the photo clockwise/counterclockwise.
Zoom In/Out: Zoom In/Out of your photos.
Move View: Move the photo in Zoom out mode.
2. Music
Listen to music
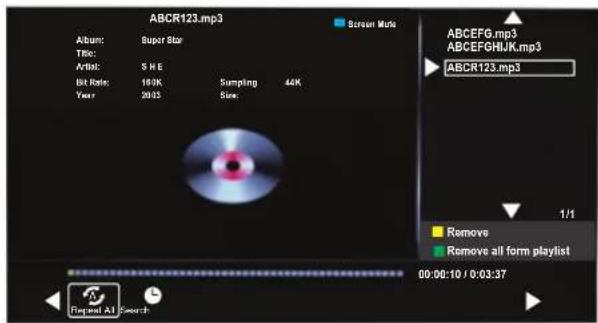
text_image
ABCR123.mp3 Album: Super Star Title: S H E Artist: 5 K Bit Rate: 10K Sampling 44K Year: 2005 Size: Screen Marks ABCEFG.mp3 ABCEFGHIJK.mp3 ABCR123.mp3 1/1 Remove Remove all form playlist 00:00:10 / 0:03:37 Repeat AI SearchPress ◀/▶ buttons to select the option on the menu, and press the OK button to activate.
Press ▲/▼ buttons to select the music, and press the OK button to play.
Repeat: Select the repeat mode from Repeat All, Repeat 1, Repeat None.
Search: Program the music to play from the time you set.
Press the OK button to display the time table, and select the position with the ▲▼◀▶ buttons, set the time using the numeral buttons on the remote, select "OK" and press the OK button to search.
Screen Saver: Press the BLUE button to enter the Screen Saver mode, press any button to exit.
3. Movie
Watch a film
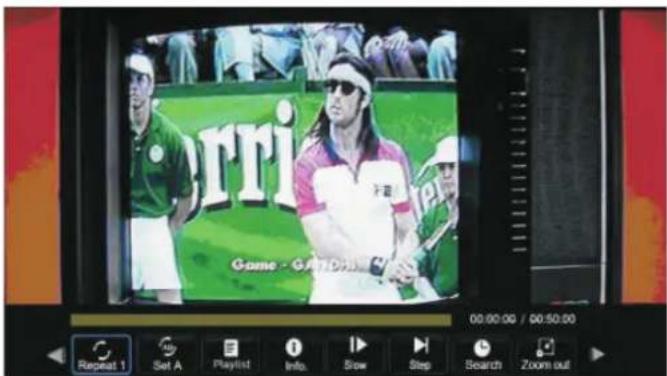
text_image
Gucci Game - G/ATDA 00:00:00 / 00:50:00 Repeat 1 Set A Playlist Info Slow Step Search Zoom outPress ◀/▶ buttons to select the option on the menu, and press OK button to activate.
Repeat: Select the repeat mode from Repeat All, Repeat 1, Repeat None.
Set A-B: Select and play the preferable part of the file by setting A and B at the beginning and end. Press OK button to cancel.
Playlist: Display the playlist on the screen.
Info: Display the information of the movie file.
Slow: Play the movies at slow speed, press T button to cancel and resume at normal speed.
Step: Step quickly through the movie by using this option
Search: Program the movie form the time you set.
Zoom In/Out: Zoom In/Out of the movie screen.
Aspect Ratio: Select the aspect ratio of the on screen display.
Move View: Moves the enlarged picture area.
4. Text
View text files
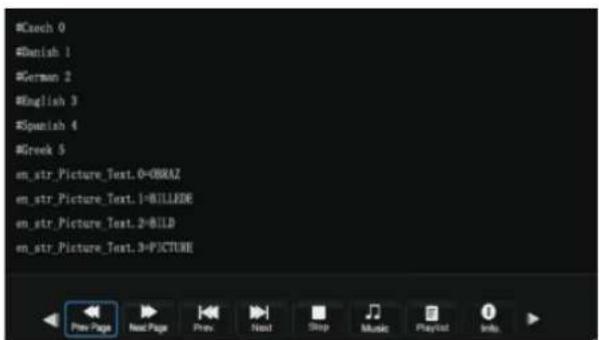
text_image
#Csech 0 #Danish 1 #German 2 #English 3 #Spanish 4 #Greek 5 en_str_Picture_Test.0=OBRAZ en_str_Picture.Text.1=KILLEDE en_str_Picture_Test.2=BILD en_str_Picture_Test.3=PICTURE Pren Page Next Page Prev Next Stop Music Playset InfoPress ◀/▶ buttons to select the option on the menu, and press the OK button to activate.
Prev/Next page: Turn to previous/next page of the text.
Prev./Next: Turn to previous/next file.
Stop: Stop auto turning pages.
Music: Play/pause the background music of your choice.
Playlist: Display the playlist on the screen.
Info: Display the information of the text file.
DVD Operation
Basic Operation
Press the Power button on the TV or the remote control, and select "DVD" source by the TV/AV(SOURCE). If there is no disc in the DVD player the screen will show "NO DISC". Insert Disc according to picture next to disc slot. Do not touch the playing surface.
Hold the disc around the outside with your fingers and place the disc into the slot The player will automatically draw the disc into the player
To "Eject" the disc, press the EJECT button on the TV or the "▲" button on the remote control.
DVD Setup MENU
- DVD Setup is a menu to enable the user to configure the DVD settings.
Enter the DVD Setup menu
Press the Menu button on the remote control and select the OPTIONS MENU. Scroll down and select DVD Setup. When in the DVD setup menu use the ◀▶button to navigate along the top of the menu and the ▲▼ to scroll up and down the menus.
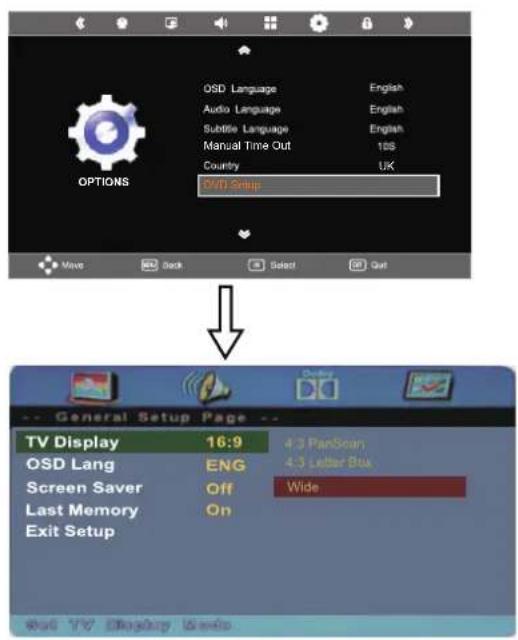
text_image
OSD Language Audio Language Subtitle Language Manual Time Out Country OIS Setup Options Moss Back Select Out General Setup Page TV Display 16:9 4.3 PanScan OSD Lang ENG 4.3 Letter Box Screen Saver Off Wide Last Memory On Exit Setup Out TV Display EventsExit the DVD Setup menu
In the General setup page options scroll down to Exit setup and press OK.
General Setup
TV Display
4:3 Pan Scan
This is selected when the DVD player is connected to a normal TV. Wide-screen images are shown on the screen, but with some parts cut automatically.
4:3 Letter Box
This is selected when the player is connected to a normal TV. Wide-screen images are shown on the screen, with black belt on the top and bottom.
Wide
This is selected when the player is connected to a wide-screen TV.
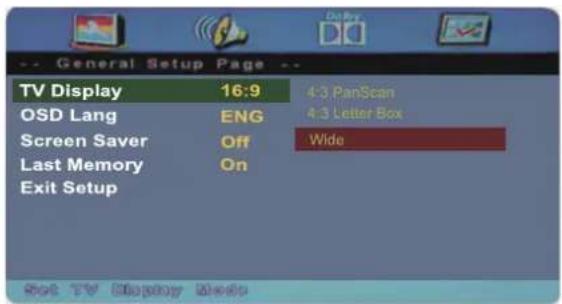
text_image
General Setup Page -- TV Display 16:9 4:3 PanScan OSD Lang ENG 4:3 Letter Box Screen Saver Off Wide Last Memory On Exit Setup Hot TV Display ModeOSD Language
This is used to select the OSD language
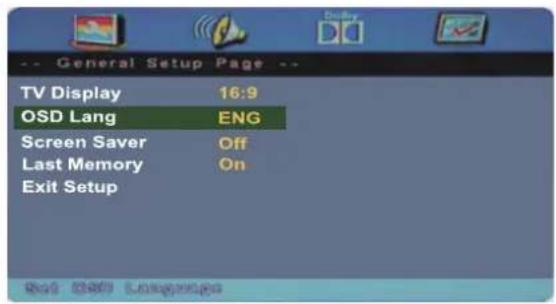
text_image
General Setup Page -- TV Display 16:9 OSD Lang ENG Screen Saver Off Last Memory On Exit Setup Ret OSD LanguageScreen Saver
Start the screen saver, the screen saver image will appear when the player stops or the picture is paused for a few minutes. This saver can keep the screen from being damaged.
- On(Start the screen saver)
- Off (Turn off the screen saver)
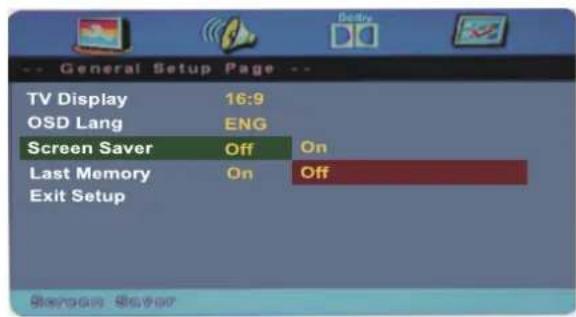
text_image
General Setup Page -- TV Display 16:9 OSD Lang ENG Screen Saver Off On Last Memory On Off Exit Setup Screen SaverLast Memory
This is setting enables you to watch the DVD from the last point it was turned off, (for example changing the source to watch TV)
• ON(Activate the last memory function)
• OFF(Deactivate the last memory function)

text_image
General Setup Page TV Display 16:9 OSD Lang ENG Screen Saver Off Last Memory On On Exit Setup Off Rel TV Display EeduAUDIO Setup
- Speaker Setup
Enter the Audio setup page using ▼ button, press ok see the options.
text_image
Audio Setup Page Speaker SetupDownmix
· LT/RT
A disc recorded multi channel soundtrack, the output signal will be incorporated to left and right channel.
. Stereo
A disc recorded multi channel soundtrack, The output signal will be incorporated to stereo.
text_image
Speaker Setup Page -- Downmix STR LT/RT Stereo Set Downmix ModeDolby Digital Setup
Dynamic
This option is used to set the compression ration in order to control the sound (Volume) contrast.
text_image
Dolby Digital Setup Dynamic Set DRC To FullPreference Setup
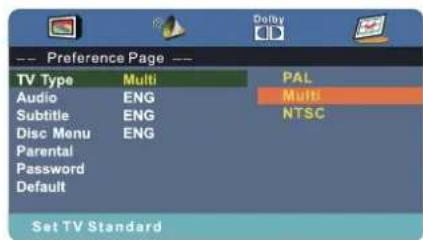
text_image
Preference Page TV Type Multi PAL Audio ENG Multi Subtitle ENG NTSC Disc Menu ENG Parental Password Default Set TV StandardThis menu is only available when in DVD mode and no DVD is playing or the DVD has been stopped.
TV Type
PAL
This is selected when the player is connected to a PAL system TV.
MULTI
The player will set the TV system according to the disc in the tray.
NTSC
This is selected when the player is connected to a NTSC system TV.
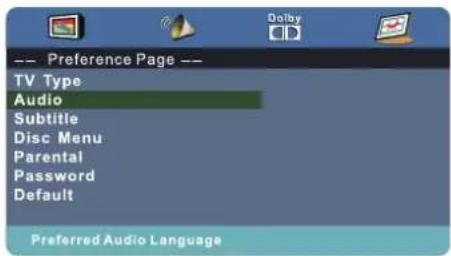
Audio
Choose the language you want to watch your DVD in. Only if the language is recorded to the DVD will this option be functional.
text_image
-- Preference Page -- TV Type Audio Subtitle Disc Menu Parental Password Default Preferred Audio LanguageSubtitle
Choose the subtitle language you want to watch. Only if subtitles have been recorded to the DVD will this option be functional.
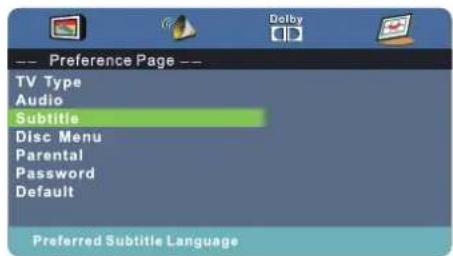
text_image
Preference Page -- TV Type Audio Subtitle Disc Menu Parental Password Default Preferred Subtitle LanguageDisc Menu
Choose the language you want to see the Disc menu in. Only if the language is recorded to the DVD will this option be functional.
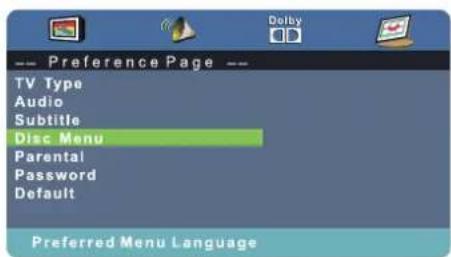
text_image
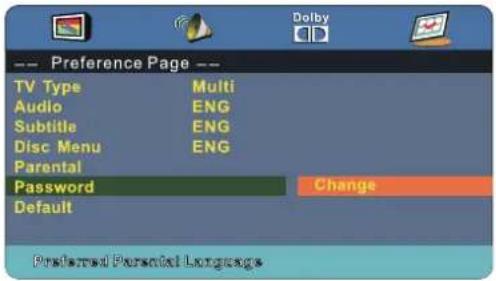
-- Preference Page -- TV Type Audio Subtitle Disc Menu Parental Password Default Preferred Menu LanguageParental
Parental lock gives you the option of selecting an age control grade. For example if PG is selected any disc inserted rated higher will not be played.
· KID SAFE
The password is a tool to lock and unlock the parental Lock setting.
Note: (Default password is 123456)
text_image
Preference Page -- TV Type Multi Audio ENG Subtitle ENG Disc Menu ENG Parental Password Change Default Preferred Parental Language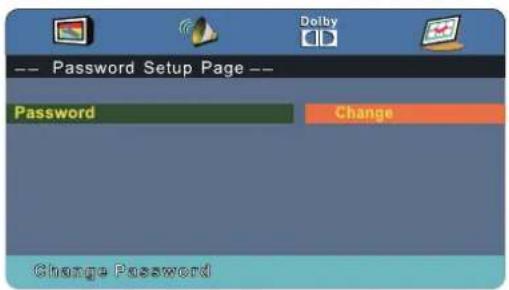
text_image
Password Setup Page -- Password Change Change Password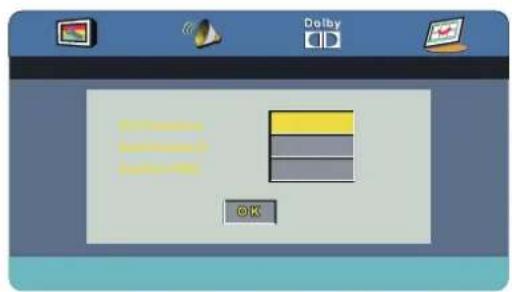
text_image
Delby OKDefault
To set the DVD settings back to factory default, choose reset and press the OK button.
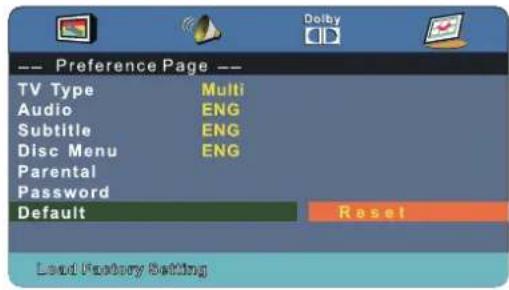
text_image
Preference Page -- TV Type Multi Audio ENG Subtitle ENG Disc Menu ENG Parental Password Default Reset Load Factory SettingDisc Care
About Disc Terms
Title
Generally, pictures or music compressed on a DVD are divided into several sections, "title".
Chapter
The smaller section unit of picture or music in a DVD under the title, usually one title is comprised of one or more chapters and each of them is numbered for easy searching, but some discs may not have a recording chapter.
Track
A segment of picture or music on a CD, Each track is numbered for searching.
Care of Disc
Video disc contains high-density compressed data that needs proper handling.
- Hold the disc with fingers by outer edge and/or the center spindle hole. Do not touch the discs surface.
- Do not bend or press the disc.


- Do not expose the disc to direct sunlight or heating sources, Stere discs in cabinet vertically, and in dry condition.
Prevent exposure to:
Direct sunlight
Heat or exhaust from a heating device
Extreme humidity
Clean the disc surface with a soft, dry cleaning cloth, Wipe the disc surface gently and radically from center toward the outer edge.
Do not apply thinner, alcohol, chemical solvent, or sprays when cleaning. Such cleaning fluids will permanently damage the disc surface.

TROUBLE SHOOTING GUIDE
To assist in locating possible faults use the help guide below.
| SYMPTOM | SOLUTION |
| No Picture, no sound | Check that the TV is correctly plugged in. Check that the TV is connected to a suitable power source. Check the electrical supply is turned on. |
| No Picture | Ensure that the TV is powered on. Check that the cables are fitted securely. Ensure the aerial and/or external sources are connected. Press the SOURCE button to change the source. Turn the TV on or off. |
| No Sound | Press the MUTE button and check if Mute mode is set. Switch to another channel and see if the same problem occurs. Press V+ button to see if the problem can be solved. |
| No picture on some channels | Check that correct channel is selected. Adjust the antenna. |
| No colour on some channels (black &white) | Check if the same problem exists on other channels. Ensure the correct picture settings are selected. |
| Noisy, Snowy, Ghosting picture. | Check the antenna is connected correctly. Check that the antenna is in good condition. Try moving the antenna. |
| Will not accept disc | DVD not selected. Select DVD mode with SOURCE button. |
| Screen shows "NO DISC" | Disc placed incorrectly. Disc must have mirror side facing you if single side. |
| Disc damaged or dirty. Inspect disc. If damaged you must discard. If dirty see "Disc care" page. | |
| Picture "Freezes" or breaks up | Disc damaged or dirty. See "Disc care" page |
| Certain disc functions not working. | Disc may not support required feature. Read disc information. |
If none of the suggestions seem to work, try switching your TV off and then on again. If this does not work contact our technical helpline.
NOTE: The TV must only be repaired by a qualified registered service person. Never attempt to remove the back cover as the TV has dangerous voltages inside that may cause fat ality or fire.
TECHNICAL SPECIFICATIONS
Specifications of the TV that you have just purchased may vary from the information in this table due to technical innovations.
TV Specifications
| TV System | PAL/BG/DK/ I |
| Audio System | BG/DK/I |
| Screen size | 21.5" (Diagonal) |
| Resolution | 1920 x 1080 Pixels (RGB) |
| Aerial input | 75 Ohm (unbalanced) |
| Audio output power | 2 x 3W |
| Power requirements | 12V —— 4A |
| Power consumption | <48W |
| Standby power consumption | <1W |
| Weight 4.0Kg(With Stand) |

DVD-Signal: NTSC, PAL (Regionalcode 2)
Caution:
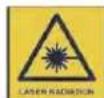
This unit is a class 1 laser product. However this unit uses a visible laser beam which could cause hazardous radiation exposure if directed. Be sure to operate the player correctly as instructed.
Remote control specifications
| Type | Infrared |
| Control distance | 5m |
| Control angle | 30 degrees (Horizontal) |
| Batteries | 2 x 1.5V, Size AAA |
| Dimensions | 48 x 193 x20mm |
| Weight | 90g (Without batteries) |
Wall Mounting
- The stand base and stand stem must be removed.
- Please follow the instructions of how to apply the stand (included in the gift box), if you have already attached the TV stand read the instructions in reverse order to detach.
- Be sure the stand stem is removed (unscrew 3 screws at the stem).
- Use four machine screws to mount the TV on the bracket.
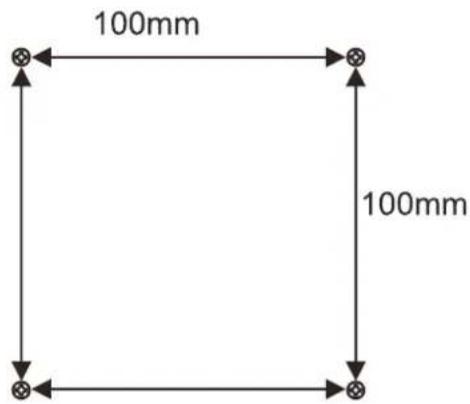
This unit is VESA-Compliant and designed to be wall mounted with a VESA-Compliant 100mm x 100 mm mounting kit. Mount this unit according to the instructions of the wall bracket (not supplied)
text_image
100mm 100mm4 Mounting holes Screw size M4 x 8
Waste Electrical Recycling
Correct disposal of Product

This sign indicates that this product may not be disposed of with your regular household waste. The recycling and separate collection of such products is your responsibility. Please drop off the above mentioned waste at a designated place for recycling waste electri-
cal and electronic equipment. If you do not know where to drop off your waste equipment for recycling, please contact your local city office or household waste collection service.
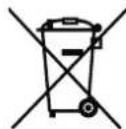
The crossed out wheeled dust bin symbol indicates that batteries and/or accumulators must be collected and disposed of separately from household waste.
Hg Cd Pb
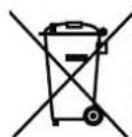
If the battery or accumulator contains more than the specified values of lead (Pb), mercury (Hg), and/or cadmium (Cd) defined in the Battery Directive (2006/66/EC), then the chemicals Hg Cd Pb symbols for lead(Pb), mercury (Hg) and/or cadmium (Cd) will appear below the crossed out wheeled dust bin symbol.
By participating in separate collection of batteries, you will help to assure the proper disposal of products and batteries thus help to prevent potential negative consequences for the environment and human health.
For more detailed information about the collection and recycling programmes available in your country, please contact your local city office or the shop where you purchased this product.

This appliance complies with European Safety and Electrical directives. It fullfils the following EU regulations:
EN 55022:2006+A1:2007
EN 55013:2001+A1:2003+A2:2006
EN 61000-3-2:2006+A1:2009+A2:2009
EN 61000-3-3:2008
EN 55024:1998+A1:2001+A2:2003
EN 55020:2007
Manufacturer:
D-66780 Rehlingen-Siersburg (Germany)
Fon: +49(0)6835 92350-0
Fax: +49(0)6835 92350-500
Contents
PRÉCAUTIONS D'EMPLOI ....3
Informations signal 18
Informations Cl....18
Mise hors tension - Aucun signal....18
natural_image
Diagram of a remote control unit showing battery, battery pack, and internal components (no text or labels)text_image
COAX RF DVB-S2 CI SLOT Headphone Signal DVB-S/DVB-S2text_image
Câble coaxialtext_image
Port USB USB HDMI SCART PC Audio VGA MINI MINI YPSPY AVtext_image
Menu Play Quiz Box TV Radio Play Play Play Play Play Play Play Play Play Play Play Play Play Play Play Play Play Play Play Play Play Play Play Play Play Play Play Play Play Play Play Play Play Play Play Play Play Play Play Play Play Play Play Play Play Play Play Play Play Play May May May May May May May May May May May May May May May May May May May May May May May May May Maynatural_image
Close-up photo of a fluffy kitten with closed eyes, surrounded by a software interface toolbar (no readable text on the image itself)text_image
erri 00:00:00:01:55text_image
There's a whole world of hotel possible, but there that we had you never have visited. With up to 10% off hand-toe and thousands of rooms, you'll find yourself about by all the choices? We can be able to pay rooms to students. And we'll never, over charge you a booking fee, whether you're going for business, prices, or just a decent night's sleep. Just book online or by phone, assure the booking with a credit card and pay the hotel on departure. Happy searching!text_image
100mm 100mmSlot Common Interface....15
UTILIZZARE LO SLOT COMMON INTERFACE....15
natural_image
Line drawing of a flat-screen monitor with no text or symbolsTV
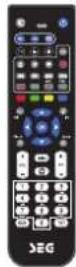
Telecomando
natural_image
Line drawing of a flat-screen monitor with a stand and antenna (no text or symbols)natural_image
Diagram of a remote control panel with battery and two battery cells, showing internal components (no text or labels)Uso del telecomando
text_image
Antenna TV / TV via cavo