CTL1554 - TV SANYO - Free user manual and instructions
Find the device manual for free CTL1554 SANYO in PDF.
| Brand | Sanyo |
| Model | CTL1554 |
| Product Type | LCD Flat Screen TV |
| Screen Diagonal | 15 inches (38.1 cm) |
| Resolution | 1024 x 768 (XGA) |
| Brightness | 450 cd/m² |
| Contrast Ratio | 300:1 |
| Viewing Angle (H/V) | 120° / 100° |
| Dimensions (W x H x D) | 500 x 328 x 184 mm (19.7 x 12.9 x 7.2 in) |
| Weight | 5.8 kg (12.7 lb) |
| Power Supply | 120 V AC, 60 Hz (AC adapter included) |
| Power Consumption | Energy saving with backlight brightness adjustment |
| Tuner | 181 channels (VHF 2-13, UHF 14-69, cable 1, 14-125) |
| Video Inputs | 1 x S-Video (AV1), 2 x composite (AV1/AV2), 1 x component (Y/Pb/Pr, AV3) |
| Audio Inputs | L/R audio input for each video input |
| Antenna Input | 75 ohms, UHF/VHF/cable |
| Speakers | 2 x 5×9 cm, surround sound |
| Audio Features | Stereo MTS/SAP, bass/treble, surround sound, mute |
| Picture Features | 3-D Y/C comb filter, preset adjustments (Auto/Game/Manual), color enhancement, 4:3/16:9 aspect ratio |
| Special Features | V-Guide (parental control), closed captioning (CC1/CC2/QuickCap), sleep timer (30 min to 3 h), auto channel search, trilingual menu |
| Remote Control | 24 keys, includes numeric keys, menu, input, caption, reset |
| Mounting | Removable tilt stand (tilt -5°/+10°), wall mount compatible (kit not included) |
| Safety | Do not expose to rain/moisture, do not open, use on a stable surface |
| Maintenance | Unplug before cleaning, dry soft cloth, do not spray liquid |
| Repairability | No user-serviceable parts, refer to qualified service personnel |
Frequently Asked Questions - CTL1554 SANYO
User questions about CTL1554 SANYO
0 question about this device. Answer the ones you know or ask your own.
Ask a new question about this device
Download the instructions for your TV in PDF format for free! Find your manual CTL1554 - SANYO and take your electronic device back in hand. On this page are published all the documents necessary for the use of your device. CTL1554 by SANYO.
USER MANUAL CTL1554 SANYO
"Read this manual before assembling (or using) this product."
ENGLISH
Table of Contents 3
ESPANOL
Contenido 19
FRANÇAIS
Table des matieres. 37
Welcome to the World of Sanyo
Thank you for purchasing a Sanyo Stereo LCD Television. You made an excellent choice for Performance, Styling, Reliability, and Value. The TV is designed with easy to use on-screen set-up instructions and operating features. Need assistance? Visit our Web site at www.sanyoctv.com or call toll free 1-800-877-5032.

"As an ENERGY STAR® Partner, Sanyo Manufacturing Corporation has determined that this product meets the ENERGY STAR® guidelines for energy efficiency."

Model No.:
No. de Modelo:
No de modele:
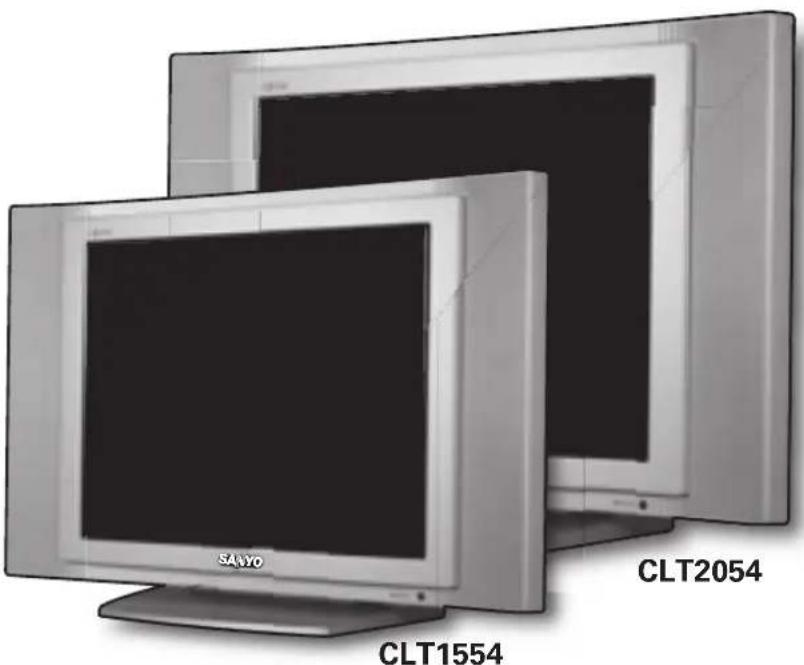
CLT1554
CLT2054
ENHANCED DEFINITION TELEVISION

MONITOR
ENHANCED
DEFINITION
TELEVISION
(EDTV)
Importado Por :
Comercializadora Mexico
Americana.S.DE R.L.DEC.V.
Nextengo N°78
Col. Santa Cruz Acayucan
Del. Azcapotzalco, Mexico D.F.C.P.
02770.RFC CMA 9109119LO
Telefono: 55-5328-3500
Printed in U.S.A. SMC, March 2004
Part No./No.de Parte/
No de piece: 1AA6P1P4426--
THIS SYMBOL INDICATES THAT THERE ARE IMPORTANT OPERATING AND MAINTENANCE INSTRUCTIONS IN THE LITERATURE ACCOMPANYING THIS UNIT.


WARNING: TO REDUCE THE RISK OF FIRE OR ELECTRIC SHOCK, DO NOT EXPOSE THIS APPARATUS TO RAIN OR MOISTURE.
IMPORTANT SAFETY INSTRUCTIONS
Important Safety Instructions for LCD TV
-
Read these instructions.
-
Keep these instructions.
-
Heed all warnings.
-
Follow all instructions.
-
Do not use this apparatus near water.
-
Clean only with dry cloth.
-
Do not block any ventilation openings. Install in accordance with the manufacturer's instructions.
-
Do not install near any heat sources such as radiators, heat registers, stoves, or other apparatus (including amplifiers) that produce heat.
-
Do not defeat the safety purpose of the polarized or grounding-type plug. A polarized plug has two blades with one wider than the other. A grounding-type plug has two blades and a third grounding prong. The wide blade or the third prong are provided for your safety. If the provided plug does not fit fully into your outlet, consult an electrician for replacement of the obsolete outlet.
-
Protect the power cord from being walked on or pinched particularly at plugs, convenience receptacles, and the point where they exit from the apparatus.
-
Only use attachments/accessories specified by the manufacturer.
-
Use only with the cart, stand, tripod, bracket, or table specified by the manufacturer, or sold with the apparatus. When a cart is used, use caution when moving the cart/apparatus combination to avoid injury from tip-over.
-
Unplug this apparatus during lightning storms or when unused for long periods of time.

- Refer all servicing to qualified service personnel. Servicing is required when the apparatus has been damaged in any way, such as power-supply cord or plug is damaged, liquid has been spilled or objects have fallen into the apparatus, the apparatus has been exposed to rain or moisture, does not operate normally, or has been dropped.
- If an outside antenna is connected to the television equipment, be sure the antenna system is grounded so as to provide some protection against voltage surges and built up static charges. In the U.S. Selection 810-21 of the National Electrical Code provides information with respect to proper grounding of the mast and supporting structure, grounding of the lead-in wire to an antenna discharge unit, size of grounding conductors, location of antenna discharge unit, connection to grounding electrodes, and requirements for the grounding electrodes.
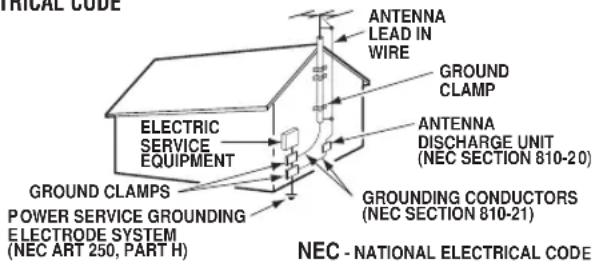
EXAMPLE OF ANTENNA GROUNDING AS PER (NEC) NATIONAL ELECTRICAL CODE
Note to CATV system installer:
This reminder is provided to direct the CATV system installers attention to Article 820-40 of the NEC that provides guidelines for proper grounding and, in particular, specifies that the cable ground shall be connected to the grounding system of the building, as close to the point of cable entry as practical.
- An outside antenna system should not be located in the vicinity of overhead power lines or other electrical light or power circuits, or where it can fall into such power lines or circuits. When installing an outside antenna system, extreme care should be taken to keep from touching such power lines or circuits as contact with them might be fatal.
Contents
Important Safety Instructions. 2
Care and Cleaning. 3
Features. 4
Specifications. 4
Getting Started. 5~6
Positioning the LCD TV. 5
Using the Tilt Stand. 5
Removing the TV Tilt Stand. 5
Power Connection. 5
Installing Batteries in the Remote Control. 6
Connecting Cable, RF Antenna, or a Satellite Receiver to the TV 75-Ohm jack . . . . . . . . . . . . . . . . . . . . . . . . . . . . . . . . . . . . . . . . . . . . . . . . . . . . . . . . . . . . . . . . . . . . . . . . .
Top & Back Panel 7
Optional Feature - Wall Mounting. 7
Using the Component Video and
Audio Input Jacks. 8
Connecting a DVD Player 8
Using the Audio / Video Input Jacks 9
Connecting a VCR or DVD Player 9
Using the Remote Control. 10
TV Adjustment and Setup. 11~13
How to Operate the On-Screen Menu 11
Adjusting Picture: Auto / Game / Manual 11
Adjusting Sound: Audio / Bass / Treble / Surround 12
Adjusting the Channel: Antenna / CH. Search /
CH. Memory 12
Selecting a Display Language. 13
Set Up: Color Enhancer / Aspect Ratio /
Backlight 13
Closed-Captioning 13
V-Guide Operation (Parental Control). 14~15
Helpful Hints (Problems / Solutions) 16
Warranty (Mexico) 17
Warranty (U.S.A. and Canada). 18
Child Safety Matters. Back cover
Care and Cleaning
The surface of the cabinet can be damaged if not properly maintained. Many common household aerosol sprays, cleaning agents, solvents, and polishes will cause permanent damage to the fine surface.
- Unplug the power cord before cleaning the television.
- Clean the screen and cabinet with a soft dry cloth.
Note: Never spray liquids on the screen because it can run down and drip onto the chassis. This may cause component failure not covered under Warranty.
Features
15 inch & 20 inch flat-screen
Wide viewing angle horizontal / vertical
Detachable tilt Stand—tilts TV down 5^ up 10^
Wall Mountable
3-DY/C Digital Comb Filter
AC Adaptor
Power Saving Mode (Back Light function)
V-chip for Movies and TV guidelines rating limits
Closed-Captioning
MTS stereo/SAP decoder
Integrated front speaker 5× 9cm (two)
Surround Sound
Bass / Treble
Picture adjustments-Aspect Ratio: 4:3 and 16:9 format
Factory preset adjustments for Picture
Video Format: Interlaced and Progressive (480i/p)
Automatic Channel Search
Color Enhancer
Receives 181 Channels: VHF 2~13; UHF 14~69; Cable TV 1, 14~125
Component video input for the best picture signal from your VCR or DVD
Rear AV input (2 sets R/L)
S-Video Input
Trilingual Menu Options
Sleep Timer
24-Key Remote Control
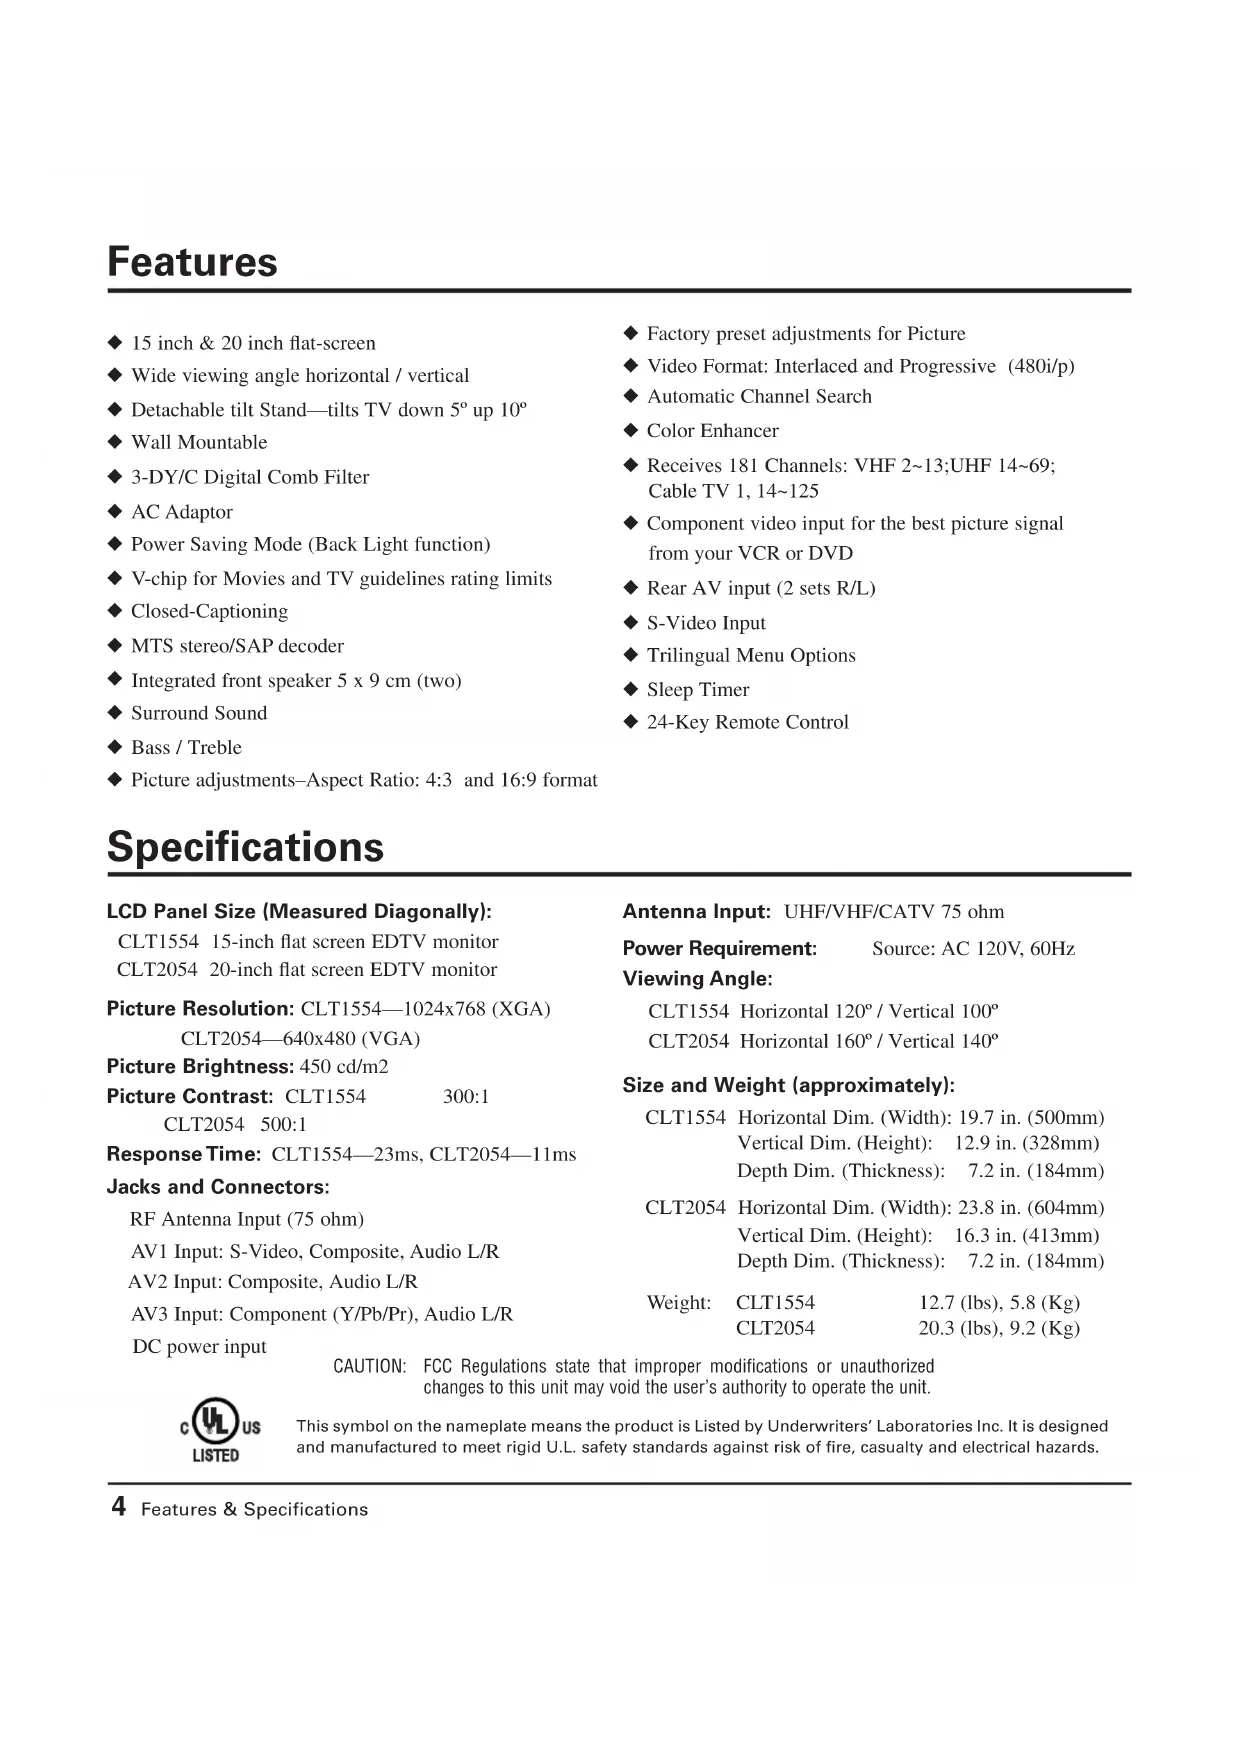
Specifications
LCD Panel Size (Measured Diagonally):
CLT1554 15-inch flat screen EDTV monitor
CLT2054 20-inch flat screen EDTV monitor
Picture Resolution: CLT1554-1024x768 (XGA)
CLT2054—640x480 (VGA)
Picture Brightness: 450 cd/m2
Picture Contrast: CLT1554 300:1
CLT2054 500:1
Jacks and Connectors:
RF Antenna Input (75 ohm)
AV1 Input: S-Video, Composite, Audio L/R
AV2 Input: Composite, Audio L/R
AV3 Input: Component (Y/Pb/Pr), Audio L/R
DC power input

Antenna Input: UHF/VHF/CATV 75 ohm
Power Requirement: Source: AC 120V, 60Hz
Viewing Angle:
CLT1554 Horizontal 120^ / Vertical 100^
CLT2054 Horizontal 160^ / Vertical 140^
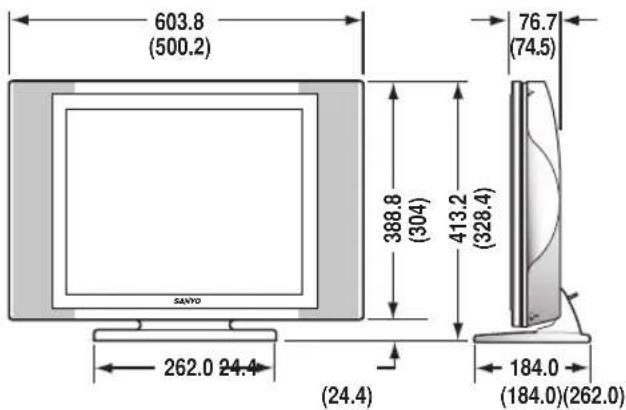
Size and Weight (approximately):
CLT1554 Horizontal Dim. (Width): 19.7 in. (500mm)
Vertical Dim. (Height): 12.9 in. (328mm)
Depth Dim. (Thickness): 7.2 in. (184mm)
CLT2054 Horizontal Dim. (Width): 23.8 in. (604mm)
Vertical Dim. (Height): 16.3 in. (413mm)
Depth Dim. (Thickness): 7.2 in. (184mm)
Weight: CLT1554 12.7 (lbs), 5.8 (Kg)
CLT2054 20.3 (Ibs), 9.2 (Kg)
CAUTION: FCC Regulations state that improper modifications or unauthorized
changes to this unit may void the user's authority to operate the unit.
This symbol on the nameplate means the product is Listed by Underwriters' Laboratories Inc. It is designed and manufactured to meet rigid U.L. safety standards against risk of fire, casualty and electrical hazards.
Positioning the LCD TV
Always use an appropriate table or stand when positioning your TV. Allow enough space to tilt the TV. For best viewing, avoid locating the TV where direct sunlight or indoor lighting will fall on the screen. (Note: CLT1554 measurements are in the parenthesis.)
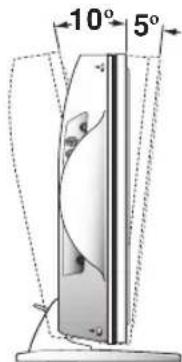
Using the Detachable TV Tilt Stand
To change the viewing angle of your LCD TV, position your hand on the top and hold the stand firmly, then tilt the LCD screen forward or backward. CAUTION: Do not position hand under the screen while tilting the TV forward.
Note: Maximum tilt is 5^ to the front and 10^ to the back.
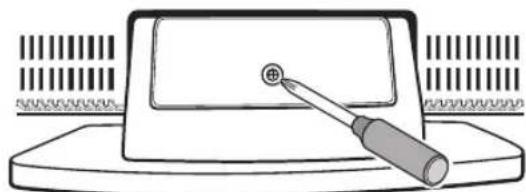
Removing the TV Tilt Stand
Tools Needed: Phillips screwdriver
Important Note: Position TV face down on a padded or cushioned surface to protect the screen and finish.
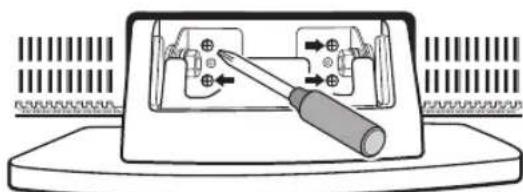
- Remove the screw from the stand back cover.
- Remove four (4) screws from the metal bracket. CAUTION: Hold the stand firmly as you remove the last screw.
- Carefully remove the TV stand.
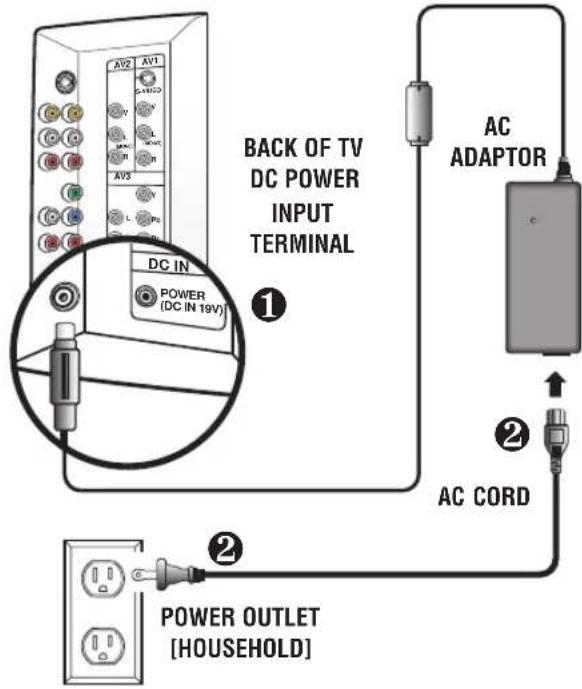
Power Connection
Insert AC Adaptor into the DC input terminal on the TV.
Insert AC power cord into Adaptor; then insert the plug fully into a 120V, 60Hz, AC power outlet.

QuickTips
The TV will automatically select the correct Antenna mode for the type of RF signal you connect.
TV will switch off automatically after 15 minutes if there is no signal reception (cable out or station not broadcasting).
Exception—When the Video mode is selected, the TV will not automatically switch off when signal reception has stopped for 15 minutes.
If you move the TV to a new location, press the RESET key twice after connecting the signal and turning on the TV.
Need help? Visit our Web site at www.sanyoctv.com or Call 1-800-877-5032
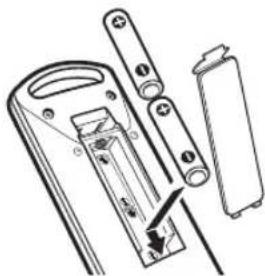
Installing Batteries in the Remote Control
Use 2 "AAA" batteries (Not supplied).
Be sure batteries are installed correctly.
Note: Do not mix old batteries with new ones or mix different types of batteries together.
Connecting Cable service, RF antenna, or Satellite Receiver to the TV
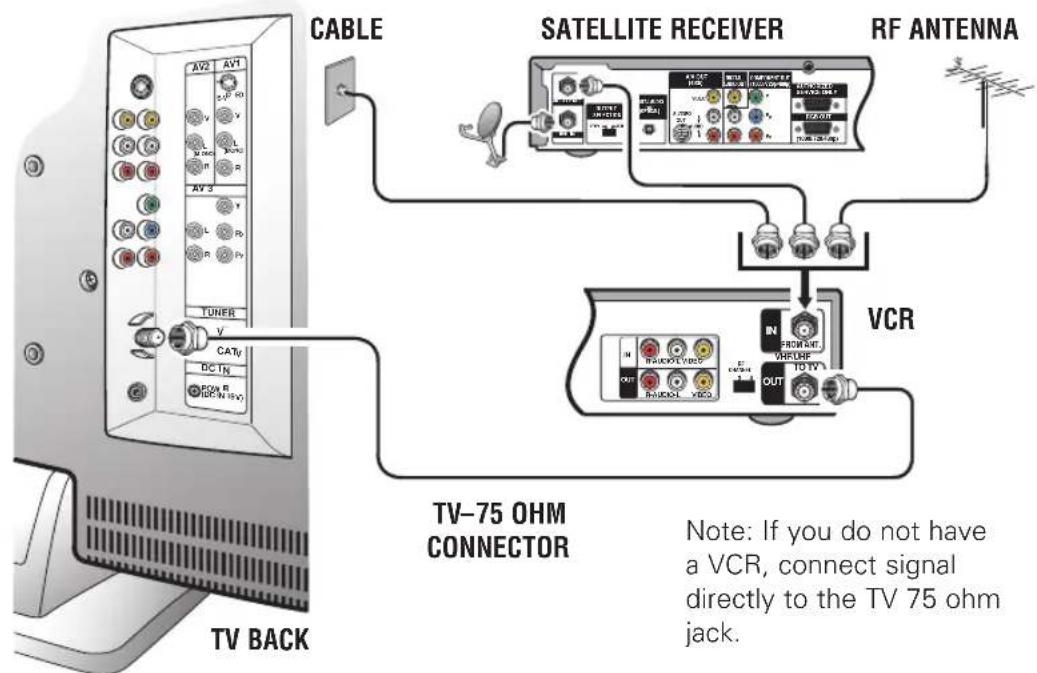
Operational Tip for No Signal Connection:
If the TV is used as a monitor only, with a DVD player or some other type of external equipment, and no cable or antenna signal is available, the following setup is necessary:
Your TV is designed to automatically search for available channels. Therefore, the initial start up requires that you press the MENU key, enabling the TV to automatically go through the channel search process before you can operate the TV. After the initial channel search is completed, you must press the MENU key again to complete the channel search process, it will take a few minutes for the TV to complete searching.
After channel search is complete (2 searches), you can press the INPUT key on the remote control to use the TV as a monitor.
CATV FRANCHISE NOTE: Cable companies, like public utilities, are franchised by local government authorities. To receive cable programs, even with equipment which is capable of receiving cable channels, the consumer must subscribe to the cable company's service.
Top View
NOTE: The Channel (up) / (down), Volume + (up) - (down), and Power keys function exactly like the keys on your remote control.

Back View
S-Video Input Jack
Toenhance video detail use the S-Video AV1 jack instead of the Video jack, if available on your external equipment. (S-Video connections will override connections to the AV1 input jacks.) (See page 9.)
Antenna Input Terminal
Connect an RF antenna, cable, or satellite receiver to this jack as shown on page 6.
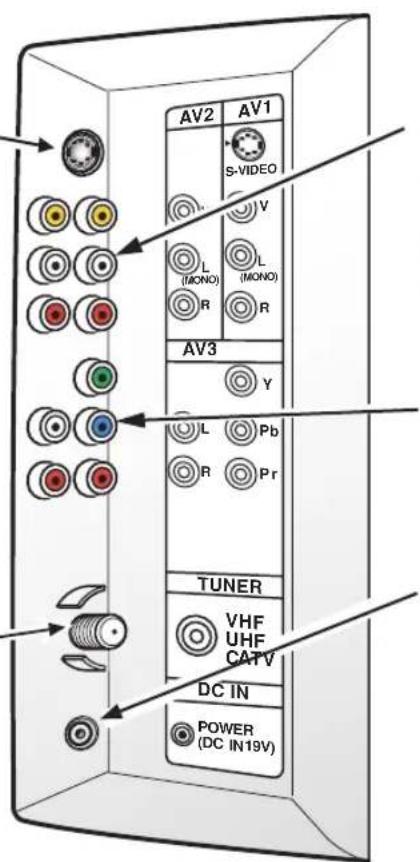
Audio/Video Input Jacks (AV1/AV2)
Connect video equipment here (see page 9).
Note: S-Video connection overrides the AV1 video connection.
480i/p Component Video / Audio Input Jacks (AV3)
Connect external equipment to the Y, Pb, Pr and Audio L/R jacks. (See page 8.)
DC Power Input Jack
Connect AC Adaptor to this terminal.
Optional Accessories:
Extra cables are needed for advance connections. Reference the connections accessories list on pages 8~9.
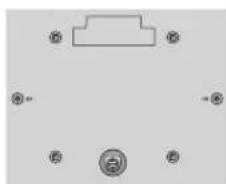
Optional Feature—Wall Mounting
This LCD TV is designed so that it may be mounted on a wall, if desired. Use the slots on the back of your TV to secure it using a wall mounting kit.
Note: Wall Mounting kit is not supplied, check with your local electronic supply store.
Back View
Using the Component Audio/Video Input Jacks

QuickTips
A solid Blue screen with the word COMPONENT3 displayed means that the Video mode is selected, but no signal is being detected at the Component jacks. Check connection, and turn on external equipment.
Need help? Visit our Web site at www.sanyoctv.com or Call 1-800-877-5032

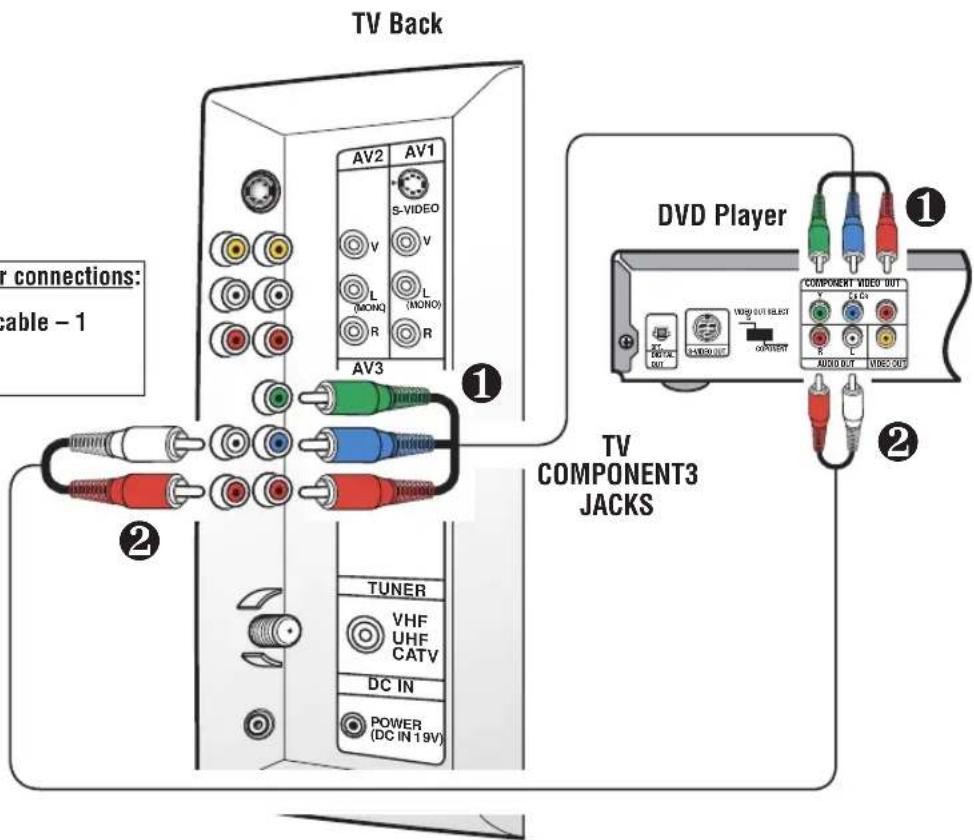
Connecting a DVD Player or other equipment
Switch off TV and external equipment before connecting cables. (Cables are not supplied.)
1 Connect a DVD Player or other equipment's interlaced Component Video Output to the TV Component Video Input (Y-Pb-Pr) Jacks.
Connect the DVD Player's Audio Output to the TV Component L/R Jacks.
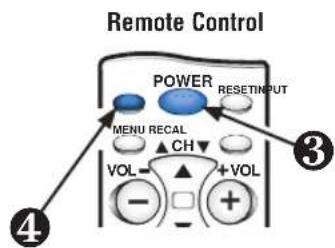
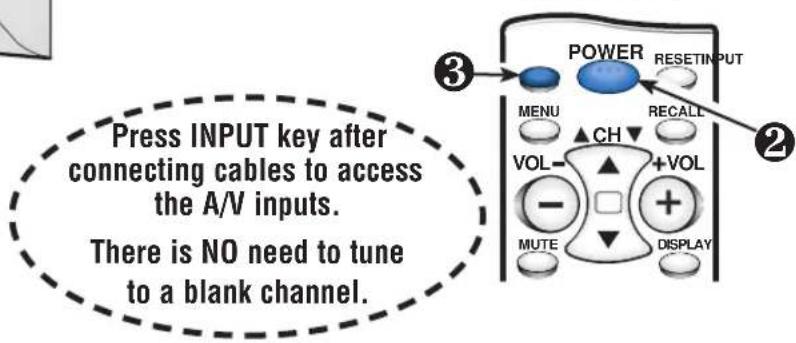
3 Press POWER to turn on the TV. Turn on external equipment also.
4 Press the INPUT key to select COMPONENT3.
Press INPUT key after connecting cables to access the A/V inputs.
There is NO need to tune to a blank channel.
Connecting a VCR or DVD Player
Switch off TV and external equipment before connecting cables. (Cables are not supplied.)
Connect VCR, DVD Player, or other equipment's Audio Video Output to the TV Audio Video Input.
For Mono VCR (Single Audio Jack) connect VCR Audio Output to TV Audio (L) Input.
① Optional
Connect DVD Player or other equipment's S-Video Output to the TV S-Video Input Jack. Using the S-Video jack overrides the Video jack.
Press POWER to turn on the TV. Turn on external equipment also.
Press the INPUT key to select VIDEO1 or VIDEO2.
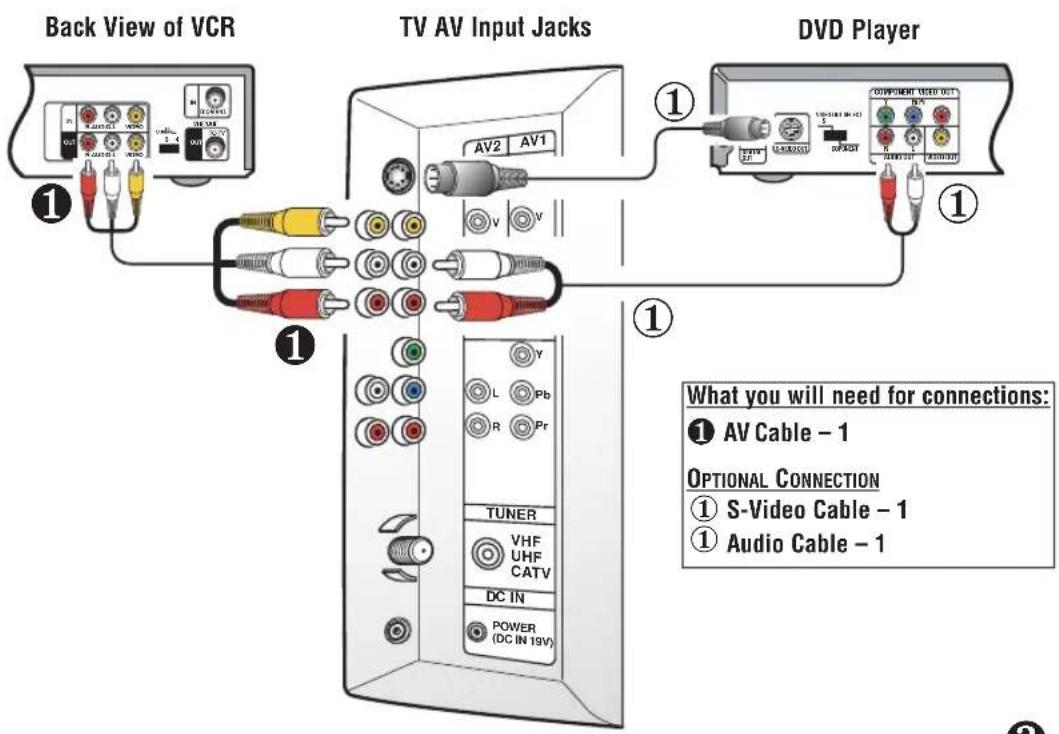

QuickTips
Make sure all cable connectors are fully seated on jacks.
Always match AV cables according to the colors; RED for right audio, WHITE for left audio and YELLOW for video.
A solid Blue screen with the word VIDE01 or VIDE02, displayed means that the Video mode is selected, but no signal is being detected at the Video jacks. Check connections, turn on external equipment.
Need help? Visit our Web site at www.sanyoctv.com or Call 1-800-877-5032
Remote Control
Using the Remote Control

QuickTips
- Be sure batteries are installed correctly.
Point the remote control toward the TV. Objects between the remote control and the TV may cause misoperation of the remote control function.
The "C" in front of the number on your screen indicates a cable channel.
Adjusting the volume level: Flashing Right arrow indicates volume is increasing and Flashing Left arrow indicates volume is decreasing.
Need help? Visit our Web site at www.sanyoctv.com or Call 1-800-877-5032
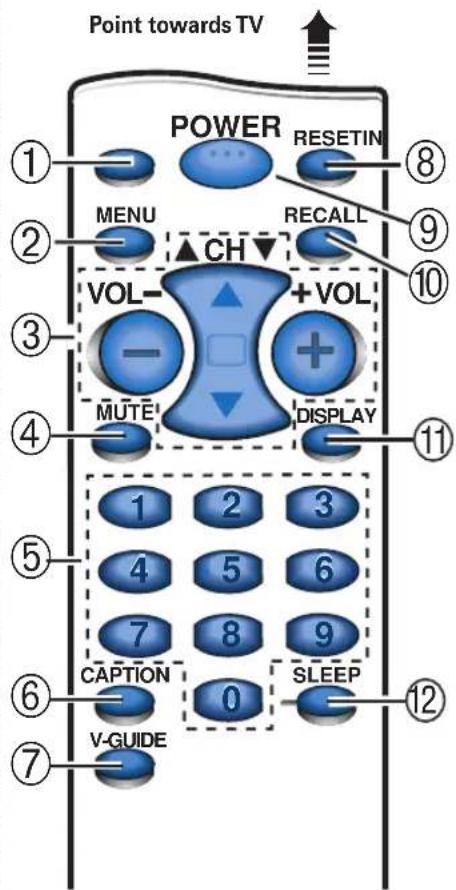
① Input Key—Press to select the program source to watch: TV signal or signal from DVD or other equipment you have connected to the A/V jacks.
② Menu Key—Use this key with the / and-/+ keys to navigate and adjust features of the on-screen menu system (see pages 11 13
③ Channel Scanning (CH / ) and Volume (VOL -/+) Keys—Press to scan through the channels in memory and to adjust the volume.
Mute Key—Press once to turn down the volume. Press again to restore volume to previous level.
Number Keys—Two keys must be pressed to select a channel. Example: Press 0 then 6 to select channel 6. For cable channels 100 through 125, press and hold the 1 key until C1—appears. Then press the other two numbers.
Caption Key—See page 13.
V-Guide Key—See pages 14 ~ 15.
Reset Key—Press this key twice to restore factory settings. The TV will automatically start Channel Search and clear all customized settings. These features will automatically reset:
- Picture Controls: Auto, Game, and Manual: Color, Tint, Contrast, Brightness and Sharpness
Sound Controls: Audio, Bass, Treble, and Surround - Channel Controls: Antenna, CH. Search and CH. Memory
- Set Up Controls: Color Enhancer, Aspect Ratio, and Backlight
- Caption to OFF
V-Guide to OFF
Language to English - Sleep Timer (if previously set)
Video to TV (if previously set) If desired, personal settings can be made again using the menu options.
9 Power Key—Press to turn TV on or off.
10 Recall Key—Select a channel; select another channel using the number keys. Press RECALL to switch between the channels.
Display Key—Press once to display the Channel number. Press twice to display the channel number continuously. Press again to remove the display.
12 Sleep Key—Press this key then press the “0” key to set the Sleep Timer. The desired time can be set from 30 minutes up to 3 hours. Sleep Timer will switch off the TV automatically.
Note: The Sleep Timer cancels when the TV is turned off or if a power failure occurs.
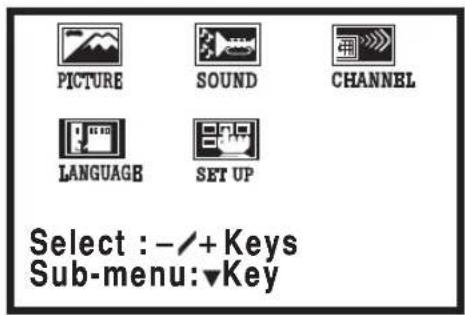
The on-screen menu provides the viewer with easy access to adjustments and settings. The LCD menu is displayed in colorful screen icons that identifies each adjustable option. Just use the keys on the remote control and follow the on-screen instructions.
How to operate the On-Screen Menu
- Press MENU key to display main menu options.
- Use the - / + keys to choose desired option. (Selected item is highlighted in YELLOW.)
- Use the key and to select the desired option sub-menu feature.
- Use the / and - / + keys to select and adjust sub-menu options (red arrow indicates selected item.)
- Press the MENU key to select other options from the main menu or to exit.
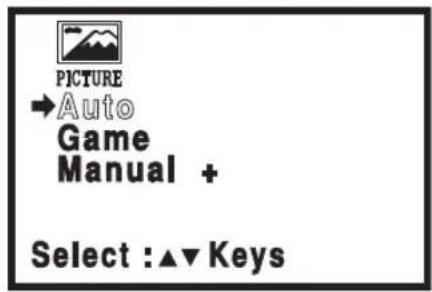
Adjusting Picture
Selecting Preset Picture Automatically
Choose Auto from the Picture menu options.
For automatic Game Setting
- Choose Game from the Picture options. The screen will automatically change to factory preset settings.
- Press the MENU key to exit.
Note: Select the input jacks by pressing the INPUT key on the remote control.
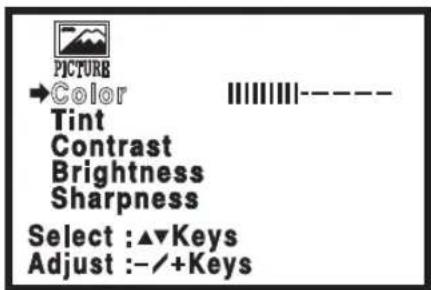
Adjust Picture Manually
- Choose Manual from the Picture menu options.
- Press + key to access the sub-menu options.
- Use the / keys to select the picture setting you want to change.
- Use the - / + keys to adjust settings.
(Continued on page 12.)
QuickTips
The menu will display on the screen for approximately 20 seconds. Press MENU again to redisplay.
Use the Channel / keys and the Volume -/+ keys to navigate through the menus and to make selections from the menus.
Need help? Visit our Web site at www.sanyoctv.com or Call 1-800-877-5032
TV Adjustment and Setup (Continued)

QuickTips
Under weak stereo signal conditions, you may receive better quality sound in the "Mono" position.
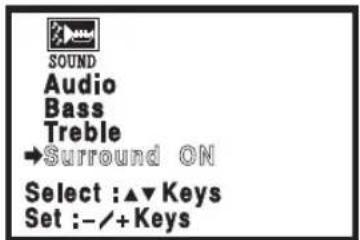
- Surround sound expands the sound effect while receiving MTS stereo signals.
Pressing the RESET key will clear all customized settings. The TV will automatically start Channel Search and clear settings.
Channels deleted from scan memory can be selected with the number keys.
- Restoring deleted channels, use the on-screen menu to manually add channels or start CH. Search from the menu. It makes take a few minutes to search thru the available channels. Or press the RESET key.
Need help? Visit our Web site at www.sanyoctv.com or Call 1-800-877-5032
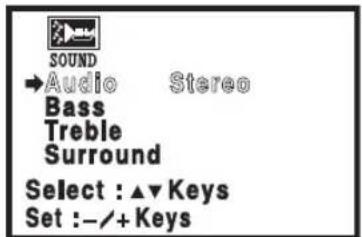
Adjusting Sound
Select desired sound setting: Audio, Bass, Treble or Surround.
- Choose Audio from the Sound menu options.
- Use the / keys to select the sound setting you want to change. (Red arrow indicates selected highlighted option.)
- Use the - / + keys to adjust settings: Stereo, Mono or SAP.
Notes: Stereo and SAP must be part of the broadcast signal.
The TV will automatically reset to stereo if unplugged or a power failure occurs.
- To adjust the other sound features: Bass, Treble, or Surround, simply follow steps 2~3 above.
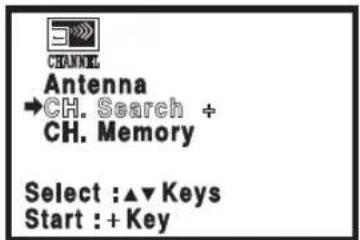
Adjusting the Channel Tuning
Resetting the Antenna Mode and Channel Search
Resetting the Antenna or CH. (Channel) Search is required only if additional channels become available, such as moving to another city or having a cable service installed.
- Choose Antenna or CH. Search from the Channel menu options. (Red arrow indicates selected menu option.)
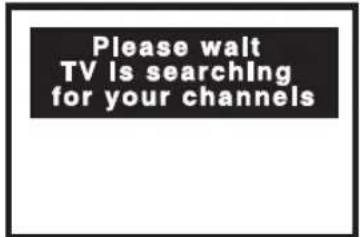
- Use the - / + keys to change Antenna settings: Cable or UHF/VHF. For CH. Search, press the ^+ key. The TV will automatically start searching for your channels. It will take the TV several minutes to complete the search.
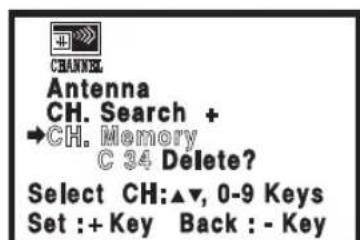
Adding or deleting Channels
- Choose CH. Memory from the Channel menu options. (Red arrow indicates selected highlighted option.)
- Press the ^+ key to select the channel number entry area.
- Enter the channel number you want to add or delete (example): C34. For cable channels above 99, press and hold the 1 key until C1- - appears. Then enter the other two numbers.
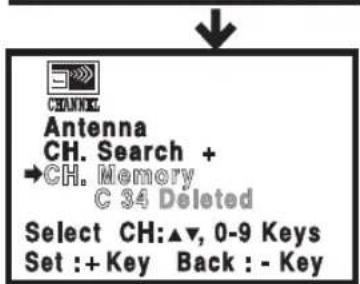
- Press the + key to change the present setting. Example: Added will change to Deleted. This takes about three seconds. During that time, the word "Added" or "Deleted" will become white.
- Use the 0~9 or / keys to chose other channels to delete or add, or press Menu key to exit.
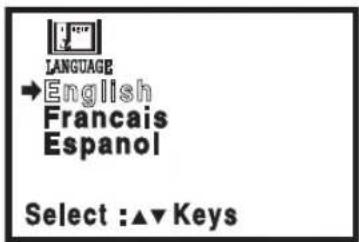
Selecting the Display Language
- Choose English, Frangais (French), or Espanol (Spanish) from the Language menu options.
- Use the / keys to select the desired language.
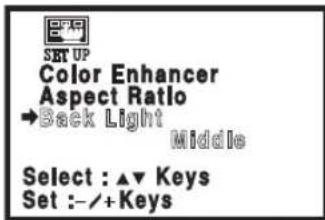
TV Set-up
Use the following features to customize your LCD according to your personal preference:
MENU ITEM
FUNCTION
Color Enhancer Normal—highlights the picture flesh tones and color highlights. Warm—deepens the picture red tints.
Cool—highlights the picture blue tints.
Aspect Ratio Use this feature when equipment is connected to the component input jacks. The 4:3 setting is for normal viewing. The 16:9 setting changes the picture image to wide-screen viewing with minimal portion of top and bottom compressed.
Back Light Power (energy) saving function—The picture image and background automatically changes as follows:
Bright—High Power (default setting)
Middle—Mid Power
Dark—Lower Power
Adjusting the Set Up Features
- Choose Color Enhancer, Aspect Ratio, or Back Light menu options.
- Use the / keys to select the setting you want to change.
- Use the - / + keys to adjust settings.
Closed-Captioning CC
16:9 Screen Format
Captioning is text information transmitted along with the picture and sound so it can be displayed on the TV screen. Because different types of captions can be transmitted with the TV signal, separate captioning modes are provided. The captioning modes recognized by this model are: Caption1 and Caption2. Local broadcasters decide which caption signals to transmit.
CAPTION1: This is the main mode used for program captioning (words match the program you are watching). These captions are generally one or two lines.
CAPTION2: This is an alternative mode for program captioning. Caption2 may be used by the broadcaster to provide captions in another language, such as, Spanish or French.
QUIKCAP: Quikcap allows captions to toggle on and off with the Mute function. Press the MUTE key on the remote control to block the TV sound; the captions display automatically. Press the MUTE key again to restore the sound, the captions will disappear. Quikcap displays program captions in the Caption1 mode.
Caption1/2
Setting Captions
- Press the CAPTION key on the remote control.
- Press the 0 key to select options: OFF, CAPTION1, CAPTION2, or QUIKCAP.
Note: Channel number will not display continuously when captioning is on.

QuickTips
- When in the V-Guide menu system, the - / + keys allow you to navigate between the ratings and the options menu.
- Blocking TVY7 does not block higher ratings.
You can block a content rating such as TVPG-V and still be able to watch TVPG programs with ratings of S-L-D provided TVPG is unblocked (U). - To temporarily unblock or view. Blocked (B) programs, set V-GUIDE to OFF, or press the RESET key twice to clear all. Blocked (B) ratings and other customized settings.
Need help?
Visit our Web site at
www.sanyoctv.com
or Call 1-800-877-5032
NOTE: THIS FEATURE IS DESIGNED TO COMPLY WITH THE UNITED STATES OF AMERICA'S FCC V-CHIP REGULATIONS. THEREFORE, IT MAY NOT FUNCTION WITH BROADCASTS THAT ORIGINATE IN OTHER COUNTRIES.
This Sanyo television is equipped with an electronic V-Chip to interpret MPAA and TV Parental Guidelines rating codes. When these codes are detected, the TV will automatically display or block the program, depending upon choices you make when setting up the V-Guide system.
The V-Guide system contains both age-based and content-based settings. This gives parents discretionary ways of choosing appropriate material for their children to view.
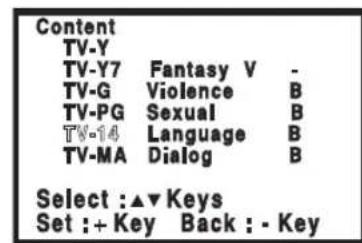
Content ratings are represented by the initials D (Suggestive Dialog), L (Adult Language), S (Sexual Situations), V (Violence), and FV (Fantasy Violence). When programming contains any or all of these conditions, these letters become part of the icon that is displayed on the TV screen.

A rating icon will generally appear in the upper left hand corner of the TV screen for about fifteen seconds.
V-Guide Operation
Use this feature to supervise television viewing for young children. This television can be set to automatically block programs with content you deem as inappropriate for your children to view.
The ability of the television to block the reception of specific programming content depends upon several conditions: 1) The program must be rated, 2) Networks must broadcast the rating code data, 3) Cable companies must transmit the rating code signal, and 4) The TV must be properly setup to decode the signal.
Setting a Rating
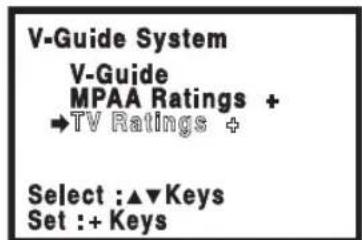
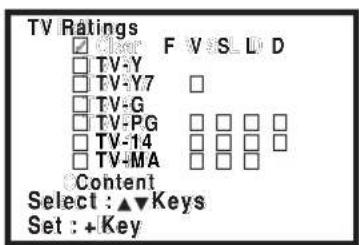
- Press the V-GUIDE key on the remote control to display menu.
- Press the - / + keys to switch V-Guide ON.
- Press the + key to access Ratings: MPAA Ratings or TV Ratings. (→ Arrow indicates selection.)
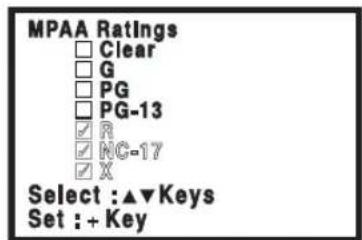
Setting a MPAA Movie Rating
- Use the / keys to block ratings: G, PG, PG-13, R, NC-17, and X.
- Press the ^+ key to set the BLOCKED rating. (√ Check mark indicates Blocked rating.)
Note: The TV will automatically block (B) ratings above or unblock (U) ratings below selection. For example, if you block rating R, NC17 and X will be blocked as well.
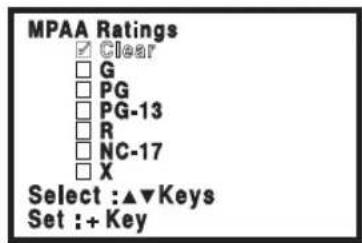
Toclear MPAA Movie Ratings
(Repeat Steps 1 and 3 to display V-Guide menu, if needed.)
- Use the / keys to highlight Clear.
- Press the ^+ key to clear all blocked ratings.
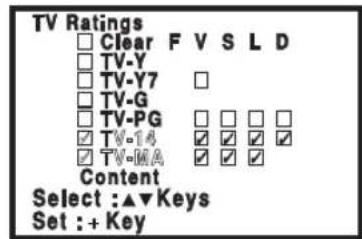
Setting TV Ratings
(Repeat Steps 1 and 3 to display V-Guide menu, if needed.)
- Use the / keys to block TV ratings: TV-Y, TV-Y7, TV-G, TV-PG, TV-14, TV-MA, or Content.
- Press the + key to set the BLOCKED rating. (√ Check mark indicates blocked rating.)
Setting Content-Based Guidelines
(Repeat Steps 1 and 3 to display V-Guide menu, if needed.)
- Use the / keys to highlight Content options.
- Press the + key to display the TV and Content Rating Options: Fantasy Violence, Violence, Sexual Situations, Adult Language, Suggestive Dialog.
- Use the / keys to highlight the TV Rating (highlighted in yellow). Then press the + key to block the content category (highlighted in white). Press + key again to Block or Unblock rating. Use the / keys to highlight another rating.
- Press the - key to return to the TV and Content Rating to block or unblock other categories. Repeat step 11 to change other ratings.
Tocular TV/Content-Based Ratings
(Repeat Steps 1 and 3 to display V-Guide menu, if needed.)
- Use the / keys to highlight Clear.
- Press the ^+ key to clear all blocked ratings.
Turning Off the V-Guide
- Press the V-Guide key.
- Use the / keys to select V-Guide. Then press -/+ keys to select OFF.

Note: Networks and local stations may or may not include the content ratings portion of the TV Parental Guidelines.
Before calling for assistance, please check the condition that most closely resembles your problem in the following chart, then try the solutions for that condition. Visit our Web site at www.sanyoctv.com or call toll free 1-800-877-5032.
| Problem Check these Conditions | Try these Solutions | Page No. | |
| TV turns off automatically. | ·Check signal (Cable/Ant.) connection. ·Power surge protection feature. ·Check AC Adaptor and Cord. | ·Press POWER key. ·The sleep timer may have been set. ·Unplug TV momentarily. | 5 |
| No picture, poor picture or wavy lines in picture. | ·Check antenna/external equipment connections. ·May be station trouble, NO signal broadcast. ·Brightness or Contrast misadjusted. ·Possible interference from household appliance. | ·Adjust antenna. ·Try a different channel. ·Press RESET key or restart channel search. ·Turn off Mixer, Drill, Blender, etc. | 6, 11 |
| No sound, poor. No sound on some channels. | ·May be station trouble. ·May be MUTE function is on. ·Check Audio/Video connections. | ·Try a different channel. ·Adjust volume. | 8~9, 11 |
| Picture too Bright or too Dark. | ·Check backlight (power energy saving) settings. ·Select Set-up Menu to set Back Light option to Middle setting. | 13 | |
| Cannot display picture on a full screen. | ·Check if Aspect Ratio setting is 16:9. ·Select Set-up Menu to set Aspect Ratio option to 4:3 normal setting. | 13 | |
| No Captioning. ·Check if station is broadcasting a Closed-Caption signal. Select another channel. | ·Press CAPTION key to select Captioning. 13 | ||
| Poor Color or no color. | ·Check if program is in color. ·Check antenna/external equipment connections. ·Color or Tint misadjusted. ·May be station trouble. | ·Try a different channel. ·Adjust antenna. ·Press RESET key to restart channel search. | 11 |
| Blue Screen with Video1, Video2, or Component3 displayed. | ·Check Audio/Video connections. ·Check external equipment connections. ·Check external equipment setting. ·Check DVD setting. | ·Press INPUT key. ·Switch on external equipment. ·Set external equipment output connections to match input connections. | 8~10 |
| No TV Stereo or SAP Sound. | ·Check if station is broadcasting a true MTS stereo signal or a SAP signal. | ·Select Sound Menu to select Stereo or SAP from Audio option. | 12 |
| Cannot select or scan some channels. | ·Channel may be removed from memory. ·Check antenna connections. ·V-Guide is set to block programming. | ·Select CH. Scan Memory and manually add channels or start CH. (channel) search. ·Turn V-Guide to OFF or press RESET key to clear all settings. | 12 14~15 |
| Remote Control will not work TV. | ·Check batteries; see if TV is plugged in. ·Check external equipment. ·Replace batteries. ·Aim remote control at front of TV. | 10 | |
| Menu words seem misspelled. | ·Maybe a different language is selected. ·Reselect menu language choice using the on-screen menu. | 13 | |
| Cabinet makes popping sound. | ·This is a normal condition during warm-up and cool down of the plastic cabinet parts. | ||
IMPORTADOR:
COMERCIALIZADORA MEXICO
AMERICANA, S.DE R.L. DE C.V.
AV. NEXTENO No 78
COL. SANTA CRUZ ACAYUCAN
DEL.AZCAPOTZALCO,MEXICO,D.F.C.P.02770
RFC: CMA9109119L0
DESCRIPTION: Television
BRAND: SANYO
MODELS: CLT1554
CLT2054
GUARANTEE
THE APPARATUS THAT YOU HAVE ACQUIRED HAS A ONE YEAR GUARANTEE FOR MANUFACTURING DEFECTS AND A ONE YEAR SERVICE WARRANTY FROM THE DATE OF PURCHASE GRANTED BY: COMERCIALIZadora MEXICO-AMERICANA, S. DE R.L. DE C.V.
UNDER THE FOLLOWING CONDITIONS:
- TO MAKE THE GUARANTEE EFFECTIVE, SIMPLY SHOW THIS POLICY Filled OUT BY THE STORE OR SUPPLIER UNIT OR THIS SALES INVOICE, WITH THE APPARATUS IN ANY OF THE SERVICE CENTERS INDICATED ON THIS GUARANTEE.
- IF THE FAULT IS ATTRIBUTED TO A MANUFACTURING DEFECT, THE APPARATUS WILL BE REPLACED OR YOUR MONEY REFUNDED. DURING THE 30 DAYS SUBSEQUENT TO THE PURCHASE THE GUARANTEE WILL BE VALID AT THE STORE WHERE THE APPARATUS WAS PURCHASED, PRESENTING THE ABOVE DOCUMENTS.
- REPAIR TIME WILL NEVER BE MORE THAN 30 DAYS. IF THIS TIME HAS ELAPSED, AND THE PRODUCT IS NOT REPAIRED, COMERCIALIZADORA MEXICO AMERICANA, S. DE R.L. DE C.V. WILL PROCEED TO EFFECTUATE THE EXCHANGE FOR AN EQUIVALENT APPARATUS OR THE RETURN OF THE BUYING-SALE COST RESPECTIVELY.
- THIS GUARANTEE WILL COVER ITS TOTALITY OF PIECES, COMPONENTS AND SERVICE REPAIR OF PRODUCT, AND THE RESPECTIVE COST OF TRANSPORTATION.
THIS GUARANTEE WILL BE NULL AND VOID IN THE FOLLOWING CIRCUMSTANCES:
- WHEN PRODUCT HAS BEEN USED IN A DIFFERENT CONDITION THAN ITS NORMAL USE.
- WHEN PRODUCT HASNT BEEN OPERATING CORRECTLY ACCORDING TO THE INSTRUCTIONS IN THIS MANUAL.
- WHEN PRODUCT HAS BEEN CHANGED OR REPAIRED BY PERSONS NOT AUTHORIZATION FROM THE MANUFACTURER, IMPORTER, OR MERCHANT RESPONSIBLE RESPECTIVE.
CENTRO DE SERVICIO Y LUGAR DONDE OBTENER PARTES, COMPONENTES, CONSUMIBLES Y ACCESORIOS:
SUCURSAL VALLEJO
Poniente 126 No 288 B
Col. Nueva Vallejo
Mexico, D.F.
Tels. 5567-5378
5368-0105, 8589-8033
SUCURSAL MINERVA
Silos No 135, Col. Minerva
Deleg. Iztapalapa
Mexico, D.F. 09810
Tels. 5646-4551
5646-4550
STAMP, DATE AND SIGNATURE
OF
STORE
DESCRIPTION: BRAND: MODEL:
CLIENTS NAME :
ADDRESS:
EXTERIOR NUMBER: INTERIOR NUMBER:
SUB DIVISION: STATE/DELEGATION:
TELEPHONE:
ONE-YEAR LIMITED WARRANTY
THIS LIMITED WARRANTY IS VALID ONLY ON SANYO TELEVISIONS PURCHASED AND USED IN THE UNITED STATES OF AMERICA, CANADA, AND PUERTO RICO, EXCLUDING THE UNITED STATES OTHER TERRITORIES AND PROTECTORATES. THIS LIMITED WARRANTY APPLIES ONLY TO THE ORIGINAL PURCHASER, AND DOES NOT APPLY TO PRODUCTS USED FOR INDUSTRIAL OR COMMERCIAL PURPOSES.
FOR ONE YEAR from the date of purchase, Sanyo Manufacturing Corporation will replace any defective TV.
To insure proper warranty exchange, keep the original sales receipt for evidence of purchase. Return the defective TV to the retailer along with the receipt and the included accessories, such as the remote control. The defective TV will be exchanged for the same model, or a replacement model of equal value, if necessary. Replacement model will be contingent on availability and at the sole discretion of Sanyo Manufacturing Corporation.
THE FOREGOING WARRANTY IS EXCLUSIVE AND IN LIEU OF ALL OTHER WARRANTYES OF MERCHANTABILITY OR FITNESS FOR A PARTICULAR PURPOSE.
OBLIGATIONS
For one year from the date of purchase, Sanyo Manufacturing Corporation warrants this product to be free from defects in material and workmanship under normal use and conditions. Should replacement be necessary under this warranty for any reason due to manufacturing defect or malfunction during the first year from date of original purchase, Sanyo Manufacturing Corporation will provide a new TV via exchange at the retailer.
For customer assistance, whether during or out of the warranty period, call toll free 1-800-877-5032.
Weekdays 7:30 AM - 7:00 PM Central Time
Saturday 7:30 AM - 4:00 PM Central Time
This warranty expresses specific contractual rights; retail purchasers may have additional statutory rights which vary from state to state.
(EFFECTIVE: August 1, 2002)
For your protection in the event of theft or loss of this product, please fill in the information requested below and KEEP IN A SAFE PLACE FOR YOUR OWN PERSONAL RECORDS.
Model No.
Serial No.
(Located on back of unit)
Date of Purchase
Purchase Price
Where Purchased

Sanyo Manufacturing Corp. 3333 Sanyo Road, Forrest City, AR 72335
Peso: CLT1554 12.7 (Ibs), 5.8 (Kg)
CLT2054 20.3 (Ibs), 9.2 (Kg)
Sanyo Manufacturing Corp.
3333 Sanyo Road, Forrest City, AR 72335
FRANÇAIS Manuel d instructions
Mettez 2 AAA, (non fournies)
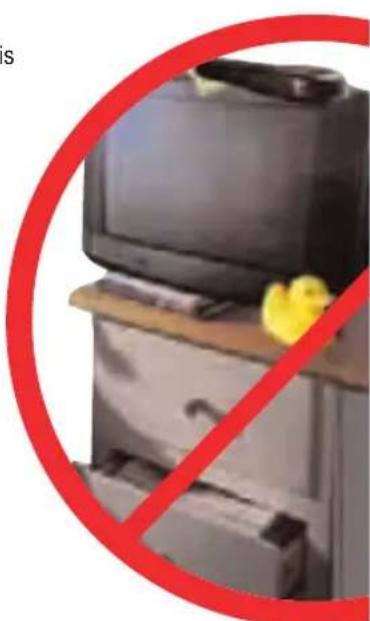
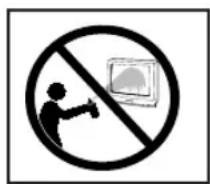
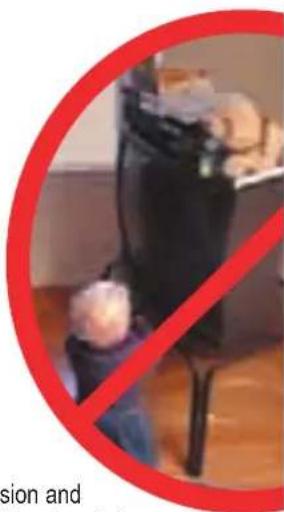
It Makes A Difference Where Your TV Stands
Congratulations on your purchase! As you enjoy your new product, please keep these safety tips in mind:

The Issue
If you are like most Americans, you have a television in your home. Many homes, in fact, have more than one television.
The home theater entertainment experience is a growing trend, and larger televisions are popular purchases and are not always supported on the proper TV stands.
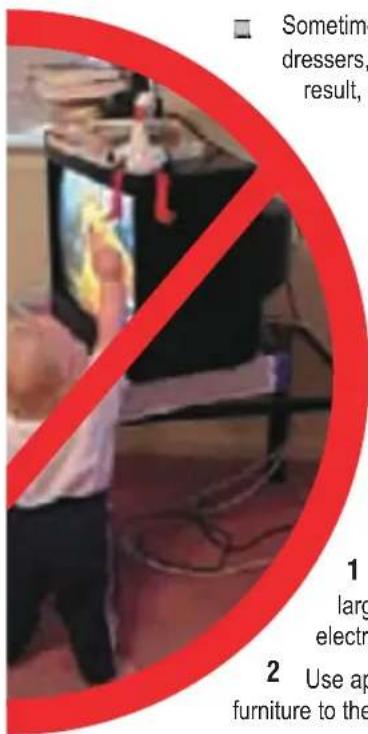
Sometimes televisions are improperly secured or inappropriately situated on dressers, bookcases, shelves, desks, audio speakers, chests, or carts. As a result, TV sets may fall over and may cause unnecessary injury.
Sanyo Cares!
The industry is committed to making home entertainment enjoyable and safe.
The Consumer Electronics Association formed the Home Entertainment Support Safety Committee comprised of television and consumer electronics furniture manufacturers to advocate children's safety and educate customers and their families about television safety.
Tune Into Safety
1 One size does NOT fit all. Use the appropriate furniture that is large enough to support the weight of your television (and other electronic components).
2 Use appropriate angle braces, straps, and anchors to secure your furniture to the wall (but never screw anything directly into the TV).
3 Carefully read and understand the other enclosed instructions for proper use of this product.
4 Don't allow children to climb on or play with furniture and television sets.
5 Avoid placing any items on top of TVs such as VCRs and remotes that may pique the children's curiosity.
6 Remember that children can become excited while watching a program and can potentially push or pull a TV over.
7 Share our safety message on this hidden hazard of the home with your family and friends. Thank you!