
Aspire E1571G - Laptop ACER - Free user manual and instructions
Find the device manual for free Aspire E1571G ACER in PDF.
| Product type | Laptop |
| Brand | Acer |
| Model | Aspire E1571G |
| Operating system | Windows 8 |
| Screen | 15.6 inches |
| Battery | Lithium-ion, rechargeable |
| Power adapter | 100-240 V AC, 50/60 Hz |
| Wireless connectivity | Wi-Fi, Bluetooth (depending on model) |
| Ports | USB, HDMI (depending on model), headphone jack, microphone |
| Optical drive | DVD±RW (depending on model) |
| Touchpad | Yes, with multi-touch gestures |
| Keyboard | With built-in numeric keypad |
| Maintenance and cleaning | Unplug before cleaning, use a soft damp cloth |
| Security | Kensington lock slot, BIOS passwords |
| Warranty | International Travelers Warranty (ITW) |
Frequently Asked Questions - Aspire E1571G ACER
User questions about Aspire E1571G ACER
0 question about this device. Answer the ones you know or ask your own.
Ask a new question about this device
Download the instructions for your Laptop in PDF format for free! Find your manual Aspire E1571G - ACER and take your electronic device back in hand. On this page are published all the documents necessary for the use of your device. Aspire E1571G by ACER.
USER MANUAL Aspire E1571G ACER
© 2013 All Rights Reserved
Aspire Notebook User's Manual
This revision: 01/2013
Model number:
Serial number:
Date of purchase:
Place of purchase:
Information for your safety and comfort
Safety instructions
Read these instructions carefully. Keep this document for future reference. Follow all warnings and instructions marked on the product.
Turning the product off before cleaning
Unplug this product from the wall outlet before cleaning. Do not use liquid cleaners or aerosol cleaners. Use a damp cloth for cleaning.
Warnings
Accessing the power cord
Be sure that the power outlet you plug the power cord into is easily accessible and located as close to the equipment operator as possible. When you need to disconnect power to the equipment, be sure to unplug the power cord from the electrical outlet.
Disconnecting the power source
Observe the following guidelines when connecting and disconnecting power to the power supply unit:
Install the power supply unit before connecting the power cord to the AC power outlet.
Unplug the power cord before removing the power supply unit from the computer.
If the system has multiple sources of power, disconnect power from the system by unplugging all power cords from the power supplies.
Using electrical power
-
This product should be operated from the type of power indicated on the marking label. If you are not sure of the type of power available, consult your dealer or local power company.
-
Do not allow anything to rest on the power cord. Do not locate this product where people will walk on the cord.
-
If an extension cord is used with this product, make sure that the total ampere rating of the equipment plugged into the extension cord does not exceed the extension cord ampere rating. Also, make sure that the total rating of all products plugged into the wall outlet does not exceed the fuse rating.
iv
- Do not overload a power outlet, strip or receptacle by plugging in too many devices. The overall system load must not exceed 80% of the branch circuit rating. If power strips are used, the load should not exceed 80% of the power strip's input rating.
- This product's AC adapter is equipped with a three-wire grounded plug. The plug only fits in a grounded power outlet. Make sure the power outlet is properly grounded before inserting the AC adapter plug. Do not insert the plug into a non-grounded power outlet. Contact your electrician for details.

Warning! The grounding pin is a safety feature. Using a power outlet that is not properly grounded may result in electric shock and/or injury.

Note: The grounding pin also provides good protection from unexpected noise produced by other nearby electrical devices that may interfere with the performance of this product.
- The system can be powered using a wide range of voltages; 100 to 120 or 220 to 240V AC. The power cord included with the system meets the requirements for use in the country/region where the system was purchased. Power cords for use in other countries/regions must meet the requirements for that country/region. For more information on power cord requirements, contact an authorized reseller or service provider.
Bundled dummy cards

Note: Information in this section may not apply to your computer.
Your computer shipped with plastic dummies installed in the card slots. Dummies protect unused slots from dust, metal objects or other particles.
Save the dummies for use when no cards are in the slots.
General
-
Do not use this product near water.
-
Do not place this product on an unstable cart, stand or table. If the product falls, it could be seriously damaged.
- Slots and openings are provided for ventilation to ensure reliable operation of the product and to protect it from overheating. These openings must not be blocked or covered. The openings should never be blocked by placing the product on a bed, sofa, rug or other similar surface. This product should never be placed near or over a radiator or heat register, or in a built-in installation unless proper ventilation is provided.
- Never push objects of any kind into this product through cabinet slots as they
may touch dangerous voltage points or short-out parts that could result in a fire or electric shock. Never spill liquid of any kind onto or into the product.
- To avoid damage of internal components and to prevent battery leakage, do not place the product on a vibrating surface.
- Never use it under sporting, exercising, or any vibrating environment which will probably cause unexpected short current or damage rotor devices, HDD, Optical drive, and even exposure risk from lithium battery pack.
- The bottom surface, areas around ventilation openings and AC adapter may get hot. To avoid injury, ensure they do not come in contact with your skin or body.
- Your device and its enhancements may contain small parts. Keep them out of the reach of small children.
- The surface temperature of the base will rise during normal operation, particularly when plugged in to AC power. Allowing sustained contact with exposed skin can cause discomfort or burns.
Product servicing
Do not attempt to service this product yourself, as opening or removing covers may expose you to dangerous voltage points or other risks. Refer all servicing to qualified service personnel.
Unplug this product from the wall outlet and refer servicing to qualified service personnel when:
The power cord or plug is damaged, cut or frayed.
- Liquid was spilled into the product.
The product was exposed to rain or water.
The product has been dropped or the case has been damaged.
- The product exhibits a distinct change in performance, indicating a need for service.
- The product does not operate normally after following the operating instructions.

Note: Adjust only those controls that are covered by the operating instructions, since improper adjustment of other controls may result in damage and will often require extensive work by a qualified technician to restore the product to normal condition.
Guidelines for safe battery usage
This notebook uses a Lithium-ion battery. Do not use it in a humid, wet or corrosive environment. Do not put, store or leave your product in or near a heat source, in a high temperature location, in strong direct sunlight, in a microwave oven or in a pressurized container, and do not expose it to temperatures over 60^ C (140°F). Failure to follow these guidelines may cause the battery to leak acid, become hot, explode or ignite and cause injury and/or damage. Do not pierce, open or
disassemble the battery. If the battery leaks and you come into contact with the leaked fluids, rinse thoroughly with water and seek medical attention immediately. For safety reasons, and to prolong the lifetime of the battery, charging will not occur at temperatures below 0^ C (32^ F) or above 40^ C (104^ F).
The full performance of a new battery is achieved only after two or three complete charge and discharge cycles. The battery can be charged and discharged hundreds of times, but it will eventually wear out. When the operation time becomes noticeably shorter than normal, buy a new battery.
Use only the approved batteries, and recharge your battery only with the approved chargers designated for this device.
Use the battery only for its intended purpose. Never use any charger or battery that is damaged. Do not short-circuit the battery. Accidental short-circuiting can occur when a metallic object such as a coin, clip or pen causes direct connection of the positive (+) and negative (-) terminals of the battery. (These look like metal strips on the battery.) This might happen, for example, when you carry a spare battery in your pocket or purse. Short-circuiting the terminals may damage the battery or the connecting object.
The capacity and lifetime of the battery will be reduced if the battery is left in hot or cold places, such as in a closed car in summer or winter. Always try to keep the battery between 15^ C and 25^ C (59°F and 77°F). A device with a hot or cold battery may not work temporarily, even when the battery is fully charged. Battery performance is especially limited in temperatures well below freezing.
Do not dispose of batteries in a fire as they may explode. Batteries may also explode if damaged. Dispose of batteries according to local regulations. Please recycle when possible. Do not dispose as household waste.
Wireless devices may be susceptible to interference from the battery, which could affect performance.

Note: Please refer to www.acer.com for battery shipping documents.
Replacing the battery pack
The notebook uses lithium batteries. Replace the battery with the same type as that which came bundled with your product. Use of another battery may present a risk of fire or explosion.

Warning! Batteries may explode if not handled properly. Do not disassemble or dispose of them in fire. Keep them away from children. Follow local regulations when disposing of used batteries.
Caution for Optical Drive Device

Note: Information in this section may not apply to your computer.
CAUTION: This appliance contains a laser system and is classified as a "CLASS 1 LASER PRODUCT." In case of any trouble with this device, please contact your nearest AUTHORIZED service station. To prevent direct exposure to the laser beam, do not try to open the enclosure.
CLASS 1 LASER PRODUCT
CAUTION: INVISIBLE LASER RADIATION WHEN OPEN. AVOID EXPOSURE TO BEAM.
APPAREIL A LASER DE CLASSE 1 PRODUIT
LASERATTENTION: RADIATION DU FAISCEAU LASER INVISIBLE EN CAS D'OUVERTURE. EVITTER TOUTE EXPOSITION AUX RAYONS.
LUOKAN 1 LASERLAITE LASER KLASSE 1
VORSICHT: UNSICHTBARE LASERSTRAHLUNG, WENN ABDECKUNG GEOFFNET NICT DEM STRAHLL AUSSETZEN
PRODUCTO LÁSER DE LA CLASE I
ADVERTENCIA: RADIACION LÁSER INVISIBLE AL SER ABIERTO. EVITE EXPONERSE A LOS RAYOS.
ADVARSEL: LASERSTRÄLING VEDÄBNING SE IKKE IND I STRÄLEN.
VARO! LAVATTAESSA OLET ALTTINA LASERSATEILLLE.
VARNING: LASERSTRALNING NAR DENNA DEL AR ÖPPNAD ALA TUIJOTA SATEESEENSTIRRA EJ IN I STRÄLEN
VARNING: LASERSTRÄLNING NAR DENNA DEL ÅR ÖPPNADSTIRRA EJ IN I STRÄLEN
ADVARSEL: LASERSTRALING NAR DEKSEL APNESSTIRR IKKE INN I STRALEN
Telephone line safety
- Disconnect all telephone lines from the equipment when not in use and/or before servicing.
- To avoid the remote risk of electric shock from lightning, do not connect the telephone line to this equipment during lightning or thunderstorms.

Warning! For safety reasons, do not use non-compliant parts when adding or changing components. Consult your reseller for purchase options.
Radio frequency interference

Warning! For safety reasons, turn off all wireless or radio transmitting devices when using your laptop under the following conditions. These devices may include, but are not limited to: wireless LAN (WLAN), Bluetooth and/or 3G.
viii
Remember to follow any special regulations in force in any area, and always switch off your device when its use is prohibited or when it may cause interference or danger. Use the device only in its normal operating positions. This device meets RF exposure guidelines when used normally. To successfully transmit data files or messages, this device requires a good quality connection to the network. In some cases, transmission of data files or messages may be delayed until such a connection is available. Ensure that the above separation distance instructions are followed until the transmission is completed. Parts of the device are magnetic. Metallic materials may be attracted to the device, and persons with hearing aids should not hold the device to the ear with the hearing aid. Do not place credit cards or other magnetic storage media near the device, because information stored on them may be erased.
Medical devices
Operation of any radio transmitting equipment, including wireless phones, may interfere with the functionality of inadequately protected medical devices. Consult a physician or the manufacturer of the medical device to determine if they are adequately shielded from external RF energy or if you have any questions. Switch off your device in health care facilities when any regulations posted in these areas instruct you to do so. Hospitals or health care facilities may be using equipment that could be sensitive to external RF transmissions.
Pacemakers. Pacemaker manufacturers recommend that a minimum separation of 15.3 centimeters (6 inches) be maintained between wireless devices and a pacemaker to avoid potential interference with the pacemaker. These recommendations are consistent with the independent research by and recommendations of Wireless Technology Research. Persons with pacemakers should do the following:
- Always keep the device more than 15.3 centimeters (6 inches) from the pacemaker
- Not carry the device near your pacemaker when the device is switched on. If you suspect interference, switch off your device, and move it.
Hearing aids. Some digital wireless devices may interfere with some hearing aids. If interference occurs, consult your service provider.
Vehicles
RF signals may affect improperly installed or inadequately shielded electronic systems in motor vehicles such as electronic fuel injection systems, electronic anti-skid (anti-lock) braking systems, electronic speed control systems, and air bag systems. For more information, check with the manufacturer, or its representative, of your vehicle or any equipment that has been added. Only qualified personnel should service the device, or install the device in a vehicle. Faulty installation or service may be dangerous and may invalidate any warranty that may apply to the device. Check regularly that all wireless equipment in your vehicle is mounted and operating properly. Do not store or carry flammable liquids, gases, or explosive materials in the same compartment as the device, its parts, or enhancements. For vehicles equipped with an air bag, remember that air bags inflate with great force. Do not place objects,
including installed or portable wireless equipment in the area over the air bag or in the air bag deployment area. If in-vehicle wireless equipment is improperly installed, and the air bag inflates, serious injury could result. Using your device while flying in aircraft is prohibited. Switch off your device before boarding an aircraft. The use of wireless teledevices in an aircraft may be dangerous to the operation of the aircraft, disrupt the wireless telephone network, and may be illegal.
Potentially explosive environments
Switch off your device when in any area with a potentially explosive atmosphere and obey all signs and instructions. Potentially explosive atmospheres include areas where you would normally be advised to turn off your vehicle engine. Sparks in such areas could cause an explosion or fire resulting in bodily injury or even death. Switch off the device at refueling points such as near gas pumps at service stations. Observe restrictions on the use of radio equipment in fuel depots, storage, and distribution areas; chemical plants; or where blasting operations are in progress. Areas with a potentially explosive atmosphere are often, but not always, clearly marked. They include below deck on boats, chemical transfer or storage facilities, vehicles using liquefied petroleum gas (such as propane or butane), and areas where the air contains chemicals or particles such as grain, dust or metal powders. Do not switch the notebook on when wireless phone use is prohibited or when it may cause interference or danger.
Emergency calls
Warning: You cannot make emergency calls through this device. To make an emergency call you shall dial out through your mobile phone or other telephone call system.
Disposal instructions
Do not throw this electronic device into the trash when discarding. To minimize pollution and ensure utmost protection of the global environment, please recycle. For more information on the Waste from Electrical and Electronics Equipment (WEEE) regulations, visit www.acer-group.com/public/Sustainability
ENERGY STAR

Acer's ENERGY STAR qualified products save your money by reducing energy cost and protecting the environment without sacrificing features or performance. Acer is proud to offer our customers products with the ENERGY STAR mark.
What is ENERGY STAR?
Products that are ENERGY STAR qualified use less energy and prevent greenhouse gas emissions by meeting strict energy efficiency guidelines set
X
by the U.S. Environmental Protection Agency. Acer is committed to offering products and services worldwide that help customers save money, conserve energy and improve the quality of our environment. The more energy we can save through higher energy efficiency, the more we reduce greenhouse gases and the risks of climate change. More information refers to
www.energystar.gov or www.energystar.gov/powermanagement.

Note: Information in this section may not apply to your computer.
Acer ENERGY STAR qualified products:
- Produce less heat and reduce cooling loads, and warmer climates.
- Automatically go into "display sleep" and "computer sleep" mode after 10 and 30 minutes of inactivity respectively.
- Wake the computer from sleep mode by pushing keyboard or moving mouse.
- Computers will save more than 80% energy at "sleep" mode.
ENERGY STAR and the ENERGY STAR mark are registered U.S. marks
Tips and information for comfortable use
Computer users may complain of eyestrain and headaches after prolonged use. Users are also at risk of physical injury after long hours of working in front of a computer. Long work periods, bad posture, poor work habits, stress, inadequate working conditions, personal health and other factors greatly increase the risk of physical injury.
Incorrect computer usage may lead to carpal tunnel syndrome, tendonitis, tenosynovitis or other musculoskeletal disorders. The following symptoms may appear in the hands, wrists, arms, shoulders, neck or back:
- Numbness, or a burning or tingling sensation.
- Aching, soreness or tenderness.
- Pain, swelling or throbbing.
- Stiffness or tightness.
Coldness or weakness.
If you have these symptoms, or any other recurring or persistent discomfort and/or pain related to computer use, consult a physician immediately and inform your company's health and safety department.
The following section provides tips for more comfortable computer use.
Finding your comfort zone
Find your comfort zone by adjusting the viewing angle of the monitor, using a footrest, or raising your sitting height to achieve maximum comfort. Observe the following tips:
-
Refrain from staying too long in one fixed posture.
-
Avoid slouching forward and/or leaning backward.
- Stand up and walk around regularly to remove the strain on your leg muscles.
-
Take short rests to relax your neck and shoulders.
-
Avoid tensing your muscles or shrugging your shoulders.
- Install the external display, keyboard and mouse properly and within comfortable reach.
- If you view your monitor more than your documents, place the display at the center of your desk to minimize neck strain.
Taking care of your vision
Long viewing hours, wearing incorrect glasses or contact lenses, glare, excessive room lighting, poorly focused screens, very small typefaces and low-contrast displays could stress your eyes. The following sections provide suggestions on how to reduce eyestrain.
Eyes
Rest your eyes frequently.
- Give your eyes regular breaks by looking away from the monitor and focusing on a distant point.
- Blink frequently to keep your eyes from drying out.
Display
-
Keep your display clean.
-
Keep your head at a higher level than the top edge of the display so your eyes point downward when looking at the middle of the display.
- Adjust the display brightness and/or contrast to a comfortable level for enhanced text readability and graphics clarity.
-
Eliminate glare and reflections by:
-
placing your display in such a way that the side faces the window or any light source,
- minimizing room light by using drapes, shades or blinds,
using a task light, - changing the display's viewing angle,
using a glare-reduction filter, -
using a display visor, such as a piece of cardboard extended from the display's top front edge.
-
Avoid adjusting your display to an awkward viewing angle.
-
Avoid looking at bright light sources for extended periods of time.
Developing good work habits
The following work habits make computer use more relaxing and productive:
- Take short breaks regularly and often.
XII
Perform some stretching exercises.
Breathe fresh air as often as possible.
Exercise regularly and maintain a healthy body.

Warning! We do not recommend using the computer on a couch or bed. If this is unavoidable, work for only short periods, take breaks regularly, and do some stretching exercises.

Note: For more information, please refer to "Regulations and safety notices" on page 59.
First things first
We would like to thank you for making an Acer notebook your choice for meeting your mobile computing needs.
Your guides
To help you use your Acer notebook, we have designed a set of guides:
First off, the setup poster helps you get started with setting up your computer.
This Aspire User's Manual contains useful information applying to all models in the Aspire product series. It covers basic topics such as using the keyboard and audio, etc. Please understand that due to its nature, the User's Manual will occasionally refer to functions or features which are only contained in certain models of the series, but not necessarily in the model you purchased. Such instances are marked in the text with language such as "only for certain models."
The Quick Guide introduces you to the basic features and functions of your new computer. For more on how your computer can help you to be more productive, please refer to the Aspire User's Manual. This guide contains detailed information on such subjects as system utilities, data recovery, expansion options and troubleshooting. In addition it contains warranty information and the general regulations and safety notices for your notebook. It is available in Portable Document Format (PDF) and comes preloaded on your notebook. Follow these steps to access it:
1 From Start, simply start typing "User" to open the Search charm.
2 Click Acer User's Manual to open the User's Manual on your machine.
Basic care and tips for using your computer
Turning your computer on and off
To turn on the computer, simply press and release the power button. Please refer to the setup poster for the location of the power button.
To turn the power off, do any of the following:
- Use the Windows shutdown command: Press the Windows key +
, click Settings > Power then click Shut Down.
If you need to power down the computer for a short while, but don't want to completely shut it down, you can put it into Hibernate by:
- Pressing the power button.
You can also put the computer in sleep mode by pressing the sleep hotkey <Fn> + <F4> .
Note: If you cannot power off the computer normally, press and hold the power button for more than four seconds to shut down the computer. If you turn off the computer and want to turn it on again, wait at least two seconds before powering up.
Taking care of your computer
Your computer will serve you well if you take care of it.
- Do not expose the computer to direct sunlight. Do not place it near sources of heat, such as a radiator.
- Do not expose the computer to temperatures below 0^ ( 32^ ) or above 50^ ( 122^ ).
- Do not subject the computer to magnetic fields.
- Do not expose the computer to rain or moisture.
- Do not spill water or any liquid on the computer.
- Do not subject the computer to heavy shock or vibration.
- Do not expose the computer to dust or dirt.
- Never place objects on top of the computer.
- Do not slam the computer display when you close it.
- Never place the computer on uneven surfaces.
Taking care of your AC adapter
Here are some ways to take care of your AC adapter:
- Do not connect the adapter to any other device.
- Do not step on the power cord or place heavy objects on top of it. Carefully route the power cord and any cables away from foot traffic.
- When unplugging the power cord, do not pull on the cord itself but pull on the plug.
- The total ampere ratings of the equipment plugged in should not exceed the ampere rating of the cord if you are using an extension cord. Also, the total current rating of all equipment plugged into a single wall outlet should not exceed the fuse rating.
Taking care of your battery pack
Here are some ways to take care of your battery pack:
- Use only batteries of the same kind as replacements. Turn the power off before removing or replacing batteries.
- Do not tamper with batteries. Keep them away from children.
- Dispose of used batteries according to local regulations. Recycle if possible.
Cleaning and servicing
When cleaning the computer, follow these steps:
1 Turn off the computer and remove the battery pack.
2 Disconnect the AC adapter.
3 Use a soft, moist cloth. Do not use liquid or aerosol cleaners.
If either of the following occurs:
The computer has been dropped or the body has been damaged;
The computer does not operate normally
Please refer to "Frequently asked questions" on page 52.
Information for your safety and comfort iii
Safety instructions iii
Warnings iii
Caution for Optical Drive Device vi
Radio frequency interference vi
Medical devices viii
Vehicles viii
Potentially explosive environments ix
Emergency calls ix
Disposal instructions ix
ENERGY STAR ix
Tips and information for comfortable use x
First things first xiii
Your guides xiii
Basic care and tips for using your computer xiii
Turning your computer on and off xiii
Taking care of your computer xiv
Taking care of your AC adapter xiv
Taking care of your battery pack XV
Cleaning and servicing XV
Touchpad 1
Touchpad basics (for models with separate buttons) 1
Touchpad basics (for models with integrated buttons) 2
3
Using the keyboard 4
Lock keys and embedded numeric keypad\ 4
Hotkeys 5
Recovery 7
Creating a recovery backup 7
Creating a drivers and applications backup 9
Recovering your system 11
Reinstalling drivers and applications 11
Returning to an earlier system snapshot 13
Returning your system to its factory condition 14
Recovering from Windows 14
Recovering from a recovery backup 16
Acer Backup Manager 19
Acer clear.fi 21
Navigating media and photos 21
Shared files 21
Which devices are compatible? 22
Playing to another device 22
Power management 23
Saving power 23
Disable Fast startup 23
Battery pack 25
Battery pack characteristics 25
Charging the battery 26
Optimizing battery life 26
Checking the battery level 27
Battery-low warning 27
Installing and removing the battery pack 27
Taking your notebook PC with you 29
Disconnecting from the desktop 29
Moving around 29
Preparing the computer 29
What to bring to meetings 30
Taking the computer home 30
Preparing the computer 30
What to take with you 30
Special considerations 30
Setting up a home office 31
Traveling with the computer 31
Preparing the computer 31
What to take with you 31
Special considerations 31
Traveling internationally with the computer 31
Preparing the computer 32
What to bring with you 32
Special considerations 32
Securing your computer 33
Using a computer security lock 33
Using passwords 33
Entering passwords 34
Setting passwords 34
Expanding through options 35
Connectivity options 35
Fax/data modem 35
Built-in network feature 36
Consumer Infrared (CIR) 36
Universal Serial Bus (USB) 37
IEEE 1394 port 38
High-Definition Multimedia Interface 38
ExpressCard 39
40
Enjoying TV with Windows Media Center 42
Choose your input type 42
Watching TV using the optional DVB-T (digital TV) antenna
(for selected models) 42
To connect the digital antenna 43
Watching TV with an external antenna or cable socket 43
BIOS utility 44
Boot sequence 44
Password 44
Using software 45
Playing DVD movies 45
Using a Bluetooth connection 46
Enabling and disabling Bluetooth 46
Adding a Bluetooth device 47
Troubleshooting 50
Troubleshooting tips 50
Error messages 50
Frequently asked questions 52
Requesting service 53
International Travelers Warranty (ITW) 53
Before you call 53
Tips and hints for using Windows 8 55
Three concepts you might want to keep in mind 55
How do I access the charms? 55
How do I get to Start? 55
How do I jump between apps? 55
How do I turn off my computer? 55
Why is there a new interface? 55
How do I unlock my computer? 56
How do I personalize my computer? 56
I want to use Windows in the way that I'm used to - give me my desktop back! 57
Where are my apps? 57
What is a Microsoft ID (account)? 57
How do I add a favorite to Internet Explorer? 58
How do I check for Windows updates? 58
Where can I get more information? 58
Regulations and safety notices 59
FCC statement 59
Modem notices 60
LCD pixel statement 62
Radio device regulatory notice 62
General 62
Wireless operation channels for different domains 63
France: Restricted wireless frequency bands 63
List of National Codes 64
The FCC RF safety requirement 64
Canada — Low-power license-exempt radio
communication devices (RSS-210) 65
Exposure of humans to RF fields (RSS-102) 65
LCD panel ergonomic specifications 67
Touchpad
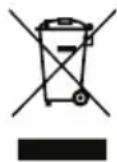
The built-in touchpad is a pointing device that senses movement on its surface. This means the cursor responds as you move your finger across the surface of the touchpad.

Note: Please keep the touchpad and your fingers dry and clean.
Touchpad basics (for models with separate buttons)
The following items show you how to use the touchpad with two buttons.
- Move your finger across the touchpad to move the cursor.
- Press the left and right buttons located beneath the touchpad to perform selection and execution functions. These two buttons are similar to the left and right buttons on a mouse. Tapping on the touchpad is the same as clicking the left button.
| Function Left button | Right button | Main touchpad |
| Execute Quickly click twice. | Tap twice (at the same speed as double-clicking a mouse button). | |
| Select Click once. Tap once. | ||
| Drag Click and hold, then use finger on the touchpad to drag the cursor. | Tap twice (at the same speed as double-clicking a mouse button); rest your finger on the touchpad on the second tap and drag the cursor. | |
| Access context menu | Click once. |

Note: Illustrations for reference only. The exact configuration of your PC depends on the model purchased.

Note: When using the touchpad, keep it — and your fingers — dry and clean. The touchpad is sensitive to finger movement; hence, the lighter the touch, the better the response. Tapping harder will not increase the touchpad's responsiveness.

Note: By default, vertical and horizontal scrolling is enabled on your touchpad. It can be disabled under Mouse settings in Windows Control Panel.
Touchpad basics (for models with integrated buttons)

Note: The touchpad is sensitive to finger movement; the lighter the touch, the better the response. Tapping harder will not increase the touchpad's responsiveness.
The cursor is controlled by some basic gestures:

- Single-finger slide: Slide a finger across the touchpad to move the cursor.
- Single-finger press or tap: Press the touchpad down, or lightly tap the touchpad with your finger, to perform a 'click', which will select or start an item. Quickly repeat the tap to perform a double tap or 'double click'.
- Single-finger press or tap in the bottom-right corner: Press the bottom right corner of the touchpad to perform a 'right click'. In the Start screen, this will toggle the app commands, in most apps this will open a context menu related to the selected item.
- Drag: Press and hold the bottom left corner of the touchpad, or tap twice anywhere on the touchtap, then slide a finger across the touchpad to select all items in an area.
Touchpad gestures
Windows 8 and many applications support touchpad gestures that use one or more fingers.

Note: Support for touchpad gestures depends on the active application.

-
Swipe in from right edge: Toggle the charms.
-
Swipe in from top edge: Toggle the app commands.
-
Swipe in from left edge: Switch to the previous app.
-
Two-finger slide: Swiftly scroll through web pages, documents and playlists by placing two fingers on the touchpad and moving both in any direction.
-
Two-finger pinch: Zoom in and out of photos, maps and documents with a simple finger-and-thumb gesture.

Using the keyboard
The keyboard has full-sized keys and an embedded numeric keypad*, separate cursor, lock, Windows, function and special keys.
Lock keys and embedded numeric keypad\

Note: Information in this section may not apply to your computer.
The keyboard has three lock keys which you can toggle on and off.
Lock key Description
| Caps Lock When Caps Lock is on, all alphabetic characters typed are in uppercase. | |
| Num Lock <Fn> + <F11>* | When Num Lock is on, the embedded keypad is in numeric mode. The keys function as a calculator (complete with the arithmetic operators +, -, *, and /). Use this mode when you need to do a lot of numeric data entry. A better solution would be to connect an external keypad. |
| Scroll Lock <Fn> + <F12> | When Scroll Lock is on, the screen moves one line up or down when you press the up or down arrow keys respectively. Scroll Lock does not work with some applications. |
The embedded numeric keypad functions like a desktop numeric keypad. It is indicated by small characters located on the upper right corner of the keycaps. To simplify the keyboard legend, cursor-control key symbols are not printed on the keys.
Desired access Num Lock on Num Lock off
| Number keys on embedded keypad | Type numbers in a normal manner. | |
| Cursor-control keys on embedded keypad | Hold <Shift> while using cursor-control keys. | Hold <Fn> while using cursor-control keys. |
| Main keyboard keys | Hold <Fn> while typing letters on embedded keypad. | Type the letters in a normal manner. |
Hotkeys
The computer employs hotkeys or key combinations to access most of the computer's controls like screen brightness and volume output.
To activate hotkeys, press and hold the <Fn> key before pressing the other key in the hotkey combination.
| Hotkey Icon Function Description | ||
| +Fn> + <F3> | Communication key | Enables / disables the computer's communication devices. (Communication devices may vary by configuration.) |
| +Fn> + <F4> | Z² Sleep | Puts the computer in Sleep mode. |
| +Fn> + <F5> | Display toggle | Switches display output between the display screen, external monitor (if connected) and both. |
| +Fn> + <F6> | Display off | Turns the display screen backlight off to save power. Press any key to return. |
| +Fn> + <F7> | Touchpad toggle | Turns the built-in touchpad on and off. |
| +Fn> + <F8> | Speaker toggle | Turns the speakers on and off. |
| +Fn> + <F11> | NumLk | Turns the embedded numeric keypad on or off (only for certain models). |
| +Fn> + <F2> | Brightness up Increases the screen brightness. | |
| +Fn> + <F3> | Brightness down Decreases the screen brightness. | |
| +Fn> + <F4> | Volume up Increases the sound volume. | |
| +Fn> + <F5> | Volume down Decreases the sound volume. | |
| +Fn> + Home> | /II | Play/Pause Play or pause a selected media file. |
| +Fn> + Pg Up> | ■ | Stop Stop playing the selected media file. |
| +Fn> + Pg Dn> | ▲▲ | Previous Return to the previous media file. |
| +Fn> + End> | ▲▲ | Next Jump to the next media file. |
Recovery
If you are having trouble with your computer, and the frequently asked questions (see page 52) do not help, you can 'recover' your computer - i.e. return it to an earlier state.
This section describes the recovery tools available on your computer. Acer provides Acer Recovery Management, which allows you to create a recovery backup, a drivers and applications backup, and to start recovery options, either using Windows tools, or the recovery backup.

Note: Acer Recovery Management is only available with a preinstalled Windows operating system.

Important: We recommend that you create a Recovery Backup and Drivers and Applications Backup and as soon as possible. In certain situations a full recovery will require a USB recovery backup.
Creating a recovery backup
To reinstall from a USB storage drive, you must first create a recovery backup. The recovery backup includes the entire original contents of your computer's hard drive, including Windows and all factory-loaded software and drivers. Using this backup will restore your computer to the same state as when you purchased it, while giving you an option to retain all settings and personal data.

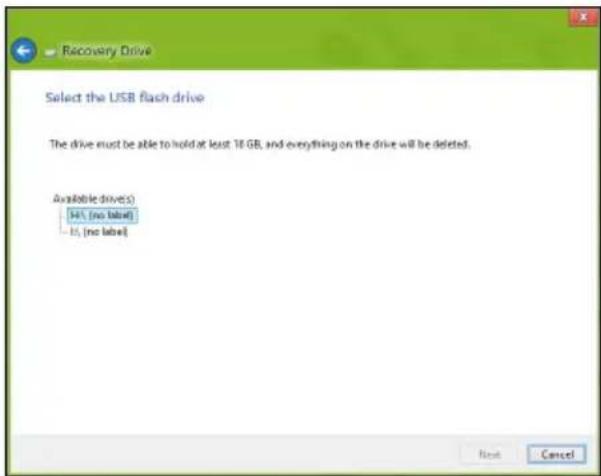
Note: Make sure you have a USB drive with a capacity of at least 16 GB.
- From Start, type 'Recovery' and then click Acer Recovery Management in the list of apps.
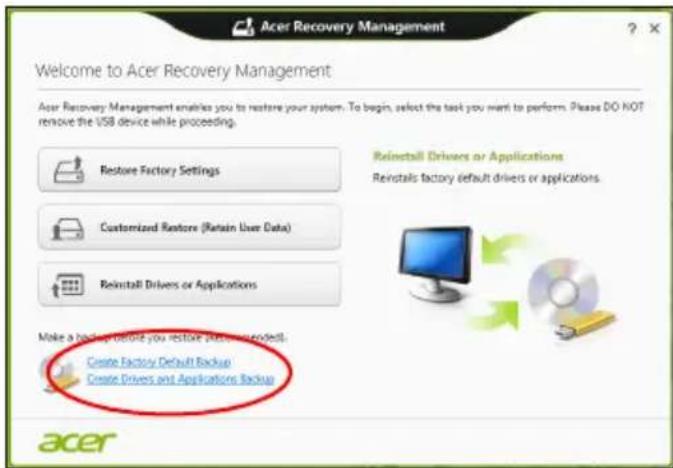
- Click Create Factory Default Backup. The Recovery Drive window opens.
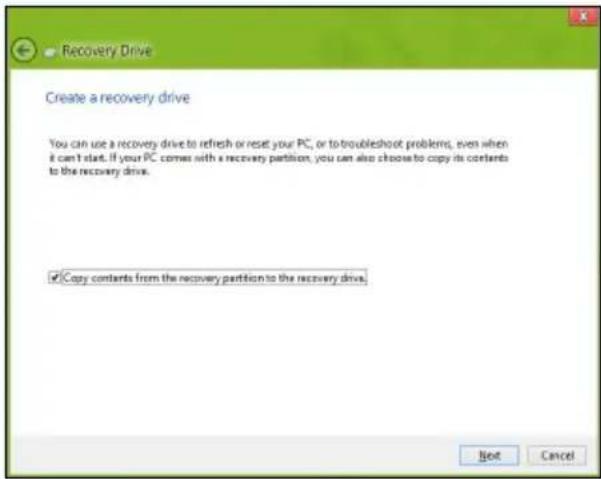
Make sure Copy contents from the recovery partition to the recovery drive is selected. This provides the most complete and safest recovery backup.
-
Plug in the USB drive then click Next.
-
Make sure your USB drive has enough capacity before continuing. The recovery backup requires at least 16 GB of storage
- You will be shown the backup progress on the screen.
- Follow the process until it completes.
- After creating the recovery backup, you can choose to delete the recovery information on your computer. If you delete this information, you can only use the USB recovery backup to restore your computer, if you lose or erase the USB drive, you cannot restore your computer.
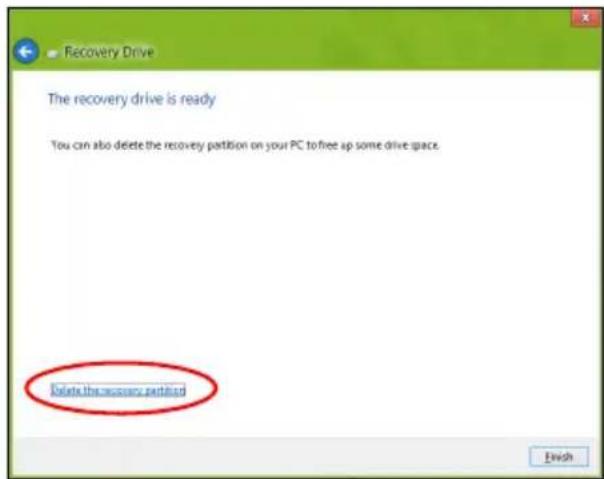
- Unplug the USB drive and label it clearly.

Important: Write a unique, descriptive label on the backup, such as 'Windows Recovery Backup'. Make sure you keep the backup in a safe place that you will remember.
Creating a drivers and applications backup
To create a Drivers and Applications Backup, that contains the factory-loaded software and drivers needed by your computer, you may use either a USB storage drive or, if your computer features a DVD recorder, one or more blank recordable DVDs.
- From Start, type 'Recovery' and then click Acer Recovery Management in the list of apps.
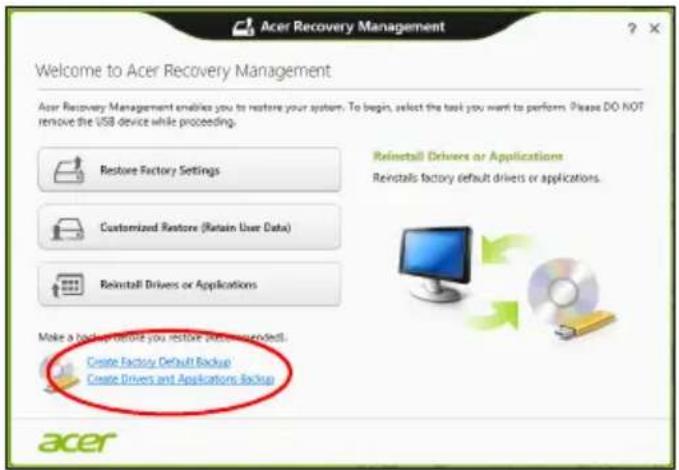
2. Click Create Drivers and Applications Backup.
Plug in the USB drive or insert a blank DVD into the optical drive, then click Next.
- If you are using a USB drive, make sure your USB drive has enough capacity before continuing.
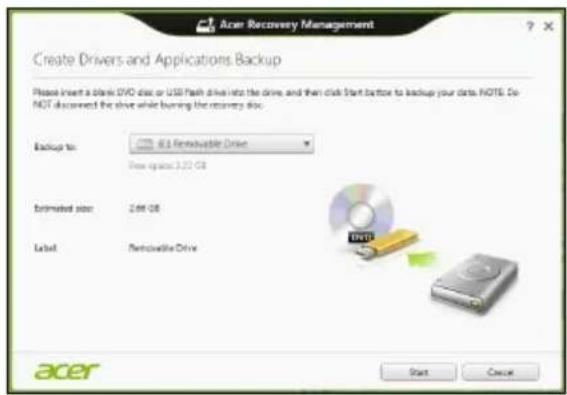
- If using DVDs, it will also show the number of blank, recordable discs you will need to complete the recovery discs. Make sure that you have the required number of identical, blank discs.
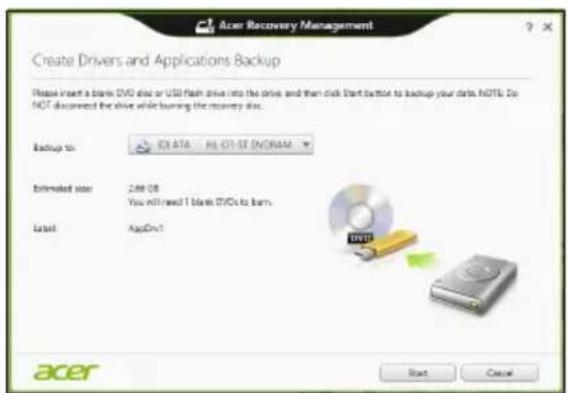
- Click Start to copy files. You will be shown the backup progress on the screen.
-
Follow the process until it completes:
-
If you are using optical discs, the drive ejects each disc as it completes burning it. Remove the disc from the drive and mark it with a permanent marker.
If multiple discs are required, insert a new disc when prompted, then click OK. Continue until the process is complete.
- If you are using a USB drive, unplug the drive and label it clearly.

Important: Write a unique, descriptive label on each backup, such as 'Drivers and Applications Backup'. Make sure you keep the backup in a safe place that you will remember.
Recovering your system
To recover your system:
- Perform minor fixes.
If only one or two items of software or hardware have stopped working correctly, the problem may be solved by reinstalling the software or the device drivers.
To reinstall software and drivers that were pre-installed at the factory, see "Reinstalling drivers and applications" on page 11.
For instructions on reinstalling software and drivers that were not pre-installed, see that product's documentation or support Web site.
- Revert to a previous system condition.
If reinstalling software or drivers does not help, then the problem may be solved by returning your system to a previous state when everything was working correctly.
For instructions, see "Returning to an earlier system snapshot" on page 13.
- Reset your operating system.
If nothing else has solved the problem and you want to reset your system, but keep your user information, see "Returning your system to its factory condition" on page 14.
- Reset your system to its factory condition.
If nothing else has solved the problem and you want to reset your system to factory condition, see "Returning your system to its factory condition" on page 14.
Reinstalling drivers and applications
As a troubleshooting step, you may need to reinstall the applications and device drivers that came pre-installed on your computer from the factory. You can reinstall using either your hard drive or the backup you have created.
-
Other applications - If you need to reinstall software that did not come pre-installed on your computer, you need to follow that software's installation instructions.
-
New device drivers - If you need to reinstall device drivers that did not come preinstalled on your computer, follow the instructions provided with the device.
If you are reinstalling using Windows and the recovery information stored on your computer:
- From Start, type 'Recovery' and then click Acer Recovery Management in the list of apps.
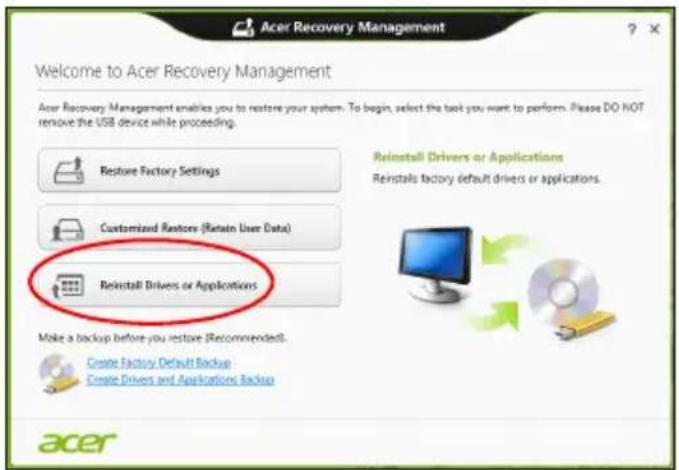
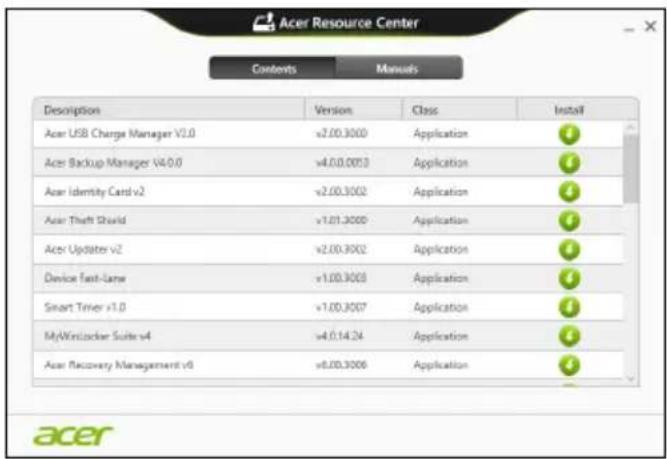
- Click Reinstall Drivers or Applications.
- You should see the Contents section of the Acer Resource Center.
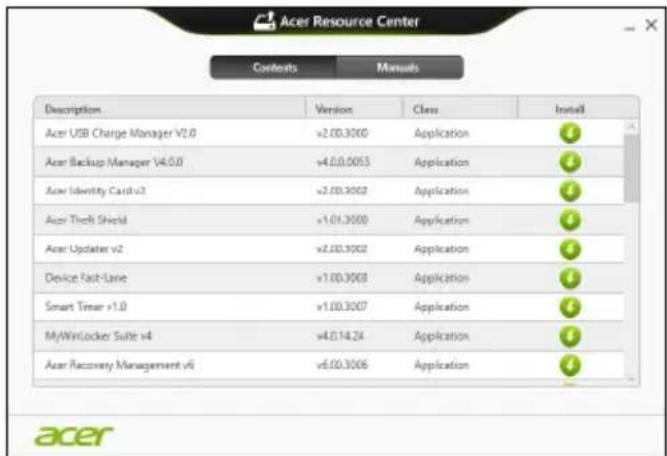
- Click the install icon for the item you want to install, then follow the onscreen instructions to complete the installation. Repeat this step for each item you want to reinstall.

If you are reinstalling from a Drivers and Applications Backup on a DVD or USB drive:
-
Insert the Drivers and Applications Backup into the disc drive or connect it to a free USB port.
-
If you inserted a DVD wait for Acer Resource Center to start.
- If Acer Resource Center does not start automatically, press the Windows key +
, then double-click on the optical drive icon. -
If you are using a USB drive, press the Windows key +
, then double-click on the drive that contains the backup. Double-click on ResourceCenter. -
You should see the Contents section of the Acer Resource Center.
- Click the install icon for the item you want to install, then follow the onscreen prompts to complete the installation. Repeat this step for each item you want to reinstall.

Returning to an earlier system snapshot
Microsoft System Restore periodically takes a 'snapshot' of your system settings and saves them as restore points. In most cases of hard-to-resolve software problems, you can return to one of these restore points to get your system running again.
Windows automatically creates an additional restore point each day, and also each time you install software or device drivers.

Note: For more information about using Microsoft System Restore, from Start, type 'Help' and then click Help and Support in the list of apps. Type 'Windows system restore' in the Search Help box, then press Enter.
Returning to a restore point
- From Start, type 'Control Panel' and then click Control Panel in the list of apps.
- Click System and Security > Action Center, then click Recovery at the bottom of the window.
- Click Open System Restore, then Next.
- Click the latest restore point (at a time when your system worked correctly), click Next, then Finish.
- A confirmation window appears; click Yes. Your system is restored using the restore point you specified. This process may take several minutes, and may restart your computer.
Returning your system to its factory condition
If your computer experiences problems that are not recoverable by other methods, you may need to reinstall everything to return your system to its factory condition. You can recover from either your hard drive or the recovery backup you have created.
- If you can still run Windows and have not deleted the recovery partition, see "Recovering from Windows" on page 14.
- If you cannot run Windows, your original hard drive has been completely re-formatted or you have installed a replacement hard drive, see "Recovering from a recovery backup" on page 16.
Recovering from Windows
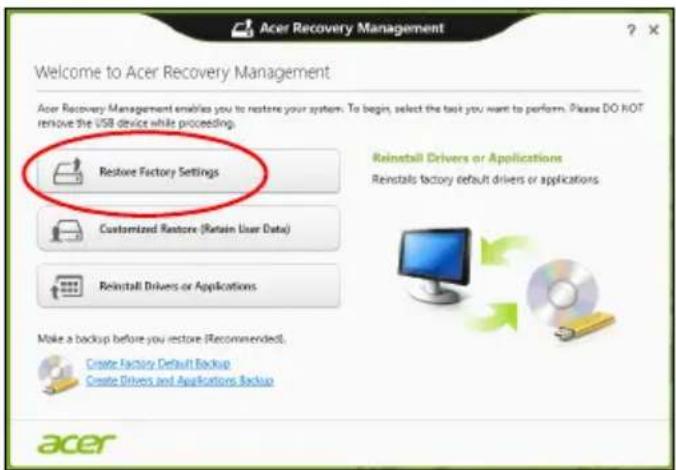
Start Acer Recovery Management:
- From Start, type 'Recovery' and then click Acer Recovery Management in the list of apps.
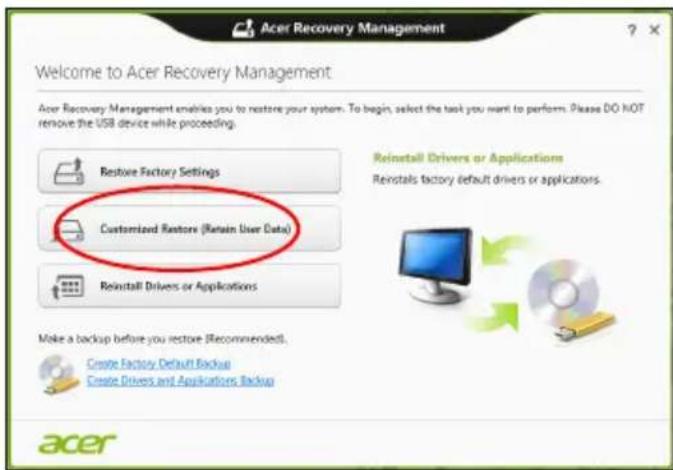
Two options are available, Restore Factory Settings (Reset my PC) or Customized Restore (Refresh my PC).
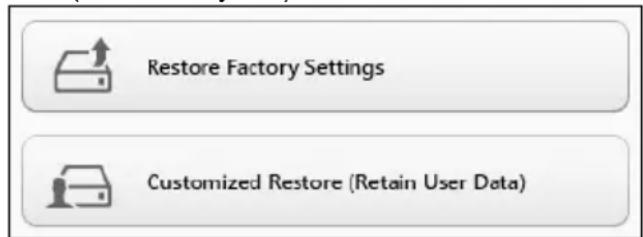
Restore Factory Settings deletes everything on your hard drive, then reinstalls Windows and all software and drivers that were pre-installed on your system. If you can access important files on your hard drive, back them up now. See "Restore Factory Settings with Acer Recovery Management" on page 15.
Customized Restore will attempt to retain your files (user data) but will reinstall all software and drivers. Software installed since you purchased your PC will be removed (except software installed from the Windows Store). See "Customized Restore with Acer Recovery Management" on page 16.
Restore Factory Settings with Acer Recovery Management
- Click Restore Factory Settings.

Caution: 'Restore Factory Settings' will erase all files on your hard drive.
- The Reset your PC window opens.
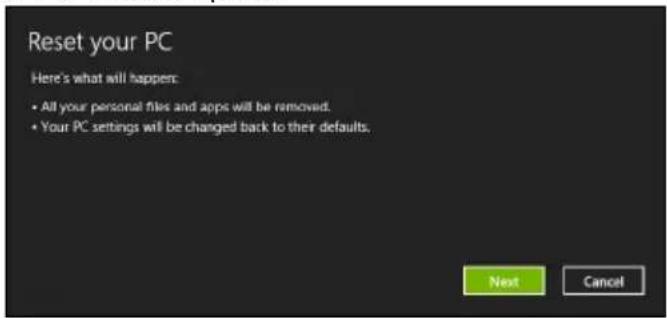
Images for reference only.
- Click Next, then choose how to erase your files:
a. Just remove my files quickly erases all files before restoring your computer and takes about 30 minutes.
b. Fully clean the drive completely cleans the drive after each file is erased, so no files can be viewed after the recovery. Cleaning the drive takes much longer, up to 5 hours, but is much more secure as old files are completely removed.
- Click Reset.
- The recovery process begins by restarting your computer, then continues by copying files to your hard drive.
- After the recovery has finished, you can start using your computer by repeating the first-start process.
Customized Restore with Acer Recovery Management
1. Click Customized Restore (Retain User Data).
2. The Refresh your PC window opens.
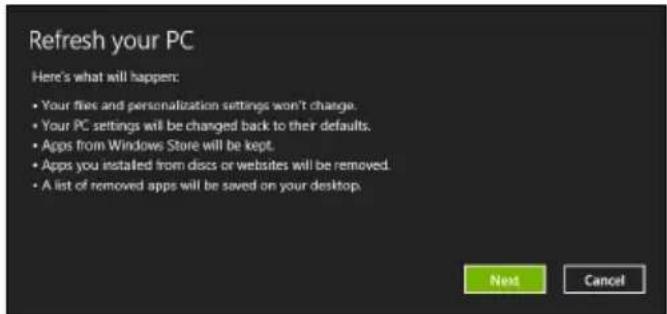
3. Click Next, then Refresh.
- The recovery process begins by restarting your computer, then continues by copying files to your hard drive. This process takes about 30 minutes.
Recovering from a recovery backup
To recover from a recovery backup on a USB drive:
- Find your recovery backup.
- Plug in the USB drive and turn on your computer.
- If it is not already enabled, you must enable the F12 Boot Menu:
a. Press <F2> when starting your computer.
b. Use the left or right arrow keys to select the Main menu.
c. Press the down key until F12 Boot Menu is selected, press <F5> to change this setting to Enabled.
d. Use the left or right arrow keys to select the Exit menu.
e. Depending on the type of BIOS your computer uses, select Save Changes and Exit or Exit Saving Changes and press Enter. Select OK or Yes to confirm.
f. Your computer will restart.
- During startup, press
to open the boot menu. The boot menu allows you to select which device to start from, select the USB drive.
a. Use your arrow keys to select USB Device, then press Enter.
b. Windows starts from the recovery backup instead of the normal startup process.
-
Select your keyboard type.
-
Select Troubleshooting and then choose the type of recovery to use:
a. Click Advanced then System Restore to start Microsoft System Restore:
Microsoft System Restore periodically takes a 'snapshot' of your system settings and saves them as restore points. In most cases of hard-to-resolve software problems, you can return to one of these restore points to get your system running again.
b. Click Reset your PC to start the reset process:
Reset your PC deletes everything on your hard drive, then reinstalls Windows and all software and drivers that were pre-installed on your system. If you can access important files on your hard drive, back them up now. See "Reset your PC from the recovery backup" on page 17.
c. Click Refresh your PC to start the refresh process:
Refresh your PC will attempt to retain your files (user data) but will reinstall all software and drivers. Software installed since you purchased your PC will be removed (except software installed from the Windows Store). See "Refresh your PC from the recovery backup" on page 18.
Reset your PC from the recovery backup

Caution: Reset your PC will erase all files on your hard drive.
- The Reset your PC window opens.
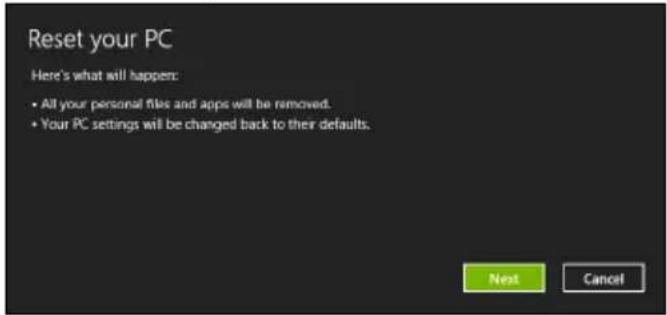
Images for reference only.
-
Click Next.
-
Select the operating system to recover (normally only one option is available).
-
Choose to keep any changes to the hard drive:
a. If you have deleted the recovery partition or otherwise changed the partitions on the hard drive and want to keep these changes, select No.
b. To completely restore your computer to Factory Settings, select Yes.
- Choose how to erase your files:
a. Just remove my files quickly erases all files before restoring your computer and takes about 30 minutes.
b. Fully clean the drive completely cleans the drive after each file is erased, so no files can be viewed after the recovery. Cleaning the drive takes much longer, up to 5 hours, but is much more secure as old files are completely removed.
- Click Reset.
- After the recovery has finished, you can start using your computer by repeating the first-start process.
Refresh your PC from the recovery backup
- The Refresh your PC window opens.
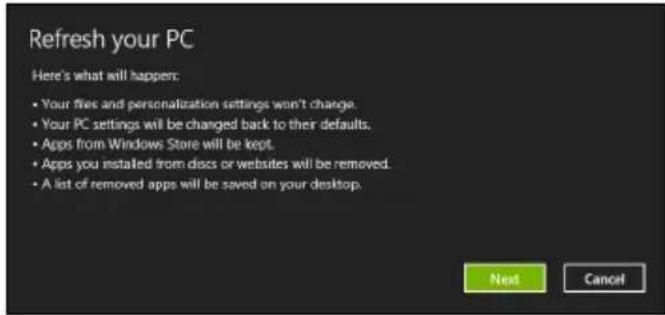
- Click Next.
- Select the operating system to recover (normally only one option is available).
- Click Refresh.
- The recovery process begins by restarting your computer, then continues by copying files to your hard drive. This process takes about 30 minutes.
Acer Backup Manager

Note: This feature is only available on certain models.
Acer Backup Manager is a utility that enables you to do a variety of backup functions each accomplished in only three simple steps. You can even set these functions to automatically recur as often as your like.
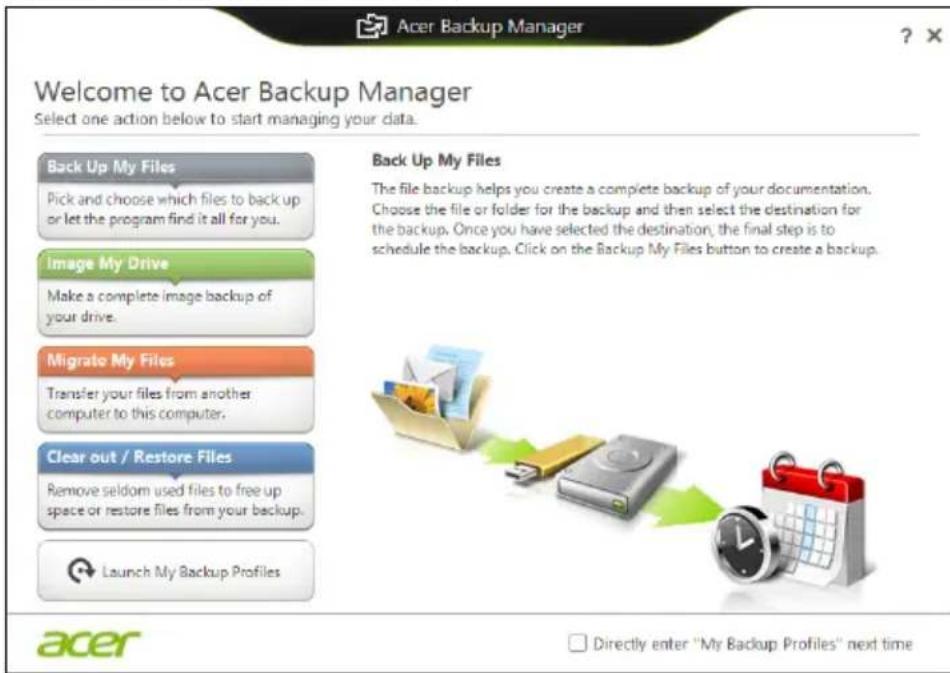
To start Acer Backup Manager in Windows 8, simply start typing "Backup Manager". Alternatively, in Desktop mode, select Acer Backup Manager. This opens the Welcome screen; from this screen you can select the type of backup you'd like to create.
-Back Up My Files: Select files to back up.
- Image My Drive: Create a backup file for the entire drive. You can burn this file to a DVD, save them to another drive on your computer*, or save them to removable media (i.e. a flash drive) to restore your computer at a later time.
- Migrate My Files: Allows you to copy files to a USB device so that you can migrate files from your old computer to your new one or any other computer with Acer Backup Manager.
- Clear out / Restore Files: Remove seldom used files to free up disk space or restore files from your backup.
Select the backup type you'd like to make and select the files or drive you want to back up, then follow the onscreen instructions:
1 Select the content you want to back up. The less content you select, the quicker the process will be, but it will increase your risks of losing data.
2 Select where you want the backup copies to be stored. Your options include removable media, a drive on your computer*, CD/DVD media, a remote PC, or the cloud using Microsoft SkyDrive.
3 Select how often you want Acer Backup Manager to create backups.
Once you have finished these three steps, backups will be created according to the schedule.

*NOTE: You will need to select an external drive or your D: drive; Acer Backup Manager cannot store a backup on the source drive.
If you wish to change your settings at any time, go to the Acer Backup Manager profiles screen. To get there from the Acer Backup Manager welcome screen, click Launch My Backup Profiles.
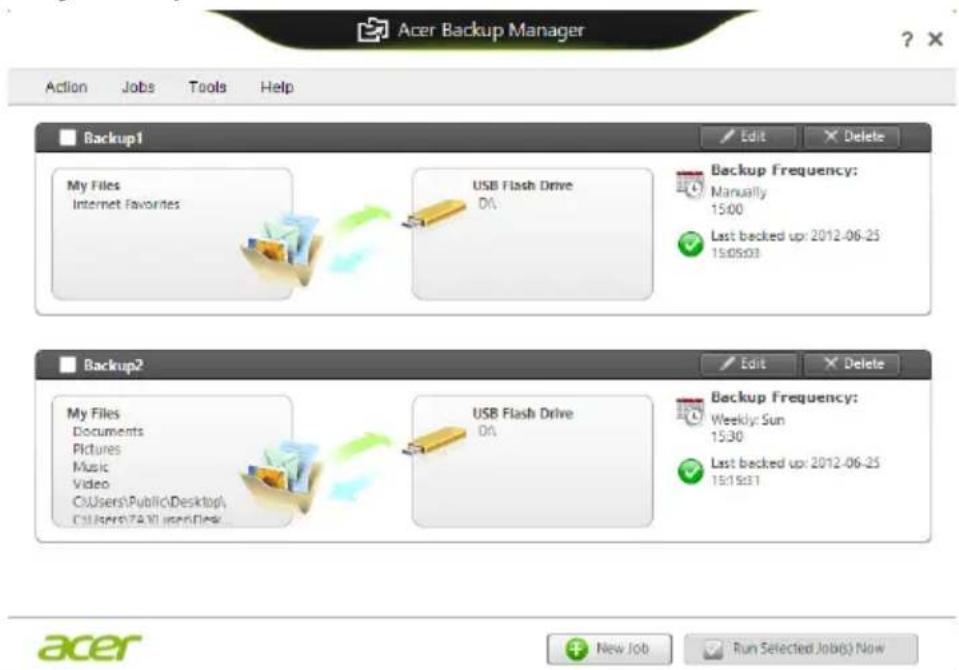
From here you can edit or delete existing backup profiles.
Acer clear-fi

Note: Only for certain models.
With Acer clear-fi, you can enjoy videos, photos and music. Stream media from, or to, other devices with Acer clear-fi installed.

Note: All devices must be connected to the same network.
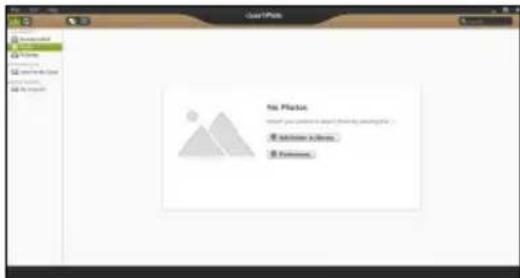
To watch videos or listen to music open clear-fi Media, to browse photos open clear-fi Photo.
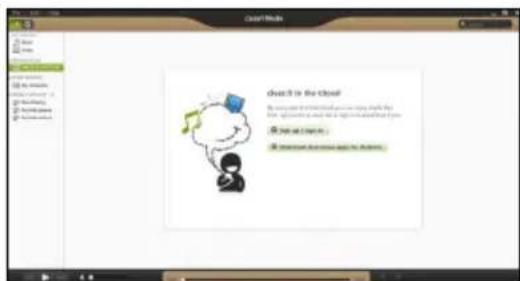

Important: When you first open a clear.fi application, Windows Firewall will ask for permission to allow clear.fi to access the network. Select Allow Access in each window.
Navigating media and photos
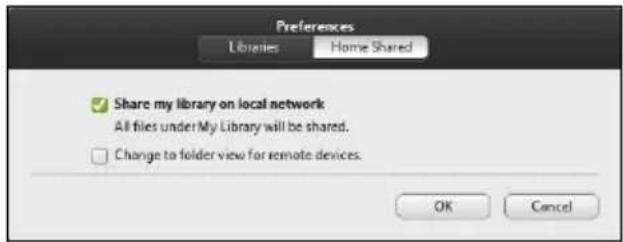
The list in the left panel shows your computer ('My Library'), then other devices if any are connected to your network ('Home Shared').
To view files on your computer, select one of the categories under 'My Library', then browse the files and folder on the right.
Shared files
Devices connected to your network are shown in the Home Shared section. Select a device, then the select the category to explore.
After a short delay, shared files and folders are shown on the right. Browse to the file you want to play, then double-click to start playback.
Use the media controls in the bar across the bottom of the screen to control playback. For example, when music is selected, you can play, pause or stop playback, and adjust the volume.


Note: You must activate sharing on the device that stores the files. Open clear.fi on the device that stores the files, select Edit then make sure Share my library on local network is active.
Which devices are compatible?
Certified Acer devices with clear-fi or DLNA software can be used with the clear-fi software. These include DLNA-compliant PCs, smartphones, and NAS (Network Attached Storage) devices.
Playing to another device
If you want to play the media on another device, you need to do the following:
- In the bottom right corner, select Play to.
- Select the remote device that will be used to play the file.

Note: Only devices optimised for playback are available in this list, certain PCs and storage devices will not appear. To add a Windows PC to this list, open Windows Media Player, select Stream and Allow remote control of my Player...
- Select a file in the main window, then use the media controls in the bar across the bottom of the screen to control the remote device.
For more help, go to http://www.acer.com/clearfi/download/.
Power management
This computer has a built-in power management unit that monitors system activity. System activity refers to any activity involving one or more of the following devices: keyboard, mouse, hard disk, peripherals connected to the computer, and video memory. If no activity is detected for a period of time, the computer stops some or all of these devices in order to conserve energy.
Saving power
Disable Fast startup
Your computer uses Fast startup to start quickly, but also uses a small amount of power to check for signals to start. These checks will slowly drain your computer's battery.
If you prefer to reduce your computer's power requirements and environmental impact, turn off Fast startup:

Note: If Fast startup is off, your computer will take longer to start from Sleep. If your computer features Acer Instant On or Acer Instant Connect, these will also be turned off.
Your computer will also not start if it receives an instruction to start over a network or from a connected HDMI device (Wake on LAN or Wake on HDMI).
-
Open the Desktop.
-
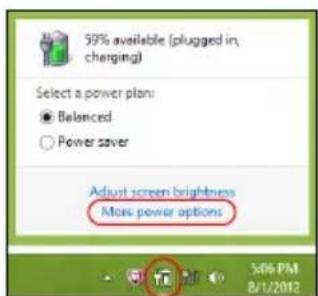
Click Power Options in the Notification area.
-
Select More Power Options.
-
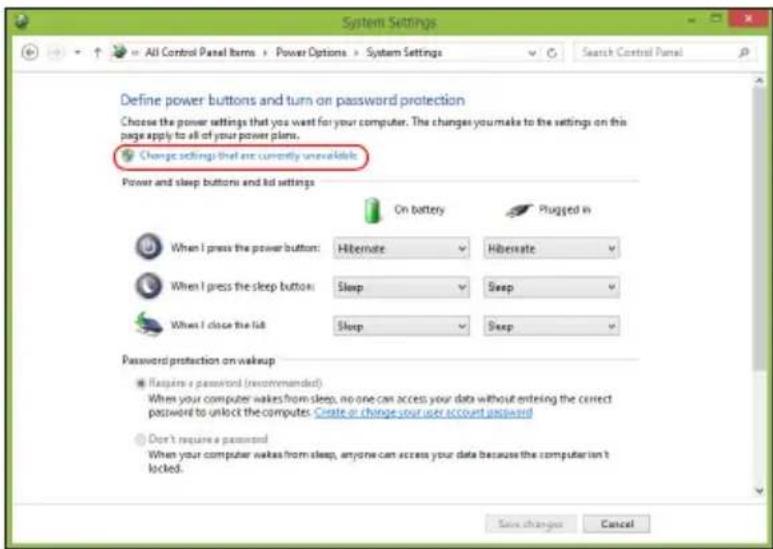
Select Choose what the power buttons do.
- To access Shutdown Settings, select Change settings that are currently unavailable.
- Scroll down and disable Turn on fast startup.
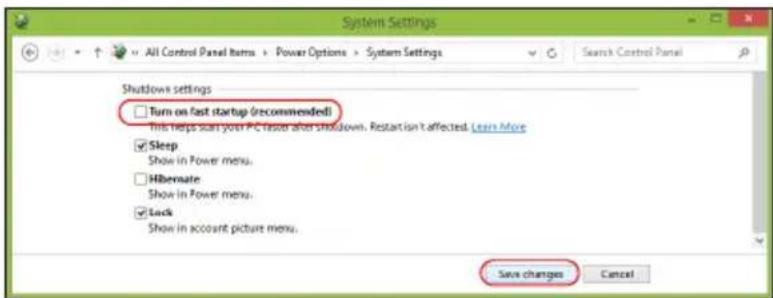
- Select Save changes.
Battery pack
The computer uses a battery pack that gives you long use between charges.
Battery pack characteristics
The battery pack has the following characteristics:
- Employs current battery technology standards.
- Delivers a battery-low warning.
The battery is recharged whenever you connect the computer to the AC adapter. Your computer supports charge-in-use, enabling you to recharge the battery while you continue to operate the computer. However, recharging with the computer turned off results in a significantly faster charge time.
The battery will come in handy when you travel or during a power failure. It is advisable to have an extra fully charged battery pack available as backup. Contact your dealer for details on ordering a spare battery pack.

Note: Some models have an embedded battery. If the battery needs to be replaced, please contact an authorized service center.
Conditioning a new battery pack
Before you use a battery pack for the first time, there is a conditioning process that you should follow:
1 Insert the new battery without turning the computer on.
2 Connect the AC adapter and fully charge the battery.
3 Disconnect the AC adapter.
4 Turn on the computer and operate using battery power.
5 Fully deplete the battery until the battery-low warning appears.
6 Reconnect the AC adapter and fully charge the battery again.
Follow these steps again until the battery has been charged and discharged three times.
Use this conditioning process for all new batteries, or if a battery hasn't been used for a long time. If the computer is to be stored for more than two weeks, you are advised to remove the battery pack from the unit.

Warning: Do not expose battery packs to temperatures below 0^ C (32^) or above 45^ (113^) . Extreme temperatures may adversely affect the battery pack.
By following the battery conditioning process you condition your battery to accept the maximum possible charge. Failure to follow this procedure will prevent you from obtaining the maximum battery charge, and will also shorten the effective lifespan of the battery.
In addition, the useful lifespan of the battery is adversely affected by the following usage patterns:
- Using the computer on constant AC power with the battery inserted. If you want to use constant AC power, you are advised to remove the battery pack after it is fully charged.
Not discharging and recharging the battery to its extremes, as described above. - Frequent use; the more you use the battery, the faster it will reach the end of its effective life. A standard computer battery has a life span of about 300 charges
Charging the battery
To charge the battery, first make sure that it is correctly installed in the battery bay. Plug the AC adapter into the computer, and connect to a mains power outlet. You can continue to operate your computer on AC power while your battery is charging. However, charging the battery with the computer turned off results in a significantly faster charge time.

Note: You are advised to charge the battery before retiring for the day. Charging the battery overnight before traveling enables you to start the next day with a fully charged battery.
Optimizing battery life
Optimizing battery life helps you get the most out of battery operation, prolonging the charge/recharge cycle and improving recharging efficiency. You are advised to follow the suggestions set out below:
Purchase an extra battery pack.
Use AC power whenever possible, reserving battery for on-the-go use.
- Eject a PC Card if it is not being used, as it will continue to draw power (for selected models).
- Store the battery pack in a cool, dry place. The recommended temperature is 10^ ( 50^ ) to 30^ ( 86^ ). Higher temperatures cause the battery to self-discharge faster.
- Excessive recharging decreases the battery life.
- Look after your AC adapter and battery.
Checking the battery level
The Windows power meter indicates the current battery level. Rest the cursor over the battery/power icon on the taskbar to see the battery's present charge level.
Battery-low warning
When using battery power pay attention to the Windows power meter.

Warning: Connect the AC adapter as soon as possible after the battery-low warning appears. Data will be lost if the battery to become fully depleted and the computer shuts down.
When the battery-low warning appears, the recommended course of action depends on your situation:
Situation Recommended Action
The AC adapter and a power outlet are available.
- Plug the AC adapter into the computer, and then connect to the mains power supply.
- Save all necessary files.
- Resume work.
Turn off the computer if you want to recharge the battery rapidly.
An extra fully charged battery pack is available.
- Save all necessary files.
- Close all applications.
- Turn off the computer.
- Replace the battery pack.
- Turn on the computer and resume work.
The AC adapter or a power outlet is unavailable. You have no spare battery pack.
- Save all necessary files.
- Close all applications.
- Turn off the computer.
Installing and removing the battery pack

Note: Some models have an embedded battery. If the battery needs to be replaced, please contact an authorized service center.

Important! Before removing the battery from the unit, connect the AC adapter if you want to continue using your computer. Otherwise, turn off the computer first.
To install a battery pack:
- Align the battery with the open battery bay; make sure that the end with the contacts will enter first, and that the top surface of the battery is facing up.
- Slide the battery into the battery bay and gently push until the battery locks in place.
To remove a battery pack:
1 Slide the battery release latch to release the battery.
2 Pull the battery from the battery bay.
Taking your notebook PC with you
This section gives you tips and hints to consider when moving around or traveling with your computer.
Disconnecting from the desktop
Follow these steps to disconnect your computer from external accessories:
1 Save any open files.
2 Remove any media, floppy disks or compact disks from the drive(s).
3 Shut down the computer.
4 Close the display cover.
5 Disconnect the cord from the AC adapter.
6 Disconnect the keyboard, pointing device, printer, external monitor and other external devices.
7 Disconnect the Kensington lock if you are using one to secure the computer.
Moving around
When you are just moving within short distances, for example, from your office desk to a meeting room.
Preparing the computer
Before moving the computer, close and latch the display cover to place it in Sleep mode. You can now safely take the computer anywhere you go within the building. To bring the computer out of Sleep mode, open the display; then press and release the power button.
If you are taking the computer to a client's office or a different building, you may choose to shut down the computer:
press the Windows key + C> and click Start Shut Down.
Or:
You can put the computer in Sleep mode by pressing Fn + F4 . Then close and latch the display.
When you are ready to use the computer again, unlatch and open the display; then press and release the power button.

Note: If the Sleep indicator is off, the computer has entered Hibernation mode and is turned off. If the power indicator is off but the Sleep indicator is on, the computer has entered Sleep mode. In both cases, press and release the power button to turn the computer back
on. Note that the computer may enter Hibernation mode after being in Sleep mode for a period of time.
What to bring to meetings
If your meeting is relatively short, you probably do not need to bring anything with you other than your computer. If your meeting will be longer, or if your battery is not fully charged, you may want to bring the AC adapter with you to plug in your computer in the meeting room.
If the meeting room does not have an electrical outlet, reduce the drain on the battery by putting the computer in Sleep mode. Press Fn + F4 or close the display cover whenever you are not actively using the computer. To resume, open the display (if closed), then press and release the power button.
Taking the computer home
When you are moving from your office to your home or vice versa.
Preparing the computer
After disconnecting the computer from your desktop, follow these steps to prepare the computer for the trip home:
- Check that you have removed all media and compact discs from the drive(s). Failure to remove the media can damage the drive head.
- Pack the computer in a protective case that can prevent the computer from sliding around and cushion it if it should fall.

Caution: Avoid packing items next to the top cover of the computer.
Pressure against the top cover can damage the screen.
What to take with you
Unless you have some items at home, take the following items with you:
- AC adapter and power cord.
The printed setup poster.
Special considerations
Follow these guidelines to protect your computer while traveling to and from work:
- Minimize the effects of temperature changes by keeping the computer with you.
-
If you need to stop for an extended period of time and cannot carry the computer with you, leave the computer in the trunk of the car to avoid exposing the computer to excessive heat.
-
Changes in temperature and humidity can cause condensation. Allow the computer to return to room temperature, and inspect the screen for condensation before turning on the computer. If the temperature change is greater than 10^ ( 18^ ), allow the computer to come to room temperature slowly. If possible, leave the computer for 30 minutes in an environment with a temperature between outside and room temperature.
Setting up a home office
If you frequently work on your computer at home, you may want to purchase a second AC adapter for use at home. With a second AC adapter, you can avoid carrying the extra weight to and from home.
If you use your computer at home for significant periods of time, you might also want to add an external keyboard, monitor or mouse.
Traveling with the computer
When you are moving within a larger distance, for instance, from your office building to a client's office building or traveling locally.
Preparing the computer
Prepare the computer as if you were taking it home. Make sure that the battery in the computer is charged. Airport security may require you to turn on your computer when carrying it into the gate area.
What to take with you
Take the following items with you:
-AC adapter
- Spare, fully-charged battery pack(s)
Additional printer driver files if you plan to use another printer
Special considerations
In addition to the guidelines for taking the computer home, follow these guidelines to protect your computer while traveling:
Always take the computer as carry-on luggage.
If possible, have the computer inspected by hand. Airport security X-ray machines are safe, but do not put the computer through a metal detector.
- Avoid exposing floppy disks to hand-held metal detectors.
Traveling internationally with the computer
When you are moving from country to country.
Preparing the computer
Prepare the computer as you would normally prepare it for traveling.
What to bring with you
Bring the following items with you:
-AC adapter
- Power cords that are appropriate for the country to which you are traveling
- Spare, fully-charged battery packs
Additional printer driver files if you plan to use another printer
Proof of purchase, in case you need to show it to customs officials
International Travelers Warranty passport
Special considerations
Follow the same special considerations as when traveling with the computer. In addition, these tips are useful when traveling internationally:
-
When traveling in another country, check that the local AC voltage and the AC adapter power cord specifications are compatible. If not, purchase a power cord that is compatible with the local AC voltage. Do not use converter kits sold for appliances to power the computer.
-
If you are using the modem, check if the modem and connector are compatible with the telecommunications system of the country you are traveling in.
Securing your computer
Your computer is a valuable investment that you need to take care of. Learn how to protect and take care of your computer.
Security features include hardware and software locks — a security notch and passwords.
Using a computer security lock
The notebook comes with a Kensington-compatible security slot for a security lock.
Wrap a computer security lock cable around an immovable object such as a table or handle of a locked drawer. Insert the lock into the notch and turn the key to secure the lock. Some keyless models are also available.
Using passwords
Passwords protect your computer from unauthorized access. Setting these passwords creates several different levels of protection for your computer and data:
- Supervisor Password prevents unauthorized entry into the BIOS utility. Once set, you must enter this password to gain access to the BIOS utility. See "BIOS utility" on page 44.
- User Password secures your computer against unauthorized use. Combine the use of this password with password checkpoints on boot-up and resume from Hibernation for maximum security.
- Password on Boot secures your computer against unauthorized use. Combine the use of this password with password checkpoints on boot-up and resume from Hibernation for maximum security.

Important! Do not forget your Supervisor Password! If you forget your password, please get in touch with your dealer or an authorized service center.
Entering passwords
When a password is set, a password prompt appears in the center of the display screen.
- When the Supervisor Password is set, a prompt appears when you press < F2 > to enter the BIOS utility at boot-up.
- Type the Supervisor Password and press
to access the BIOS utility. If you enter the password incorrectly, a warning message appears. Try again and press . - When the User Password is set and the password on boot parameter is enabled, a prompt appears at boot-up.
- Type the User Password and press
to use the computer. If you enter the password incorrectly, a warning message appears. Try again and press .

Important! You have three chances to enter a password. If you fail to enter the password correctly after three tries, the system halts. Press and hold the power button for four seconds to shut down the computer. Then turn on the computer again, and try again.
Setting passwords
You can set passwords using the BIOS utility.
Expanding through options
Your notebook PC offers you a complete mobile computing experience.
Connectivity options
Ports allow you to connect peripheral devices to your computer as you would with a desktop PC. For instructions on how to connect different external devices to the computer, read the following section.
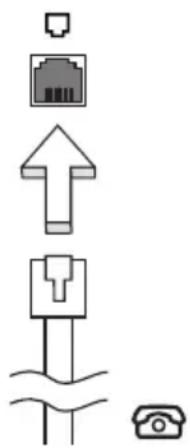
Fax/data modem

Note: Information in this section may not apply to your computer.
Your computer has a built-in V.92 56 Kbps fax/data modem.

Warning! This modem port is not compatible with digital phone lines. Plugging this modem into a digital phone line will damage the modem.
To use the fax/data modem port, connect a phone cable from the modem port to a telephone jack.

Warning! Please make sure that the cable you use is appropriate for the country in which you are working.
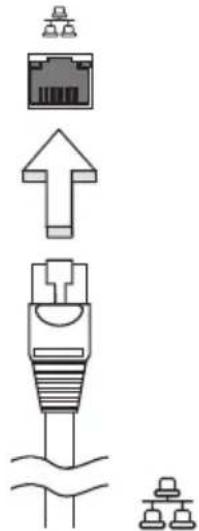
Built-in network feature
The built-in network feature allows you to connect your computer to an Ethernet-based network.
To use the network feature, connect an Ethernet cable from the Ethernet (RJ-45) port on the chassis of the computer to a network jack or hub on your network.
Consumer Infrared (CIR)


Note: Information in this section may not apply to your computer.
The computer's Consumer Infrared (CIR) port is used to receive signals from your remote control, or other devices with CIR capability.
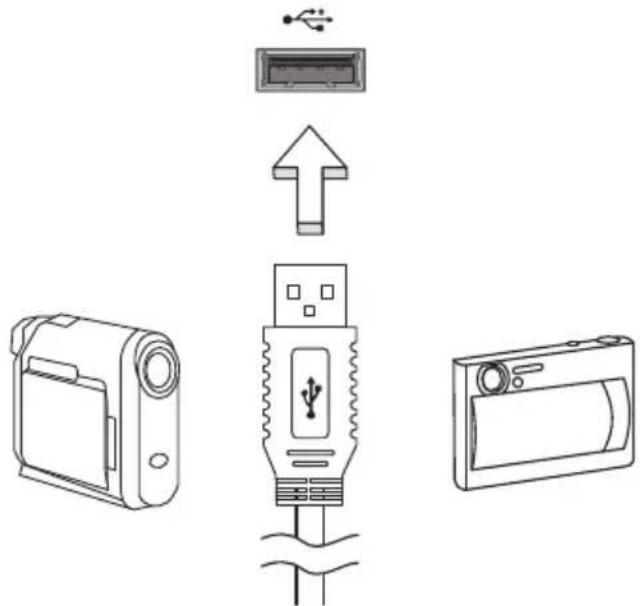
Universal Serial Bus (USB)
The USB 2.0 port is a high-speed serial bus which allows you to connect USB peripherals without taking up precious system resources.
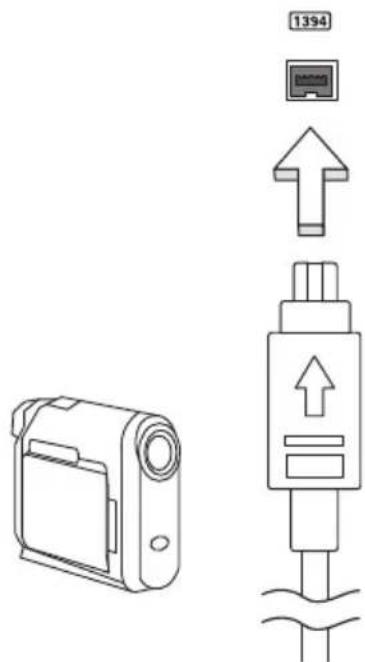
IEEE 1394 port


Note: Information in this section may not apply to your computer.
The computer's IEEE 1394 port allows you to connect to an IEEE 1394-compatible device like a video camera or digital camera. See your video or digital camera's documentation for details.
High-Definition Multimedia Interface


Note: Information in this section may not apply to your computer.
HDMI (High-Definition Multimedia Interface) is an industry-supported, uncompressed, all-digital audio/video interface. HDMI provides an interface between any compatible digital audio/video source, such as a set-top box, DVD player, and A/V receiver and a compatible digital audio and/or video monitor, such as a digital television (DTV), over a single cable.
Use the HDMI port on your computer to connect with high-end audio and video equipment. Single cable implementation allows tidy setup and fast connection.

ExpressCard

Note: Information in this section may not apply to your computer.
The ExpressCard is the newest version of the PC Card. It is a smaller and faster interface that further enhances the usability and expandability of your computer.
ExpressCards support a vast number of expansion options, including flash memory card adapters, TV-tuners, Bluetooth connectivity and IEEE 1394b adapters.
ExpressCards support USB 2.0 and PCI Express applications.

Important! There are two types, ExpressCard/54 and ExpressCard/34 (54 mm and 34 mm), each with different functions. Not all ExpressCard slots will support both types. Please refer to your card's manual for details on how to install and use the card, and its functions.
Inserting an ExpressCard
Insert the card into the slot and push gently until it clicks into position.
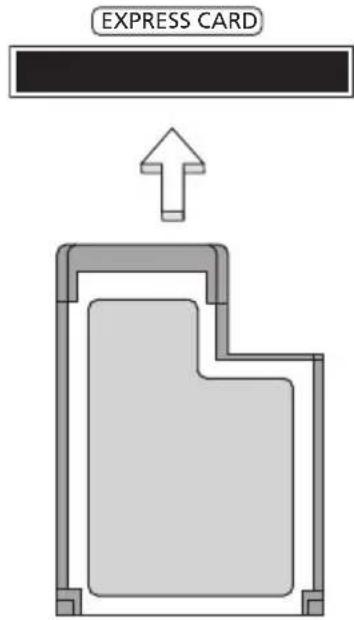
Ejecting an ExpressCard
Before ejecting an ExpressCard:
1 Exit the application using the card.
2 Left-click the remove hardware icon on the taskbar and stop the card operation.
3 Push the card gently into the slot and release to pop out the card. Then pull the card free from the slot.
Installing memory

Note: Information in this section may not apply to your computer.
Follow these steps to install memory:
1 Turn off the computer, unplug the AC adapter (if connected) and remove the battery pack. Then turn the computer over to access its base.
2 Remove the screws from the memory cover; then lift and remove the memory cover.
3 (a) Insert the memory module diagonally into the slot, then (b) gently press it down until it clicks into place.
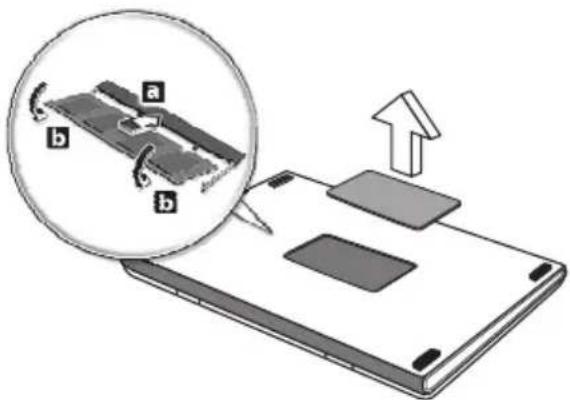
4 Replace the memory cover and secure it with the screw.
5 Reinstall the battery pack, and reconnect the AC adapter.
6 Turn on the computer.
The computer automatically detects and reconfigures the total memory size. Please consult a qualified technician or contact your local Acer dealer.
Enjoying TV with Windows Media Center

Note: This feature is only available on certain models.
Computers that include Windows Media Center Edition or InstantOn Arcade may be used to watch TV and to access video content (via an audio/video connection to an external device, such as a video camera).
Choose your input type
The audio/video connection may be either a DVB-T digital antenna (for selected models) or a PAL/SECAM or NTSC connector. Please refer to the appropriate section:
Watching TV using the optional DVB-T (digital TV) antenna (for selected models)
DVB-T digital TV is an international standard that is used to transmit terrestrial television services in digital format. It is gradually replacing analog broadcasts in many countries. The DVB-T digital antenna can be used with Windows Media Center to watch local DVB-T digital TV broadcasts on your notebook PC.
To connect the digital antenna
1 Plug the antenna cable into the RF jack of your computer.
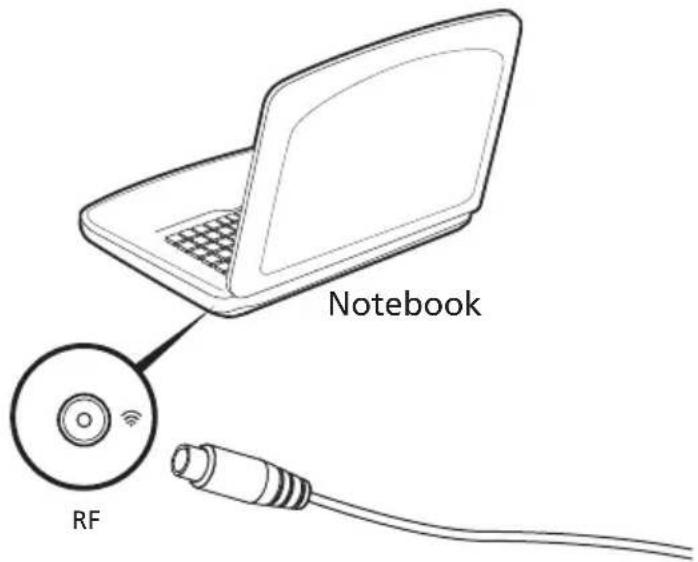

Note: Do not twist or loop the antenna cable. Extend the antenna cable up to 20~cm to improve signal quality.
Watching TV with an external antenna or cable socket
You may use conventional TV cables (connected to an external antenna or cable socket) to watch TV on your computer.
Connecting antenna cables
To connect your cables:
1 Plug the antenna connector into the RF jack of your computer.
2 Connect the other end to your TV cable, using the cable converter if necessary.
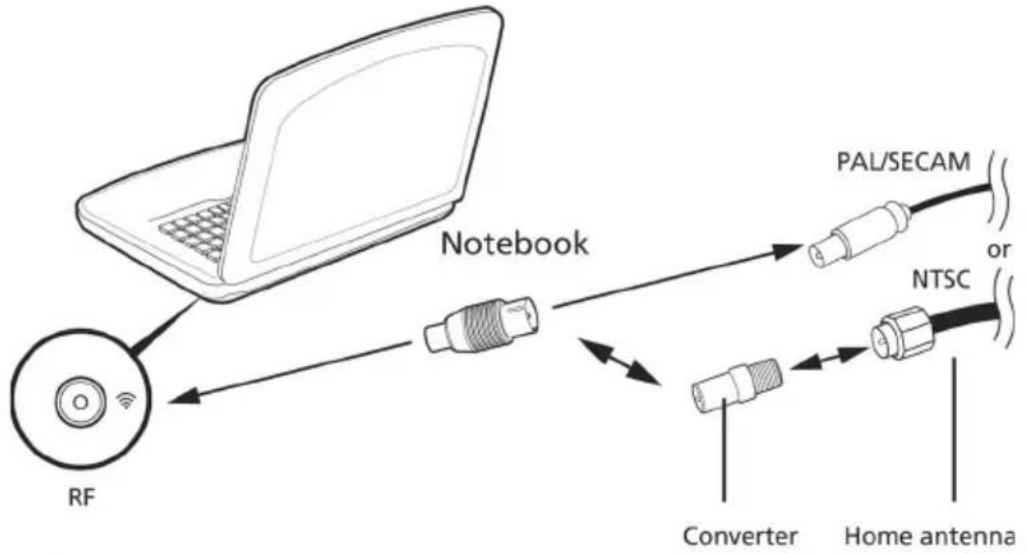

Important! Please ensure you use the correct cable system for your region before attempting to connect the antenna cable.
BIOS utility
The BIOS utility is a hardware configuration program built into your computer's BIOS.
Your computer is already properly configured and optimized, and you do not need to run this utility. However, if you encounter configuration problems, you may need to run it.
To activate the BIOS utility, press <F2> during the POST while the notebook PC logo is being displayed.
Boot sequence
To set the boot sequence in the BIOS utility, activate the BIOS utility, then select Boot from the categories listed at the top of the screen.
Password
To set a password on boot, activate the BIOS utility, then select Security from the categories listed at the top of the screen. Find Password on boot: and use the
Using software
Playing DVD movies

Note: This feature is only available on certain models.
When the DVD drive module is installed in the optical drive bay, you can play DVD movies on your computer.
1 Eject the DVD.

Important! When you launch the DVD player for the first time, the program asks you to enter the region code. DVD discs are divided into 6 regions. Once your DVD drive is set to a region code, it will play DVD disks of that region only. You can set the region code a maximum of five times (including the first time), after which the last region code set will remain permanent. Recovering your hard disk does not reset the number of times the region code has been set. Refer to the table below for DVD movie region code information.
2 The DVD movie will automatically play after a few seconds.
Region code Country or region
1 USA, Canada
2 Europe, Middle East, South Africa, Japan
3 Southeast Asia, Taiwan, South Korea
4 Latin America, Australia, New Zealand
5 Former USSR, parts of Africa, India
6 People's Republic of China

Note: To change the region code, insert a DVD movie of a different region into the DVD drive. Please refer to the online help for more information.
Using a Bluetooth connection
Bluetooth is a technology enabling you to transfer data wirelessly over short distances between many different types of devices. Bluetooth-enabled devices include computers, cell phones, tablets, wireless headsets, and keyboards.
To use Bluetooth, you must ensure the following:
- Bluetooth is enabled on both devices.
- Your devices are "paired" (or connected).
Enabling and disabling Bluetooth
The Bluetooth adapter must be enabled on both devices. For your computer, this may be an external switch, a software setting, or a separate Bluetooth dongle plugged into the computer's USB port (if no internal Bluetooth adapter is available).

Note: Please check your devices owner's manual to determine how to turn on its Bluetooth adapter.
Then, from the notification area, click the Bluetooth icon, and select Open Settings.
Select the Allow Bluetooth devices to find this computer check box, click Apply, and then click OK.
The Bluetooth adapter in your computer is now enabled and ready for you to add Bluetooth devices.
To disable your computer's Bluetooth adapter, do the following:
- Press the Windows key + W and then type Wireless.
- In the results, click on Wireless.
- Click the toggle under Bluetooth to enable/disable it.
Adding a Bluetooth device
Every new device must first be "paired" with your computer's Bluetooth adapter. This means it must first be authenticated for security purposes. You only need to pair once. After that, simply turning on the Bluetooth adapter of both devices will connect them.
From the notification area, click the Bluetooth icon, and select Add a Bluetooth Device.
Click on the device you want to add.
A code displays on your computer, which should match the code displayed on your device. Select Yes. Then, accept the pairing from your device.

Note: Some devices using older versions of the Bluetooth technology require both devices to enter a PIN. In the case of one of the devices not having any inputs (as in a headset), the passcode is hardcoded into the device (usually "0000" or "1234"). Consult your device's user manual for more information.
Your device will show up in the list of devices if it was successfully paired. Open the Control Panel and under Hardware and Sound click on View devices and
printers. Right click on your device and select Advanced Operations > Connect to operation window.
The operation window enables you to play music and audio from your device through your computer, send files to your device and change Bluetooth settings.

Troubleshooting
This chapter shows you how to deal with common system problems.
Read it before calling a technician if a problem occurs. Solutions to more serious problems require opening up the computer. Do not attempt to open the computer yourself; contact your dealer or authorized service center For assistance.
Troubleshooting tips
This notebook PC incorporates an advanced design that delivers onscreen error message reports to help you solve problems.
If the system reports an error message or an error symptom occurs, see "Error messages" below. If the problem cannot be resolved, contact your dealer. See "Requesting service" on page 53.
Error messages
If you receive an error message, note the message and take the corrective action. The following table lists the error messages in alphabetical order together with the recommended course of action.
| Error messages Corrective action | |
| CMOS battery bad Contact your dealer or an authorized service center. | |
| CMOS checksum error Contact your dealer or an authorized service center. | |
| Disk boot failure | Insert a system (bootable) disk, then press <Enter> to reboot. |
| Equipment configuration error | Press <F2> (during POST) to enter the BIOS utility, then press Exit in the BIOS utility to reboot. |
| Hard disk 0 error Contact your dealer or an authorized service center. | |
| Hard disk 0 extended type error | Contact your dealer or an authorized service center. |
| I/O parity error Contact your dealer or an authorized service center. | |
| Keyboard error or no keyboard connected | Contact your dealer or an authorized service center. |
| Keyboard interface error | Contact your dealer or an authorized service center. |
Error messages Corrective action
Memory size mismatch
Press <F2> (during POST) to enter the BIOS utility, then press Exit in the BIOS utility to reboot.
If you still encounter problems after going through the corrective measures, please contact your dealer or an authorized service center for assistance.
Frequently asked questions
The following is a list of possible situations that may arise during the use of your computer. Easy solutions are provided for each one.
I turned on the power, but the computer does not start or boot up.
Look at the power indicator:
If it is not lit, no power is being supplied to the computer. Check the following:
- If you are using on the battery, it may be low and unable to power the computer. Connect the AC adapter to recharge the battery pack.
- Make sure that the AC adapter is properly plugged into the computer and to the power outlet.
-If it is lit, check the following:
- Is a non-bootable (non-system) disk in the external USB floppy drive?
Remove or replace it with a system disk and press <Ctrl> + <Alt> + <Del> to restart the system.
Nothing appears on the screen.
The computer's power management system automatically blanks the screen to save power. Press any key to turn the display back on.
If pressing a key does not turn the display back on, three things might be the cause:
- The brightness level might be too low. Press <Fn> + <> (increase) to adjust the brightness level.
- The display device might be set to an external monitor. Press the display toggle hotkey <Fn> + <F5> to toggle the display back to the computer.
- If the Sleep indicator is lit, the computer is in Sleep mode. Press and release the power button to resume.
No audio is heard from the computer.
Check the following:
- The volume may be muted. In Windows, look at the volume control (speaker) icon on the taskbar. If it is crossed-out, click the icon and deselect the Mute all option.
- The volume level may be too low. In Windows, look at the volume control icon on the taskbar. You can also use the volume control buttons to adjust the volume.
- If headphones, earphones or external speakers are connected to the line-out port on the computer, the internal speakers automatically turn off.
I want to eject the optical drive tray without turning on the power.
There is a mechanical eject hole on the optical drive. Simply insert the tip of a pen or paperclip into the hole and push to eject the tray.
The keyboard does not respond.
Try attaching an external keyboard to a USB port on the computer. If it works, contact your dealer or an authorized service center as the internal keyboard cable may be loose.
The printer does not work.
Check the following:
-
Make sure that the printer is connected to a power outlet and that it is turned on.
-
Make sure that the printer cable is connected securely to a USB port and the corresponding port on the printer.
Requesting service
International Travelers Warranty (ITW)
Your computer is backed by an International Travelers Warranty (ITW) that gives you security and peace of mind when traveling. Our worldwide network of service centers are there to give you a helping hand.
An ITW passport comes with your computer. This passport contains all you need to know about the ITW program. A list of available, authorized service centers is in this handy booklet. Read this passport thoroughly.
Always have your ITW passport on hand, especially when you travel, to receive the benefits from our support centers. Place your proof-of-purchase in the flap located inside the front cover of the ITW passport.
If the country you are traveling in does not have an Acer-authorized ITW service site, you can still get in contact with our offices worldwide. Please visit
www.acer.com.
Before you call
Please have the following information available when you call Acer for online service, and please be at your computer when you call. With your support, we can reduce the amount of time a call takes and help solve your problems efficiently. If there are error messages or beeps reported by your computer, write them down as they appear on the screen (or the number and sequence in the case of beeps).
You are required to provide the following information:
Name:
Address:
Telephone number:
Machine and model type:
Serial number:
Date of purchase:
Tips and hints for using Windows 8
We know this is a new operating system that will take some getting used to, so we've created a few pointers to help you get started.
Three concepts you might want to keep in mind
1. Start
The Start button is no longer available; you can launch apps from the Start screen.
2. Tiles
Live tiles are similar to thumbnails of the apps.
3. Charms
Charms allow you to perform useful functions, such as sharing content, turning off your PC or changing settings.
How do I access the charms?
Move the cursor to the upper or lower right-hand corner of the screen to access the charms, or press the Windows key +
How do I get to Start?
Press the Windows key on the keyboard; press the Windows key +
How do I jump between apps?
Move the cursor to the left-hand edge of the screen to view thumbnails of apps that are currently running.
You may also press the Windows key +
How do I turn off my computer?
Press the Windows key +
Why is there a new interface?
The new interface for Windows 8 is designed to work well with touch input. Windows Store apps will automatically use the whole screen and don't require closing in the traditional way. Windows Store apps will be displayed on Start using live-tiles.
What are 'live tiles?'
Live tiles are similar to thumbnails of the apps that will be updated with new content whenever you're connected to the Internet. So, for example, you can view weather or stock updates without needing to open the app.
How do I unlock my computer?
Press the any key and click on a user account icon to unlock the computer. If your account has a password set, you will need to enter the password to continue.
How do I personalize my computer?
You can personalize Start with a different background image or by arranging the tiles to suit your personal needs.
To change the background, press the Windows key +
How do I move tiles?
Click and hold a tile to select it, then drag it to the place on Start that you want it to appear. Other tiles will be moved to accommodate the tile in its new location.
Can I make tiles bigger or smaller?
Right-click on a tile, then select Smaller or Larger from the menu that appears at the bottom of the screen.
How do I personalize the Lock screen?
You can personalize the lock screen with a different image or to show you quick status and notifications to suit your personal needs.
To change the background, press the Windows key +
So, how do I close an app?
Move the cursor to the top of the screen and click and drag the window downwards to close the app.
You can close apps from the thumbnails on the left-hand edge of the screen by right-clicking on a thumbnail and selecting Close.
Can I change the screen resolution?
From Start, start typing 'Control Panel' to open Search and display the results; click Control Panel > Adjust screen resolution.
I want to use Windows in the way that I'm used to - give me my desktop back!
From Start click the Desktop tile to see a traditional desktop. You can pin apps you frequently use to the taskbar to easily open them.
If you click an app that is not a Windows Store app, Windows will automatically open the app using Desktop.
Where are my apps?
From Start, simply start typing the name of the app you would like to open, and Search will automatically open and list results.
To view the complete list of apps, press the space bar or the Menu key and click All apps.
How do I make an app appear on Start?
If you're in All apps and you want to make an app appear on Start, you can select the app and right-click on it. Select Pin to Start from the menu that appears at the bottom of the screen.
How do I remove a tile from Start?
Right-click the tile and click Unpin from Start from the menu that appears at the bottom of the screen.
How do I make an app appear on my taskbar in Desktop?
If you're in All apps and you want to make an app appear on the taskbar in Desktop, you can select the app and right-click on it. Select Pin to taskbar from the menu that appears at the bottom of the screen.
How do I install apps?
You can download Windows Store apps from Store. You will need to have a Microsoft ID to purchase and download apps from Store.
I can't find apps like Notepad and Paint! Where are they?
From Start you can simply start typing the name of the app you're looking for to open Search and list the results. Alternatively, open All apps and scroll to 'Windows Accessories' to see the list of legacy programs.
What is a Microsoft ID (account)?
A Microsoft account is an email address and password that you use to sign in to Windows. You can use any email address, but it is best if you choose the one you already use to communicate with friends and sign in to your favorite websites. When you sign in to your PC with a Microsoft account, you'll connect your PC to the people, files, and devices you care about.
Do I need one?
You do not need a Microsoft ID to use Windows 8, but it makes life easier because you can sync data across different machines you sign in to using a Microsoft ID.
How do I get one?
If you've already installed Windows 8 and didn't sign in with a Microsoft account or you don't have a Microsoft account and want to get one, press the Windows key +
How do I add a favorite to Internet Explorer?
Internet Explorer 10 doesn't have traditional favorites, instead you can pin shortcuts to Start. Once you have the page open, right-click anywhere on the page to open the menu at the bottom of the screen. Click Pin to Start.
How do I check for Windows updates?
Press the Windows key +
Where can I get more information?
For more information please visit:
- Windows 8 tutorials: www.acer.com/windows8-tutorial
- Support FAQs: www.acer.com/support
Regulations and safety notices
FCC statement
This device has been tested and found to comply with the limits for a Class B digital device pursuant to Part 15 of the FCC rules. These limits are designed to provide reasonable protection against harmful interference in a residential installation. This device generates, uses, and can radiate radio frequency energy and, if not installed and used in accordance with the instructions, may cause harmful interference to radio communications.
However, there is no guarantee that interference will not occur in a particular installation. If this device does cause harmful interference to radio or television reception, which can be determined by turning the device off and on, the user is encouraged to try to correct the interference by one or more of the following measures:
- Reorient or relocate the receiving antenna.
- Increase the separation between the device and receiver.
- Connect the device into an outlet on a circuit different from that to which the receiver is connected.
- Consult the dealer or an experienced radio/television technician for help.
Notice: Shielded cables
All connections to other computing devices must be made using shielded cables to maintain compliance with FCC regulations.
Notice: Peripheral devices
Only peripherals (input/output devices, terminals, printers, etc.) certified to comply with the Class B limits may be attached to this equipment. Operation with non-certified peripherals is likely to result in interference to radio and TV reception.
Caution
Changes or modifications not expressly approved by the manufacturer could void the user's authority, which is granted by the Federal Communications Commission, to operate this computer.
Notice: Canadian users
This Class B digital apparatus complies with Canadian ICES-003.
Compliant with Russian regulatory certification


ME61
Modem notices

Note: Information in this section may not apply to your computer.
Notice for USA
This equipment complies with Part 68 of the FCC rules. Located on the modem is a label that contains, among other information, the FCC Registration Number and Ringer Equivalence Number (REN) for this equipment. Upon request, you must provide this information to your telephone company.
If your telephone equipment causes harm to the telephone network, the telephone company may discontinue your service temporarily. If possible, they will notify you in advance. But, if advance notice is not practical, you will be notified as soon as possible. You will also be informed of your right to file a complaint with the FCC.
Your telephone company may make changes in its facilities, equipment, operations, or procedures that could affect the proper functioning of your equipment. If they do, you will be notified in advance to give you an opportunity to maintain uninterrupted telephone service.
If this equipment should fail to operate properly, disconnect the equipment from the phone line to determine if it is causing the problem. If the problem is with the equipment, discontinue use and contact your dealer or vendor.

Caution: To reduce the risk of fire, use only No. 26 AWG or larger UL Listed or CSA Certified Telecommunication Line Cord.
TBR 21
This equipment has been approved [Council Decision 98/482/EC - "TBR 21"] for single terminal connection to the Public Switched Telephone Network (PSTN). However, due to differences between the individual PSTNs provided in different
countries, the approval does not, of itself, give an unconditional assurance of successful operation on every PSTN termination point. In the event of problems, you should contact your equipment supplier in the first instance. For more information about applicable countries, please refer to "Regulations and safety notices" on page 59.
Notice for Australia
For safety reasons, only connect headsets with a telecommunications compliance label. This includes customer equipment previously labeled permitted or certified.
Notice for New Zealand
1 The grant of a Telepermit for any item of terminal equipment indicates only that Telecom has accepted that the item complies with minimum conditions for connection to its network. It indicates no endorsement of the product by Telecom, nor does it provide any sort of warranty. Above all, it provides no assurance that any item will work correctly in all respects with another item of Tele permitted equipment of a different make or model, nor does it imply that any product is compatible with all of Telecom's network services.
2 This equipment is not capable, under all operating conditions, of correct operation at the higher speeds for which it is designed. Telecom will accept no responsibility should difficulties arise in such circumstances.
3 Some parameters required for compliance with Telecom's Telepermit requirements are dependent on the equipment (PC) associated with this device. The associated equipment shall be set to operate within the following limits for compliance with Telecom's Specifications:
a There shall be no more than 10 call attempts to the same number within any 30-minute period for any single manual call initiation, and
b The equipment shall go on-hook for a period of not less than 30 seconds between the end of one attempt and the beginning of the next call attempt.
4 Some parameters required for compliance with Telecom's Telepermit requirements are dependent on the equipment (PC) associated with this device. In order to operate within the limits for compliance with Telecom's specifications, the associated equipment shall be set to ensure that automatic calls to different numbers are spaced such that there is not less than 5 seconds between the end of one call attempt and the beginning of another.
5 This equipment shall not be set up to make automatic calls to Telecom's 111 Emergency Service.
6 This device is equipped with pulse dialing while the Telecom standard is DTMF tone dialing. There is no guarantee that Telecom lines will always continue to support pulse dialing.
7 Use of pulse dialing, when this equipment is connected to the same line as other equipment, may give rise to bell tinkle or noise and may also cause a
false answer condition. Should such problems occur, the user should NOT contact the telecom Fault Service.
8 This equipment may not provide for the effective hand-over of a call to another device connected to the same line.
9 Under power failure conditions this appliance may not operate. Please ensure that a separate telephone, not dependent on local power, is available for emergency use.
LCD pixel statement
The LCD unit is produced with high-precision manufacturing techniques.
Nevertheless, some pixels may occasionally misfire or appear as black or red dots.
This has no effect on the recorded image and does not constitute a malfunction.
Radio device regulatory notice

Note: Below regulatory information is for models with wireless LAN and / or Bluetooth only.
General
To prevent radio interference to the licensed service, this device is intended to be operated indoors.
This product complies with the radio frequency and safety standards of any country or region in which it has been approved for wireless use. Depending on
configurations, this product may or may not contain wireless radio devices (such as wireless LAN and/or Bluetooth modules). Below information is for products with such devices.
Declaration of Conformity for EU countries
Hereby, Acer, declares that this computer is in compliance with the essential requirements and other relevant provisions of Directive 1999/5/EC.
Wireless operation channels for different domains
N. America 2.412-2.462 GHz Ch01 through Ch11
Japan 2.412-2.484 GHz Ch01 through Ch14
Europe ETSI 2.412-2.472 GHz Ch01 through Ch13
France: Restricted wireless frequency bands
Some areas of France have a restricted frequency band. The worst case maximum authorized power indoors is:
- 10 mW for the entire 2.4 GHz band (2400 MHz - 2483.5 MHz)
100mW for frequencies between 2446.5 MHz and 2483.5 MHz

Note: Channels 10 through 13 inclusive operate in the band 2446.6 MHz to 2483.5 MHz.
There are few possibilities for outdoor use: On private property or on the private property of public persons, use is subject to a preliminary authorization procedure by the Ministry of Defense, with maximum authorized power of 100mW in the 2446.5 - 2483.5 MHz band. Use outdoors on public property is not permitted.
In the departments listed below, for the entire 2.4 GHz band:
Maximum authorized power indoors is 100mW
Maximum authorized power outdoors is 10mW
Departments in which the use of the 2400 - 2483.5 MHz band is permitted with an EIRP of less than 100mW indoors and less than 10mW outdoors:
01 Ain Orientales
25 Doubs
59 Nord
75 Paris
02 Aisne
26 Drome
60 Oise
82 Tarn et Garonne
03 Allier
32 Gers
61 Orne
84 Vaucluse
05 Hautes Alpes
36 Indre
63 Puy Du Dome
88 Vosges
08 Ardennes
37 Indre et Loire
64 Pyrenees Atlantique
89 Yonne
09 Ariege
41 Loir et Cher
66 Pyrenees
This requirement is likely to change over time, allowing you to use your wireless LAN card in more areas within France.
Please check with ART for the latest information (www.artelecom.fr).

Note: Your WLAN Card transmits less than 100mW , but more than 10 mW.
List of National Codes
This equipment may be operated in the following countries:
| Country | ISO 31662 letter code | Country | ISO 31662 letter code |
| Austria | AT | Malta | MT |
| Belgium | BE | Netherlands | NT |
| Cyprus | CY | Poland | PL |
| Czech Republic | CZ | Portugal | PT |
| Denmark | DK | Slovakia | SK |
| Estonia | EE | Slovenia | SL |
| Finland | FI | Spain | ES |
| France | FR | Sweden | SE |
| Germany | DE | United Kingdom | GB |
| Greece | GR | Iceland | IS |
| Hungary | HU | Liechtenstein | LI |
| Ireland | IE | Norway | NO |
| Italy | IT | Switzerland | CH |
| Latvia | LV | Bulgaria | BG |
| Lithuania | LT | Romania | RO |
| Luxembourg | LU | Turkey | TR |
The FCC RF safety requirement
The radiated output power of the wireless LAN Mini PCI Card and Bluetooth card is far below the FCC radio frequency exposure limits. Nevertheless, the notebook PC series shall be used in such a manner that the potential for human contact during normal operation is minimized as follows:
1 Users are requested to follow the RF safety instructions on wireless option devices that are included in the user's manual of each RF option device.

Caution: To comply with FCC RF exposure compliance requirements, a separation distance of at least 20~cm (8 inches) must be maintained
between the antenna for the integrated wireless LAN Mini PCI Card built in to the screen section and all persons.

Note: The wireless Mini PCI adapter implements a transmission diversity function. The function does not emit radio frequencies simultaneously from both antennas. One of the antennas is selected automatically or manually (by users) to ensure good quality radiocommunication.
2 This device is restricted to indoor use due to its operation in the 5.15 to 5.25 GHz frequency range. FCC requires this product to be used indoors for the frequency range 5.15 to 5.25 GHz to reduce the potential for harmful interference to co-channel Mobile Satellite systems.
3 High power radar is allocated as the primary user of the 5.25 to 5.35 GHz and 5.65 to 5.85 GHz bands. These radar stations can cause interference with and/or damage this device.
4 An improper installation or unauthorized use may cause harmful interference to radio communications. Also any tampering of the internal antenna will void the FCC certification and your warranty.
Canada — Low-power license-exempt radio communication devices (RSS-210)
Exposure of humans to RF fields (RSS-102)
The notebook PC series employs low gain integral antennas that do not emit RF field in excess of Health Canada limits for the general population; consult Safety Code 6, obtainable from Health Canada's website at www.hc-sc.gc.ca/rpb.
This device complies with RSS210 of Industry Canada.
This Class B digital apparatus complies with Canadian ICES-003, Issue 4, and RSS-210, No 4 (Dec 2000) and No 5 (Nov 2001).
"To prevent radio interference to the licensed service, this device is intended to be operated indoors and away from windows to provide maximum shielding. Equipment (or its transmit antenna) that is installed outdoors is subject to licensing."
Caution: When using IEEE 802.11a wireless LAN, this product is restricted to indoor use due to its operation in the 5.15- to 5.25-GHz frequency range. Industry Canada requires this product to be used indoors for the frequency range of 5.15 GHz to 5.25 GHz to reduce the potential for harmful interference to co-channel mobile satellite systems. High power radar is allocated as the primary user of the 5.25- to 5.35-GHz and 5.65 to 5.85-GHz bands. These radar stations can cause interference with and/or damage to this device.
The maximum allowed antenna gain for use with this device is 6dBi in order to comply with the E.I.R.P limit for the 5.25- to 5.35 and 5.725 to 5.85 GHz frequency range in point-to-point operation.
LCD panel ergonomic specifications
| Design viewing distance 500 mm | |
| Design inclination angle 0.0° | |
| Design azimuth angle 90.0° | |
| Viewing direction range class IV | |
| Screen tilt angle 85.0° | |
| Design screen illuminance | •Illuminance level: [250 + (250cosα)] lx where α = 85° •Color: Source D65 |
| Reflection class of LCD panel (positive and negative polarity) | •Ordinary LCD: Class I •Protective LCD: Class III |
| Image polarity Both | |
| Reference white: Pre-setting of luminance and color temperature @ 6500K (tested under BM7) | •Yn •u'n •v'n |
| Pixel fault class Class II | |
Notebook Aspire
www.acer-group.com/public/Sustainability
ENERGY STAR

ENERGY STAR
Acer Backup Manager 20
Acer clear.fi 22
Considerations speciales 34
(International Travelers Warranty; ITW) 56
Avant d'appeler 56
CD panel ergonomic specifications 66
Touchpad
This Class B digital apparatus complies with Canadian ICES-003.
This device complies with RSS210 of Industry Canada.
This Class B digital apparatus complies with Canadian ICES-003, Issue 4, and RSS-210, No 4 (Dec 2000) and No 5 (Nov 2001).
"To prevent radio interference to the licensed service, this device is intended to be operated indoors and away from windows to provide maximum shielding. Equipment (or its transmit antenna) that is installed outdoors is subject to licensing."
Caution: When using IEEE 802.11a wireless LAN, this product is restricted to indoor use due to its operation in the 5.15- to 5.25-GHz frequency range. Industry Canada requires this product to be used indoors for the frequency range of 5.15 GHz to 5.25 GHz to reduce the potential for harmful interference to co-channel mobile satellite systems. High power radar is allocated as the primary user of the 5.25- to 5.35-GHz and 5.65 to 5.85-GHz bands. These radar stations can cause interference with and/or damage to this device.
CD panel ergonomic specifications
| Design viewing distance 500 mm | |
| Design inclination angle 0.0° | |
| Design azimuth angle 90.0° | |
| Viewing direction range class Class IV | |
| Screen tilt angle 85.0° | |
| Design screen illuminance • Illuminance level: [250 + (250cosα)] lx where α = 85° • Color: Source D65 | |
| Reflection class of LCD panel (positive and negative polarity) | • Ordinary LCD: Class I • Protective LCD: Class III |
| Image polarity Both | |
| Reference white: | • Yn |
| Pre-setting of luminance and color temperature @ 6500K (tested under BM7) | • u ' n • v ' n |
| Pixel fault class Class II | |
Aspire-Notebook
Benutzerhandbuch
CLASS 1 LASER PRODUCT
ACHTUNG: INVISIBLE LASER RADIATION WHEN OPEN. AVOID EXPOSURE TO BEAM.
APPAREIL ALASER DE CLASSES 1 PRODUIT
LASERATTENTION: RADIATION DU FAISCEAU LASER INVISIBLE EN CAS D'OUVERTURE. EVITTER Toute EXPOSITION AUX RAYONS.
LUOKAN 1 LASERLAITE LASER KLASSE 1
Acer Backup Manager 20
Acer clear.fi 22
HDMI (High-Definition Multimedia Interface)
(International Travelers Warranty; ITW) 57
Vor einem Anruf 57
LCD panel ergonomic specifications 67
Touchpad
LCD panel ergonomic specifications
| Design viewing distance 500 mm | |
| Design inclination angle 0.0° | |
| Design azimuth angle 90.0° | |
| Viewing direction range class Class IV | |
| Screen tilt angle 85.0° | |
| Design screen illuminance · Illuminance level: [250 + (250cosα)] lx where α = 85° ·Color: Source D65 | |
| Reflection class of LCD panel (positive and negative polarity) | ·Ordinary LCD: Class I ·Protective LCD: Class III |
| Image polarity Both | |
| Reference white: | ·Yn |
| Pre-setting of luminance and color temperature @ 6500K (tested under BM7) | ·u ' n ·v ' n |
| Pixel fault class Class II | |
Notebook Aspire
Manuale dell'utente
Acer Backup Manager 20
Acer clear.fi 22
High-Definition Multimedia Interface
ITW (International Traveler's Warranty) 54
How do I access the charms? 56
Come arriv o a Start? 56
LCD panel ergonomic specifications 64
Touchpad
ITW (International Traveler's Warranty)
How do I access the charms?
Come arriv o a Start?
The use of these equipments is regulated by:
- D.L.gs 1.8.2003, n. 259, article 104 (activity subject to general authorization) for outdoor use and article 105 (free use) for indoor use, in both cases for private use.
- D.M. 28.5.03, for supply to public of LAN access to networks and telecom services.
LCD panel ergonomic specifications
| Design viewing distance 500 mm | |
| Design inclination angle 0.0° | |
| Design azimuth angle 90.0° | |
| Viewing direction range class Class IV | |
| Screen tilt angle 85.0° | |
| Design screen illuminance · Illuminance level: [250 + (250cosα)] lx where α = 85° ·Color: Source D65 | |
| Reflection class of LCD panel (positive and negative polarity) | ·Ordinary LCD: Class I ·Protective LCD: Class III |
| Image polarity Both | |
| Reference white: | ·Yn ·u ·v ·n |
| Pre-setting of luminance and color temperature @ 6500K (tested under BM7) | ·u ·v ·n |
| Pixel fault class Class II | |
Portátil Aspire
Manual de usuario
CLASS 1 LASER PRODUCT
PRECAUCION: INVISIBLE LASER RADIATION WHEN OPEN. AVOID EXPOSURE TO BEAM.
APPAREIL A LASER DE CLASSE 1 PRODUIT
LASERATTENTION: RADIATION DU FAISCEAU LASER INVISIBLE EN CAS
D'OUVERTURE. EVITTER Toute EXPOSITION AUX RAYONS.
LUOKAN 1 LASERLAITE LASER KLASSE 1
Los)."Losylvania's.
losylvania's.
losylvania's.
losylvania's.
losylvania's.
losylvania's.
losylvania's.
losylvania's.
losylvania's.
Acer Backup Manager 19
Acer clear-fi 21
(International Travelers Warranty; ITW) 52
Antes del lamar 53
LCD panel ergonomic specifications 62
Panel tactil
The operation of this product in the radio channel 2 (2417 MHz) is not authorized in the following cities: Agadir, Assa-Zag, Cabo Negro, Chaouen, Goulmima, Oujda, Tan Tan, Taourirt, Taroudant and Taza.
LCD panel ergonomic specifications
| Design viewing distance 500 mm | |
| Design inclination angle 0.0° | |
| Design azimuth angle 90.0° | |
| Viewing direction range class Class IV | |
| Screen tilt angle 85.0° | |
| Design screen illuminance · Illuminance level: [250 + (250cosα)] lx where α = 85° ·Color: Source D65 | |
| Reflection class of LCD panel (positive and negative polarity) | ·Ordinary LCD: Class I ·Protective LCD: Class III |
| Image polarity Both | |
| Reference white: | ·Yn |
| Pre-setting of luminance and color temperature @ 6500K (tested under BM7) | ·u ' n ·v ' n |
| Pixel fault class Class II | |
Portátil Aspire
Manual do Utilizador
CLASS 1 LASER PRODUCT
CAUTION: INVISIBLE LASER RADIATION WHEN OPEN. AVOID EXPOSURE TO BEAM.
APPAREIL A LASER DE CLASSE 1 PRODUIT
LASERATTENTION: RADIATION DU FAISCEAU LASER INVISIBLE EN CAS D'OUVERTURE. EVITTER TOUTE EXPOSITION AUX RAYONS.
LUOKAN 1 LASERLAITE LASER KLASSE 1
www.acer-group.com/public/Sustainability
ENERGY STAR

Acer Backup Manager 19
Acer clear.fi 21
Consumer Infrared (CIR)
High-Definition Multimedia Interface
(apenas para determinados modelos) 39
(International Travelers Warranty; ITW) 53
LCD panel ergonomic specifications 63
LCD panel ergonomic specifications
| Design viewing distance 500 mm | |
| Design inclination angle 0.0° | |
| Design azimuth angle 90.0° | |
| Viewing direction range class Class IV | |
| Screen tilt angle 85.0° | |
| Design screen illuminance · Illuminance level: [250 + (250cosα)] lx where α = 85° ·Color: Source D65 | |
| Reflection class of LCD panel (positive and negative polarity) | ·Ordinary LCD: Class I ·Protective LCD: Class III |
| Image polarity Both | |
| Reference white: | ·Yn |
| Pre-setting of luminance and color temperature @ 6500K (tested under BM7) | ·u | n ·v | n |
| Pixel fault class Class II | |
Aspire Notebook
Acer Backup Manager 20
Acer clear.fi 22
High-Definition Multimedia Interface
ITW (International Travelers Warranty) 54
Voordat u belt 55
LCD panel ergonomic specifications 63
Touchpad
Start Acer Recovery Management
ITW (International Travelers Warranty)
LCD panel ergonomic specifications
| Design viewing distance 500 mm | |
| Design inclination angle 0.0° | |
| Design azimuth angle 90.0° | |
| Viewing direction range class Class IV | |
| Screen tilt angle 85.0° | |
| Design screen illuminance · Illuminance level: [250 + (250cosα)] lx where α = 85° • Color: Source D65 | |
| Reflection class of LCD panel (positive and negative polarity) | • Ordinary LCD: Class I • Protective LCD: Class III |
| Image polarity Both | |
| Reference white: | • Yn |
| Pre-setting of luminance and color temperature @ 6500K (tested under BM7) | • u ' n • v ' n |
| Pixel fault class Class II | |
Aspire Notebook
Brukerhandbok
2012 Med enerett.
Brukerhandbok for Aspire Notebook
Denne revisjonen: 01/2013
Modellnummer:
Serienummer:
Innkjopsdato:
Innkjøpssted:
KLASSE 1 LASERPRODUKT
FORSIKTG: USYNLIG LASERSTRÄLING I APEN TILSTAND. UNNGA STRÄLEN.
APPAREIL ALASER DE CLASSES 1 PRODUIT
LASERATTENTION: RADIATION DU FAISCEAU LASER INVISIBLE EN CAS D'OUVERTURE. EVITTER Toute EXPOSITION AUX RAYONS.
LUOKAN 1 LASERLAITE LASER KLASSE 1
Acer Backup Manager 18
Acer clear.fi 20
Deaktiver hurtigoppstart 23
Batteri 25
CIR-port (Consumer Infrared) (bare for visse modeller) 36
Universal Serial Bus (USB) 37
IEEE 1394-port (bare for visse modeller) 37
International Travelers Warranty (ITW) 51
For du ringer 51
LCD panel ergonomic specifications 60
Berøringsplate (Touchpad)
Deninnebygde beroringsplaten er en pekeenhet som foler bevegelser pa overflaten. Dette betyr at markoren reagerer nar du beveger fingeren pa overflaten av beroringsplaten.

Start Acer Recovery Management:
Deaktiver hurtigoppstart
CIR-port (Consumer Infrared) (bare for visse modeller)
International Travelers Warranty (ITW)
LCD panel ergonomic specifications
| Design viewing distance 500 mm | |
| Design inclination angle 0.0° | |
| Design azimuth angle 90.0° | |
| Viewing direction range class IV | |
| Screen tilt angle 85.0° | |
| Design screen illuminance • Illuminance level: [250 + (250cosα)] lx where α = 85° • Color: Source D65 | |
| Reflection class of LCD panel (positive and negative polarity) | • Ordinary LCD: Class I • Protective LCD: Class III |
| Image polarity Both | |
| Reference white: | • Yn |
| Pre-setting of luminance and color temperature @ 6500K (tested under BM7) | • u ' n • v ' n |
| Pixel fault class Class II | |
Aspire Notebook
Brugervejledning
© 2012 Alle Rettigheder Forbeholds.
Aspire Notebook - Brugervejledning
Denne revision: 01/2013
Modelnummer:
Serienummer:
Købsdato:
Kobt hos:
CLASS 1 LASER PRODUCT
CAUTION: INVISIBLE LASER RADIATION WHEN OPEN. AVOID EXPOSURE TO BEAM.
APPAREIL A LASER DE CLASSE 1 PRODUIT
LASERATTENTION: RADIATION DU FAISCEAU LASER INVISIBLE EN CAS D'OUVERTURE. EVITTER Toute EXPOSITION AUX RAYONS.
LUOKAN 1 LASERLAITE LASER KLASSE 1
Acer Backup Manager 18
Acer clear.fi 20
High-Definition Multimedia Interface
International Travelers Warranty (ITW) 51
Indendringer 51
LCD panel ergonomic specifications 60
Pegefelt
Start Acer Recovery Management:
- Fra Start indtaster du 'Recovery', hvorefter du klikker på Acer Recovery Management i listen over apps.
International Travelers Warranty (ITW)
LCD panel ergonomic specifications
| Design viewing distance 500 mm | |
| Design inclination angle 0.0° | |
| Design azimuth angle 90.0° | |
| Viewing direction range class Class IV | |
| Screen tilt angle 85.0° | |
| Design screen illuminance • Illuminance level: [250 + (250cosα)] lx where α = 85° • Color: Source D65 | |
| Reflection class of LCD panel (positive and negative polarity) | • Ordinary LCD: Class I • Protective LCD: Class III |
| Image polarity Both | |
| Reference white: | • Yn |
| Pre-setting of luminance and color temperature @ 6500K (tested under BM7) | • u ' n • v ' n |
| Pixel fault class Class II | |
Aspire bärbar dator
Användarhandboken
KCLASS 1 LASERPRODUKT
VARNING: OSYNLIG LASERSTRALNING NAR DENNA DEL AR ÖPPEN. UNDVIK ATT UTSÄTTA DIG FÜR STRÄLEN.
APPAREIL ALASER DE CLASSES 1 PRODUIT
LASERATTENTION: RADIATION DU FAISCEAU LASER INVISIBLE EN CAS D'OUVERTURE. EVITTER TOUTE EXPOSITION AUX RAYONS.
LUOKAN 1 LASERLAITE LASER KLASSE 1
www.acer-group.com/public/Sustainability
ENERGY STAR

ENERGY STAR
Acer Backup Manager 18
Acer clear.fi 20
(International Travelers Warranty; ITW) 51
Innan du ringer 52
LCD panel ergonomic specifications 61
Pekplatta
Starta Acer Recovery Management:
International resegaranti (International Travelers Warranty; ITW)
LCD panel ergonomic specifications
| Design viewing distance 500 mm | |
| Design inclination angle 0.0° | |
| Design azimuth angle 90.0° | |
| Viewing direction range class Class IV | |
| Screen tilt angle 85.0° | |
| Design screen illuminance •Illuminance level: [250 + (250cosα)] lx where α = 85° •Color: Source D65 | |
| Reflection class of LCD panel (positive and negative polarity) | •Ordinary LCD: Class I •Protective LCD: Class III |
| Image polarity Both | |
| Reference white: | •Yn |
| Pre-setting of luminance and color temperature @ 6500K (tested under BM7) | •u'n •v'n |
| Pixel fault class Class II | |
Aspire kannettavat
Käyttoohjekirja
Acer Backup Manager 20
Acer clear.fi 22
High-Definition Multimedia Interface
"International Travelers Warranty" (ITW) 54
LCD panel ergonomic specifications 64
Kosketusalusta
LCD panel ergonomic specifications
| Design viewing distance 500 mm | |
| Design inclination angle 0.0° | |
| Design azimuth angle 90.0° | |
| Viewing direction range class IV | |
| Screen tilt angle 85.0° | |
| Design screen illuminance • Illuminance level: [250 + (250cosα)] lx where α = 85° • Color: Source D65 | |
| Reflection class of LCD panel (positive and negative polarity) | • Ordinary LCD: Class I • Protective LCD: Class III |
| Image polarity Both | |
| Reference white: | • Yn |
| Pre-setting of luminance and color temperature @ 6500K (tested under BM7) | • u ' n • v ' n |
| Pixel fault class Class II | |
Hoyt6yK Aspire
PykoBODCTBO NOIb3OBaTeJra
© 2012 Bce npaba coxpanHebl.
PykoBOcTBo IOJIb3OBaTeJHOyT6yK Aspire
3Ta peJaKun: 01/2013
Hormep moedn:
CepnHbI Homep:
Даразпуки:
MecTo nokyPkN:
HΦopMauny IJIy BaWei 6e3oNaChOCTN yDObCTBa pa60tbl
ПразвILA Тхнки 6e3oNaChocTN
BHNMaTeJIbHO O3HaKOMbTecb C 3TmM INHCTpyKzmaM. CoxpaHnTe 3TOT DOkymeHT dIy HabeJeHnC npaBok B 6dyuIeM. CJeDyIte BCem INHCTpyKzmaM I npdUnpexKeHnM, HaHeceHHbIM Ha n3DeJIne.
BbIKIIOueHHe yCTpOJcTba nepeI YnCTkoI
Ipepe erO uNCTKOJ OTKJIIOUaIte 3TO n3deJIne OT HAcTeHHoJ PO3eTKn NHTAHn. He nCpONb3yIte KNDKne nJIn aApO3OJIbHbIe YNCrTcIe CpeIcTBA. JnA uNCTKn IcNoJIb3yIte BJIaXHyIO TkaHb.
IPEyPExEHENo NOKIOUeHIO NOTKIOUeHIO yctpoiCTBa
Pn noKIOUeHn n OTKIOUeHn nITaHn oT nCTOuHnKa HnprJxHn Co6IouaTe cNeDuOuIne nHcTpkyu:
YctaHOBNTe NCTOCHNK NITAHN, PpeKdE Chm NOdkHouaTb UHyp NITAHN K PO3eTKe CTeBOrO 3JIeKTPoNtAHN.
OTKJIIOUaTe UHyp IITAHnI nepeI OTCOeINHeHnEM NCTOCHNkA IITAHnI OT KOMNbHOtepa.
Ecnn CnCTema 3aNTbIbAEcra OT HeCKOJIbKIX NCTOCHNKOB NITAHN, TO OTKNIouHtene NITAHne OT CnCTeMbI, OTOeDNHB BCE UHpybl NITAHN O T 6NOKOB NITAHN.
PPEyIeHNE B OTHoWeHn DOCTynHOCTN
IocTyN K ceteBoi po3eTke, B KOtOpyIO BCTaBnIeTcH Hyp NITaHINr, He DOJXeH 6bITb 3aTpUdHeN, 3Ta po3eTKa DOnJxHa HaxOuITbcra MAKCmAmJIbHO 6JN3KO K IIOJIb3OBaTeJIIO O6OpyIDoBaHInr. Ppr Heo6xoDMOCrN OTKJIIOHTb NITaHne OT O6OpyIDoBaHInr O6a3aTeJIbHO BbIHMaIte UHyp NITaHINr I3 po3eTKI 3JIeKTPoPNTaHnR.
He 6pocaiTe aKKymyIaTOpb I OROHb - OHN MOrTy B3PbIbTaBcR. OHN TaKKe MOrTy B3OpBaTbcra npn nobpeXeHnn. AKKymyIaTOpb I cneDyeT yTNIN3uPoBaTb B COOTBeTCTBnC MeCTHBIMnpabUNAm. Ecnn BO3MOxHO, CdaBaIte INx Ha nepepa60TKy. He BB6pacbiBaIte aKKymyIaTOpb I BmecTe C 6bITOBbIMN OTXoAMn.
Pa6oTuOuIaKKyMylrTop MoKet Bbl3bIBaTb NOMExn B pa6oTe 6ecnpoBOHbIX yCTPOuCTB, YTO NOBIIraET Ha INx IpON3BOIDNTeJIbHOCTb.
3aMeHa aKKyMnyTopa
IopTaINBnbl KOMNbIoTe PIK Tnna "HoYToK" cepnn nCNoJIb3yET IITneBbl aKKymJrTOp.ДЯ 3aMeHbI NcNoJIb3yIte aKKymJrTOp TAKORe JTe Tnla, KaK y aKKymJrTOpa, KOtOpBb BxOJT B KOMNKeT NOCTaBKn BaUeRo YcTPOiCTBa. IcNoIb30BaHne DpyrOro aKKymJrTOpa MoXeT NOBNeYb 3a Co6oN OAnCHocTb BO3rOpAHn INN B3pIBa.

IpeynpexdHne! B cnyae HnpaBnIbHoro o6paueHnaKKymyIaTOPhIe 6aTapeN Moryr B3OpBaTbcra. He pa3bnpaTe nxI He 6pocaiTe B pIamr. Depxnte nx nOdaJIbwe ot DeTeN 6bICTpo n36abJnTEcB OT NcNoJIb3OBAHHbIX 6aTapeN. Ppn yTnIn3aun Otpa6OtaHHoro aKkymyIaTopa co6JIouJaTe MeCTHbIe npaBnla.
viii
IpeDynpexKdEHeB OTHOWeHn PpNBOda ONTtuecknx DnCKOB
(TOJIbKO DnIa ONpeDeIeHHbIX MoJeIeI)
BHHMaHHe: B 3TOM yCTpOiCTBe npImeHaeTcra Ja3epHa cNCTema, PO3ToMy OH cnTaEcra "JIA3EPHbIM YCTPOICTBOM KJIACCA 1." B cnyaee HenoJaOk B pa6Ote 3TOrO yCTpOiCTBa o6paTntecb 3a nOMoCbIO B 6nHexaIshn
ABTOPN3OBAHHbI cepBnchbI ueHtp. He oKpbBaIe KoxyX, yTo6bI Ha Bac He nonan lyu na3epa.
CLASS 1 LASER PRODUCT
CAUTION: INVISIBLE LASER RADIATION WHEN OPEN. AVOID EXPOSURE TO BEAM.
APPAREIL A LASER DE CLASSE 1 PRODUIT
LASERATTENTION: RADIATION DU FAISCEAU LASER INVISIBLE EN CAS D'OUVERTURE. EVITTER Toute EXPOSITION AUX RAYONS.
LUOKAN 1 LASERLAITE LASER KLASSE 1
CbeHnI coBtI dIyO6CTBa pa60TbI
HOrda nOlb3OBaTeJI, npoBOJaUne MHO BpeMeHN 3a KOMNbIOTepOM, JaanyOTcHa Ype3MepHoe HApJxKeHne rna3 n rOIOBHyIO 60nb. NOb3OBaTeJI TAKKe yAcTO pNCKyIOT NOyHTb fN3NUeCKyIO TpaBMy, ecNI 6ydyT MHO OACOB NOprd CnDeTb 3a KOMNbIOTepOM. IpoDOnKJteJIbHO BpeMa pa6Obl, HeyDo6Na I03a, HeNPabINbHa oPraHn3aUu pa6OyeO MeCTa, CTpeCC, HeNoxDxoJaUne ycIOBnPa6Obl, COCTOHNHe JInHOrO 3dOpOBbY I dpyrIe fakTopbl 3NaHTbHo yBeJIuHBAIoT pNCK NOyEHHa Fm3NuEckO TpaBMbl.
HenpaBnIbHa pa6oTa 3a KOMbHOTepom MoKeT npBecTu K NOBHeHIO 3aJcTHOrO cyXoxNtBHO CnHDPoma, TeHNHTy, BocNaJIeHIO cyXoxNIIu N CInHOBaJIbHO CymK INI DpyHX cKeIeTHO-MblIeUHbIX 3a6OJIeBAHNI. B KnCTx pyK, 3aJIaCtBax, PIIeayx, PpeINIeYbAx, Iee INI CNHMe MOrT NOBtBCs CJIeDyUOJIne CmMTOMbl:
- Ohemehne, XkeHne nn NOKaJIbBaHne.
- Tomota, 60JIe3HeHHoe OuJUeHne HJN cJa6ocTb.
- BoIb, onyxoJIb nII nn yIbcaIaI.
OceneHeNoctb nn HapxKeHne.
CyxocTBnIINcna6oCTb.
Пи НИЧИТAKNX CIMNTOMOB, NOBTOPЯОUIXCSI JINI NOCTOHHbIX OUyUeHnIX DnCKOMФOPTa N/IIN 6OJIe3HeHHbIX OUsUeHnIX npi pa6Ote 3a KOMNbIOTepOM HemeДLEHNO OБpaTITecb 3a KOHCyIbTaциЕ K BpauY u COObIte O6 3Tom B OTdEJI TexHnK 6e3ONaCHOCTN I OXpaHbI 3dOpOBbBy BaSeI KOMPaHnI.
B cneyuouem pa3eene npnbOaTc8 coBeTb, KaK cdeNaTb pa6oTy 3a KOMNbIOTepom Boone yDobHoi.
Ponck ydo6Horo pa6oeryo noJoxeHn
HaIInTe IJIe Ce6MaKcImaJIbHO yO6Hoe NIOXKeHne 3a KOMNbHTepoM, MeHЯ yrO o630pa MOHITOPa, INcNoJIb3yra NODCTABky IIN HOr IIN peRyIInpyR BbICOTy kpcna. BocnONb3yITeCb cNeDuOuIMN COBETAMN:
He cnDnte nooJny B oHno no3e.
He cKNoHnTeCb Hn3KO 3a CToIOM n He OTKnDbIbAITeCb daJIeKO Ha cNHHky KpeCna.
- Pernoiueckn BCTaBaIte n npoxaXuBaITeCb, yTo6bI cHraTb HaprJxHeB MycKylax Hor.
- DeJaTe KopoTKe nepepbIbbl, yTo6bl ocJabntb HanpJxHne B Iwe n Pnueax.
He HanpraaTe MyskyIbI He NoDnMaTe BbICOKo PJIeYu.
- YctaHOBHTe BHeHnI DnCnnei, KnaBnAtpy N MbIIb Ha pa6Oyem MeCTe TaK, TTO6bl Do Hnx 6blno Ierko DotraHyTbcra.
- Ecnn Bbl CMOTpnte Ha MOHITOp YaSe, Yem Ha DOKymeHTbI, TO pa3MeCTNTe DnCnpei no ceHTpy CToJa, YTObBi Wej HAnpraJanaB KaK MoXHO MeHbWe.
3a6oTa o 3peHn
Ecnnoonry cmOTpeb Ha MOHtOp, Hocntb He npabnbo NOo6paHbIe Ockn nn KOHTaKTHbIe IIN3bl, nCNOB3OBaTb JRPKn CBETnn pa60TaT 3a CToIOM C 6JeCTauei IOBepxHOCTbIO, IIOXO OTpeRyJInPOBaTb pe3KoCTb 3kPaHa, nCNOB3OBaTb MeIKN 7pnp T nn MaIOKOHTpactHbI dncnne, To rna3a 6dyT cnilbHo yctBaTb. B cNeDyUox pa3dEnax npIBOJrTc COBeTb, kak UMeHbUHTb Ype3MepHoe HapjKeHne rna3.
Tna3a
- DaaBaiTe rna3am YactbIy OTdbIX.
- PernoDnueckn OTbOndTe rna3a OT MOHNTopa n CMOTpnte Ha KaKoH-N6yDb ydaJIeHHbI npEmdet.
- Yacto Mraite, yTo6bl rJa3a He 3acbixaJIn.
Ducnnne
- Depknte nucnne B uHCTOTE.
Ba7a roNoBa dOJxHa haoDntb8 Bblwe HxKHe KpOMKn DnCnIe, YTO6bl npnpocMOTpe n3o6paXeHnB UcHTpe DnCnIe rna3a CMOTpeN CBepxu BHn3.
Otperynpyte npKocb n/nn KOHTpact dncnpe TaK, YTO6bI TeKCT 6blno JERKO qHTaTb, a rpaqNka OTO6paXkanaacb YeTKO.
-ymeHbIte MepuaHne nOtpaKeHne:
yctahOBnTe nucnneTak, yTO6bI erO 6OKOBa KpOMka 6bIna o6paueHa K OKHy nIN nCTOuHnky OCBeueHnry,
ymehbnteCBETB NOMEeHNN,NCNOb3yraopTbepyI,HTOpblnn KaJIIO3N,
BKNIOaIte OCEeHHe Ha pa6OeM MeCTe,
- OTPerynpyte yron o63opa dincnpe,
NCNoJIb3yIte aHTn6JNKOBbl qnlbp,
yctaHOBtHe Ha BepxHcNKe DnCnpeaHTbIK KO3bIpeK, HapnpMep, KapToHHyo NOnocky.
He cmoTpnte Ha dncnne H3 Heydo6Horo noLoKeHHa.
He cMOTpIte noDoJrhy Ha nCToHnKn npKO rCBeta.
Bbipapotka npabnIbHoro ctnna pa6oTbI
Cneyuoune npnBbUckn pa60tbi 3a KOMnbIOTepom N03BOJrT MeHbWe yCTaBaTb n pa60taTb 6oJee npOdyKTINBHO:
-ДелайтКОРOTКИЕЧАТБIЕпeрьВыВ pa6оTe.
- EaaiTe kakne-Hn6ydb ynpaxKHeHna dJa pa3MnHKn.
KaMKoXHOaUe BbIXOINTe NObIbIaTb YnCTbIM, CBExHM BO3dyXOM.
- Perynapno DeJaTe Φn3uYeCKyU 3apJky, yKpePnIyoUyU TeNo.

IpeynpexdHne! He noJb3yTeCb KOMNbIOTePOM Ha dNBaHe nnB NocteHN. Ecnn 3TOro HEnb3r N36ExKaTb, To pa6OtaIte TOJbKO KOpOTKmN nepNoaMn, YacTo DeJaITe nepepbIBbl N BbINOJIHraTe ynpaxHeHnДЯ pa3MNKn.

Mbl pa3pa6oTaII pI dy pyKOBoIDCTB, KOToPbIe NOMOryT Bam B IcNoJIb3OBaHIn HoYToByka Acer:
3TOT nJaKAT NOMOXET BbINOJHHTb NepBOHaJIbHyIO HaCTpOy KOMNbIbTepa.
PykoBoCTBO noIb3oBaTeJI Aspire copeKNT noIe3HyIO INΦopMaUHO,
PnIMeHmYIO KO BcEM MoJeIaM cepIN Aspire. B HEM ONICbIBaOTcO cHOBHbIE
Tembl, TaKHe KaK pa6Ota C KnaBnAtypoi, 3BykOM n T.D. YyTtTE, YTO PykoBoCTBO
NoIb3oBaTeJI RAIIeTcR O6ObuEHHbIM, IO3Tomy B HEM INHorda 6yDyT
ONICbIBaTcR cyHKUIN IIN CBOJCTBA, peAIN3OBAHHbIE He B KynIeHHoB BamN
MOeJIa, a IINsb B ONPeDeJIeHHbIX MoJeIax 3ToI cepIN B Taknx CInyIaX B TeKCTe
DaETcR NometKa "ToIbKO dJIa ONpeDeJIeHHbIX MOeJIe".
KpaTkoe pyKOBOcTBo 3HaKOMNT BAC C OCHOBbIMN XapaKTepNCtNKaMn IN yHKUIMN BaJero HOBOrO KOMbIOTepa. YTo6bl y3HaTb 60JIbWe O TOM, KaK C IOMOuIO KOMbIOTepa IOBbICITb PPOyKTINBHOCTb CBOe pa60Tb, CM.
PykoBoDCTBO noIb3OBeTJAspire. 3To pyKOBoDCTBO coDEpXHT IOdpo6HyIOHΦopMaIIO O CnCTeMHbIX ΦyHKUJx, BOCCTaHOBJIeHN DaHHbIX, BO3MOKHOCTAX paCUnpeHnI yCTpaHEnn HEncnpaBHOCTeN. B HEM TAKKe npNBedeHa IHΦopMaIIO rapaHTnHOM o6CnyKuBaHN, a TAKKe O6Une IpeDNsCaHnI npaBnla 6e30NaChOCTn pRn pa6oTe c HOY6yKOM. 3To pyKOBoDCTBO B BVNe φaJIa PDF n3HaayabHo 3arpyKeHO B KOMNbIoTeP. 4To6bl OTKpbItb erO, BBINOJIHITe cNeDuioee:
1 YTo6bI OTKpbITb YyDo-KHONKa POncK, Ha 3KpaHe Iyck HauHnTe BBOuNTb "Ponb3OBAteJIb".
2 Haxmnte PykoBocTBo noIb3oBaTeAcer, yTo6bl OTkpbl PykoBocCTBO noIb3oBaTeAHa KOMnblOtepe.
OCHOBhIe CBeJeHn8 o6 yXoJe 3a KOMNbIOTepOM I COBETbI IO NcNoJIb3OBaHnIO
BkIIOueHne I BbIKIOueHne KOMNbIOTepa
YTo6bI BKHOnHTb KOMNbIOTep, HaxMnTe N OTNyCTnTe KHONKy nTaNHa. PaCnoJIOKeHHe KNOKn nTaNHa cM. Ha nJaKaTe No HAcTpOKe.
YTo6bl OTKIOUHTb NITAHNE, BbINOJHNTe CNeDyUOUIne DeIcTBn:
OchOBblncnoJb30BaHna CeHCOPHO nHaJIi
OCHOBblNCIOJIb3OBaHnA
ceHcOpHoi paHei (dIy moJeIe C HHTerpnpOBaHHbIMN KHOJIkAmn) 2
XectbHa ceHcOpHoi paHeJI 3
IcnoIb3OBaHne KnaBnaTypbl 4
KnaBnI 6JIOKINOBKN I BCTpoEHNa YIΦpOBA KnaBnAtypa* 4
KnaBnHbIe KombHaucn 5
BocctaHOBJIeHne 7
Co3aHne pe3epBHOI KOINI JIA BOCCTaHOBHeHn 7
Co3dHne pe3epBHOI KOINI dpaBepOB I npJIOKeHN 10
BocctaHOBJIeHHe cIcTeMbI 11
IpeyectaHObKa dpaBepOB n npINOxKeHn 12
Bo3BpaT K npeIbIyUeMy
"MOMeHTaJIbHOMy CHIUMKy" CNTeMbI 14
BocctaHOBJIeHHe cNCTeMbI Do
nepBoHaaybHoro coCToHn 14
BocctaHOBJIeHne n3 camoN cnCTembl Windows 15
BocctaHOBJIeHne n3 pe3epBHOJ KOHN
ДЯ BOCCTaHOBJIeHn 17
Acer Backup Manager 21
Acer clear.fi 23
Haburaunno meDnaopaanm n oToTpaqnam 23
O6eDocTyHbIe paJIbI 23
KaKHe yCTpoIcTBA COBMeCTnMbI? 24
Bocnpon3BeJeHne Ha npyroe yctpoiCTBO 24
YnpabJIeHne nITaHHeM 26
3nheproc6epexeHne 26
OTKnHouHTe cyHKUIO "BbIcTpbi 3anyck" 26
AkkymyITopHa 6aTape8 28
XapaKTepeNCTnKn aKKymyIaTOpHoi 6aTapei 28
3apn akymyIopHoi 6aTapeu 29
OnTmnaIy nCnoJb3ObaHn 6aTapeu 30
IpoBepka ypoBn 3aepda aKkymytaTopHo6batapeu 30
IpeDynpexKdHne O Hn3kOM ypoBHe 3apJa aKKymyJIaTOpHoi 6aTapei 30
YCTAHOBKa n 3BLeueHne aKKymyIaTOPHO6aTapeN 31
Bepem Hoy6yK c co6oJ
OTKJIIOUHHe OTo pa6OeRo cTOna 33
IpeBnKeHn 33
IoproTOBka KOMnbIOTepe 33
UTo npHocHTb Ha coBeeHaHn 34
3a6npaem KOMnbIOTep DOMOJ 34
IodroTOBka KOMnbHTepa 34
UTo 6paTb c co6oI 35
Oco6bIe coo6paXeHn 35
YcTpaBaeM domaunn oΦnc 35
IyTeUeCTBnC KOMNbIOTepom 35
IodrotOBka KOMNbIOTepa 35
UTo 6paTb c co6oI 36
Oco6bIe coo6paXeHn 36
MekdynapoHbIe nyTeWeCTBnC KOMNbHTepom 36
IodroTOBka KOMNbIOTepa 36
UTo 6paTb c co6oI 36
Oco6bIe coo6paKeHn 37
Бezonachoctb Bawero komnbótepa
IcnoJb3ObaHne 3aMka 6e3oNaChocT KOMNbTepea 37
IcnoJb3ObaHne naponei 37
Bvoi napoile 38
3aIaHne napoJe 38
PacunpeHne c NOMOuI OJIOJIHTeJIbHbIX BO3MOXHOCTeI
CnoocbI nodknquhen 39
MoDemIpepeaun paKcoB/daHHbIX
(ToIbko Inra onpeJeHbIX MoJeNei) 39
BcTpoeHHbIe cpeIcTBa pa6oTbI B ceTn 40
IK-nopT cTaHdapTa Consumer Infrared (CIR)
(TOJIbKO DnIa onpeJeHnBIX MoJeNei) 40
YHnBepcaJIbHa nocJeDoBaTeIbHa 1uHa (USB) 41
NopT IEEE 1394
(TOJIbKO IINI ONpeJeHnBIX MoJEn) 41
High-Definition Multimedia Interface
(TOJIbKO DnIg ONpeJeHnBIX MoJeIeN) 42
ExpressCard (ToIbko dIy onpeIeHbIX MoJeIe) 42
YCTaHOBka namrtn
(TOJIbKO IJRA ONpeJeHnBIX MoJeNei) 43
LCD panel ergonomic specifications 66
Cechopnay naHeJIb
BcTpoEHnA ceHcOpHa nHeJIb - 3TO yKa3bIbAIOoee ycTpoNCTBO, OuYuaIOoee DvIXeHnNo erO nobepxHOCTn. 3To 03NaHaeT, YTO KypCop OTBeHaET Ha DvIXeHn NaIbueB No NobepxHOCTn CEHCOPHoN nHeII.

UnpabnTb KypcopOM MOxHO HeCKoBKMUM OCHOBbIMN JecTaM:
CDBnOdHm naIbIeM: IJI npEpeMeueHnKypcopa DBrarTe naIbIeM nO ceHCOPHOI naHeII.
Haxkatae nnKacahne Ondn m naIbue: Haxmnte ceHCOPHyo nAHeNb Bn3 nIIN cIeRka KOCHNTecb ee nIaIbue, yTo6bl "uEJyKom" Bbl6paTb 3IeMeHT nII 3aNcyTtB erO. IInra "DBOHoro 1eJyka" HyXHO b6ICTpo DBaXdBi KOCHYbCra CEHCOPHO nAHeJIi.
Haxatne nIIN Kacahne OndHM paBcEM B HxKHeM npaBOM yrJy: DnIeMMtauu "UeJIyka npaBOH KOHKOH Mblu" HaXMMte HxHN IIpaBbI yroI ceHCOPHOI naHEn. Ha 3kpaH eYcK 3TO DeNCTBue nepeKIOUaET KOMaHDbI npInIOXeHna, a B 6OJIbSHNCHTBe pnpIOXeHn OTkpBaET KOHTekCTHOe MeHIO, COOTBETCTBYUoee BBi6paHHOMy 3JeMeHTy.
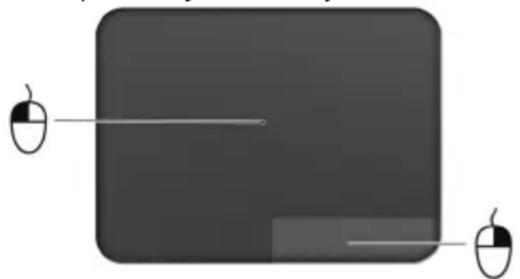
- IpeetacknBaHne: HaxMnte u ydepxnBaTe HxHn JEBi yroJ ceHCOPHO naHeN nIIN DbaKdbI KOCHNTecb B IIObOM MecTe Ha Hei, 3aTem, He OtpbIBaI naIeU OT CEHCOPHO naHeN, ObBeDInTe ObNaCTb N BBi6epNTe BCE 3JIeMeHTbl B Hei.

KectbI Ha ceHcOpHoi nanei
B Windows 8 n BO MHorix npInIOxEHHx NODepKINBaOTc JEcTbI ODNHM IJIHecKOJIbKIMn NaIbCuAMn Ha CeHCOPHOI NaHeII.

Примочи:ВОзMOЖHOCТьИСПОЛБ3OBAHЯжECTOBHa ceHCOPHOn паHEи 3aBNCIT OT aKTINBHOrO ПиJOXeHry.

- PpOBeCTn OT npaBoro Kpa BHyTpb: NepeKJIIOueHHe MExdU yUdo-KHOpKamN.
- Побети OT Верх Hero Краз BHyTpь:пегклочене Мжду KOMaHДamN npiloxeHn.
- Побети OT Левого Краз Витув: поеклочене на преыдушейприложени.
CdBn DByMa NaBcAm: Yo6bI 6bICTpO npOKpyTntB Be6-CTpaHnCbI, DokyMeHTb IIN CNNCKN BOCpON3BeDEHnA, NOMeCTNTe Dba NaBcA Ha CeHCOPHyo NaHeJIb N CdBnraITe B JIO6OM HAnpaBHeHH.
CBeHeHne Hn pa3BeHeHne DByx naIbueB ("uNKn": yBeHnueHne Hn yMeHbIeHne MacUta6a foToRpaΦn, KapT n DokymeHTOB "uNkam" DBymnaIbuaMn.

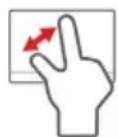
B cnyuae H enoiaok B pa6ote KOMnbIOTepa, KOrda He NOMORAOT OTBeTbHa Yaacto 3aIaBaemble BOpocbl (cm. cTp. 55), MOxHO "BOcCTaHOBnTB" KOMNbIOTep, To eCTb BOCCTaHOBnTB erO npdeIyUee coCTOAHne.
B 3TOM pa3dene onncbIbaOTc HMeIOUeCE B BaWem KOMNbIOTepe cpeCTBa BOCCTaHOBHeHNA. Acer npednaeT npuOKeHne Acer Recovery Management nra Co3dAnHn pe3epHoKoUU dJa BOccMaHOBHeHn, pe3epHoKoUU dpauBePoE u npuOKeHu, a TaKke BblONHeHn BOCCTaHOBHeHn INoC nOMoubIO NHCTpyMeHTOB Windows, N6o pe3epBOH KOIN dJa BOCCTaHOBHeHNA.

- Ecnn nCnoNb3yete DVD-dnCKn,To nporpaMa yKaXeT,CKoNbKO HxKHO uHCTbIX 3aIncbIbAemblx DnCKOB dIg 3aIncn DnCKOB BOCCTaHOBJIeHn. PpuroToBbTe INx neped NaJOM pOueDpybl.
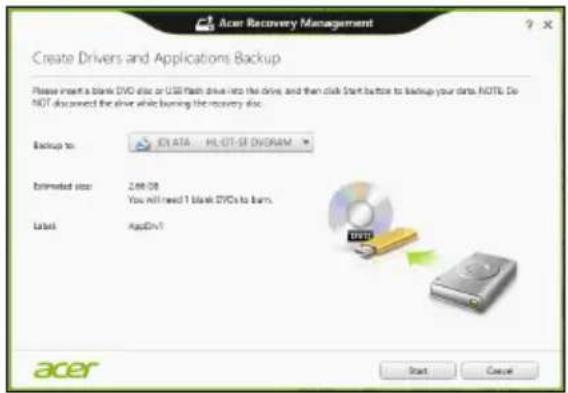
-
Haxmte Nyck, YTO6bI cKoNpObaTb faiNbI. Ha 3KpaH e 6ydet oTo6paXaTbcx Od BblONHeHnpe3epBHOrO KOnnpOBaHn.
-
BbInoHnTe yka3aHnI dIy 3aBepSeHnI npOcecca:
-
EcInn HcNoIb3yTe ONTtueckne DnCKn, To IOTOK npNBOda 6yDet OTKpbBaTbcra nocNe 3aIncn KaJdoRo DnCKa. N3BLeKeNTe DnCK n3 npNBOda n NOMeTbe erO nepMaHeHThblm MapkePOM.
EcnHyKHO 3aIncatb HeCKOJIbKO DnCKOB,TO,yBnDEB npednoXeHne Ha 3kpaHe,BCTaBbTe CJeDyUoUsn DnCK n HaxMMTE OK.PpOJoJxAte 3TN DeICTBn, NOKa pOuecc He 3aBepuNTcra.
- Ecnn nCnoNb3yete USB-HaKoNtEnb, To OTCoeDnHInTe erO n HaHeCnTe Ha Hero YETKYIO MAPKnipOBky.

Baxho! HanuHnte Ha KaXdOM DnCKe NOHrTHbI TeKCT, HApnMep, "Pe3epBna KOnnA DpaBBePOB n npINOKeHn". CoxpaHnte 3Ty pe3epBHyIO KOnnO B HAnEgHOM MeCTe N 3aONMHNTe 3TO MeCTo.
BocctaHOBJeHne cNCTembl
IopraOK BOCCTaHOBJIeHnCnCTembl:
- YcTpaHnte MeJIKne npo6IeMbI.
EcnB03HnKHyr HeNoJaKn B pa6oTe ToIbKO OndHO rNn DByx nporpaMMhix Nn annapaTHbIX KOMnoHeHTOB,TO npo6nemy MoXHo peuNTb nepeyctaHOBko 3Tnx nporpaMM nIi dpaBepOB ycTpoiCTB.
Iopraok BocctaHOBneHnI PO n dpaBepOB, npedyctaHOBHeHbIX Ha 3aBOeHn3roTOBtene, CM. B pa3dene "IpeyeCTaHOBka dpaBepOB n npINOxehn" Ha cTp. 12.
HCTpykunnopeyectaHOBKe nporpaMM n dpaiBepOB, yCTaHOBJIeHHbIX BAMN Oocne NOKyKN, CM. B DOKymeHTaun Ha 3TN npOdyKtBu IIN Ha Be6-caTAX NOIDepxKn.
2.Bo3BpaT K npeDbIyUeMy COCTOHHIO CnCTeMbI.
Ecnn nepeyctaHObKa nporpaMM n DpaBepOB He NOMOKeT, To nonpo6ynte
ycTpaHnTB npo6nemy, BepHyB cnCTemy K ee npedbIyUeMy COcToHnIO, KOrda BCE pa6oTaJIo HOpMaJbHo.
HactpaINBaemoe BocCTaHOBJIeHne npn noMoU nnpIoJxHnAcer Recovery Management
- Haxmte HactpaBaeMoe BocctaHOBneHne (coxpaHTb NOIb3OBaTeJIbckne daHHble).
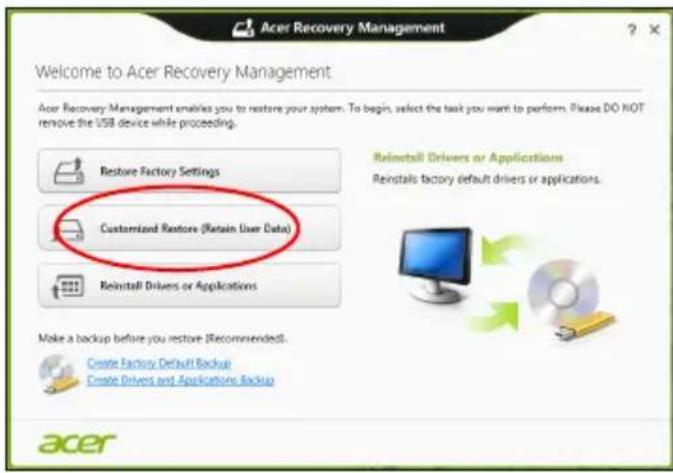
- OTKpoeTcra OKHO 06HOBnTB PIK.

-
HaxmTe Daane, 3aTeM O6HOBnTb.
-
B npoecce BocctaHOBneHna Chauana npo3oJTe T nepe3arpy3ka KOMnbIOTepa, a 3aTeM HauHetcK OINpOBaHHe aJIOB Ha JxecTkN Dnck. 3TOT npoecc 3aHmaeT OKONo 30 MNHyT.
BocctaHOBJeHne n3 pe3epBHOJ KOHN dJI BOCCTaHOBJeHnI
Iopraok BocctaHOBJeHnI3 pe3epBHOJ KOHN, 3ancaHHo Ha USB-hakonnte:
- HainTe pe3epBHyIO KONIO JIA BOCCTaHOBJeHnA.
- BctaBbTe USB-hakonnteJIb IN BkHouHTe KOMNbIoTeP.
- BkHouTe F12 Boot Menu (MeHIO 3aepy3ku F12), ecn oHO eue He BKIOUeHo:
a.BoBpeM3arpy3KNKOMNbHOtepaHaXKMnTe KnaBnUy
b. HaxatneM KnaBnCo CTpeKamn BneBO Nn BnpaBO Bb6epTe MeHIO Main (TnaBhoe).
c. HaxaTneM KnaBnU CO CTpeNkoB Hn3 BbI6epnte F12 Boot Menu (MeHIO 3arpy3kn F12), 3aTeM Haxmnte KnaBnUy
d. HaxatneM KnaBnS CO CTrpeKamN BnEBO Nn BnPaBO BbIbepnte MeHIO Exit (BbIXoJ).
e. B 3aBnCmOCTn OT TnIa CnCTeMbI BIOS BaUero KOMNbTepa Bbl6epnte Save Changes and Exit (CoXpaHnTb n3MeHeHn y Bbltn) nn Exit Saving Changes (Bbltn, coXpaHnB n3MeHeHn) n HaxMnTe KnaBnSy Enter. IpnTBePjDeHn HaKmTe OK nn Yes (Da).
f. KomnbioTepe npe3arpy3ntcra
- Bo Bpem 3aRpy3Kn HaKmTe KnaBnUy
, yTo6bl OTKpbItb MeHIO 3aRpy3Kn. B MeHIO 3aRpy3Kn MOxHO BbIbpaTb yCTpoNcTBO, c KOtOporo CneDyET 3aRpyKaTbcra, HanpImep, USB-HaKonnteJIb.
a. Haxatne KnaBnS co cTpeKamN BbIeNITe cTPOky USB Device (USByCTpoiCTBO), 3aTeM HaxmTe KnaBnSy Enter.
b. BmecTo 06bIHOH 3aRpy3Kn npOn3oJET 3anyck Windows c pe3epBHOJ KOONN BOcCTaHOBJIeHHJ.
- BbIepeNTe TIN KnaBnAtypbl.
- BbIbePnte Troubleshoot (YcTpaHHe HEnCnpaBHOCTe) n 3aTeM BbIbePnte HyxHbI TnBocCTaHOBNeHnA:
a. Haxmte DononHnTeNbHO n 3aTem BocctahOBHeHne cncTembl, yTo6bI 3anyCTnTB cyHKUIO "BocctahOBHeHne cncTembl Microsoft": ΦyHKUIA "BocctaHOBHeHne cncTembl Microsoft" nepnoDnueckn DeJaET "MOMeHTaNBhIE CHIMKINnapaMeTPOB IN HAcTpoEK BaWeN CnCTembl IN COxpaHReT IN KAK TOOKI BOCCTAHOBHeHry. B 6OJIbShnHCTBe cnyaeB CNOJHbIX npo6lEM C nporpamMaMn DnA BOCCTaHOBHeHry pa6OTocNoC6HoCTN CnCTembl MOXHO BepHyTbcR Ha OdHy IJN HeCKOJbKO 3TNX TOeK BOCCTaHOBHeHry Ha3aI.
b. HaxmTe C6poc PK, YTObHaayatb npoecc c6poca hacTpoek:ФyHKnna C6poc PK ydaHNT BCE daHHbIe c JxecTKoro DNCKa, NocIe 3TOrO 6yDyT nepeyctaHOBHeHbI cnCTema Windows n BCE npedyctaHOBHeHbIe B KOMNbIOtepe nporpaMMbl I dpaiBepbl. EcIIe Ie MOXHO OTKpbITb BAXHbIe faJIbI Ha JxecTKOM DnCKe, To npraMo ceuac Co3dAnTe IN xe3epBHbIe KOHN. CM. pa3deJ "C6poc PK n3 pe3epBHOJ KOHN BOCCTaHOBJeHnA" Ha cTp. 18.
c. Haxmte O6HOBtB NK, YTObI Naatb npoeccc 6HOBHeHNA:ФyHKnna O6HOBtB NK nonbTaetc coXpaHtB Baun paNbl (noIb3ObaTeNbckne daHHble), HO nepeycTaHOBt BCE nporpaMMbl n dpaBepbl. PporpaMMbl, yCTaHOBHeHHbE Bamn nocIe NOKK, 6dyT ydaJIeHbl (Kpome nporpaMM, ycTAHOBHeHHbx c caIta Mara3Ha Windows). Cm. pa3dEn "O6HOBHeHNE PIK n3 pe3epBHOJ KOHN BOCCTaHOBHeHNA" Ha cTp. 19.
C6poc PIK n3 pe3epBHOJ KOONBOCCTaHOBNeHnA

BHHMaHHe! Pn c6pOce PIK 6ydyT ydaJIeHbI Bce paJIbI Ha XeCTKOM DnCKe.
- Otkpoetcra OKHO C6poc PIK.
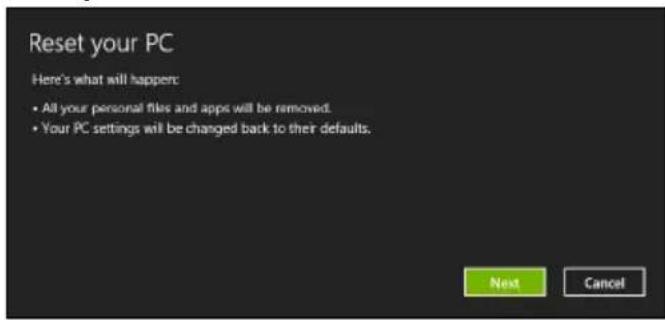
Innncpaau npueedehbl monbko dna cnpaeku.
- Haxmnte Danee.
- BbIbePte onepaunOHHyIO cnCTemy IJI BOCCTaHOBNeHn (ObIyHO DOCTyneH ToIbKO OINBapnaHT).
- Bb6epnte coxpaHeHne BCex n3MeHeHn, npOn3BeJeHHbIX C JecCTKm DNCKOM:
a. EcIи Bbl ydaJIINn Ha JecTKOM DnCKe pa3deJn BOCCTaHOBJIeHn IIN dpyrIM CnOCo6om n3MeHnIpa3dEJI XeCTKO rDnCKa N XOTnTe COxpaHHTb 3TN n3MeHeHn, To Bbl6epnte Het.
b. YTo6bl NOnHOCTbIO BOCCTaHOBnTb KOMNbIOTep Do COCTOHN 3aBOIDCKNX HAcTpoE, To BbIepeTe Da.
- BbIbePte cnoc6 ydaJIeHna qaiNoB:
a. ydaNTb TOnbKO MON 0aIbI - 6bICTpoe ydaJIeHne BCex 0aIIOB nepeBBOcCTaHOBJIeHnEM KOMNbIOTepa; TakoE ydaJIeHne 3aHNMaET OKJIo 30 MInHyT.
b. NOJHOCbIO OUcHITb DNCK - NOHnA OUcCTKa DnCKa Nocne ydaJIeHn KaKDoRo 0aINa, YTObI NocNe BOCCTaHOBJIeHn HN ODNH CTapBn 0aII HeNb3r 6bIIO npOHTaTb. OUcCTKa DnCKa 3aHmMaET HamHOro 6OJIbIe BpeMeHi (D0 5 uAcOB), HO 3TO HAMHOrO 6OJee 6e3OnaChbI CNOCo6, TAK KaC CTapBle 0aJIbI ydaJIaHOTc8e3BO3BpaTHO.
- Haxmnte C6poc.
- После завершени BOCCTAHOBJIENHЯ Bbl CMOXeTe Hauatb pa60Ty c KOMlbOTepom, NOBTOpNB DeiCTBnY, BblNOJHReMbI epNпрВOM 3aNyCke.
OboBHeHne PIK n3 pe3epBHOJ KOIN BOCCTaHOBJIeHnA
- OTKpoeTcOkHO 06HOBnTB NK.

- HaxmTe Danee.
- BbIbepTe onepaunOHnyo cnCTemy IIN BOCCTaHOBnHn (ObIyHO DOCTynToJIbKO OINBapnaHT).
-
HaxmTe 06HOBnTb.
-
B npocece BOCCTaHOBneHna Chauana npo3OJTe Npe3arpy3ka KOMnbIOTepa, a 3aTeM NaHHeTcKoNpOBaHne faiIOB Ha JecTKn Dnck. 3TO T npoccc 3aHmaeT OKoNo 30 MInyT.
Acer Backup Manager

PnmueyHne: 3Ta yHKnue cTb TOJbKO B onpeJeHHbIX MoeJx.
Acer Backup Manager - 3TO yTnIITa, NO3BOJIAOuaB BbIOJIHTb MHOKeCTBO ΦyHKcIpe3epBHorO KOINPOBaHnA, KaJdA u3 KOTOpbIX COCTOIT BCero u3 Tpex npocTBIX WArOB. Bbl MoKTe HAcTpONb ABTOMaTnueckn 3aNyCK 3THx ΦyHKcIc C HyKHO Bam YacToToI.
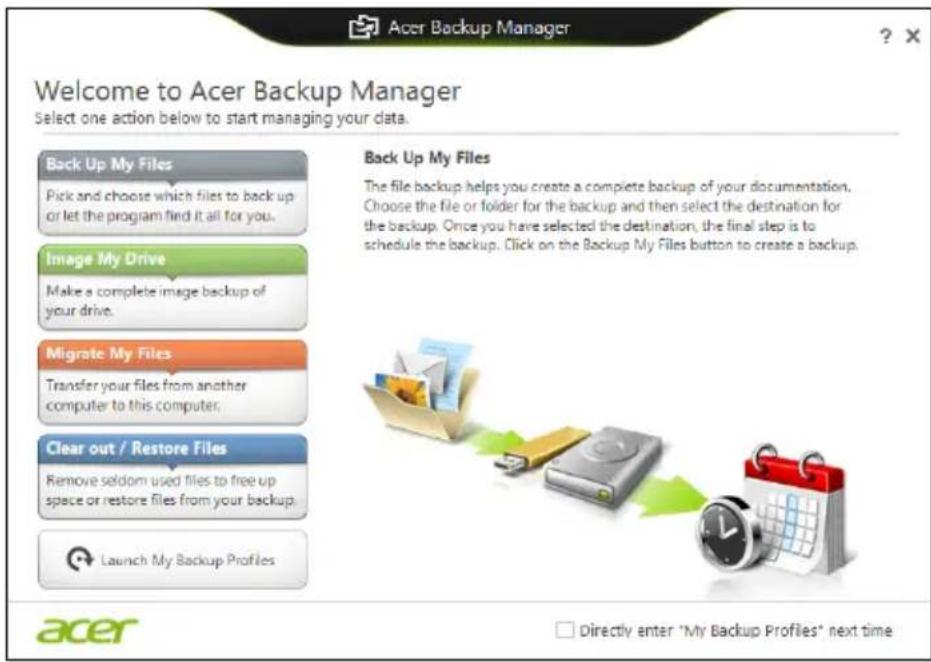
YTo6bI 3anyCTnTb yTuNTy Acer Backup Manager B Windows 8,HaunHTe BBODntB "Backup Manager".DpyroI cnocob:B pexmme "Pa6oyn CToJ" Bbl6epnte Acer Backup Manager.OTKpoeTcA kpaH PpNBETCTBne,Ha KOTOpOM MOXHO Bbl6paTb TIN pe3epBHO KOIN, KOTOpBI Bbl XOTITe CO3dATb.
ApxuBnpoBaTb faJIb: BbIePeNTe faJIbI dIy pe3epBHO r KOIpOBaHn.
Co3daTb 6pa3 Dncka: Co3daIte faJn pe3epBHO KOnHn Bcero DNCKa. TOT fain moKHO 3anicaTb Ha nck DVD, coxpaHntb erO Ha npYroN dNCK KOMbIOTepa* IIN Ha cBeMHbI HAKONITeNb (HaNPIMep, Ha flash-HaKONITeNb), YTO6bl NOTOM pRn Heo6XODMOCTN BOCCTAHOBNTb BaW KOMbIOTep.
- Ipehectn foai: I03BOJAEr KOINPOBaTb faaiIbHa USB-yCTpOcTBO, UTO6bl npn nOMoUyTNJIHTbAcer Backup Manager nepeHocntb faaiIb co CTAPOROKOMJIIOTEpa Ha HOBb HNI Ha JIO6oDpyoKOMJIIOTeP.
CTepetb/BocctaHOBntb paJIb:YdaItepeDKOHCNOJb3yeMbIEpaJIbI, YTO6bl BBICBO6OAnTb MeCTO Ha JXeCTKOM DnCKE, ININ BOCCTaHOBNTe paJIbIC CO3DaHHoB BamPe3epBHOKONN.
Bb6epnte Tn pe3epBHOJ KOH, KOTOpB XOTNTe CO3daTb, Bb6epnte faiNbI nnN Dnck IJIpe3epBHOro KOHnpOBaHnA, 3aTeM BblONHIne OTo6paXaEMbIe Ha 3KpaHe INCTpykUIN:
1 Bb6epnte coedeqxmoe dna pe3epBHO KOnpOBAHn. Yem Mehble coedeqxmoro Bb6paHo, Tem 6bictpee ocuueCTBnraTc npouee cKOnpOBAHn, HO TEM Bblpe pNCK NOTepn daHHbIX.
2 Bb6epntMeCTO dIy xpaHEny pe3epBbIX KOII. BblMOKeTe Bbl6paTb TaKHe BapNaHTbl, KAK CbeMHbI HAKONITeJIb, DnCK KOMMbIoTepa*, nNCK CD/DVD, ydaJIeHHbI PIK nIII o6naHoe xpaHInnIe Microsoft SkyDrive.
3 BbIbePte nepnoDnHocTb, c KOtOpoi Acer Backup Manager 6ydt co3daBaTb pe3epBhIe KOnN.
IIO 3aBepseHn 3Tnx Tpex WaOB pe3epBbIe KOHN 6ydyT co3daBaTbcra ABTomaTuYeCKn corJaCHO paCnicaHIO.

- BbIepeHtTe CoXpaHHTb n3MeHeHnA.
AkkymyJIaTOpHaj 6aTapeJ
B KOMNbItepe IcNoJIb3yeTcAaKKMyJrTopHa 6aTape, oBeCneuBaIOUaJ npoDOnKHTeJIbHoe Bpem aBTOHOMHO pa6Otbl.
XapaKTepeNCTnKn aKKyMylTOpHoi 6aTapei
IcnoIb3yemajakkymyIaTopna6atapeo6nadaet cJeDyuUIMXapaKTepeNCTnKaM:
CoOTBeCTBnE TeKUzIM TexHOJOrnueCKm CtAHdApTaM.
-Функци npednpexdengno Hn3kom ypoBhe 3apya.
3apd akymyIaTOPHO 6aTapeN BbIOJHReTc npn NOKluOeHN K
peHoCHOMy KOMbIOTepy aadTepa 3JIeKTPoNTaHnNEpeMeHHORo TOKa.
3apd 6aTapeN BO3MOxEN N B pOceCCE NCNoB3OBaHnR KOMNbIOTepa,
no3BOJRA He nppebIBaT pa6To npn 3apJe akymyIaTopa.Tem He
MeHee, 3apd akymyIaTOPHO 6aTapeN npn BbIKIIOUeHHOM KOMNbIOTepe
3aHIMaeT 3HaHTeJIbHO MeHbSe BpeMeHN.
3apjxehnag 6atapen n03Bnnt nCNOJb3OBaTb KOMNbIOTep B noe3dKe nn npn c6oax 3neKtponntanHn. PekomeHdyetc nMeTb B pe3epBe DOnOJIHnTeJbHyIO nOJIHOCTbIO 3apjxehnHyIO 6atapeIO. CBeJeHnO npno6peTeHHn pe3epBHOJ aKKymyTAHn 6atapen MoXHO nOJIyHTb y npoDaBa npeHoCHOrO KOMNbIOTepa.

Примechанe:В HeKOTopbIX MoeJx ectb BCTpoEHHbI aKKymyJIaTOp.Ecnn Notpe6yeTc3aMeHHTb aKKymyJIaTOp,TO o6paTnTEcbB aBTOpN3OBAHHbI cepBnCHbI ueHTp.
IodroTOBka HOBOAkkymyTOpHoi 6aTapen K IcNoJIb3OBAHIO
Ipeed hauanom nCnoB3OBAHnA HOBOAkkymyTOpHO6aTapei peKOMeHdyETcra npOBecTn pOceCC NOdrotOBKn ee K pa6oTe:
1 BcTaBbTe HOByo aKKyMnyTOpHyo 6aTapeo B BBkIIOueHHbIKOMNbIOTeP n He BKIOUaIe erO.
2 POKHIOHTe aIaITepe 3neKtpOnuTahnry n NOnHocTbU 3apAInTe 6atapeio.
3 OtknHouHTe aanTep 3neKtpoNTaHna.
4 BkJIIOUHTe KOMNbIOTep n pa6OtaITe, nCNoJIb3yra 3JIeKTpOnITaHnra O T aKKymJrTOpHO bAtapen.
5 IcnoIb3yIte KOMNIOTePdo NOHoro pa3praDa 6aTapeu IN NOBHeNn npedynpeKdEHNr O Hn3KoM ypoBHe 3apra.
6 IopKIOHTe aIaITepe 3JIeKTPoNTaHnN IN BHOBb NOpHOCbIO 3apAITe 6aTaapeio.
IobTopaTe onHbIe BbiIe DeiCTBnA DJIa BblONHeHn Tpex uKIOB noHoro pa3pa n 3apra da 6atapen.
BbIOnHnIe 3Ty npOceDpy NOIroTOBKn IJRA BCEx HOBbIX 6aTapei n 6aTapei, KOToPbIe He NcNoJIb3OBaJIncsB dNITeJIbHOe BpeM. EcNI KOMNbIOTeP He IIaHnIpyETcNcNoJIb3OBaTb B TeHeHne DByX HeJeIb IINI 6oJIee, peKOMeHNyETcN3BJIeKaTb aKKyMylrTopHyIO 6aTapeIo.

BHMaHHe: He noDBepraIte aKKymJrTopHyIO 6aTapeIO BO3DeiCTBnIO Tempeatyp HnKe 0^ (32^) n BbIwe 45^ (113^) . Bo3DeiCTBne BBICOKnx I Hn3Knx Tempeatyp MoXeT He6laoropnraTHo NOBnIaRb Ha pa6OToCnOco6HoocTb aKKymJrTopHO 6aTapen.
IpoceDypa nOtroTOBn aKKyMylrphoN 6aTapeu K NcNoJb3OBaHnU O yBeHHBaET eMKoCTb (MaKcImaJIbHbI yPoBeHb 3apra) 6aTapeu.
Ecnn He npoBODntb npoceDpy noDROTBKN, 6aTapeH He CMOXeT 3apJxatbcrdo MaKcImaJIbHOrO ypOBHra, a cPOK ee cIyKbI cOKpaTITcR.
POMMBOBIIepeueHcHHOHa cpoK cnyk6bI 6aTapeN cyuecTBENHO BnIAJOT CNeDyUOUIne akTopbl.
Pa6ota KOMnbIOTepa OT aDAnTepa NITaHnA CO BCTaBJIeHHoN 6batapee. Ipr pa6ote OT aDAnTepa NITaHnPeKOMeHdyeTcR n3BNeKaTb 6batapeIO NOcNE DOCTUKeHnMaKcIMaJIbHOrO ypOBHn 3apya.
HeBbIOnHHe NpOeDpybI NOdROTBKn 6aTapeN K IcNoJb3OBaHnO, OINCAHHo Bblwe.
- INHTeHcNBOHOe nCNoIb3OBAHne; Yem qaSe nCNoIb3yETc8 6aTape, tem 6bIcTpee cokpaauaetc8 ee pecypc. Pecypc cTaHdapTHoI aKKymJrTopHOH 6aTapei dIg nepeHoCHoro KOMNbIOTepa - OKOIO 300 uKKnOB 3apJa/pa3pJa.
3apd aKKymyTopno 6atapei
Ipeed 3apqom y6eintecb, yTO 6aTapey yCTAHOBHeHa B 6aTapeHOM OTceke. IopKIOHTe aadTep 3JIeKTPoNTaHnK KOMNbIOTepy n K cTeu 3JIeKTPoNTaHnR. B IpoUecce pa3ra pMOH NOPOJNkAtb pa6Oty c KOMNbIOTepom. Tem He MeHee, 3apd aKKymJrTOpHO J6aTapei npi BbIKIOUeHHOM KOMNbIOTepe 3aHmaeT 3NaHTeJbHO MeHbWe BpeMeHn.

Примechанe: PeKOMeHdyeTc8 3apJxatb 6atapeu B hauaJIe KaJdOrO dHЯ. 3apJIb 6atapeu HocbIIO nepei NaHApIOM noe3dkn N03BOJNT yTpOM Haayab Ta6OToY c ONHOCtB 3apJxehHOh 6atapeeI.
IodroTOBbTe KOMNbIoTe, KaK Bblero OobHNO roTOBnTe nepe noe3dkamN.
UTo 6paTb c co6oH
Bepntc c6oob cnedyuopee:
- Адагелпеременно ТOKA
HypbI nHTAHnI, nOxOJaUne IJIa CTPaHbI, B KOTpyu eINTe
3anachbIe noJIHOCTbIO 3apJKeHHbIe aKKMyJrTOpbI - Доннельные саилдраиверов дя пиHTepOB, ecn Bbl nlaHpyeTe NOlb3OBAtbcra dpyrIM npiHTepOM
- DokymeHT, doka3bIbaOuSni NOKyNkY, Ha cIyuaH, ecn erO noHaDo6ntcnaoka3aTb Ha TaMOxHe
- Мекдунаровь rapаHTинь nacnopt nyTeWeCTBeHHnka
Oco6bIe coo6paXeHnA
CneDyIe Te TEM JKe COBeTAM, KaK npN O6bIuHOM NyeTeWeCTBUN C KOMNbIoTEpOM.
Kpome TOrO, B0T Bam HeCKoJIbKO IODcKa3OK, IOnE3HbIX BO BpeM MeJxHaPoIbIX
NyTeWeCTBNI:
BcTpoEHhIe cpeIcTbApabOTbIB cETN
BcTpoeHHbIe CpeIcTBa pa6Otbl B cETn IIO3BOJIaOT IIOKJIIOuA Tb BaU KOMNbIOTep K cTeN Ethernet.
Для pa6obtby B cetn BcTaBbTe OINH KOHeu cTeBOrO Ka6eJy B cTeBoN nopT (RJ-45) B KOpnyce KOMnbIOTepa, a BToPoJ KOHeu 3ToT O Ka6eJy - B po3eTKy cEtN Ethernet INI B pa3bEm cTeBOrO KOHcEHTpaTopa.
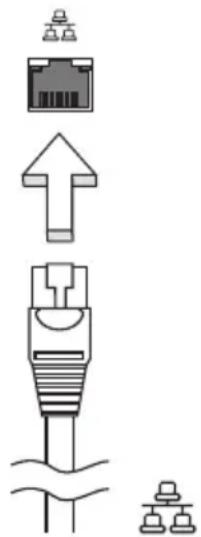
IK-nopT cTaHdapTa Consumer Infrared (CIR) (ToIbKO dIa ONpeJeHbIX MoJeIeI)
IK-nopr cTaNapTa Consumer Infrared (CIR), KOtOpbIM o6OpydoBaH KOMnbIOTep, nCNOJIb3ayetcIЯ npHeMa CnHaIOB OT BaUeRo NylbTa DnCTaHcNoHHOrO ynpaBNeHn IIn dpynx ycTroY CTB, IMeIoXn nopT CIR.
YHnBepcaIbHa nocJeDoBaTeIbHa yHa (USB)
IopT yHnBepcaIbHOI NOcneIOBaTeJIbHOJ USB) 2.0 YBnIeTcR BbICOKoCKOpOCTHOI NOcneIOBaTeJIbHOJ UINHOJ, KOTopoM MoKHO NODKIIIOuTaBJ IO6bIe nepiΦepiNtBuIE USB-ycTroPoiCTBa, He OTHIMa IeHHbIX pecypcoB y cNCTeMbI.
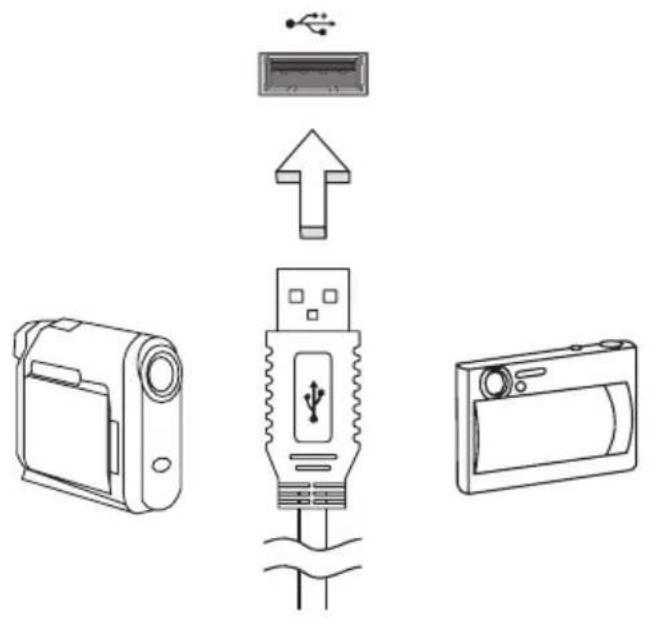
IopT IEEE 1394 (ToIbKO dIy onpeJeHbIX MoJeIe)
3TOT nopt oecneuBaet CBA3b C yCTPOINCTBAMN, NOdepKINBAIOUIMN CTaHdapT IEEE 1394, Hnprimep, c Bndeokamepo nn C uippoBoi kamepo. Boone noDpo6hIe CBeDeHnC M. B DOKyMeHTaun Ha uippoByo kamepy.

High-Definition Multimedia Interface (TOnbkoДЯОпразделеньхMoDEнe)
HDMI (High-Definition Multimedia Interface - INTEPΦeIc MЛьТИмЕДиа ВьICOKоуETKOCtN) - 3TO NOДДeрЖИВaEMbI B OTPaCnI, He NcNoJIb3yUOuIиСКАТе, NOINHO TIO UФPoBOrA ayDINO/BuDEoINTEPΦeIc. INTEPΦeIc HDMI nO3BONЯTe NO ODHOMY Ka6JIIO COeINHЯTb COBMeCTMlbI NcToHnK UΦpOBOrO ayDINO/BuDeO (deKOeR KaHaIob Ka6JIbHoro TB, npOnrPbIbATEb DVD-DInCKOB, A/V-peCnBep) c COBMeCTMlbIM MOHITOpOM UΦpOBOrO 3ByKa I/NJIb BVdEo, HAnpIMeR, pPneMHNKOM UΦpOBOrO TeJIeBvIDeHnR (DTV).
IcnoJb3yInTe nOpT HDMIBaWem KOMNbIOtepe IJI NaOKNIOUeHnK BbICOKKNaCCHO ayDnO- INBnDeoAnnapaType. NcNoJb3OBaHne BCero Ondoro Ka6eNa 3HaHTenbHO yCKopReT NOKNUOeHne n HaCTpoNkY.
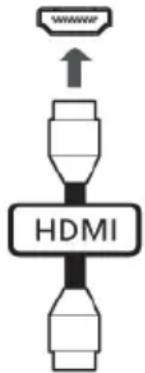
ExpressCard (Tolbko Дя оределеньх мodeл)
ExpressCard - 3TO HOBENJAR BERCNA KAPT φopMaTa PC Card. ΘTOT INHTeppeicn Pn MeHbux pa3Mepax oBeCneuNbaet 6oJee BBICOKyU cKOpocTb nepeaun DaHHbIX, N03BOJAE TJeKo HapaUNBaT bФyHKUHOHaJIbHbIe BO3MOXHOCTN KOMNbOTepa I DeJaET pa6Oty c Hm eEe 6oJee ydo6HoN.
3 BCTaBbTe MoDyNb NaMaTn DnaRoHaNbHO B CNOT (a), 3aTeMaKKypaTHO HaDaBNTe Ha Hero, NOKa OH He BCTaHET CO UeNkOM Ha MeCTO (b).
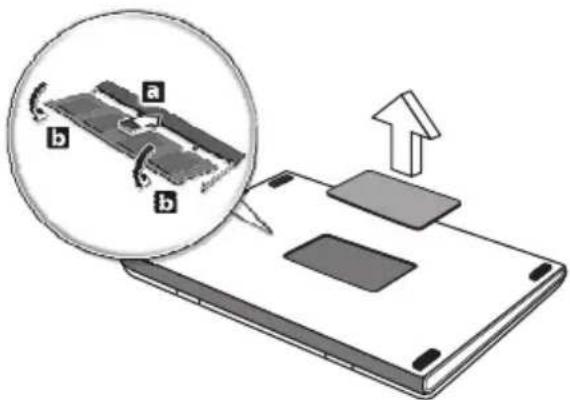
4 YctaHOBNTe KpbIuKy CIOTa NaMRTN O6paTHo Ha MeCTO N 3aKpeINTe ee BnHTOM.
5 YcTaHOBnTe aKKymyIaTOp Ha MecTo I NoDCoeHNHTe aAnTep nepemEHORo TOka.
6 BkIIOHTe IITaHHe KOMbIOTepa.
KoMnIbIepe aBtOMaTnueckn paCno3Haet n nepeKoHpNpypye pa3Mep naMaTn. IoxaanyiCTa, NocOBeTyIeScb C KBaIuΦnIupOBaHHbIM TexHnueckm CneUaJIncToM IIN o6paITeCb K MeCTHOMy dIInepy KOMnAHn Acer.
PpmeHHe: He cKpyuHbAte n He cMaTbIbAte aHTeHHbI Ka6JIb. BbITAHTE Ka6JIb aHTeHHbI Ha 20 cm, yTO6bl yNyUHNTb KaueCTBO npHema cnHaHa.
Iprocmotp TeIeInporpaMM uepe3 BHeShHIO aHTehHy IJI KaeIbHoe rHe3do
Дя npocmoTpa TepePpamHa KOMbIOTepe MOxHO NcNoB3OBaTb O6bIHyB TeBn3IOHHb KaBb (NODKnIOueHHbIK BHeUHe aHTeHHe NIn Ka6eNbHomy rHe3dy).
IopKJIIOUeHne aHTeHHbIX Ka6eJe
UTo6bI NpOKnIouHt bKa6eHn:
1 POnKInOHTe aHTeHHb pa3bEm K rHe3dy paAnOuAcTOTHOro BXQda KOMnIbTepa.
2 IopKIOHnTe npyro K OHeu K TeNEBn3nOHOMy Ka6eHIO, npn Heo6xOIMOCn nCnoJb3yra Ka6eIbHbI nepeXoHNK.
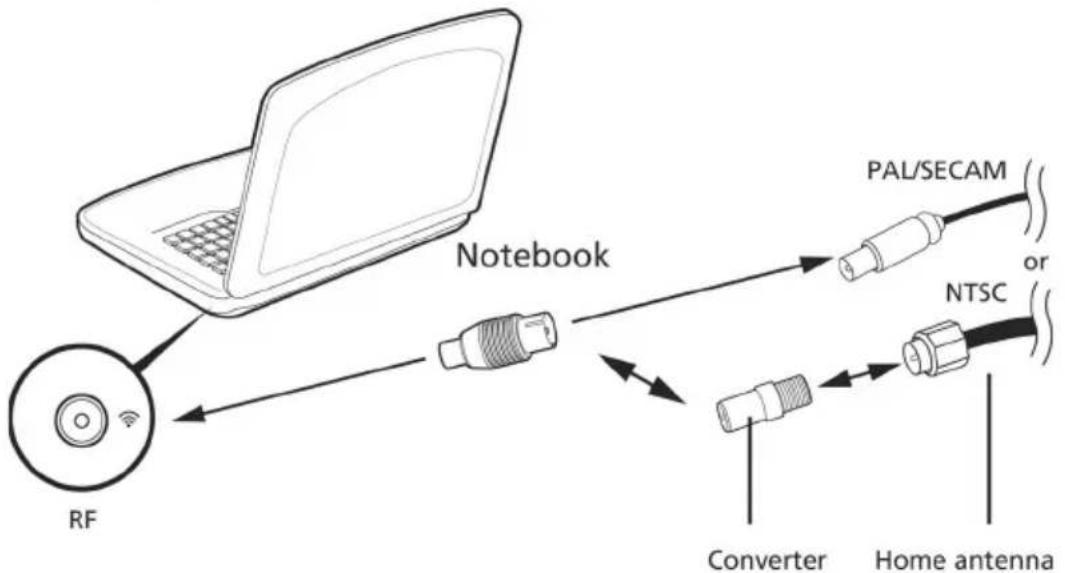

BHMaHHe! Npeed noKJIOueHnem aHTeHHOro Ka6eJa npOBepbTe, yTO nCNoJIb3yEma BamKa6eJIbHaCnCTema COOTBeTcTByeT TeNEu3NOHHo CnCTeMe B BaWem pernoHe.
YTNINTA BIOS
Ytuneta BIOSЯВЯETCSnporpammoKoHcHypnpoBaHn nporpaMMHoro
ObecepeHnBCTPoeHHOB6a3OByU cnCTeMy BbOda/BbIBOda (Basic Input/Output System (BIOS)) KOMnbIOTepa.
BaW KOMNbIbTeP yXe cKOHcHrpynpoBaH n ONTmN3npoBaH naJIeKaUIM o6pa3OM, IIO3tOMy Bam HET Heo6xOdMocn 3aNyckaTb 3Ty yTuJInTy. Ondako ecn y Bac BO3HnkaOT npo6JIembl C KOHcHrpypaUnei KOMNbIbTePa, Bam MoKeT NOHaIo6NtbcR eIN BOCNOJIb3OBaTbcra.
PnmeHne:3Ta yHKuIyIOCTynHa He BO BcEx MoJeIax.
EcnMoynb DnCKOBoDa DVD nHCTaIIINpOBaH B OTcEK ONTNUeCKO rPnBOda, Bbl MoKeTe npocMaTpnbTaB DVD fMbHa KaOMNbIOtepe.
1ИЗВЕКИТe DVD.

BaxHo! Korda BbI 3aNyCTnte DVD nleep B nepBbI pa3, nporpaMa
nonpocnt Bac BBeCTn KoD perNoHa. DnCKn DVD DeJAreTc Ha 6 perNoHOB. KaK TOnbKO DnCKOBOD DVD 6yDeT HAcTpoEHN KaD perNoHa, OH 6yDet npOInrpblBaTb TOnbKO DnCKn DVD ynomHyToRo perNoHa. Bb MoKeTe BBOINrB KoD perNoHa MaKcIMyM PAnTb pa3 (BkIIOUa CaMbI NepBbI pa3), NocNe Yero yCTaHOBJIeHHbIKoD perNoHa OCTaHETcH HeN3MeHHbIM. PnB BOCCTaHOBJIeHN JecTKOrO DnCKa UyET KOnuYeCTBa pa3 BBeDEHnKoDa perNoHa He TepReTc. KoDbI peNoHOB dIyΦnIbMOB Ha DVD npBVeHbI B Ta6NIue HnXe B 3tOM Xe pa3dJe.
2 Yepe3 HeckoIbKO cekyHd fIbM DVD Haunet demOHcTpnpoBaTbcra ABTomatnueckn.
BzraHnTe Ha nHdNkaTop Power (PiTaHne):
Ecni OH He CBETTcA, NITaHHe HA KOMNbIOpTe HnOdaHO. IpoBepbTe cneNyUouee:
- Ecni Bbl pa60taete OT aKKymyIaTopa, 3TO MOKeT O3Haayatb, YTO erO 3apRn Hn3Km n HeCNOco6eH nITaTB KOMMbTe. NOpKnIOuHTe aAnTep nepemEHORo TOKa, YTO6bl 3apRdNtB aKKymyIaTOp.
-
Y6eIntecb, yTo aIantep nepemeHHoro Toka DoJxHbIM o6pa3OM NOdknOueH K KOMNbIoTepy N K cETN.
-
Ecnn nHnKkaTOp CBeTntcra, npoBepbTe cneyUouee:
HaxoNTcTaN He npedHa3HaueHHa dJa 3arpy3Kn (He CnCTeMHa) DnCKeTa BO BHeuHem USB-npnbOJe r6Knx DNCKOB? BbInbTe 3Ty DNCKeTy NIN BCTaBbTe BmecTo Hee 3arpy3OHyO (CnCTeMHyO) DNCKeTy, 3aTeM dJa nepe3anycka cnCTeMbI OndHOBpeMeHHo HaxMMTE KnaBnUn .
Hertn3o6paXeHHa 3KpaHe.
CnCTema ynpaBJIeHnaIHTaHHeM KOMIbIOTepa aBTOMaTHUeCKN OTKJIIOyaeT dNcJIeJdIg 3KOHOmnn 3JIeKTPo3HepRn. HaxMMTe IIO6yIO KNaBnSy, YTO6bl BKNIOHTbDnCJIneJ.
EcnnaTne KnaBnHn He Bo3Bpaaet DncnpeB pa6oHn peKm,Bo3MOxHbI DBe npuHbl:
- YpOBeHb JPKoCTN MoXeT 6bITb CJIINuKOM Hn3OK. HaxMnte
+ < >, qTo6bl NOBbICNTb YpOBeHb JPKoCTN.
B kaueCTBe yctpoiCTBa OTo6paXeHnMaor 6bItb Bbl6paH BHeuHm MOHTOp. HaxMnte "TopaYne KlaBn" nepeKIOUeHn DaCnpeer < Fn> +F5>,yTo6bI noDKIouHTb o6paTHo DInCnJeKOMNbIoTepa.
EcHrOpHT HnDnKaTOp pexKIma ChA (Sleep),TO 3TO 3HaUHT, YTO KOMNbIOTep HaxoINTcB pexKIme ChA. JIЯ BO3O6HOBJeHnja pa6Otbl B O6bIuHOM peKIme HaxMNTe N OTNcyCTnTe KHONKy nITaHnJ.
KOMNbIOTepe He BOCpOu3BOoNT 3ByK.
PpOBepe cneyiooee:
- FrpOMKoCTb MoKeT 6bIb OTKnHoueHa. B Windows, B3rJnHnTe Ha 3HaOKe peRyJrTopa rPOMKoCTn (DInHaMnK) Ha nAHeJI 3aJaU. EcII N 3ByK OTKnHoueH, To IeIKHnTE 3TOT 3HaOcK n CHmMtE cIpaKOB OKOuike "OTKnHoueHne 3Byka".
- YpOBeHb rPOMKoCTn MoKeT 6bITb CnUkOM Hn3OK. IpoBepbTe nOIOKeHne nON3yHka 3HaUka peYJrTopa rPOMKoCTn Ha naHeN 3aDaW Windows.ДЯpeRyIINPOBKN rPOMKoCTn MOxHO TaKKe IcNoJIb3OBAt b KOleCnKO npOKpyTKn, He IMeIoUe eOrpaHnUHTeJIa, INI KHOKn peRyIINPOBKN rPOMKoCTn.